You can run your system in two ways. One is trusting everything until there is evidence it is malicious. The evidence needs to be provided by, for example, your antivirus solution. This is a method of the past that could hardly keep up with the over 390,000 daily newly generated malware. The other is you trust only known software/executables/scripts.
But have you ever tried to whitelist all executables of your image with software restriction policies or AppLocker? First you need to inventory all executables and then create a policy based on a digital certificate, hash, or path. There are a huge number of executables. And not all are digitally signed. So you need to fall back to filenames and hashes. But what if you use an application that creates unsigned randomly named executables in your temporary folder during runtime? You have to punch a huge security hole into your AppLocker rules by allowing a generic path for execution.
Besides the executables, you need to whitelist all DLLs. Not only are there so many DLL files that they make inventory and rule creation more complex, you will also notice a possible performance degradation of your system when checking all your DLLs with AppLocker.
And what about scripts? Most of your scripts are not signed, and it is common to create and execute scripts during the runtime of executables. Again, you have to punch huge holes into your AppLocker security by allowing paths or generic names without signatures.
Also, AppLocker can be tampered with by an administrator or malware so that it doesn't restart after reboot. A more restrictive, tamper-proof, but easy-to-manage solution is needed. Welcome to Code Integrity, a.k.a. Device Guard.
Code Integrity was already introduced with Windows Vista. In the desktop version of Windows 8.0, it was called KMCI. It enforced digital signatures, integrity of Windows kernel binaries, Windows first-party drivers, and x64 driver signatures. In the mobile and Windows RT versions, Code Integrity was additionally extended to user mode code integrity (UMCI) and enforced digital signature and integrity of all executables. This was one reason why mobile and RT were only able to run correctly signed apps from the Windows Store. So we already have practical knowledge of implementing such CI.
But why was it not sufficient? The version used in Windows 8.x had one major drawback: it was running inside the same kernel space of the high-level OS and could be tampered with by malware. And the UMCI required an enterprise-friendly possibility to sign LOB and Win32 apps.

In Windows 10, the KMCI and UMCI components moved inside the secure VBS container. Additionally, Code Integrity is now configurable, so in KMCI mode too, third-party drivers can be allowed/integrated into the KMCI policy. And in UMCI, all executables, both classic Win32 apps and modern UI (appx) apps, can be integrated into a Code Integrity policy or a trusted and signed catalog file. The Code Integrity policy is burned into hardware, that is, stored into tamper-proof TPM. So even if you boot from a Windows Preinstallation Environment (Win PE) DVD or reinstall your OS, the policy stays intact and protects your OS.

Device Guard Code Integrity uses digital signatures if possible. If there is no digital signature, it can fallback to file hashes. The more file hashes you have, the more likely you will break your system/Code Integrity policy with the next app update. So you should try to keep the use of hashes to a minimum to avoid unnecessary problems after patching.
Device Guard is used to white-list all your executables, DLLs, and scripts. On top of Device Guard, you can use AppLocker for additional blacklisting.

During the boot-up of Windows and loading of the kernel, not all components of Device Guard are available, so the usage of signed catalog files is only possible for UMCI. To create such a blueprint of your image, that is, Code Integrity policy, you need to perform the following steps:
- Prepare your golden system, which will be used for the collection of the enforcement policy.
- Enable VBS and Device Guard on the system. Set Device Guard to Audit Mode.
- Collect all file information with PowerShell cmdlets to create a policy.
- Repeat steps 1-3 for all different hardware models/base image configurations. Merge multiple policies or deploy differentiated policies. Keep in mind that there can only be one active Device Guard policy at one same time on the same system.
- Convert the policy to binary format and sign it.
- Deploy your policy in audit mode to the target system and test.
- Use Windows PowerShell cmdlets to create a policy from the audit log and merge.
- Enable enforcement of the policy and test.
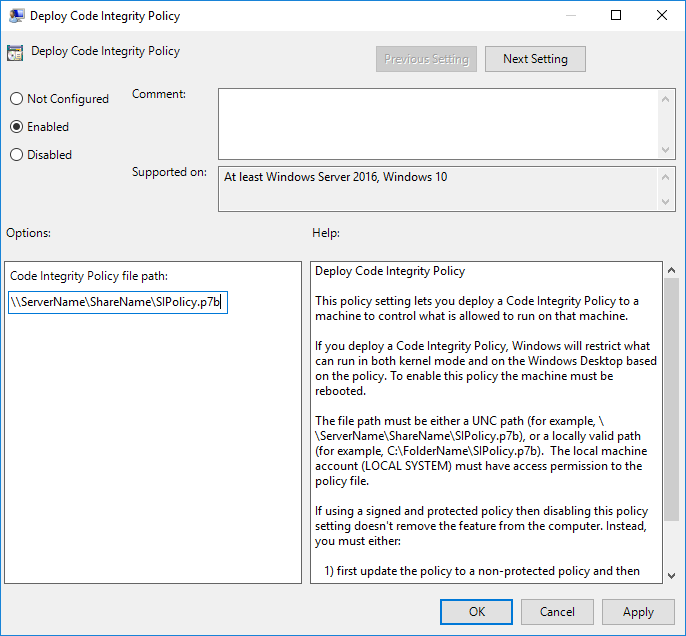
To enable Device Guard on a system, VBS needs to be activated first. After that, you can enable Device Guard with the following GPO:

After the successful creation of such a Code Integrity policy, it can be enforced either through GPO or MDM. A Code Integrity policy once applied to a system can only replaced by another Code Integrity policy with the same signing cert. Be careful with using very short-lived certs as the policy needs to be replaced before the cert is outdated. The Code Integrity policy needs to be on a UNC path or a locally valid path. UNC is preferred, as a local path needs an extra copy job:
For creating, signing, and testing, the following Device Guard PowerShell cmdlets are available in Windows 10:

As an alternative, you can create a catalog file for applications. This can only be used for applications/UMCI components, as during bootup of the system, when drivers and system components are checked, the suitable program parts of Device Guard are not yet ready to scan catalog files, and so only Device Guard policies work for these KMCI components. To create a signed catalog file of an application, you need to perform the following steps:
- Prepare your catalog system, which will be used for the collection of all new file added information of the catalog file.
- Enable VBS and Device Guard on the system. Set Device Guard to Audit Mode.
- Run PackageInspector.exe start C: for an initial scan of the system.
- Install the application(s).
- Stop information collection with PackageInspector.exe stop c: -name \Catalog.cat -cdfpath \Catalog.cdf (You can change the names of the .cat and .cdf files).
- Sign the catalog file with SignTool.exe.
- Copy the signed catalog file to target system at C:\Windows\System32\catroot\{F750E6C3-38EE-11D1-85E5-00C04FC295EE}.
- After successful testing, deploy the catalog file to all your systems in this folder.
There is no official limit of catalog files documented, but you should try to keep it low/clean up unnecessary catalog files.
The third option is to automatically add applications installed by your managed installer to the Device Guard Code Integrity. This option was added with Windows 10 1703. A managed installer uses a rule to trust one or more executables as an authorized source for application deployment. By specifying an executable as a managed installer, all files written from that executable's process will be tagged by Windows as having originated from a trusted installation authority. At the time of writing this book, there is no GUI dialog to define a managed installer, and it has several known limitations. All necessary steps, including the manual modification of XML files, are documented at https://docs.microsoft.com/en-us/windows/device-security/device-guard/deploy-managed-installer-for-device-guard.
In a future version of Windows 10, a fourth method of adding applications with scripts to the gold standard will be added. Keep an eye on the Windows Insider Preview builds to get first-hand information as soon as it is available.
Besides the enforcement of Code Integrity, there are also other enforcements introduced by Device Guard. On the kernel memory and driver side, the following enforcements are made:
- Code Integrity rules are still enforced even if a vulnerability allows unauthorized kernel mode access, because it runs in a secure VBS space
- Memory pages are only marked executable if they are successfully validated by Code Integrity
- Device Guard KMCI-protection-activated kernel memory cannot be marked both writable and executable to reduce the risk of self-modifying malicious code that is hard to detect
- Unfortunately, not all drivers will be currently compatible and they can no longer write and execute kernel memory, so updated Device Guard-compatible drivers are needed
To test all your existing drivers before enforcing Device Guard on these systems, you can use the Device Guard and Credential Guard hardware readiness tool. The tool can be found at https://www.microsoft.com/en-us/download/details.aspx?id=53337.
Additionally, there are enforcements in script handling with Device Guard activated:
- Windows Script Host will require signed scripts: all VBScript (.vbs and .vbe), JScript (.js), Windows Script File (.wsf), and Windows Script Components (.wsc) files need to be signed or they will not execute.
- All MSIs must be signed or they will not execute.
- Unsigned PowerShell scripts will be in Constrained Language mode, which will block several dangerous commands/cmdlets. To use the full potential of PowerShell, the script needs to be signed to run in Full Language mode.
- Other scripts such as .bat and .cmd are currently not restricted.
Besides these limitations and enforcements, where is Device Guard applicable? We need to distinguish four different use cases, from tightly managed up to Bring Your Own Device (BYOD).
Fixed workload:
- Very well-defined software and hardware configuration
- Tightly managed
- Low churn rate
- Ideally no user or standard users only
In the fixed-workload scenario (such as kiosk-mode PCs and production-line PCs), you can activate all the necessary parts of the security chain with Secure Boot, VBS, and Device Guard, and you can run KMCI protected by VBS and UMCI in enforced mode.
Fully managed:
- Well-defined hardware configuration
- Managed software only
- Tightly managed
- Ideally standard users only
In a fully managed scenario (should be the typical office workplace PC without an admin user), you can again activate all required parts of the security chain with Secure Boot, VBS, and Device Guard, and you can run KMCI protected by VBS and UMCI in enforced mode. If a user has admin rights, he or she cannot install his or her own software as it will be blocked by Device Guard.
Lightly managed:
- Multiple and varied hardware configurations
- User can install unmanaged software
- Standard or admin users
In the lightly managed scenario (which is still found far too often), you can only activate some parts of the security chain. Secure Boot and VBS should be available without problems. But KMCI with VBS protection needs to be checked. UMCI can only be activated in audit mode, and logs need to be inspected regularly. Due to high false-positive hits for unmanaged software, the logs are hard to read/interpret.
BYOD:
- Personally owned devices
- Highly variable hardware and software
In the BYOD scenario, no parts of the security chain, such as Secure Boot, VBS, or Device Guard, even in audit mode, can be activated.
With the current implementation of Device Guard, you can run it only in fixed workload and fully managed scenarios. Even then, you are not capable of activating it on all clients, and you should activate it on as many scenarios as possible to raise the security bar and improve your knowledge of Device Guard.
With future implementations of Device Guard, the lightly managed scenario will be able to be protected without too much overhead. Also, scan times of Code Integrity policy creation and catalog file creation will be improved and new security features will be added soon.
A violation of KMCI will result in a blue screen. If you see the following blue screen repeatedly, check your Code Integrity policy and scan for malware:
