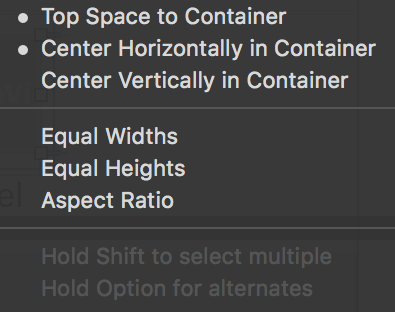
The next step is to add the contact's image and its name label to the content container view. Start by dragging a UIImageView and UILabel object from the Object Library. Position them so that they both are horizontally centered in the view. Also, position them so they have about 10 points of spacing on the vertical axis. Don't forget to apply a nice light gray background color to the image. You've already seen the following two ways to add constraints:
- Have Xcode add constraints for you.
- Add constraints through the menu in the bottom-right corner.
You'll add a third technique to that list: Ctrl + dragging. You already used Ctrl + dragging while setting up the scroll view, but it also works when dragging from one view to another in your design preview.
If you select the UIImageView object and drag upward while pressing Ctrl, you can add constraints that relate to the view you started dragging from, the view you let go in, and the direction you were dragging in. Try this now; a menu such as the one in the following screenshot should appear. Press and hold Shift and select Vertical Spacing to Top Layout Guide and Center Horizontally in Container. An Add Constraints option should have appeared at the bottom of the list after you selected the constraints you want to add. Click on that to add the selected constraints. Moving forward, this will be the preferred way to add constraints:

To set an appropriate width and height for the UIImageView object, press Ctrl and drag on the image itself. If you drag and release in a horizontal direction, you can add a width constraint, and dragging vertically allows you to add a height constraint. You can't set the value though; the value will be set to whatever the current size is.
If you want to change the value of a constraint, go to the Size Inspector on the right-hand side of the screen and double-click on a constraint. This allows you to change the Constant for a constraint. When you set a size constraint, the constant will refer to that size. When setting spacing, the constant will refer to the current amount of spacing. Click on the image and correct the width and height constraints so the image will be 60 x 60 points. Update the preview by clicking on the Update Frames menu option at the bottom of the Interface Builder window located in the bottom-right area of the window.
With the image view set up, it is time to add some constraints to layout out the name label. Position the name label approximately 10 points beneath the image and make sure that it's centered. Now, press Ctrl and drag from the label to the image view. The dialog you saw before should appear; press Shift and add Vertical Spacing and Center Horizontally constraints. This will set up constraints that horizontally center the label relative to the image. It also adds a constraint that vertically spaces the label from the image. Finally, drag down from the label to set its vertical spacing to the container view. Modify this constraint, so the label has a spacing of 8 points to the container's bottom. This will make sure that the content view has a height, and this resolves the Auto Layout issue you saw earlier.
Change the preview to a couple of different devices, and the image and label should always appear nicely centered on every layout. The designs we saw earlier had a larger image on the iPad. This means that separate sizing constraints should be used for the iPad's larger screen. This is what the next step is about.