The following dinacharya, or daily practices, appear here in their optimal order. You do not have to practice them all. Generally, tongue scraping and oiling of the skin are most important for everyday practice. For rajas imbalances, a weekly head massage is highly beneficial, and for tamas imbalances, dry brushing a few times weekly keeps the energy moving.
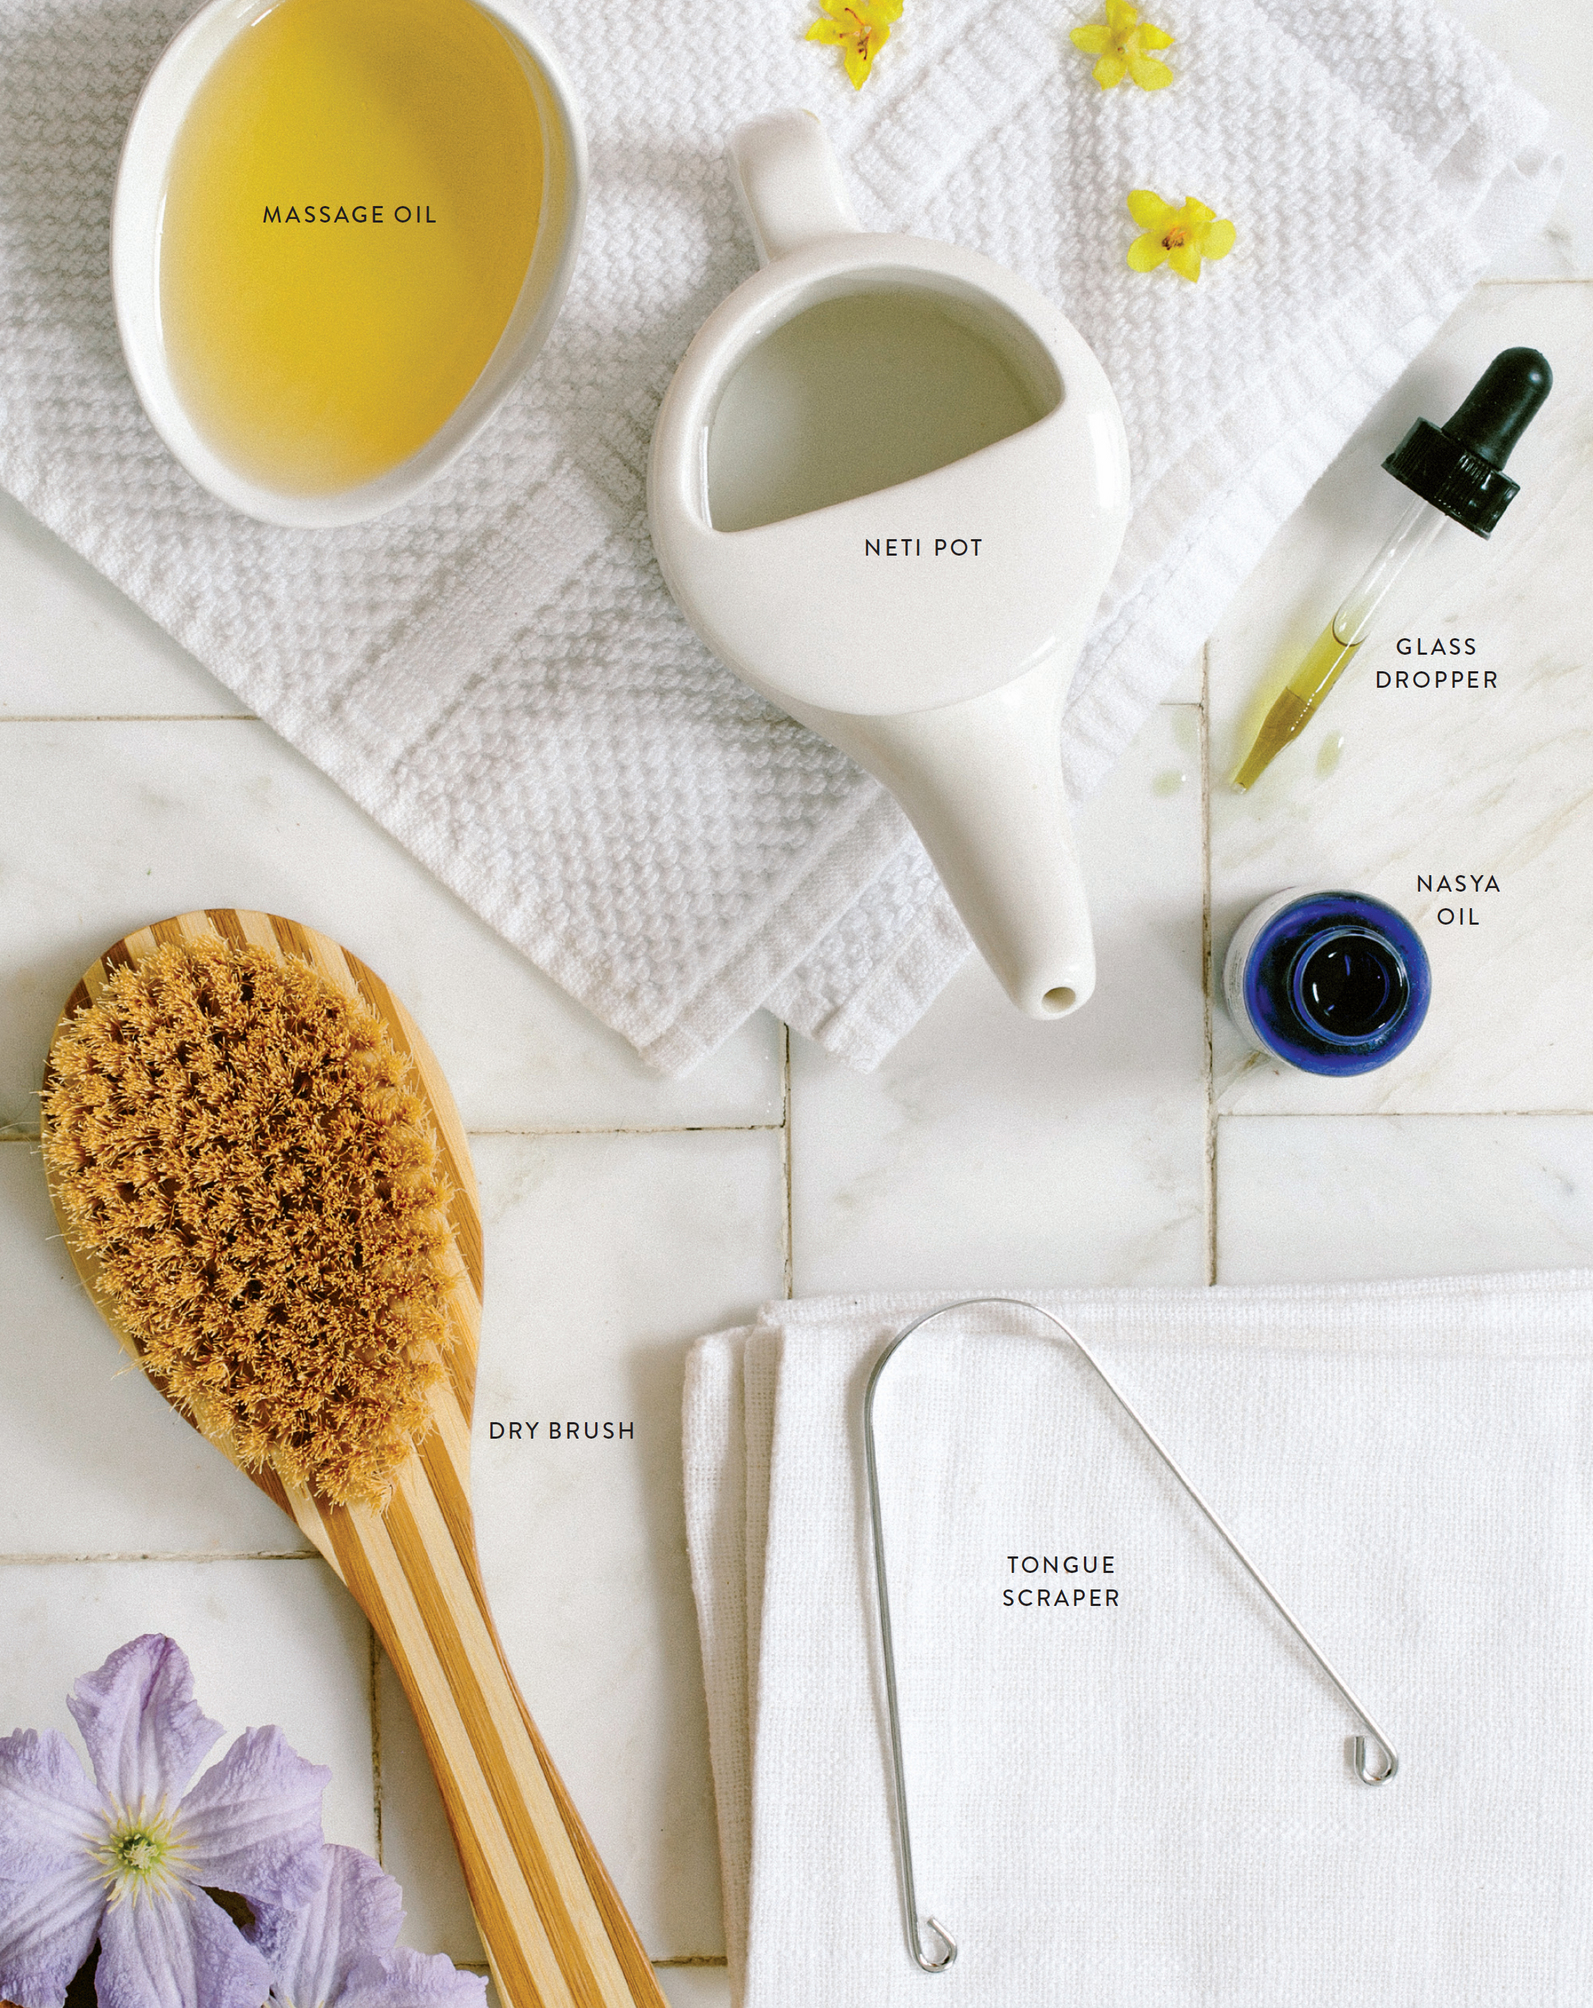
Materials
• Tongue scraper: A U-shaped, bevel-edged piece of copper or stainless steel used for cleaning the tongue.
• Dry brush: A stiff, natural bristle brush with a wooden handle, used for exfoliating the skin.
• Massage oil: Be sure to buy organic, high-quality oil that is less than one year old. Keep oil out of the sun. Buy refined sesame oil for oil pulling. (Visit the “Resources” section for trusted mail-order sources.)
• Neti pot: Drugstores sell nasal irrigation kits with plastic pots and packets of salt (both handy for travel), but it’s best to purchase a ceramic or stainless steel pot for home use. You can find them at most health food stores or from a supplier in the “Resources” section of this book.
• Glass dropper bottles: Sterile, empty glass dropper bottles can be purchased at some health food stores and herbal suppliers. Use them to store sesame oil for the nose or rose water for the eyes.
• Rose hydrosol: A decoction made from the water of steamed rose petals, it is safe for use in the eyes and to flavor food. Hydrosol is different from rose water, which is made by adding rose essential oil to water and is unsafe for the eyes.
Tongue Scraping
Use a stainless steel or copper tongue scraper. First thing in the morning, before consuming any liquids, scrape your tongue five to six times, from as far back as you can reach to the tip. Scrape the entire surface of your tongue, especially way in the back. Press gently, but do not disturb the tongue tissue. Mucus will likely appear on the scraper; rinse in the sink as needed.
After finishing, clean the scraper thoroughly with hot water, and keep it near your toothbrush. Follow with tooth brushing and a cup of hot water or Vitalitea or Yogi Tea. Do not scrape your tongue at other times of the day.
Eye Washing
Run cool water from the tap, and rinse your eyes well by splashing the cool water over open eyes with your hands four or five times. Follow by blinking seven times and rolling your eyes in circles. If you have burning, itching, or redness of the eyes, you can spray or drop rose water into them at this time. Be sure to purchase a hydrosol rather than water with rose essential oil added to it. Essential oils are not safe for the eyes.
Neti (Nasal Irrigation)
Think of neti, or irrigation of the nasal passages, as flossing for your nose. Using a neti pot involves pouring a small amount of salt water from a ceramic or stainless steel pot through each nostril, dislodging any accumulated mucus and impurities. I like to practice neti in the shower, where the warmth of the shower opens the nasal passages and any drips will be washed away.
Potential bugs can’t get a hold on you when you use the neti pot. Practice neti in the morning, when the seasons change, when the cold and flu season begins, and as needed through the spring and fall. Mucus-prone or allergic types will find they benefit from daily use of the neti pot, while dry types will need this only occasionally and will benefit more from nasya (see the next section). This practice can also be used for a few days when your immunity feels compromised. Not everyone needs it every day. If you feel the water does not drain fully from your nasal passages, refrain from doing it.
To practice, boil purified water and add enough cold purified water to be sure the temperature is not too hot. You should be able to hold your finger in it comfortably. Be sure to check. Dissolve fine-grain, pure sea salt completely in the warm water (neti pots come in different sizes, so read the instructions on yours to find the correct amount of salt). In the shower or at the sink, lean forward, keeping the back of your neck extended, so your whole torso is bending. Tip your head to the side, place the spout in your top nostril and gently tip the neti pot to slowly pour the water in; wait for the water to run out the other nostril.
If the water is not draining easily after a few tries, refrain from practicing until you can get formal guidance. Let the water run out naturally. Do not forcibly blow your nose, as this can send the water in farther. You may cover one nostril and simply exhale to help the last bit of water out. Tip your head the other way, and repeat for the other nostril.
Note: Too much salt burns, whereas too little leaves you feeling like you have swimmer’s ear. Do not practice neti more than once a day.
Nasya (Oiling of the Nose)
Administration of medicines through the nasal cavity can access the brain directly and is traditionally used for mental as well as physical imbalances. A general practice of oiling the nose balances the effects of dry, cold air and can induce a state of calm. For medical applications, an Ayurvedic practitioner trained in nasya therapies is required.
Unless you experience congestion, always follow neti with nasya, applying sesame oil to your nostrils by swirling it in with a Q-tip or pinkie fingertip and inhaling deeply. This will balance the drying effect of the salt from neti. Order oil from a supplier in the “Resources” section, or make your own nasya oil by decanting refined sesame oil into a sterile dropper bottle. Drop the oil onto your pinkie, a Q-tip, or directly into your nostril; do not touch the dropper. Keep the dropper next to your bed if you experience dry nasal passages at night. Even if you don’t practice neti, take care to oil your nose while doing daily oil massage. Don’t forget to take your nasya oil on plane rides and use it before riding on public transportation. The oil is generally good for one year.
Nasya is not indicated in cases of chronic congestion; it is better to see an Ayurvedic practitioner to help you discover the cause.
Gandush (Oil Pulling)
The swishing or holding of oil in the mouth for 5 to 20 minutes is used to balance the effects of excessive air and space elements in the region of the head and to detoxify the digestive system. As the minutes go by, the oil pulls saliva into the mouth, which cleanses the mouth of bacteria that can be responsible for tooth decay and bad breath. When held for a longer time, detoxification of the sinus can also result in a small amount of drainage. The amount of liquid in the mouth will increase as the saliva arrives, and the oil should be white when you spit it out. As a preventive measure for oral hygiene and tooth health, practice gandush daily. Even if you don’t do it every day, it still benefits you.
Sesame oil’s antibacterial properties are greater than those of coconut oil; however, coconut has a more appealing taste to some and can be used if necessary for palatability. Flavored blends for oil pulling are becoming available from Ayurvedic suppliers. As with any oral hygiene, morning is the ideal time to cleanse the mouth. To practice, begin by taking note of the time. Slug about 1 Tbsp of oil into your mouth, trying not to get the oil on your lips (just because the oily feeling can be unpleasant). Hold it there for a minute or so, then begin gently swishing it over your gums and between your teeth. Do not swallow while the oil is in your mouth. Be gentle so you do not exhaust your jaw or facial muscles—remember you are working toward 20 minutes. Do not engage in any activities that might result in tripping, falling, or accidentally swallowing. I like to swish as I get ready to leave for work in the morning or while I’m washing some dishes. Twenty minutes ensures optimal benefits, but you may have to work up to this. See how long you make it in the beginning, but hold the oil for a minimum of 5 minutes. Spit the oil into the trash, not the drain, as it will eventually clog the pipes. Gargle with warm water and brush your teeth. Do not drink or eat anything without gargling and brushing first. If you have excessive or chronic tension of the jaw or facial muscles, do not swish; simply hold the oil in your mouth for the desired time.
Shiro Abhyanga (Head Massage)
This technique is excellent for relaxation and stress relief. Ayurvedic body treatments for the mind generally focus on the head, mouth, ears, and nasal passages for their proximity to the brain and the activity of the sense organs. Shiro abhyanga and oiling of the ears and nose can be used to calm the mind. Because oiling the scalp requires a good shampooing afterward, practice the head massage one or two times weekly, when it is convenient for you to wash your hair, such as a weekend morning. When sleep is a problem, head massage can be an excellent way to calm the mind at bedtime. To avoid going to bed with a wet head, you can wrap it in an old towel, scarf, or hat and wash the oil out in the morning. Take care not to let your head get cold in the night. Head massage with oil is contraindicated in cases of congestion, illness, brain fog, or lethargy.
Melt 2 Tbsp of coconut oil in a small vessel or ramekin. If you run cold, sesame oil is a good choice. Warm the oil slightly if it is cold out. Remove any hair ties and brush the tangles out of your hair. Begin by gently kneading your shoulders and neck with circular motions a few times. Dip your fingers into the oil and distribute it evenly over your fingertips. Spread your fingers and work your hands into your hair on either side of your head, above your ears, with your fingers pointing up. With a shampoo-like action, work your fingertips to the crown of your head. “Shampoo” the scalp around the crown gently with your oiled fingertips until you have covered the top of your head. This is the most important part of the scalp. Dip your fingers into the oil again, and “shampoo” the rest of your scalp until finished; this should take 5 minutes or more. Rub a bit of the oil onto the entirety of each ear with small, circular motions, and slide your pinkie tips into the ear holes to coat them with oil. Wrap your head if it’s bedtime, or relax for 10 to 30 minutes with the oil on your head.
To clean your hair, first apply shampoo to your scalp and roots and work into the oily parts of your hair, without water. Add a small amount of water to make suds and shampoo. Add more water as needed to get enough suds for your whole head. Those with thick hair may need to shampoo again to remove the oil. Sesame oil may require a bit more shampooing than coconut oil.
Dry Brushing
This procedure is especially indicated in cases of tamas, including lethargy, weight gain, or water retention. Use a natural bristle dry brush (available in drugstores and health food stores) on dry skin. Beginning at your ankles and moving up toward your heart, make small, brisk circles to exfoliate and stimulate the skin of your entire body, especially your armpits and chest, inner thighs and groins, and anywhere stubborn fat tissue likes to hang around. Take 3 to 5 minutes and be firm, but do not disturb the skin. A rosy color should result. Practice anywhere from daily to once a week, before having your oil massage and shower.
Abhyanga (Oiling of the Skin)
If you do only one dinacharya practice, do this one. You will notice that oiling your skin creates a protective, strengthening force field around you for the day.
It’s best to apply warm oil thickly right before you shower or in the shower. The warm water will open your pores, and the massage will penetrate more deeply. Warm the oil by sitting a small container of it in a sink of hot water while you get undressed. Apply the oil for 5 minutes before you shower, using long strokes along bones and circular strokes on joints. To avoid slipping, do not oil the feet. In cold weather, you may choose to keep a small plastic container of massage oil in your shower. When you’re ready to perform your abhyanga, put the container on the shower floor and turn on the water, so you and the oil warm up together in the shower for a minute. Turn off the water; apply a palmful of oil to your entire body, including your ears and nostrils—but you may skip the rest of your face. Rub it in well for a few minutes, then turn on the warm water again, stand under it, and rub some more. Do not soap off your skin—just soap the hairy parts to remove the oil. Towel dry—lingering in your towel for a few minutes to let your skin absorb the oil, if necessary—get dressed, and go about your day.
WHAT KIND OF OIL TO USE
You may enjoy changing your massage oil with the seasons, as indicated in the seasonal lifestyle guides, but here are a few general choices. Please remember to do a patch test with any oil before applying it to your entire body to be sure you are not allergic.
Sesame oil: Traditionally sesame oil is favored for its ability to build strength and softness in the body. Sesame oil is warming and indicated for those who run cold and experience dry skin.
Sunflower and almond oil: These two lighter oils are neither heating nor cooling and are indicated for those who do not experience very dry skin.
Coconut oil: Coconut oil is cooling and indicated for those who run hot or have sensitive skin.
SNEHANA (SPECIAL ABHYANGA DURING A CLEANSE)
The following practice is recommended for daily use throughout a seasonal cleanse to quiet the nerves and to soften impurities and the channels that carry them out of the body, so they can be released.
Sneha means “love” in Sanskrit, and this ancient practice is literally an application of love. Taking the time for this kind of massage once a week throughout the year will greatly enhance the immune system, strengthen the nervous system, and help with pain management.
Warm ¼ to ½ cup of organic sesame oil in a jar or bottle placed in hot water. Make sure the room you oil in is cozy and warm. Prepare the room and remove your clothes before you begin to minimize the need to move (and the possibility of slicking surfaces with oil). Lay an old bath towel on the floor and sit down. Breathe deeply a few times and give thanks for the time and space to care for yourself in this way. Apply the warm oil to your body with love and patience. Rub it in well, especially in areas that trouble you. Beginning with your feet, work your way up your body, using long strokes along bones, circular strokes on joints, and wide, clockwise circles on your chest and abdomen. Massage your face and head last, rubbing the oil into your scalp. Use your little fingers to put oil in your ears and nose. Half a cup will seem like a lot. Keep going until you don’t think your skin can absorb anymore; this process may take 15 minutes. When you’ve massaged in all the oil, lie back on your towel and relax for 5 to 30 minutes. It takes at least 20 minutes for the body to absorb the oil, so after 15 minutes of massage, relax for at least 5 minutes. Burn a candle or play soft music.
Now enjoy a hot shower, but wipe your feet first so you don’t slip. Do not use soap; the hot water will remove any excess oil. Apply shampoo to your hair before wetting it to cut the oil. After you shower, pat yourself dry. Your skin may still seem a bit oily; massage the oil in further, and it will gradually be absorbed. Afterward, clean your bathtub or shower stall of residual oil to make sure no one slips!
Note: When your towel becomes very oily, it can create a fire hazard if you put it in the dryer after washing. Better to hang your abhyanga towels to dry and replace them periodically instead.
