Chapter 2
VMware
IN THIS CHAPTER
 Installing VMware Player
 Creating and using virtual machines
 Installing VMware Tools
Virtualization is a complex subject, and mastering the ins and outs of working with a full-fledged virtualization system like VMware Infrastructure is a topic that’s beyond the scope of this book. You can dip your toes into the shallow end of the virtualization pond, however, by downloading and experimenting with VMware’s free virtualization product, called VMware Player. You can download it from www.vmware.com.
This chapter is a brief introduction to VMware’s virtualization platform and creating and using virtual machines with VMware Player.
Looking at vSphere
vSphere is an umbrella term for VMware’s virtualization platform. The term vSphere encompasses several distinct products and technologies that work together to provide a complete infrastructure for virtualization. These products and technologies include the following:
- ESXi: ESXi is the core of vSphere; it is a Type-1 hypervisor that runs on host computers to manage the execution of virtual machines, allocating resources to the virtual machines as needed. ESXi comes in two basic flavors:
- Installable: The Installable version of software can be installed onto the hard drive on a host computer, much as any other operating system can be installed.
- Embedded: The Embedded version runs as firmware that is actually built into the host computer. It’s preinstalled into read-only memory by the manufacturer of the host computer.
- vCenter Server: vCenter Server is a server application that runs on Windows Server installed in a virtual machine. vCenter is the central point for creating new virtual machines, starting and stopping virtual machines, and performing other management tasks in a vSphere environment.
- vCenter Client: vCenter Client is a Windows application that you use to access the features of a vCenter Server remotely. vCenter Client is the tool you’ll work with most when you manage a vSphere environment.
- VMFS: VMFS, which stands for Virtual Machine File System, is the file system used by vSphere to manage disk resources that are made available to virtual machines. With VMFS, you can create data stores to access physical disk devices, and you can then create volumes on these data stores to make disk storage available to virtual machines.
Getting Started with VMware Player
VMware Player is a simplified version of the vSphere environment that provides many of vSphere’s features but does not utilize the Type-1 ESXi hypervisor. Instead, VMware Player is a Type-2 hypervisor that runs within a Windows environment. VMware Player is useful for learning about virtualization and for simple desktop virtualization, but not for production use. I’m covering it here because experimenting with VMware Player is a great way to learn some of the basic concepts of virtualization.
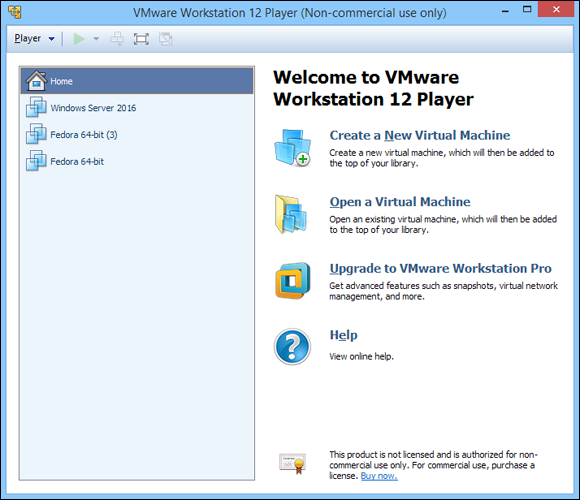
Figure 2-1 shows VMware Player’s main screen. From this screen, you can create a new virtual machine or run one of the virtual machines you’ve already created. As you can see in the figure, I’ve created several virtual machines: two that run various versions of Fedora (a popular Linux distribution) and one that runs Windows Server 2016.
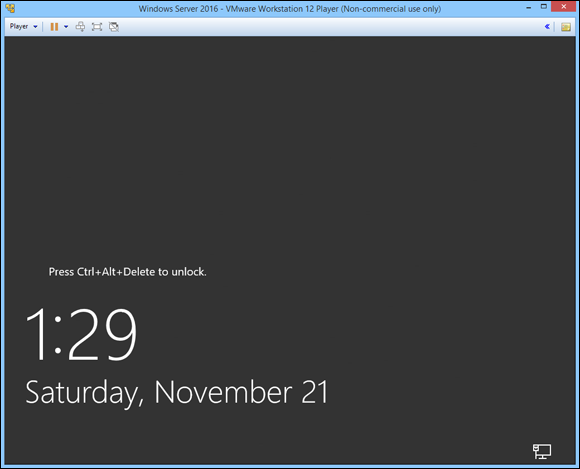
You can run an existing virtual machine by selecting the virtual machine and clicking Play Virtual Machine. This launches the virtual machine, which opens in a new window, as shown in Figure 2-2. When you launch a virtual machine, the virtual machine behaves exactly as a real computer would when you power it up: First, it initializes its virtual hardware devices; then it loads the guest operating system that has been installed in the virtual machine.
In Figure 2-2, Windows Server 2016 has booted up and is waiting for you to press Ctrl+Alt+Del to log on.
The prompt to press Ctrl+Alt+Del shown in Figure 2-2 illustrates one of the peculiar details of running a virtual machine within a host operating system. When you press Ctrl+Alt+Del, which operating system — the host or the guest — responds? The answer is that the host operating system responds to the Ctrl+Alt+Del before the guest operating system ever sees it.
To get around this limitation, VMware uses the special keyboard shortcut Ctrl+Alt+End to send a Ctrl+Alt+Del to the guest operating system. Alternatively, you can use the VM drop-down menu that appears in the menu bar above the virtual machine menu. This menu lists several actions that can be applied to the virtual machine, including Send Ctrl+Alt+Del.
Another detail you should know about when working with a virtual machine is that when you click in the virtual machine’s window, the VM captures your mouse and keyboard, so your input will be directed to the virtual machine rather than the host computer. If you want to break the bonds of the virtual machine and return to the host computer, press Ctrl+Alt.
Creating a Virtual Machine
Creating a new virtual machine in VMware Player is relatively easy. In fact, the most challenging part is getting hold of the installation disc for the operating system you want to install on the VM. Remember that a virtual machine is useless without a guest operating system, so you need to have the installation disc available before you create the virtual machine.
If you just want to experiment with virtualization and don’t have extra licenses of a Windows Server operating system, you can always download an evaluation copy of Windows Server 2016 from www.microsoft.com. The evaluation period is six months, so you’ll have plenty of time to experiment.
The downloadable trial version of Windows Server 2016 comes in the form of an .iso file, which is an image of a DVD file that you can mount within your virtual machine as though it were a real disc.
When you have your .iso file or installation disc ready to go, you can create a new virtual machine by following these steps:
-
Click Create a New Virtual Machine on the VMware Player home screen (refer to Figure 2-1).
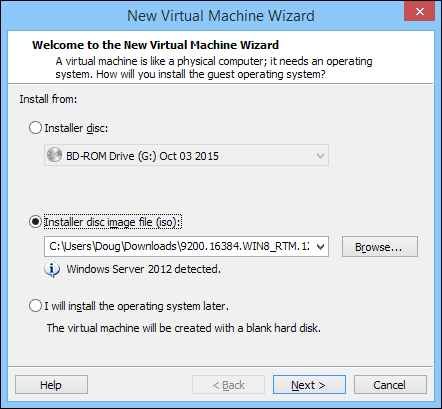
This brings up the New Virtual Machine Wizard, shown in Figure 2-3.
-
Choose the installation option you want to use.
You have three choices:
- Installer Disc: Select this option and then choose from the drop-down list the drive you'll install from if you want to install from an actual CD or DVD.
- Install Disc Image File (iso): Select this option, click the Browse button, and browse to the
.iso file that contains the installation image.
- I Will Install the Operating System Later: Select this option if you want to create the virtual machine now but install the operating system later.
Note that the remaining steps in this procedure assume that you select a Windows Server 2016 .iso file as the installation option.
-
Click Next.
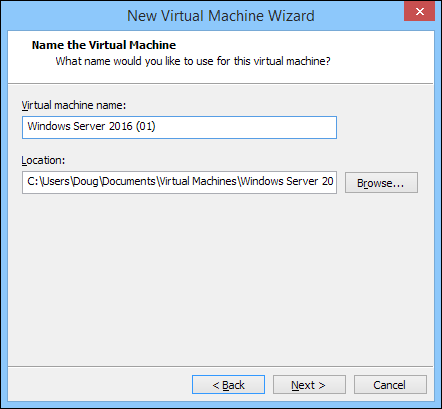
The screen shown in Figure 2-4 appears.
- Enter a name for the virtual machine.
-
Enter the location of the virtual machine’s disk file.
If you want, you can click the Browse button and browse to the folder where you want to create the file.
-
Click Next.
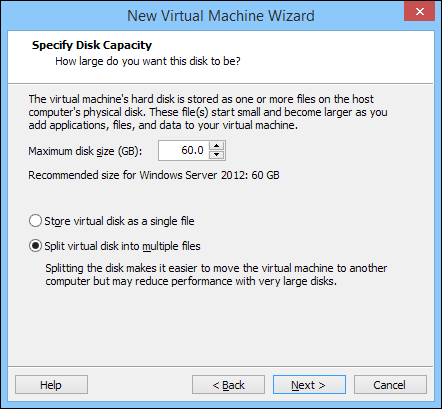
The wizard asks for the size of the disk to create for the virtual machine, as shown in Figure 2-5.
-
Set the size of the virtual machine’s hard drive.
The default setting is 40GB, but you can change it depending on your needs. Note that you must have sufficient space available on the host computer’s disk drive.
-
Click Next.
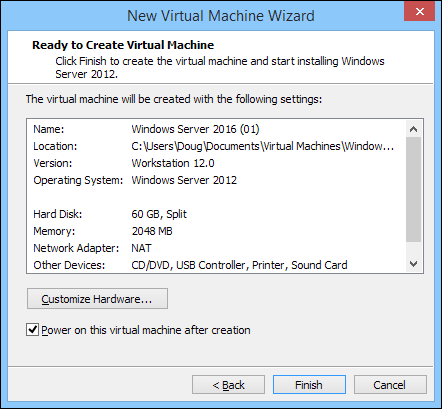
The wizard displays a final confirmation page, as shown in Figure 2-6.
-
Click Finish.
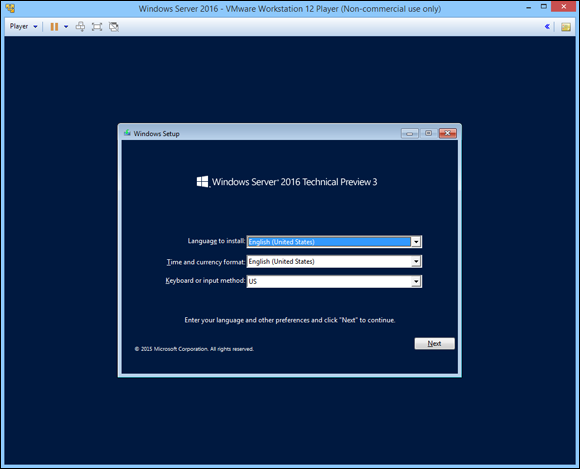
The wizard creates the virtual machine and then starts it. Because the machine doesn’t have an operating system installed, it boots from the CD/DVD installation image you specified back in Step 2. In this case, I booted with the Windows Server 2016 evaluation software disk image, so the new virtual machine displays the Windows Setup screen, as shown in Figure 2-7.
-
Follow the steps to install the operating system.
Installing an operating system on a virtual machine is exactly the same as installing it on a physical computer, except that the installation screens appear within a virtual machine window.
When the operating system is installed, you’re done! You can start using the virtual machine.
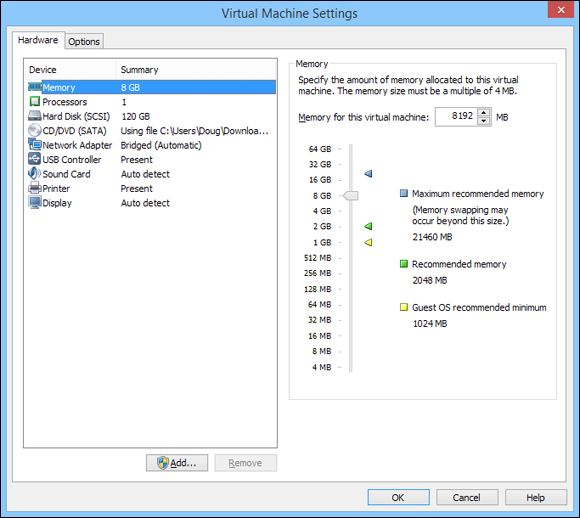
You can adjust the hardware configuration of a virtual machine by choosing VM⇒ Settings while the virtual machine is running. This command brings up the Virtual Machine Settings dialog box, shown in Figure 2-8. From this dialog box, you can adjust the virtual machine’s hardware configuration, including the amount of RAM available to the virtual machine and the number of processor cores. You can also adjust the disk drive size; add CD, DVD, or floppy drives; and configure network adapters, USB connections, and sound and display settings.
Installing VMware Tools
When you’ve installed an operating system into a VMware virtual machine, you should install an important application called VMware Tools before you do anything else. VMware Tools provides a variety of important functions for a VMware virtual machine:
- Significantly improved graphics performance
- Shared folders, which lets you share folders between the virtual machine and the host, making it easy to exchange files between the two
- A shared clipboard, which lets you copy and paste between the virtual machine and the host
- Synchronized time between the guest and host
- Better control of the mouse between guest and host
To install VMware Tools, follow this procedure:
- Start the virtual machine.
-
On the menu of the VMware console window, choose Player⇒ Manage⇒ Install VMware Tools.
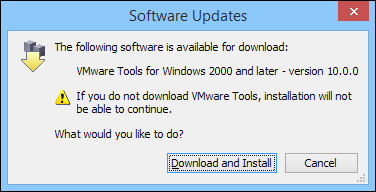
The dialog box shown in Figure 2-9 appears.
-
Click Download and Install.
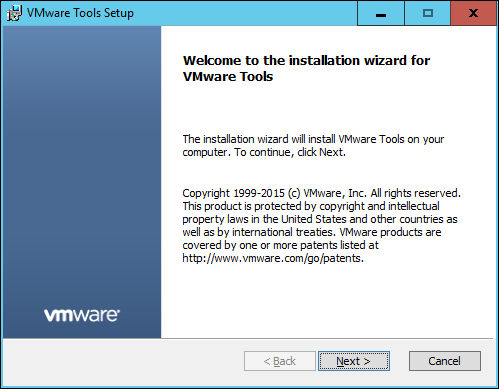
The VMware Tools are downloaded to the guest operating system. The Setup program displays the Welcome screen, shown in Figure 2-10.
 If the Setup program doesn’t automatically start, press Windows+R, type d:\setup.exe, and press Enter. This will manually start the Setup program.
-
Follow the instructions in the Setup program to install the VMware Tools.
When the tools are installed, you’ll be prompted to restart the virtual machine.
 Installing VMware Player
 Creating and using virtual machines
 Installing VMware Tools
 If the Setup program doesn’t automatically start, press Windows+R, type d:\setup.exe, and press Enter. This will manually start the Setup program.