Chapter 6
Using Group Policy
IN THIS CHAPTER
 Looking at group policy concepts
Enabling group policy on a Windows Server
Editing group policy objects
Group policy refers to a feature of Windows operating systems that lets you control how certain aspects of Windows and other Microsoft software work throughout your network. Many features that you might expect to find in a management console, such as Active Directory Users and Computers, are controlled by group policy instead. You must use group policy to control how often users must change their passwords, for example, and how complicated their passwords must be. As a result, group policy is an important tool for any Windows network administrator.
Unfortunately, group policy can be a confusing beast. In fact, it’s one of the most confusing aspects of Windows network administration. So don’t be put off if you find this chapter more confusing than other chapters in this minibook. Group policy becomes clear after you spend some time actually working with it.
Understanding Group Policy
Here it is in a nutshell: Group policy consists of a collection of group policy objects (also called GPOs) that define individual policies. These policy objects are selectively applied to both users and computers. Each policy object specifies how some aspect of Windows or some other Microsoft software should be configured. A group policy object might specify the home page that’s initially displayed when any user launches Internet Explorer, for example. When a user logs on to the domain, that policy object is retrieved and applied to the user’s Internet Explorer configuration.
Group policy objects can apply to either computers or users. A policy that applies to a computer will be enforced for any user of the computer, and a policy that applies to a user will be enforced for that user no matter what computer he or she logs on to. As a network administrator, you’ll be concerned mostly with policies that apply to users. But computer policies are useful from time to time as well.
To use group policy, you have to know how to do two things: (1) create individual group policy objects, and (2) apply — or link — those objects to user and computer objects. Both tasks can be a little tricky.
The trick to creating group policy objects is finding the particular setting you want to employ. Trying to find a specific group policy among the thousands of available policies can be frustrating. Suppose that you want to force all network users to change their passwords every 30 days. You know that a group policy controls the password-expiration date. But where is it? You’ll find help with this aspect of working with group policy in the section titled “Creating Group Policy Objects,” later in this chapter.
After you’ve created a group policy object, you then are faced with the task of linking it to the users or computers you want it to apply to. Creating a policy that applies to all users or computers is simple enough. But things get more complicated if you want to be more selective — for example, if you want the policy to apply only to users in a particular organizational unit (OU) or to users that belong to a particular group. You’ll find help for this aspect of working with group policy in the section “Filtering Group Policy Objects,” later in this chapter.
Enabling Group Policy Management on Windows Server 2016
Before you can work with group policy on a Windows Server 2016, you must enable group policy on the server. The procedure is simple enough and needs to be done only once for each server. Here are the steps:
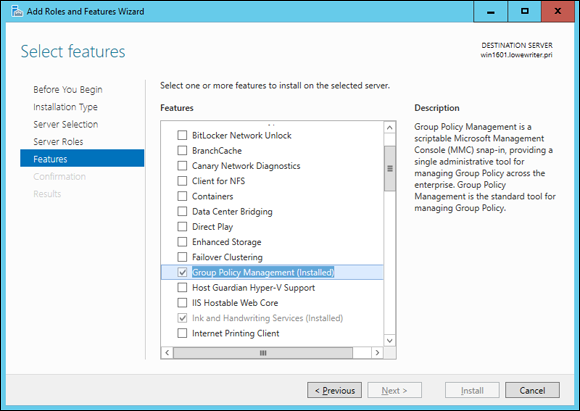
- In the Server Manager, click Add Roles and Features.
- Follow the wizard until you get to the Select Features page, which is shown in Figure 6-1.
- If the Group Policy Management check box is not already checked, select it.
- Click Next.
-
When the confirmation page appears, click Install.
Be patient; installation may take a few minutes.
-
Click Close.
You’re done!
After you’ve completed this procedure, a new command titled Group Policy Management appears on the Tools menu in the Server Manager.
Creating Group Policy Objects
The easiest way to create group policy objects is to use the Group Policy Management console, which you can run from the Server Manager by choosing Tools ⇒ Group Policy Management.
A single group policy object can consist of one setting or many individual group policy settings. The Group Policy Management console presents the thousands of group policy settings that are available for your use in several categories. The more you work with group policy, the more these categories will begin to make sense. When you get started, you can expect to spend a lot of time hunting through the lists of policies to find the specific one you’re looking for.
The easiest way to learn how to use the Group Policy Management console is to use it to create a simple group policy object. In the following procedure, I show you how to create a GPO that defines a group policy enabling Windows Update for all computers in a domain so that users can’t disable Windows Update.
-
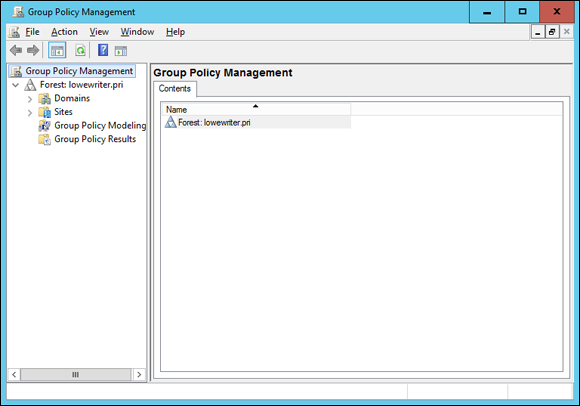
In the Server Manager, choose Tools ⇒ Group Policy Management.
The Group Policy Management console appears, as shown in Figure 6-2.
- In the Navigation pane, drill down through the Domains node to the node for your domain, then select the Group Policy Objects node for your domain.
-
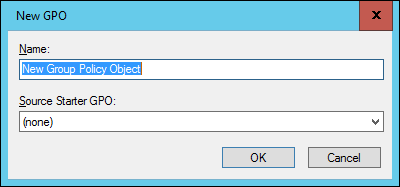
Right-click the Group Policy Objects node and then choose New from the contextual menu that appears.
This command brings up the dialog box shown in Figure 6-3.
-
Type a name for the group policy object and then click OK.
For this example, type something like Windows Update for a policy that will manage the Windows Update feature.
When you click OK, the group policy object is created and appears in the Group Policy Objects section of the Group Policy Management window.
-
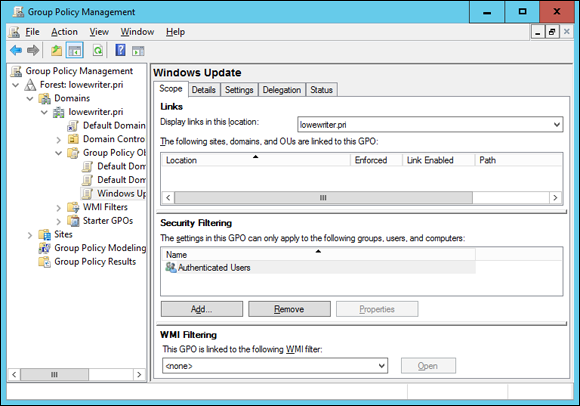
Double-click the new group policy.
The group policy opens, as shown in Figure 6-4. Note that at this stage, the Location section of the group policy doesn’t list any objects. As a result, this policy is not yet linked to any Active Directory domains or groups. I get to that topic in a moment. First, I create the policy settings.
-
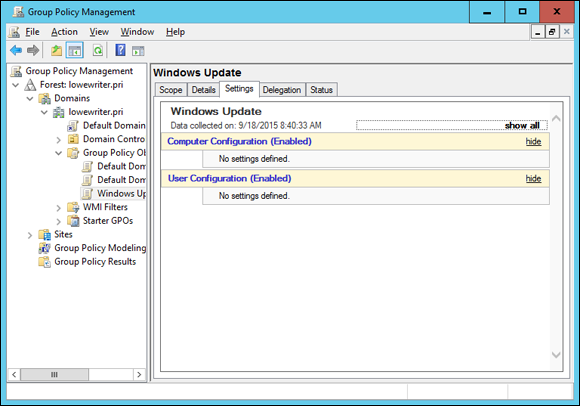
Click the Settings tab.
The message “Generating Report” appears for a moment, and then the group policy settings are displayed, as shown in Figure 6-5.
-
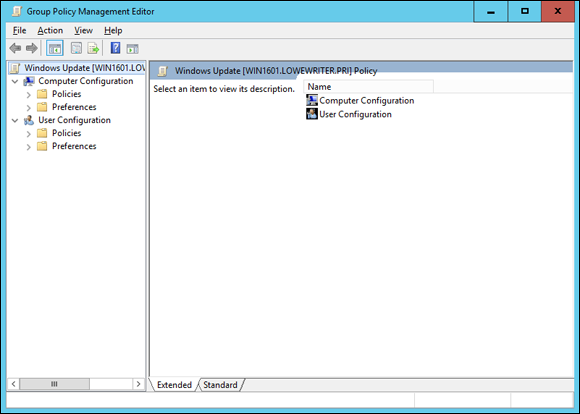
Right-click Computer Configuration and then choose Edit from the contextual menu.
This command opens the Group Policy Management Editor, as shown in Figure 6-6, where you can edit the Computer Configuration policies.
-
In the Navigation pane, navigate to Computer Configuration ⇒ Administrative Templates ⇒ Windows Components ⇒ Windows Update.
This step brings up the Windows Update policy settings, as shown in Figure 6-7.
-
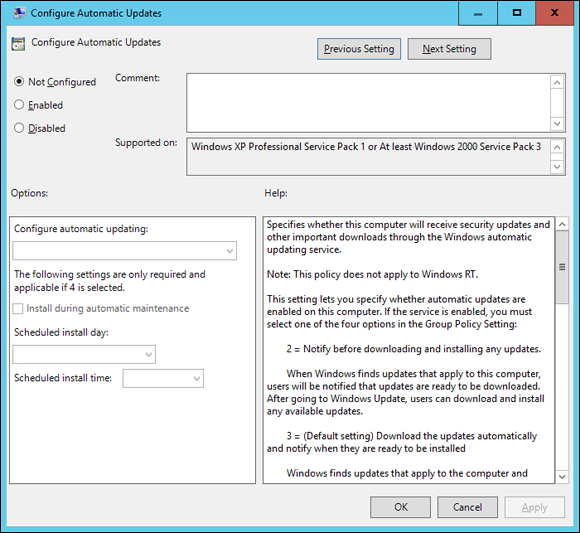
Double-click Configure Automatic Updates.
This step brings up the Configure Automatic Updates dialog box, as shown in Figure 6-8.
- Select Enabled to enable the policy.
-
Configure the Windows Update settings however you want.
For this example, I configure Windows Update so that updates are automatically downloaded every day at 3 a.m.
-
Click OK.
You return to the Group Policy Management Editor.
-
Close the Group Policy Management Editor window.
This step returns you to the Group Policy Management settings window.
-
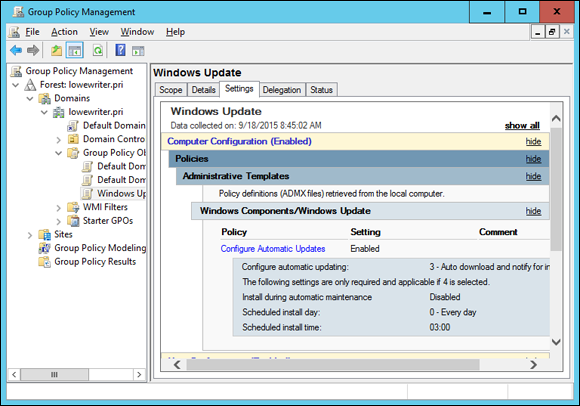
Right-click Computer Configuration, and choose Refresh from the contextual menu.
The Windows Update policy is visible, as shown in Figure 6-9. (To show the full details of the policy, I expanded the Administrative Templates and Windows Components/Windows Update sections of the policy report.)
-
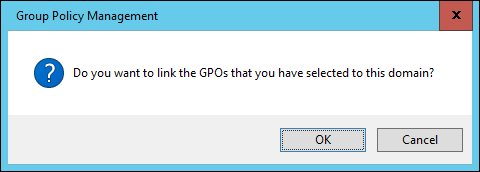
In the Navigation pane of the Group Policy Management window, drag the new Windows Update policy object to the top-level domain (in this case, lowewriter.pri).
When you release the mouse button, the dialog box shown in Figure 6-10 appears.
-
Click OK.
The domain is added to the scope, as shown in Figure 6-11.
-
Close the Group Policy Management window.
The new group policy is now active.
Filtering Group Policy Objects
One of the most confusing aspects of group policy is that even though it applies to users and computers, you don't associate group policy objects with users or computers. Instead, you link GPOs to sites, domains, or organizational units (OUs). At first glance, this aspect may seem to limit the usefulness of group policy. For most simple networks, you’ll work with group policy mostly at the domain level and occasionally at the OU level. Site-level group policy objects are used only for very large or complex networks.
Group policy wouldn’t be very useful if you had to assign exactly the same policy to every user or computer within a domain. And although OUs can help break down group policy assignments, even that capability is limiting, because a particular user or computer can be a member of only one OU. Fortunately, group policy objects can have filters that further refine which users or computers the policy applies to. Although you can filter policy objects so that they apply only to individual users or computers, you’re more likely to use groups to apply your group policy objects.
Suppose that you want to use group policy to assign two different default home pages for Internet Explorer. For the Marketing department, you want the default home page to be www.dummies.com, but for the Accounting department, you’d like the default home page to be www.beancounters.com. You can easily accomplish this task by creating two groups named Marketing and Accounting in Active Directory Users and Computers, and assigning the marketing and accounting users to the appropriate groups. Next, you can create two group policy objects: one for the Marketing department’s home page and the other to assign the Accounting department’s home page. Then you can link both of these policy objects to the domain and use filters to specify which group each policy applies to.
For the following procedure, I’ve created two group policies, named IE Home Page Dummies and IE Home Page Beancounter, as well as two Active Directory groups, named Marketing and Accounting. Here are the steps for filtering these policies to link correctly to the groups:
-
Choose Start ⇒ Administrative Tools ⇒ Group Policy Management.
The Group Policy Management console appears. (Refer to Figure 6-2 for a refresher on what it looks like.)
-
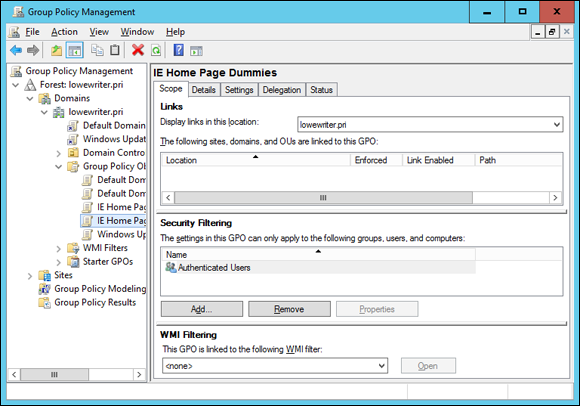
In the Navigation pane, navigate to the group policy object you want to apply the filter to.
For this example, I navigated to the IE Home Page Dummies policy, as shown in Figure 6-12.
-
In the Security Filtering section, click Authenticated Users and then click Remove.
This step removes Authenticated Users so that the policy won’t be applied to all users.
-
Click Add.
This step brings up the Select User, Computer, or Group dialog box, as shown in Figure 6-13.
-
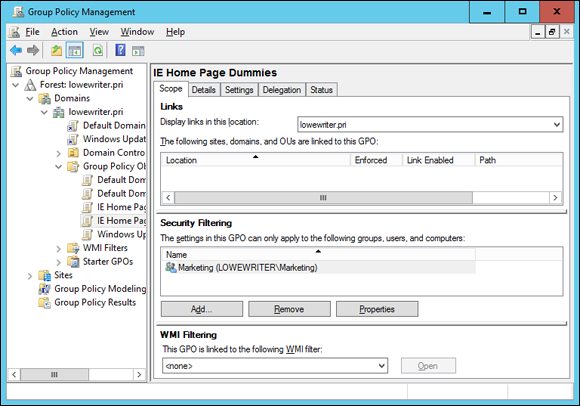
Type Marketing in the text box and then click OK.
The policy is updated to indicate that it applies to members of the Marketing group, as shown in Figure 6-14.
-
Repeat Steps 2 through 5 for the IE Home Page Beancounter policy, applying it to the Accounting group.
You’re done!