Chapter 8
Using Facebook Apps and Games
Apps, which is short for “applications,” are computer programs or software that cause a computer to perform some function. Facebook apps are programs that perform some function ancillary to Facebook and are accessed from Facebook as well. There are many different kinds of Facebook apps, some developed by Facebook that are a standard part of the product, like Events, Notes, Photos, Videos, and Music; and a great many more developed by people and organizations other than Facebook (called “third-party apps”) that must be added by the user from sources both inside and outside Facebook. Games are just apps in which you play a game, either alone or against other Facebook users, whether currently or soon to become your friends.
In this chapter we’ll discuss apps and games; how to locate, start, and briefly use them; how to respond to requests to join a game and be secure in your use of them; and how to edit and manage them.
LOCATE AND USE APPS
Most of the Facebook-created apps appear as options on the top and left of your Home and Timeline pages. They are started by clicking those options, as discussed elsewhere in this book. Many other apps from both Facebook and other developers are available. In this section we’ll look at how you locate, start, and use the apps you are interested in.
 Locate Apps
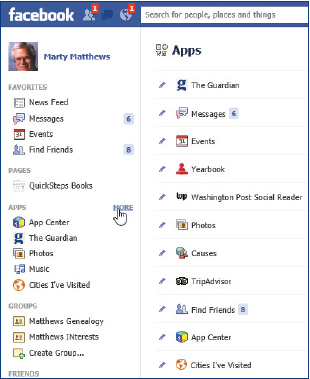
When you click Apps (or More which is displayed when you hover over the Apps title), a list of some Facebook apps is displayed. These may also be listed beneath the Apps title in the left column. You can explore any of these links, but the best place to get started is with the App Center shown in Figure 8-1.
Figure 8-1: The App Center is the hub for finding ones you are interested in and seeing those that your friends are using.
| Note The entries that you have on your lists of apps and games are probably different from those shown in Figure 8-1 and elsewhere in this chapter. This is because Facebook often changes what it displays and new ones are constantly being developed. If you don’t see the app you are looking for, do a specific search on its name.
|
1. From your Home page, click App Center and review the apps your friends are using on the right and the suggested apps on the left.
2. Scroll down and review the long list of top-rated apps. Follow this by clicking Trending and look at a list of the apps that are growing the fastest, and then click Top Grossing to see the apps that are earning the most for their creators.
3. Select an app to use as an example and click its logo or name. Here we’ll look at Pinterest (found under Suggested), an online board on which you can pin items you find on the Internet.
4. In most instances the app’s Facebook page will open, seen in Figure 8-2. Here you can see information about the app and some of your friends who use it.
Figure 8-2: The initial page that opens when you click an app is a standard Facebook page for that app, which has a look similar to other Facebook pages.
5. It is a good idea to read the description of the app and read the ways that the app will use your information and post what you are doing to give yourself a good understanding of the app before trying it out.
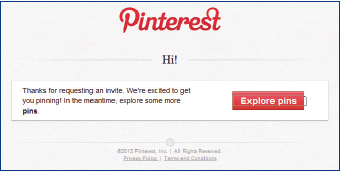
6. When you are ready to go ahead and use the app, click Visit Website. In the case of Pinterest, a Create Your Account dialog box is displayed. Enter a user name, your email address, and a password. Click Create Account. You should get an email message that tells you “Thanks” and provides an Explore Pins button. Click it. You are taken back to the Pinterest website where you can click Login; choose Login With Facebook; enter your ID, email address, and password; and click Create Account.
Other apps have their own pages and processes they use to sign you up. Follow through it if the app is something you want to use. Be aware that the information you give them or have placed on Facebook can be used by the app.
Once you have begun to use apps, you will see the icons and names of apps you have used in the menu on the left of your Home page beneath the title, Apps.
Use Apps
How you use the many apps available on Facebook varies greatly. After you start an app and follow its sign-up procedure, as described previously, you are taken to pages unique to that app.
To explore the way you can use these unique pages, we’ll briefly explore three different apps: Pinterest, Birthdays, and TripAdvisor. While looking at how to use these three apps won’t show you how to use every app, it will hopefully give you confidence to dive in and follow the directions you find in other apps.
| Note The three apps were chosen based upon their popularity and what we judged would be of interest to our audience in three different categories. Being chosen does not constitute an endorsement of these apps, just that they are popular and provide examples of how Facebook apps are used.
|
Use Pinterest
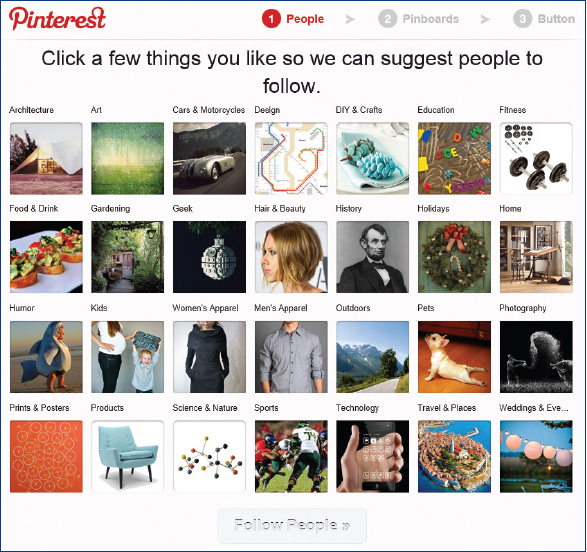
Pinterest allows you to collect pictures, videos, articles, and blogs that you find on the Internet and share them with your friends and the Facebook community. When you have completed the sign-up procedure, the app displays a number of categories you can select to see a list of people you can follow who are pinning in that area, as you see in Figure 8-3. From this page you can:
Figure 8-3: Pinterest gives you a number of categories from which you can get suggestions of people to follow who are also interested in those categories.
1. Click several of the categories and click Follow People. You will see a list of a few of the people who are interested in the categories you have chosen. You will also see a set of photos of your friends who are using Pinterest.
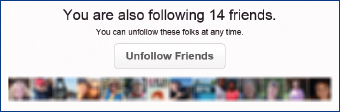
2. Just to see where it leads, click Unfollow Friends. You’ll see your friends’ names with buttons to unfollow them individually, or you can click Unfollow All to do that.
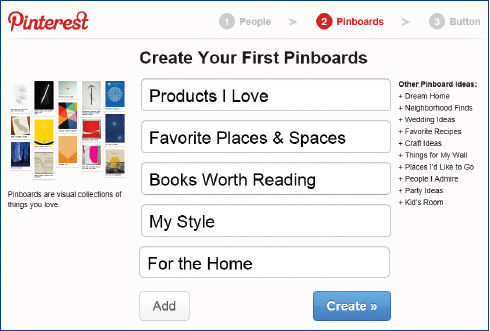
3. When you are ready, click Create Boards to create your own space to collect what you are interested in, as shown in Figure 8-4.
Figure 8-4: Pinterest uses pinboards to collect items from the Internet you are interested in.
4. Click one of the options in the center or one on the right side, which you then need to click again in the center. You can select several categories for your boards.
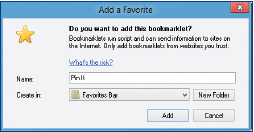
5. When you are ready, click Create. You are told how to add a “Pin It” button to your browser. Follow those instructions (view the video if you wish). You should see the Add A Favorite dialog box (remember to choose Favorites Bar).
6. If you don’t see your Favorites bar, right-click the top of the Internet Explorer window and click Favorites Bar.
7. When you see Pin It on your Favorites bar, click Start Pinning. You are taken to the Pinterest site.
8. Click your name in the upper-right corner and click Boards, click the board you want to pin to, click the down arrow, and select a category for your board.
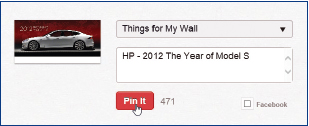
9. In your browser navigate to the photo, video, or information you want to pin. When you find it, click Pin It in your browser’s Favorites bar. You are shown the image that will be pinned; move the mouse over it and click Pin It.
10. Click the board you want to pint it to, enter a description, and once again click Pin It.
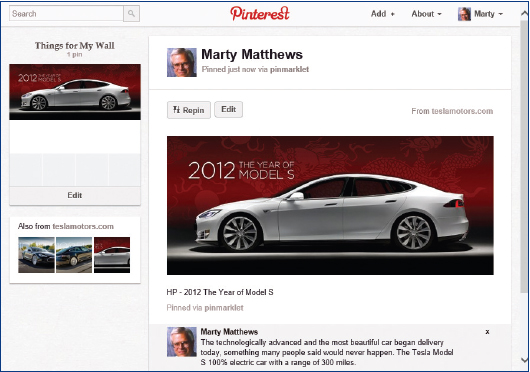
11. Click See Your Pin. You are shown your entry enlarged, as you can see in Figure 8-5.
Figure 8-5: It is amazing how fast people see and repin your pins.
Susan Used Facebook in Her Campaign
After years as a partner in a law firm, I decided to run for a district court judge position. As soon as word got out, younger people, such as staff in our firm and my daughter, repeatedly told me that I had to have a Facebook page. After getting that message several times, I said, “OK, how do I do that?” Thankfully a secretary in my firm said, “Let me help you,” and in short order I had a Facebook page. The second Facebook comment I got was that the candidate with the most friends wins, so we began by sending out a number of friend requests, and many of them suggested other friends. Throughout the campaign we continually added friends, although we carefully vetted who they were. We used the Facebook site to announce events and generally keep our friends informed about the campaign. I think the campaign definitely benefitted from Facebook. In the end I won! My opponent, who also had a Facebook site, had far fewer friends, so, at least in this case, the comment about the number of friends held true. The only downside is that being a judge I must severely limit my activity on Facebook.
Susan S., 65, Nevada
Use MyCalendar-Birthdays
The MyCalendar-Birthdays app calls itself the most popular calendar app on Facebook and has many millions of users. It helps you keep track of friends’ birthdays on Facebook.
1. Type MyCalendar-Birthdays (without any spaces) into the Facebook search text box and press ENTER. You will select the first Web Results item and then click Go To App once or twice before you get to the actual App Welcome page.
2. You will see three checkboxes asking if you want to add birthdays, setup reminders, or accept requests. Clear any checkmarks you do not want and click Continue.
3. You are shown a list of your friends whose birthdays aren’t already on Facebook and told that a request will be sent to these people saying you want to add their birthday to MyCalendar. If you want to do that, click Send Requests. Otherwise, click Cancel. If you click Cancel, which I would suggest, you are returned to the MyCalendar-Birthdays’ home page shown in Figure 8-6.
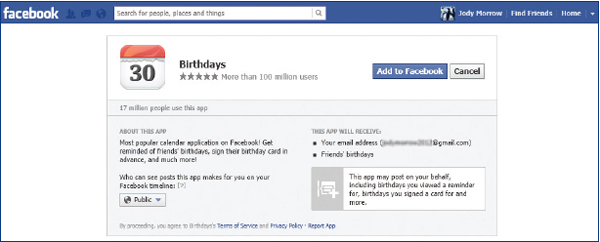
Figure 8-6: MyCalendar-Birthdays provides a way to remember your friends’ birthdays and send them cards, which you can queue up ahead of time.
4. Read about the app and what it will get from you. If you want to go ahead, click Add To Facebook.
5. You are asked a series of questions:
• Do you want to be notified when a friend is having a birthday? (Respond Yes or No.)
• Do You want to receive email reminders? (Respond Yes or No.)
• If yes, you’ll be asked to verify your email address. You will be sent a confirmation email. Open it and click Confirm Email Address.
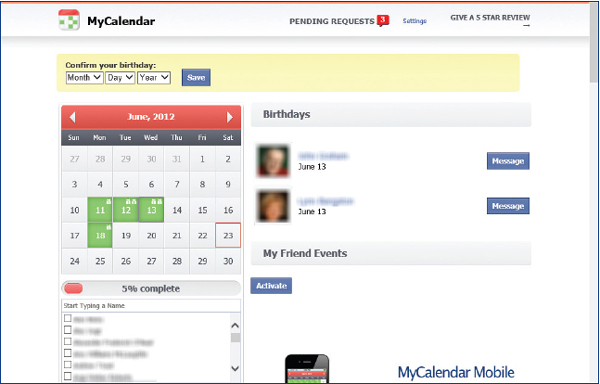
6. The MyCalendar-Birthdays calendar page will appear. On the calendar you may see some dates that are highlighted in green. Click one of these dates, and you will see one or more of your friends whose birthdays are in Facebook and have it on the date selected, as you can see in Figure 8-7.
Figure 8-7: MyCalendar-Birthdays gives you a nice visual picture of your friends’ birthdays and lets you easily add others.
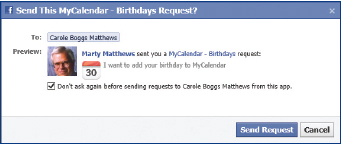
7. In the lower part of the page you are shown a list of your friends. Click in the check box opposite the friends you want to send requests for their birthdays, and click Add Birthdays.
8. You will be asked if you want to send the request and what it will say. If you do, click Send Request; otherwise, click Cancel.
9. When a friend’s birthday is displayed, you can click Message to send them a greeting.
Judge Apps
Most apps are created by organizations other than Facebook, and as a result provide a wide variety of experiences and levels of sophistication. If you find an app in which you might be interested, check out its pages in Facebook before using the app itself—type its name in the search text box at the top of the Facebook page. In the App Center page, look at the rating (anything below four stars is suspect) and the number of users or players. Also see if any of your friends are using it. None of those items give you an absolute measure of the app, but they help you get a feel for it. The objective is to determine whether you should use the app. Only you can make that choice. For most apps, your risk can be mitigated by careful, commonsense usage. See “Stay Safe with Games” later in this chapter. Much of the discussion also applies to other apps.
Use TripAdvisor
TripAdvisor allows you to create an interactive travel map you can share with your friends. TripAdvisor is a large online travel community that includes a website (tripadvisor.com) separate from Facebook. On Facebook, TripAdvisor currently has over 10 million users.
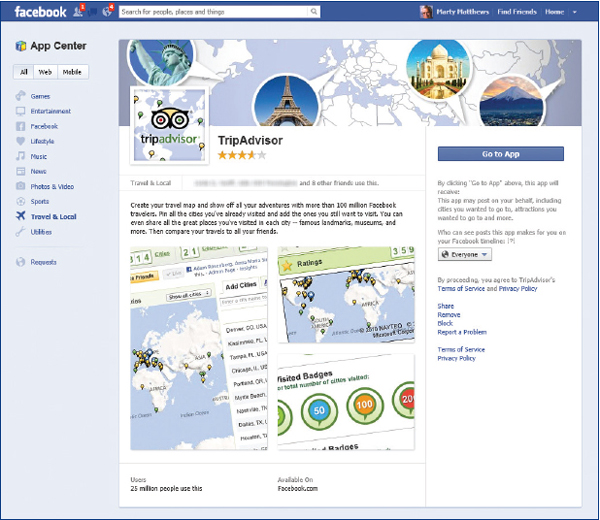
1. From your Home page click App Center, click Travel & Local, scroll down if needed, and click TripAdvisor. The TripAdvisor App Center page will open, as you can see in Figure 8-8.
Figure 8-8: The TripAdvisor app is used to show where you have been and where you want to go.
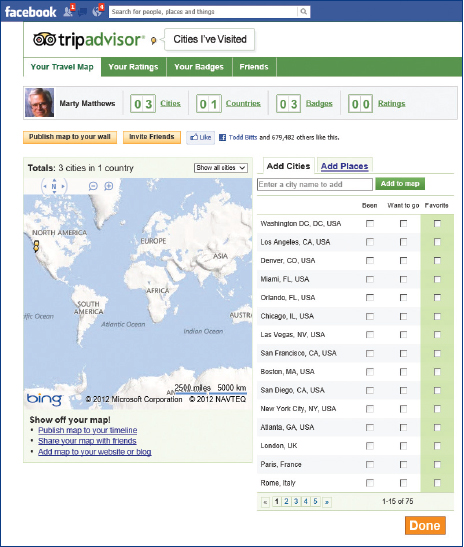
2. Read the description of TripAdvisor and what it will do with your information. When you are ready, click Go To App. After choosing friends to invite to participate with you in TripAdvisor, you’ll see the TripAdvisor–Cities I’ve Visited page open. Click Your Travel Map in the menu bar to start pinning your own travel map, as you can see in Figure 8-9.
Figure 8-9: You can tell your friends where you have been and help them in their travel plans.
3. Start in one of three ways:
• Click the cities in the list on the right that you have visited, want to go to, and are your favorites. Click Next to display more cities.
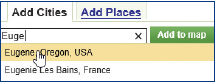
• Begin to type the name of a city, and a list of matching cities will appear. Click the city you want, and click Add To Map.
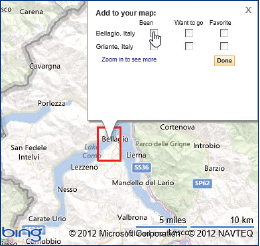
• Double-click the map several times until you have magnified it to the point you can see the city you want to add. Drag the map using the hand icon to find the country or area you want, and then click the city (or region if you don’t see the city), and in the latter case click the city in the list displayed.
4. When you have added all the cities you want, click Done to the right and below the map.
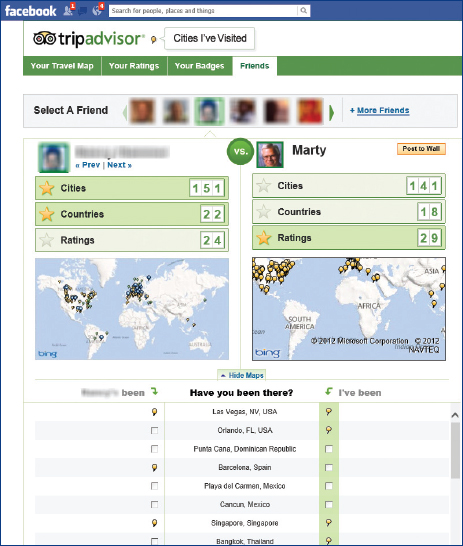
5. You can see your friends’ maps and compare them with yours by clicking Friends near the top and selecting the friend from the photos. The friend’s map will be displayed with their pins next to yours, comparing the number of cities, countries, and ratings each of you have, as shown in Figure 8-10.
Figure 8-10: Comparing your travels with your friends can be fun and help you find friends that might help you with a trip.
Remove an App
You can hide or remove an app from your Home page’s left column and from your Facebook account, and control its settings through its context menu.
1. To hide an app in the left column, hover the mouse over the app icon or name, and click the pencil icon on the left to open a context menu.
2. Click Add To Favorites to add the app icon and name to the list of favorites at the top of the left navigational column. Once you’ve done that, this option becomes Remove From Favorites.
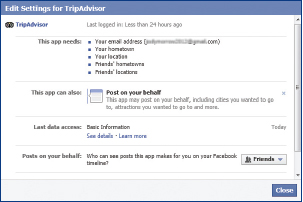
3. Click Edit Settings to open the Edit Settings dialog box. The contents of this vary, depending on the app. Generally, you can control the same elements that you could when you originally signed up for the app, as well as control the overall privacy setting.
4. To remove an app from your Home page and your Facebook account, click Remove App on the bottom of the dialog box. You are told that this will also prevent the app from having access to your profile and other Facebook data. If that is what you want, click Remove.
| Note You can also delete an app from the Privacy Settings page. Click the Account down arrow, and then click Privacy Settings. At the bottom, opposite Ads, Apps, And Websites, click Edit Settings. Beside Apps You Use, click Edit Settings. Next to the app you want to delete or change, click the X to remove the app and click Remove to confirm it. Click Edit to display the app’s options in the Edit Settings dialog box shown elsewhere in this chapter.
|
ENJOY GAMES
We all need to relax occasionally, and playing games is a way that a lot of people like to do that. Games can get competitive juices flowing, and with Facebook games, you can interact with your current friends, meet new friends, and build community around a fun activity. On Facebook you have access to a large number of games, most of which are social games you play with others who are or become your friends. As with any social activity, you need to use good common sense to protect yourself. In this section we’ll explore several of the more popular games and then discuss how to stay safe while you play them.
Use Games
Facebook games are just Facebook apps that you can start and manage in much the same way as was discussed in the “Use Apps” section.
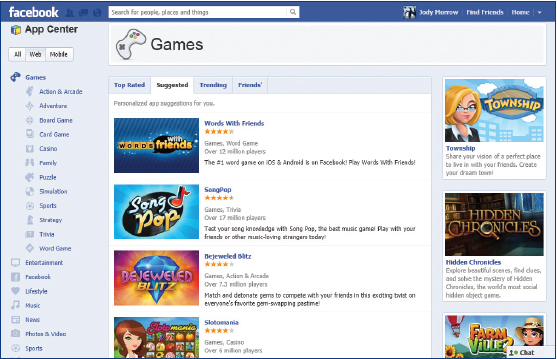
1. From your Home page click App Center on the left of the page to open the App Center shown in Figure 8-1 earlier in this chapter.
2. Click Games to review lists of top-rated, recommended, trending, and games your friends play, as shown in Figure 8-11.
Figure 8-11: Games are a great way to find and build friends while having fun.
3. Click Friends’ to review the games your friends play and through which you might enjoy connecting with them. Look also at the other tabs (Top Rated, Suggested, and Trending) to see the many games that are available.
4. If you see a game that interests you, click that game. If you don’t see something that grabs at you, click the categories on the left under Games that hold possibilities for you, and see if there is anything there you want to try. You can also try searching for games not in the categories listed by typing such queries as war games or fantasy games to search those categories.
5. If you know or have heard of a game on Facebook and don’t quickly see it in the lists, type its name in the search text box to see if it can be found.
After selecting and opening the game you want to play, you need to follow a combination of sparse instructions, instinct, and help from your fellow game players to find your way through the game. Here we’ll look at several popular games to give a brief look at how they are played.
Use CityVille
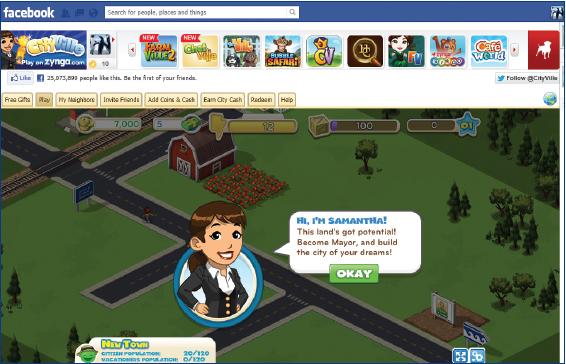
CityVille is a very popular Facebook game from Zynga with over 30 million players. CityVille allows you to create a virtual city from scratch by constructing buildings, collecting rent and income, and growing crops to feed your city.
1. In any of the ways just discussed, locate and click CityVille to open its Facebook page. Review the description and how the game uses your information.
2. When you are ready to start playing, click Play Game. The CityVille game page will open and you can start playing, as you can see in Figure 8-12.
Figure 8-12: At the beginning of CityVille, you see a lot of suggestions to get you started.
3. Click OKAY to start playing. You will see a suggestion such as to become Mayor or build a house.
4. Click Build, click the little house on the left (not that you have any choice), and follow the remaining suggestions.
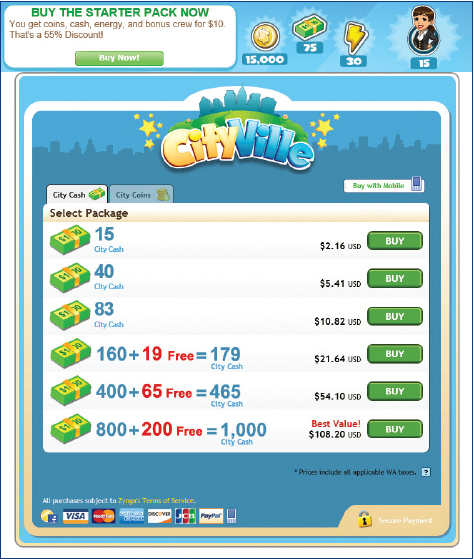
5. Soon you will see why the developers build these games. You will see offers to add “coins” and “cash.” This will open a page allowing you to buy the fake coins and cash for real money. If you click this, you are taken to the page shown in Figure 8-13, where you can carry out the transaction. You can do this if you wish, but you don’t have to.
Figure 8-13: Many games are a money-making proposition: the developers make it; you pay for it!
| Note You may see pop-ups appearing on your screen. If you don’t want to engage with them, just click Cancel or Close. They can be confusing and disorienting. Just push them aside (cancel or close them) until you’re ready to go forward.
|
6. There will be many pop-ups suggesting things that you can do. Add houses, businesses, and farms to your city. There are also “gotchas” where you are told you can’t do something before you do something else that costs coins, cash, energy, and so on. You have to figure out how to keep moving ahead without running out of resources.
| Note You may see offers, like the one shown next, for CityVille cash for free. These are often an excuse to get your name, email address, and your IP address (the Internet address of your computer) and force you to watch several ads that try to sell you things. I would stay away from these offers.
|
Mary Plays Several Role-Playing Games
For over a year I have been playing several role-playing games, including FarmVille, FrontierVille, Café World, and CityVille. I have found that I like FrontierVille the best. These games hold my interest, are fun, and have introduced me to new friends.
The most important tip that I can give players of these games is to get friends and then ask them to be neighbors. They can give you help in many ways, including giving you tips about how to get around obstacles and giving you items such as coins, energy, and goods. Other valuable points that I have learned include being sure that rent is collected and crops are harvested, and plant strawberries, as they don’t wilt and can be harvested quickly.
Mary P., 68, Washington
Use Texas HoldEm Poker
This game claims to be the world’s largest Texas HoldEm poker game. Facebook says there are over 33 million players. You can play with your friends or make new friends while playing. You are periodically given some chips to play with; you can win chips if you are lucky; and you can buy chips, but you cannot cash in chips for money.
1. In any of the ways discussed earlier, locate and click Texas HoldEm Poker (or Zynga Poker) to open its Facebook page. Review the description and how the game uses your information.
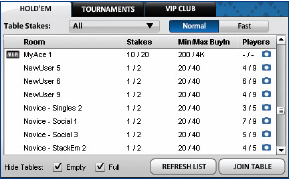
2. When you are ready to start playing, click Play Game. The Texas HoldEm Poker page will open and you can start playing, as you can see in Figure 8-14.
Figure 8-14: Texas HoldEm Poker is a real poker game with other players, just not for real money.
3. If you are new to Texas HoldEm Poker, click Learn To Play. A poker table is displayed. Click Start and you are led through four lessons on poker hands, betting basics, smart folding, and the game interface. Click Next as needed to proceed through the lessons. In the Interface lesson, move your mouse around the poker table, pausing at each question mark to read the comment (see Figure 8-15). When you are ready, click Done and then click Exit Tutorial.
Figure 8-15: Even if you are an old hand at poker, the tutorial is worth going through.
4. Click Close in the Welcome box. You are forced to accept the offer to send you email, and the Request For Permission page opens. If you want to go ahead, click Allow.
5. To start playing, click Play Now. A long list of tables will appear. If you are just starting out, look for a table labeled NewUser or Novice with low stakes, like this:
6. When you have found such a table, click it and click Join Table. You are reminded of the terms of service. Click Okay and begin to play.
| Tip When you start out playing Texas HoldEm Poker, it is my experience that the game goes rather quickly and you have to fully pay attention to not get left in the dust.
|
Use Café World
Café World is a role-playing game from Zynga similar to CityVille and FarmVille. In it you run your own restaurant, choosing the dishes to cook and then preparing them. You can invite your friends to help you in a number of ways. Café World has over 3 million monthly active users. You start out with some supplies and will need to buy more with the profits from your business. When you first enter Café World, you open the Play Now page. Explore a bit by looking at the Info, Reviews, and Wall pages.
1. In any of the ways discussed earlier, locate and click Café World to open its Facebook page. Review the description and how the game uses your information.
2. When you are ready to start playing, click Play Game. The Request For Permission dialog box will open.
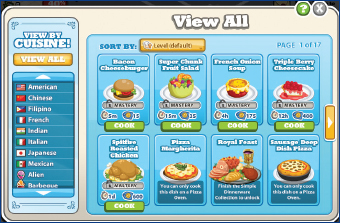
3. If you want to play the game, click Allow, click OK to accept a notice, click Female or Male, and click Next. The Café World page will open. (See Figure 8-16.)
Figure 8-16: Café World keeps you busy preparing food and upgrading your café.
4. Click a stove, and you will be presented with a menu of things you can cook—initially, the selection is pretty limited.
5. You need to select items to cook, add stoves to cook more items, add tables to serve more people, and so on. By selling items you make coins to buy more items. You also need to accomplish certain steps, like finishing a spice rack, adding tables and chairs, and so on.
Like all Zynga games, you can spend real money to buy coins and cash, but there is no need to do that if you are patient.
Stay Safe with Games
Your safety while playing Facebook games is really not that much different than it is anywhere else in Facebook. The possible exception is that when you are enjoying yourself and you are looking for help or some resource while playing a game, you might let down your guard a bit. Sometimes, exuberance in playing a competitive game can overcome common sense. There are two situations to consider:
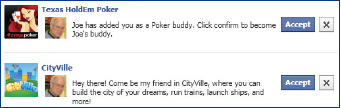
• Getting requests to join a friend in playing a game you haven’t tried
• Getting requests for help and resources from friends while playing games you have signed up for
With either type of request, you can accept it by clicking Accept or reject it by clicking the X. If you reject the request, you can block all requests from a particular game or ignore all requests from a particular person. If you are becoming irritated with requests from either a game or from a person, block or ignore them—there is no need to suffer.
One type of request I often reject are those ostensibly from a friend offering a lot of resources with which to play a game. These often lead to a site where you have to provide your email address as well as other information and have to go through several advertisements to have a chance at winning something.
Like Facebook in general, consider who you want for your friends, whether it is friends in general or friends while playing a game. How well do you know them? What are you telling them while in a game? What can they do with the information they are getting about you? It’s one thing to be reasonably cautious, but at the same time you don’t want to get paranoid.
It is also wise to not invite all your friends to play a game. Some of them might not be your friends for long if you do this. Before asking them, consider if the game you are asking them to join is really their cup of tea. If you don’t know, don’t ask them, or at the very least, in a regular email ask them if they would like such an invitation.
See the next section “Edit and Manage Apps” and Chapter 10 for a further discussion of apps and Facebook security.
EDIT AND MANAGE APPS
You should closely manage apps, including games that you use within Facebook, to give you what you want from the app and to provide the security you need. There are two areas you should review to edit and manage apps: within the app itself and in Facebook.
Edit App Settings
Some apps have settings that you can control to tailor your experience with that app and give the level of security you want. Not all apps have settings, and those that do call them by several names. An example of an app that has controllable settings is TripAdvisor, where you can set member preferences.
On TripAdvisor you can create a profile with your preferences and control subscriptions to online information.
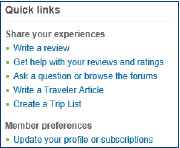
1. From the TripAdvisor home page (www.tripadvisor.com), scroll down to the Quick Links section and, under Member Preferences, click Update Your Profile Or Subscriptions. You may need to sign in, and then the Profile page opens, as you see in Figure 8-17.
Figure 8-17: TripAdvisor gives you a moderate degree of control over your experience on its site.
2. Read the note at the top telling you that the information on this page is public, and with that in mind, fill out the information you want to be public by clicking Edit, first for your information and then again for your travel preferences.
3. By clicking the options on the left you add or change your photo, change your account information, review the compliments you have received for your reviews, and change the relationship between your Facebook and TripAdvisor accounts.
4. By clicking Subscriptions on the left you can control the email information you receive from TripAdvisor, which can be extensive.
5. Similarly, by clicking Contributions, you can keep track of your reviews; by clicking Messages, you can reference recent email; by clicking Trips, you can build and store a detailed plan for a trip; by clicking Travel Map, you can maintain the travel maps you have created; and by clicking Travel Network, you can enable or disable the following of your friends’ travel reviews, as well as the sending and receiving of private messages through TripAdvisor.
Manage Apps in Facebook
Facebook gives you a number of settings to control apps and gives you some degree of protection from them.
1. From your Facebook page, click the Account down arrow in the upper-right corner, and click Privacy Settings.
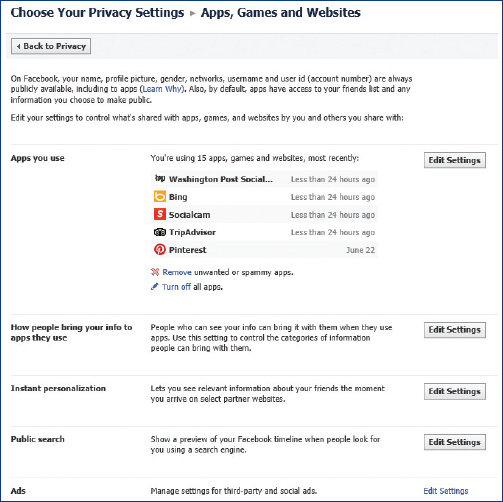
2. In the lower part of the page, opposite Ads, Apps, And Websites, click Edit Settings. The Choose Your Privacy Settings page will open, as you see in Figure 8-18.
Figure 8-18: If you will take the time to review your settings, Facebook provides the means to control your information.
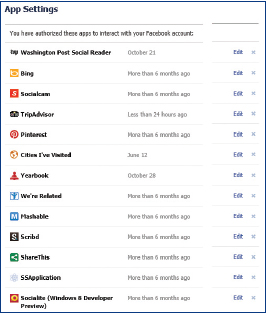
3. Opposite Apps You Use, click Edit Settings to open a list of the apps and games you use. For each one, you can click the X on the far-right corner of the app, click Remove, and then click Okay to remove the app from your site and your Profile page. Of course, you also lose any history and accomplishments within the app.
4. Also, opposite each app or game you can click Edit to expand the app entry to show the original settings you agreed to when signing up for it. For the most part, you cannot change those, but here with Mashable you can change who sees posts the app makes and whether you receive notifications.
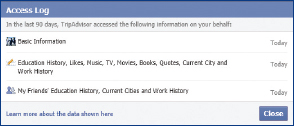
5. You can also remove the app by clicking Remove App, and you can see the information that has been mined from your Facebook account by clicking See Details opposite Last Data Access. When you have reviewed the information, click Close.
6. Once again click the Accounts down arrow in the upper right; click Privacy Settings; click Edit Settings opposite Ads, Apps, And Websites; and then click Edit Settings opposite How People Bring Your Info To Apps They Use to open a dialog box of that name. This is one of the most valuable dialog boxes in Facebook because it allows you to control the information that is available to apps that your friends are using.
7. We recommend that you seriously consider turning off most, if not all, of the check boxes in this dialog box and click Save Changes.
8. Click Edit Settings opposite Instant Personalization, and consider whether you want apps to personalize their sites for you with your information. In some cases, that is pleasing and worthwhile. Watch the video and click Close. Decide if you want to change the default of enabling instant personalization, and then click Back To Apps.
9. Finally, click Edit Settings opposite Public Search, and consider if you want your information available to public search engines like Google and Bing from your Facebook site. This is enabled by default. Click the check box to disable it and then click Confirm.
10. When you are done, return to your Home page.
| Note Seeing the information that was mined from my friends’ Facebook sites as the result of my agreeing to give an app access to my site was a little scary, but even worse is the information that is taken off my site when my friends use apps. This is all the more reason to thoroughly check the information you have on Facebook often.
|