
5
soil and gardens
When we first moved to this land, neither Penny nor I truly understood the value of soil. Certainly, we understood it to be where food came from, along with many other life essentials, and we understood that modern farming practices are enormously detrimental to soil health. But we grasped these things only vaguely, as amorphous concepts that, while true, didn’t go terribly far toward a thorough understanding of soil’s role as a living entity, the health of which is mirrored in the health of ourselves.
Consider: In just a gram of healthy soil, there are as many as 500 million bacterial organisms, comprising an estimated 2 to 3 million species of bacteria.1 The human body is much the same. As Michael Pollan noted in a New York Times Magazine article in May 2013, the human body contains one hundred trillion—that’s 100,000,000,000,000—individual bacterial cells, which means we comprise approximately 10 times as many bacterial cells as we do human cells.
All of these bacterial cells work symbiotically to ensure the wellbeing of our soil and of ourselves, and the less bacterial diversity, the less vitality and resourceful resilience an organism has. Of course, the same concept—diversity as vitality and resourceful resilience—applies to the homestead ecosystem.
Any healthy farm or homestead must be understood and respected as a living organism, in which its various aspects—its “bacteria,” if you will—function symbiotically to ensure maximum wellbeing. Our homestead is not just a home and a piece of land upon which we grow food; it is a living, breathing, evolving entity. It is where our children were born, and it is the very source of the nutrients that support each breath we take. It is where we make our living; it is where we make our life. If we are lucky, it will be where we die and are buried, our bodies returning to the very soil that nourished them. It is a petri dish of microorganisms, and the way we interact with these microorganisms can either support or suppress their growth.
The separation and segregation of all the varying aspects of human life and survival is a disempowering and enormously unhealthy phenomenon. It pulls individuals away from their homes and their land, and it fragments families as parents are forced to spend the majority of their waking hours at the jobs they need to afford the fundamentals of human survival. Meanwhile, children are shipped off to school, where they spend thousands of hours memorizing the abstract information necessary to become “productive” members of society. Of course, what is “productive” is defined and measured by purely economic forces, with a preference for profit margins over health of individual, family, and community, never mind soil.
And the monoculture mirage applies to farming practices, too. To understand what I’m talking about, consider the typical modern farm, which generally produces a single crop: wheat, milk, soy, corn, carrots, apples, whatever. The point isn’t what it produces; the point is that it produces only one thing, and that the very nature of this practice, so often conducted in the name of efficiency and profit, engenders vulnerability. Any anomaly—be it weather-related, pest-related, or a disruption of the inputs necessary to ensure an ample harvest—will have devastating ripple effects that may even spell the farm’s demise.

But on a diversified homestead, there are no such fears. Sure, you might have a bad year for strawberries, but that same year might be excellent for your blueberries. Or vice versa. On a diversified homestead, there are no fears of disruptions to fertility inputs, because the inclusion of animals into the farm organism, on a scale that does not create issues of so-called waste management, ensures ample manure. On a diversified homestead, and particularly one in which the soils have been amply fertilized and mineralized (much more on this later), weather anomalies are better tolerated, as are pests and disease.
Just last year, over the course of May and June 2013, Vermont had the wettest two-month period the state has ever seen, with a total of 18.6 inches of rainfall.2 This was followed almost immediately by one of the most intense and longest heat waves I can remember. The talk everywhere was of stunted plants and rampant pests. We experienced almost none of this, and although I’m sure that our well-drained soils played a role, I’m equally certain that our gardens’ and orchards’ vibrancy in the face of suboptimal conditions was bolstered by the fact that for years, we’ve been cultivating the teeming populations of soil microbes, feeding them the diverse nutrients they need to truly thrive, and handling them in a manner that supports these populations.
Of course, the diversity and culture I speak of apply to more than plants and soil; they also apply to humans and our relationship to the land, to the animals under our care, and to the communities in which we live. If we view ourselves as existing in separation from any of these things, we deprive ourselves of vibrancy in body, mind, and spirit. We suffer if we think of homesteading and all its tasks as something we must do, rather than something we are blessed to be a part of. The former implies an ethos of dominance over the land and creatures we live with and among; the latter both humbles and enriches us, and we begin to recognize our role as merely a thread in the quilt, rather than weavers of the quilt.
And it’s a quilt that invariably starts with the soil. For a moment, take stock of the items in your sight: Consider the chair you’re sitting in, the clothing you wear, the wooden floor beneath your feet, the drywall ceiling over your head. The truth is, every one of these items—indeed, everything that is essential for human life and all of the things that are not strictly essential but are still pretty nice to have (toilet paper and telephones, for instance)—is a product of the soil. True, they don’t actually grow from the soil, but at some point along their journey from raw material to finished product, all of the constituent components of human life were at some point extracted from the ground beneath our feet.
Which means it is hardly a stretch to say that we are a product of the soil.
It is probably not necessary to revisit all the ways in which modern agriculture violates the soil. For the purposes of this book, it’s enough to say that contemporary monoculture farming practices are depleting our soils at a rate far higher than they are being replenished. This depletion can be measured in volume, as denuded soils are extremely prone to being carried away by water and wind. On a global basis, soil is being lost at between 10 and 40 times the rate of natural replenishment, leading some experts to calculate that humanity has about 60 years of soil remaining.3
But even in places where soil has not been lost to the erosion created by poor farming practices, the essential vitality of the soil in most parts of the world has declined precipitously. There are numerous reasons for this but chief among them is the simple fact that growing food depletes the macro- and micronutrients that provide soil—and thus, food—with its life force. But even if you’re cultivating ground that’s never been plowed, there are other factors that contribute to depleted soils. For one, the loss of old-growth trees that once mined minerals from deep in the ground means we’ve lost one of our primary vectors for ensuring biologically active soil. For another, societies once settled in the fertile river bottoms where annual floods remineralized the fields; population growth long ago compelled us to settle less fertile regions, far beyond the reach of those remineralizing floods.
All of this is true whether you farm conventionally, organically, biodynamically, or only when standing on your head on the first Monday of the month. Sure, certain practices hasten the loss of nutrients, just as certain others forestall it. But in all cases, the loss occurs. This isn’t theoretical: A study published in 2004 in the Journal of the American College of Nutrition compared the nutritional data for 43 different fruits and vegetables from 1950 and 1999, respectively, and found “reliable declines” in the amount of protein, calcium, phosphorus, iron, vitamin B2, and vitamin C over this period.4
how biological activity changed everything
As I noted in the introduction, we came to our land in 1997. At the time, the cleared portions of our land were being grazed by a neighboring dairy farmer, in the let-the-cows-grub-it-down-till-there-ain’t-nothing-left manner common to the industry. In other words, the pasture was receiving a severe beating on an annual basis.
That said, it could have been a lot worse. For starters, it was immediately apparent that we had a healthy layer of topsoil. And the land had not been plowed or tilled, or if it had, it had been so long ago that no visible evidence of these practices remained. Likewise, there was no indication that pesticides or herbicides had ever been sprayed. Finally, as I’ve already noted, the soil drained extremely well.
All of this led us to believe that we didn’t need to do a whole lot to grow vigorous crops. Like many home gardeners, we assumed that simply because we grew our own food, it would be as nutritious as food could possibly be. So we didn’t do much. We hired a neighbor to till up a couple of garden plots, trucked in a few yards of compost, and started planting. We did get some basic soil tests analyzed by our local university ag extension service, and were quite pleased with ourselves when the results came back with everything in the “optimum” range. It was like being told our children were doing extremely well on their standardized tests.
Over the years, we began to observe that despite our so-called optimum soil test results, our crops sometimes lacked vigor and results were inconsistent. Sure, we were still producing lots of food, and we continued adding the amendments necessary to replace what our harvests took from the soil. But in truth, it felt as if we could be doing better. We were starting to get wise to the fact that growing our own did not necessarily mean optimal nutrition.
Now, just as this was beginning to occupy more of our mental energy (or in truth, more of Penny’s mental energy; she’s always been the green thumb around here), Penny happened upon a poster advertising a workshop with Dan Kittredge, founder of the Bionutrient Food Association in North Brookfield, Massachusetts. The BFA is a non-profit focused on teaching the importance of soil revitalization and the improved food quality that results, via the application of trace minerals and elements, seed inoculation, interplanting, and other techniques that foster biologically active soil and nutrient-dense crops. I should note that the BFA has begun using the term bionutrient food (hence the organization’s name), rather than nutrient-dense food, since nutrient density is based on a different metric. But for the sake of clarity, and because nutrient dense is the term that brought us to this methodology, I’m sticking with it in this book.
Indeed, it was the phrase nutrient dense in the workshop poster that caught Penny’s eye; for many years, we’d sought nutrient density in our diet, via traditional whole foods. The notion of incorporating nutrient density in our vegetable and fruit production efforts appealed to her immensely.
It is difficult to overstate just how profoundly that simple poster has impacted our relationship to the soil and, therefore, our food. After the first workshop she attended, Penny knew she’d found the missing link. “It’s like I found something I didn’t know I’d lost,” she said when she returned home, where she danced a little jig in the kitchen, her eyes gleaming with excitement. When she finally calmed down, she launched into a partial list of all she’d learned, including (but by no means limited to):
• Our habit of fertilizing our garden with compost we proudly made from vegetation and animal manure originating from plants grown in depleted soil only magnified soil imbalances, as the depleted compost was incorporated into the soil from which it came.
• The role of insects and diseases in nature is to attack organisms that aren’t fit for reproduction. Pests and disease are not the cause of crop failure, but rather symptoms of an already failing crop. With their simple digestive systems, larval forms of insects can digest only simple carbohydrates. If your plant cells comprise complex carbohydrates and complete proteins—as they do in healthy plants—they become inedible to these pests. Put simply, it’s not food to them anymore.
• As the soils’ digestive system becomes stronger, plants begin storing excess energy in the form of fats (lipids). This helps them develop thicker, stronger cell membranes, and they become increasingly resistant to airborne pathogens like mildews and blights.
• Eventually, plants can use higher levels of lipids to build essential oils, which serve as plant protectant compounds. Their immune systems become fully developed, and they are resistant even to insects with complex digestive systems like Colorado potato beetles (the scourge of practically every home grower we know), flea beetles, Japanese beetles, and so on. This is the point at which your food truly becomes medicine.
Penny’s sense that she’d found something she didn’t know she’d lost actually makes a lot of sense when the subject of soil health is placed in historical context. That’s because the advent of modern agriculture, dependent on fertility derived from fossil fuels and gobs of chemicals (for instance, there are currently 1,200 active pesticide ingredients incorporated into 18,000 different products approved for use in the United States), is systematically destroying the biological activity of our soils. And as we lose this biological activity, we also lose minerals and nutrients, not merely in our soils, but also in our foods and our bodies. This is extremely bad for us, but like so many of the things that are bad for us, it’s proven extremely profitable to the corporate entities presiding over the fundamental facets of our survival.
Furthermore, the contemporary view of soil health as being primarily about NPK and bushels per acre has overshadowed a much longer historical view of comprehensive soil health—articulated by soil pioneers like William Albrecht—that incorporates critical aspects such as trace minerals and biological activity. In short, it’s not as if the recognition that these factors are critical to healthy soil is some radical new concept; it’s just that the advent of for-profit, chemical agriculture has squashed these ideas beneath its too-big-to-fail fist.
The challenge with discussing soil remineralization and revitalization in general is that things get technical really quickly. Penny and I are not soil scientists. Nor are we chemists; in fact, neither of us remembers much, if any, of what we learned in our high school chemistry classes. But with the help of others, and some dogged persistence, we have learned an enormous amount and seen phenomenal results.
A thorough treatment of soil remineralization is beyond the scope of this book. It is too big and complex a topic to fully address in the context of a single chapter in a much broader homesteading book. And I am simply not qualified to tackle this subject in the depth it deserves. Fortunately, there are a number of excellent resources available for anyone interested in digging deeper, and I highly encourage you to take advantage of the resource list at the end of this book.
Instead, please consider this a primer on the subject of soil remineralization. In the following pages, I will share our journey toward truly optimal soil health and will provide you with the core information you need to begin your own journey in this direction. It is a journey that requires some effort and expense, but I can emphatically say that it will be well worth it, if you follow through. In fact, I strongly encourage you to find a workshop to attend; the Bionutrient Food Association leads workshops across the country and is in the process of establishing regional chapters. Remineralizing our soils has utterly transformed the vitality of our gardens and the food they produce, to the extent that we now consider investments in our soil to be the soundest investments we can make. That nagging sense of feeling like we could be doing better has been replaced by profound amazement at what our crops are capable of when grown in fully functioning soil.
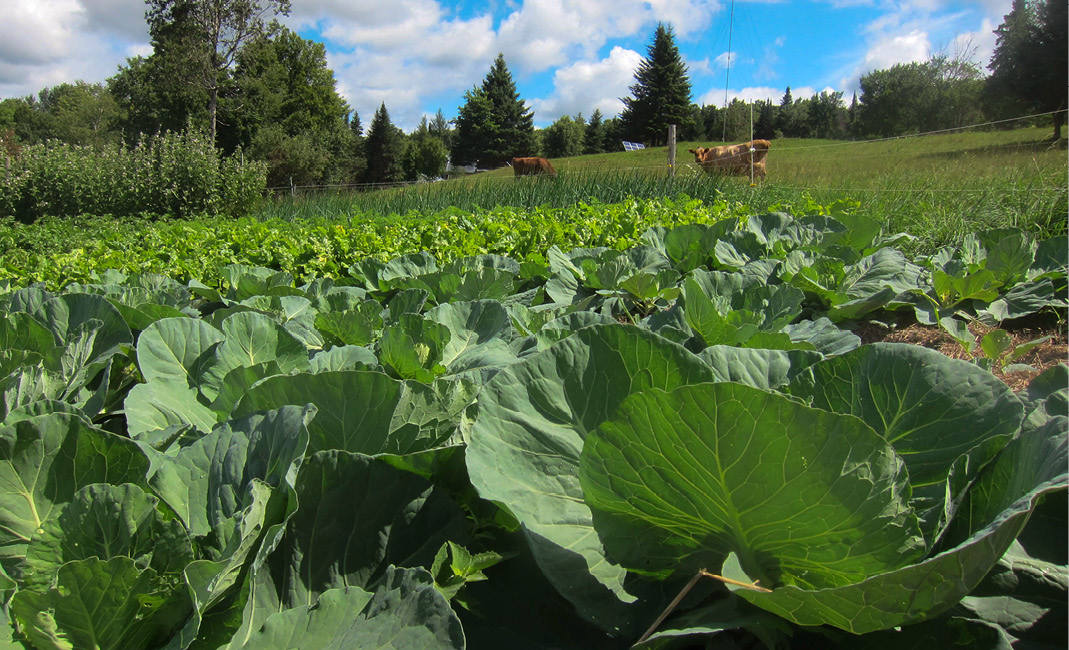
Since we embarked on our remineralization campaign half a decade ago, we have seen marked increases in yields, to the point that we’ve actually decreased the amount of square footage devoted to many of our crops. We’ve also seen notable improvements in size and flavor. Our blueberries are larger, more deeply blue, and sweeter. Our garlic bulbs and onions have increased in size by 20 percent or more. Our cabbages, one of our most important crops because it serves as the foundation for kimchi and sauerkraut, two of our staple winter foods, are almost absurdly enormous and juicy. If this weren’t enough to convince us we’re on the right track, virtually everyone comments on the unique sweetness of our kimchi, most likely attributable to the high Brix of our vegetables. (Via the use of a refractometer, Brix is the best tool currently available for measuring the relative quality of crops. Put simply, Brix is a measure of sugars and minerals dissolved in water. The more sugars and minerals, the more nutritious the crop.) And everything stores much better; our root crops stay crisp and flavorful for longer than we’d become accustomed to.
What’s more, the prevalence of insects and disease in our gardens is greatly reduced. Every so often, we still find a handful of Colorado potato beetles, which we relish ushering to the pearly gates with a quick pinch of thumb and forefinger. But it’s nothing like the hours upon hours we used to spend each summer trying desperately to stay ahead of those little ravaging monsters. If we could have back all the hours we spent hunched over our potato plants, squishing and smearing, there’s no telling what we could accomplish (in fact, just a few days before I wrote this paragraph, Fin commented that he couldn’t remember what a Colorado potato beetle even looks like). And in recent years, when late blight has decimated neighboring tomato crops, our tomatoes have been more prolific than ever.
At first, we assumed this was all a fluke—after all, most crops vary from season to season—but after the third consecutive year of improvement, it dawned on us that we’d reached a new normal. Indeed, five years after Penny went to that first workshop, our harvests are still improving. It seems as if every season, we reach a newer normal that is even better than the last.
shifting your perspective on soil
The first key to understanding why your soil needs a balanced complement of minerals involves a simple shift of perspective. Instead of merely thinking of soil as the medium in which plants grow, think of it as a living, breathing entity. The soil is your gardens’ heart, lungs, and nervous system. It is the immune system for your plants, as critical to the health and vitality of your fruits and vegetables as your immune system is to your health and vitality. If your soil is not fully healthy, your crops will not be fully healthy. If your crops are not fully healthy, you will not be fully healthy. In a sense, you eat the soil with every bite you take, and it cannot be overstated just how important it is to ensure that your soil functions as optimally as possible.
The second key to understanding soil remineralization is explained by the weak link principle. In short, your crops’ capacity to achieve their full genetic potential will always be limited by whatever critical mineral is most deficient. This is one reason why, despite our early soil tests showing optimal levels of macronutrients and organic matter, our fruits and vegetables were not achieving their full potential.
Like commercial farmers, most home gardeners focus on the macronutrients of nitrogen (N), phosphorus (P), and potassium (K), as well as organic matter. It’s not that these nutrients, along with sufficient organic matter, are not important; it’s just that they tell only part of the story. Now that we better understand the role of trace minerals and elements, we amend for NPK as well as sulfur, calcium, and magnesium, along with boron, manganese, copper, zinc, cobalt, molybdenum, and selenium. The irony of amending only for NPK is that while it produces a noticeable short-term boost, over the long term, it actually suppresses the microbial communities in the soil, which ultimately creates less healthy soils and decreases the vigor of plants. At which point, the enterprising grower applies more NPK and the cycle begins all over again. When you bring minerals into balance, the entire soil ecology and all the microlife comes into healthy balance, also.
Obviously, all this amending does not make our lives less complicated, and it is certainly not free. And the process has compelled us to buy in amendments and mined minerals from far off our farm, in contradiction to many of our stated goals. We have chosen to do so in light of the fact that we have young children now and wish for them (and ourselves) to be eating the most nourishing food we can produce. There are local materials (such as rock dust and manure teas) that can supply many of these minerals, but they will take a much longer time. In regard to the finances, we have simply prioritized our soil. To us, any money spent on soil is an investment that returns good health to the land and to us. Therefore, anytime we have extra money, we generally seek ways to invest it into our soil.
It is also worth pointing out that once our soils are fully rebalanced and restored, we will no longer need to amend as diligently as we do now. Of course, we’ll continue to test our soil regularly and make whatever adjustments are necessary, but as our soils become more balanced, the need for inputs should decline to merely replacing what we take on a year-to-year basis, rather than compensating for decades of mismanagement and natural erosion. But because a highly mineralized and balanced soil makes a great deal of organic matter on its own, only modest applications of compost should be necessary. And the fact that our compost now consists of healthy ingredients means that it no longer exacerbates existing imbalances.
how to achieve optimal soil health
The first step toward achieving optimal soil health is obtaining a complete soil test, using the instructions provided by the testing lab. But do not assume that your local university ag extension soil test measures these values! We’ve been very happy with the tests we’ve gotten from Logan Labs in Lakeview, Ohio, although there are probably other labs capable of providing complete test results. However, the Bionutrient Food Association website includes a downloadable soil test form that is specific to Logan Labs and ensures you’ll get comprehensive results. Note that because different labs analyze soil differently, the desired values that follow apply only to Logan Labs.
We gather soil samples in fall, in accordance with the instructions on Logan Labs’ website. This allows us enough time before freeze-up and snowfall to calculate our amendments and then to actually spread them, so they have ample time to work their way into the soil and mellow before spring planting. In the case of water-soluble amendments, we wait until spring to apply.
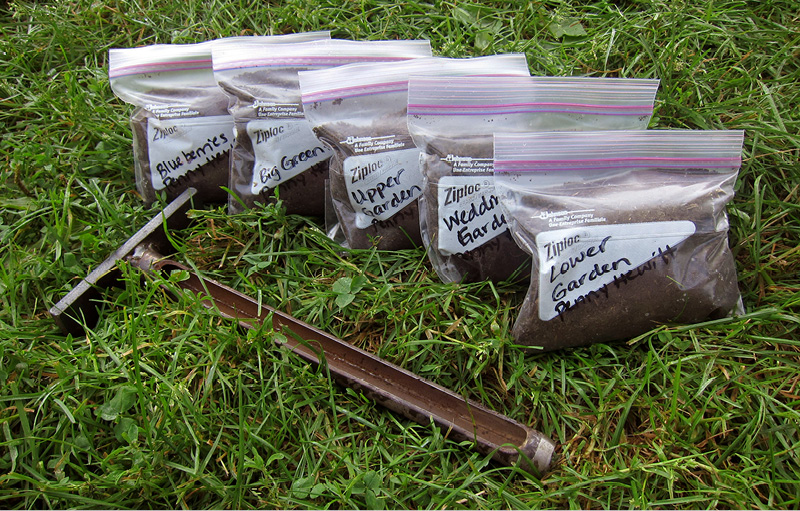
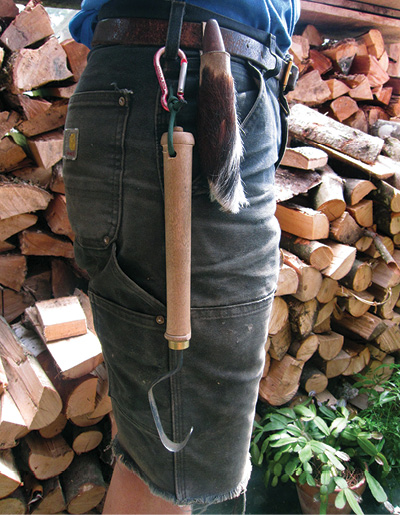
Soil samples ready to be sent for analysis. Also pictured is the custom sampler tool our children will inherit.
A word on gathering samples. As you’ll see in the instructions, there are numerous ways to go about getting the soil samples from the ground. Our favorite method is to collect core samples with a hollow soil sampling tube. The readily available, mass-produced models tend to be lightweight, and over the years, we’ve mangled several beyond recognition. Last year, we hired a local blacksmith to make one to our specifications, and simply from it’s heft and overall quality, I’m confident we now have a lifetime soil sampling tool (if you’d like a lifetime soil sampling tool of your own, see “Resources for Digging Deeper” for contact information).
Interpreting your soil test is where things get a bit complicated. The values on your test represent what is available in the soil to feed your crops; that much is fairly straightforward. Once you know these values, you can begin the process of applying this knowledge to your particular situation. The first step is knowing what those values should be, which is somewhat complicated by the fact that different people have different ideas regarding what constitutes the ideal soil. (We use values provided by the Bionutrient Food Association, which have obviously worked extremely well for us. See the sidebar “Maximum Annual Application Rates” for more details.) It’s critically important to note that soil health is not about having more and more of particular values, but about having the proper balance.
With your actual current values and ideal values in hand, you’ll need to call up a bit of high-school-level science and math to move forward. This has been a challenge for Penny and me, as neither of us was a particularly ambitious student, and this is one regard where I can confidently, without a shred of doubt, say that if a couple of formerly underachieving high school students can do it, you can do it. The truth is, I suspect most people will need a little help the first time they attempt to translate their soil test into a recipe for proper amending, and I encourage you to seek out a workshop or soil expert in your region.
This is how we do it. First, we subtract the value found of a given substance from the desired value, to arrive at the quantity we need to amend for. The values on the test results we get are expressed in parts per million (ppm), but we need to know pounds per acre (ppa) to determine application rate. This sounds confusing, but by multiplying ppm by a factor of 2, it’s actually quite easily attained. This works because the top 6 inches of soil, which is the depth of soil that has been tested, equates to 2 million pounds per acre.
We’re not quite done with the math. Since most home growers aren’t dealing in acres of crops, we need to convert pounds per acre to pounds per square feet, which is as simple as multiplying ppa by the square footage of the area you’re amending and dividing by 43,560, the number of square feet to an acre.
Now that we have the pounds per square foot that we need to supply of each deficient element, we need to determine how to get that amount from the variety of amendments at our disposal, some of which contain two or more elements. Keep in mind that the elements are merely a percentage of the amendment; for instance, gypsum is 23 percent calcium and 19 percent sulfur, so each 50-pound bag of gypsum has only 11.5 pounds of calcium (50 pounds x 0.23 = 11.5 pounds) and 9.5 pounds of sulfur (50 pounds x 0.19 = 9.5). Many of the micronutrients will be expressed in grams and ounces, not pounds, so you’ll need a kitchen scale capable of weighing very small amounts. Also keep in mind that there is a maximum annual application rate for many of these amendments (see the sidebar “Maximum Annual Application Rates”). This is critical, because some of these traces can be toxic in large quantities. In some cases, it may take multiple years to achieve desired values while not exceeding maximum annual application rates.
Once we have our amendments for a given area figured out, we mix them in a wheelbarrow (remember to always wear a dust mask and gloves!) with a source of carbon in the form of biochar, compost, or humates. The purpose of these carbon sources is to give the amendments something to bond to, making them less likely to leach out of the soil. Finally, we spread our amendment-and-carbon mix as evenly as possible, scooping from the wheelbarrow with a 1-quart yogurt container. Since we don’t till, we allow the rain and snow to water them in for us.
Once you’ve got your soil on the road to recovery, there are other ways to improve your plants’ potential. In fact, some of simplest and most cost-effective steps along the path to nutrient-dense crops begin before the first shoots of green begin to emerge from the soil.
seeding
Perhaps the best way to think of your seed and your practices around seeding and starting your plants is to draw the obvious analogy to human gestation. Starving your seeds of nutrients is no different from starving your unborn child of nutrients, and the results will be no better in the long haul. This is the first opportunity we have to minimize the stresses that negatively impact your crops’ potential.
Step 1: Inoculate
You may be familiar with inoculating legumes, which is the process of coating the seed with the bacteria that allow it to “fix” nitrogen in the soil. But it’s not merely legumes that benefit from inoculation. In fact, prior to sowing, we treat all of our seed with a high-quality inoculant (we get ours from the Nutrient Dense Supply Company, the same source for many of the trace minerals, inoculants, and enzymes we use).
Seed inoculant cheap as all get-out: For a mere 13 bucks, you can purchase enough inoculant to treat 100 pounds of seed, and the process is ridiculously simple. Just mix a pinch of the powdered inoculant with the seed inside the seed packet. Doing so assists with germination, improves seed vigor, and breaks down nutrients so they are available to young roots. In other words, it’s a jump start on plant health.
Step 2: Sow Your Seeds into a High-Quality, Inoculated, and Mineralized Potting Soil
Ideally, we’d be making our potting soil from scratch, but until we realize that goal, we purchase high-quality potting soil from the Vermont Compost Company. Their Fort Vee potting soil includes compost, sphagnum, rock phosphate, gypsum, protein meal, kelp, bone char, crushed granite, and vermiculite. We add more kelp, montmorillonite clay, humates, and alfalfa meal, which can generally be found at your local farm supply store. We also add two ingredients that will likely require a bit more diligent shopping: a biological inoculant (we use Biogenesis from NDSC) and an enzyme microbial stimulant (Pepzyme from NDSC).
The quantities of our additions are not an exact science. Roughly speaking, to a 60-quart bag of potting soil we add a quart each of the first five ingredients, a few grams of inoculant, and half a milliliter of Pepzyme mixed into the water we use to moisten the soil.
Step 3: Punt the Pots
One of the best investments we’ve made in the health and vitality of our seedlings, and therefore of the vegetables we ultimately grow and eat, is a soil blocker. This is a small mechanical contraption that compresses loose potting soil into tight seedling blocks that are then released into an open flat. They are available in numerous sizes; we use one that makes twenty ¾-inch blocks for starting peppers, tomatoes, and eggplant. Because we have limited space for our starts, the mini blocks make it possible to germinate lots of seedlings in a small space. The most vigorous seedlings are then transferred to a larger block shortly after germinating.
The size blocker we use most makes four 2-inch blocks. We own two of these blockers, one with a seed pin that makes seed-sized holes in the top of each block and one with a ¾-inch cube pin that creates a hole in the top of the block that’s just the size of the mini blocks. Coincidence? I think not. The blocker with the seed pin is used for brassicas, lettuce, chard, celery, celeriac, onions (four seeds to a block), basil, parsley, and other herbs and flowers. We also use it for germinating squash, cucumbers, and melons. The 2-inch blocker with the cube pin is, of course, for anything that has been sown into mini blocks, as well as for larger seeds like corn or beans.
Lastly, we have a blocker that forms a single 4-inch block with a 2-inch square relief in the top to accept the 2-inch blocks. We use this for “potting on” (a term that means potting up in size) cukes, winter and summer squashes, peppers, and eggplant.
The two smaller sizes of soil blocks are quick to make after a little practice. It’s key to get the soil moisture just right; generally, we make it a bit wetter than for pots. Think spongy, not soggy; you should be able to squeeze a few drops out of a handful. The larger 4-inch blocks are more time consuming to make, simply because they tend to fall apart without a studious effort to really pack the soil into the form. For this reason, we are not above using large pots instead if time is short. We always use 6-inch pots for potting on tomatoes, because with the 4-inch blocks, it isn’t possible to set the original 2-inch block deeply enough in the soil to take advantage of all the little root hairs on the stem that will create a stronger root system if buried in the soil.
The advantages of soil blockers are numerous. First, they eliminate the inevitable waste and expense of cracked and broken containers that must be discarded and replaced. Second, the blocks are cubic, rather than tapered, providing more room for root growth. Third, by eliminating the impenetrable walls of a plastic container, you eliminate one of the primary limiting factors to early plant growth and vitality.
To understand why this is true, remember that the growth you see above the soil surface is merely a reflection of the growth that is happening below the surface. In fact, root growth generally exceeds top growth, which means that a 4-inch seedling in a 4-inch pot is already experiencing diminished potential as its roots bump against the hard container surface. Think of a plant’s roots as its “feelers”; as soon as these feelers hit the container wall, they circle around, looking for more space, and in that circling back, a degree of vitality and development is lost. Before you’ve even put your starts in the ground, you’re losing vigor and yield.
In blocks, instead of the roots circling, they simply fill the block to the edges and wait. When transplanting, there is no root shock and seedlings are quickly established in their new environment. However, if the seedlings are not transplanted in a timely manner, they will eventually grow into neighboring blocks, which should be avoided.
Once the seeds have been inoculated as discussed, Penny then engages in a bit of seed discrimination, selecting the largest, plumpest seeds from each packet for planting. She also plants more seeds than necessary, so that she can discriminate once again when the seeds become seedlings by discarding the ones that lack the vigor of their companions. In the case of tomatoes and peppers, she’ll actually plant at least twice as many seeds as the actual number of seedlings she’s looking for, just so she can have the pick of the litter. If this seems wasteful, I assure you it is precisely the opposite, because by selecting for health and vitality, we end up with far greater yield for a given square footage of garden space.
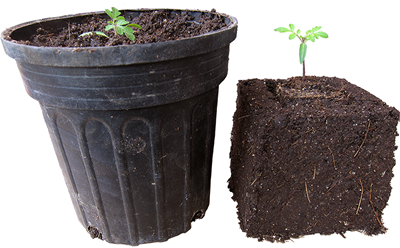
Tomato seedling in a pot versus “potted on” to a larger soil block

Seedlings are moved to the porch for the day.
Our earliest seedlings are started on shelves in front of a set of south-facing French doors. We have chosen to not rely on artificial lighting or heat for our starts, a habit established during the 15 years we were disconnected from the utility grid and simply didn’t have access to the necessary electricity. Now that we are grid-connected, we could rely on these technologies, but we still choose not to, because our cheap electricity inevitably costs someone, somewhere a great deal.
Once the weather warms up, we transfer our flats of seedlings to makeshift shelves on the enclosed porch that houses our summer kitchen. We installed translucent panels on the southern end of the porch expressly for this reason, and the seedlings thrive out there, as long as we bring them inside for the nights, until temperatures warm up. This daily shuffling of our seedlings—out to the porch in the mornings to catch the most light, in from the porch in the evenings to protect them from the cold—is unquestionably a hassle, necessitating reminder notes left in conspicuous places (BRING! SEEDLINGS! IN!). But like most hassles, it seems bigger than it actually is. As the season progresses, there are more and more flats to move, but with the boys’ help, it generally doesn’t take much longer than seven or eight minutes. Just about the time we’re getting sick of this little dance and the number of flats has increased to multiple dozens, it is suddenly warm enough to leave them out at night.
Seeds that need a lot of heat to germinate, such as tomatoes, peppers, and eggplant, are granted a coveted spot atop our coldbox, which resides near the wood cookstove. As soon as they germinate, they are potted on into the larger-sized soil blocks and placed in front of the French doors with their companions.
The next big stressor event for our seedlings is transplanting. We’ve already mitigated some transplant shock by seeding into soil blocks, rather than containers. We also refrain from starting our seeds too soon. This is not easy, because like most gardeners, by the time March rolls around, we’re chomping at the bit. But we have found that vigorous seedlings of the proper age do better than seedlings that were started too early and have grown beyond the capacity of their soil blocks to fully nurture them. Finally, all our seedlings are allowed a few days in their flats outside to “harden off” in preparation for transplanting. We then transplant on an overcast day or late in the day, to protect the young seedlings from the stress of direct sun.
Over the years, as we’ve learned to select for more vigorous seed and seedlings, we’ve also learned that we have to take this increased vigor into account and provide them with a little extra space to fully express themselves. Whereas we once planted our tomato plants 1 foot apart, we now allow them at least 2 feet, if not even more. This may sound counterintuitive; after all, if we’re planting fewer plants, won’t our yield be greatly reduced? But the reality is precisely the opposite. In fact, over the past few years, our tomato yield has increased dramatically, despite a 50 percent reduction in actual plants. The genetics are the same. The overall space devoted to their cultivation is the same. The only thing that’s different is that we’ve created an environment that allows our plants to come closer to achieving their full potential.
Despite continuing to evolve our annual and perennial plantings in a direction that dispenses with defined garden and orchard spaces, we do still maintain three very distinct annual garden areas, totaling about 8,600 square feet (approximately a fifth of an acre). In these delineated areas, we grow enough vegetables to feed our family year-round, give away and barter plenty of surplus produce, and indulge in enough experimentation to satisfy our curiosity.
All of our gardens consist of raised beds that are 3 feet wide and range from 15 to 20 feet long, with 1-foot aisles for foot traffic. Making the beds of our various gardens approximately the same dimension is by design. It facilitates crop rotations, long considered an essential component to maintaining balanced soils, since certain crops extract certain nutrients. In theory, this leads to depleted soils and increased insect and disease pressure over time, which is remedied by rotating. We still practice regular rotations (Penny keeps careful maps of the gardens to facilitate this), but our experience with the tomatoes, which are grown in the same soil every summer, coupled with becoming aware of the idea that soil develops microorganisms specific to different crops so they can thrive in it over consecutive seasons, has us wondering if it might at some point be advantageous to keep crops in same place year after year.
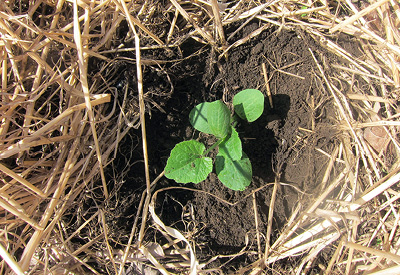
A squash seedling just transplanted into winter-killed oats
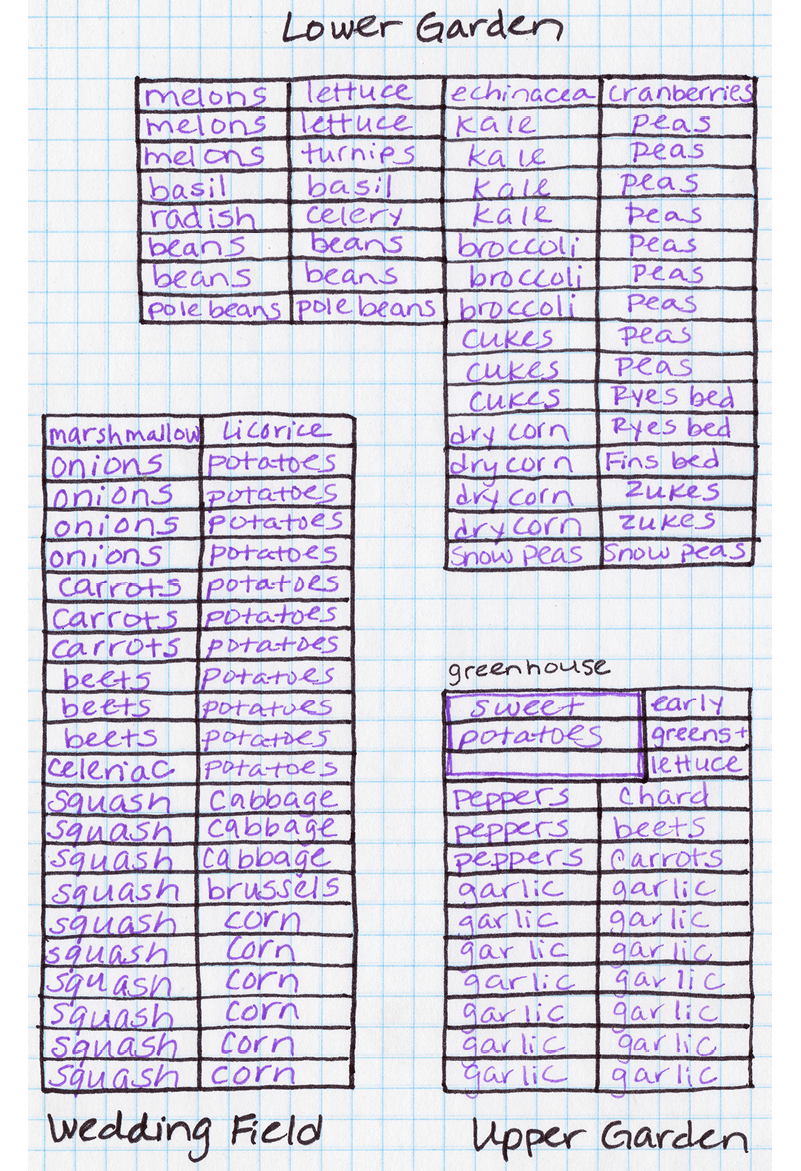
Sample garden plan for 2014
Over the years, we’ve tried different configurations of beds and have experimented with the “keyhole beds” that are popular among permaculturists. But for our purposes, which can roughly be summed up as growing a large quantity of nutrient-dense food without undue fuss, our bed system has proven to be the most practical and productive. While dispersed planting is great for some cultivated plants, it’s also extremely convenient to be able to walk down a garden aisle, rapidly filling a harvest basket with peas or green beans or any number of the staple crops upon which we rely. For instance, harvesting a large quantity of potatoes is a task that begs for consolidated planting along straight rows.
Despite our fondness for traditional straight rows, we have gleaned a number of extremely helpful tips from permaculture design and theory, including interspersing our annuals with various dynamic accumulators, nitrogen fixers, pest confusers, and insectary plants (see the sidebar “Building Soil and Thwarting Pests with Plants” for expanded definitions of these terms). And slowly, we are filling in the spaces between our annual gardens with perennial plantings—and in doing so, moving from a patchwork system of homestead agriculture to a dynamic, functioning ecosystem. Truthfully, our entire piece of land is becoming a garden.

Comfrey and lupine in the orchard
Siting our primary gardens did not require a whole lot of thought on our part; owing to the sloping and undulating nature of our land, we basically chose the only three flattish areas within sight of the house. That’s a slight exaggeration, of course, but only slight. Incidentally, if you’re planting on a slope—as we do in the lower garden that’s the least flat of the trio—always arrange your beds to cut across the slope to reduce erosion and retain water (and therefore nutrients).
In addition to the gardens, we have the three unheated greenhouses I mentioned in the first chapter. One of the small (12-by-24-foot) houses is devoted to tomatoes, as well as providing winter shelter to our laying hens. The second small house was salvaged from some friends’ land when they moved a few years ago. It was in pretty rough condition, but we bent the pipes back into usable shape, and it now alternates among melons, sweet potatoes, and peppers. With some effort, all of these can be grown without a greenhouse (see “Not-Quite-a-Greenhouse Greenhouse”). Don’t let the lack of a greenhouse stop you from growing heat-loving crops, since a bit of row cover and wire wickets can do a lot of good work. But since we have the greenhouse space, and since these crops thrive under its translucent dome, we use it.
Finally, we have a fairly large 17-by-48-foot hoop house attached to the south-facing exterior wall of our living room. We grow some heat-loving crops in this house during the summer (eggplants and more melons, for instance), but it’s primarily for winter and spring growing. We often have to uproot summer crops prematurely in order to get our winter crops started, since these crops need the longer days of late summer and early fall to reach a harvestable stage before the cooler temps and shorter days slow and eventually halt their growth.
Our winter plantings consist of cold-hardy vegetables that will remain dormant and edible under such modest protection. As it gets colder, we add a layer of floating row cover over each greenhouse bed, securing the cover to wickets of 9-gauge wire with clothespins. This layer must be pulled tight; if it sags and touches the plants, there will be frost damage to those leaves. Also, it has to be above freezing to harvest greens from the winter house.
The current layout of our large winter house looks like this: In fall, we plant one-quarter of the house to carrots, which we mulch with hay to keep the ground from freezing. We plant another quarter of the house to spinach, still another quarter to other cold-hardy greens (see the sidebar “Our Cold-Hardy Standbys”), and leave the final quarter open for early-spring plantings of new potatoes, green beans, and salad greens. Because we don’t heat our greenhouse, our harvest windows can vary dramatically, depending on the weather. Generally speaking, we can harvest carrots all winter. The greens eventually succumb, leaving us pining for fresh greens for the coldest two to three months of winter, before starting up again in the spring, with spinach being the last to leave and the first to return.
But even this annual absence is in many ways a gift, because during the period when we don’t have fresh greens at our disposal, our desire for them and appreciation for them grow in lockstep. By the time they start pushing out of the soil in early April, with the last remnants of dirty spring snow still on the ground outside the greenhouse, you’d think we’d never seen anything so glorious in all our lives. Penny and I have to be crafty and fast if we want to get our share, as it’s not uncommon to find the boys prowling through the greenhouse, munching the crop as they go like a couple of overgrown and furless rabbits.
the mulching miracle
We love working in the gardens. Penny loves it more than I do, to be sure, but I love it, too. Anyone who’s spent any time bent over a cultivated row of fledging plants, their knees pressing into the cool soil, the sweet, damp smell of growth permeating the air, knows exactly what I mean. A garden is a respite from the real world. Actually, I am slowly coming to understand that the garden is the real world, for it depends so little on all the strange contrivances of humanity.
Our Cold-Hardy Standbys
Naturally, the definition of cold is somewhat variable, depending on where you live. As always, I speak only from our experience, in a climate where winter temperatures routinely drop to 20 below. We’ve experimented with most of Fedco Seeds’ “season-extending” varieties, with mixed success. Giant Winter Spinach is an especially dependable cold-weather producer for us and one we rely on every year. Some of the lettuce varieties have fared better than others; as a rule, red lettuces do better than greens. The best for us have been Red Tinged Winter Oscarde and Rouge d’Hiver. However, all the other season-extending lettuce varieties (as designated in Fedco’s catalog by a snowflake icon) do well into late fall and often sprout again in spring. We have learned to steer clear of the Winter Mix, as some of the varieties in the mix die back sooner than others, leaving the remaining healthy greens covered in black slime. Years ago, we took Eliot Coleman’s advice on Napoli carrots and haven’t been disappointed; they are small but remain incredibly sweet all winter long. Mâche and claytonia are also staples in the winter greenhouse.
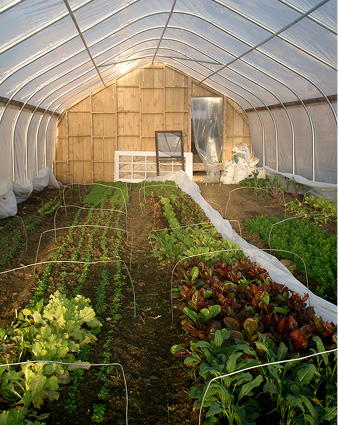
Large greenhouse on a warm spring day. The row cover has been pulled off but left in the aisles to replace at night.
But as much as we value our work in the gardens, we are also keen to maximize our efforts and time investment. In other words, we want our gardens to thrive, with no more labor than is strictly necessary. The truth is, producing so much of our own food and other essentials will always require enough work to satisfy our desire for honest labor.
Our desire to streamline and simplify our gardening led us by the hand to mulching. At the risk of giving away too much, too soon, we love mulching. We love mulching so much we can hardly imagine how bereft and hollow our lives were before mulching. We might even love mulching more than bacon fresh off the smoker or butter just out of the churn. But just a little bit more.
It took us a while to find that love, though. We have always been vigilant about not letting weeds go to seed in our gardens, in the hope that we’d someday reach that ideal of the naturally weed-free (or nearly so) garden. And while it’s certainly true that weeding is one of those tasks that builds upon itself if left undone, it’s also true that we never reached that idealized state. Every summer, we passed many hours with scuffle hoe and garden fork, doing our best to eradicate the unwanted garden visitors.
Our initial resistance to mulching was rooted in our belief that in order to avoid massive seed contamination, we’d need to use straw, which was (1) prohibitively expensive and (2) not guaranteed to be weed-seed-free in the first place. Fortunately, we had trusted friends who swore by hay as mulching medium, weed seeds and all. Finally, three summers ago, faced with numerous infrastructure projects, and desperately wanting to liberate ourselves from our usual weeding routine, we read Ruth Stout’s No-Work Garden Book and checked in with our hay-mulching friend one more time. Thus emboldened, we bit the bullet and mulched with hay, hoping upon hope that we weren’t consigning ourselves to years of cleanup weeding.
The amount of time-consuming labor we’ve saved since would be hard to overstate. Mulching has become a cornerstone of our gardening practices. Weeds from the hay have not been an issue at all. We simply continue adding hay on top of hay, creating a smothering effect. If a few seeds do sprout, we just flip that flake over or pile more hay on top.
The advantages of mulching extend beyond the significant time savings. In combination with our amending protocol, mulching has greatly increased the biological activity in our garden soils. The number of earthworms in our gardens has risen dramatically, and the friability of our soil, defined as the ease with which it can be crumbled in the hand, is much improved. Moisture retention is much higher; during dry periods, we can go longer between irrigating, saving us even more time. Mulching also adds nutrients as it decomposes and encourages soil dwellers to “till” all the layers together.
Are there any downsides? Probably the biggest potential downside is that once you start mulching, it’s important to keep mulching, particularly if you’re using hay or any other seed-bearing mulch. Otherwise, any seeds that are introduced will germinate. The other obvious downside is that you need mulching material. Which material you choose is dependent on where you live and what you have access to. For us, living as we do in a dairy-farming community, it’s not difficult to find organic mulch hay at very reasonable prices. We can generally source mulch-quality round bales (equivalent to about 15 square bales; for more discussion of hay, see chapter 6) for $10 each; the going rate for mulch-quality square bales seems to be in the $2 range, making them a much more expensive (but far-easier-to-work-with) option. Roughly, we use 100 square bales of mulch each season, although our cultivated garden area is pretty extensive.
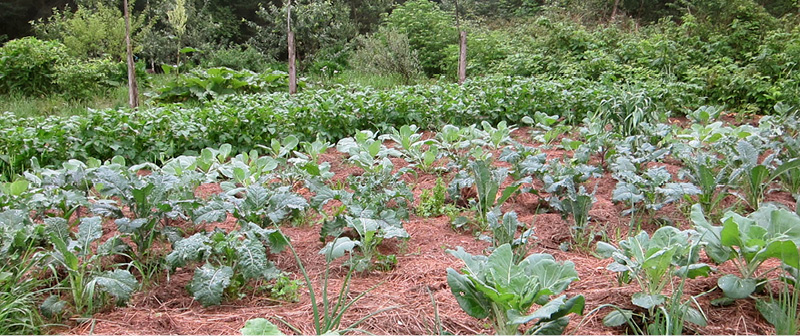
Piracicaba: Better Than Broccoli
One of the advantages of having some extra space and time to experiment is that you occasionally stumble on a little gem that would otherwise have gone undiscovered. A couple of years ago, Penny sourced a packet of piracicaba seeds from Fedco, and it’s become an annual family favorite.
Piracicaba (peer-a-sea-CAH-bah) is a non-heading variety of broccoli that falls somewhere between standard broccoli and broccoli rabe. It’s incredibly tender, just a little sweet, and soaks up butter like nobody’s business. It also grows oodles of side shoots that produce for months on end, which the boys are prone to plucking and eating raw on the way to raise some sort of hell or another. These shoots are also great steamed.
This variety is so prolific that we weren’t able to keep up with the eight trial plants Penny originally transplanted; a bunch went to flower, and we considered pulling them until we noticed all the pollinators lining up at the piracicaba bar. So we let them stay, because of course there’s no such thing as too many bees on a homestead.
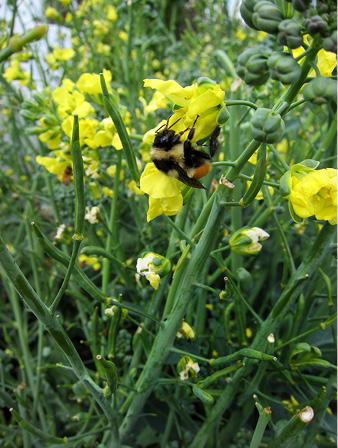
Piracicaba, a non-heading broccoli, gone to seed, providing food for pollinators
But what’s practical for us may not be practical for you. Fortunately, there are a number of other options for mulching materials.
• Straw contains fewer nutrients than hay but shouldn’t have nearly as many weed seeds. If someone is growing grain in your area, you might have access to affordable straw (with affordable being a relative term; we’ve seen straw advertised for as much as $8 per bale). Just be aware that straw from grain harvests is extremely dry and might suck moisture rather than conserve it. This can be remedied by leaving it exposed to the elements for a while to rehydrate or making sure you soak it down well.
• Corrugated cardboard stripped of tape and staples works great as a first layer to suppress weeds, necessitating less hay or other material on top. As a bonus, it’s generally very easy to find for free.
• Leaves make great mulch. We are fortunate to abut a neighbor’s large sugarbush, where we gather truckloads of maple leaves each autumn. These are packed with minerals the trees draw from deep in the soil. Ideally leaves would be shredded so they don’t pack into a mat; we know folks who put their leaves through a shredder or even run a lawn mower over them. But that’s way too labor-intensive for us, and the whole leaves have never posed a problem.
• Sheep wool is the only other material we’ve made use of. When we’ve had waste wool (too full of hay to bother cleaning), we’ve used it to mulch our raspberries. Recently we’ve read of a study where wool was used to mulch eggplant in the hope that naturally occurring lanolin in the wool would deter flea beetles. The plants that received wool mulch were dramatically darker in leaf color and significantly taller (both signs of robust health) than hay-mulched plants, and although the beetles did not seem to be deterred, the plants were much more resistant to the insects’ damage. Although we don’t have much waste wool from our small flock, we are experimenting with a bed of eggplant this year.
We’ve heard of people using grass clippings, pine needles, bark mulch, wood chips, and grain hulls for mulch, though we have no personal experience with any of these materials. My guess is that unless grass clippings were mixed with other materials, they would decompose into a slimy, stinky mat in fairly short order. Pine needles would be fine, but too thick a layer (more than a couple of inches) might affect soil pH. Wood chips, bark mulch, and grain hulls are very slow to decompose, making them great for pathways or around trees, but we would keep these materials out of the growing area.
Our primary method is to put down a 6- to 8-inch layer of hay over any bare spots, between plants in the beds, and over the paths as well. In short order, this compacts to 3 to 4 inches and creates an effective weed barrier. One downside we’ve noticed but since remedied is that the previous season’s mulch insulates the soil in the spring, keeping it from warming sufficiently for early planting. After a few false starts, we have learned to pull back the mulch until the soil thaws and reaches a workable temperature. Of course, that’s an issue limited to northern climates. And in the south, the mulch should be an advantage in keeping the soil cool.
In spring, we transplant or seed into bare soil, let everything get established, then go through with a scuffle hoe to knock back any weeds that have germinated. Then we snug the mulch back around the plants, adding more hay when necessary. Even after the soil has warmed, we pull back the mulch for direct seeding, replacing it after the plants get some size and have been weeded once.
For transplanting later in the season, we just pull enough mulch away to dig a hole for the transplant, leaving a mulchless few inches around the plant, as we’ve found that mulching right up tight invites damage from slugs and snails. Around trees and bushes, which we mulch with a mixture of hay and wood chips, we keep the mulch a good 6 to 12 inches from the trunks to discourage rodent damage.
The only crop we handle a little differently is potatoes. Although Ruth Stout recommends mulching potatoes and even growing potatoes on top of mulch by simply throwing them on a layer of hay and covering them with more hay, we have found mulching potatoes from the get-go to be a recipe for lots of green ’taters. The mulch makes it hard to hill the plants up with soil to cover the potatoes growing near the surface, and it doesn’t do the job of protecting the tubers from the light on its own.
Instead, we pull all the previous year’s mulch off the potato beds before planting. Once the plants reach 8 to 10 inches high, we use a hard rake to bring the loose soil from the beds and aisles to cover the vines so only the top leaves are exposed. Then we add mulch to the aisles and up to a few inches from the plants. Two or three weeks later, we hill a second time, using a few inches of compost around the vines.
cover crops and undersowing
We also use cover crops as living mulch. Over the years, we’ve refined our cover cropping to the point where we only use buckwheat and oats, both of which die after a hard frost, a phenomenon known as winter kill. Perennial cover crops have proved too difficult to incorporate in the spring without tilling, and as you know by now, we’re not big fans of tilling.
Buckwheat
We sow buckwheat into any bare spot that is created by an early-season harvest or fallow bed awaiting a later planting. It is exceptionally fast growing and adds a tremendous amount of organic matter quickly when killed off. It also makes soil nutrients, particularly phosphorous and calcium, more accessible to the crops that follow. Finally, buckwheat does a fine job of crowding out weeds, attracts pollinators with its flowers, and has fibrous roots that hold soil.
Buckwheat requires four to six weeks to mature. About a week after it flowers, we scythe it as low as possible and lay the material on the soil over the buckwheat roots to completely cover them. Then we mulch with hay or compost, because sunlight will cause the crop to regrow. Using this method, it takes two to four weeks for the buckwheat to decompose. If we used compost earlier as our “mulch,” we seed directly into that; if we used hay, we pull it back to seed into the soil, then snug the hay back in around the seeds.
Oats
Oats grow quickly as well, make a lot of valuable biomass, and have fibrous roots to hold soil. They also take up excess soil nutrients. Often, we add field peas to the oats to fix nitrogen. We choose oats later in the summer, when there isn’t time to plant a following crop. We seed thickly, so that when the oat crop winter-kills after a few hard frosts, it covers the bed and becomes mulch we transplant into in the spring. This has worked particularly well with winter squash, with the oat residue suppressing weeds until the squash vines take over.
Another way we’ve utilized oats is to plant garlic cloves into either the dying or living oat crop (whether they’re dying or living depends on how cold it’s been in late October, when we generally plant our garlic). When the garlic begins to grow in the spring, the oats have died down around it to become its mulch.
Sometimes we undersow buckwheat or oats before a crop of vegetables is ready for harvest, giving it a little head start. However, it’s crucial not to give it too much of a head start, or it will shade out the vegetable crop. We frequently use this undersowing technique with corn, peppers, eggplant, brassicas, and other crops with a fair amount of space between plants.
We don’t always manage to seed a cover crop or undersow all bare spots. But in these cases, we make sure to cover any exposed soil with mulch. We live by the motto There is no excuse for bare soil, because bare soil leaches nutrients, erodes, and is a wasted opportunity to gain fertility and organic matter with little money or effort. Equally important, it’s an opportunity for unwanted weeds to take hold.
tools for soil and toil
The longer we work with the soil and our cultivated crops, the more we realize how few mechanical tools are truly necessary. We use a four-pronged garden fork to harvest potatoes and carrots, as well as a scuffle (aka stirrup) hoe for a quick run through the beds in the early spring where we pulled back the mulch to warm the soil. We also use a hard rake frequently, for tasks such as hilling potatoes or smoothing raised beds. Recently, the same blacksmith who made our beloved soil-sampling tool also made us a small hand cultivator, and it has become an indispensible addition to our modest array of garden tools. Penny keeps it lashed to her belt, where it’s always available for a quick swipe at emerging weeds.
Lastly, we still have the broadfork we used religiously in the post-rototiller, pre-mulch days, but which now leads a rather lonely existence leaning unused against the side of the barn. We relied on our broadfork because it allows for the aeration of soil without damaging its structure, as would happen if you tilled. But the increased biological activity in our soil has largely eliminated the need for regular broadforking, although we do use it occasionally to prepare beds for seeding deep-rooted crops.
There’s no mystery in the naming of the broadfork, which looks and functions exactly like a big, broad fork. Ours is 24 inches wide with five 12-inch tines attached to a pair of shoulder-height handles. Stepping on the cross bar sinks the tines into the soil, at which point a slight wiggle is all that’s needed to encourage proper aeration. We do this every foot or so along our garden beds. You are not trying to turn over the soil or otherwise create significant disturbance; in fact, proper broadforking technique will leave little indication of the tool’s passing. All you should see are the puncture wounds of the tines and perhaps the slightest evidence of soil shifting.
Still, if you embark on a mulching and amending routine, your soils should improve to the point that regular broadforking is no longer necessary. The mulch protects the soil from the compaction that occurs in unmulched soil over the winter months, and the mineral amending increases biological activity, creating a friable soil structure.
The Most Important Tool Money Can’t Buy
The most important tool you can apply toward healthy soils and cultivated plantings can’t be found in any catalog or garden supply center. You won’t find it at a yard sale or in the basement of your neighbor’s old barn. You can’t even hold it in your hands.
I speak elsewhere in this book about the importance of observation, which is as crucial in relation to cultivated crops as it is to livestock. It takes time to develop a keen sense of observation, in part because doing so requires tuning in to the ecosystem of soil and plants and our interactions with this ecosystem, but also because it requires context that only time and experience can provide. It’s hard to know what to observe and what those observations mean if you don’t know what you’re looking for. Below are some of the questions we ask ourselves as we observe our cultivated plantings and the soil that feeds them.
• Are there numerous earthworms in a trowelful of soil?
• When we squeeze a handful of soil, does it hold together, suggesting adequate moisture content?
• Are there pollinators working the flowers?
• What weeds are dominant?
• Are the leaves shiny or dull?
• Are the leaves thick and strong or flimsy and weak?
• Are the plants growing vigorously or limping along?
• Are the plants stocky and broad or leggy and thin?
• What color is the leaf sap? Darker sap = more chlorophyll = healthier plants.
• How many flowers are there?
• What is our overall impression of the garden or cultivated area? Does it just “feel” healthy and vibrant?
perennial plantings
As I’ve mentioned, the boundaries between what is a garden and what is not a garden on our homestead are steadily eroding as we fill the spaces between our cultivated annual crops with a tremendous diversity of perennial food-bearing trees and bushes.
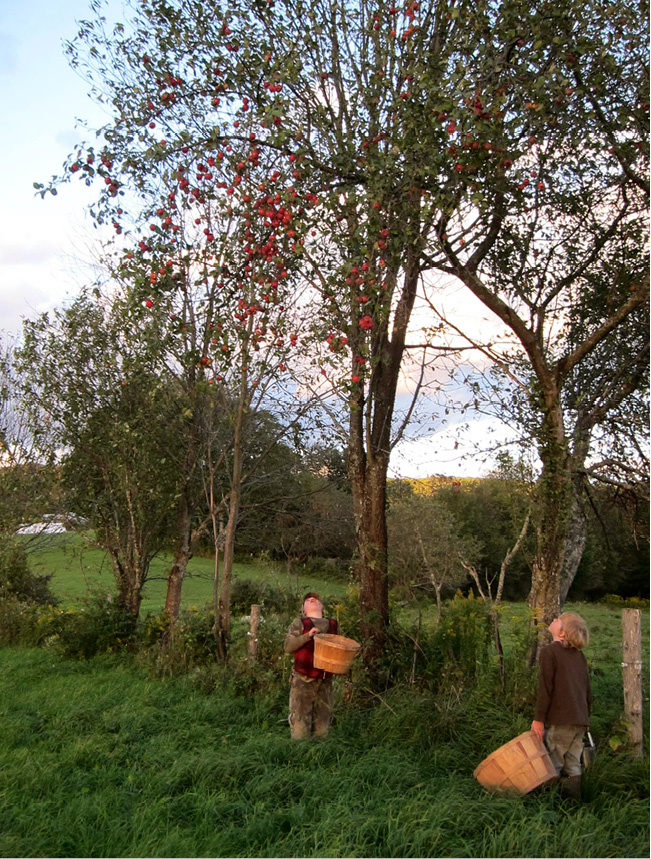
Initially, the majority of our perennials were contained in a small “orchard” about 150 feet to the southeast of the house. In this orchard, which was established on a hillside thick with rotting balsam fir we logged off and worked with pigs, we planted apple and pear trees, intermingled with currants, gooseberries, bush cherries and plums, rhubarb, elderberries, nannyberries, and Jerusalem artichokes. As with our annual gardens, all of these edibles were interplanted with dynamic accumulators, nitrogen fixers, nectary plants, and pest confusers. In particular, we’ve made extensive use of comfrey as mulch and a dynamic accumulator. As a bonus, our comfrey plants show great promise in becoming a staple animal crop (see the sidebar “Comfrey, the Miracle Plant”). Throughout the orchard, we use a mixture of hard- and softwood chips and old hay as mulching material, inoculating the mulch layer with wine cap mushroom spawn. Not only are wine caps a choice edible and one of the easiest mushrooms to grow, they also build soil and suppress weeds.
In full candor, we haven’t actually harvested an appreciable quantity of apples from our cultivated trees. Apples are particularly susceptible to a wide array of diseases and pests, and while we’ve experimented with numerous biological deterrents, we haven’t yet gone to the trouble necessary to harvest a reliable crop of fruit. Our current strategy is to continue working on the trees’ immune system via soil health, keep adding to the mixed-species ecosystem, and make use of the tremendous quantity of wild “pioneer” trees surrounding our homestead, while being grateful for what we do harvest from our trees. The prevalence of wild apples in our region has allowed us to take a fairly relaxed approach to our cultivated apples, although we definitely intend to put more energy into this in the future.
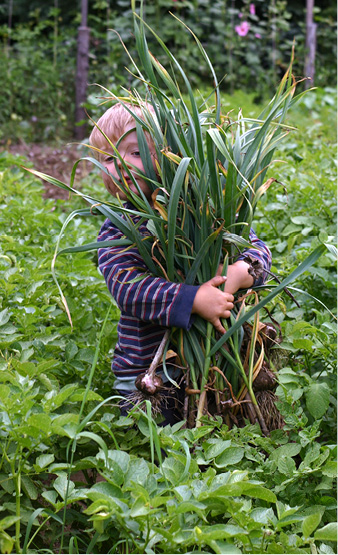
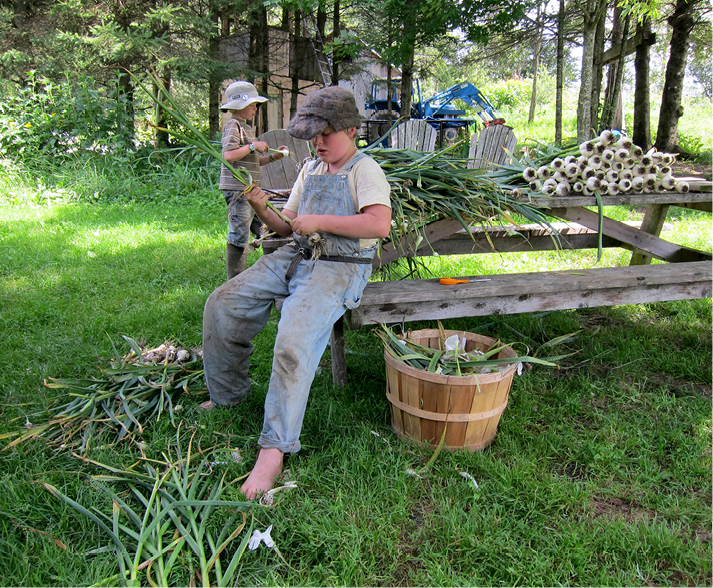
The Garlic
Owing to the abundance of excellent material on specific crops, I’m not going to write in detail about every species and variety we grow. However, garlic is one crop we handle a little differently from most.
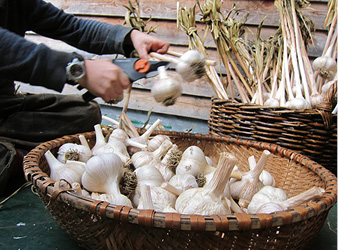
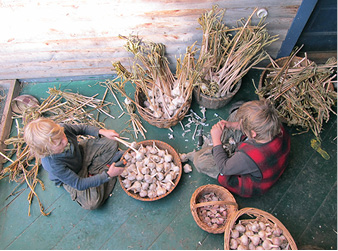
Most people harvest their garlic, hang it to dry, and only then clean it, clip off the stems, and store. This is what we did for years, until a friend clued Penny in to a variation on the theme that has worked beautifully for us. Right after harvesting, we pull off the first layer of leaves, which also pulls off the first layer of the bulb wrapping. Now we have a shiny white bulb, from which we trim the roots. We then fold over the top few inches of eight or so stems and bind them together with a rubber band. These bundles are hung on nails driven partway into the rafters on the north end of our porch, out of direct sun. Once the garlic is dry, we clip the stem an inch or so above the bulb and put them in baskets to store.
Harvesting garlic
The reason we like this technique is threefold. First, the soil that was adhering to the bulbs goes back into the garden (because of course we compost whatever leaves we pull off the bulbs), rather than falling all over the firewood stacked under our drying rafters. Second, our garlic seems to dry better than it used to, and because it dries better, it stores better. Third, the clean bulbs are particularly pleasing to look at while they’re drying. Really, the only downside is the time spent cleaning has to happen right after harvest, instead of whenever we get to it once the garlic is dry.
Comfrey, the Miracle Plant
The more we learn about and experiment with comfrey, the more smitten we become. Comfrey is a vigorous perennial with hairy leaves about 12 to 18 inches long. It grows about 3 feet tall and 3 feet wide and has a strong tendency to spread and take over a given area if the seeds are allowed to set or if the roots are disturbed. To alleviate this issue, we grow a sterile cultivar and take pains to avoid disturbing the roots, unless we are dividing the plants in order to cultivate a new patch elsewhere.
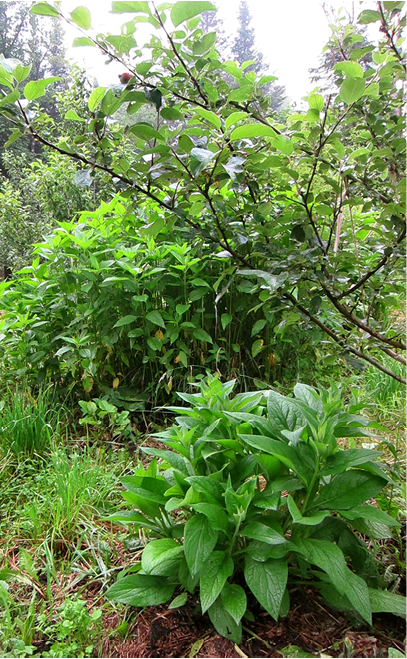
Comfrey and Jerusalem artichokes in the orchard
We got our original five comfrey plants from a friend who was dividing his patch. The first year, we did not cut them back at all, and by the second year, our original plants had grown enough to divide and begin spreading around the homestead. Now, three years later, we have enough comfrey to cultivate as much as we want and divide for friends.
What’s so great about comfrey? First of all, it is rich in calcium, nitrogen, potassium, phosphorous, and trace minerals that it mines via its 6-foot-plus-long taproot. To take advantage of all these nutrients, we cut the plants back at the base four or five times each summer, letting the biomass fall in place, where it mulches and feeds the surrounding trees and bushes, releasing all its stored nutrients as it decomposes.
Comfrey can also be made into a powerful garden tea by filling a barrel half full of leaves and adding water to cover. After steeping for three to six weeks, and straining into a sprayer, you’ve got an extremely nutrient-rich (and stinky!) drench to water your plants with or administer as a foliar spray.
Comfrey can also be used as an animal feed. It is high in protein (20 to 30 percent), low in fiber (this makes it easier for non-ruminants to digest), and rich in minerals. We have experimented with feeding it fresh in summer and dried in winter to poultry, pigs, cows, sheep, and goats, and we are excited by the potential it holds for helping to wean this homestead from its unsustainable grain habit and as a local source of minerals for our ruminants.
For this reason, we are planning to experiment much more with comfrey in the coming years, perhaps planting rows of it along the fringes of the pasture for the cows. Once grazed, these rows could be fenced off and allowed to regrow multiple times per season.
We are still experimenting with how much of the diet can be replaced with this amazing herb. There has been some controversy over the possibility that it can cause liver problems when used internally. As far as we can tell from our research, this seems to stem from results of studies that isolated the pyrrolizidine alkaloids (which are said to cause the toxic effects) and fed or injected them into animals in very high doses. Comfrey leaf has been regularly ingested by people and animals around the world with no negative effects.
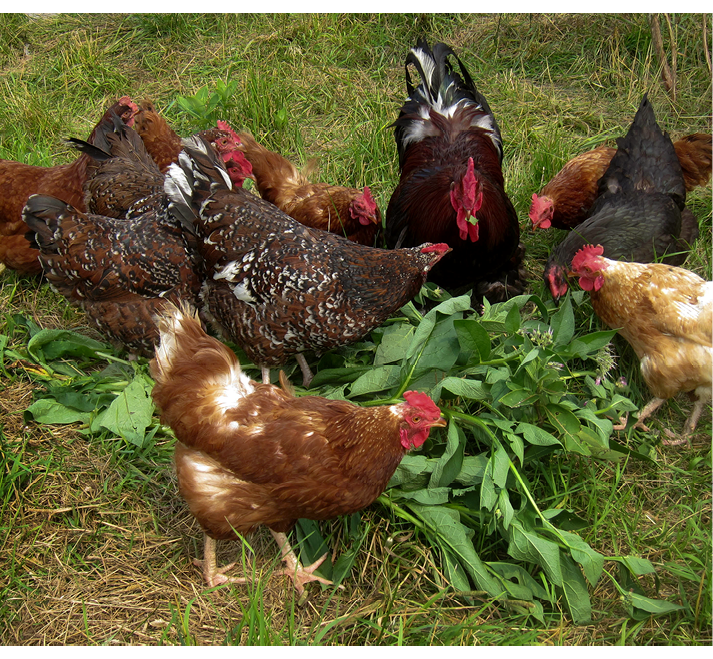
Chickens gathered round the comfrey bar
Of course, used externally, it is hugely beneficial for many ailments of both human and livestock. For more information on how to use it medicinally, see “Making Your Own Medicine” in chapter 8.
This primary orchard area, which abuts the upper garden, is slowly expanding and now segues into an area planted with honeyberries, Juneberries, and a mulberry, along with a smattering of other beneficial plants. Soon, it will extend even farther, into an area we’ve recently cleared of coniferous trees to make room for more edible plantings—chestnuts, pears, and mulberries, to name a few. Once we develop this area, there will be little separation between the orchard and upper garden and the lower garden, which is flanked on one side by a wild blackberry patch and the tomato greenhouse and on the other by a rose hip and currant hedge. Between this garden and the stream that runs along the northern boundary of our land is a strip we recently converted to perennial food production by our tried-and-true method of timber extraction and hog fattening. This area is being filled in with a hazelbert hedge, a few trellised grapes, several Korean nut pines, a hedge of pawpaws, two Asian pears, a sweet cherry tree, nannyberries, and the boys’ experimental copse of Osage orange trees for bow staves. Of course, all of this is interspersed with the usual array of beneficial plants.
Our overall goal is to transition the land closest to the house to food production, with an abundance of both annual and perennial cultivars. This is in keeping with permaculture design theory, which utilizes zones of production to help determine how to optimize the efficiency of a given piece of land (more on this in chapter 3).
We are also slowly establishing perennial crops in the spaces around our third annual garden, which lies approximately 600 feet down the field, at the edge of our pasture. As described earlier, this garden is near our 100 blueberry plants, and we are slowly working to bridge that gap with other plantings. On the downhill side of the garden, there is a young nut grove comprising various acorns, chestnuts, walnuts (including butternuts, heartnuts, and buartnuts), and hickories. This has yet to be interplanted because we are still in the process of transitioning the spaces between the trees from bramble to grass, using pigs and sheep as our primary labor forces.
The last area of perennial plantings is just uphill of our pond. Owing to the steep slope of the land in this spot, Penny has formed terraces with three stone walls. This is where the bulk of our more unusual experiments are growing, including pawpaw, Nanking cherry, cornelian cherry, quince, medlar, ground nuts, apricots, aronia, beach plums, Juneberries, and hardy kiwis, as well as the better-known grapes and elderberries, with strawberries lining the top of each wall. A path from this terraced area leads down to the pond through our small sugarbush, which is home to plantings of woodland edibles, including winterberry, several varieties of violets, Solomon’s seal, wild ginger, and sweet woodruff. Seaberries, along with more Juneberries, chokecherries, basket willow, and various other experiments are planted around the pond’s edge. The pond is three years old and beginning to find its place in the ecosystem of our homestead. We hope to stock it with trout soon.
We are currently in the early stages of clearing yet another copse of mostly balsam fir along the edge of the farm road. This area comprises approximately three-quarters of an acre and will eventually connect the terraced area to the lower garden in a sort of semicircle. This furthers our goal of transitioning the handful of acres nearest to the house into a highly diverse ecosystem of biological activity and edible plants, which is itself central to our strategy of ensuring we can remain on this land as long as possible. Contemporary methods of agriculture—even on a small scale—require relatively large inputs of labor, and as much as we value that labor and hope to be engaged in it until we die, we also realize that at some point, our bodies won’t be as strong and limber as they are today.
one season at a time: a few words on process and starting small
Reading back over this, I realize how overwhelming it might sound to someone who hasn’t planted even a single row of sweet peas. Heck, it even sounds overwhelming to me, and I want to point out that it didn’t happen all at once. Every year, we set aside a little money for nursery stock. Every year, we clear another small section of ailing balsam fir, arranging the tops and branches into long rows to create the foundation for new Hugelkultur mounds (see the sidebar “Planting in Piles”). Every year, we run a couple of pigs through where we cleared. And every year, we plant a bit more.
Please keep in mind, we have been picking away at this for over 15 years. The first year we planted the blueberries, one of the annual gardens, and two apple trees, one of which got trampled by an excavator when the foundation was being dug. Each year, we add a little bit, creating new areas to plant and experimenting with new ideas.
One thing we’ve learned is that no matter how tempting it might be to go to the nursery and buy 6-foot trees that are so satisfying to see in the ground, we highly recommend buying larger quantities of small stock. The advantages are threefold. First, they are much quicker to plant, not needing the very large hole a 6-foot tree’s root system requires. Second, there is very little transplant shock and consequently they get off to a better start, resulting in a healthier tree that very likely will catch up to the more mature alternative. Third, they are far less expensive to purchase. If you are on a budget, this means you can get more plants in the ground sooner. Aside from the obvious advantages of more plants, it allows for natural selection, because no matter how carefully you choose and tend your new stock, some plants will invariably be more vigorous than others. If you only plant two apple trees and one gets run over or dies, four years later you are left with no pollinator and four years’ growth for a new one to catch up. But if you plant half a dozen and one dies, it’s no big deal.
The only real disadvantage to smaller stock is the threat of being weedwhacked, mowed, browsed upon, or simply lost in the weeds. We remedy this by using Tubex Treeshelters, which are 4-foot-tall, approximately 4-inch-diameter polypropylene tubes that go over the tree and attach to a stake with zip ties. They provide the trees with five to seven years of protection from the above-mentioned threats, as well as creating a mini greenhouse environment. As with all our decisions regarding the use of petroleum products, we did not choose to utilize these without carefully weighing the pros and cons and deciding that the resources embedded in the tubes were less than the resources embedded in the replacement of damaged stock. One word of caution: On a couple of occasions, we’ve had issues with Japanese beetles becoming trapped in the tubes, where their only source of food was—you guessed it—our precious nursery stock. The remedy for this is included with the tubes in the form of a protective net that slips over the top. Be sure to use these nets if pests are an issue!
No matter when you start or what practices you employ, remember that all your efforts add up. While waiting for this to happen does require a certain amount of patience, it is also true that the work involved is work that satisfies both mind and body. It is work that brings us ever closer to aligning the life we’ve long imagined with the life we actually live.