9. Hair
In the film and television industries, the Makeup Artist is responsible for anything that is applied to or glued onto the face, including facial hair and sideburns.
IATSE Local 706's general definition of Makeup Artists: “Makeup Artists perform the art of makeup, which includes:
Application of all moustaches, chin pieces, side burns, beards, false eyebrows and lashes.”
There are many professionals who do not feel that hair experience is necessary in today's market, because Hollywood has become so specialized. We disagree, and feel that in order to be a professional Makeup Artist working in film and television, you need to learn the skills for working with facial hair. If, at some point in your career, you choose to not polish these skills or to not use them, and prefer to “hire out” or not accept jobs requiring these skills, that will be your option. Not learning to work with facial hair will limit you. Until you have the working experience to know what your forte is, you will need experience and exposure to all areas of makeup artistry. So, learn all the skills that are required to be a professional Makeup Artist before deciding what suits you. Having a working knowledge of all aspects of your field not only makes you a well-rounded professional, but is extremely beneficial during conversations with producers and directors on how to create certain looks. It is not uncommon today to “hire out” jobs that require a high level of skill and expertise; it saves time and money to have the best. Early in your career, you will be hired for jobs in which there is no available budget to “hire out” specialists, so the producers will hire a makeup department that can handle all the makeup needs. This is an example of what can happen if you do not have all the skills required to be a professional, especially at the beginning of your career. You most likely will be working on projects that have small budgets and cannot “hire out.”
Remember, Makeup Artists who specialize have done so after achieving a level of experience in all areas, prior to specializing in an area of makeup design that is their forte or passion. It is in your best interest to learn all of the skills required to become a well-rounded Makeup Artist before deciding if you want to specialize in a given area, or that a particular area of makeup design is not for you. Doing so will give you a more complete education, and the essential background experience that you will need in the film and/or television industries.
Most department heads will hire a Makeup Artist who is skilled in everything, so they do not have to worry about the makeup designs that you are assigned. For example, there will be moments when an actor shows up in the morning and has accidentally shaved off his moustache or has changed the shape of his sideburns. In this instance, your film continuity will not be affected because you are able to fix the problem by laying hair or applying a lace piece. As a well-rounded Makeup Artist, you will have the skills and resources to take care of the situation—not to mention that the actor will be relieved and pleased by your ability to fix the problem. Accidents do happen.
Erwin H. Kupitz is a Makeup Artist and wig maker. He trained in a classic German apprenticeship, which included a unisex hairstylist license, makeup artistry, and wig making for five years, with three examinations and one final examination. Unfortunately, there is no longer an apprenticeship program of this magnitude in the United States. This is a wonderful method of training because the learning period is long, and the practical experience is invaluable. Erwin specialized when he emigrated to the United States, after seeing the need for wig making and facial hair experience, and recognizing that Hollywood had evolved into an industry with specialization in each area of makeup.
Erwin will guide us through facial hair design, the laying of facial hair and lace facial hair pieces, and where to start the design process. Things to think about beforehand follow:
• What is the period of the project (current, past, future)?
• Who will wear it, and what medium are you working in?
• How many shooting days?
• Interior or exterior, rain or snow? What is the climate?
• If it is a reshoot, and you are matching something that was shot a year ago, what are you going to match to as far as shape and color? Is a good photo available for reference?
Once all the script information is collected, the design process starts. You will need:
• A template or live cast of the actor
• A hair sample from the actor
• Reference of the final look to be created
• Approval of the design
• Approval from production on cost, and a purchase order issued with instructions for billing
Template
When possible, it is best to have the wig maker do their own fitting, using a template or face cast. If this is not possible, knowing how to do a template or head cast will save you time and money.
Making a Full-Beard Template
By Erwin H. Kupitz
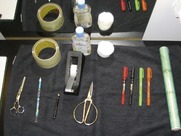
Materials and Tools
• Eyebrow pencil
• Plastic wrap
• Clear tape or matte tape
• Permanent markers
• Scissors
• Baby oil or makeup remover
• Tissue or cotton pads
• Camera (digital or instant) (Figure 9.1)
Procedure
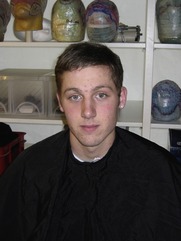
1. Cover the actor with a cape (Figure 9.2).
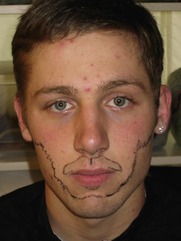
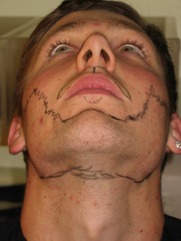
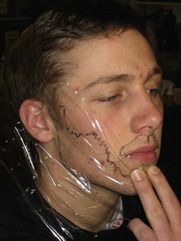
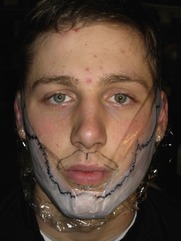
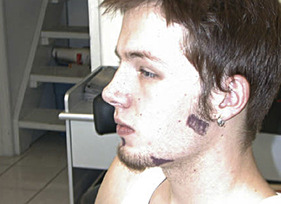
2. Using the eyebrow pencil, follow the beard shadow of the actor, and mark it on his skin (Figures 9.3 and 9.4).
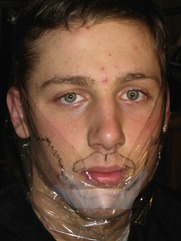
3. Cover the beard area (and disregard the moustache for now) with a single layer of plastic wrap, and secure with tape on the top of the actor's head. Make sure that your eyebrow pencil notes (markings) are all covered with plastic wrap (Figure 9.5).
4. Start using clear tape, and tape over the plastic wrap. Make sure that the tape is tight around the chin. This is very important for a proper fitting of the lace beard around the chin (Figure 9.6).
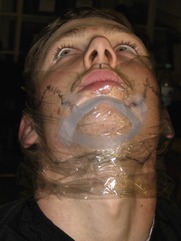
5. Take special care below the chin and around the neck, making sure that the taped plastic wrap is tight. Two to three layers would be appropriate (Figures 9.7 and 9.8).
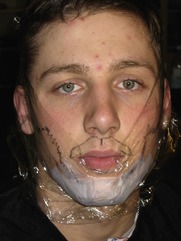
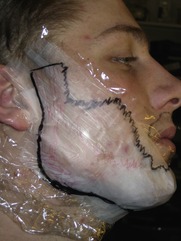
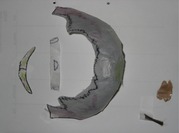
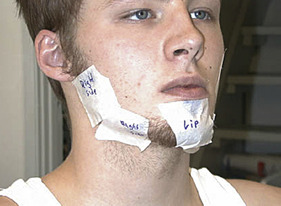
6. Now proceed to the sides of the beard, and cover again with two layers of tape. Use a permanent marker to trace the eyebrow pencil markings onto the tape (Figures 9.9 and 9.10).
7. After the full beard is done, do the same to the moustache, lip piece, and two connector pieces between moustache and chin (Figures 9.11 and 9.12).
8. Now cut out the beard template above the permanent marker lines about two to three millimeters, and try the entire template again. Take special care around the chin. The template should lay tight around the chin and below the chin, and should lay flat onto the actor's hair at the sideburns (Figures 9.13 and 9.14).
9. After the beard template is checked and finished, while the eyebrow pencil markings are still on the skin, take photos from all sides. Clean up the actor's face (Figure 9.15).
10. Cut out a hair sample from the actor's own hair. If the actor's hair is too short, refer to a swatch ring or hair color swatch book for reference. Sometimes sending hair from another source, such as a wig or someone else's hair, is an alternative. Try to make a base that matches the desired skin tone of the actor, or a final skin tone of a character, and spread it onto a clean white paper or in between two layers of plastic wrap. This sample is needed as a guide to color the lace.
11. Double-check to make sure that you have all of the items needed by the wig maker before you release the actor. (The approximate time to make a full beard is about four working days in backup or doubles.)
Masking Tape Technique
Use a lip or eyebrow pencil and masking tape to transfer markings from the face into the tape. This technique is very good for small or partial facial-hair additions. It also works well on a clean-shaven face.
Material and Tools
• Masking tape
• Eyebrow or lip pencils
• Scissors
• Loose powder and powder brush
• Towel
Procedure
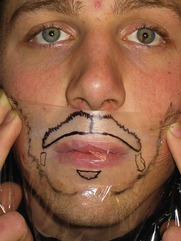
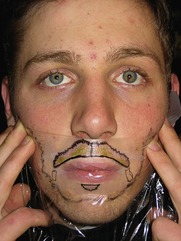
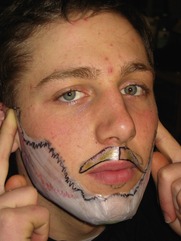
1. Using the lip or eyebrow pencil, mark all facial-hair additions or trace the natural growth pattern and shape of the model's facial hair. If needed, different colors help to design new shapes or mark special patterns (Figures 9.16 and 9.17).
2. After all markings are done, use small pieces of masking tape, and apply one or two layers over the marked areas. Try not to use more than two layers because this would be too much of a build-up. In this demonstration, sideburn and chin-beard extensions and the addition of a lip piece are created (Figure 9.18).
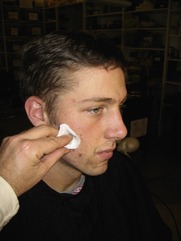
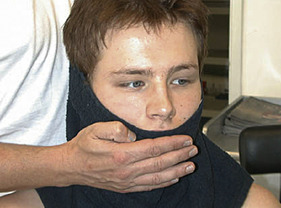
3. Using a warm towel (warmed for 10 minutes in a wig dryer), the areas are wrapped and pressed down tight with your hand. The heat of the towel as well as the pressure from your hands will transfer the grease in the eyebrow or lip pencil into the adhesive. A combination of gentle rubbing and pressing for about two to three minutes is recommended (Figure 9.19).
4. If doing a full-beard or chin-beard pattern, special care has to be taken around the curves of the chin to make sure the tape is pressed tight against the chin curve. This will ensure the proper shaping of the pattern and a tight fit of the final lace beard.
5. After the pressing and rubbing is done, carefully start to remove the tape from the face. The markings are transferred into the tape.
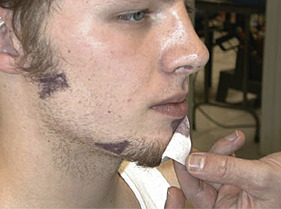
6. Carefully remove the tape from the face (Figure 9.20).
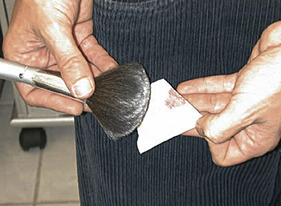
7. The removed tape pieces are organized on a towel and are ready to powder. Using loose face powder, powder the tape pieces to prevent them from sticking together or getting messed up (Figure 9.21).
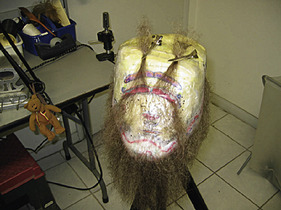
The beard template can now be cut out and applied to a beard block. After the lace pieces are completed, it is recommended to store them together with pictures of the actor, as well as hair color and lace color swatches, in a plastic bag or box for future reference.
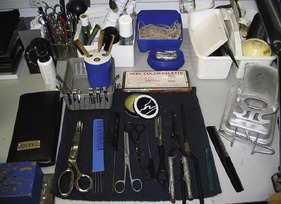
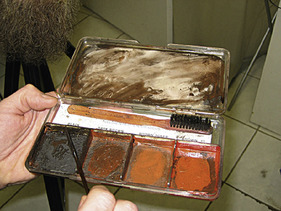
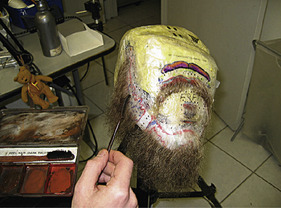
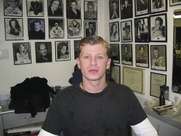
Tools in the photo of Erwin's workstation (see Figure 9.22):
• Cutting comb for combing hair during cut
• Rat-tail comb for separating and sectioning
• Small hair clips to secure separations
• Lifting comb for detangling and lifting permed hair
• Hair-cutting and thinning shears as well as razor for cutting hair
• Tweezers for eventual plugging and finishing of hair line
• Ceramic iron heater
• Flat curling iron for lifting and shaping
• Small marcel iron for texturizing and curling
• Natural bristle brushes for wax and tattoo color
• Pinking shears for precutting excess lace
Products in the photo of Erwin's workstation:
• Moustache wax or stronger hair wax
• Plastic sealer in pump bottle or a strong, fast-drying hair lacquer
• Tattoo color for detail work on finished beard (Figure 9.23)
• 99-percent alcohol
• Lace pieces
Construction of a Ventilated Beard
Ventilating is the technique used by wig makers to knot hair (either human or synthetic) into wig lace. It is similar to tying a rug, and has been used since King Louis XVI of France. There is single knotting and double knotting, and many versions of lace and qualities of hair. Most lace pieces in film do not use synthetic hair—it does not look real. The quality of lace and hair and the blending of colors are extremely important.
The medium of the lace piece, as well as the design of the facial hair, will dictate what materials and hair are used. The hairline or beard line is always the finest quality of knots to create the illusion of the hair coming out of the follicle.
The Base
The base is made of one layer of custom-dyed nylon lace using a blend of layers of fabric dye following the manufacturer's directions. Match the actor's skin color or the foundation makeup used on the actor as closely as possible.
Construction includes seven separate pieces: chin, two side pieces, one lip piece, two connections, and one moustache. A light coat of acrylic spray is applied before hair ventilation to the finish base. This adds durability.
The Hair
Use human hair from different origins (Asian, Indian, European), as well as yak tail and belly hair. Blends of thicker and coarser hair are used at the bottom of the beard for body. Thinner, finer hair is used closer to the edges.
All hair is custom color blended using darker colors at the bottom and lighter colors at the edges, and then permed using a mild alkaline perm. The diameter of the perm rod will determine the curling result. In this case, a medium to small perm rod is chosen for a frizzy, “ungroomed” result. This will ensure that the beard keeps the shape, and restyling will be minimized.
Ventilating Hair
Knotting the preblended and permed hair into the lace base is done hair by hair (single-hair knotting), using the various color blends to design natural shading and highlighting. Lighter colors are always used around the edges of the beard (front shade), building up more volume at the bottom and in areas where denser beard growth appears, and decreasing the amount closer to the edges for a natural appearance (Figure 9.24).
How to Cut Facial Hairpieces
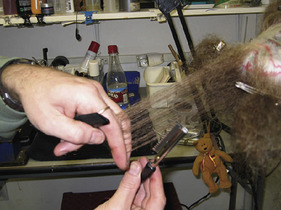
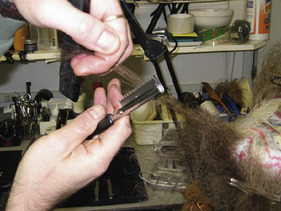
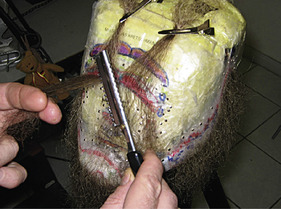
A good haircut can eliminate half of the styling and maintenance later on. Because perming is done on the hair, it needs to be treated like curly hair, which means caution is needed during cutting. Texturizing and cutting with razor and thinning shears (cutting different lengths into the hair) will give a more natural appearance to “beard hair.” Blunt cutting a straight line, especially on the moustache, will result in an unnatural “fresh-cut look” that is very “eye-catching” for the camera. The proper cut for a beard is as important as the proper cut for a hairstyle. If the cutting and texturizing are finished and the permed hair is reactivated with water, let it dry naturally.
The beard shape and style should be almost completed after proper cutting. Finishing can be achieved with curling irons.
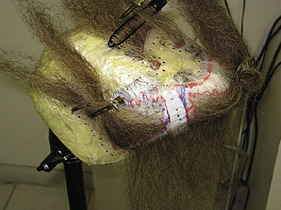
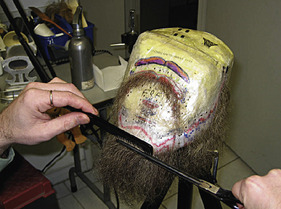
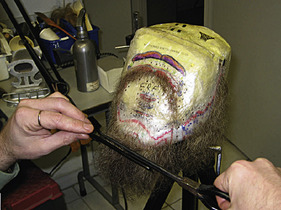
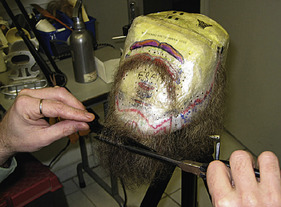
Elevating your hand while you razor the hair will give a layered-hair effect. All hair except for the sides of the beard is cut to this guideline. The sides of the beard are blended in length into the sideburn length of the design (Figures 9.25 and 9.26).
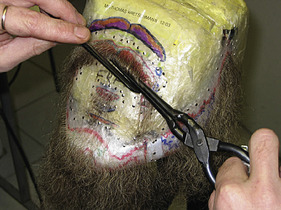
Cutting a guideline to the desired length with the tip of the razor cuts the moustache in the same manner. Make sure that both sides are even in length and shape. All of the hair is then cut to the length of that guideline with the tip of the razor (Figure 9.27, Figure 9.28, Figure 9.29 and Figure 9.30).
Mist the precut beard with water, and lift hair using a lifting comb, so the curl can go back into its permed style. The beard is then dried in a wig dryer on a low setting: 100 °F, or 45°C (Figure 9.31).
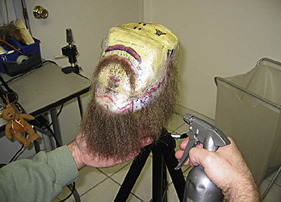
After the hair and the base (lace) are truly dry, the hair is then lightly waxed using moustache wax and a bristle brush. The wax will protect the hair from the heat of the curling irons and from moisture (Figure 9.32). The facial hair is now ready for final styling with the curling irons and tongs.
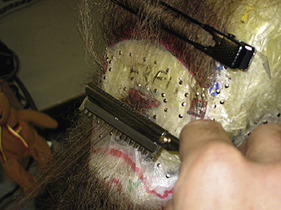
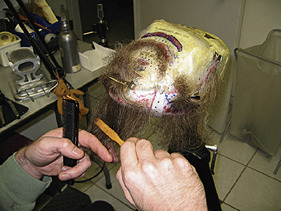
To bring the permed texture into shape, a small marcel curling iron and waving technique is used. Caution is to be taken that the texture does not appear like finger or marcel waves similar to the waves in hairstyles. Using artistic input as well as practice, this technique is useful for all longer beards and facial hairpieces for building texture, movement, and style (Figures 9.33 and 9.34).
Final touches are done on the texture of the beard prior to styling the moustache (Figure 9.35).
A flatiron, or tongs, is used to shape the moustache and the lip piece (Figure 9.36). Because of the use of perm-textured hair, the moustache hardly needs curling. Only the ends at the bottom of the beard are blended under. A root lift is applied to the edges by lifting and sliding a warm flatiron to the hair.
Final color touch-ups are done using tattoo color and 99-percent alcohol (Figures 9.37 and 9.38).
Using an eyebrow brush with a lash comb attached, a tattoo color wash (more alcohol than color, like an aquarelle color drawing) similar to the beard's color is then brushed over the lighter shades around the edge (front shade). Brushing and immediate combing of the hair will make blending easy. It is important to keep the knots light, while softly blending the ends of the lighter hair into the beard color. Be careful not to make it too opaque or even too dark. The beard line should still be lighter than the beard for a natural effect. This technique will keep the edges soft, and knots will blend more easily around the edges with the skin color. After coloring is done, a light coat of matte clear acrylic spray is applied to the finished beard.
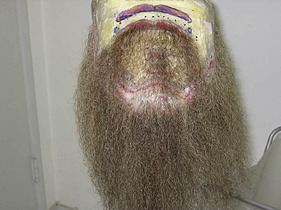
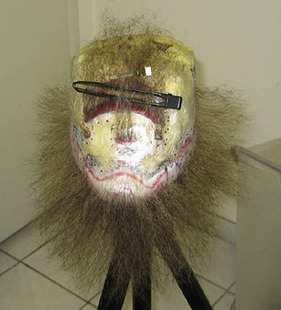
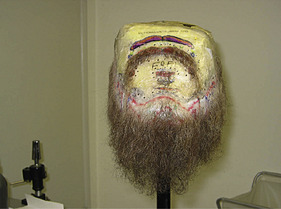
Figure 9.39 is a photo of the finished, styled beard before removing it from the beard block.
Sample Application of a Beard with Stubble
Materials Needed:
• Chin lace piece
• Lower lip piece
• Sideburns
• Chopped curly hair matching beard color
• Scissors, thinning shears
• Metal tail comb
• Adhesive (W.M. Creations Adhesive)
• Tattoo color (e.g., Reel Hair Palette)
• Hair spray
• Makeup sponges
• Brushes
• Alcohol, 99 percent
• Cotton swabs
• Makeup cape
• Concealer pencil in skin tone matching actor
Steps for Application:
1. Start with a clean face.
2. Start applying the chin beard. Check its placement, and use the concealer pencil to mark dots where the edges of the piece belong.
3. Brush a thin layer of adhesive onto the skin, staying about one centimeter below the markings of the lace piece edge.
4. Stipple adhesive with your finger until tacky. Apply a thin second layer and repeat. Be careful not to get adhesive over the concealer marks.
5. Glue the lace piece in place using your rattail comb. It is important that you press with the tail in between the hair at the base of the lace. Make sure you do not glue down the beard hair flat against the skin. This will take a few minutes, and a bit of practice.
6. Use a cotton swab dampened with alcohol to carefully remove your concealer markings.
7. Use a new cotton swab or a finer brush to apply a very thin layer of adhesive to the skin. Tack it with your finger or a brush until flat and tacky.
8. Press lace piece gently into place using your clean rat-tail comb. Continue pressing all edges until they are smoothly glued down to the skin.
9. Apply the lip piece in the same manner. Because it is very small, you probably don't need to use the concealer pencil. Placement of a lip piece should be easier than the placement of a larger beard piece.
10. Apply the sideburns in the same manner. It is important that you position them directly at the bottom of the actor's own sideburns, without a gap in between.
11. Cut the sideburn hair to match the actor's own sideburn hair at the same length, using thinning shears.
12. Brush in a little tattoo color to blend possible color differences between the actor's hair and the false sideburns.
Lace facial hairpieces for high definition (HD) are much more difficult because the HD shows every detail so crisply and sharply. The lace pieces have to be designed in sections that puzzle together onto the face, with a lower hairline edge that has to be overlaid with hair by hand to finish off the edge of the facial-hair design. The glue must be totally matte.
13. After all of your lace pieces are applied, you can start using chopped hair to create a patchy, shorter beard stubble.
Lace facial hairpieces require an investment of time and money that pays off in the long run. The work and materials used are expensive, but the result is a more natural, consistent look, with easy maintenance.
Beard Stubble
As with everything else in makeup, there are several ways to create beard growth that looks like more than several days of growth. There are different products and techniques to use, depending on the situation you are working in. As with all areas of makeup, you will need to be able to answer critical questions before designing or choosing what to use. The hardest beard growth to simulate is between five and 10 days, too long to be painted in, and not long enough to use lace pieces. You will need to use one of several techniques to create the look and length needed. The length of hair for beard stubble will depend on how much time has passed, or how scruffy the look is designed to be, or how many “story days” in the script that the actor has not shaved. The actor's own beard growth and density will also affect your decisions.
What is the growth pattern like, what color is the hair, how old is the beard growth, and how many days will you have to re-create the look? These are the questions to which you will need to have answers. Look at the growth pattern of the actor—this is your guide for placement of hair stubble. This is very important in creating realistic beard stubble. If you do not follow the natural growth pattern and beard line of the person, it will not look real.
In some cases, the actor's own beard growth and growth pattern are minimal or sparse. You will still need to follow the person's own beard as a guide. If you choose to add more to make the stubble read better on camera, be careful—your stubble will look unnatural if you add or fill too much on an actor with sparse growth.
Hair color for beard stubble needs to be a blend of colors, with highlights and lowlights—and in some cases, a bit of auburn or red added. Use caution with adding too much red to your blend—this can look too artificial, even if the actor has a lot of red in his own beard.
Careful hair color blending with proper placement will sell the look. We will look at creating beard stubble by using a hair ball, a lace net, and a makeup brush.
Erwin Kupitz's Hair Ball Method
The chopped hair should be no longer than 0.5 centimeter; otherwise it will be very hard to apply. Prepare the chopped hair by making little hair balls of about the size of a walnut. The chopped hair is placed in the palm of your hand and then rubbed in a circular motion between your two palms until a ball is formed. This can also be done in advance to save time. If you do so, spray the prepared hair balls lightly with hair spray, and store them in a plastic box until you are ready to use them.
Hair Ball Application
1. Apply only one layer of adhesive, starting close to the chin lace piece.
2. Stipple adhesive with a makeup sponge until flat and tacky.
3. Quickly pull one of the hair balls apart, and you will notice that the short hair is sticking out of the ball where it has been separated.
4. Lightly touch the adhesive with the standing hair, and pull the hair quickly away from the face. The short hair will adhere to the face, and it will stand out like real beard hair. Do not press hair flat to the face. If you do, it will look very unnatural.
5. Continue this process until you have finished your design.
6. After all of the hair has been laid, spray a light mist of hair spray over the beard. Be careful not to point the bottle straight into the actor's face. Have the actor hold his breath and close his eyes while you are spraying the beard. Make sure that you mist only the hair and not the skin, because this could create a sheen effect, and it is very uncomfortable on the skin.
For actors and beards with a curlier texture, you can use chopped permed hair, and you don't have to build a hair ball out of it. Chop the hair to about 0.5-centimeter length, and apply it directly to the skin. Because of the curly texture, it cannot lay flat.
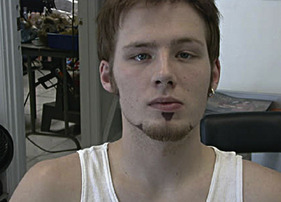
Your character's beard application using lace pieces in combination with chopped hair is now complete (Figures 9.40 and 9.41).
Matthew Mungle's Net Lace Method
1. Apply spirit gum adhesive to the surface of the beard area to be stippled.
2. Press down with a soft cloth to take out or matte the shine of the adhesive.
3. Lay down a piece of hair lace into the adhesive.
4. While the chopped hair is still wet, press it into the lace using a stiff makeup brush, sponge, or atomizer.
5. Before the adhesive dries, pull the lace up and away from the face, leaving the cut hair behind, standing straight up or at the angle the lace net is pulled off the skin.
Beard Stubble with Brush
For stubble looks by hand, you can choose to use a medium-sized makeup brush or a small atomizer, with a matte spirit-gum adhesive or beard stipple wax by KRYOLAN. We will show you this technique using the makeup brush and stipple wax. The wax is clear on the skin no matter what the skin tone, and has no shine whatsoever. This is a huge advantage for HD and close-up work. If you use spirit gum, we recommend W.M. Creations, Extra Hold Matte Adhesive. Blend and prep your hair using at least two colors of hair.
1. Lay white facial tissue on your workstation or counter.
2. Wet your hair with a small amount in your hand. Hold over the tissue, making uniform cuts to the hair, so that the chopped hair drops onto the tissue.
3. Let the chopped hair dry on the tissue.
4. Remember, it is best to cut the hair when wet, and to take care making each cut the same size.
5. There is a tendency to make your cuts too long. Look at your first cut of hair to check length.
6. Hair needs to be completely dry before being applied to the face.
7. Apply beard stipple wax over the beard area of the face where you want to apply hair.
8. With a clean, medium-sized makeup brush, pick up the desired amount of chopped hair from the tissue by dipping the brush into the hair on the tissue.
9. Using a quick, light motion with the end of the brush, apply at a slant to the beard area. The quick hand motion, or stipple, needs to barely touch the skin to create a raised beard area. If you hit the brush with too much pressure, the hair will stick flat. It helps to have a bit of static electricity in the makeup brush. You can get static in your brush by rubbing the brush quickly back and forth over a towel.
10. Go back with a small, stiff brush or tweezers, and lift any hair that is not sticking out straight. You do not want any hairs to be lying flat against the skin.
11. Sometimes there can be clumps or patterns that you will need to thin out.
12. Be gentle. This application is fragile, but easily touched up.
Remember, as with all hair applications, you need to stand back and really look at your work, as well as getting up close to the skin and checking. Check your work in the makeup mirror from all angles, by rotating the actor around.
If you believe it up close, so will the camera.
Glues and Adhesives
In film, television, and HD, use only matte adhesive. The application is very important because any shine or glow from the adhesive under the lace piece will register. This will cause the viewer to realize it is not real facial hair.
W.M. Creations Adhesive is lightweight but strong. It is greenish in color during application, but dries clear.
K.D. Spirit Gum is a processed spirit gum, and works very well with lace pieces.
Alternate Adhesives
Telesis comes with its own thinner, and the application is slightly different from spirit gum. The brush usually has to be dipped into the thinner, then into the adhesive. All of the adhesives dry very fast, and are not recommended for use by the beginner.
Adhesives to Avoid
Any kind of latex-based adhesive should be avoided. It is impossible to clean it from the lace without the danger of destroying the lace piece and its edges.
Exception: If you have a new lace piece for each day, for all of the shooting days, using a latex-based adhesive for facial hair works—in other words, the lace pieces are not reused the next day. If it is a small piece, Pros-Aide usually works better than latex adhesives.
Cleaning the Lace
Once the lace pieces have been removed from the actor, you will need to clean the lace and re-dress the pieces. With classic spirit gum or lightweight adhesives, the actual removal of the lace from the skin also removes some adhesive from the lace. Any adhesive left on the lace can be removed by the following steps:
1. In a saucer or plate filled with the cleaning agent about one-half inch deep, lay the pieces in the solution with the lace facing down (hair up). Try not to have the hair covered entirely by the cleaning solution. Let it set for one to two minutes. The heavier the adhesive, the longer it needs in the cleaning bath.
2. Lay the piece on a towel, but try to avoid pressing the hair flat.
3. Dip the brush into the cleaning agent, and brush out any leftover adhesive from the lace.
4. Important: Always follow the direction of the knotting on the lace. Example: On a moustache, brush from the nostrils down to the upper lip.
Very important: Never brush against the knotting. This results in opening the knotted hair, and the knots will appear larger and eventually fall out.
5. After all the adhesive is removed, place the pieces on a clean towel and let evaporate for 10 to 20 minutes.
The pieces are ready for blocking and any re-dressing.
The cleaning agent varies according to the glue and/or adhesive being used:
Classic spirit gum: Easy cleaning with a mix of 99-percent alcohol and acetone (1:1 ratio).
Matte adhesives: 99-percent alcohol.
Silicone-based adhesives: Use special cleaner that often has a slight oil base in it. Lay the facial hair in alcohol after using these cleaners, and let soak for a few minutes to dissolve the oil. Remove, do not comb, and let dry without stretching the lace, on a clean towel. After the facial hair is completely dry, it can be re-dressed.
Latex-based adhesives: Need a heavy oil and alcohol mix. Try a mix of baby oil and alcohol (1:1 ratio). A stiff bristle brush is used to brush off the residue of the latex—this is labor-intensive.
Beard stubble wax: Cannot be used with lace pieces as an adhesive. It is a tacky wax paste, and the lace hairpiece would not successfully stay on.
Hair Texture
All facial hair needs to be texturized before applying it to the face. The texture varies from kinky straight (Asians, Indians), to slightly wavy (European), to kinky curly (African). All hair used for knotting into wig lace is custom permed before ventilating into the lace, and therefore will not turn straight if it gets wet or during cleaning.
Quality facial hair takes all kinds of hair origins into consideration, and the texturizing creates the look of real facial hair. The color design enhances the simulation of the facial hair, again creating the illusion of a real beard.
Hair Laying Using Bald-Cap Material (Plastic Cap)
By Christien Tinsley
One of the greatest challenges Makeup Artists face is the ability to hand-lay a believable beard. Successfully accomplishing this technique will require you to recognize the problems of traditional methods.
The laying of human hair down with spirit gum is one of the oldest and most widely used techniques by veteran artists. This same method of application has been slightly modified and updated throughout the years and is, at present, commonly being employed with the use of Pros-Aide. Both approaches to laying down the hair start with applying a thin layer of the adhesive to the skin and gently pressing the tips of the hair into the glue allowing for realistic-looking growth. The glue is often treated with a matting agent or powdered during the process to keep the natural glossy sheen of the glue minimized. After the hair has been applied, it is commonly cut, curled, and dressed.
Common problems with this technique follow:
• The glue is always too shiny, giving an unnatural look to the skin under the hair.
• The glue remains or becomes tacky, which the hair eventually lays flat on and sticks to. Often in the case of doing beard stubble this becomes an absolute disaster when the hair lies flat rather than sticking on end.
It is almost impossible to color the area of skin under the laid hair because:
• Alcohol colors will reactivate the glue.
• Common makeup contains grease and oils that will eventually loosen the hair and act as a remover.
On the Job
I was faced with the challenge of applying a half-face prosthetic. The actor's face was partially shaven to apply the prosthetic and I had to match the prosthetic side to the actor's own one-quarter-inch length beard stubble. Two weeks into shooting I had exhausted the flocking, hair-through-lace, and hand-laying approaches. Being unsatisfied with the results of traditional techniques, I decided to experiment. When my actor came in one morning, I told him that I wanted to try a new concept and that it could fail miserably. Fortunately, he obliged with no resistance.
My idea was simple: Use plastic cap material as the adhesive and synthetic hair for the stubble. Plastic cap material has been around for decades and has been used most often for making plastic bald caps. It is a plasticized plastic bead that is dissolved in acetone until it turns into liquid. You can thin it to the point of spraying through an airbrush. When the acetone dries, the solution becomes a flexible plastic skin that can be adhered with glue and re-melted with acetone. This has made it useful for not only bald caps but also prosthetics and over the last decade has been used as the barrier for GFAs (silicone gel–filled appliances). The process is very simple and is as follows:
1. Assemble your hair by blending the colors you wish to use. (Human hair works just fine, and for longer beards to be dressed it is the best choice. However, for stubble, synthetic is cheaper and because it is an acrylic it holds much stronger in the “plastic glue.”)
2. Cut the hair into short lengths that are more manageable and not wasteful. Remember, you will be cutting this to a short length after application.
3. Formulate your plastic cap by thinning it with acetone to a thin syrup-like consistency.
4. Prepare the actor's skin by cleaning with alcohol and/or astringent.
5. After the skin is cleaned I recommend laying down a very fine layer of thinned-down Telesis. This is not necessary but it acts as a primer for the plastic. Cap plastic likes this surface more than skin. It should be unnoticeable to the eye and touch. If it is glossy or thick, you have put too much on.
6. When applying the plastic cap, you must work fast. The acetone dries almost instantly and gives you very little time to react. So prepare your hair in one hand and your plastic applicator in the other. (It is important to note that your hair should be slightly fanned between your fingertips. You will be laying directly into place, so you don't want the hair to be in clumps resulting in an unnatural growth pattern.)
7. Work in small areas from the top going up and lay down (in a small area) the wet plastic and then quickly stick the roots of the hair into place. Hold this for a moment (5 to 10 seconds) and then let go.
8. Repeat until you have the required area(s) covered. After the application is complete you have no need to powder and/or to be concerned with the hair laying flat and sticking because the plastic does not remain tacky.
9. Grab your electric trimmers with the spacers. That's right: ELECTRIC TRIMMERS!! Shave as though it was the actor's own hair. (Of course you can use scissors if you prefer.)
10. You can, at this point, paint the area if necessary with any form of makeup or inks. They should not affect the plastic in any way.
If you find areas need to be filled and you have clumps of hair, simply fill in using the same technique and/or take a Q-tip with a touch of acetone and gently dot the area you wish to remove hair from. Use tweezers and quickly pull the hair from the area. The acetone dissolves the plastic, allowing the hairs to loosen and be removed easily. Once the acetone evaporates the glue dries and re-connects the hair.
The end result is a tack-free, clean (no dirt sticking to tacky areas), matte, paintable surface with believable rooted hair. If at any time during the day the hair wants to lift, simply glue down with adhesive under the lifted plastic and/or re-melt to the skin with a touch of acetone.
To detach the beard, you can use any remover you normally would use for adhesive or prosthetics. (Isopropyl myristate works great and is gentle on the skin.)
1. Take a powder puff and dip into the remover.
2. Apply to the skin and use gentle strokes in a circular motion until the hair is removed and the skin is no longer tacky.
I found the results to be exceptional and with a little practice I hope you do as well.
Reference
Kupitz Cimuha, Inc, Kupitz, E.H., wig maker design, laying of facial hair and lace facial pieces. Tel: 818-769-6465.
Mungle Mungle, M. www.matthewmungle.com.
Tinsley Tinsley, C. www.tinsleytransfers.com.
