Everything You Need to Know First
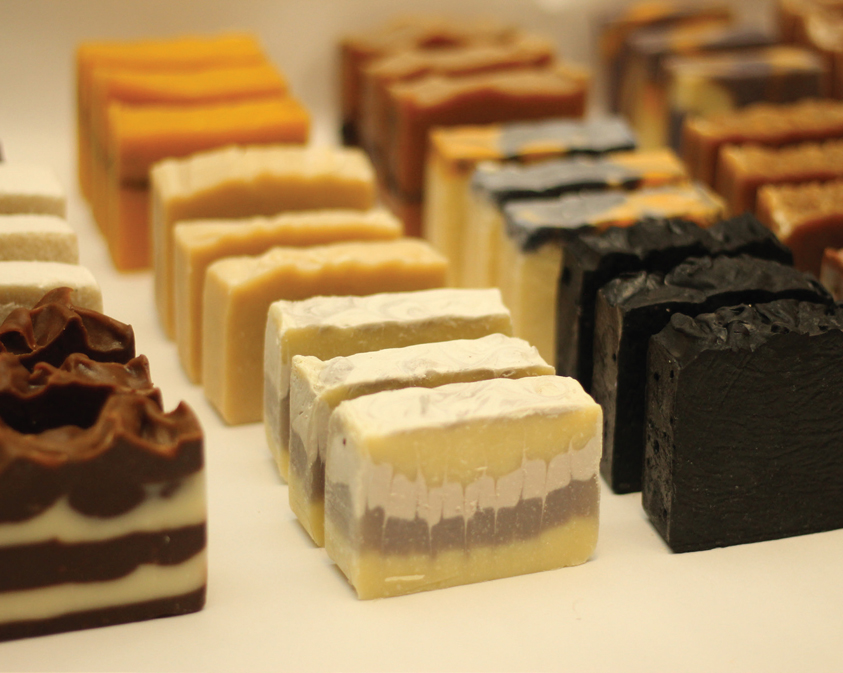
Handcrafting soap is one of the most satisfying ways to spend time in your kitchen. The return on joy and skincare alone makes it worthwhile—not to mention, it’s a way to spend time in your kitchen without adding to the size of your waist!
I want to start with a brief (promise!) history of soapmaking, just so you know where soap came from and how it has transformed over the years to become the soap we all use today. Then we’ll focus on pH, saponification, oil properties, and a few other values that need to be taken into consideration when crafting soap. Don’t worry if these concepts seem foreign and confusing; they are simply given as an understanding of the how’s and why’s in soapmaking language. Everything will make sense as you progress through your soap-crafting journey and you’ll be grateful for a solid foundation once you begin creating your own recipes. I also hope to help you avoid many a soap problem before they arise.
We will also review some cautionary advice and safety precautions—do not skip this section. Your future unscathed self will thank you. Finally, I will go over tools used and provide you with a short shopping list to get you started. And then we’ll get into the fun stuff: formulations, recipes, and ideas!
A Brief History of Soap
Soap has been around for a long time, of course. However, soap that doesn’t scour off a good portion of your skin is a recent phenomenon. My mother has told me stories about washing out stains in her father’s work shirts with regular Tide when she was a child. Her skin would start burning off before she was finished. Ouch! (For the record, if your soap is doing this after curing time, you may wish to review and try again.)
The oldest written record of soap comes from ancient Babylon. In 2800 B.C., the Babylonians were making soap from boiled fats and ashes. At that time, soap was used for cleaning fibers and utensils, as well as medicine, but it hadn’t been used on the body.
In 1550 B.C., Egyptians were using alkaline salts blended with animal and vegetable oils to create a soap-like substance.
In 600 B.C., the Phoenicians were using wood ash and goat tallow to create soap, and in the first century A.D., the Romans were making soap from urine.
The Celts came up with a soap made from plant ash and animal fat and called it saipo, from which we get our modern word soap, although historically soap has also been said to have come from Mount Sapo in Rome. The Romans were well known for their soap crafting and bathhouses. When animals were sacrificed and burned on the altar, the burned ashes and fat traveled downhill and collected into pools. These pools were soap!
Later, bathhouses and soap fell right along with the rest of the Roman Empire and the practice of washing with soap was largely lost in Europe. This was followed by hundreds of years of filth, poor hygiene, and most notably, plagues. From the fourth to the tenth century, soap was once again manufactured in European countries, but only regularly used by the wealthy. Crafting soap was a coveted art, and soap makers were highly taxed, so the price of soap was high. Eventually, the soap- making process was mainstreamed, and in the 1800s, it became a more cost-effective commodity.
As our knowledge of the chemistry of soap has increased, the soap we use for laundry has become separate from that used for the body, and we now have special soaps used for dishes, cars, and so on. Liquid hand soaps were invented in 1970.
Now you, too, can make your own soap. You won’t even need to sacrifice any animals! In fact, most of the recipes in this book, the exceptions being the honey bee and goat milk soaps, are vegan.
A BIT ABOUT pH
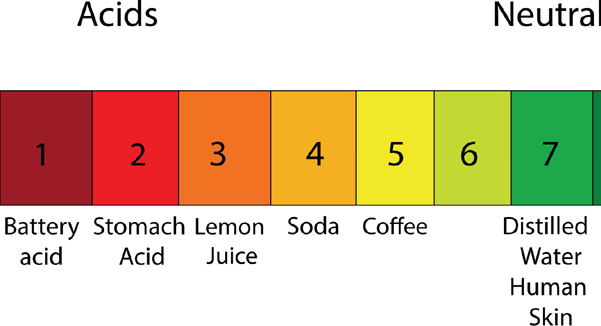
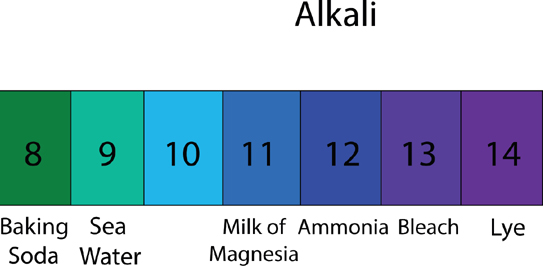
Why do you need to know about pH to create a perfect bar of soap? pH stands for potential of hydrogen or power of the hydrogen ion and refers to whether a substance is either acid, alkaline, or neutral, which is measured on a pH scale. This is very important in soapmaking because when it comes to soap for your skin, you certainly don’t want to be peeling it off. You just want to remove grime while retaining oils. Human skin’s natural pH is around 7. When making soap, we want it to be slightly alkali because that assists in cleaning skin and destroying the bad bacteria that cause odors or acne while retaining the nourishment that skin needs.
So it is really important that the soap we craft comes to a pH between 8 and 10. Over 10 becomes clothing detergent and then pure sodium hydroxide very quickly.
The chart on this spread gives a nice visual of the pH scale: at one end, you have acid and the other end, you have alkaline. The middle ground is what we aim for in soapmaking, as that is the baseline of healthy human skin pH.
You will always want to test your soap after it has cured (curing takes four to six weeks) to ensure the pH balance is within an acceptable range. To do this, you can purchase pH testing strips; these work by blending a little bit of distilled water into a sample of your soap and dipping the paper in. The paper will change color, or not, according to the soap’s pH levels.
Another method that many soap makers use is the zap test. All you do here is lightly taste your soap with the tip of your tongue—if you feel nothing, your soap is at a good pH. However, if you feel a zap, that is the lye, meaning the pH is too high.
You can also test with purple cabbage. To use this method, simply chop up a few pieces of purple cabbage and toss into your blender. Add about a cup of distilled water and blend until you have a nice mixture. Now strain out the water and compost the cabbage. Drip a small amount of your cabbage water onto your soap; the purple cabbage drops will quickly change color. Check the color against a pH color scale. You want to see blue.
One thing to note with pH is that baby soap needs to be much closer to neutral, as babies’ skin is so sensitive.
Saponification is the fine art of converting oil or fat into soap using a strong catalyst, which, in our case, is lye and water. This turns the oils into soap salts and glycerin, resulting in a cleansing yet softening effect on the skin. Soap molecules contain micella, the surfactant action. These micelles have a hydrophilic head and hydrophobic tail. They form a packing layer that is lipophilic on the skin. This attracts oil containing grime and dirt and pulls it away from the skin as you wash the soap off with water.
A properly made bar of soap has transformed the water-repelling molecules of oil and oil-repelling molecules of water into these fantastic little molecules that wrap around oil and dirt on your skin and pull it away to be washed down the drain.
SAP
When calculating a recipe for soap, we use what is called the SAP value or saponification value. This relates to how much lye is needed to react with the fatty acids in your recipe to create the soap. The following recipes have been formulated for you already, but do not substitute one oil for another without a complete recalculation. You can find a great soaping calculator at www.soapcalc.net, so you don’t need to do the math yourself.
Iodine in Soap
How hard a bar of soap will be is based on the iodine absorption value for each oil. The lower the number, the harder the bar. If you’re nearing seventy, the bar becomes softer, which is an undesirable quality for the recipes in this book. Forty-one is the lower range and creates a harder bar of soap.
Oils
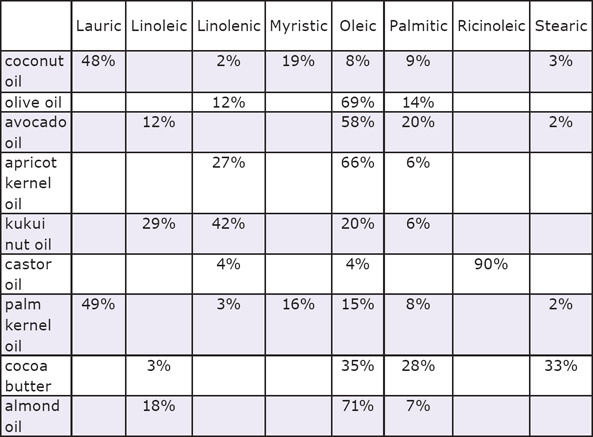
When creating a soap, there are certain oil values that are desired for bubbly, cleansing, hardness, lather, creamy, conditioning, etc. Each oil contains different fatty acids that create different qualities and also react with varying amounts of lye. This why you can’t substitute one oil for another oil in these recipes. Instead, the entire recipe must be recalculated when you want to add or subtract an oil.
The following chart shows all the fatty acids across the top and a few common oils down the side and their related percentages of fatty acids. It should give you an idea of the varying oil properties.
As you can see, coconut and palm oil are very similar. They are high in lauric acid, which creates bubbles and a hard bar of very cleansing soap, but it can be drying. Generally, one of these oils is in almost every bar of soap.
Castor oil is an oil in its own category, as it contains such a high percentage of rinoleic acid. You won’t find this quality in any other oil. Castor oil in soap creates a very stable lather but no bubbles of its own. In a bar of soap, it contributes to a softer bar and it will be more conditioning.
Super Fatting
When formulating a recipe, we rely on super fatting. This is the percentage of excess-free fats leftover after the lye has reacted with your oils. This is used in a recipe as a buffer so you know that there will not be excess lye in your soap. It’s also used to create a more moisturizing soap. Most recipes use 5% super fat, but sometimes this percentage will vary for different purposes, such as in the Soleseife Brine Soap on page 31, the Mermaid Kisses Salty Sea Soap on page 29, and the Beard Wash Soap on page 52. The super-fat percentage varies for these recipes due to utilizing large percentages of highly drying yet super sudsing oils to counter the effect of the bubble-reducing qualities of salt, or as with the beard bar, the super fat is reduced so as to not leave any oil residue in the hair. In this book, there are a few recipes that have different super fat percentages, but it is always noted and explained.
Precautions and Soap Safety
Make no mistake: soapmaking is dangerous.
You will be using Lye (sodium hydroxide). When lye touches liquid (including the moisture on your skin), a chemical reaction instantly takes place and the lye heats up to 200°F. Lye is highly caustic, and the fumes are toxic, which is why it is so important to be mindful when making soap and to use safety gear.
• Always add lye to water and not the other way around.
• Always freeze alcohol before use or you can create a volcanic eruption when adding lye.
• If for any reason you get lye on your skin, wash it for 15 minutes with water and seek medical help.
• Always store lye out of reach of children.
• Don’t use reactive utensils or bowls. Make sure what you are using is plastic, stainless steel, silicone, or wood. Lye will react with anything it can, even old pottery if it has the fine cracks in the enamel that come with age.
• Always wear protective goggles that seal around your eyes to deter splashes.
• Wear gloves, long sleeves, and closed-toe shoes to protect your skin.
• Do not substitute oils in a recipe! That being said, if you really want to substitute another oil, it is possible, but you must run it through a soap calculator, as the lye percentage will be different for every single oil and you don’t want to scour skin.
• Be sure to keep distractions to a minimum. Don’t work while kids or animals are running around, and keep your space clean, orderly, and covered. You can use newspaper to cover counters, and wipe down counters with vinegar when finished because vinegar will neutralize any lye.
• Be mindful and always work sober—soap isn’t something to mess around with. You are using serious chemicals to create a reaction that will be safe and effective, but the process to get there requires mindful awareness or dangerous things can happen.
Trace
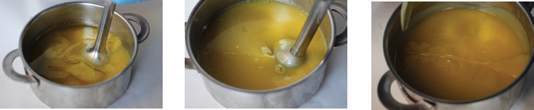
When making soap, learning what trace looks like will be of the utmost importance, but don’t worry, it’s pretty simple. Trace refers to the stage in which the oils and lye water have begun to homogenize; you will recognize this by observing the oils and lye water going from translucent to blending, turning opaque and no longer being separated. You can test for trace by lifting a spoonful of the soap mixture from the bowl and drizzling it back in; if the drizzle takes a second or two to sink back into the mixture, you’ve achieved light trace.
In the picture below on the far right, the spoon has been lifted and the soap drizzled across the top of the soap batch. As you can see, it is taking a moment for that drizzle to sink back in.
Here’s a handy checklist for making soap safely:
SAFETY CHECK
Suit up (long sleeves and pants)
Animal distractions gone
Friends or distractions at a minimum
Everyone, in the house knows not to bother or enter the kitchen
Tools in hand and available
You (mindfully aware and present)
Children distractions gone
Hands covered (gloves)
Eyes covered (goggles)
Creativity on
Klean and covered area
Throughout this book and in every recipe, you’ll see SAFETY CHECK!
If you keep blending, the trace will get thicker and thicker, eventually pudding-like. Different recipes will call for differing trace stages, depending on the desired outcome.
Scents in Soaps
Natural fragrance is a fleeting thing. Using essential oil to scent your soap can have very effective and beautiful results, but they will continuously evaporate from your soap—that’s just the nature of botanical fragrance. I have a background in perfuming so the scent formulas in this book are created with fixative or “stay” in mind. This means I create scents that are as long-lasting as possible. To do this, I use base notes in almost all my recipes.
Lavender, for example—I add frankincense or benzoin because they go well with lavender and accentuate its floral aspect while creating a fixative effect in your scent formula.
Essential oils also add the benefit of natural preservative in your soap formulations (almost every essential oil contains them). Every essential oil also has therapeutic properties. I won’t go into that here, but there are many resources available online if you’d like to learn more about them.
A note on essential oils: Some essential oils will accelerate the hardening of your soap. Clove, for example, will almost always accelerate the hardening rate so you have to be ready to pour quickly.
Heat
When making soap, the temperatures of the lye water and the oils should be within 10 degrees of each other. If you can have your water and oil within 10 degrees of each other, the chemical process of saponification will be smoother. I like to work with my oils and lye water at about 100°F to 110°F, so that is what is recommended on most recipes. If your lye water and oils are too hot, they have a tendency to setup rapidly and go right into the gel stage, which isn’t always a desired state.
Gelled Soap Versus Non-Gelled Soap
Gelling soap refers to how hot you want your soap to get after pouring it into molds. The gelling process can brighten colors and lend a more translucent look to your soap. With milk, fruit, veggie, alcohol-based, sugar, and honey soaps you will want to skip this stage since these soaps are prone to burning, cracking, or billowing over as the sugars react with heat in creating more heat.
How to gel your soap:
Some people use a heating pad or place their soap in an oven on low heat for 20 minutes then wrap it to keep it insulated. However, I recommend simply wrapping your soap in a towel or blanket, which I have found creates plenty of warmth for the soap to fully gel (you need it to reach about 180°F). Directly after you pour your soap into a mold, set the mold on a towel or blanket in a safe and undisturbed area and wrap the towel completely around the soap and mold. Let set for 12 to 24 hours. Unwrap when you are ready to cut your soap block.
None of the recipes in this book are gelled beyond what naturally occurs, as sometimes gelling is unavoidable unless you pop your soap in the freezer after pouring. I just place my soaps in a safe, undisturbed area, uncovered, to setup at room temperature.
Soda Ash
Soda ash is a strong alkali white substance that can sometimes accumulate on top and along the sides of your soap bars depending on the oils used, the temperature of your process, and a variety of other unknown causes. You can simply run your finished bar under water and wipe off the soda ash. You can also use a little 99% isopropyl rubbing alcohol or 190-proof distilled spirits and spritz it over the top of your soap with a spray bottle. This will greatly diminish the probability of soda ash occurring, although sometimes no matter what you do, it just happens.
Tools
These are the basic tools you will need to get started soaping safely:
• 1 to 2 thermometers
• Safety goggles that seal around the edges (trust me on this, you don’t want soap flying in your eye)
• Rubber or disposable gloves
• Long sleeves
• Closed-toe shoes
• Electronic kitchen scale
• Pot for melting and mixing in
• A hand mixer, although you can just use a non-reactive (page 32) spoon, too
• Spatula
• Spoons
• Mixing bowls (non-reactive, page 14)
• Newspaper to cover your counter space
• 1 3.5 x 7-inch soap mold
• Freezer paper for lining square and rectangle molds
• Parchment paper for lining tubular molds. (This will not work on square molds because it quite simply will not stay in place. Freezer paper will also not work for tubular molds because it gets stuck to the edges of the tube and cannot be pulled out without ruining your block of soap, so pay attention to what you will need to line with.)
• Tape to help your lining to stay in place
• Essential oils, if you like scent
• A variety of plant oils (each recipe uses specific oils, although oftentimes the same oils are used in many of the recipes)
• Olive oil
• Castor oil
• Coconut oil
• Lye (pure sodium hydroxide)
• Distilled water
• Knife or soap cutter
• Cutting board
• Soap mold (able to hold 30 ounces)
• PVC or other similar tubing is used in a few recipes to create circular soaps. The tubes used in this book are: (1) 22-inch-long, 2-inch diameter PVC piping with a cap for one end and (1) 16-inch-long, 3-inch diameter with one cap.
• 99% isopropyl alcohol or 190-proof alcohol in a spritzer
Shopping List for 20-ounces of Basic Soap
Assuming you have a mold, blending tools, and safety tools, you’ll want to pick up the following:
• 8 ounces olive oil
• 8 ounces coconut oil (refined or cold pressed)
• 4 ounces castor oil
• 1 bottle lye (sodium hydroxide)
• Distilled water
• Freezer paper
• Essential oil of your choice, if you want to add scent.