
SHREDDERS AND OTHER EQUIPMENT
Compost can easily be made without mechanical equipment. However, more compost can be made—in a shorter time—when the materials are first shredded or ground. For this reason, the compost shredder has become a standard fixture in many gardens and small farms. Shredder design has been improved over the years, and modern shredders bear little resemblance to those primitive, bulky, and often dangerous models of the past. (See the Appendix for a list of companies and websites offering garden and composting equipment.)
There are many advantages to using a shredder as part of a home composting program. The benefits of shredding compostable materials include the following:
• Speed. Your compost piles really will heat up and break down within 2 weeks because the shredder chews the compostable materials into small bits, making the job of the decomposers much easier.
• Quantity. You’ll have plenty of compost when you need it, provided you keep working at the shredder.
• Quality. You’ll have better, more uniform compost because the shredder breaks up the materials more thoroughly.
• Mixtures. You can “mix your own” right at the machine, to ensure a balance of nutrients or to make a compost specially designed to meet the needs of your soil.
• Variety. You can readily set up a program using different kinds of mulches and composts for various parts of the garden.
There is another factor about the compost shredder that will appeal to the hardworking gardener—it’s a tool you can bring to the work. This is a real boon to the compost maker who wants to have several heaps piled up in the garden where they are needed. The movable shredder makes this easy because it can go to work wherever the ground is reasonably level.
Shredders are designed to do big garden jobs for you. First, they can speed and ease your task of preparing mulches. Cut-up and macerated leaves, weeds, and other similar materials make much better mulch than the rough raw product because they hold moisture better and form a thicker blanket that chokes off the weeds.
The shredder is especially useful when you are getting ready to build your compost heap. Again, it will take the raw stock and chew it into the kind of shape that eases the job of the decomposers in your pile.
A third use that contributes to shredder popularity is the grinding and pulverizing job it can do with finished compost. The fine compost that can be achieved is ideal for potting soil and for use on lawns, in flowerbeds, in greenhouses, and in other “high-quality” jobs.
If you buy a shredder, you may find that you no longer have to travel far and wide in search of compostable materials. One gardener describes having changed his whole view of his trees, shrubs, and hedges after acquiring a shredder—now they are sources of trimmings that can be readily made into compost.
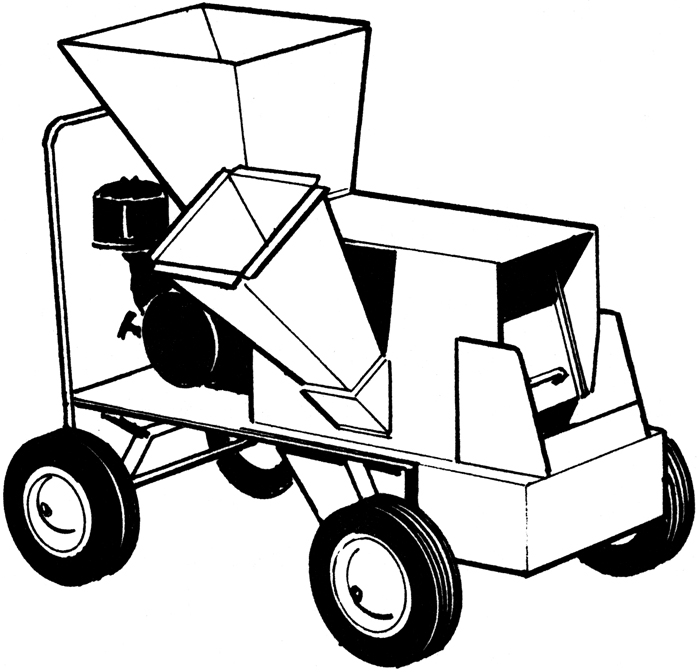
Interest in shredding equipment has grown in recent years, spurred by legislative restrictions on yard waste disposal, and equipment manufacturers have responded with a wide variety of machines. Shredders currently on the market range from small electric units designed to shred leaves and kitchen wastes, to units combining a chipper/shredder with a leaf vacuum/blower, to heavy-duty chipper/shredders capable of reducing 3-inch-thick limbs to a fine mulch. Prices are equally variable; chipper/shredders range in cost from about $150 for a small electric leaf shredder to more than $1,500 for a heavy-duty, 15-horsepower model.
Options and accessories have expanded the applications of home shredding equipment. As with many types of power machinery, operators are no longer forced to struggle with pull starters; electric models are available, and many gas-powered machines come equipped with electric starters. The majority of shredders are actually chipper/shredders—with a chute for feeding hard-to-shred materials like branches and cornstalks to a knifelike chipping blade.
Large-size hoppers for feeding in leaves are offered as accessories on many machines, as well as screens and grates of varying sizes to allow a variety of materials to be shredded. Other options include collection bags for catching shredded material and tow bars that allow some units to be pulled behind garden tractors.
FEATURES TO CONSIDER
Like any major purchase, selecting a chipper/shredder requires evaluation of several factors before buying. When choosing a machine that will be a valuable asset to your composting efforts, compare the type of materials you expect to shred and the ease of moving the shredder to your composting area with the durability of both the whole unit and its cutting mechanisms. Consider power sources: Is electricity available, or do you want a gas-powered unit? Are you satisfied with the safety features and the warranty? Finally, do the level of use you plan for your machine and the quality of the resulting shredded material justify the cost of the purchase?
Some heavy-duty chipper/shredders are capable of chopping up branches as thick as 3 inches in diameter and can shred large volumes of organic materials.
Materials
Anything that is organic and compostable, and can be reduced to a workable aggregate or mass in your shredder, is grist to your grinding mill. Large-scale gardeners find that there is plenty of material on the home grounds to keep the shredder busy for a series of weekends, particularly in the late summer and fall. There are the weeds, the grass clippings, the crop residues, and the leaves. Add to these the contents of your garbage pail and other household wastes, and you will have no trouble finding material to shred.
Next, you might be able to get wood chips from the municipal road department, sawdust from a local lumberyard, and corncobs from the nearest feed mill. All of these varieties of cellulose are fine for mixing with the garbage (so long as the cobs are ground up). If the cobs have not been ground, then you should go slowly. Experimentation is called for here, since tough cobs have a habit of flying back up out of the hopper, right at your head. Some gardeners have reported that thoroughly soaking the cobs—up to a week under water—softens them and makes shredding easier and less dangerous. Some of the larger machines can handle cobs with no difficulty at all.
No garden chore is easier or more pleasant than shredding dry autumn leaves. But if your leaves have wintered over and are tough, wet, and rubbery, feed them into the shredder in very small handfuls followed by dry sawdust, and be prepared to stop occasionally to clear the screen.
The Cutting Mechanisms
There are three or four basic systems for reducing and mixing your organic wastes. In one system, hammermill tempered-steel flails revolve freely on a rotating shaft and so have the ability to absorb shocks from hitting stones. There also seems to be a minimum of blockage in the mixing chamber caused by wet materials.
Another system uses sets of hardened-steel teeth or knives, fixed rigidly on a revolving shaft, working in combination with interior baffle plates and the bottom screen that together tend to keep the material in contact with the knives.
The smaller shredder/bagger machines work with a series of two or three rotary blades similar to those of a lawn mower. In some models, these whirling knives pass between stationary cutters that are part of the frame or chassis to achieve more complete cutting. The turbulence created by the rotary blades also whirls the aggregate out through the vent that permits you to deposit it right where it is needed—either in the compost pile or in the planting row.

There are three types of cutting mechanisms used in most shredders: (top) steel flails that revolve freely on a rotating shaft; (middle) fixed steel knives on a revolving shaft, working in combination with baffle plates and a bottom screen; and (bottom) rotary blades similar to those on a lawn mower.
At least one shredder now on the market uses nylon line, like that used in string trimmers, as a cutting mechanism for shredding leaves and other relatively “soft” materials.
Shredder Design
The design of a shredder has much to do with its efficiency in shredding wet or dry materials. In general, shredders can be divided into two types. Indirect-feed shredders work well on dry or damp refuse, but they may perform poorly on wet, sticky compost, soils, and manures. Direct-feed shredders handle both dry and wet materials, although some designs within this group work better on wet materials than others.
The main difference between the two types lies in the design of the rotor assembly and its relationship to the feed-hopper throat. The illustration below shows the generalized construction and refuse flow of indirect-feed shredders. The feed hopper is mounted on the side of the shredding chamber, and the rotor assembly (the rotating hardware that does the shredding) passes in front of the hopper throat at 90 degrees to the movement of refuse in the hopper. When the refuse enters the shredding chamber, the rotor assembly blades smash into it. Because the rotor assembly spins rapidly, the time interval between blades striking the refuse is very short. Therefore, the rotor blades smash the material into very small pieces. The spinning rotor assembly sucks the fragments around the circular shredding chamber before they’re blown from the discharge chute.
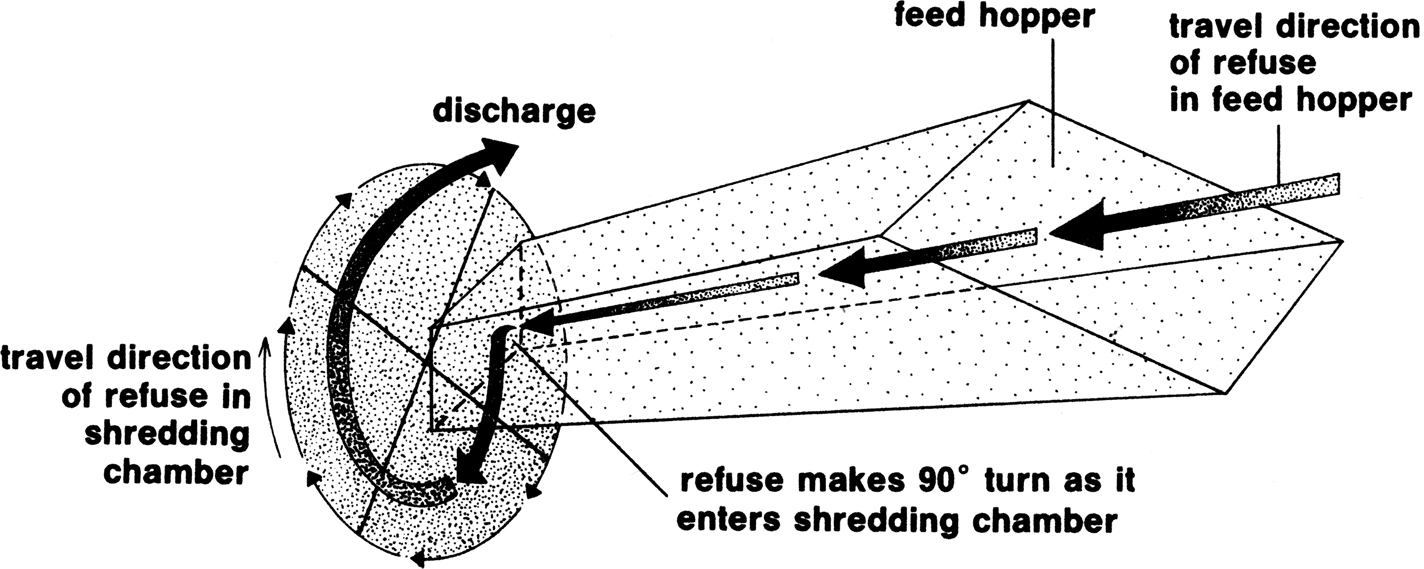
An indirect-feed shredder design.
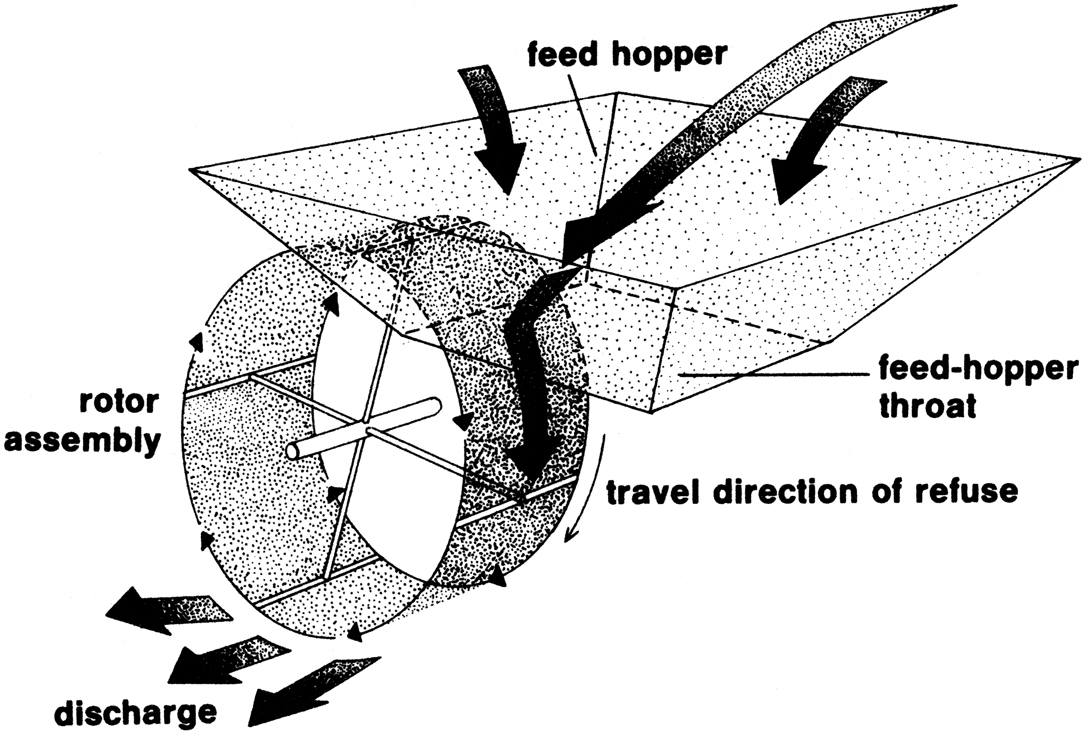
A direct-feed shredder design.
The illustration above shows a typical direct-feed shredder with rigid tines on the periphery of the rotor assembly. The tines are short, narrow pieces of steel that tear refuse apart. For fragment size control, most rigid-tine shredders use some combination of (1) adjustable discharge door, (2) semipermanent screen or bar grate, and (3) baffle plate.
The baffle plate forces the refuse in the shredding chamber against the tines. A powerful spring holds the baffle closed while the rotor assembly tries to push refuse past the baffle. The greater the spring tension, the more the baffle will slow the travel of refuse through the shredder. Once shredded refuse moves past the baffle, the tines carry the fragments over a curved piece of perforated metal.
If the piece of metal has round holes, it’s called perforated metal. If it has slots, it’s called a bar grate. The screens and bar grates in this style of shredder are securely bolted to the lower front of the shredding chamber. Fragments smaller than the holes or slots are driven through, while larger pieces are swept around the shredding chamber and further reduced in size. Screens and bar grates perform well for sizing dry leaves, stems, and vines. The fragments pass easily through the screen and pile up near the front of the shredder.
But if you try shredding wet, sticky material, the screens and bar grates will soon plug. Therefore, most rigid-tine shredders have an adjustable discharge door located at the top front of the shredding chamber. The rotor assembly twirls any soggy refuse around the shredding chamber, across the plugged screen, and to the open discharge door, where it is kicked from the shredder. Since this refuse is only partly shredded, when your pile is drier, you’ll probably want to reshred it with the discharge door partly closed. This second shredding will give you smaller fragments that will decompose quicker in your compost pile.
However, if you want to aerate wet, half-finished compost, you may run into problems. Since wet refuse tends to plug screens, you may have to remove the screen before feeding the refuse. Shredding without a screen won’t give you much size reduction but will aerate your compost, thus speeding it toward complete decomposition.
Jamming and Clogging
Overloading the machine—any machine—will result in jamming and stalling. This is especially true when you are shredding fibrous, damp, or wet materials. Work with as large a screen as possible—1¾ inches is ideal. Some manufacturers offer a grating of rods or square roller bars that seem to be nearly jam-proof. Another solution to the problem is a rack that encloses only half the shredding chamber, available on some models.
If possible, shred leaves when they are dry. Allow green, leafy trimmings to wilt in the sun for a day before shredding. Mixing wet and dry materials together can also reduce clogging—running a handful or two of dry wood chips through the shredder will carry out much of the softer, clinging material that can jam the machine. If you are shredding very wet, soggy, and rubbery leaves, work slowly, alternating drier materials with the leaves, and plan to stop occasionally to clear the screen, grate, or collection bag opening.
In the best case, your shredder will have a screen or grate size appropriate for the material being shredded. Operating a shredder without a screen or grate should be done only if it is in keeping with the manufacturer’s safety recommendations.
A clutch—either a centrifugal clutch, which depends upon the speed of the motor to activate it, or one that is manually operated—helps to avoid jams. This calls for alert operation of the machine, but it can save a lot of time spent in clearing out the shredding chamber. Some models also offer a king-size, spring-held, stone-ejection plate that is a real time-saver. A quick tug on its handle opens up the mixing chamber and spills the damp mass out to save you still another jam. By all means, ask about these plates when shopping around for a shredder.
Machine Mobility
Wheels are important. In the spring and autumn, you will want to wheel your shredder right down the garden rows, shredding leaves and crop residues right where the next crop will be planted. Check the wheels on the shredders you are considering. They should have at least a pair, rugged and rubber tired and placed so that they will support the machine with ease, comfort, and safety when you move it. Some of the larger models come with three wheels, and others have four. Make sure the machine you are thinking of buying handles easily over rough ground.
SAFETY FIRST
It is a good idea to get into the habit of wearing both safety shoes and safety glasses when operating the shredder. Shredders, especially gas-powered models, can be very noisy when running; use earplugs or some other type of hearing protection when operating your machine. If yours is an electric model, be certain that it is properly grounded, and do not operate it under wet or damp conditions. To avoid danger in feeding materials into the hopper, make use of a flexible stick as a pusher. A large sunflower stalk works well and later can be fed to the machine as “dessert.” A rigid stick may jam the machine or even bounce back to injure the operator. Many shredders include a feeding stick or pushing device to help you direct materials into the hopper. Stand clear of the exhaust chute while the machine is in operation; flying shreds and pellets of cellulose can feel like buckshot. Some shredder or mulcher models come with pivoting metal rods with which the operator maneuvers the material into place and directs it downward. The temptation is to use your hands instead. Resist this temptation. Shredders have no way of discriminating between sticks and fingers, and they will shred either quite easily. For maximum safety, always follow the usage guidelines provided by the manufacturer and wear appropriate clothing and safety equipment.
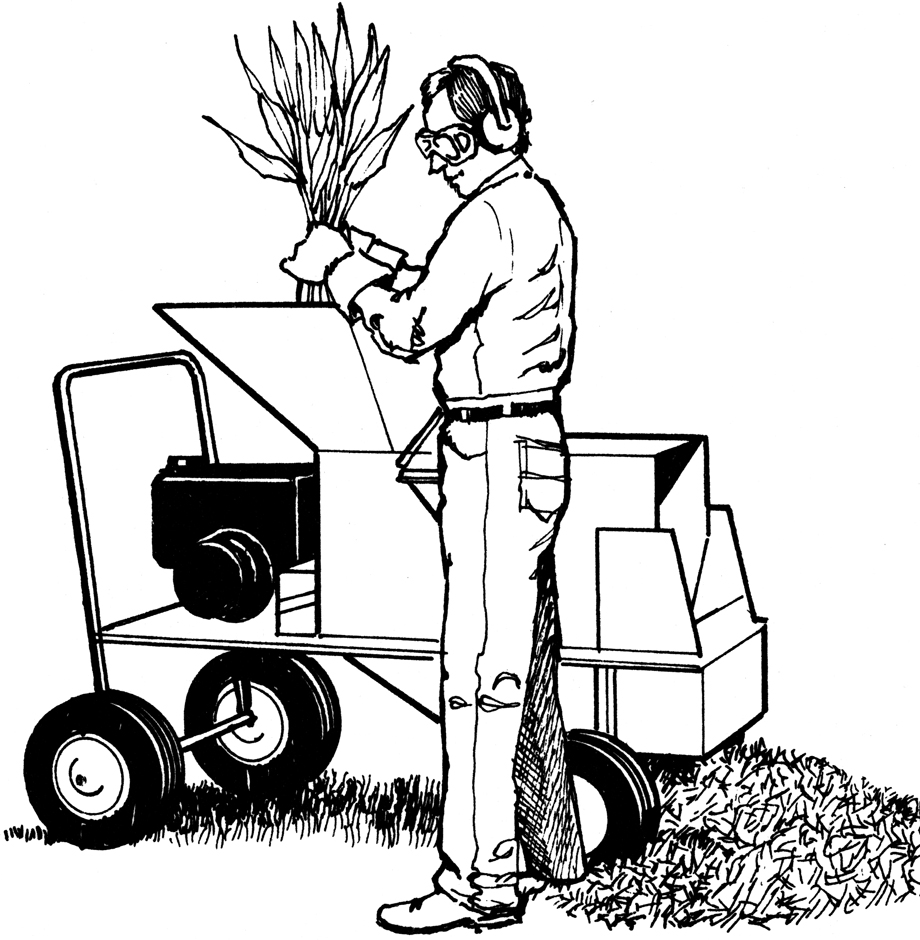
When operating a shredder, tie back long hair and wear gloves, close-fitting long pants and long sleeves, goggles, and hearing protectors.
RENT OR BUY?
Gardeners on a small scale might find that the most economical way to gain the advantages of a shredder without making the investment is to rent a machine in spring and fall and to prepare enough material for several compost piles at one time. Material to be shredded can be stored in heaps, located strategically around the garden, until the shredder is rented. Materials, once shredded, can again be stored until garbage or partially rotted manure becomes available to use with it. It is less important to grind soft garbage than to reduce the size of fibrous material; and since garbage is often the slowest material to accumulate and the hardest to store, stockpiles of fibrous material already shredded are handy to have around.
Rental fees for shredder use are high, but then so are the costs of purchasing shredders. Part of the high rental rates reflects the fact that shredders are in great demand during certain weeks of the year, while they stand idle for most of the rest of the year. Nevertheless, if you can manage your operations so that you can get by with shredding facilities for only a few days of the year, then you will save money by renting one.
A shredder lends itself well to group ownership. A garden club, a group of friends, or a neighborhood might well consider making a joint investment, sharing the responsibilities for its care and fueling.
SUBSTITUTES FOR THE SHREDDER
Not ready to make a purchase or spring for a rental? You can create similar results with other garden and household tools.
The Rotary Mower
If you have no access to a shredder or a grinder, you can use a rotary mower to grind up straw, weeds, and leaves. Sometimes a mower works even better than a shredder on dry leaves.
For mowers with side exit ports, use a carton or fence, or the side of your compost bin, as a backstop. If your mower can be adjusted, set it for cutting high. Pile up the material in low piles. Then depress the handle of your mower and push the machine forward until the blades are positioned directly above the pile. Lower the machine gradually into the pile, lifting it and dropping it again several times. If the mower seems to be on the point of stalling, depress the handle again to lift the cutting blades. For really fine grinding, repeat the process. Mulching mowers are ideal for this use, since they cut the materials more than once on a single pass.
The Meat Cleaver
Helga and Bill Olkowski, in The City People’s Book of Raising Food, report that they discovered that coarse materials like melon rinds, dry weed stalks, or straw decompose more rapidly when cut into short lengths of 3 to 8 inches. Convinced of the need to reduce the size of their materials, the Olkowskis bought a shredder. The noise, the danger, the tendency to jam, and the fuel consumption of their machine soon persuaded them that they had made an unwise investment. Finally, they went back to their old method of using a cleaver to shred and chop material.
The Olkowskis’ experience points out once more that the choice of grinding or chopping method, like many other choices in composting, is up to you. No one should tell you that you must have a shredder to make good compost. Composters agree that shredders and grinders save time, especially in large gardens. Shredded material composts more rapidly, and machine shredding is quicker than hand shredding. Time saving, then, is on one side of the ledger. Fuel consumption, machine cost, and noise are on the other side. Only you can place a value on your time in relationship to these other factors.
The Food Processor
Some composters use electric blenders, food processors, or meat grinders to reduce household garbage to particles. Meat grinders are painfully slow. Blenders are quicker but can reduce garbage to a pulp that tends to cake when dried out. Food processors are perfect—highly efficient, miniature shredders that will quickly and easily shred materials to your specifications.
Kitchen garbage, of course, doesn’t have to be shredded or ground in order to break down sufficiently, since it is the first thing to be attacked by bacteria in the compost heap. Nevertheless, shredding does speed up the process.
Blender Compost
For reducing kitchen scraps to small, readily composted pieces, a blender can be every bit as effective as a shredder. As kitchen scraps accumulate, put them in the blender, add enough water to cover them, and blend until finely chopped. Then pour the “liquid compost” into a bucket with a lid to keep it until you can take it out to the garden. Pour it into a shallow hole dug in your pile, and cover it with a shovelful of compost. Or if your gardening space is limited and you don’t have room to make conventional compost, dump your liquid gold directly into trenches dug in the garden, and cover it with a shovelful of dirt. Some people will freeze their compostable refuse until it can be brought to a local composting site or added to a new compost pile.
TILLERS AND TRACTORS
Rotary tillers and garden tractors with tiller attachments are valuable tools in the composting process—particularly in sheet composting and green manuring.
Green manure plants, which can add tremendous amounts of organic matter to the soil, are easily handled with the proper garden power equipment. Fertility-building crops such as rye, clover, and buckwheat can be fitted into the garden rotation schedule. The practice is especially worthwhile in large gardens, where at little cost, time, or effort, a great amount of organic matter is returned to the soil.
Green manuring is an idea and a method that has long been used by farmers to build soil but has largely been overlooked by gardeners. By taking full advantage of tillers and garden tractors, however, you can do as good a green-manuring job as any farmer. You can work into the soil a green manure crop that soon will decay into fertile humus.
Sheet composting is accomplished by spreading extra organic material on the bare ground, or over a green manure crop. Then both the crop and the extra material are worked into the soil, where they will quickly decompose.
Green manuring and sheet composting are often more efficient methods than heap composting, since the decay occurs right in the soil and there is no turning and far less hauling of materials.
The secret behind fast sheet composting is rotary tilling. For example, suppose that at the end of the summer you have several good stands of flowers or other plant debris that you ordinarily gather up and take to the compost heap. Unless shredded, they can take anywhere from 3 to 6 months to decompose. But with a rotary tiller, you can till them in to a depth of 3 or 4 inches, and—at the end of only a few weeks—you will find scarcely a trace of the plants left. Instead there will be only a more fertile soil.
A note of caution: Your soil will thank you for avoiding use of the rotary tiller whenever possible. While it is extremely useful for incorporating green manures and garden refuse, it should not be used to cultivate between rows and similar tasks. By disturbing the soil structure—that is, pulverizing all those aggregates—the soil loses its porosity that allows good circulation of water and air. This inevitably suppresses the all-important microbial community that is responsible for creating soil health. Best practice is to leave a good layer of trash or mulch on the surface, and try to get some kind of plant roots growing in it as quickly as possible. Organic farmers, including Jeff Moyer of the Rodale Institute, have pioneered methods of killing green manure crops without tilling them in, and then planting directly into the brown layer of vegetation, either using vegetable transplants or special tiller-seeders that cut a narrow slice into which the desired seeds, such as corn or beans, can be inserted.