Chapter 3: Organizing Your Photos
Are you ready to organize your digital photos? You can catalog, view, and sort photo files by using the Organizer. A complement to the Editor in Photoshop Elements, the Organizer helps you manage your growing library of digital pictures by categorizing them in a variety of ways. This chapter shows you how to take advantage of the many photo-management features in the Organizer.
View Photos in the Media Browser
Display a Slide Show in Full Screen
Introducing the Organizer
You can use the Organizer program to manage your growing library of digital photos. Photos you import or save in Photoshop Elements are automatically added to the Organizer catalog. In the Organizer, you can sort and filter your photo collection in different ways. You can also group photos into albums and tag them with descriptive keywords.
Once you have found one or more photos that you want to edit, you can switch to the Editor interface to cut and paste objects in your photo, adjust color and lighting, or apply special effects. You can switch back to the Organizer when you are done or when you need to find more photo content.
Virtual Browser

The Organizer acts as a virtual browser, enabling you to view thumbnails, or miniature versions, of your pictures. The thumbnails you see in the Organizer are merely pointers to the original file locations. The images remain intact in their original location unless you decide to delete them. The Organizer enables you to view your photos from one convenient window. See the sections “View Photos in the Media Browser” and “View Photos by Date” to learn more.
Catalog
When you bring photo files into the Organizer, the program adds them to your catalog of images. Images are cataloged by date. You can keep all your photos in one catalog, or you can store them in separate catalogs. If you want to group your photos further, you can place them into albums or stacks. See the sections “Create a Catalog” and “Work with Albums” for more on these topics. For more on stacking photos, see Chapter 4.
Keyword Tags

You can use keyword tags to help you sort and track your photos. A keyword tag is a text identifier you assign to a photo. After you assign tags, you can search for photos that match certain tags and also sort your photos in tag order. You can assign any of the preset tags that come with the Organizer, or you can create your own. The Organizer’s presets include tags for people, places, events, and more. You can also assign multiple tags to the same photo. For more on keyword tags, see Chapter 4.
Share Photos

One of the advantages of digital photos over traditional prints is the ease in which digital photos can be shared. Once you have sorted and tagged your photos in the Organizer and decided on which are the best of the bunch, you can share them with the world in a variety of ways. The Share tab enables you to create online photo galleries based on the albums you have created in the Organizer. You can also share on social networks such as Facebook and photo-sharing sites such as Flickr or send your images to others via e-mail. See Chapter 17 for details.
Find Photos

As your photo collection grows, being able to quickly find photos becomes critically important. Although filtering photos by album or keyword tag offers one way to find photos, the Organizer also includes full-featured searching tools. You can search your catalog by date, filename, camera model, visual similarity, and more. You can even mix multiple search criteria to create more powerful searches. See the section “Find Photos” for more information.
Creations
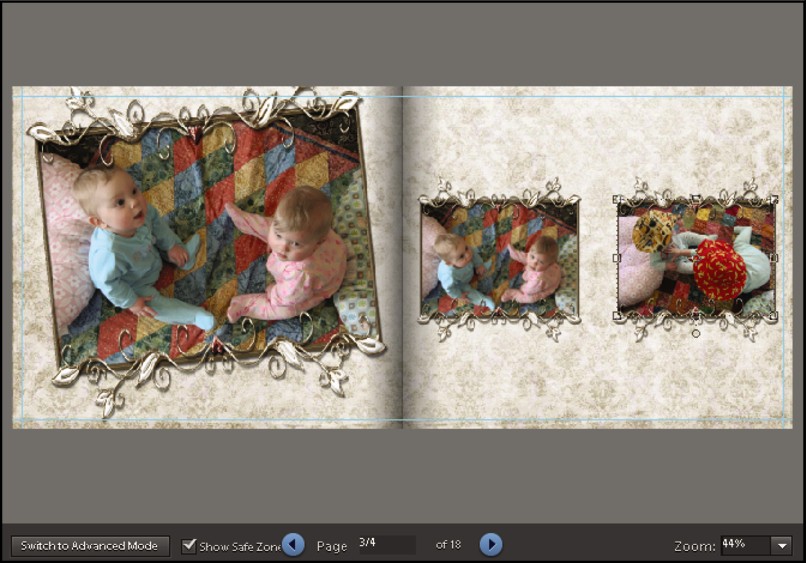
Because it enables you to easily organize and find photos in your collection, using the Organizer is an important first step in completing various Photoshop Elements projects. For example, you can display your favorite photos in the Organizer and then create a custom slide show to distribute to friends and family. The slideshow feature is not available to Mac users. You can also create photo books, postage stamps, and more. See Chapter 16 for photo projects you can build in Photoshop Elements.
Open the Organizer
You can organize and manage your digital photos in the Organizer in Photoshop Elements. The Organizer works alongside the Editor to help you keep track of the digital photos and other media you store on your computer. You can open the Organizer from the Welcome screen that appears when you first start up Photoshop Elements or switch to it from the Editor. The main feature of the Organizer is the Media Browser, which features a grid of miniature versions of your photos, also known as thumbnails. You can select a thumbnail and then perform basic commands on it in the Organizer or open the image in the Editor to perform more complex operations.
Open the Organizer
From the Welcome Screen
 Start Photoshop Elements.
Note: See Chapter 1 for more on starting Photoshop Elements.
The Welcome screen appears.

 Click Organize to open the Organizer.
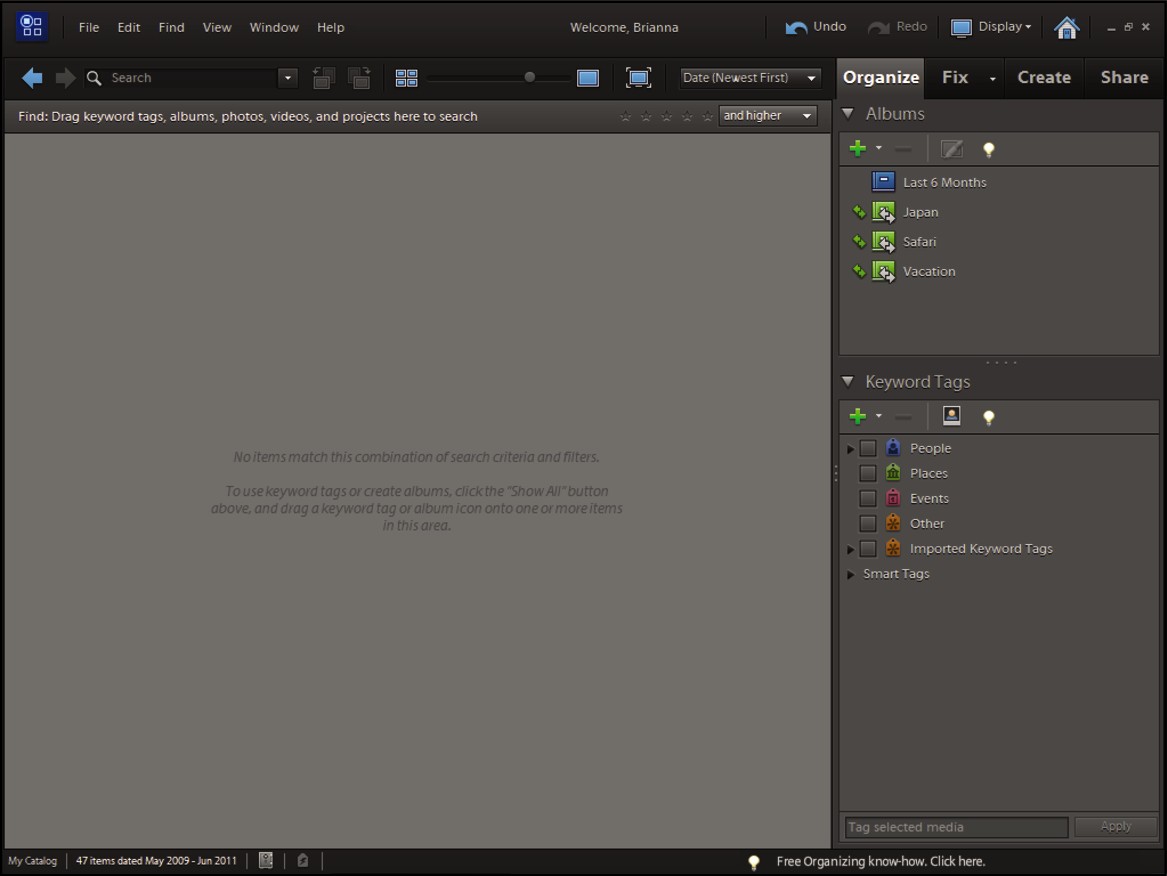
The Organizer opens.
To import photos into the Organizer workspace, see Chapter 2.
To create a new catalog with which to organize your photos, see the section “Create a Catalog.”
From the Editor
 Start Photoshop Elements.
 From the Welcome screen that appears, click Edit to open the Editor.
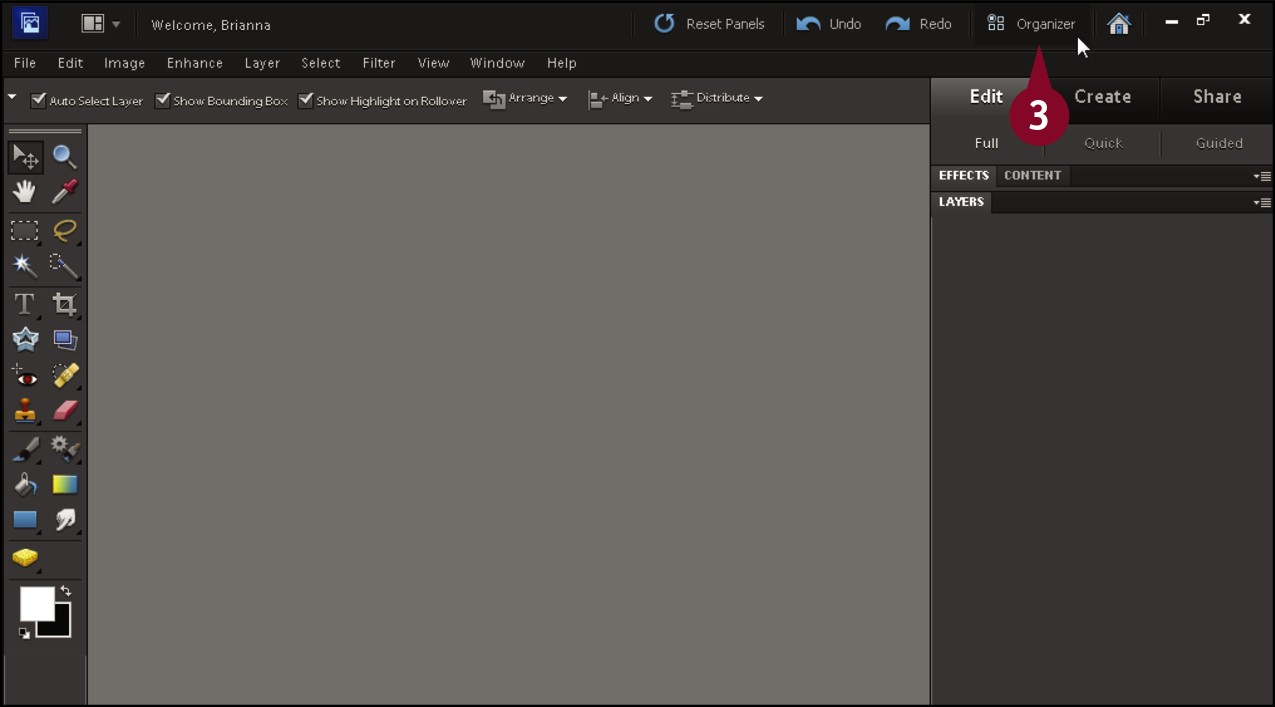
 Click the Organizer icon (
 ).
).
The Organizer opens.
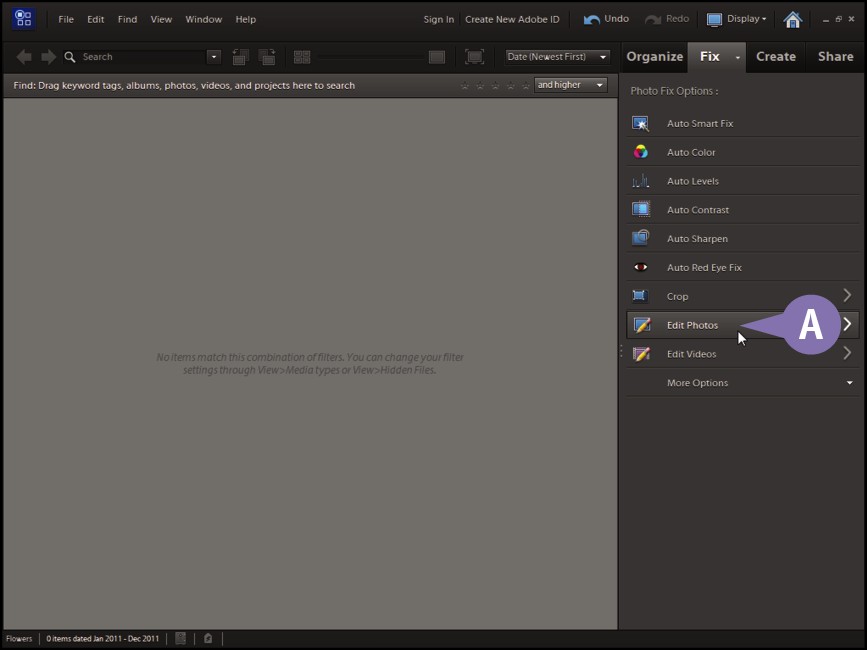
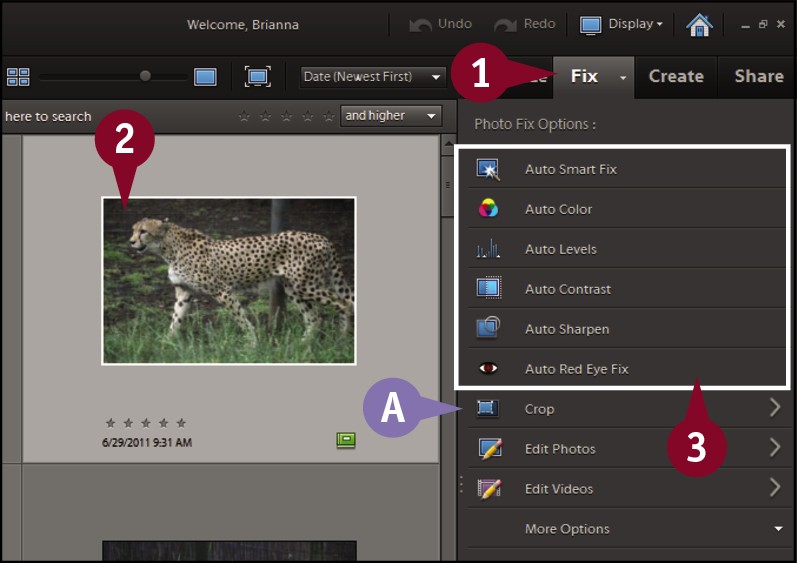
A To return to the Editor, click Fix and then click Edit Photos.
Create a Catalog
The photos you manage in the Organizer are stored in catalogs. You can keep your photos in one large catalog or separate them into smaller catalogs. When you start the Organizer, Photoshop Elements creates a default catalog for you called My Catalog. You can organize your photos within a catalog into smaller groups called albums. See the section “Work with Albums” for more. You can also combine similar photos into stacks to save space when viewing your catalog. See Chapter 4 for details. Photoshop Elements 10 can open catalogs created in previous versions of Photoshop Elements and can convert them so you can use all the newest features of the Organizer.
Create a Catalog

 In the Organizer, click File.
 Click Catalog.
A You can restore a catalog you have previously backed up by clicking Restore Catalog from CD, DVD or Hard Drive. See Chapter 17 for more on backing up photos.
The Catalog Manager dialog box opens.
Photoshop Elements lists the available catalogs.

 Click New.
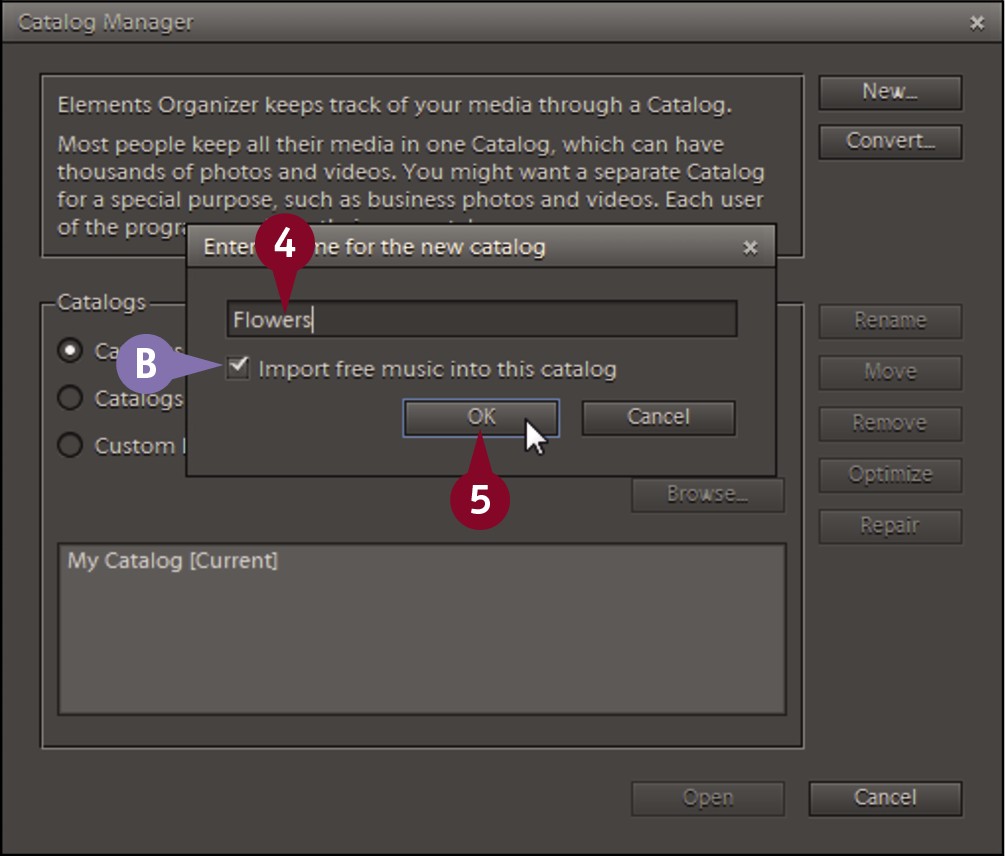
 Type a name for the new catalog.
B You can click here to import free music ( changes to
  ), which Windows users can use in the backgrounds of slide shows.
 Click OK.
Photoshop Elements creates the new catalog and opens it.
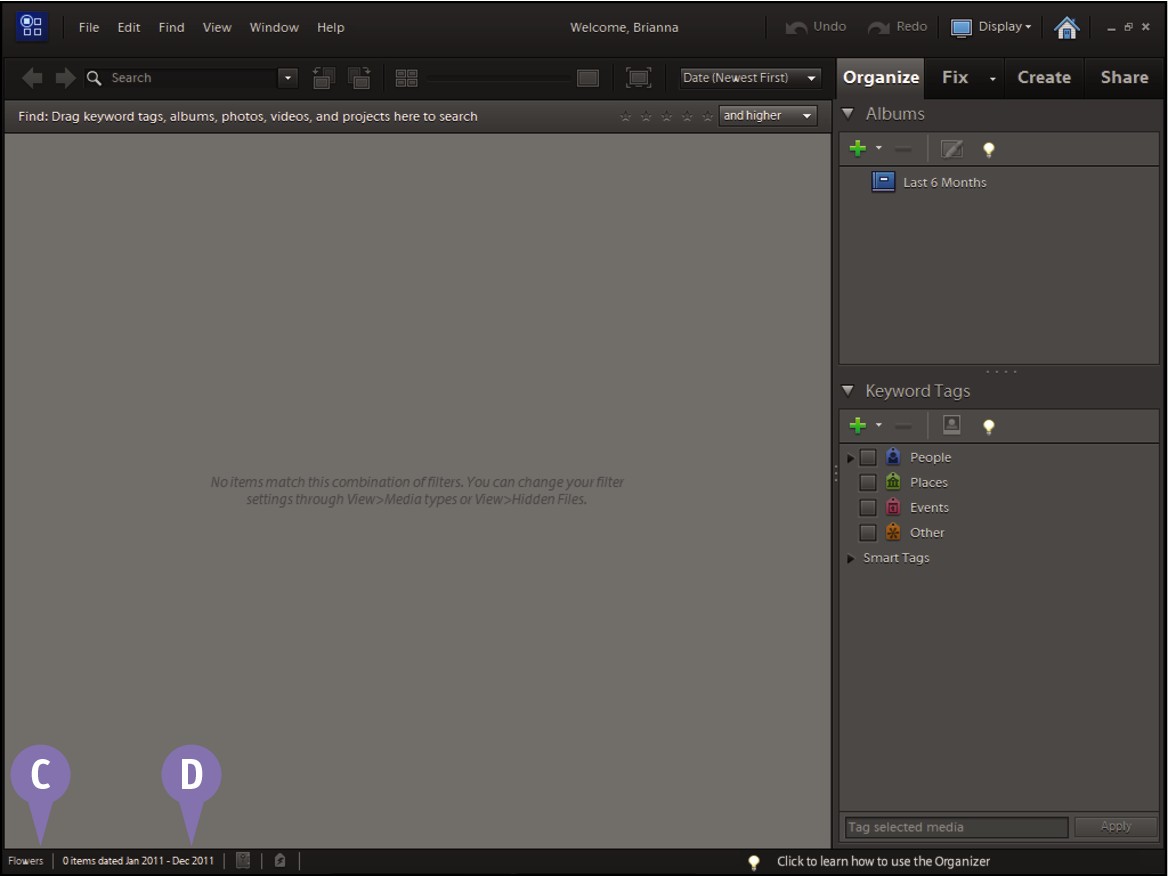
C Photoshop Elements displays the name of the current catalog.
D The number of files in the catalog and the range of dates for the files appear here.
Note: To add photos to your catalog, see Chapter 2.
View Photos in the Media Browser
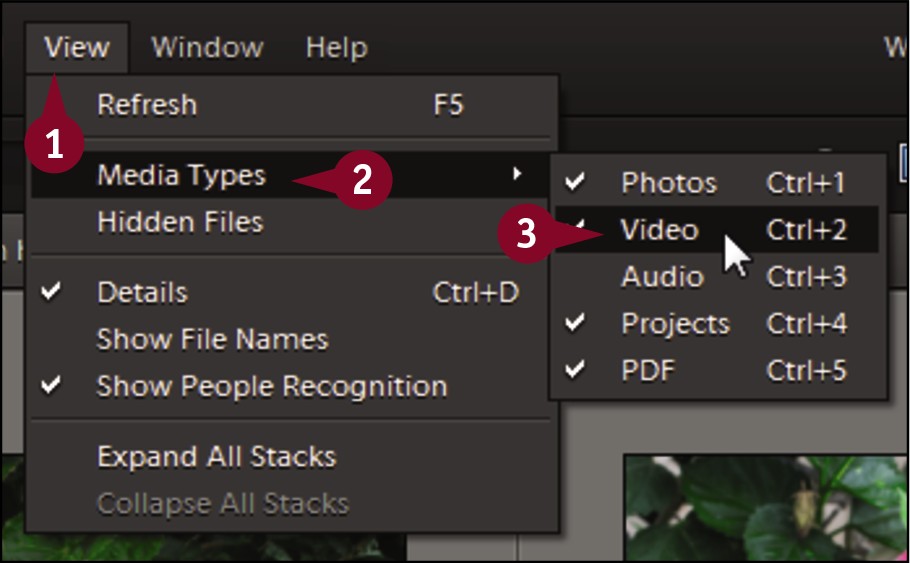
After you add photos to your catalog, you can view them by using the Organizer’s Media Browser. The Media Browser displays thumbnails, or miniature versions, of your photos, along with details about those photos. You can filter, sort, and change the size of the thumbnails. Shrinking the thumbnails enables you to view more of them at once, whereas enlarging the thumbnails lets you examine their details from within the Organizer. Filtering and sorting enables you to find specific photos from thousands very quickly. For more about sorting and filtering using keyword tags, see Chapter 4.
View Photos in the Media Browser
 Open the Organizer.
The Media Browser displays the photos in the Organizer catalog.
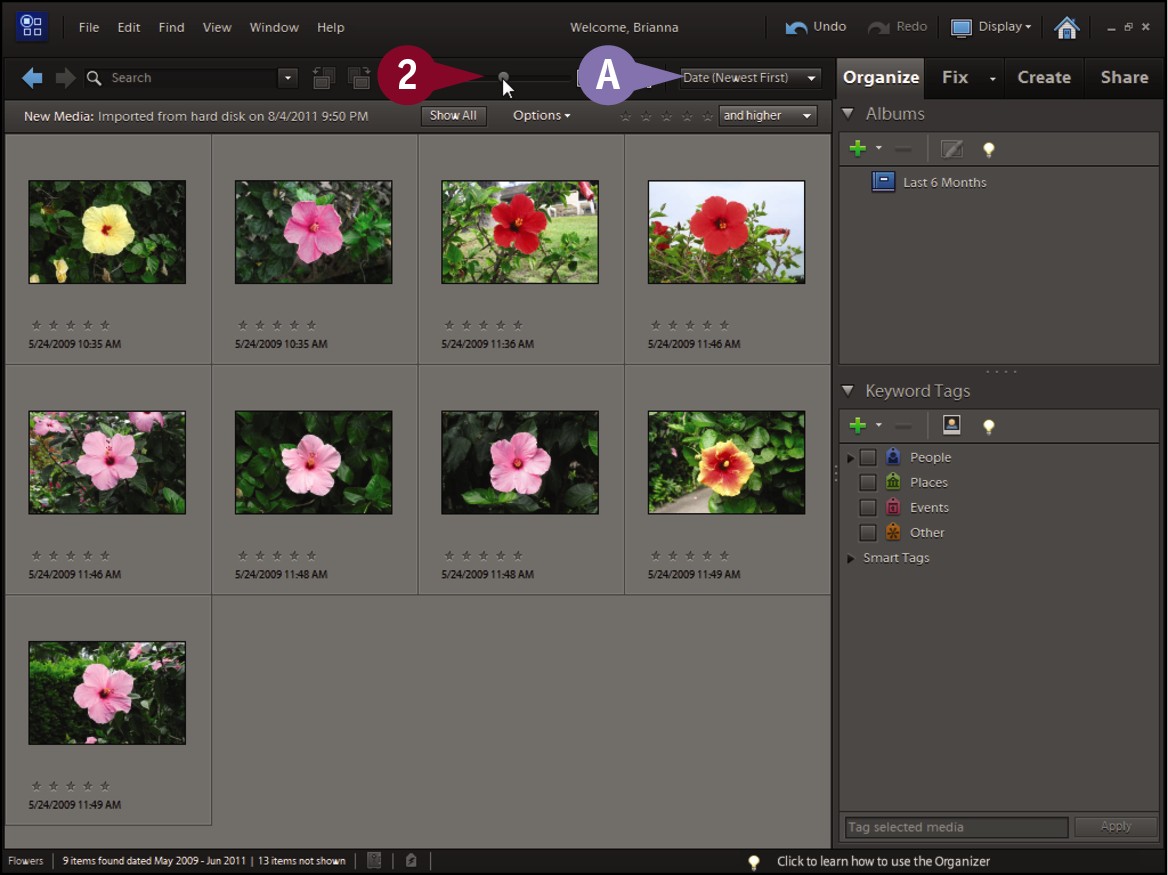
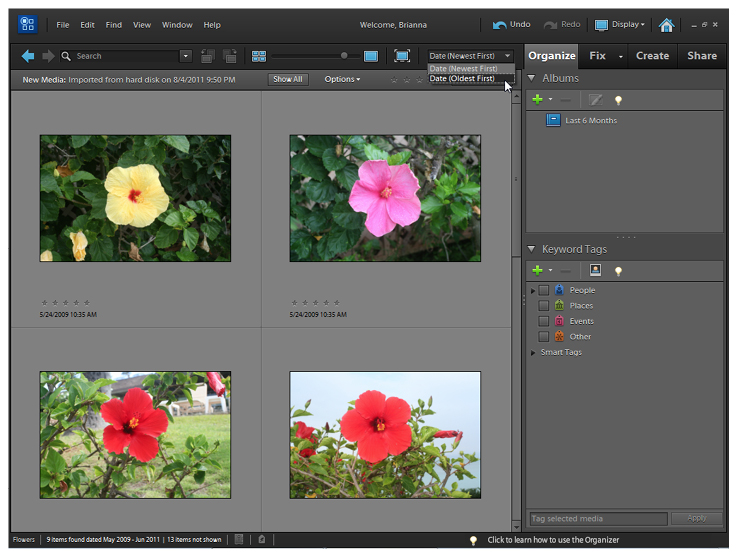
A Photos are sorted by their capture date from newest to oldest by default.
 Click and drag the thumbnail size slider (
 ) to the right.
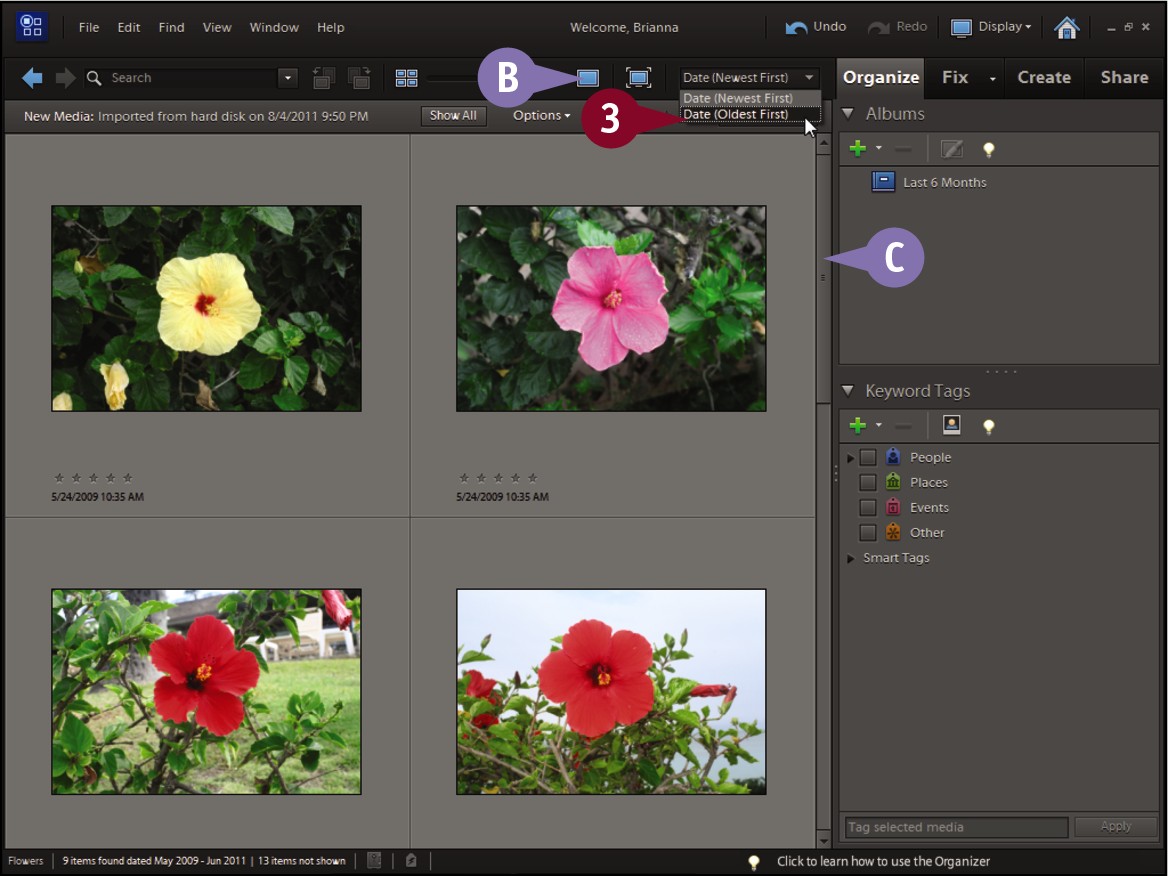
B The thumbnails enlarge. You can click  to maximize the thumbnails.
Dragging the slider ( ) to the left decreases the size of the thumbnails. You can click
  to minimize the thumbnails.
C You can use the scroll bar to browse other available thumbnails in the Media Browser.
 Click the down arrow (
 ) and then click Date (Oldest First).
The sorting order reverses in the Media Browser, with the oldest photos at the top.

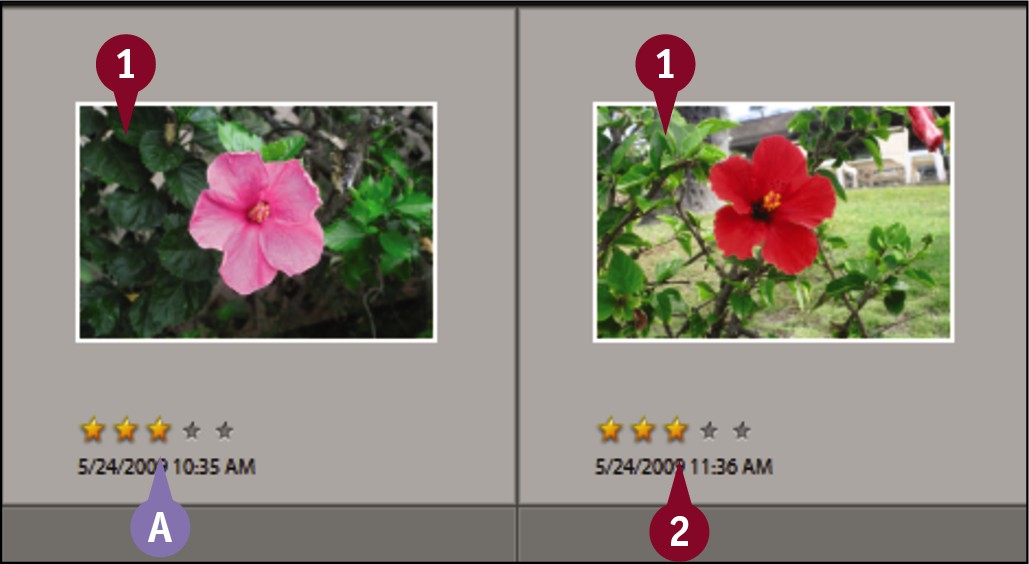
D The star rating and date details appear below each photo.
Note: See the section “Rate Photos” for more on star ratings.
 Click the left arrow (
 ).
).
Photoshop Elements returns the Media Browser to the previous view, which was with the images sorted with the newest displayed first.
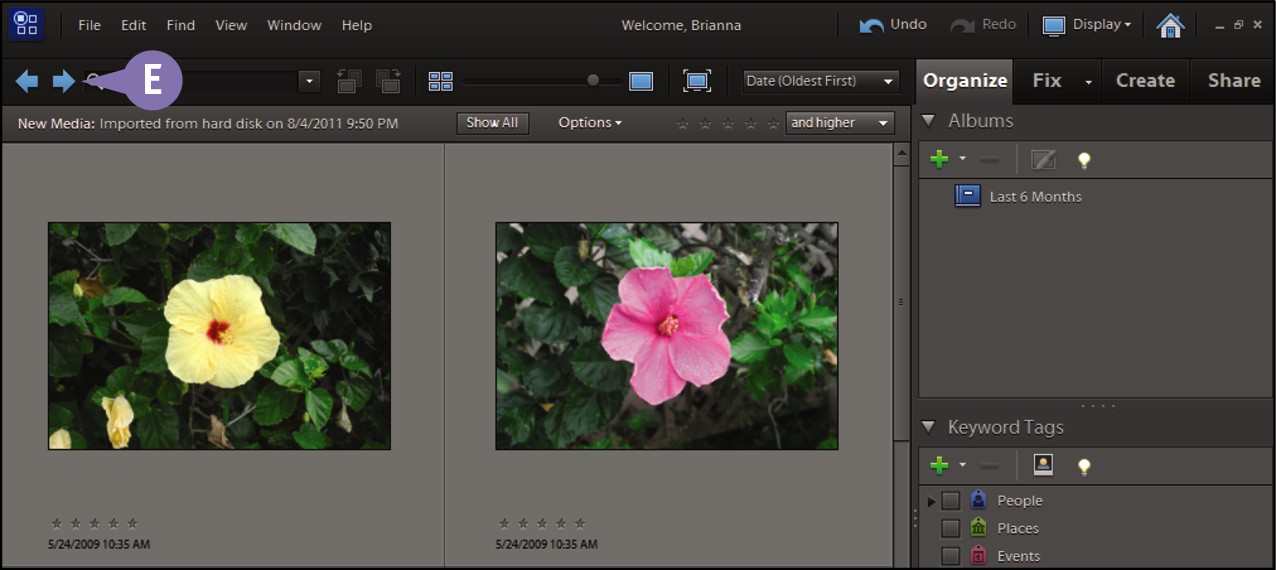
E You can click the right arrow ( ) to go to the next view.
View Photos in Full Screen
You can switch to Full Screen mode in the Organizer to get a clearer view of your photos. Photoshop Elements expands the photos to fill the workspace and displays special panels for applying commands.
Full Screen mode is useful when you want to perform basic edits on a large version of your photo but do not want to switch to the Editor interface. You can access a film strip in Full Screen mode to access image thumbnails from your current catalog. This enables you to switch to another image.
View Photos in Full Screen
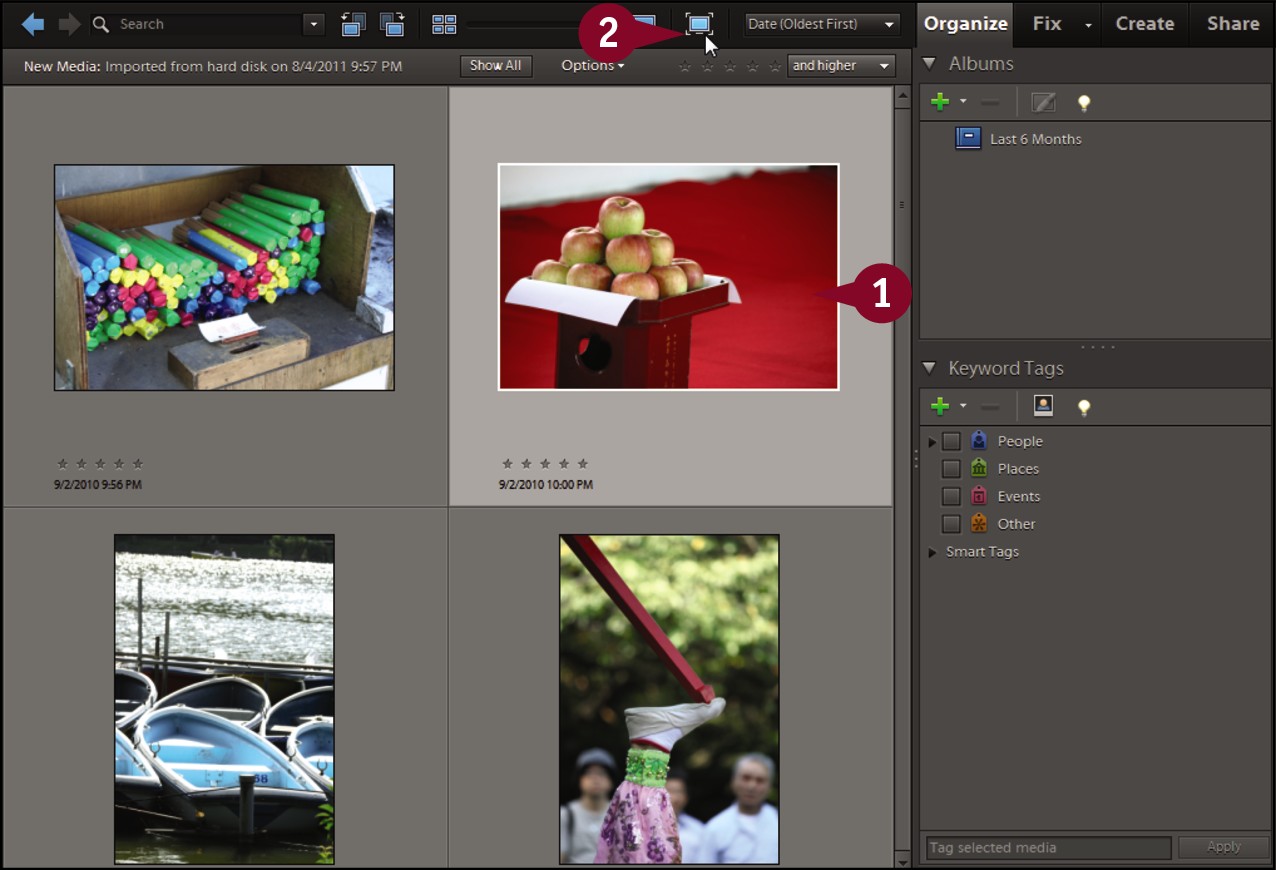
 In the Organizer, click the photo you want to view in Full Screen.
 Click
Click  .
.
Photoshop Elements opens the photo in Full Screen.
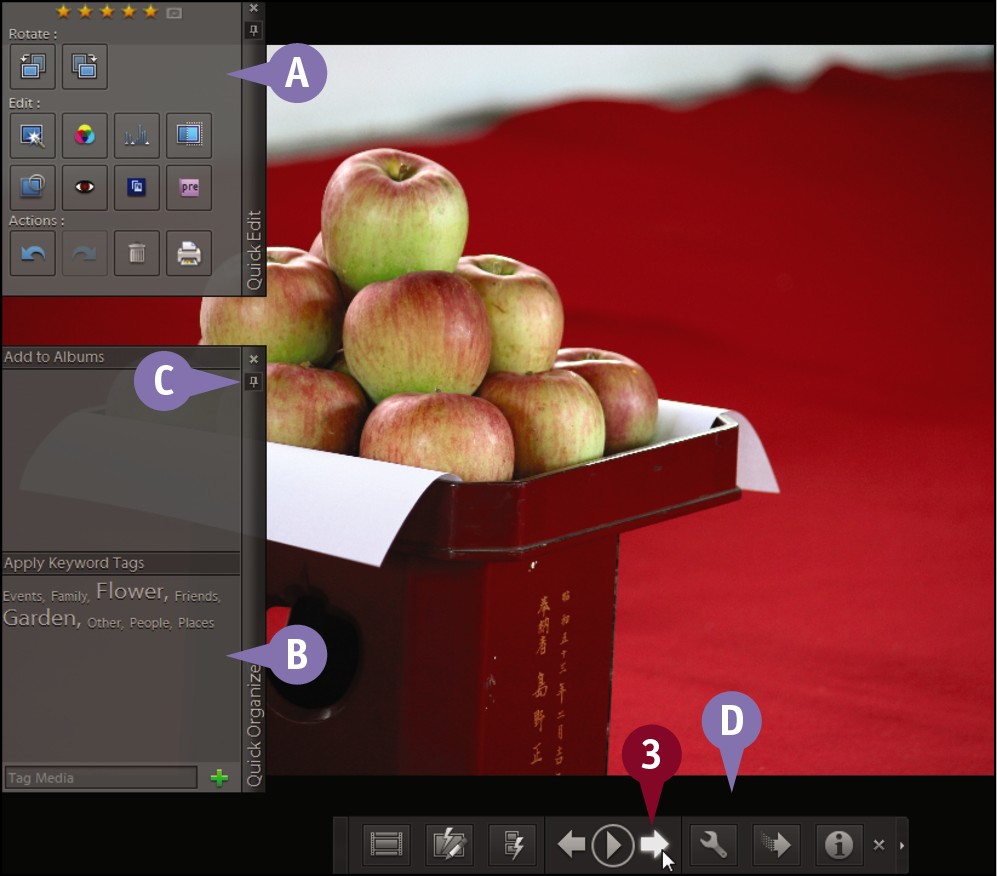
A A Quick Edit panel for performing image edits is shown.
B A Quick Organize panel for adding images to albums and applying keyword tags is shown.
C The panels automatically hide if not used. You can click Auto Hide ( ) to turn this hiding on and off.
D Controls for viewing different photos and managing panels appear here.
 Click
Click  to go to the next photo in the Organizer, or press the
  key.
key.
Photoshop Elements displays the next photo.
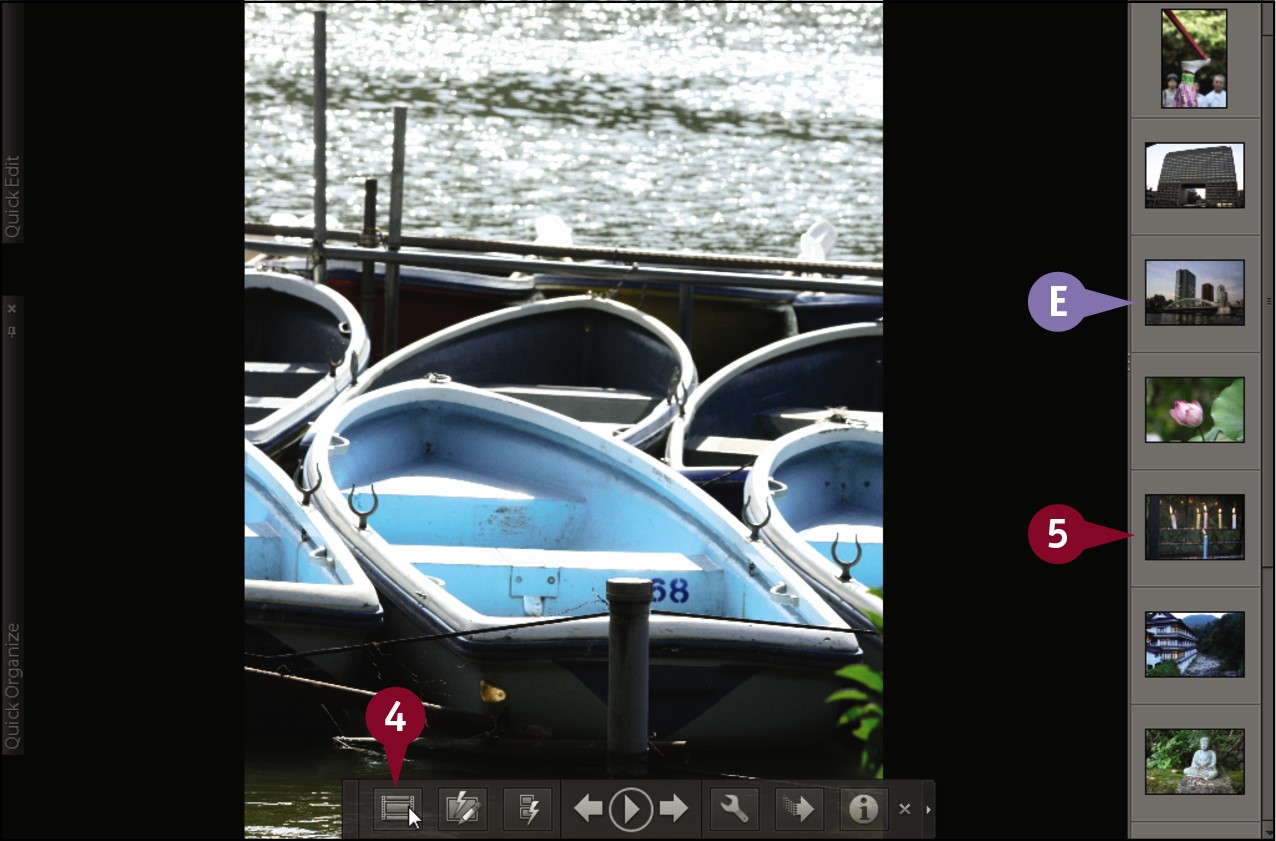
 Click Toggle Film Strip (
 ).
).
E The Film Strip opens, displaying thumbnail versions of your images.
 Click a thumbnail.
Photoshop Elements displays the photo.
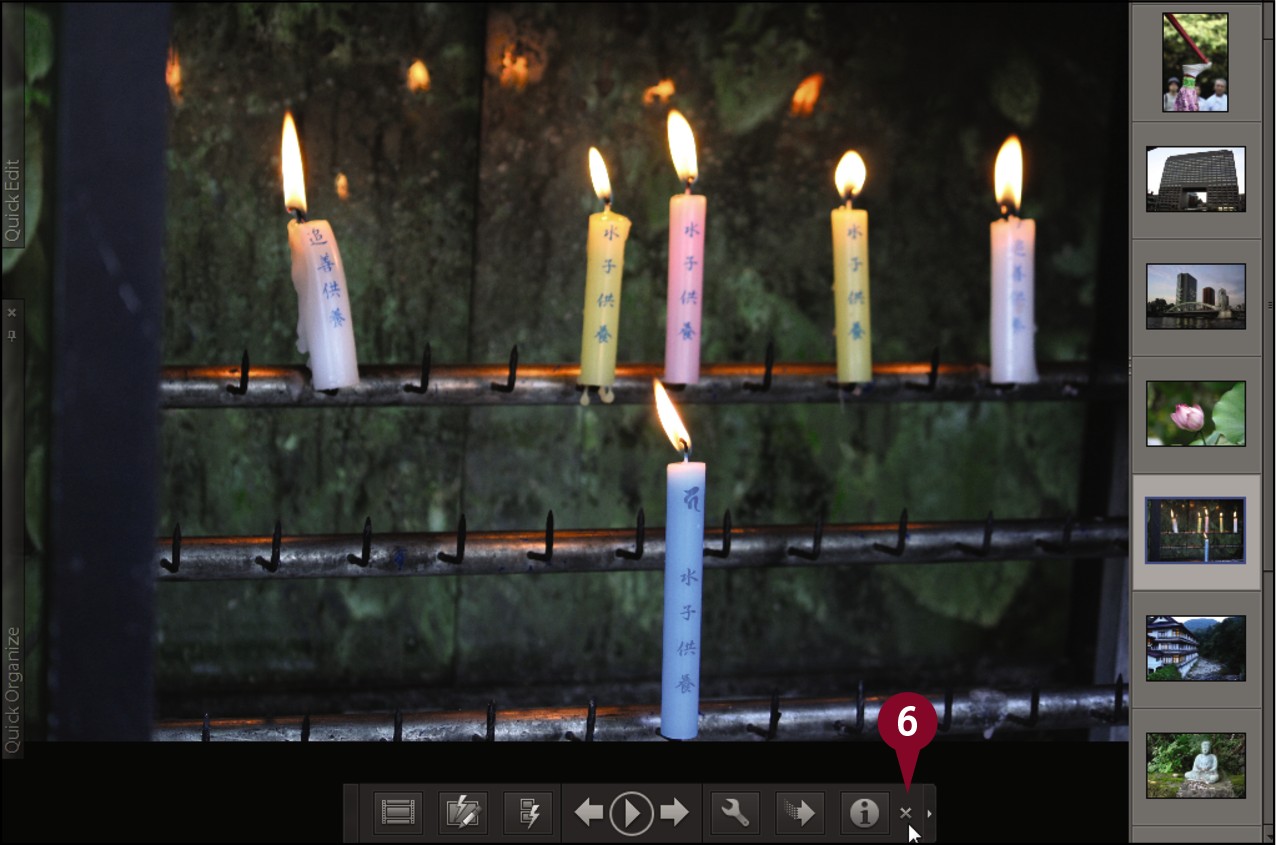
 Click
Click  or press the
  key to exit Full Screen mode.
Display a Slide Show in Full Screen
You can play a slide show in Full Screen mode to cycle through large versions of your images. You can choose background music and transition effects to accompany the slides. This enables you to display photos from a vacation or event to friends and family on a monitor or, if your computer is hooked up to one, on a television screen.
Buttons enable you to play or pause the slide show, or flip through the slides one at a time. You can also create a slide show in Photoshop Elements and turn it into a movie that you can send to others. See Chapter 16 for details. Note that while Mac users can view images in Full Screen, only Windows users can create and save slide shows.
Display a Slide Show in Full Screen
 In the Organizer, display the images you want to view as a slide show in the Media Browser.
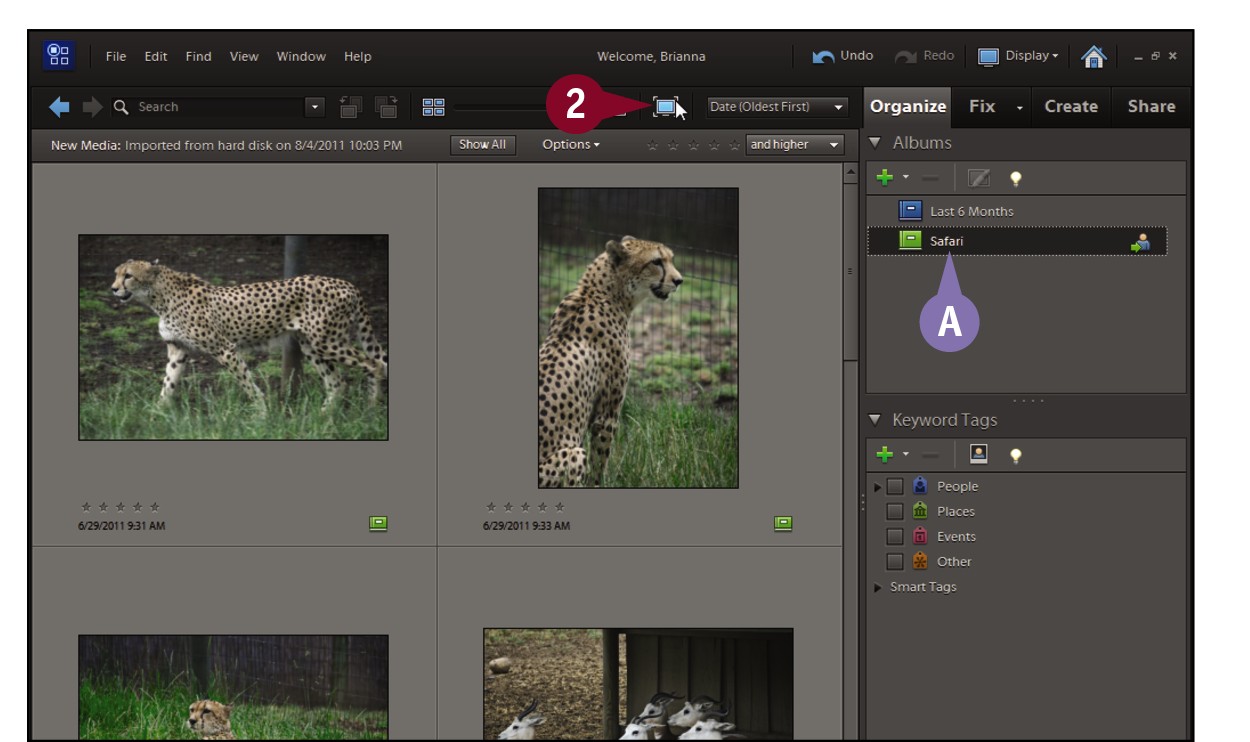
A You can click an album to display photos from an album as a slide show.
 Click
Click  .
.
Photoshop Elements displays the first image in Full Screen mode.
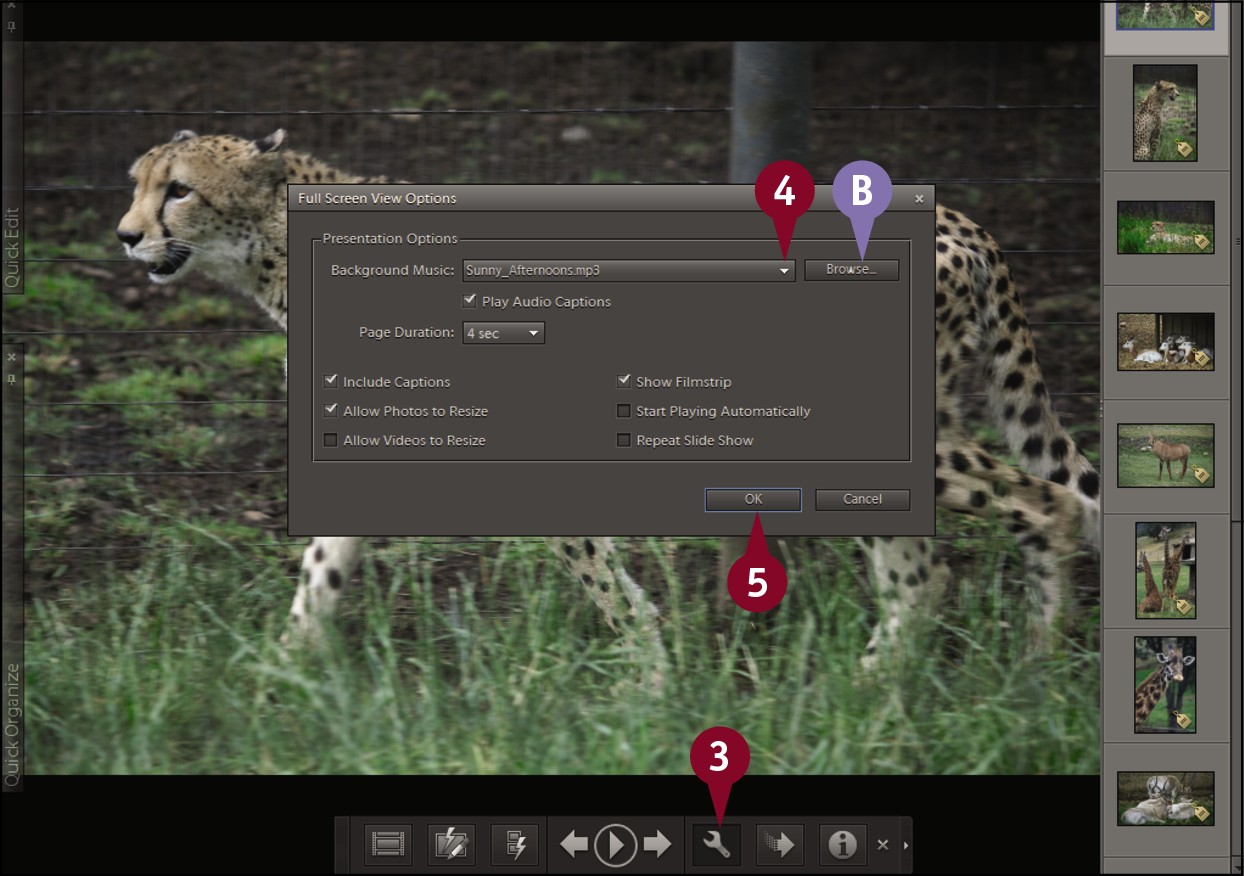
 Click the Open Settings Dialog button (
 ).
).
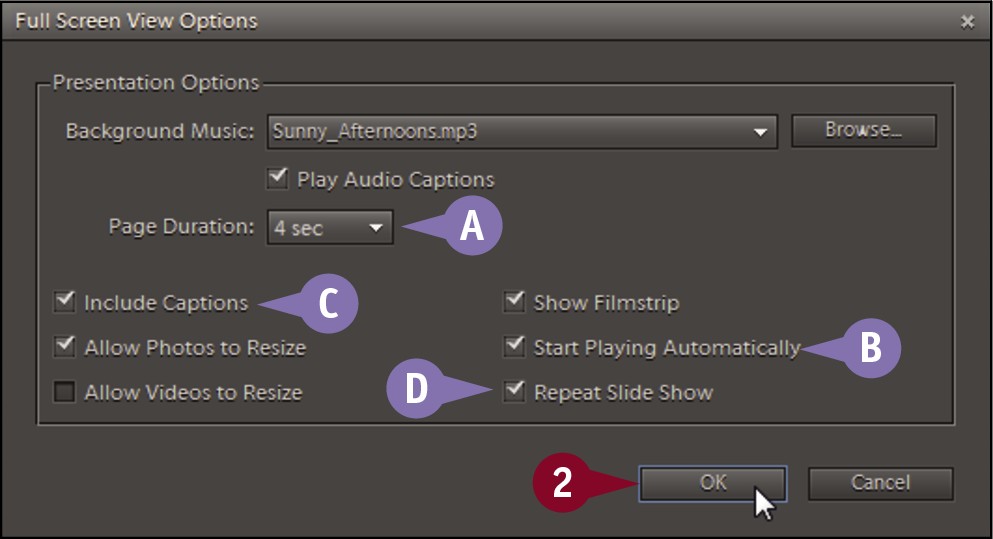
The Full Screen View Options dialog box opens.
 Click the
  to choose background music.
B You can click Browse to browse for music on your computer to use as background music.
 Click OK to close the dialog box.
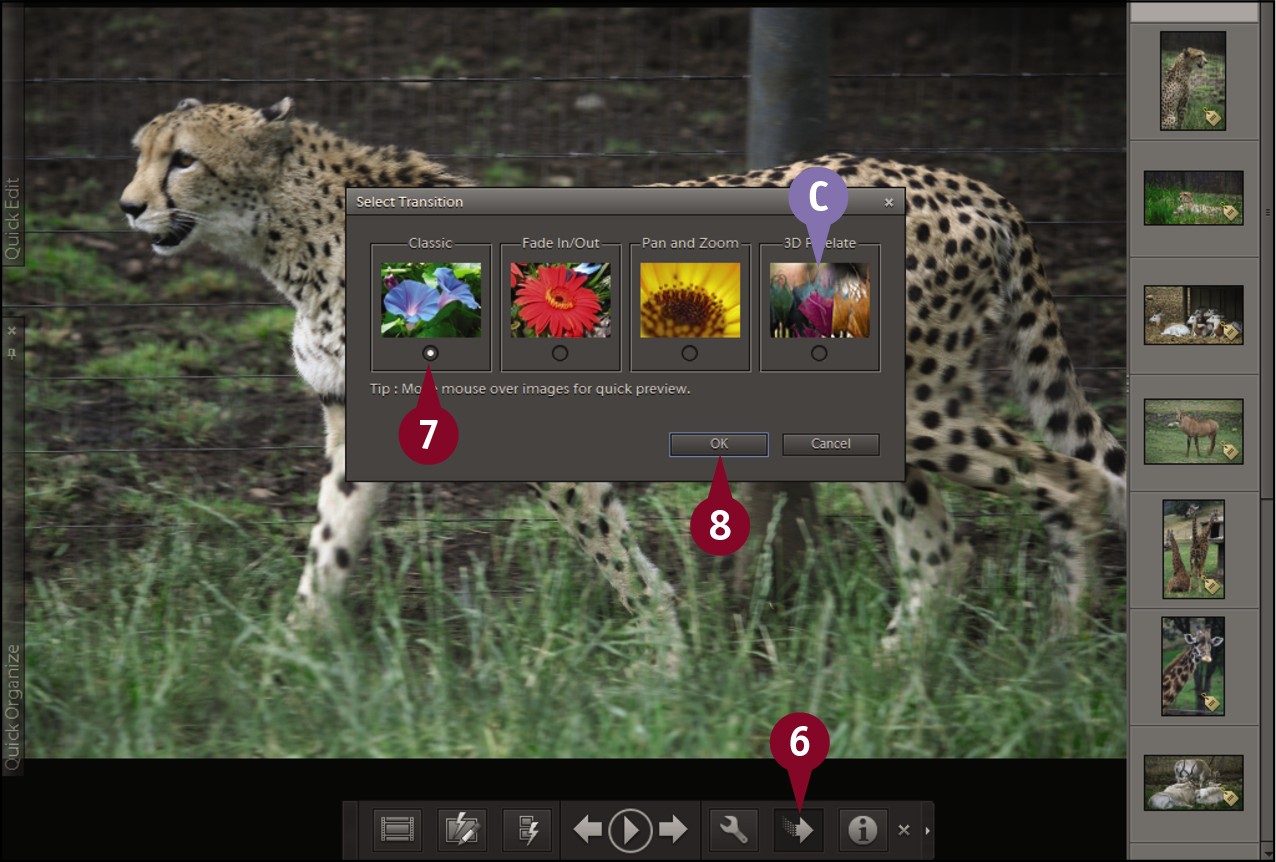
 Click the Transitions button (
 ).
).
The Select Transition dialog box opens.
 Click a transition effect to display between slides in the slide show.
C You can position your mouse pointer over an option to preview the option.
 Click OK to close the dialog box.

 Click the Play button (
 ) or press
  .
.
Photoshop plays the slide show, cycling through the images at full screen.
You can click the Play button ( ) again to pause the slide show.
View Photo Properties
You can view the properties for any photo in your catalog. The Properties box displays a photo’s general information, which includes the filename, file size, image size, and location.
You can also view any associated tags, file history, and metadata information. Metadata is detailed information about how a digital photo was taken; it includes camera settings, such as exposure time and f-stop. You can automatically organize your photos based on their metadata by creating a Smart Album. For more information, see Chapter 4.
View Photo Properties
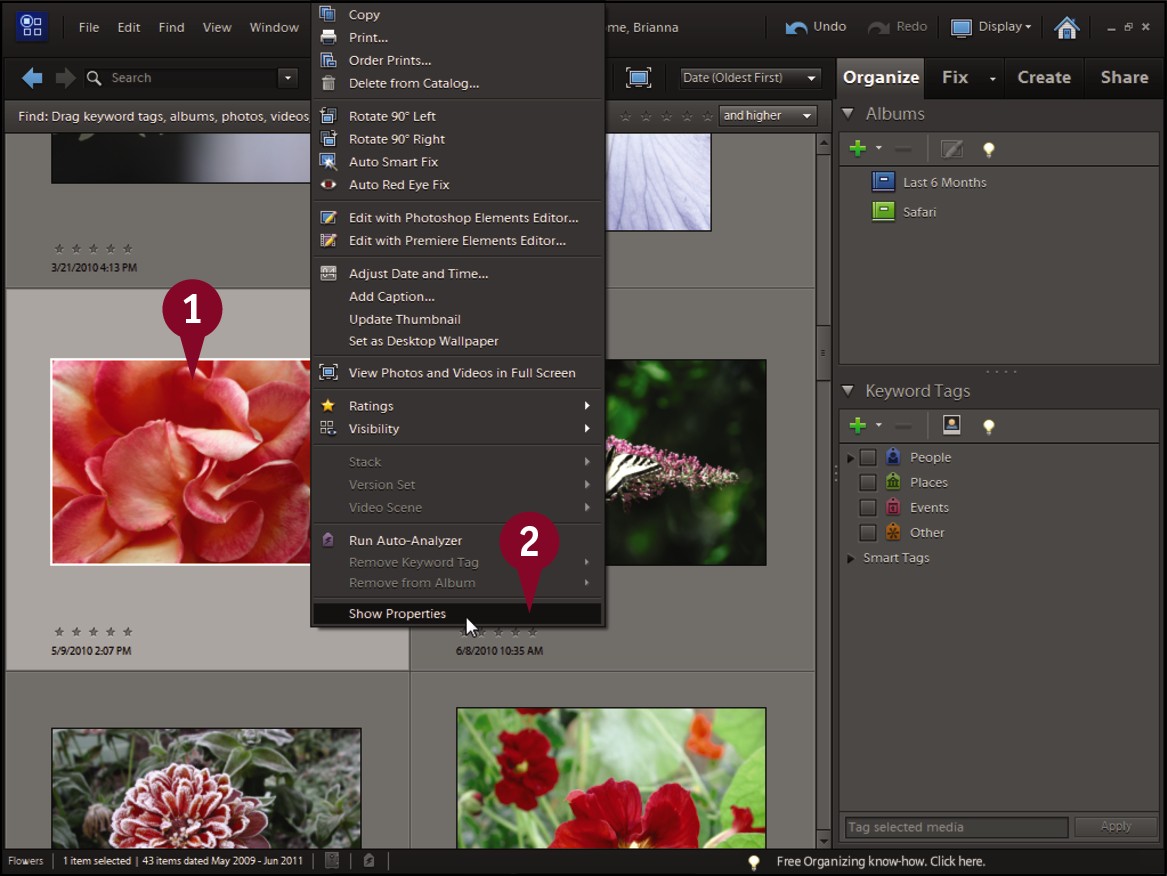
 In the Organizer, right-click a photo.
 Click Show Properties.
The Properties dialog box opens.
The General properties appear by default.
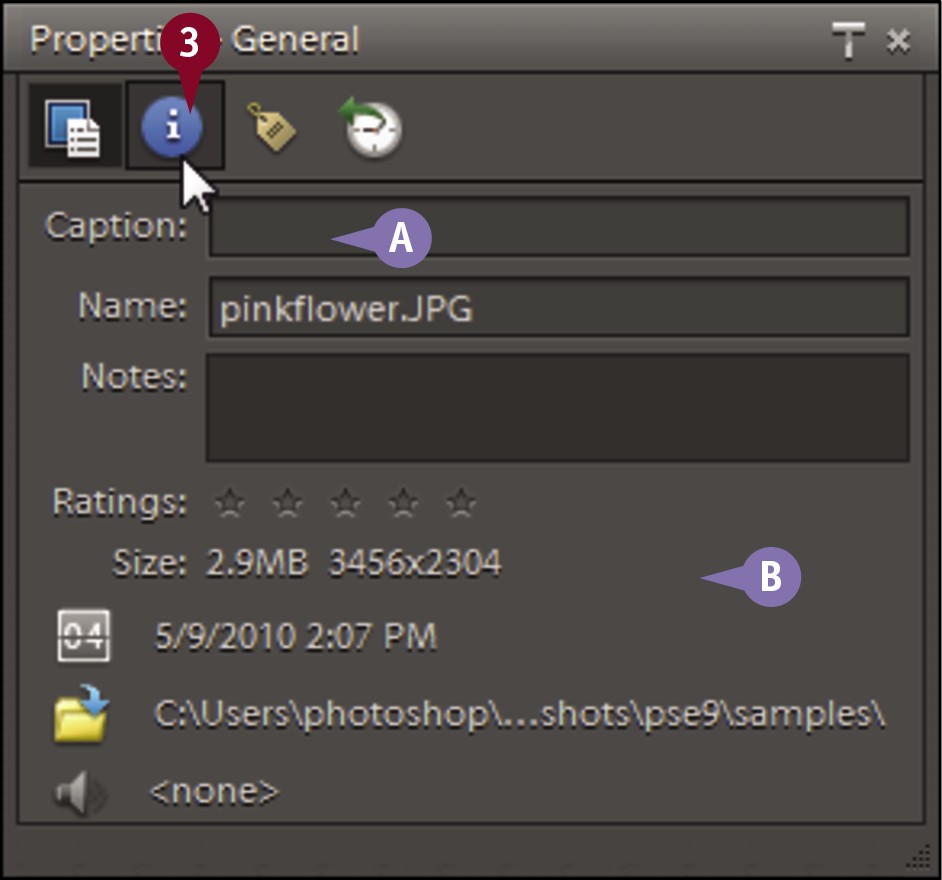
A You can add or edit a caption for the photo here.
B The rating, size, capture date, and other information for the photo are shown here.
 Click the Metadata button (
 ).
).
The Metadata properties appear. This includes the camera model and settings if the photo came from a digital camera.
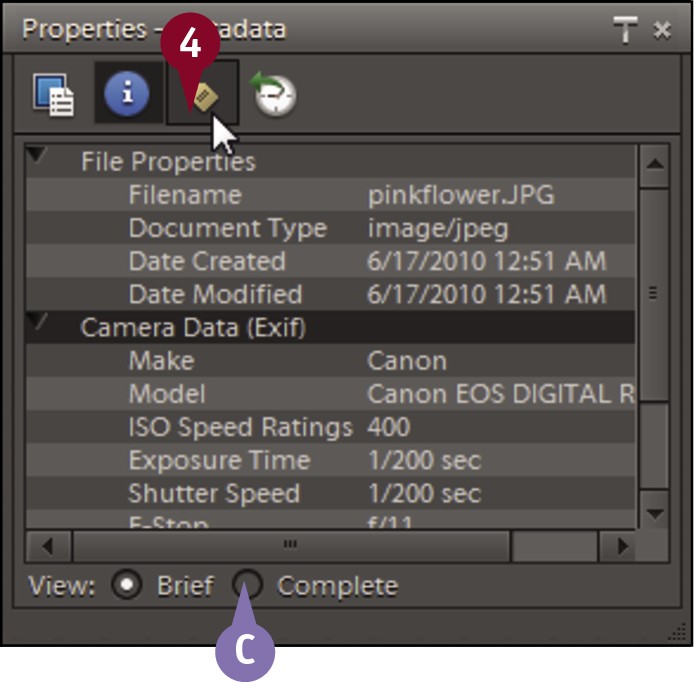
C You can click here to display the complete metadata for a photo ( changes to
  ).
).
 Click the Keyword Tags button (
 ).
).
The Keyword Tags properties appear.
Photoshop Elements displays any keyword tags or albums associated with the photo. You can right-click a tag or album to remove it from the photo.
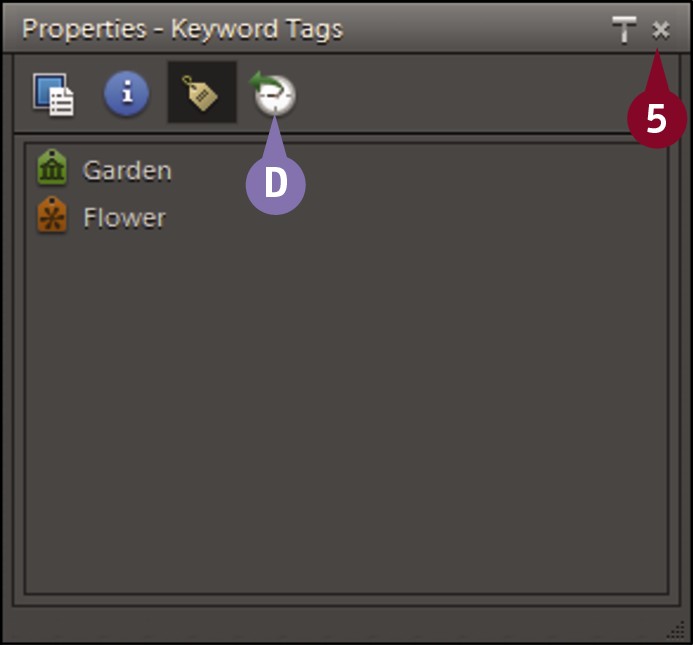
D You can click the History button ( ) to view Organizer statistics for the photo.
 Click
Click  to close the Properties box.
Add a Caption
In the Organizer, you can add captions to your photos to help you remember important information about the images you catalog. For example, you may add captions to your vacation pictures with details about the location or subject matter.
Captions appear below a photo when the image is viewed in Single Photo View. You can display captions when viewing a slide show in the Organizer. See “Display a Slide Show in Full Screen” for details. You can also include caption information with photos when you print them. See Chapter 17 for more information.
Add a Caption
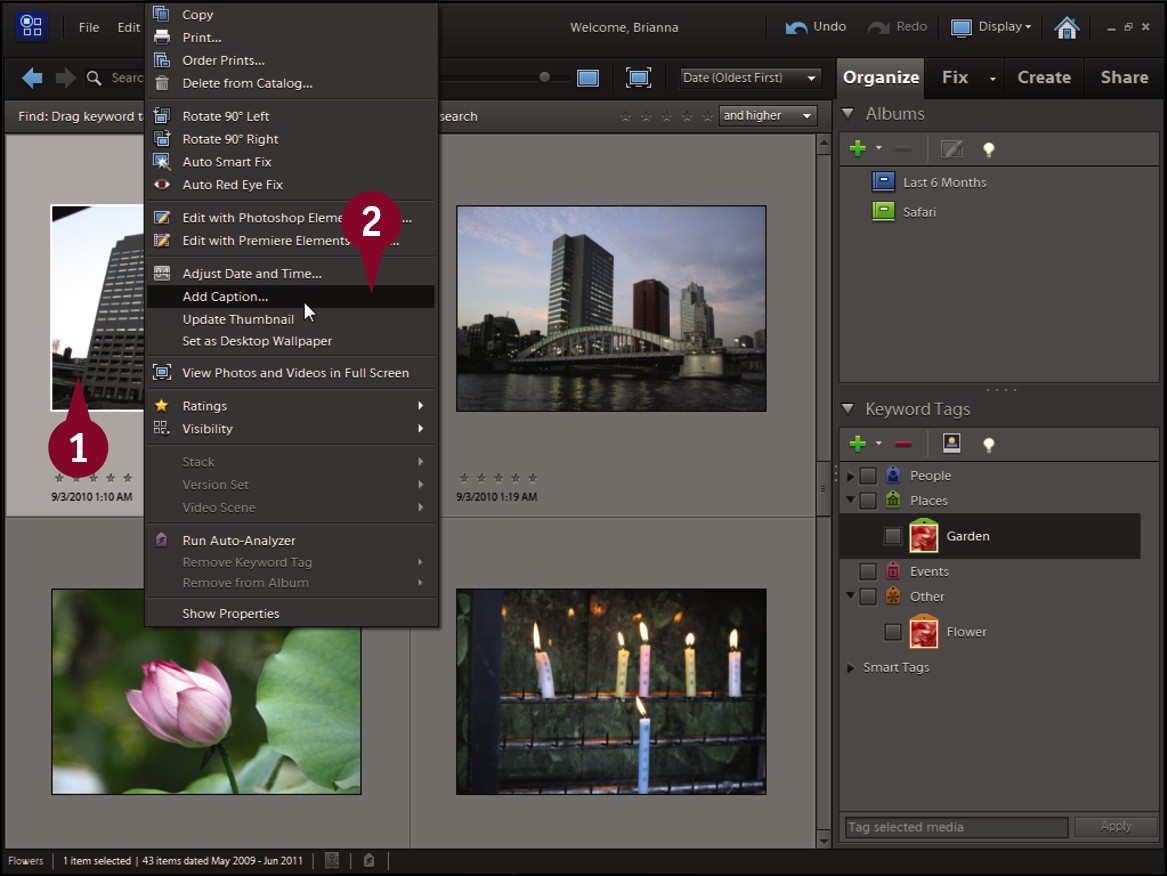
 In the Organizer, right-click the photo you want to caption.
 Click Add Caption.
The Add Caption dialog box opens.
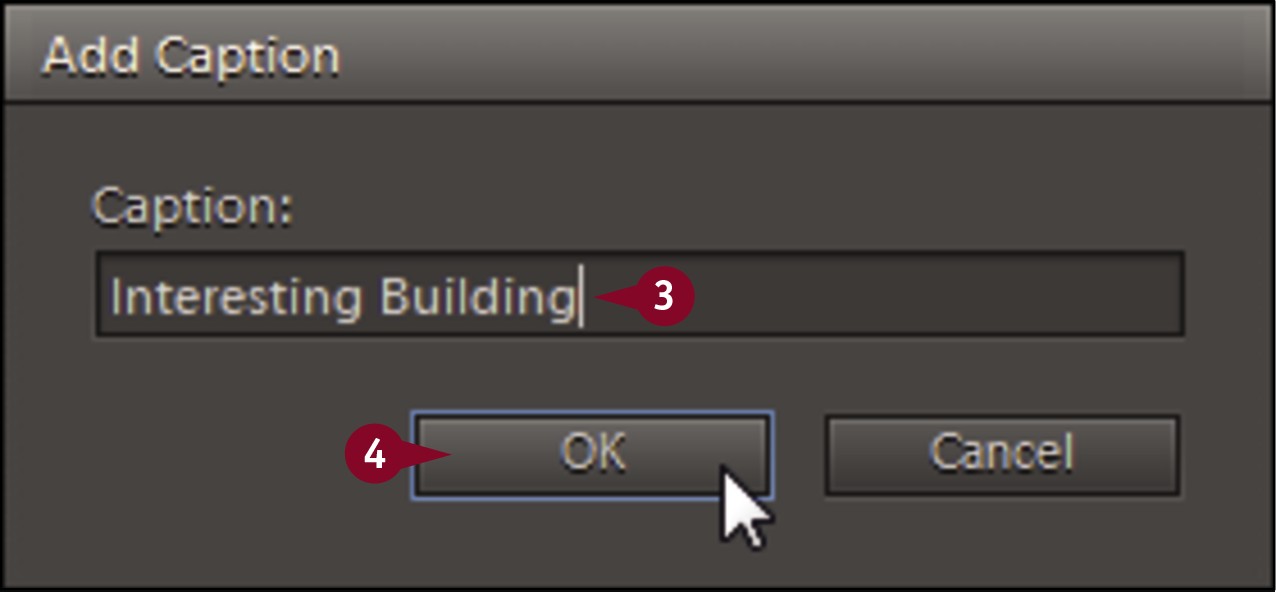
 Type a caption for the photo.
 Click OK.
The Organizer adds the caption to the photo. The caption is added to the metadata of the photo, which is accessible to programs besides Photoshop Elements.
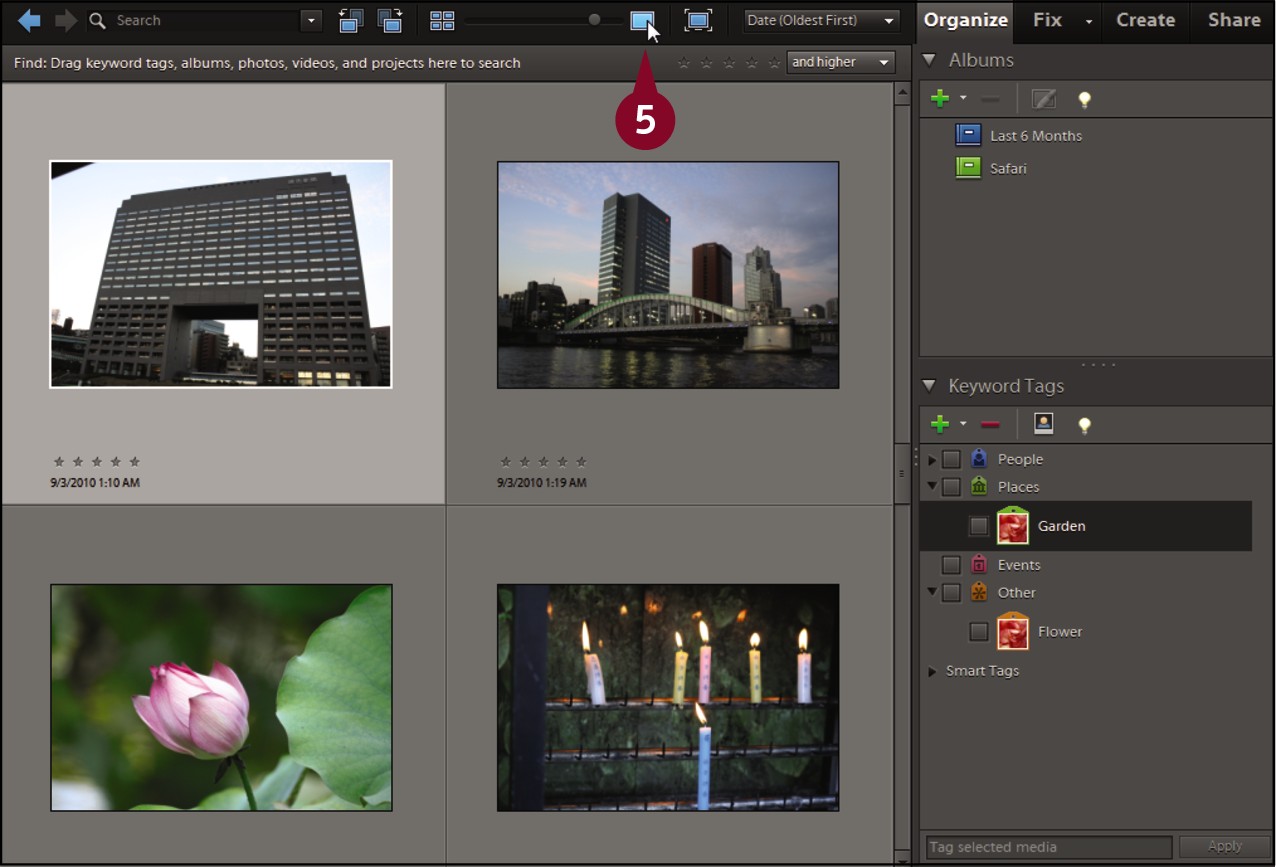
 Click the Single Photo View button (
 ).
).
A large thumbnail of the photo appears.
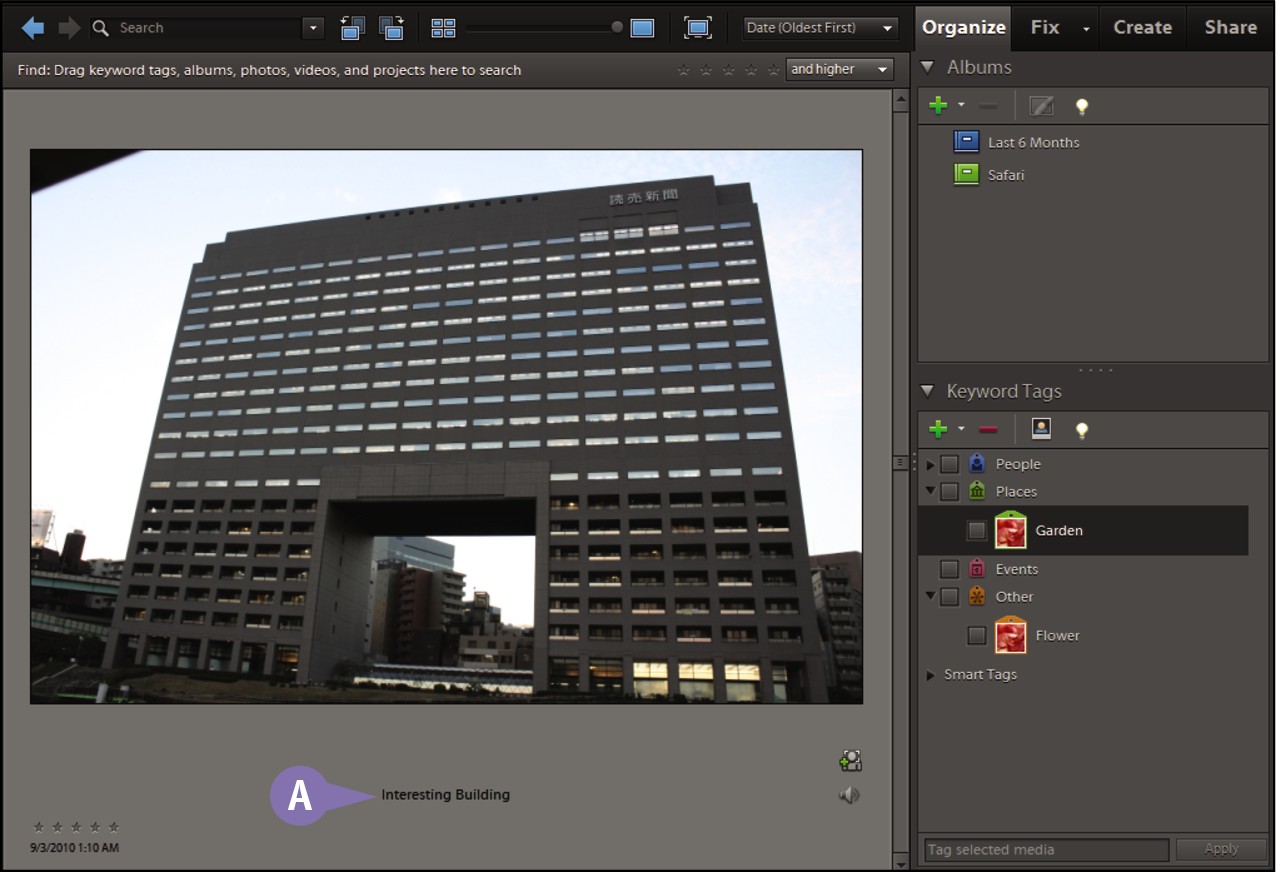
A The caption appears below the photo.
Work with Albums
Albums are a way to organize your photos within an Organizer catalog. For example, you can take photos shot at a particular time or place and group them as an album. This makes it easier to find the photos later. Having photos organized in albums is also helpful with projects such as slide shows and photo books. Selecting an album to access a group of interesting photos is often the first step in making these creations.
A Smart Album is a special type of album that Photoshop Elements can automatically add to based on the characteristics of your images. You can also organize photos in a catalog by using keyword tags. See Chapter 4 for more about these features.
Work with Albums
Create a New Album
 In the Organizer, open the catalog within which you want to create an album.
Note: For more on catalogs, see the section “Create a Catalog.”
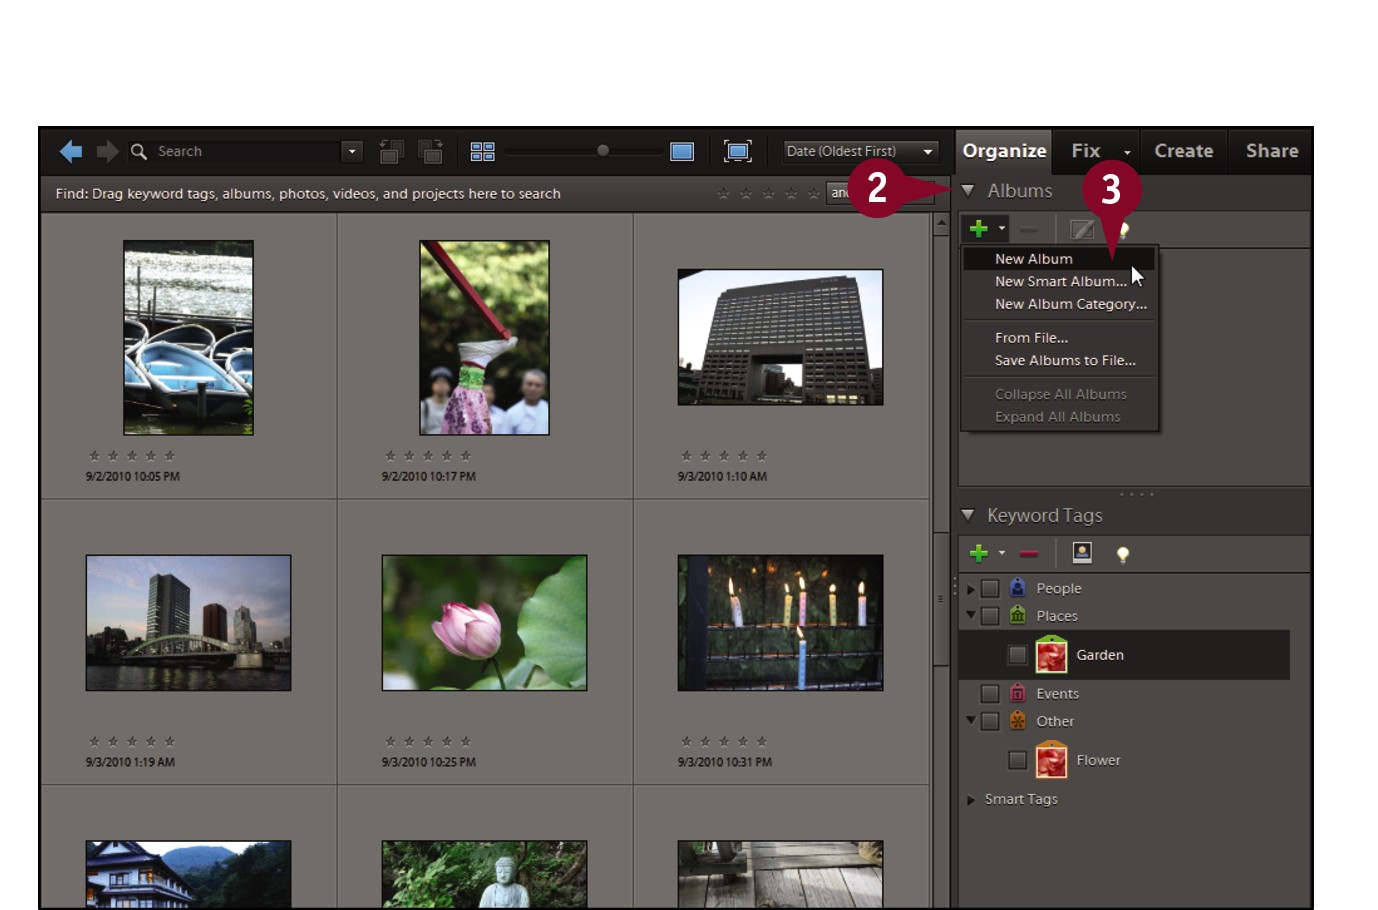
 Open the Albums panel in the Panel Bin.
 Click the plus sign (
 ) and then click New Album.
The Album Details panel opens.
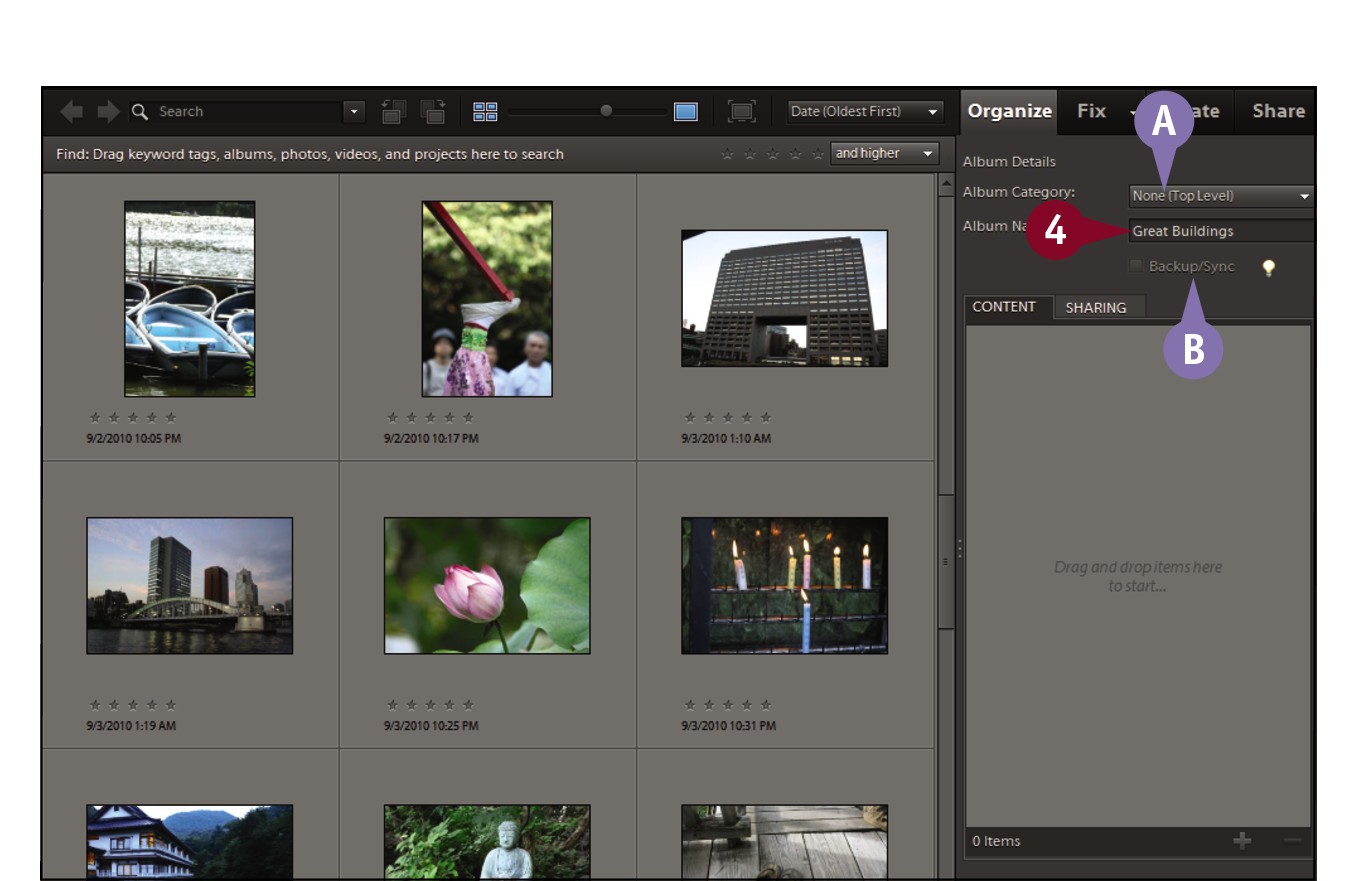
 Type a name for the album.
A You can assign the album to an album category.
B If logged in, you can click here to enable Photoshop Elements to back up your album photos by using the Photoshop.com service ( changes to
  ).
).
Note: For more on Photoshop.com, see Chapter 17.
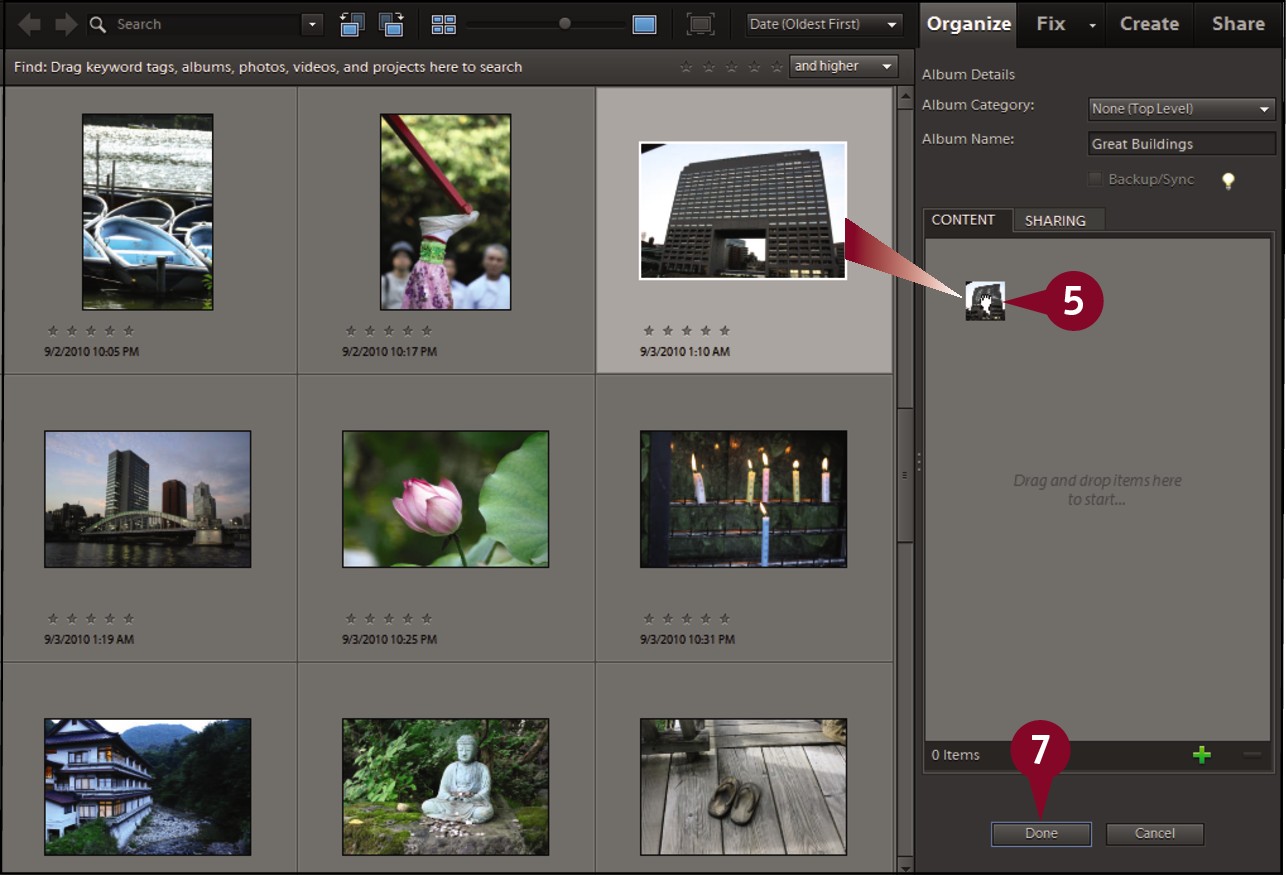
 Click and drag a photo from the Media Browser to the Items list box.
The Organizer adds the photo to the album.
 Repeat step 5 for all the photos you want to add to the album.
You can  +click to select multiple photos and then click and drag to add them all to the album.
 Click Done to close the Album Details panel.
View an Album
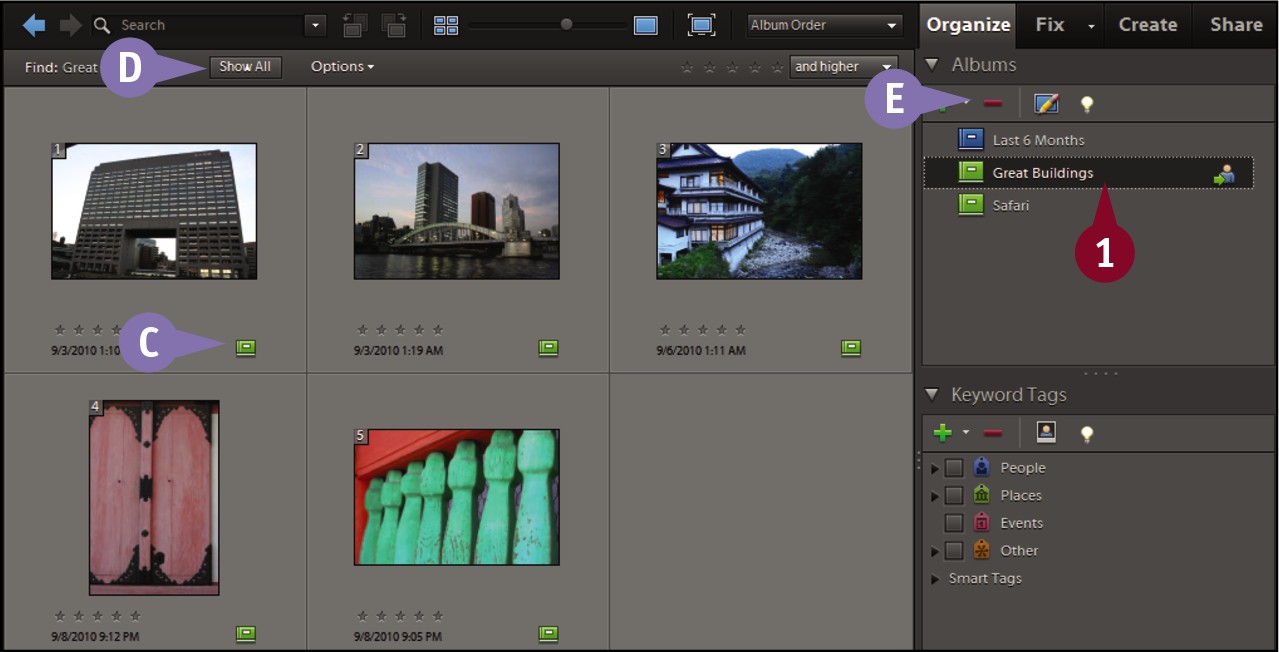
 Click the album name in the Albums panel.
The Organizer displays all the photos in the album.
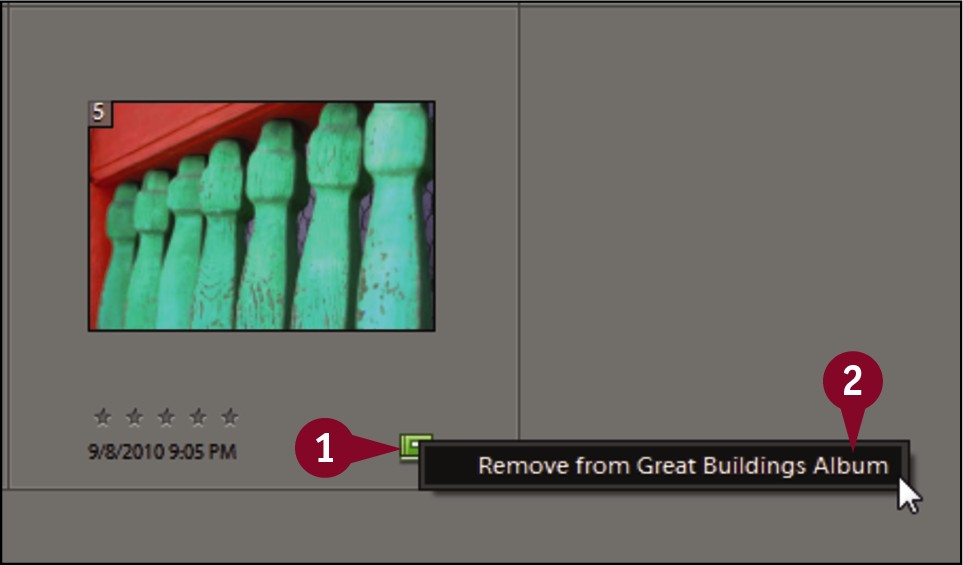
C Photos assigned to an album are marked with an Album icon.
D You can click Show All to return to the entire catalog.
E You can click the minus icon ( ) to delete the album.
View Photos by Date
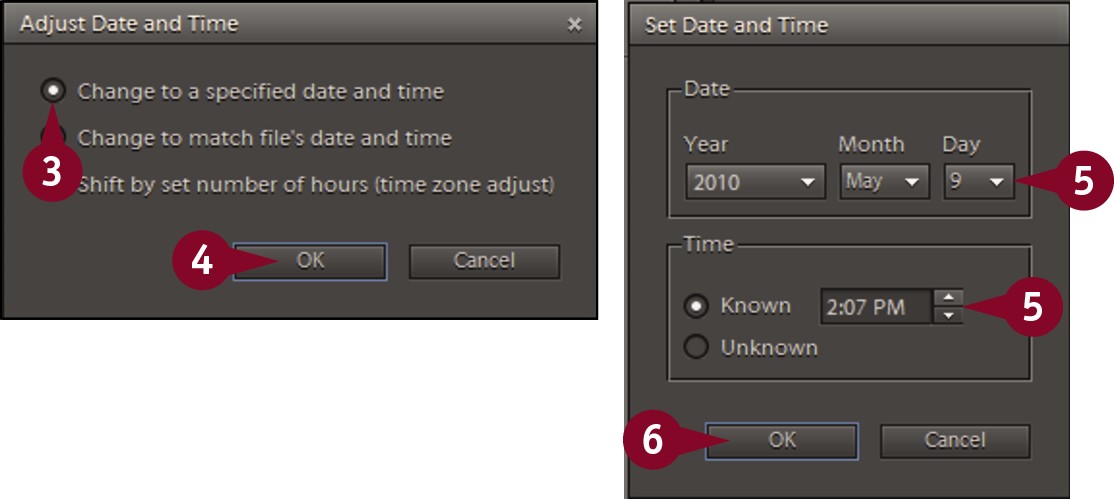
To help you keep track of your photos, the Organizer can sort your images by date and display those taken during a specific date range. You can also view the images for a particular date range as a slide show. When you take a photo with a digital camera, the camera automatically attaches date information to your photo along with other information such as camera model and exposure settings. By accessing your photos’ digital time stamps, Photoshop Elements can automatically sort them by the time they were taken. If the date setting of your camera was not set correctly, you can fix the dates associated with your photos. See the tip in the “View Photo Properties” section.
View Photos by Date
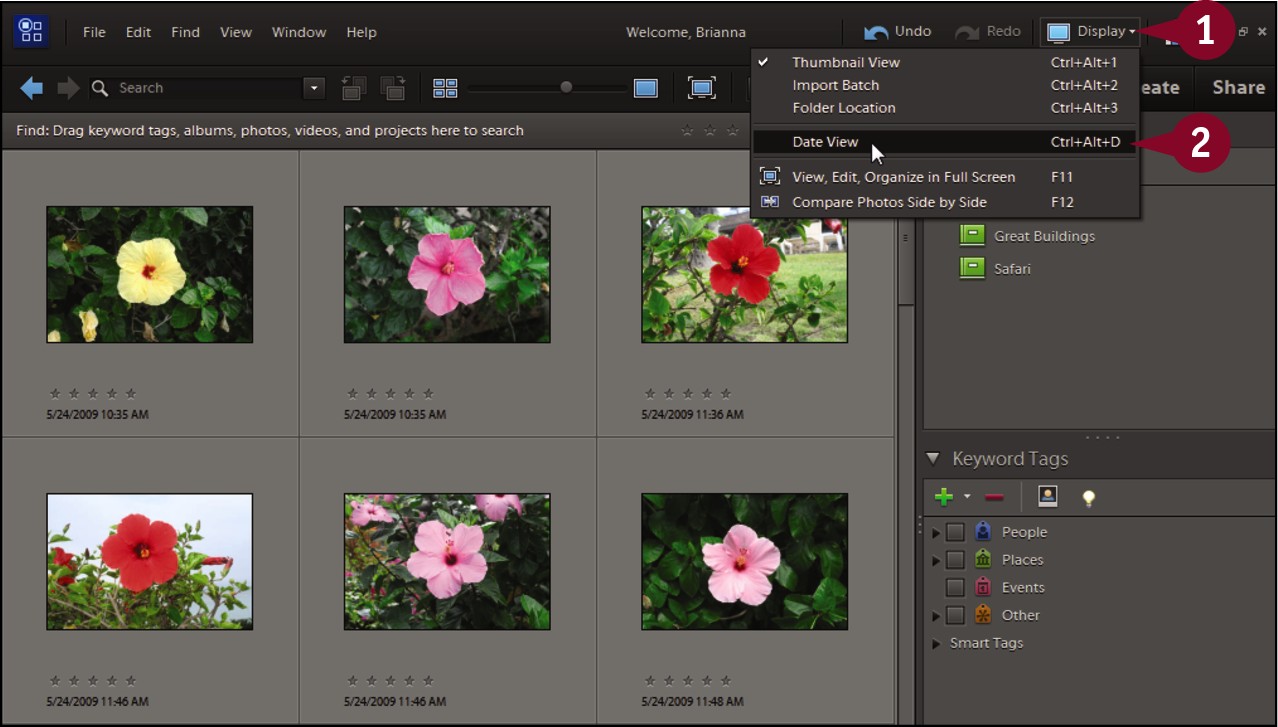
 In the Organizer, click Display.
 Click Date View.
The Organizer displays a calendar view of your catalog.

A You can view your photos by year, month, or day. In this example, the Month view is shown.
B To see a different month, click the Previous Month ( ) or Next Month (
 ) button.
 Click the date for the photos you want to view.
C The first photo in the group appears here.
 Click the Play button (
 ).
).
The Organizer starts a slide show, displaying each photo from the date you selected.
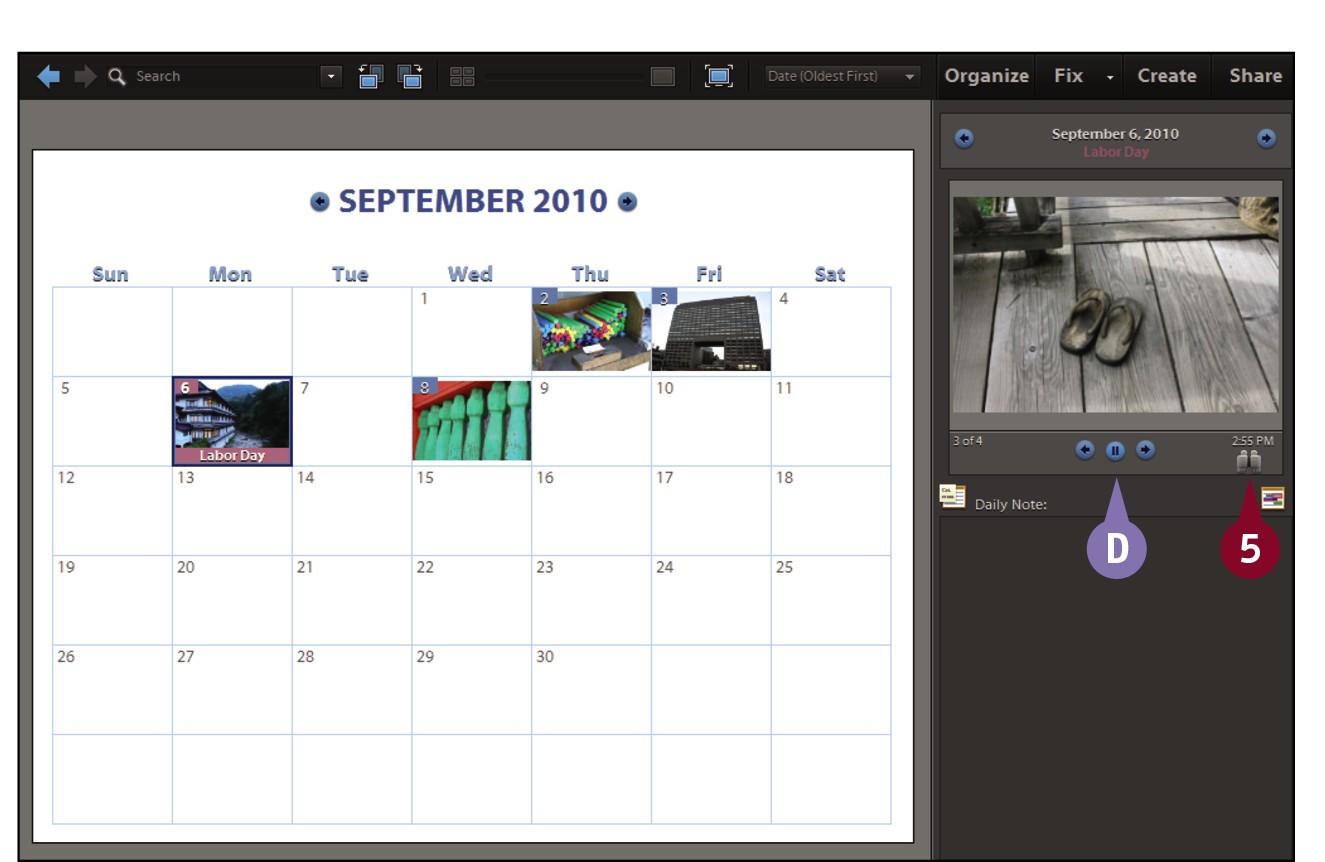
D To pause or stop the sequence, click the Pause button ( ).
).
To view the previous image again, click the Previous Item button ( ).
).
To view the next image, click the Next Item button ( ).
).
 Click the Find in the Media Browser button (
 ).
).
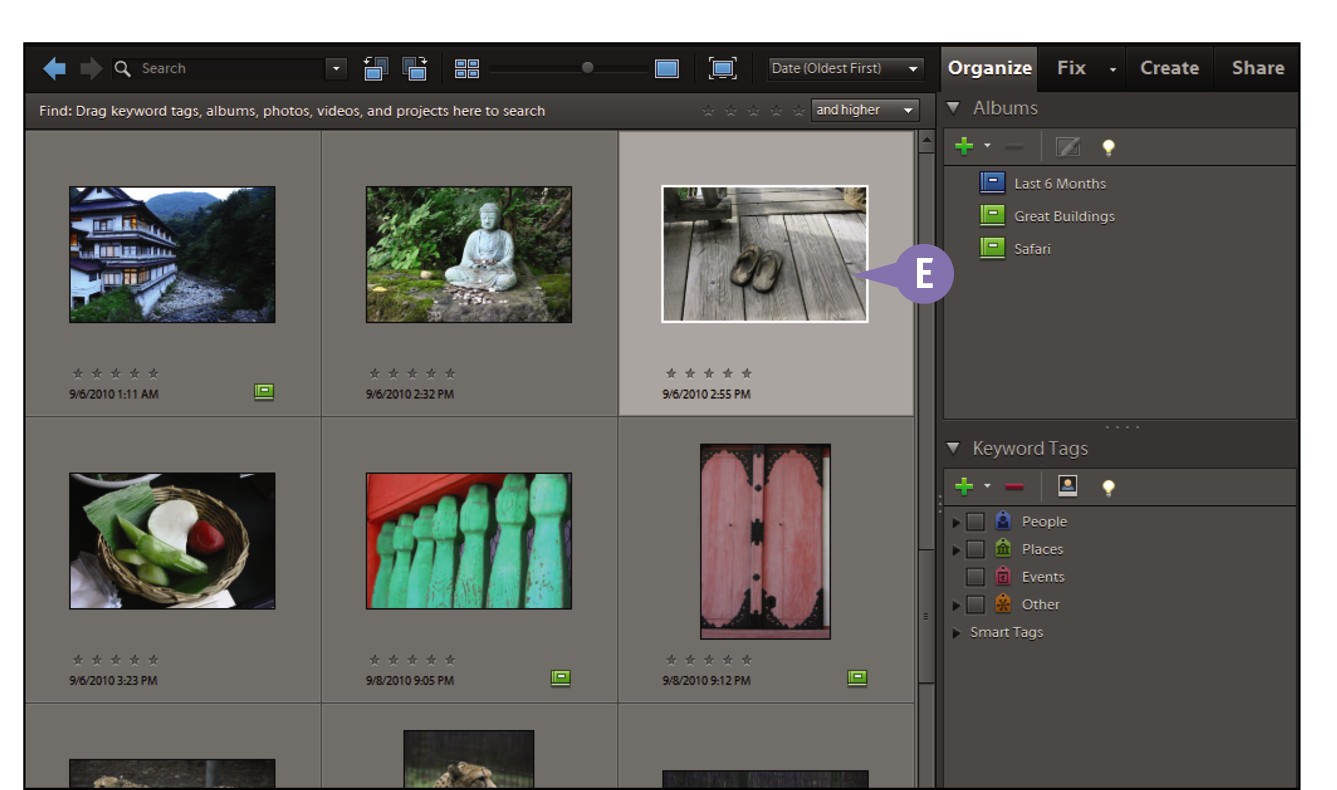
E The Media Browser appears with the photo from the Date View visible.
You can also get to the Media Browser from the Date View by clicking Display and then Media Browser.
Find Photos
The Organizer offers a variety of methods for finding particular photos in your catalog. You can search for photos by date, filename, tags, text, and more. This can be helpful as your catalogs in the Organizer grow to thousands of photos and span years.
In this example, you search for photos taken during a specific date range and by text. When you search by text, Photoshop Elements examines captions, keyword tags, album names, and other text associated with your Organizer catalog.
Find Photos
Find Photos by Date
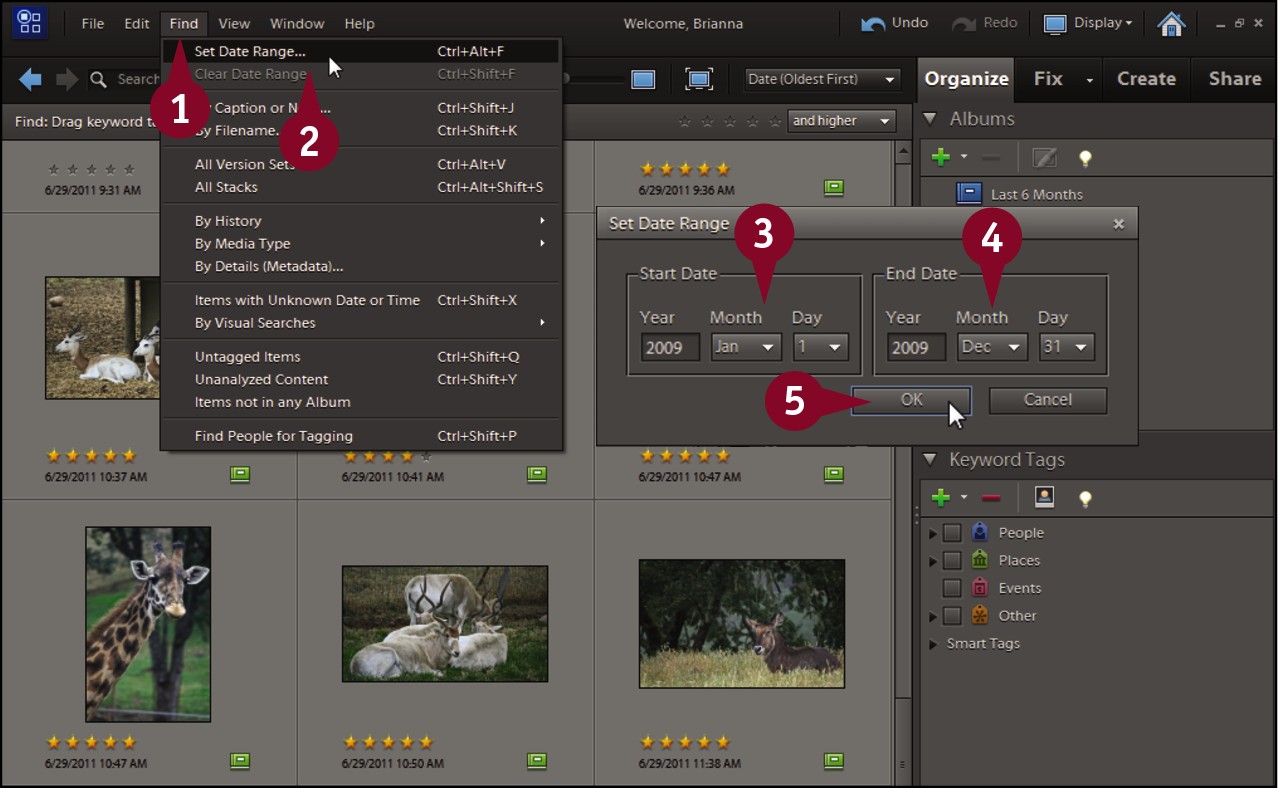
 In the Organizer, click Find.
 Click Set Date Range.
The Set Date Range dialog box opens.
 Select the start date for the date range you want to search.
 Select the end date for the date range you want to search.
 Click OK.
The Organizer displays any matching photos in the Media Browser.
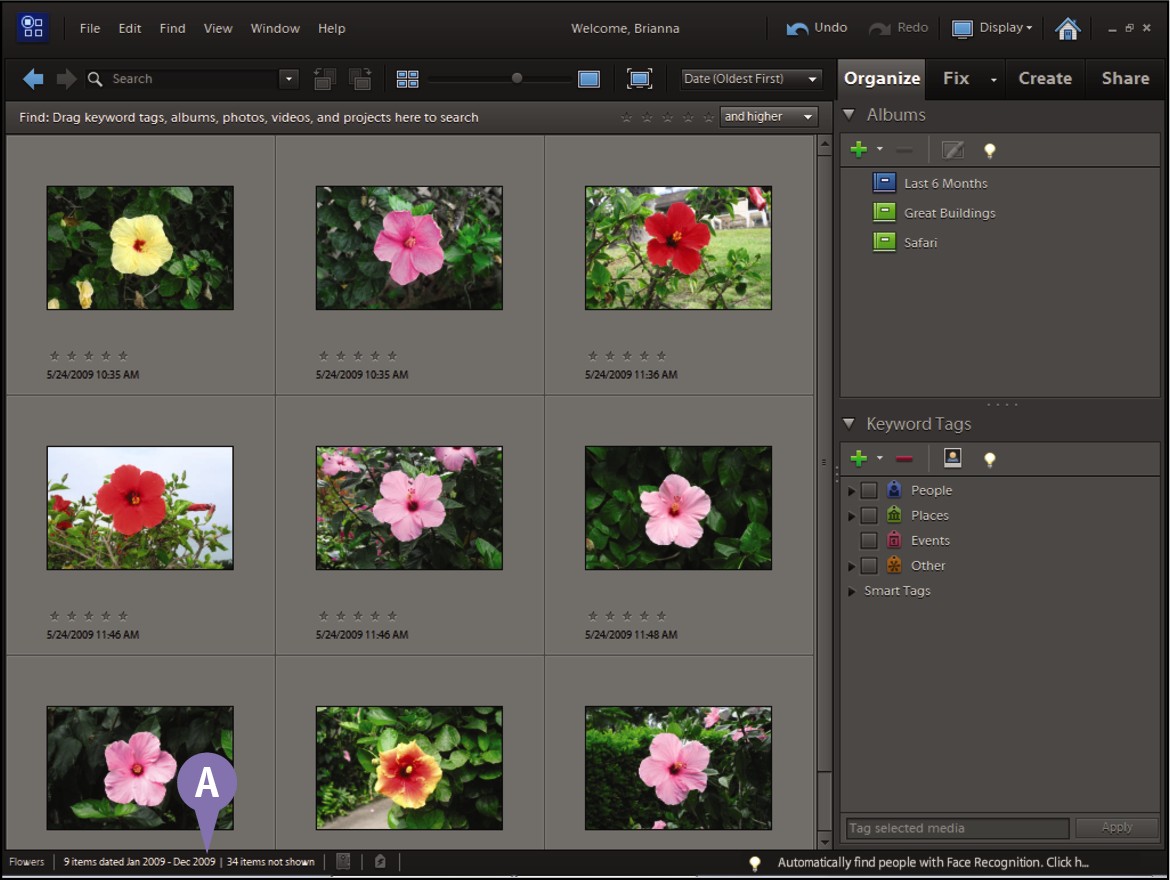
A A summary appears at the bottom of the Media Browser.
You can reset the date search by clicking Find and then Clear Date Range.
Find Photos by Text
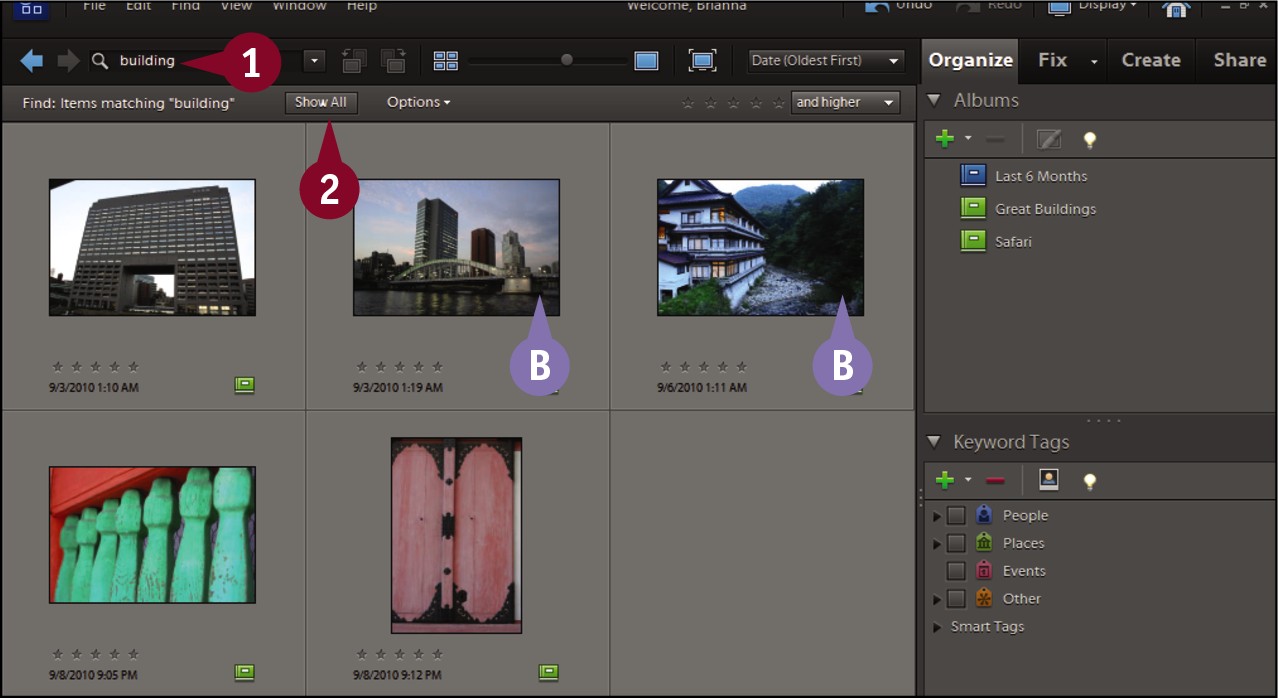
 Type one or more keywords in the search box.
Photoshop Elements searches the filenames, captions, keyword tags, album names, and other text associated with your photos.
B Photoshop Elements displays photos associated with the text as you type.
If you type multiple keywords, photos must be associated with all the keywords to match.
 Click Show All.
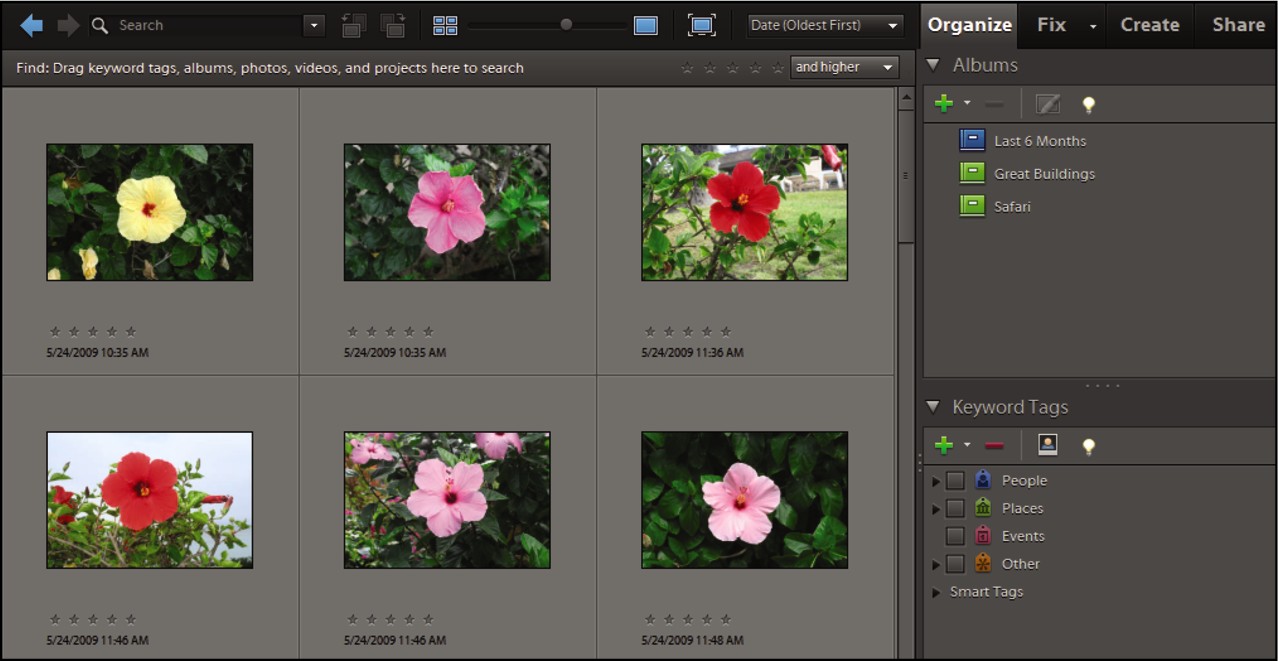
Photoshop Elements cancels the search and displays all the photos.
Rate Photos
You can add star ratings to your photos in the Organizer to distinguish which ones are interesting and suitable for editing or projects. Photoshop Elements enables you to give each photo a rating of from one to five stars. After you rate your photos, you can filter them by rating and then add those photos to an album or use them in a slide show.
With the Smart Album feature, you can automatically have all images with a certain rating grouped together in an album. For information about Smart Albums, see Chapter 4.
Rate Photos
Apply a Rating

 Click a star rating icon (
 ) below a photo in the Media Browser.
You can add a star rating from 1 to 5 by clicking the icons from left to right. You can also press a number key from 0 to 5. Pressing 0 removes the rating.

A Photoshop Elements assigns the rating and gold stars ( ) appear.
You can also apply ratings in the Properties box in the General section. See the section “View Photo Properties” for more.
Filter by Rating
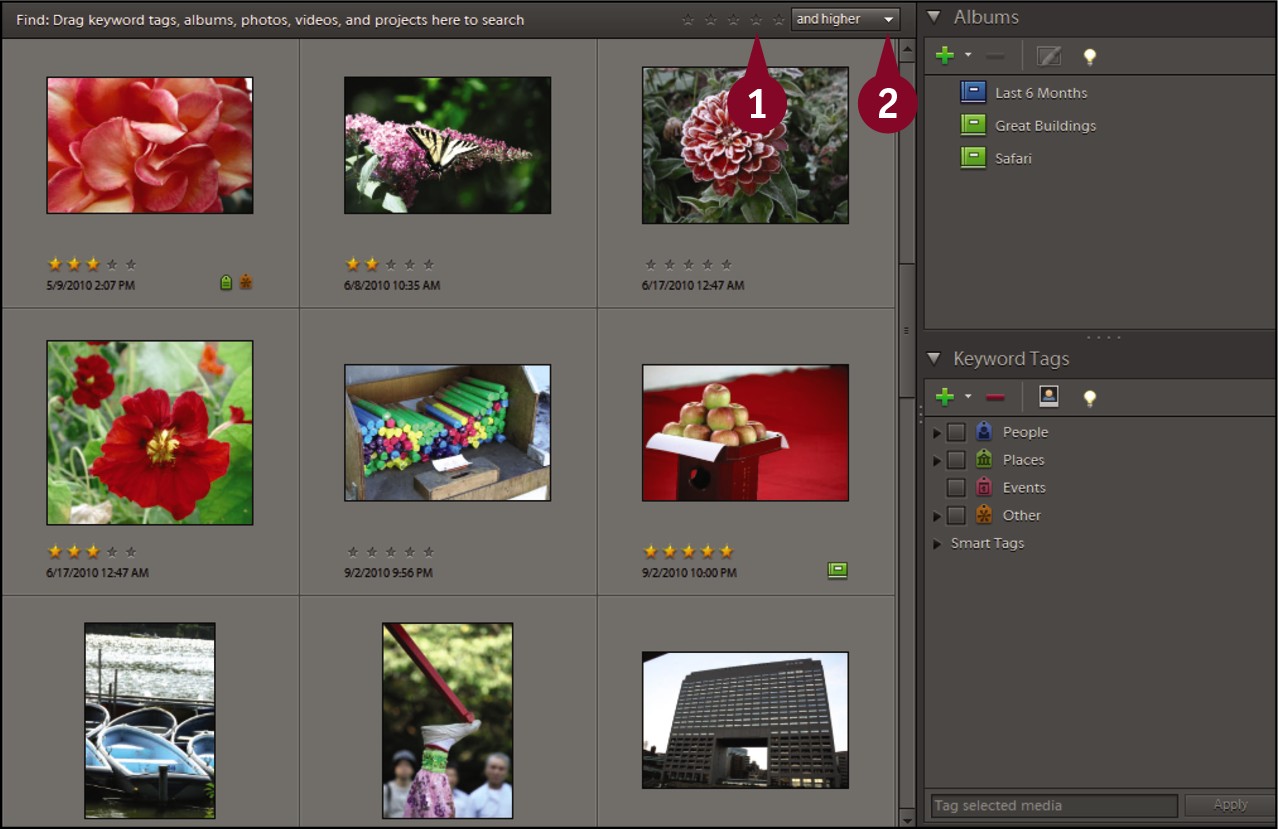
 Click a star rating (
 ).
).
 Click the
  and then choose and higher, and lower, or only.
Photoshop Elements displays photos that meet the rating criteria.
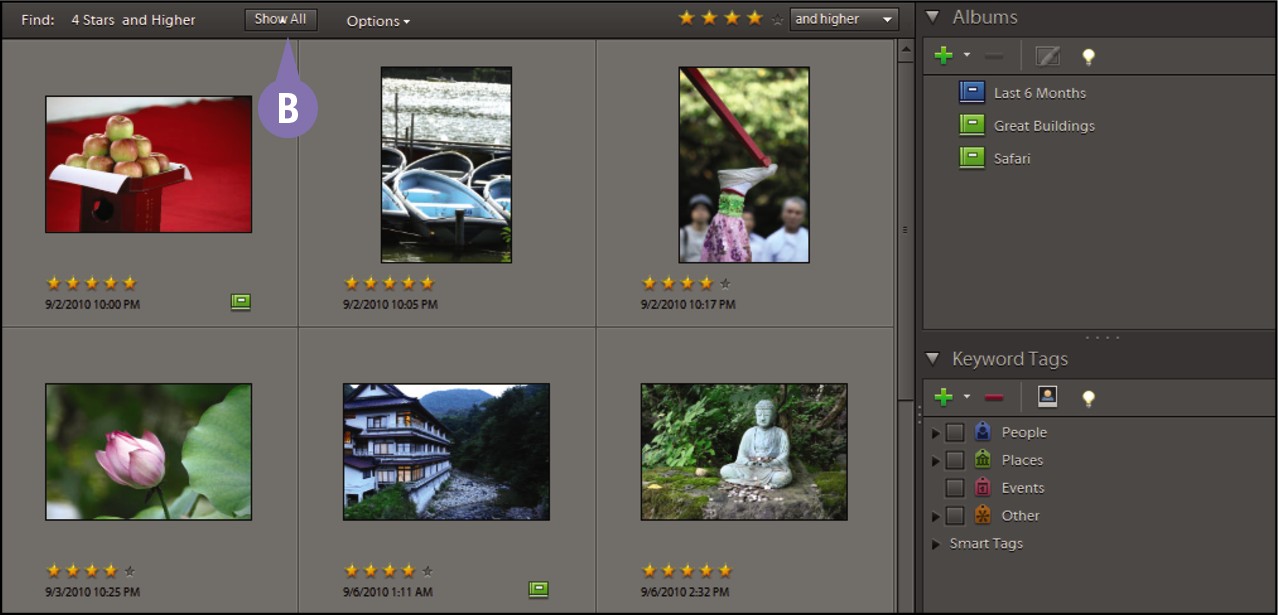
B You can click Show All to remove the rating filter.
