Chapter 5: Applying Image-Editing Basics
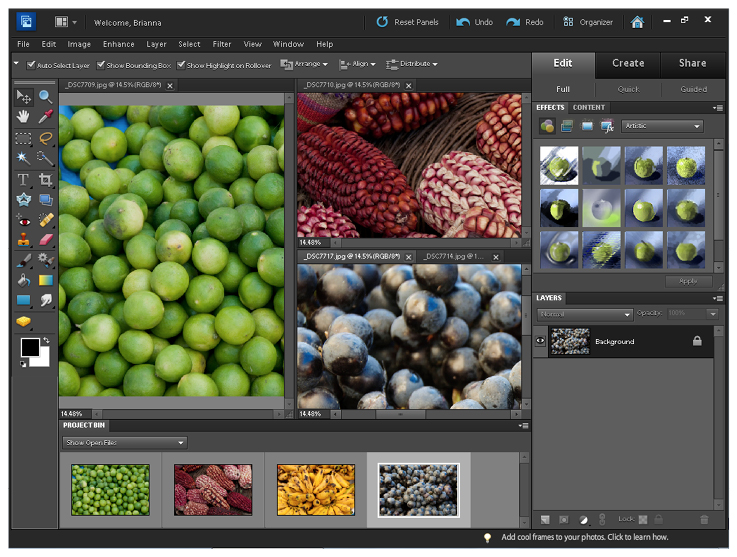
This chapter shows you how to fine tune your workspace to best arrange your open images. You also discover how to change the on-screen image size, set a print size, and change the print resolution.
Change the On-Screen Image Size
Manage Open Images
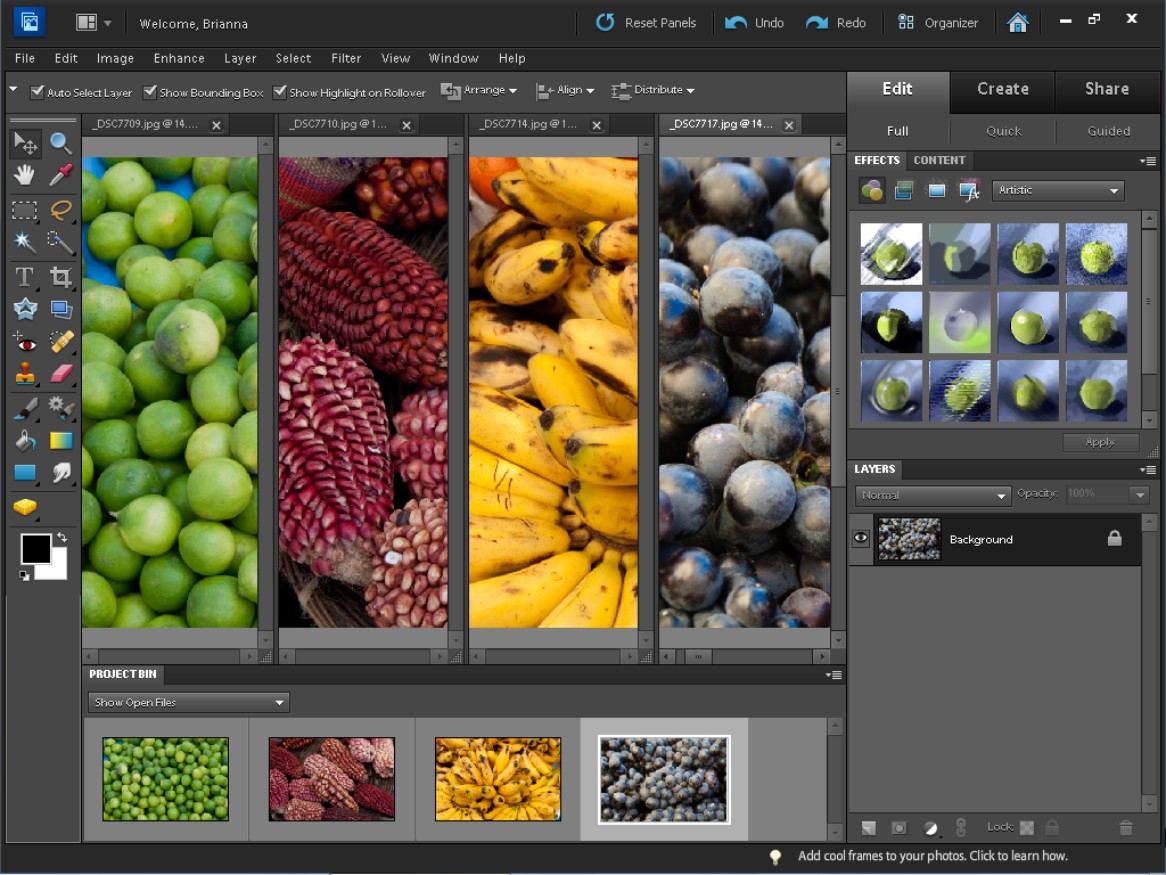
Each image you open in Photoshop Elements appears in its own window, and you can have multiple windows open at once. When viewing one image window at a time, tabs at the top of each window enable you to switch between images. Each tab lists the name of the image file, the current magnification, and the image mode.
Viewing one image at a time gives you the maximum space for viewing and editing an image. You can also use the Project Bin or Image menu to switch between different open images.
Manage Open Images
Using Tabs
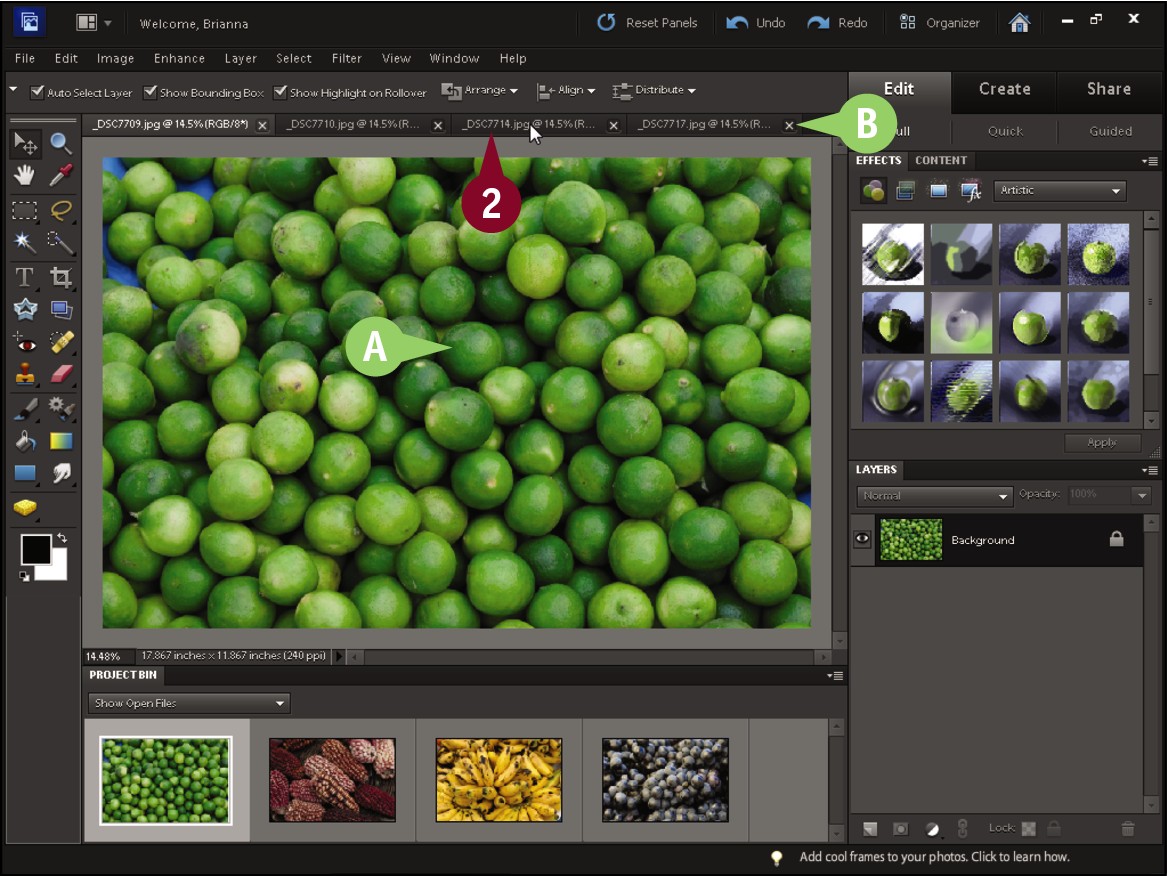
 In the Editor, open two or more images.
Note: For more on opening the Editor, see Chapter 1. For more on opening image files, see Chapter 2.
A The active or current image appears here.
B Each open image has its own tab, which displays its filename and magnification.
 Click a tab for the image you want to view.
C The image appears as the active image. You can make changes to the active image by applying commands and effects.
Using the Project Bin

D By default, the Project Bin displays smaller versions, or thumbnails, of the images.
Note: See the tip on the next page for more on how to display other images in the Project Bin.
If the Project Bin is closed, you can click Window and then Project Bin to open it.
 Double-click a thumbnail.

E The image appears as the active image.
Using the Window Menu
 Click Window.
 Click an image filename.

F The image appears as the active image.
G You can click  to close an image.
You can view multiple image windows at the same time by choosing a layout. Layouts enable you to display images as a grid, in vertical columns, or in horizontal rows. Viewing more than one image window at a time can be helpful when comparing images.
When viewing multiple images at once, only one of the windows is active. You can choose the active window by clicking its tab, clicking inside the window, or selecting the image from the Window menu. When you apply commands in Photoshop Elements, the commands act on the active image.
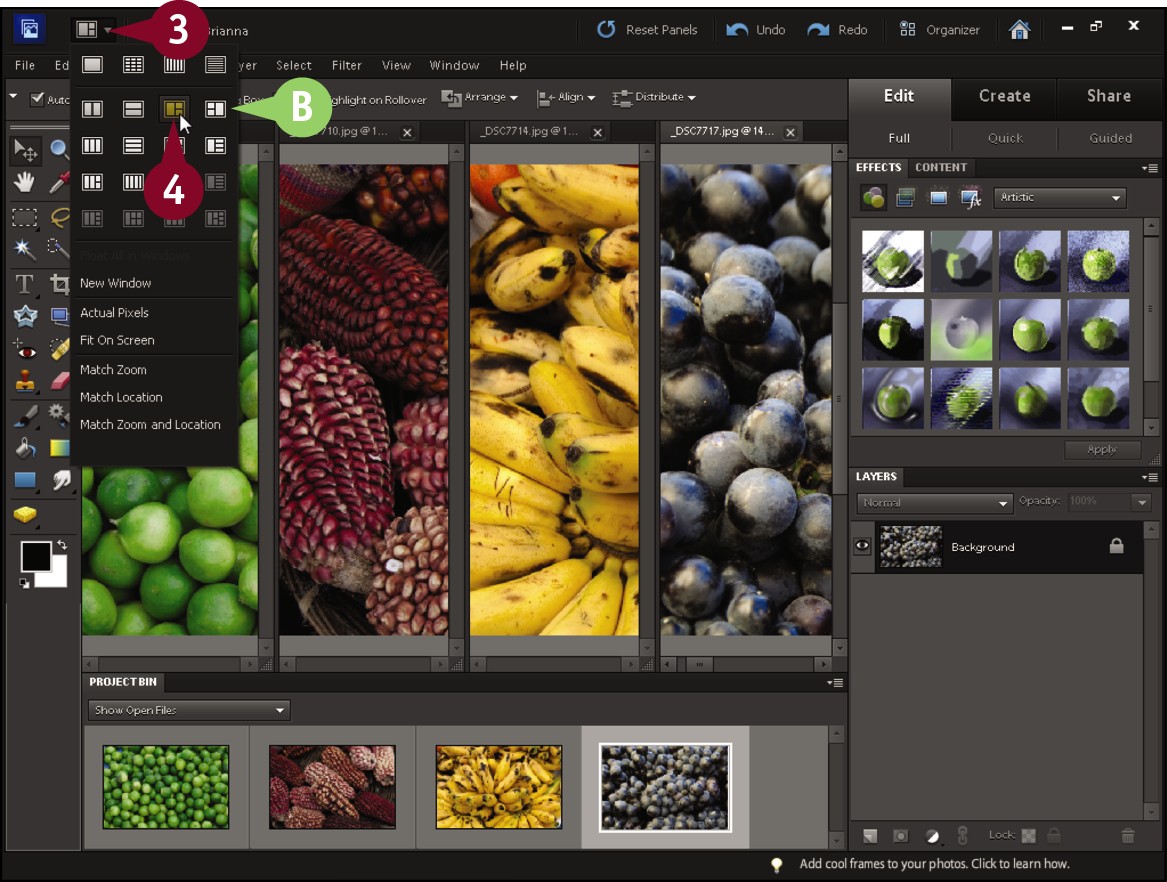
Using Layouts
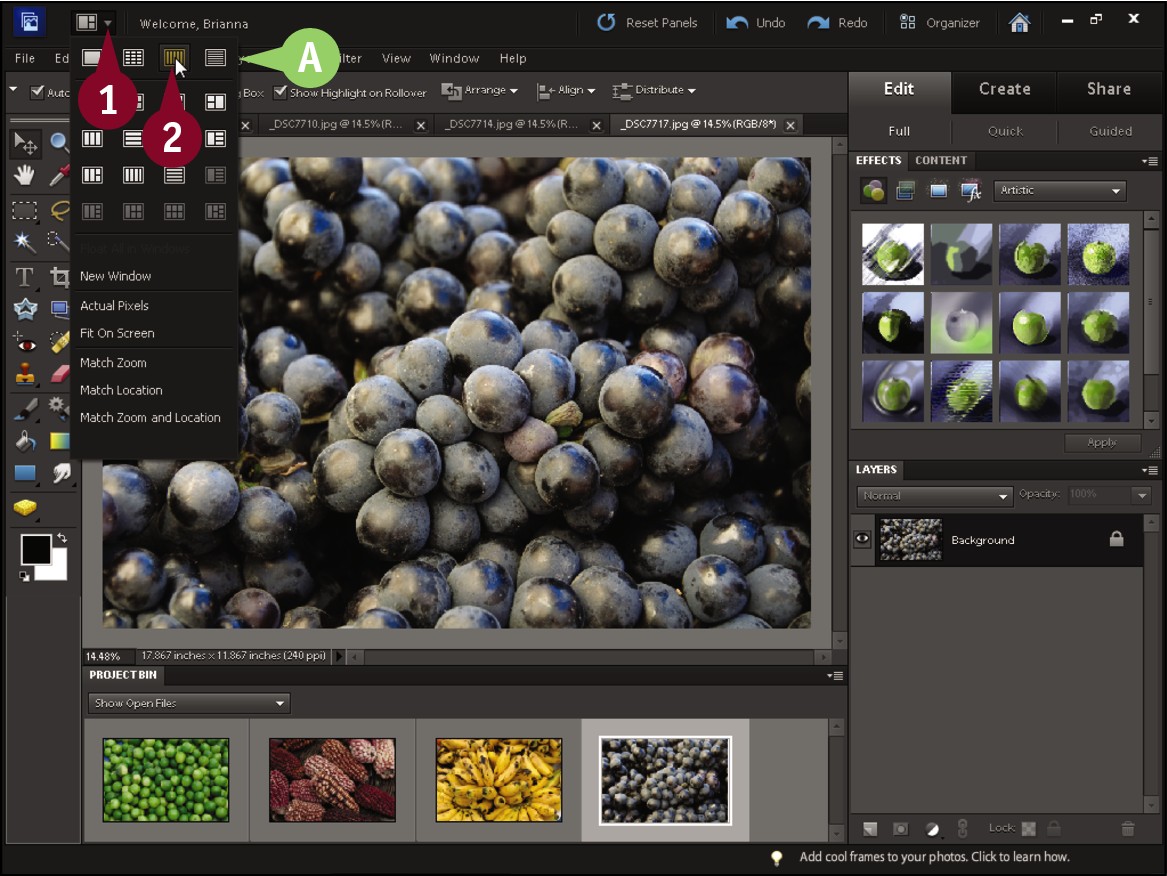
 Click the down arrow (
 ).
).
Photoshop Elements displays a menu of layouts.
A The top row enables you to display images one at a time, as a grid, in vertical columns, or in horizontal rows.
 Click a layout.
Photoshop Elements displays multiple windows, each with a different image.
 Click
Click  .
.
B The lower rows enable you to display a specific number of images at a time.
For example, selecting a 3 Up layout displays three windows, with an open image in each one.
 Click a layout.
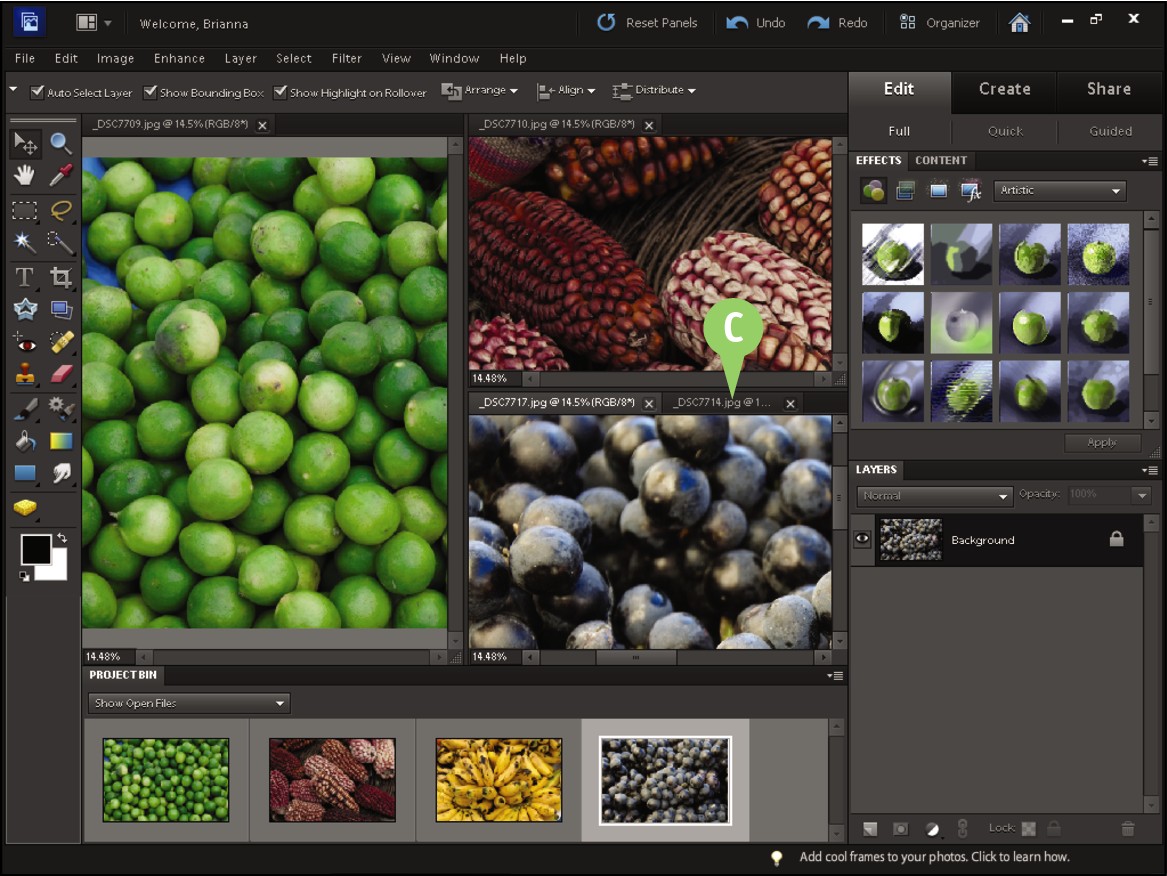
Photoshop Elements displays multiple windows at once, each with a different image.
C If you have more open images than windows, you can click tabs to switch between images.
Magnify with the Zoom Tool
You can change the magnification of an image with the Zoom tool. This enables you to view small details in an image or view an image at full size. Magnifying has no effect on the size of the actual saved image. Zooming in on an image can be helpful when you are making detailed selections with a selection tool, searching for imperfections in your image, or aligning layers precisely with one another. For more about making selections, see Chapter 6. For details about layers, see Chapter 8. You can also adjust the magnification of an image to an exact percentage using the field in the lower left corner of the image window.
Magnify with the Zoom Tool
Increase Magnification
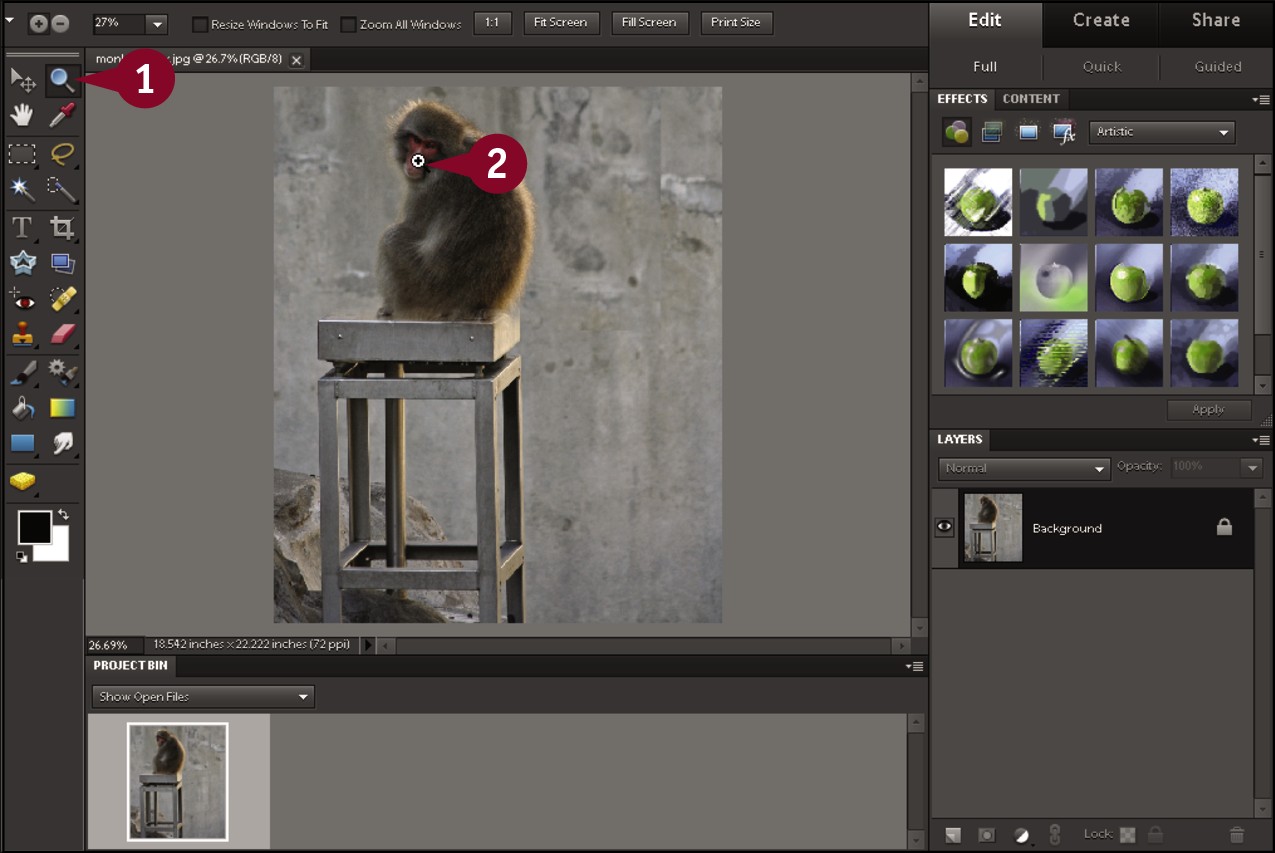
 In the Editor, click the Zoom tool (
 ).
).
You can also press the  shortcut key.
Note: For more on opening the Editor, see Chapter 1.
 Click the image.
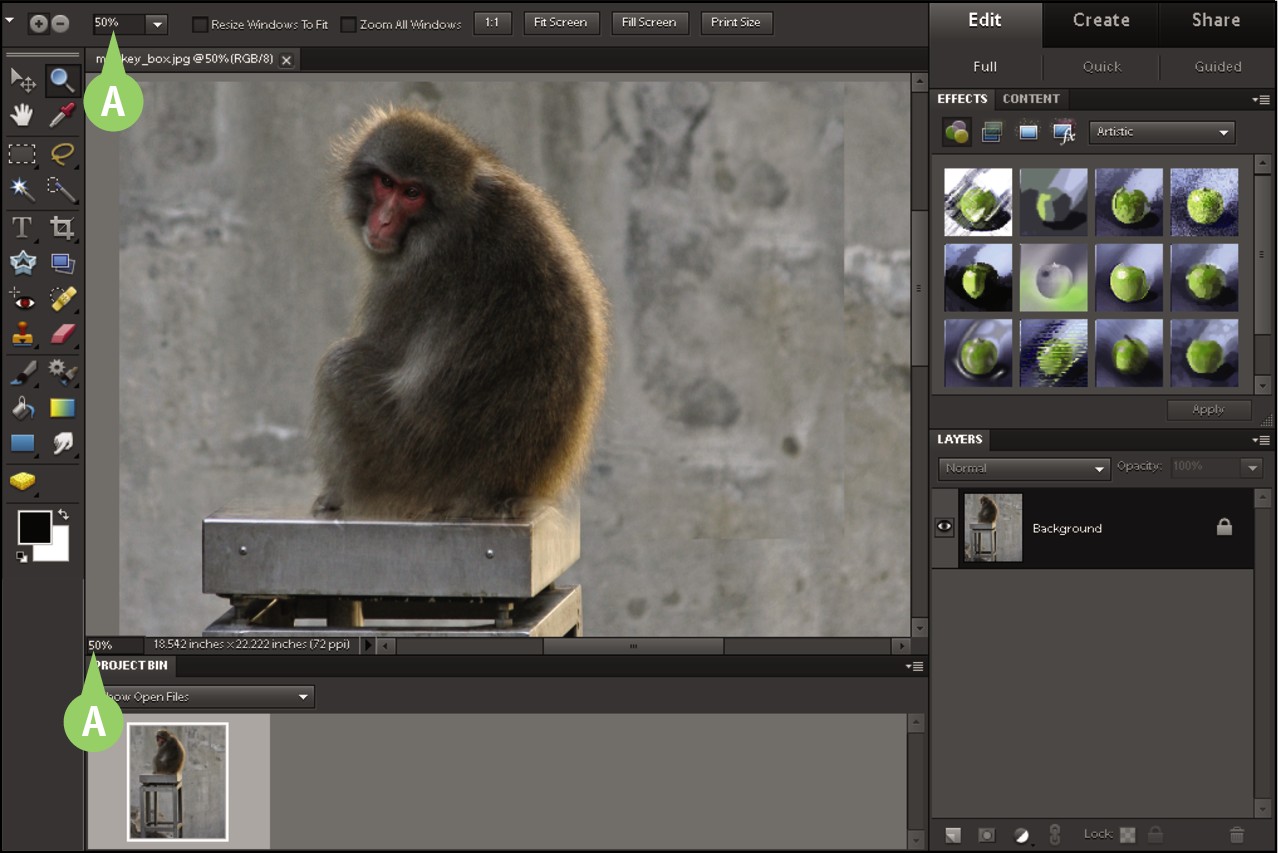
Photoshop Elements increases the magnification of the image. By default, the Zoom tool zooms in when you click the image.
The current magnification shows in the image title bar and Options bar.
A You can select an exact magnification by typing a percentage value in the Options bar or in the lower left corner of the image window.
Decrease Magnification
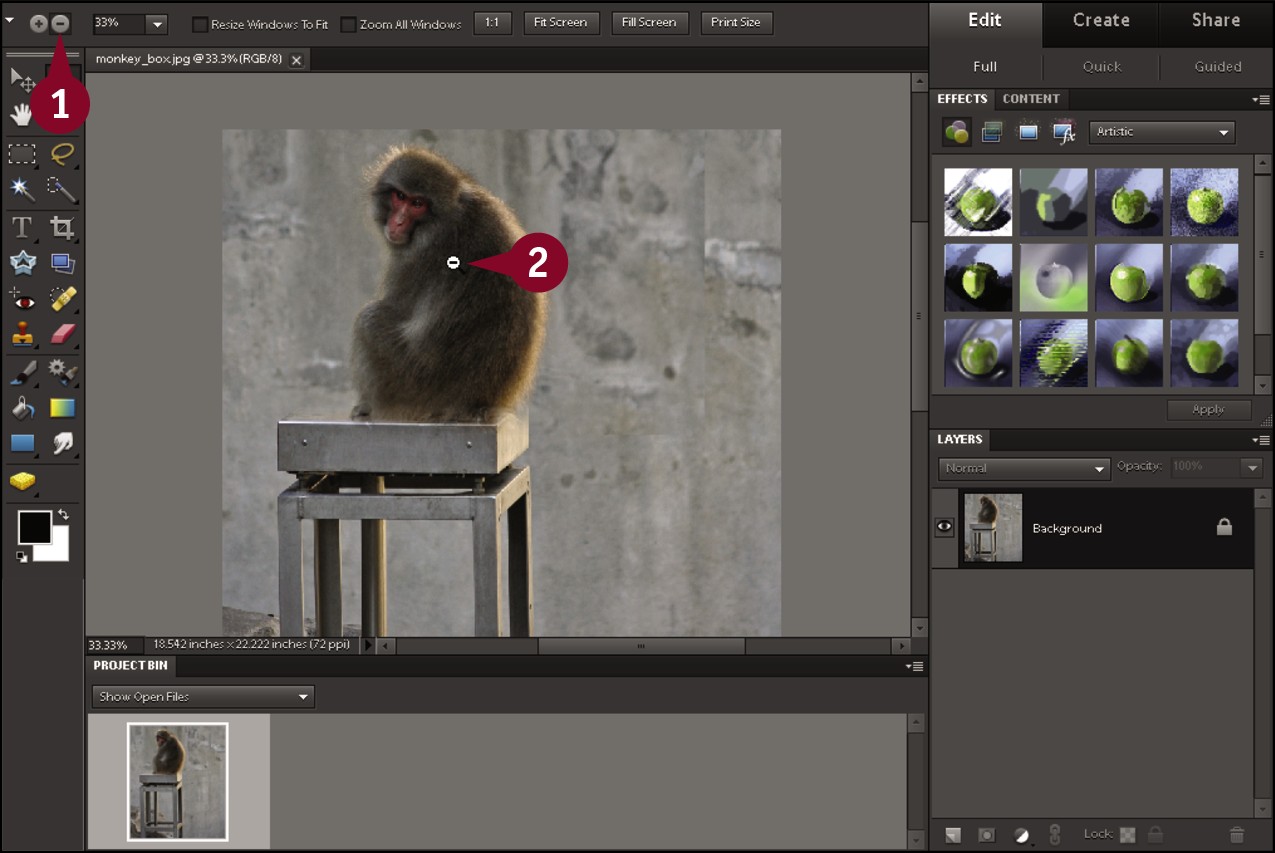
 Click the Zoom Out button (
 ).
).
You can also press and hold  (
( on a Mac) to zoom out.
 Click the image.
Photoshop Elements decreases the magnification of the image.
Magnify a Detail
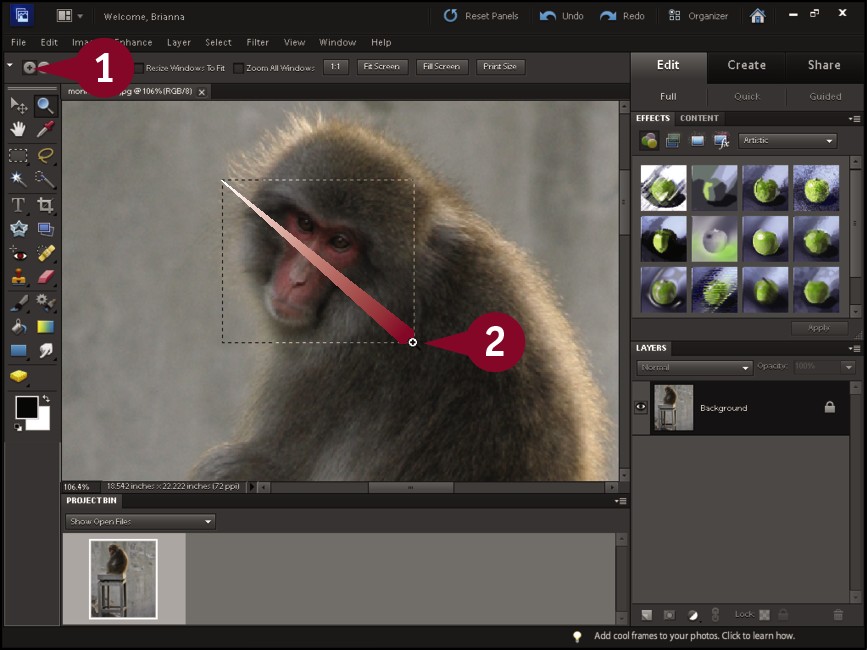
 Click the Zoom In button (
 ).
).
 Click and drag with the Zoom tool (
 ) to select the detail.
The area appears enlarged on-screen.
The more you zoom in, the larger the pixels appear and the less you see of the image’s content.
Adjust the Image View
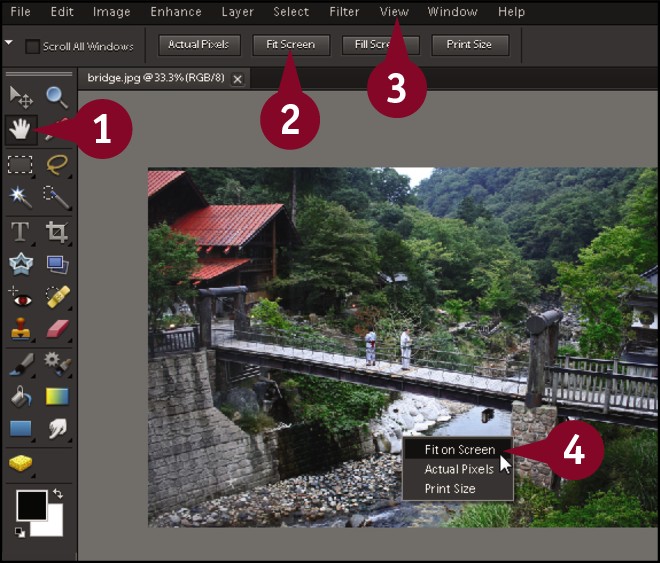
You can move an image within the window by using the Hand tool or scroll bars. The Hand tool helps you navigate to an exact area in the image by dragging freely in two dimensions. The scroll bars enable you to pan an image vertically or horizontally.
Using the Hand tool is helpful when you are working with a high-resolution image and want to examine details throughout the image at high magnification. The tool is also useful when you have a low-resolution monitor, which means there is a smaller area in which to display the Photoshop Elements workspace.
Adjust the Image View
Using the Hand Tool
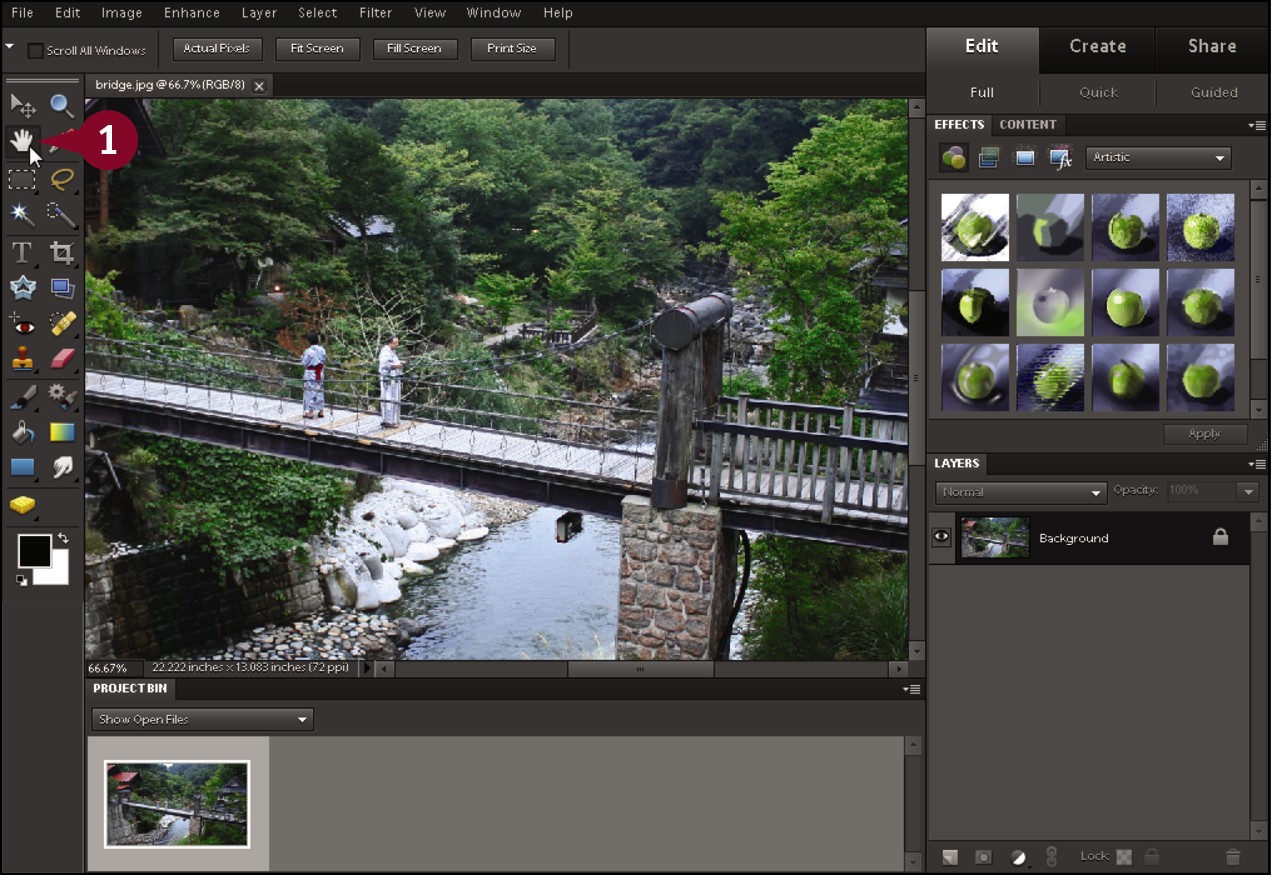
 In the Editor, click the Hand tool (
 ).
).
You can also press the  shortcut key.
Note: For more on opening the Editor, see Chapter 1.
Note: For the Hand tool ( ) to have an effect, the image must be larger than the image window.

 Click and drag inside the image window.
The view of the image shifts inside the window.
Using the Scroll Bars
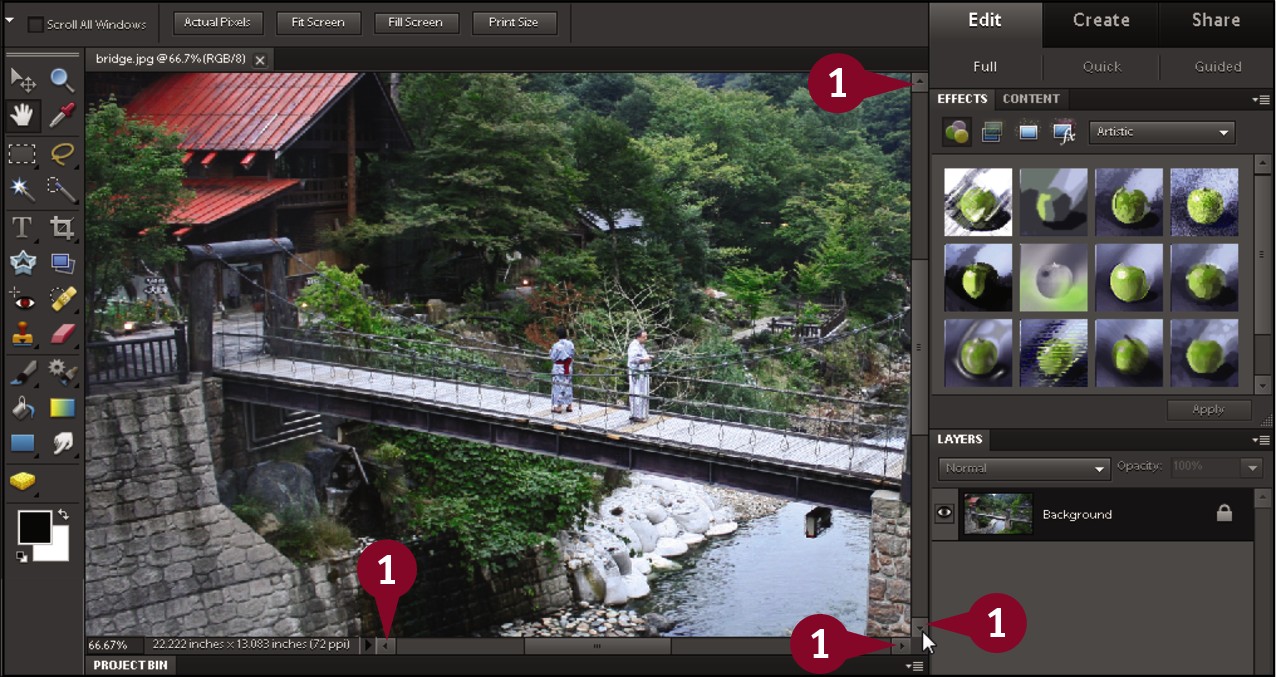
 Click and hold one of the window’s scroll bar buttons (
 ,
,  ,
,  , or
, or  ).
).

The image scrolls in the direction you select — in this example, down.
Change the On-Screen Image Size
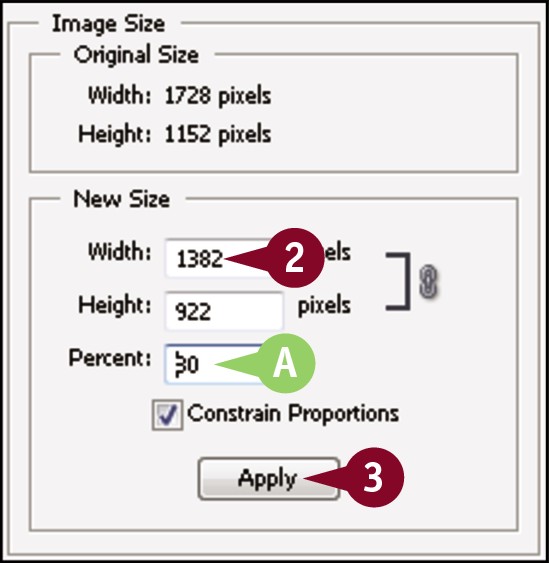
You can change the on-screen size of an image you are working with in Photoshop Elements to make it better fit the confines of your monitor when viewed at the same magnification. Shrinking an image can also lower its file size and make it easier to share via e-mail or on the web.
When you change an image’s on-screen size, you need to resample it. Resampling is the process of increasing or decreasing the number of pixels in an image. Enlarging or shrinking an image too much can cause a noticeable decrease in image quality, which you can notice by examining details using the Zoom tool.
Change the On-Screen Image Size
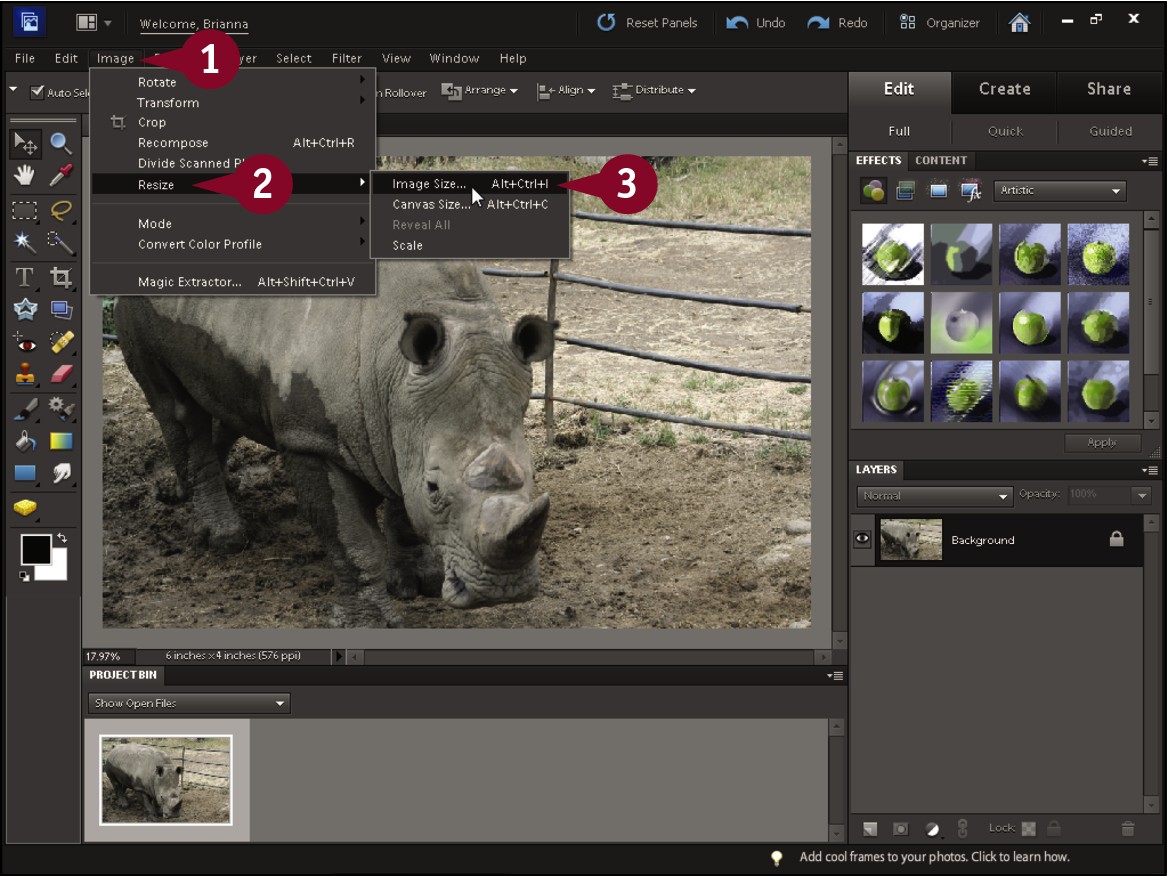
 In the Editor, click Image.
Note: For more on opening the Editor, see Chapter 1.
 Click Resize.
 Click Image Size.
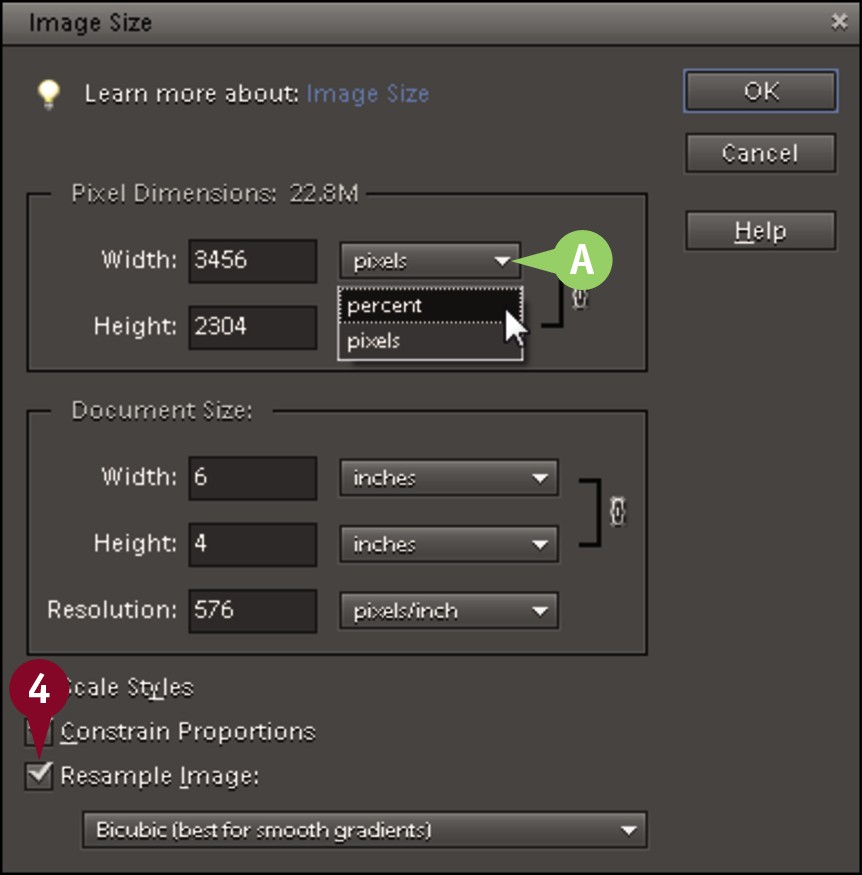
The Image Size dialog box opens, listing the width and height of the image in pixels.
You can also press  +
+ +
+ (
( +
+ +
+ on a Mac) to open the Image Size dialog box.
A To resize by a certain percentage, click the  and change the units to percent.
 Click the Resample Image check box (
 changes to
  ).
).
Note: Of the options in the Resample Image menu, Bicubic Smoother is often better for enlarging, whereas Bicubic Sharper is better for shrinking.
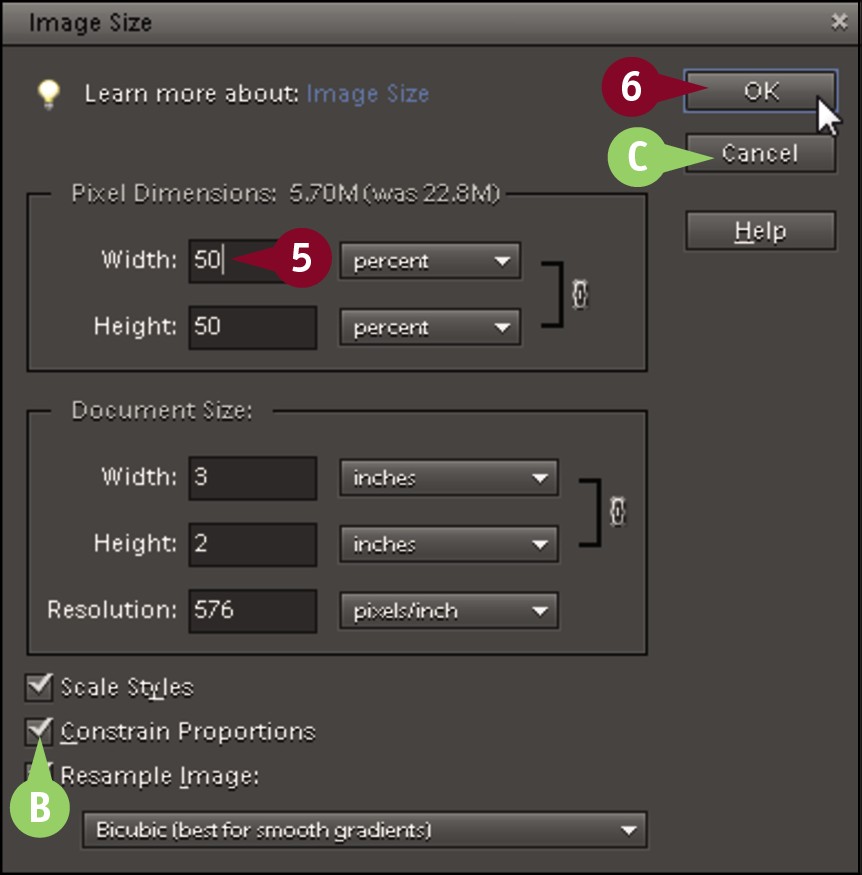
 Type a size or percentage for a dimension.
B You can click the Constrain Proportions check box ( changes to
  ) to cause the other dimension to change proportionally.
 Click OK.
C You can restore the original dialog box settings without exiting the dialog box by pressing and holding  (
( on a Mac) and clicking Cancel, which changes to Reset.
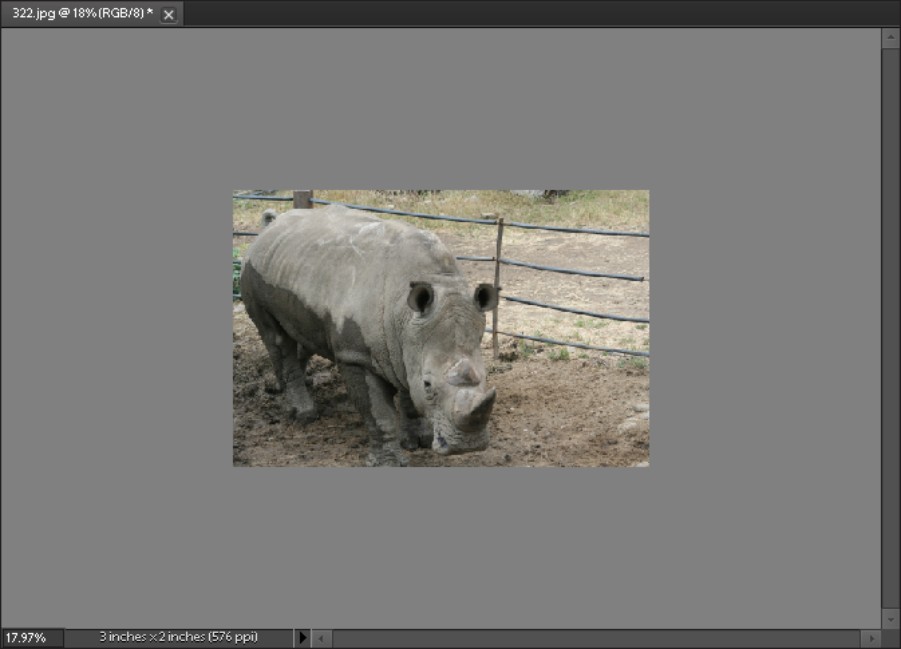
Photoshop Elements resizes the image.
In this example, the image decreases to 50 percent of the original size.
Change the Image Print Size
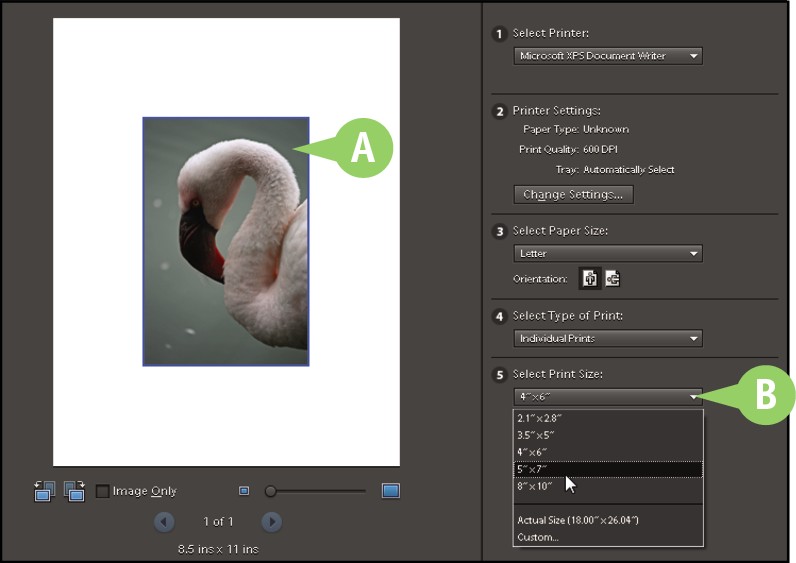
You can change the printed size of an image to determine how it appears on paper. Print size is also called document size in Photoshop Elements. If you change the print size of an image with the resampling option checked, Photoshop Elements adjusts the number of pixels in the image but keeps the resolution the same. If the resampling option is unchecked, the resolution changes but not the number of pixels. Photoshop Elements also gives you resizing options when you print your image. You can either print it at actual size or you can choose from a list of common photo print sizes. For more about printing, see Chapter 17.
Change the Image Print Size
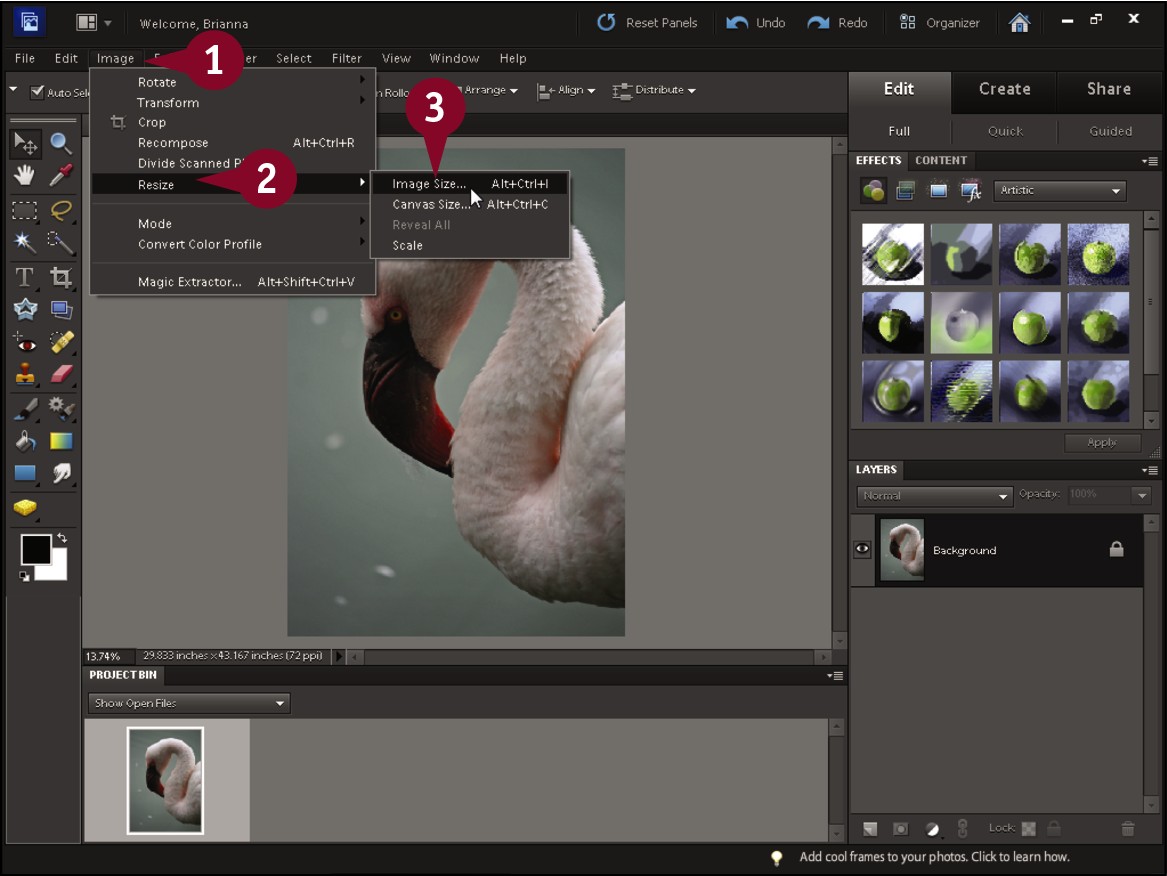
 In the Editor, click Image.
Note: For more on opening the Editor, see Chapter 1.
 Click Resize.
 Click Image Size.

The Image Size dialog box opens, listing the current width and height of the printed image.
A You can click the  to change the unit of measurement.
B If you click the Resample Image check box, Photoshop Elements adjusts the number of pixels in the image to resize. Otherwise, it adjusts the resolution.
Note: For more on resolution, see the section “Change the Image Resolution.”
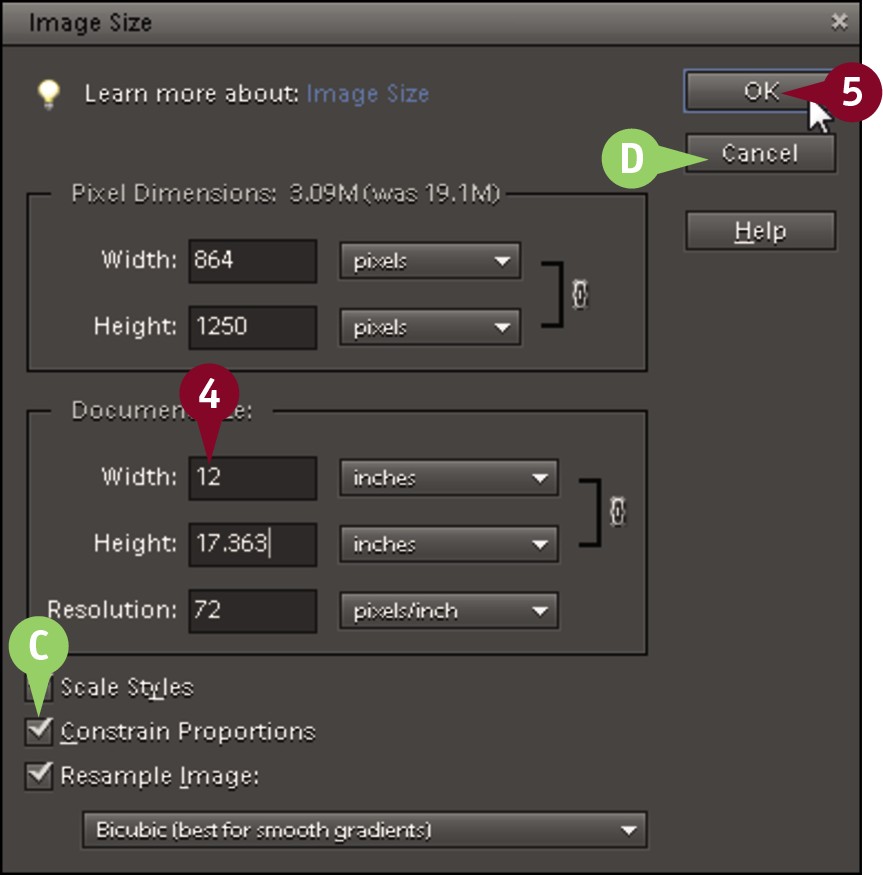
 Type a size or percentage for a dimension.
C You can click the Constrain Proportions check box ( changes to
  ) to cause the other dimension to change proportionally.
 Click OK.
D You can restore the original dialog box settings by pressing and holding  (
( on a Mac) and clicking Cancel, which changes to Reset.
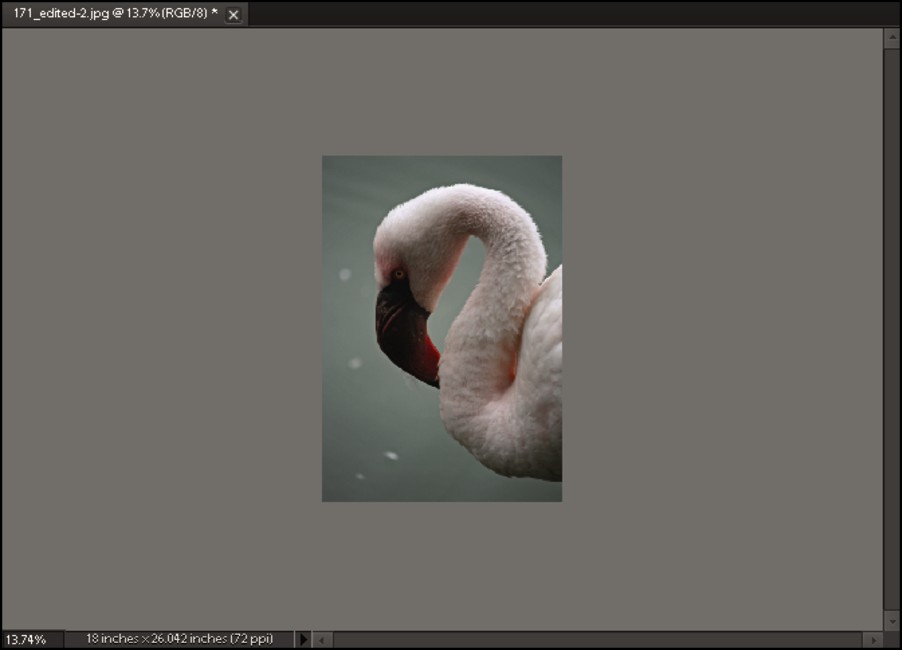
Photoshop Elements resizes the image.
Note: Changing the size of an image, especially enlarging, can add blur. To sharpen a resized image, see Chapter 9.
Change the Image Resolution
You can change the print resolution of an image to increase or decrease the print quality. The resolution, combined with the number of pixels in an image, determines the size of a printed image. The greater the resolution, the better the image appears on the printed page — up to a limit, which varies with the type of printer you use and the paper on which you are printing.
For more about how the size of images is determined in Photoshop Elements, see “Change the On-Screen Image Size” and “Change the Image Print Size.”
Change the Image Resolution
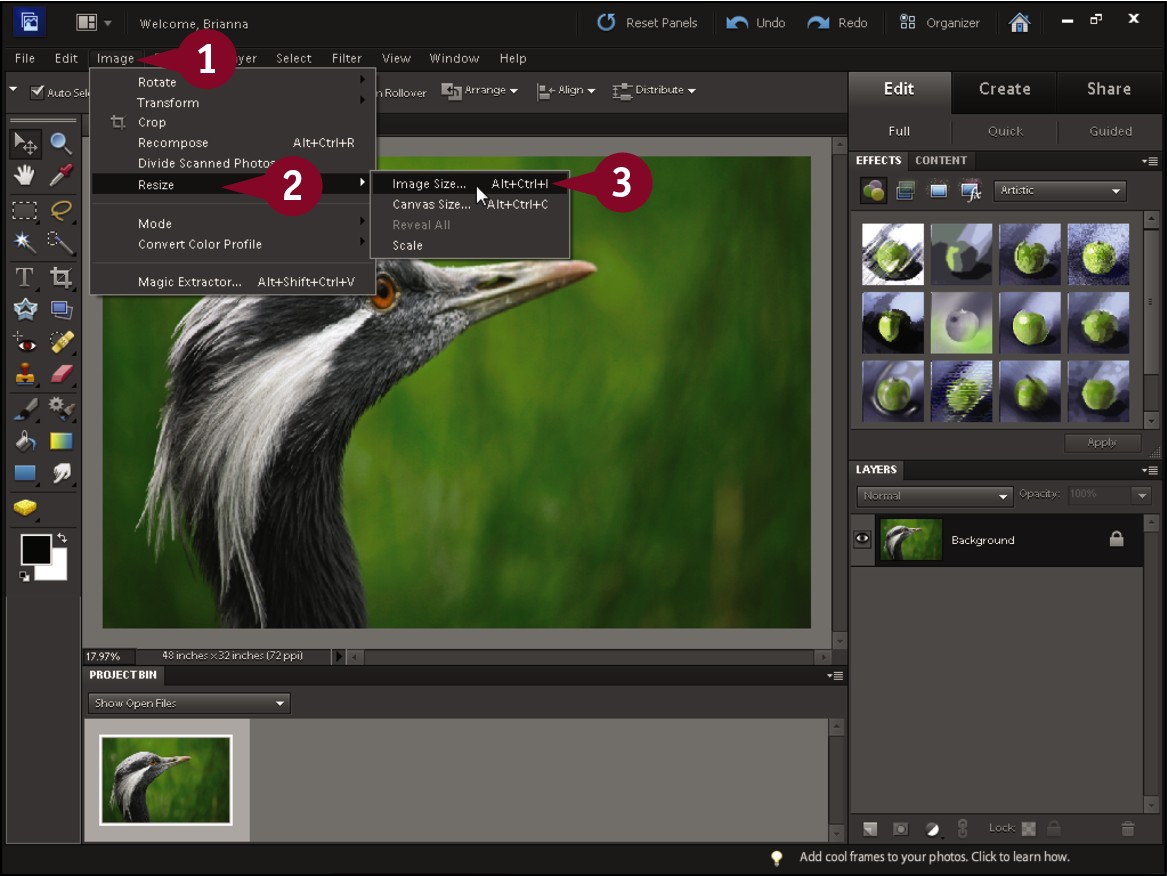
 In the Editor, click Image.
Note: For more on opening the Editor, see Chapter 1.
 Click Resize.
 Click Image Size.
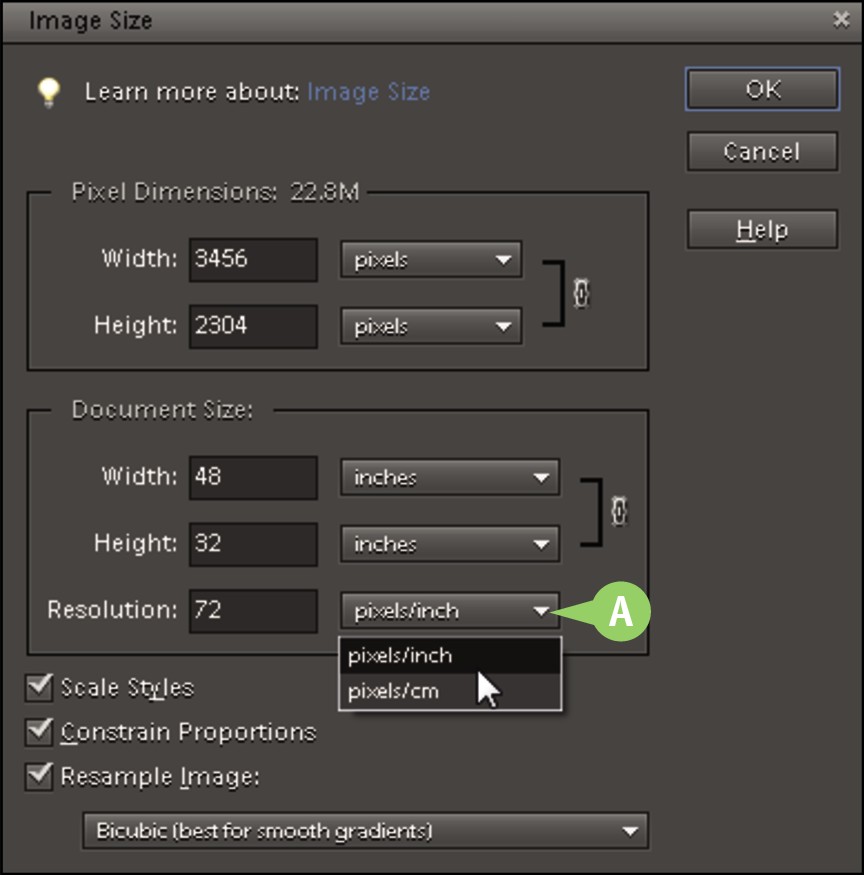
The Image Size dialog box opens, listing the current resolution of the image.
A You can click the  to change the resolution units.
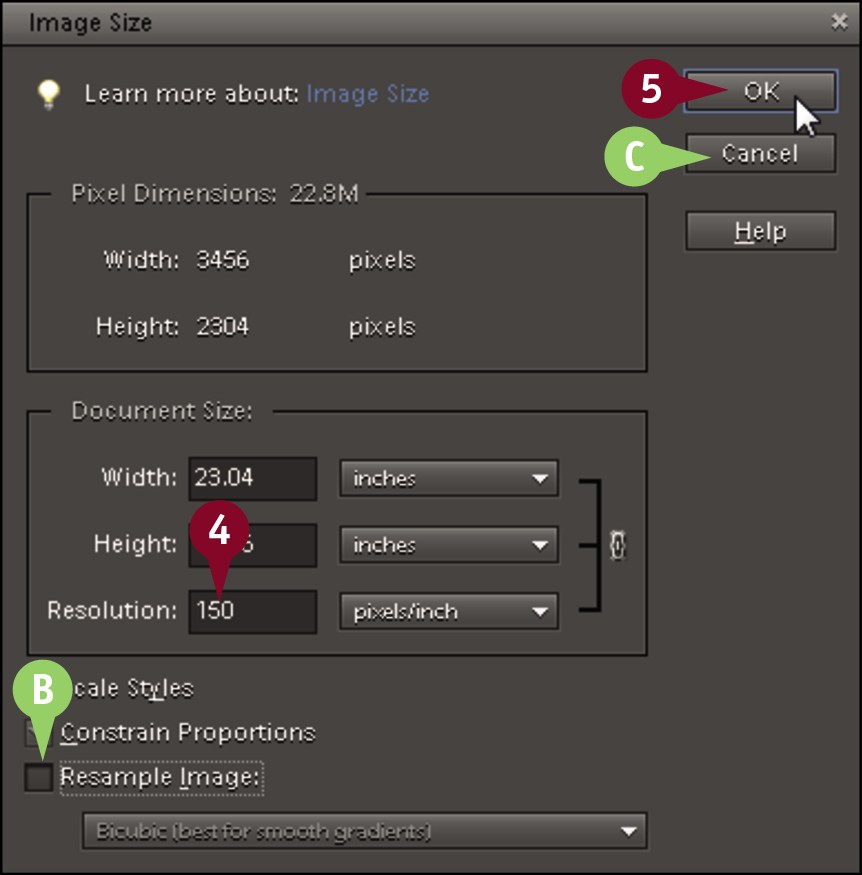
 Type a new resolution.
B You can deselect the Resample Image check box ( changes to
  ) to keep the number of pixels in your image fixed and change the printed dimensions. The print quality will change.
 Click OK.
C You can restore the original dialog box settings by pressing and holding  (
( on a Mac) and clicking Cancel, which changes to Reset.

Photoshop Elements adjusts the image resolution.
If you deselected the Resample Image check box, the number of pixels stays the same, as does the on-screen image size. Increasing the resolution makes the print size smaller, and decreasing the resolution makes it bigger.
Change the Image Canvas Size
You can alter the canvas size of an image to change its rectangular shape or add space around its borders. The canvas is the area on which an image sits. Changing the canvas size is one way to crop an image or add matting, which is blank space, around an image.
Photoshop Elements warns you when you decrease the dimensions of the image canvas because this deletes part of the image. You might want to increase the canvas size if you are making a collage of images and want the images to overlap one another. Increasing the canvas gives you space to add other images.
Change the Image Canvas Size
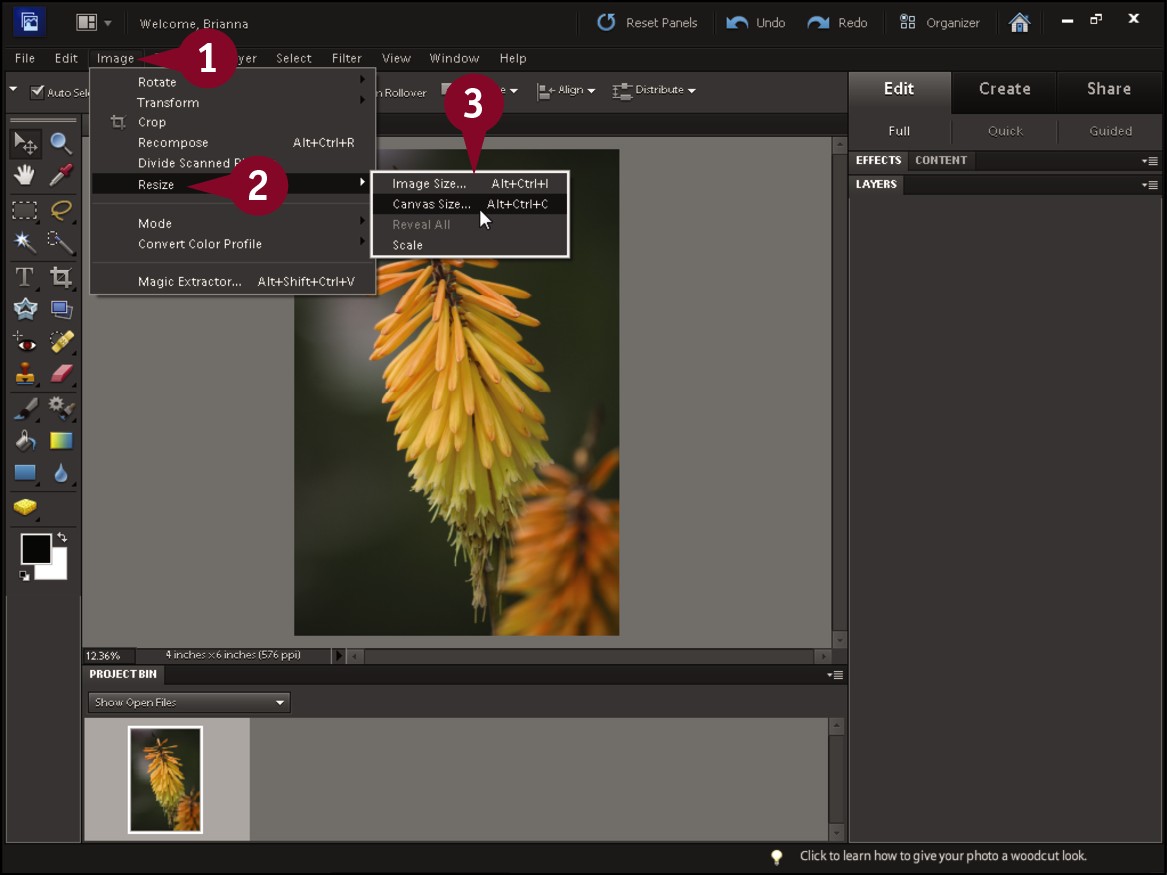
 In the Editor, click Image.
Note: For more on opening the Editor, see Chapter 1.
 Click Resize.
 Click Canvas Size.
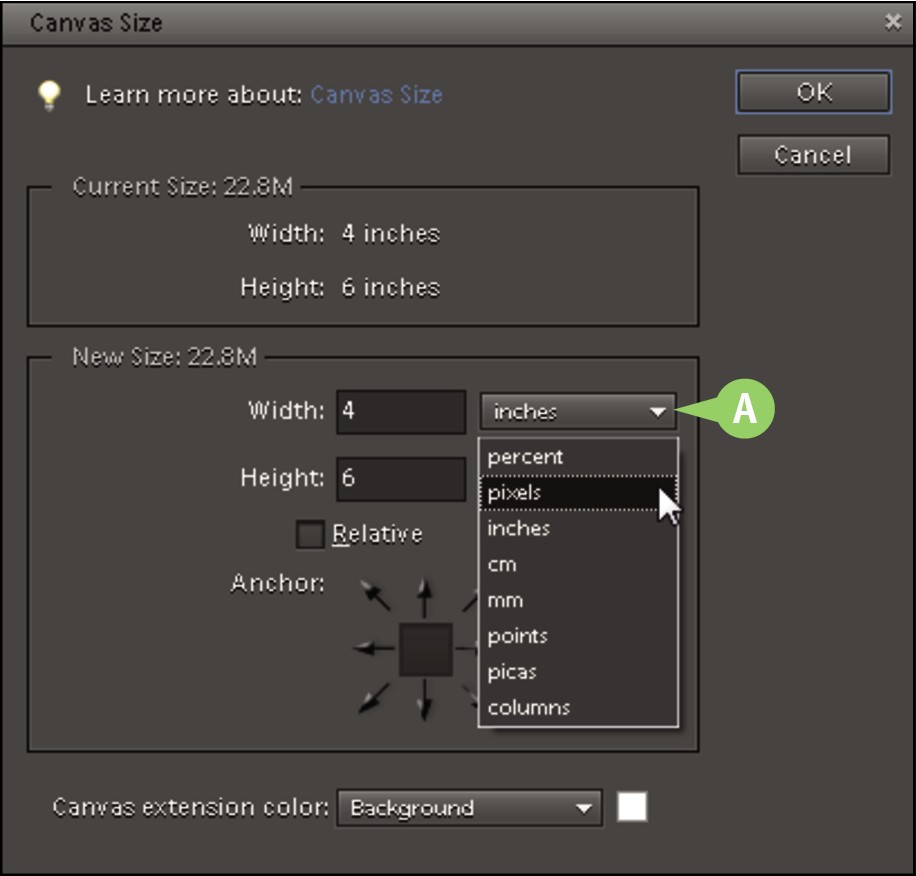
The Canvas Size dialog box opens, listing the current dimensions of the canvas.
A You can click the  to change the unit of measurement.

 Type the new canvas dimensions.
B You can click an arrow ( ) to determine in which directions Photoshop Elements changes the canvas size. Clicking the square in the middle of the arrows crops the image equally on opposite sides.
 Click OK.
Note: If you decrease a dimension, Photoshop Elements displays a dialog box asking whether you want to proceed. Click Proceed.

Photoshop Elements changes the image’s canvas size.
In this example, because the width is increased, Photoshop Elements creates new canvas space on the sides of the image.
Crop an Image
You can use the Crop tool to quickly remove unneeded space on the top, bottom, and sides of an image. Cropping is a great way to edit out unwanted background elements or reposition a subject in your photo. You can also rotate the cropping boundary prior to cropping, which enables you to rotate while you are cropping.
You can also crop an image by changing its canvas size. See the section “Change the Image Canvas Size” for more on setting a new canvas size. Another way is by selecting an area with a selection tool, clicking Image, and then clicking Crop. See Chapter 6 for more on making selections.
Crop an Image
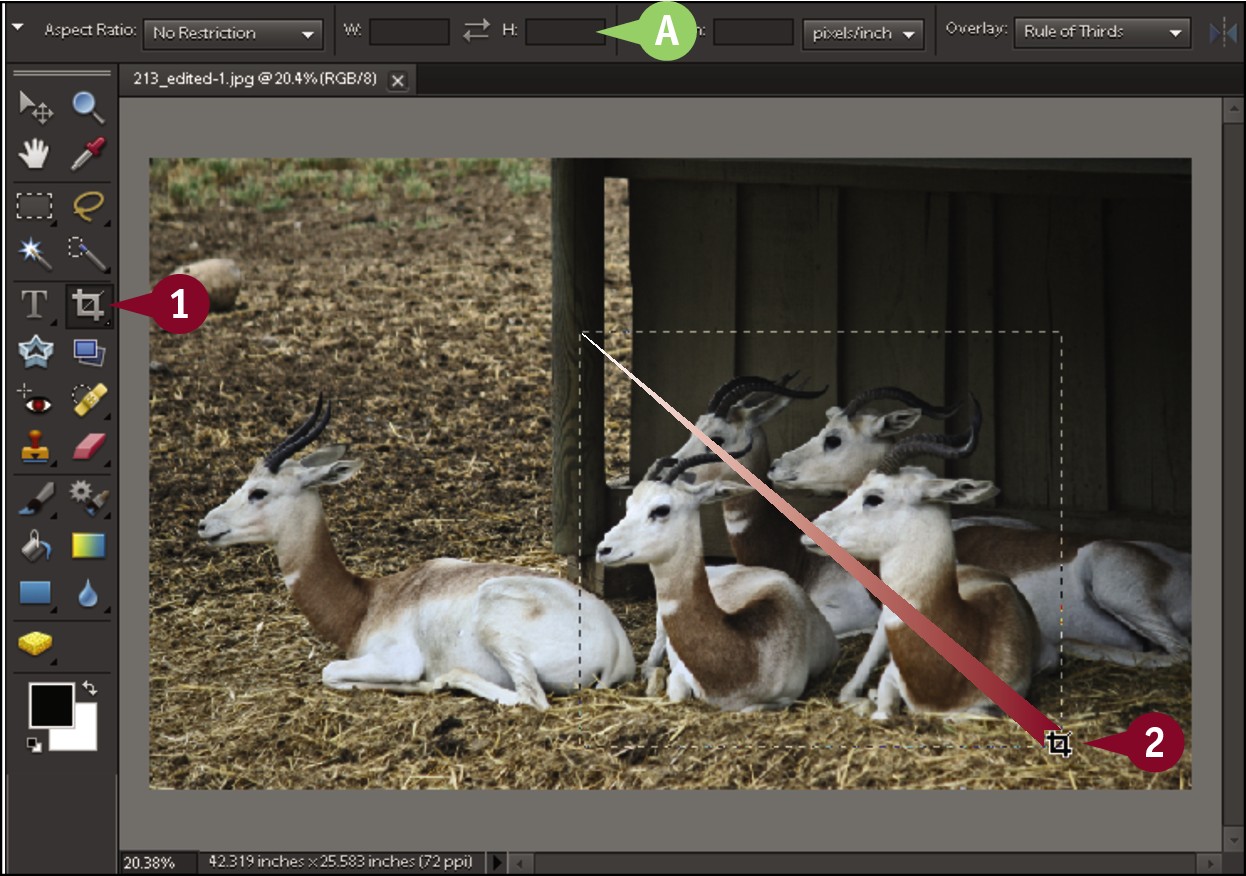
 In the Editor, click the Crop tool (
 ).
).
Note: For more on opening the Editor, see Chapter 1.
 Click and drag to select the area of the image you want to keep.
A You can set specific dimensions for a crop by using the Width and Height boxes in the Options bar.

 Click and drag the side and corner handles (
 ) to adjust the size of the cropping boundary.
You can click and drag inside the cropping boundary to move it without adjusting its size.
You can click and drag outside the cropping boundary to rotate the tool prior to executing the crop.

 Click
Click  or press
  to accept the crop.
You can also double-click inside the crop area to crop the photo.
B To exit the cropping process, you can click  or press
  .
.
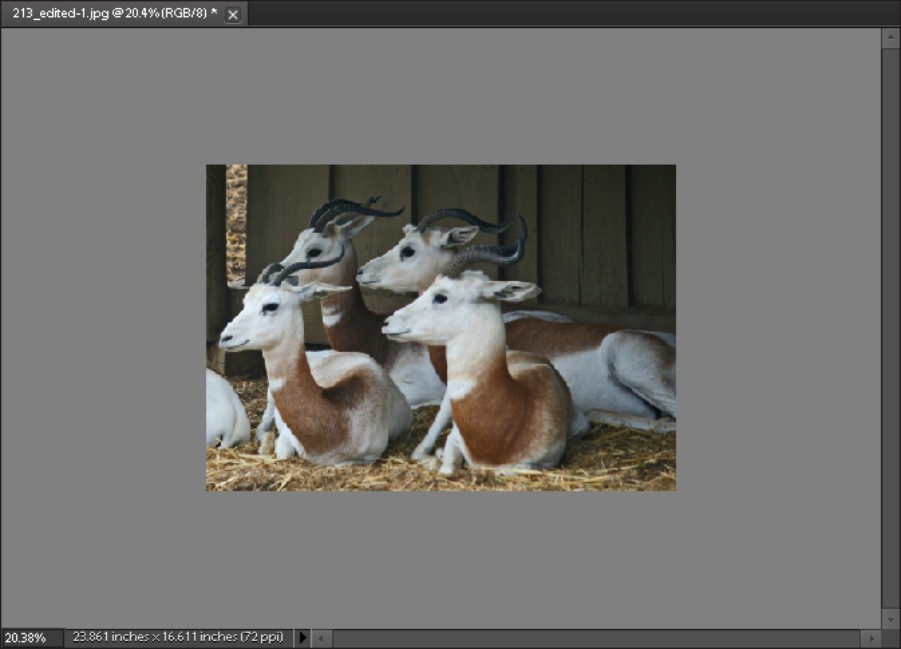
Photoshop Elements crops the image, deleting the pixels outside the cropping boundary.
Rotate an Image
You can use the rotate actions on an image to turn it within the image canvas. If you import or scan a horizontal image vertically, you can rotate it so that it appears in the correct orientation.
You can also flip a photo to change the direction of the subject matter. Flipping it horizontally, for example, creates a mirror image of the photo. Rotating an image can add blank space around the sides. You can crop the image to remove this extra space. Note that rotating an image by something other than 90-degree multiples can decrease image quality slightly.
Rotate an Image
Rotate 90 Degrees
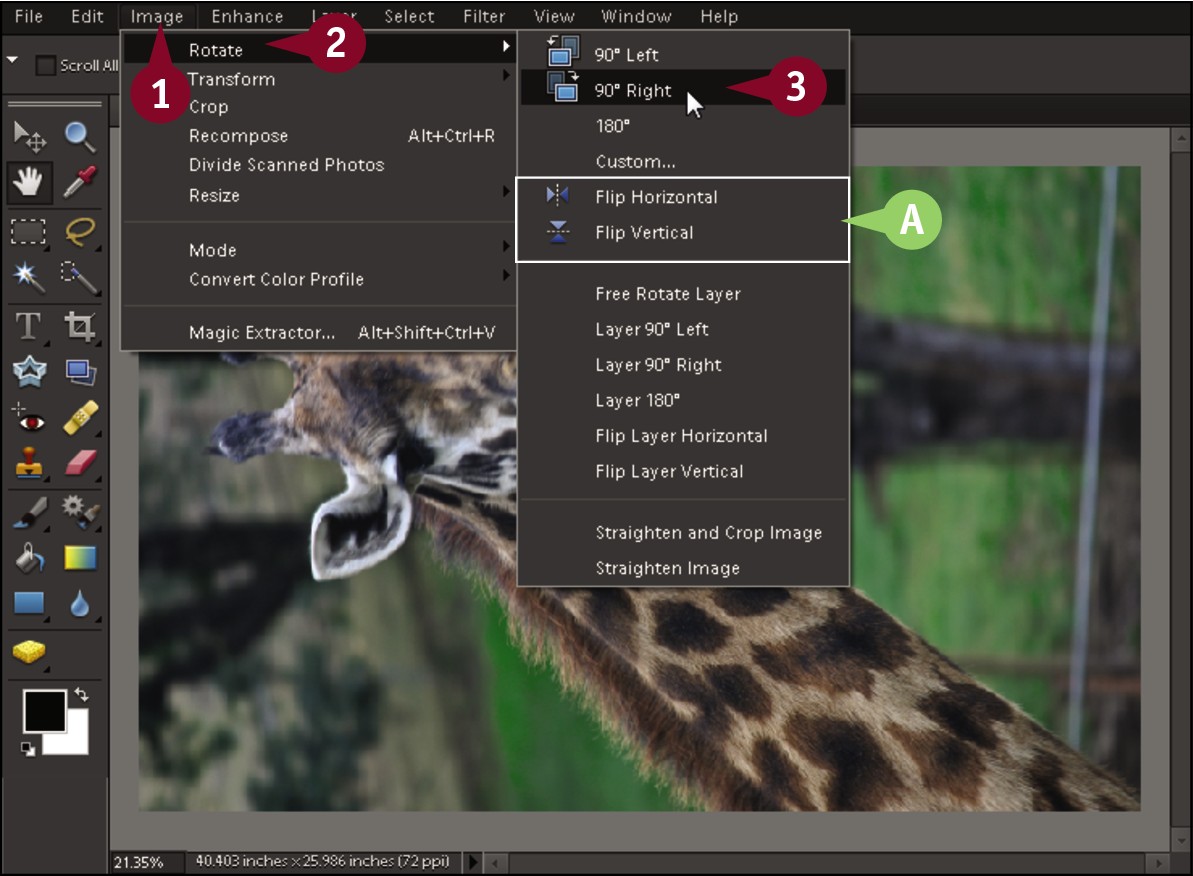
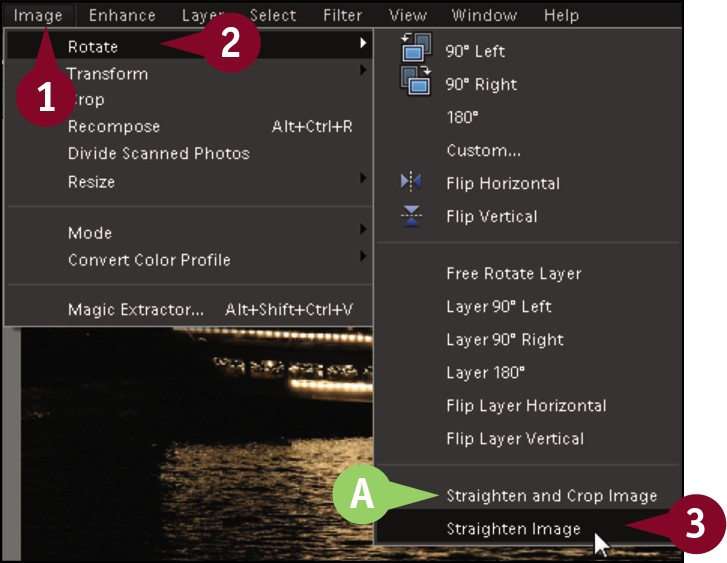
 In the Editor, click Image.
Note: For more on opening the Editor, see Chapter 1.
 Click Rotate.
 Click 90° Left or 90° Right to rotate an image.
A To change subject direction, click Flip Horizontal or Flip Vertical.

Photoshop Elements rotates the image.
Rotate Precisely
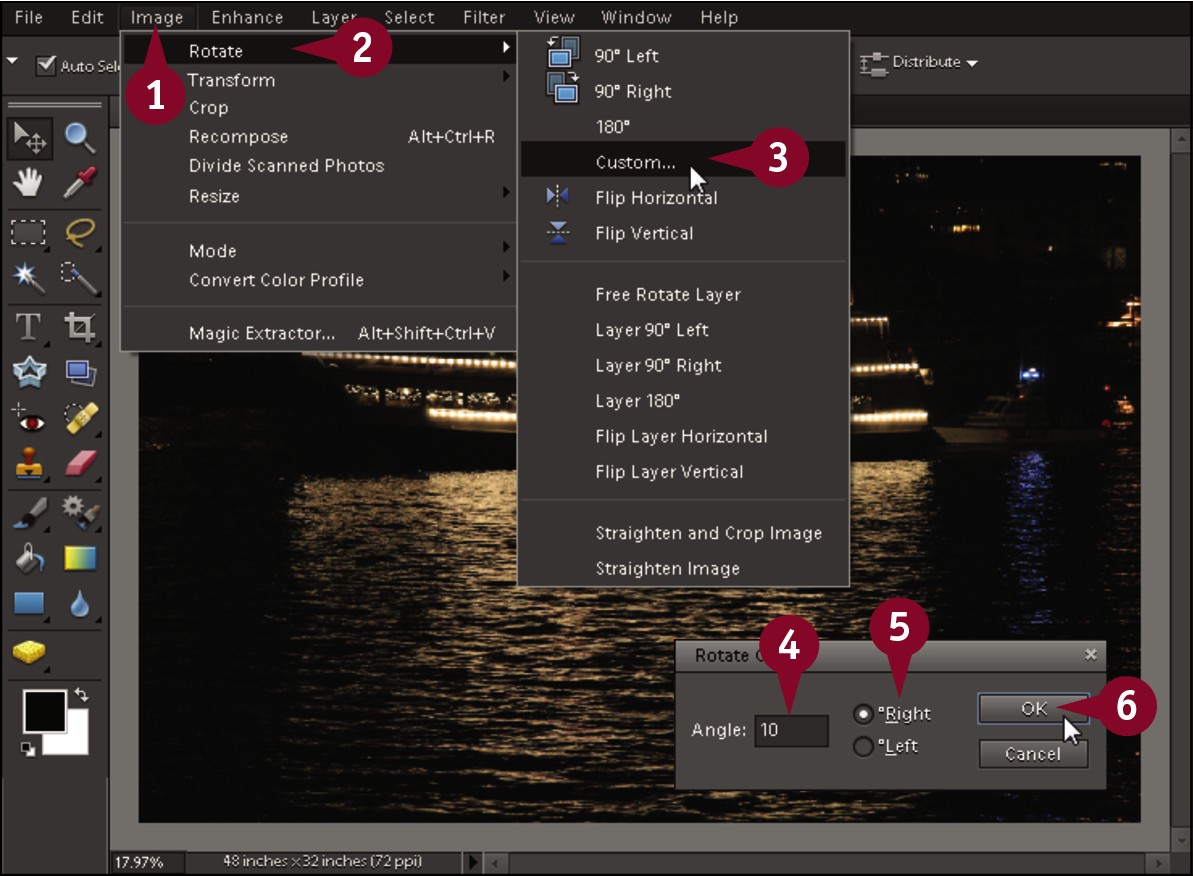
 Click Image.
 Click Rotate.
 Click Custom.
The Rotate Canvas dialog box opens.
 Type an angle from –359.99 to 359.99.
 Click a direction to rotate.
 Click OK.
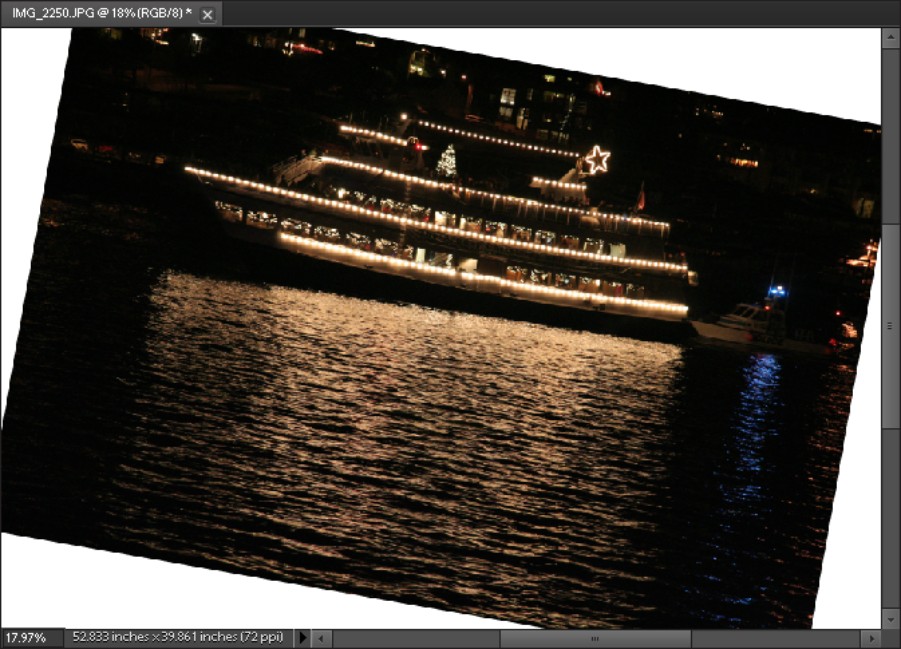
Photoshop Elements rotates the image to your exact specifications.
Undo Changes to an Image
You can undo commands by using the Undo History panel. This enables you to correct mistakes or change your mind about operations you have performed on your image. The Undo History panel lists recently executed commands, with the most recent command at the bottom. In the Preferences dialog box, you can control how many commands Photoshop Elements remembers in the Undo History panel. Up to 1,000 commands can be remembered. To undo just a single command, you can use the Undo button located at the top of the Photoshop Elements interface or press  +Z (
+Z ( +Z on a Mac). After you undo a command, you can execute the same command again using the Redo command.
Undo Changes to an Image

 In the Editor, click Window.
Note: For more on opening the Editor, see Chapter 1.
 Click Undo History.
The Undo History panel opens, listing recently executed commands.
 Click the History slider (
 ) and then drag it upward.
A Alternatively, you can click a previous command in the Undo History panel.
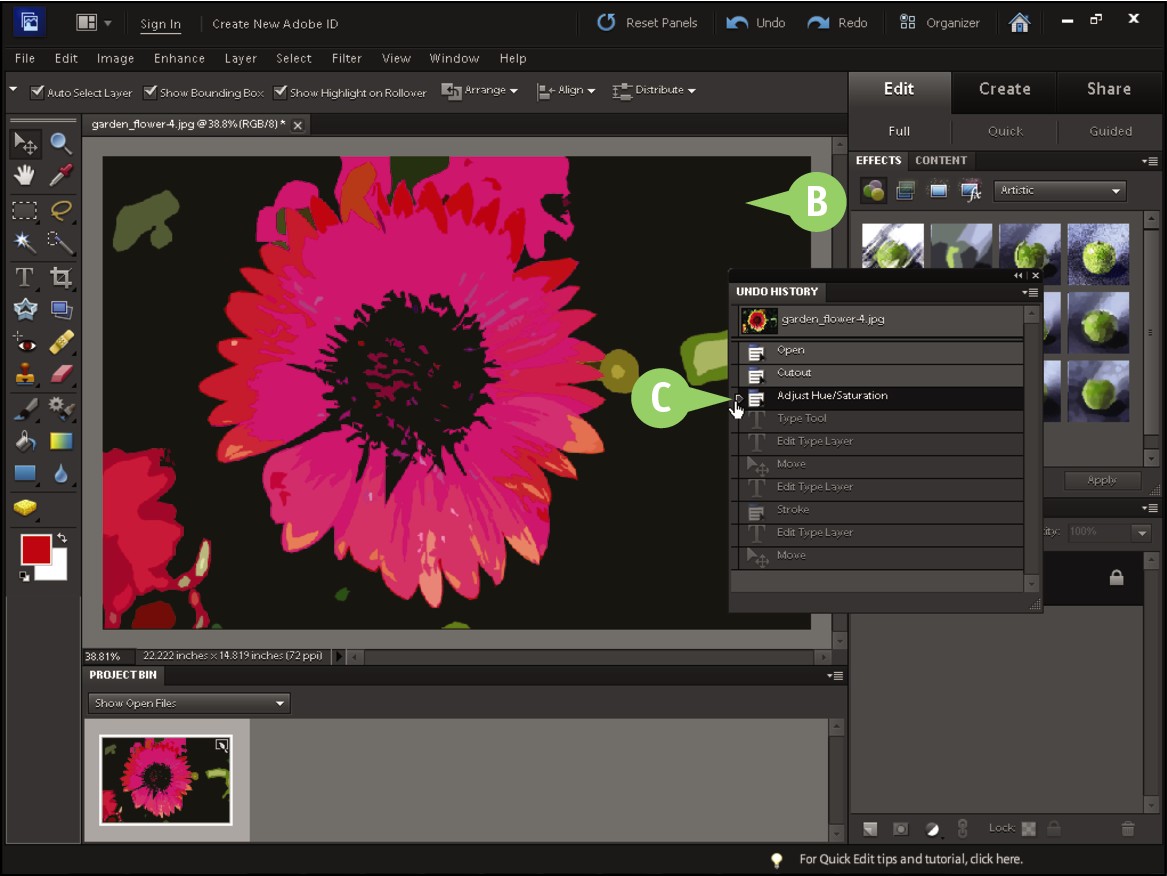
B Photoshop Elements undoes the previous commands.
C You can click and drag the slider down to redo the commands.
Revert an Image
You can revert an image to the previously saved state. This enables you to start your image editing over. After you revert an image, you can still change your mind and switch back to the unreverted state by clicking Edit and then Undo Revert.
An alternative to reverting all at once is undoing commands. The Undo History panel enables you to roll back your image-editing work by undoing a set number of commands. See “Undo Changes to an Image” for details.
Revert an Image

 In the Editor, click Edit.
Note: For more on opening the Editor, see Chapter 1.
 Click Revert.

Photoshop Elements reverts the image to its previously saved state.
A To return to the unreverted state, click Undo ( ).
).


 Press
Press 
