Chapter 9: Enhancing and Retouching Photos

Do you need to fix a photo fast? This chapter offers you all kinds of techniques for retouching your digital photos, including correcting common color problems, making flaws disappear, and rearranging objects.
Retouch with the Clone Stamp Tool
Extract an Object from a Background
Retouch with Guided Edit
You can remove unwanted objects by using the step-by-step instructions and adjustments in the Guided Edit view of Photoshop Elements. With the Spot Healing Brush and Healing Brush, you can remove imperfections by copying from unblemished areas of your photo. The Spot Healing Brush is good for removing small elements such as skin blemishes. The Healing Brush, like the Clone Stamp tool, is better for eliminating larger objects. In addition to retouching a photo in Guided Edit, you can access adjustments that enable you to merge content from multiple photos into a single image, correct lighting, and more. For more about merging content, see the section “Merge Group Shots” later in this chapter. For more about correcting lighting, see Chapter 10.
Retouch with Guided Edit

 In the Editor, click Edit.
 Click Guided.
Note: For more on opening the Editor, see Chapter 1.
The Guided Edit view opens.
A Make sure the Advanced Edits list is open. You can click the  to open it (
 changes to
  ).
).
 Click Touch Up Scratches and Blemishes.

 Click the Spot Healing Brush (
 ).
).
 Click and drag the slider (
 ) to select a brush size between 1 and 1000.
Select a brush size that will cover the area you plan to correct.
You can also type a value for the brush size.
 Click an object in your image.
Photoshop Elements patches and blends the object with the color and texture of nearby pixels.

 Click the Healing Brush (
 ).
).
 Click and drag the slider (
 ) to select a brush size between 1 and 1000.
Select a brush size slightly smaller than the area you plan to touch up.
You can also type a value for the brush size.
 Press
Press  (
( on a Mac) and then click an unblemished area of your image that has a similar color and texture.

 Click and drag across an object or blemish in your image.
Photoshop Elements covers the object with pixels from the unblemished area.
 Click Done to return to the main Guided Edit view.
Quick Fix a Photo
You can use the Quick Fix view in Photoshop Elements to make fast corrections to your photos in one convenient window. You can adjust lighting, contrast, color, and focus as well as compare Before and After views of your adjustments.
The Quick Fix pane consists of a variety of panels. The General Fixes panel includes Red Eye Fix and Smart Fix, which automatically corrects lighting, color, and contrast. The Lighting panel fixes contrast and exposure problems; the Color panel fixes color problems; and the Sharpen panel sharpens photos. For more about fixing light and color issues, see Chapter 10 and Chapter 11.
Quick Fix a Photo

 In the Editor, click Edit.
 Click Quick.
Note: For more on opening the Editor, see Chapter 1.
The Quick Fix pane opens.

A You can zoom, pan, select objects, or crop the image with these tools.
 Click the down arrow (
 ) and then a view mode.
The After Only view shows the results of your changes.
The Before Only view shows the original unedited photo.
The Before and After views show both the original image and the image with changes applied.

 Click and drag the Fix slider (
 ).
).
B You can also click Auto to have Photoshop Elements automatically adjust your image.
C Photoshop Elements makes immediate adjustments to the lighting, contrast, and colors in the image.
D You can click Reset to return to the original settings.
 Click
Click  or press
  to accept.

E To make different types of adjustments automatically, click Auto for the type of correction you want to make.
F You can also click and drag a slider ( ) to adjust a setting.
G In this example, the shadows in the image are lightened.
 Click
Click  or press
  to accept.
 Click Full.
Photoshop Elements applies the changes and returns to the Full Edit interface.
Improve Colors with Quick Fix
You can use the tools in the Quick Fix view to correct common color problems in your photos. The tools enable you to easily fix specific issues such as whitening teeth and boosting the blue in a washed-out sky. You can perform the same tasks with color and lighting tools in the Full Edit interface, but the settings are more complex. You can also access the Black and White – High Contrast tool, which is covered in the tip, and the Red Eye Removal tool in the Quick Fix view. With the exception of the Red Eye Removal tool, the tools in the Quick Fix view apply their changes as adjustment layers, which means you can fine-tune their effects later. See Chapter 8 for more about adjustment layers.
Improve Colors with Quick Fix
Add Blue to Skies

 In the Editor, open a photo that includes a dull-colored sky.
Note: For more on opening the Editor, see Chapter 1. For more on opening a photo, see Chapter 2.
 Click Quick.
The Quick Fix view opens.
 Click the Make Dull Skies Blue tool (
 ).
).

A You can click the  to adjust the brush size.
 Click and drag over the sky.
Photoshop Elements selects the sky and boosts the blue color.
B You can click Reset to revert the photo to its previous state.
Whiten Teeth
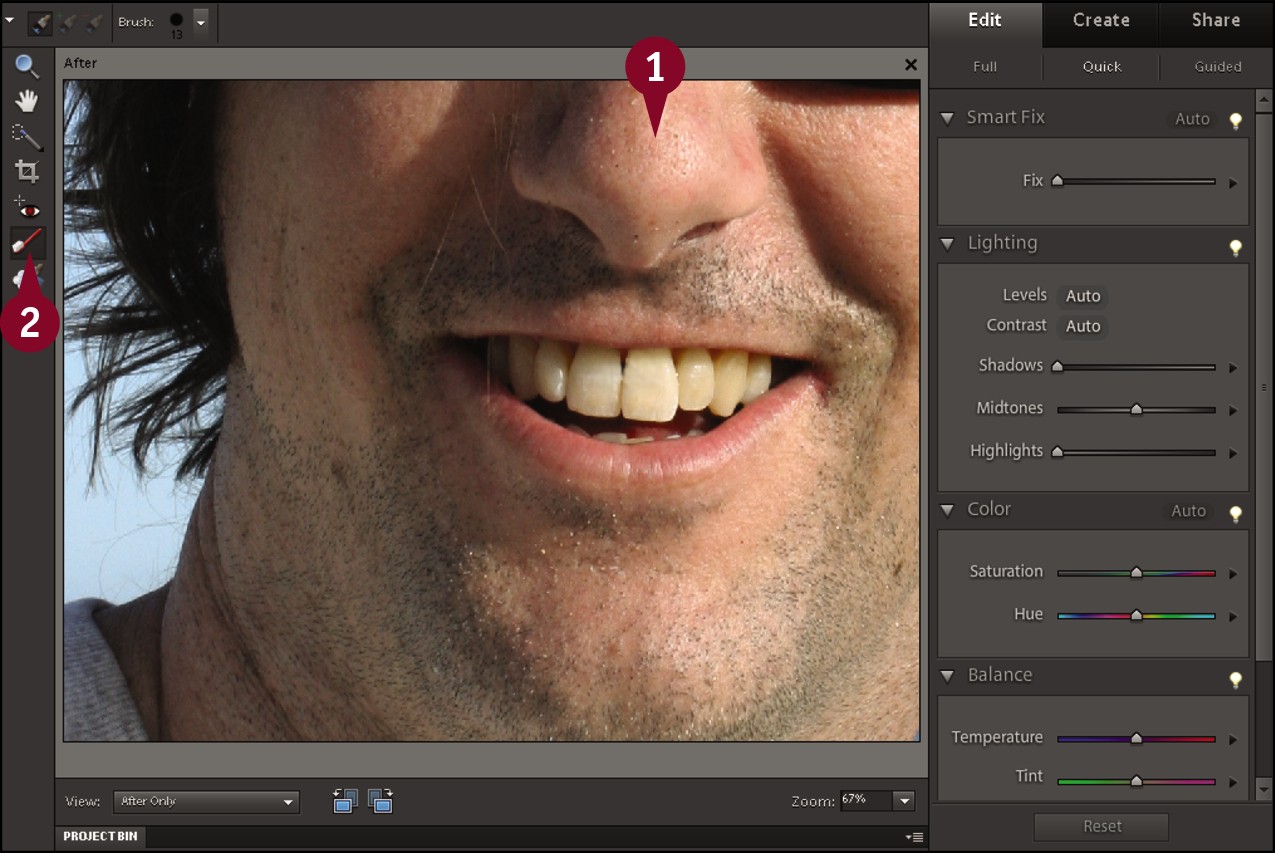
 Open a photo that includes teeth.
 Click the Whiten Teeth tool (
 ).
).

C You can click the  to adjust the brush size.
 Click and drag over teeth in the photo.
Photoshop Elements whitens the teeth, decreasing any colorcast they may have.
Remove Red Eye
You can use the Red Eye Removal tool to remove the red eye color that a camera flash can cause. Red eye is a common problem in snapshots taken indoors with a flash. The light from the flash reflects off the back of the subject’s eyes, creating the red eye appearance. Using the Red Eye Removal tool, you can edit the eye to change its color without changing image details. You can experience a similar problem with animals, but their eyes can turn yellow, blue, or green. See the tip for details about how to fix that.
Remove Red Eye

 In the Editor, click the Red Eye Removal tool (
 ).
).
Note: For more on the Editor, see Chapter 1.
 Click the
  and then drag the slider that appears to control the size of the area to correct.

 Click the
  and then drag the slider that appears to the darkness setting you want.

 Click the eye you want to fix.
 Release the mouse button.
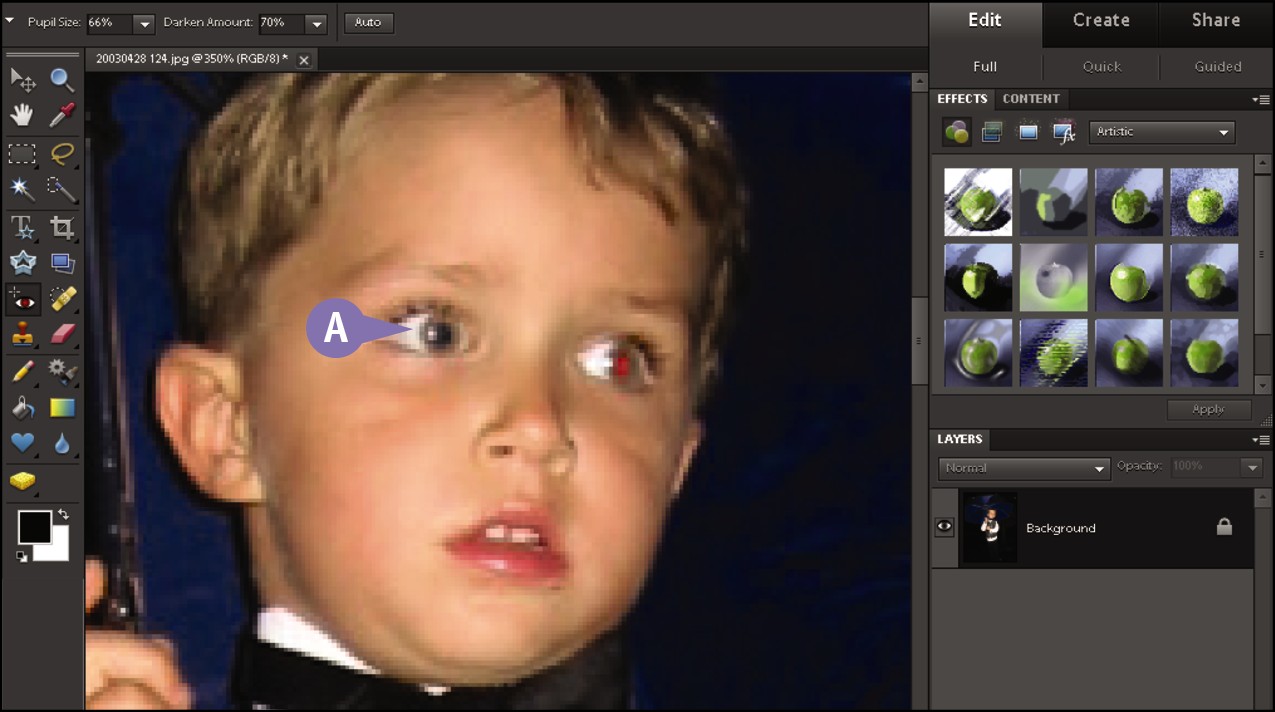
A Photoshop Elements repairs the color.
If you need to change the settings, you can click Undo ( ) to undo the color change.
Retouch with the Clone Stamp Tool
You can clean up small flaws or erase elements in your image with the Clone Stamp tool. The tool copies information from one area of an image to another. For example, you can use the Clone Stamp tool to remove unwanted blemishes of all kinds by cloning an area near the flaw and then stamping over the flaw.
You can adjust the opacity of the tool to copy information partially to the new location. Lowering the opacity and then copying from multiple areas in an image can sometimes be the best way to cleanly erase an unwanted object.
Retouch with the Clone Stamp Tool

 In the Editor, click the Clone Stamp tool (
 ).
).
Note: For more on opening the Editor, see Chapter 1.
 Click the
  to choose a brush size and type.
You can change the brush size while using the tool by pressing  and
and  .
.

 Click the
  to choose an opacity, which determines whether the tool covers an area completely or partially.
You can also type a value for the opacity.
 Press and hold
  (
( on a Mac) and then click the area of the image from which you want to copy.
In this example, the Clone Stamp is used to remove a dog’s leash.

 Click and drag the area of the photo that you want to correct.
Photoshop Elements copies the cloned area to where you click and drag.

 Continue clicking new areas to clone and dragging over the area as many times as needed to achieve the desired effect.
Note: Short strokes can often produce better results than long strokes because they help avoid cloning from unintended areas.
You can click Undo ( ) to undo the tool’s effects.
Remove a Spot
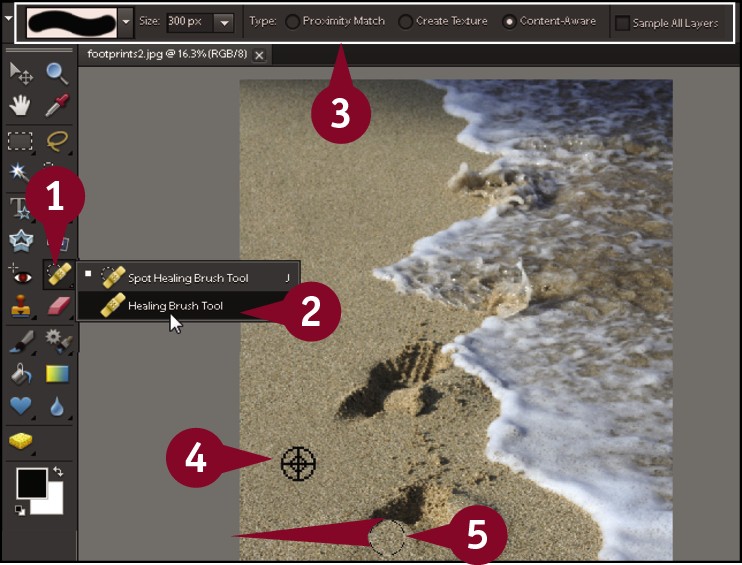
You can use the Spot Healing Brush to quickly repair flaws or remove small objects in a photo. The tool works well on small spots or blemishes on both solid and textured backgrounds. You can adjust the brush size so that it covers the feature you want to remove.
The tool’s Proximity Match setting analyzes pixels surrounding the selected area and replaces the area with a patch of similar pixels. The Create Texture setting replaces the area with a blend of surrounding pixels. The Content-Aware setting, which is often the most useful, is similar to Proximity Match but can also recognize patterns within the surrounding pixels and keep them intact.
Remove a Spot

 In the Editor, click the Spot Healing Brush tool (
 ).
).
Note: For more on opening the Editor, see Chapter 1.
 Click the
  to choose a brush size and type that will cover the spot.

A You can also set an exact brush size here.
 Click the type of healing effect you want to apply (
 changes to
  ).
).

 Click the spot you want to correct.
You may have to click and drag across the spot to get the desired effect.
Photoshop Elements replaces the selected area with pixels similar to those nearby.

B You can click Undo ( ) to undo the change.
Sharpen an Image
You can use the Adjust Sharpness dialog box to sharpen an image suffering from focus problems. The tool enables you to control the amount of sharpening you apply.
To apply sharpening to just part of your image, for example to the main feature of your image, you can first select that part with a selection tool. To use the selection tools, see Chapter 6. Photoshop Elements also lets you perform the opposite of sharpening by applying a blur filter. The blur filter is covered in Chapter 13.
Sharpen an Image

 In the Editor, select the layer to which you want to apply the enhancement.
Note: For more on opening the Editor, see Chapter 1. For more on layers, see Chapter 8.
In this example, the image has a single Background layer.
 Click Enhance.
 Click Adjust Sharpness.
The Adjust Sharpness dialog box opens.

A A preview area displays the filter’s effect.
B You can click the Preview check box to preview the effect in the main window ( changes to
  ).
).
 Click minus or plus (
 or
or  ) to zoom out or in. It is best to preview a sharpened image at 100% magnification.
 Click and drag the sliders (
 ) to control the amount of sharpening you apply to the image.


C Amount controls the overall amount of sharpening.
D Radius controls how far from any edges of high contrast sharpening is applied. A higher radius setting applies sharpening farther from edges in your image.
You can type values for the amount and radius settings.
E You can click the  to remove a specific type of blur in the image. The default is Gaussian Blur, which applies sharpening across the image. Lens Blur concentrates the sharpening on details, whereas Motion Blur removes blur caused by camera or subject motion.
 Click OK.
Photoshop Elements applies the enhancement.
Extract an Object from a Background
You can extract an object in your photo from its background by using the Magic Extractor tool. You define the object and background by brushing lines of color over them, and then Photoshop Elements deletes the background automatically. When you perform the extraction, the area around your selected object is removed and replaced with transparent pixels.
Using the Magic Extractor can be quicker than selecting the object with one of the lasso tools, inverting the selection, and then deleting the background. For more on the lasso tools, see Chapter 6.
Extract an Object from a Background

 In the Editor, click Image.
Note: For more on opening the Editor, see Chapter 1.
 Click Magic Extractor.
You can also press  +
+ +
+ +
+ (
( +
+ +
+ +
+ on a Mac).
The Magic Extractor dialog box opens.

 Click the Foreground Brush tool (
 ).
).
 Click the
  to specify your brush size.
 Click and drag to apply brushstrokes to the object you want to keep.
The more of the object you cover, the greater the chance of a successful extraction.

 Click the Background Brush tool (
 ).
).
 Click and drag to apply brush lines on the background you want to remove.
 Click Preview.
Photoshop Elements extracts the object from the background and displays a preview.

A To remove your work and repeat the process, click Reset.
 Click OK to complete the extraction and return to your image.
Merge Group Shots
You can take several photos of groups of people and then merge them so the good parts of the different versions are combined into a single optimized photo. This can help when some people have their eyes closed or are not smiling in photos.
The Group Shot tool works best when the different photos have similar backgrounds. This allows Photoshop Elements to align the different photos and place the different parts in the correct places.
To merge content between the photos, you paint over the good areas of the source photo to add those areas to another photo.
Merge Group Shots
 In the Editor, open multiple versions of the same group photo.
Note: For more on opening the Editor, see Chapter 1.


 +click (
 +click on a Mac) to select the photos in the Project Bin.
 Click Guided.
A Make sure the Photomerge panel is open. You can click the  to open it (
 changes to
  ).
).
 Click Group Shot.
Photoshop Elements opens the photos in the Photomerge Group Shot tool.

 In the Project Bin, click and drag the photo that you want to fix to the Final window.
 Click to select the source photo you want to copy from.
B The photo to select from appears in the Source window.
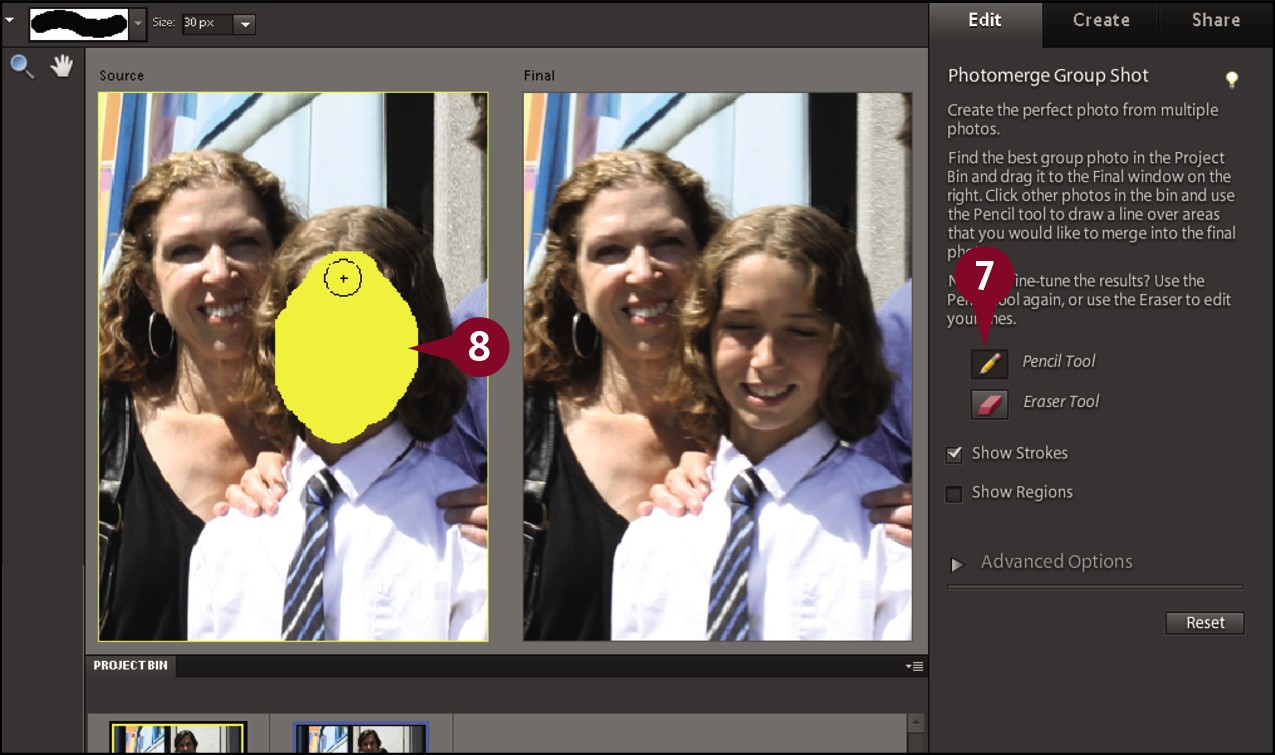
 Click the Pencil tool (
 ).
).
 Click and drag to apply brushstrokes in the Source window to define the area you want replaced in the Final window.

C Photoshop Elements takes the defined area and merges it into the similar area in the Final window.
You can click Undo ( ) to undo the change.
 Repeat step 8 to replace different areas of the final photo.
You can select other photos in the Project Bin to replace more areas.
 Click Done to exit the Photomerge Group Shot tool.
Clean Up a Scene
You can use the Scene Cleaner tool in Photoshop Elements to cover over extraneous people and objects to improve the look of a large scene. You take different versions of the scene and choose the areas you want to fix. The tool paints over the areas using unobstructed areas from the alternate versions of the scene.
The tool works best when the scenes you are combining are oriented in a similar fashion. Using a tripod to shoot your photo can help attain this. You can use the tool’s advanced options to align photos that were shot from slightly different angles and are aligned differently.
Clean Up a Scene
 In the Editor, open two or more photos of the same scene.
Note: For more on opening the Editor, see Chapter 1.


 +click to select the photos in the Project Bin.
 Click Guided.
A Make sure the Photomerge panel is open. You can click the  to open it (
 changes to
  ).
).
 Click Scene Cleaner.
Photoshop Elements opens the photos in the Photomerge Scene Cleaner tool.

 Click and drag the photo you want to copy to into the Final window.
 Click to select the photo you want to copy from.
B The photo to copy from appears in the Source window.
 Click the Pencil tool (
 ).
).

 Click and drag over the area in the Source scene that you want to apply to the Final scene.
To erase an object in the Final scene, click and drag over the same area in the Source scene where that object does not exist.
C Photoshop Elements copies the area from the Source scene onto the Final scene.

 Click to select a different version of the scene.
D The selected photo appears in the Source window.
 Click and drag over another area that you want to apply to the Final scene.
E Photoshop Elements copies the area from the Source scene onto the Final scene.
 Click Done to save the changes.
Recompose a Photo
You can recompose a photo to change its size while keeping important objects within it intact. Recomposition is an alternative to cropping for when you want to reduce an image’s size without trimming or deleting certain subject matter. For more on using the Crop tool, see Chapter 5.
Before you apply the Recomposition tool, you designate areas of your photo that you want kept unchanged by painting over them. You also paint over areas that you would prefer be eliminated. Photoshop Elements can then intelligently rearrange the correct areas of the photo as you resize.
Recompose a Photo
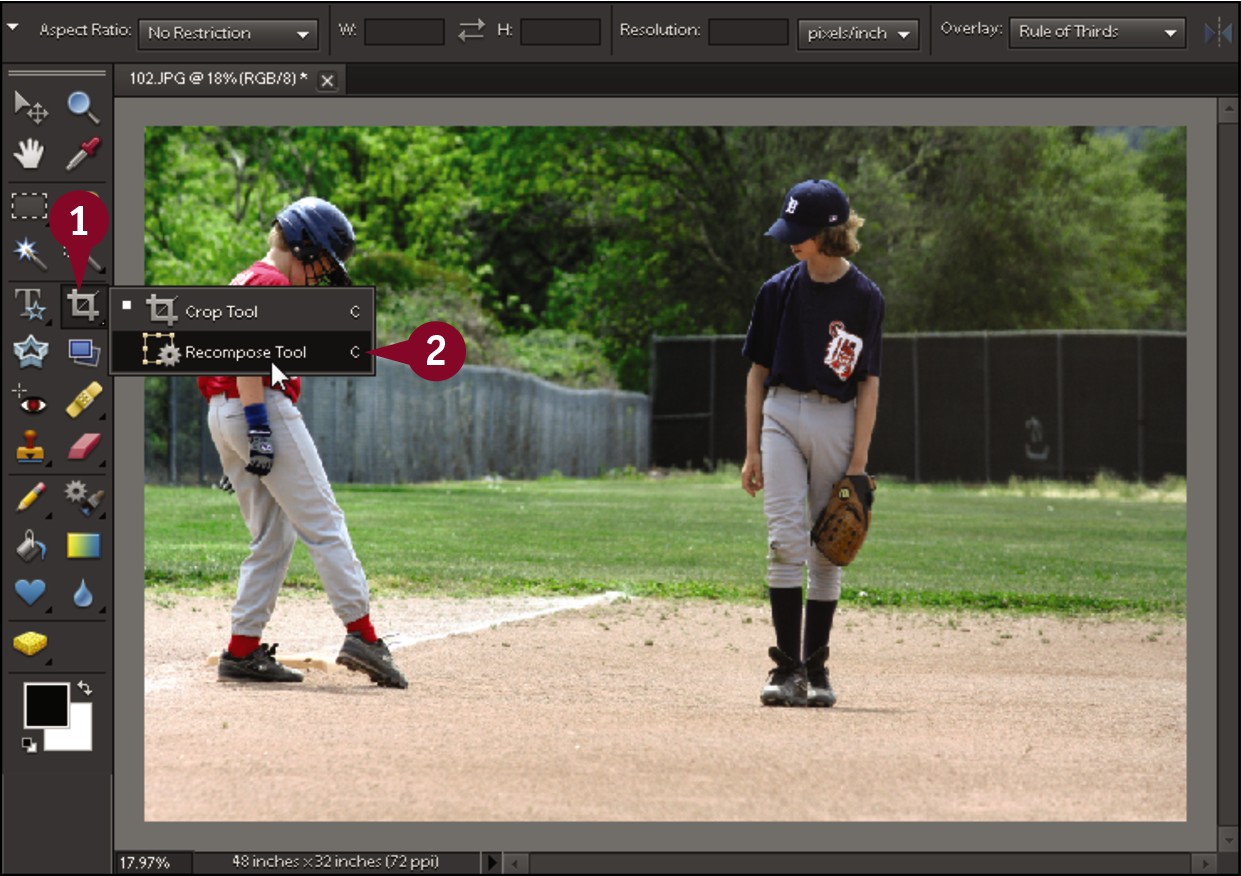
 In the Editor, right-click the Crop tool (
 ).
).
Note: For more on opening the Editor, see Chapter 1.
The Recompose tool shares space with the Crop tool in the Toolbox.
 Click the Recompose tool (
 ).
).
If a dialog box opens with tips about using the tool, click OK.
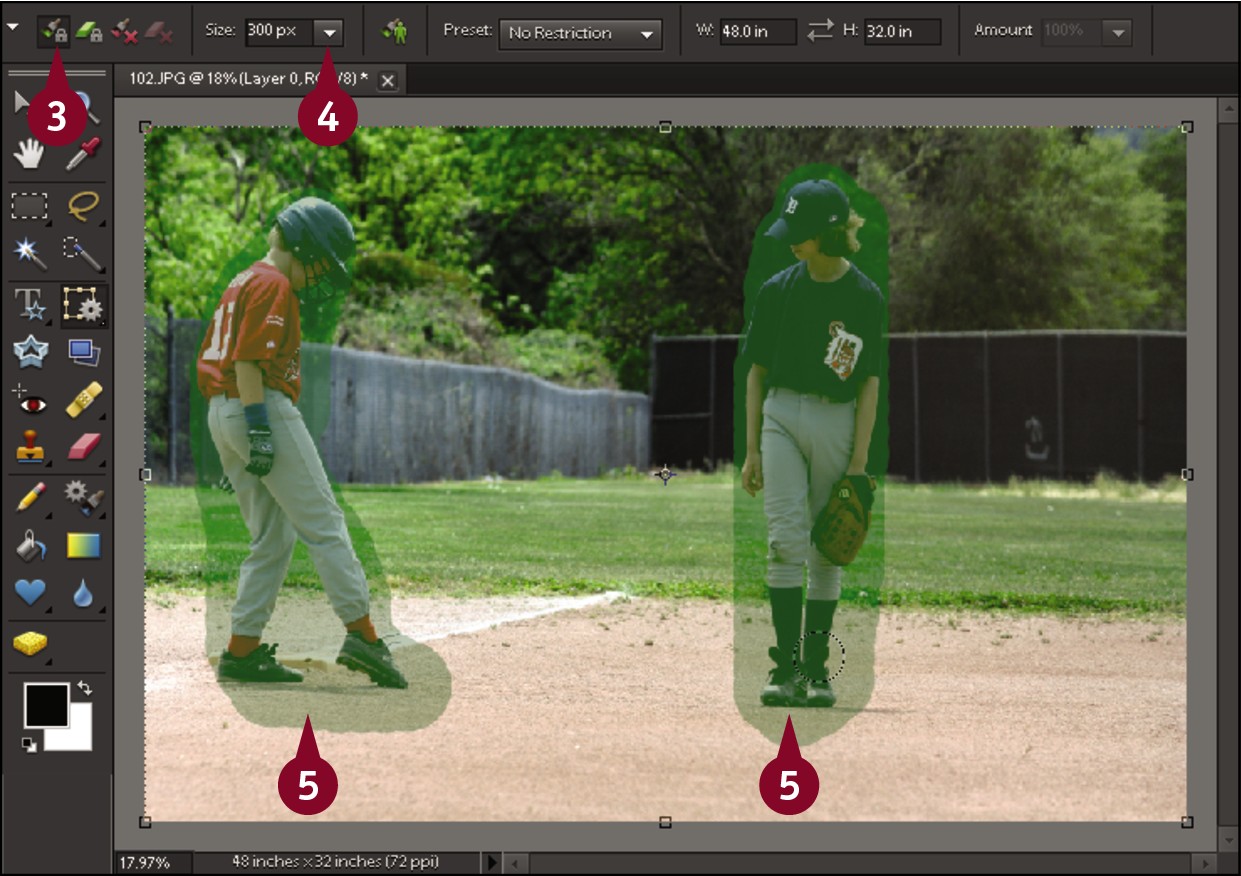
 Click Mark for Protection (
 ).
).
 Click the
  to specify a brush size.
 Click and drag over the objects you want to keep unchanged.

 Click Mark for Removal (
 ).
).
 Click the
  to specify a brush size.
 Click and drag over the areas that can be deleted.

 Click and drag the corner handles to recompose the image.
Photoshop Elements rearranges content in the image, keeping the protected objects intact.
 Click
Click  or press
  to commit the changes.
A You can fix misaligned edges in the recomposed image using the Spot Healing Brush tool or Healing Brush tool.
Fix Keystone Distortion
You can use the camera distortion tools in Photoshop Elements to fix keystone effects. This can occur when taking pictures with the camera tilted horizontally or vertically, which can cause rectangular objects — such as tall buildings — to appear trapezoidal.
The Correct Camera Distortion dialog box enables you to stretch and squeeze your image in various ways to eliminate distortion and straighten large objects. It also includes a vignette adjustment that removes shadowing around the edges of an image. Vignetting can be caused by camera or lens limitations.
Fix Keystone Distortion

 In the Editor, open a photo that has keystone distortion.
Note: For more on opening the Editor, see Chapter 1.
 Click Guided.
 Click Fix Keystone Distortion.
The Fix Keystone Distortion panel opens.

 Click the
  to scroll to the bottom of the panel.
 Click Correct Camera Distortion.
A You can click the  to view Before and After versions of the image.
The Correct Camera Distortion window opens.

 Click and drag the sliders (
 ) to correct the horizontal and vertical perspectives.
 Click and drag the
  to correct distortion that fisheye lenses can cause.
B You can click and drag the  to scale the photo.
You can also type values for the horizontal and vertical perspectives, the distortion, and the scale.
 Click OK.
Photoshop Elements corrects the photo.

 Click Done to exit the tool.
C You can click Reset to undo the correction.
Improve a Portrait
The Perfect Portrait tools enable you to fix common flaws on skin, add a subtle glow, and even slim a subject’s figure. The Guided Edit panel puts these tools in one place, and you can apply them one at a time to improve the appearance of a face or full-body shot.
Professional digital artists use such techniques to create the flawless portraits seen on magazine covers. You can use the techniques to take years off of friends and family in your photos.
Improve a Portrait

 In the Editor, click Edit.
 Click Guided.
Note: For more on opening the Editor, see Chapter 1.
The Guided Edit view opens.
 Click Perfect Portrait.
The Create a Perfect Portrait panel opens.

 Click the Zoom tool (
 ).
).
 Click to enlarge features you want to improve.
 Click Apply Smart Blur.
The Smart Blur dialog box opens.
 Click and drag the sliders (
 ) to apply an overall blur to the image.
 Click OK.

 Click Reveal Original to remove the blur.
 Click the Blur Brush tool (
 ).
).
 Click and drag to reapply the blurring to select areas of the photo to soften skin and deemphasize wrinkles.
 Click the
  to scroll lower down the panel.

 Click the Spot Healing tool (
 ).
).
 Click
Click  to select a brush size.
 Click to remove freckles or blemishes.
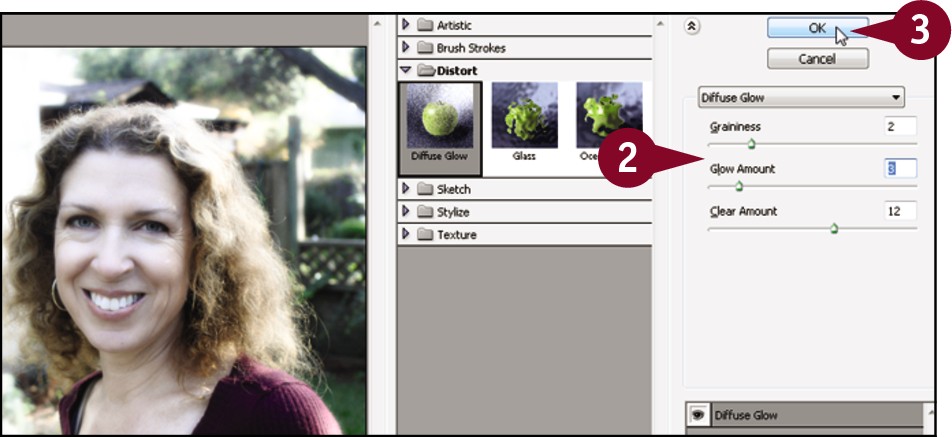
In the Perfect Portrait interface, you can erase wrinkles and blemishes using the Smart Blur and Spot Healing tool. The Dodge and Burn tools help you brighten eyes and darken eyebrows, respectively. Adding the Diffuse Glow filter subtly can give your image a glamorous feel.
When applying the different effects, Photoshop Elements applies them to different layers so you can easily remove them or decrease their intensity later. See Chapter 8 for more about layers.

 Click the Dodge tool (
 ).
).
 Click
Click  to select a brush about the size of the subject’s iris.
 Click the eyes to lighten their colors.

 Click the Burn tool (
 ).
).
 Click
Click  to select a brush about the size of the subject’s eyebrow.
 Click and drag across the eyebrows to darken them.

 Click Slim.
A Photoshop Elements zooms out and narrows the image, and your subject, slightly.
You can click Slim multiple times to narrow your subject further.
 Click Done.
Photoshop Elements modifies your image.
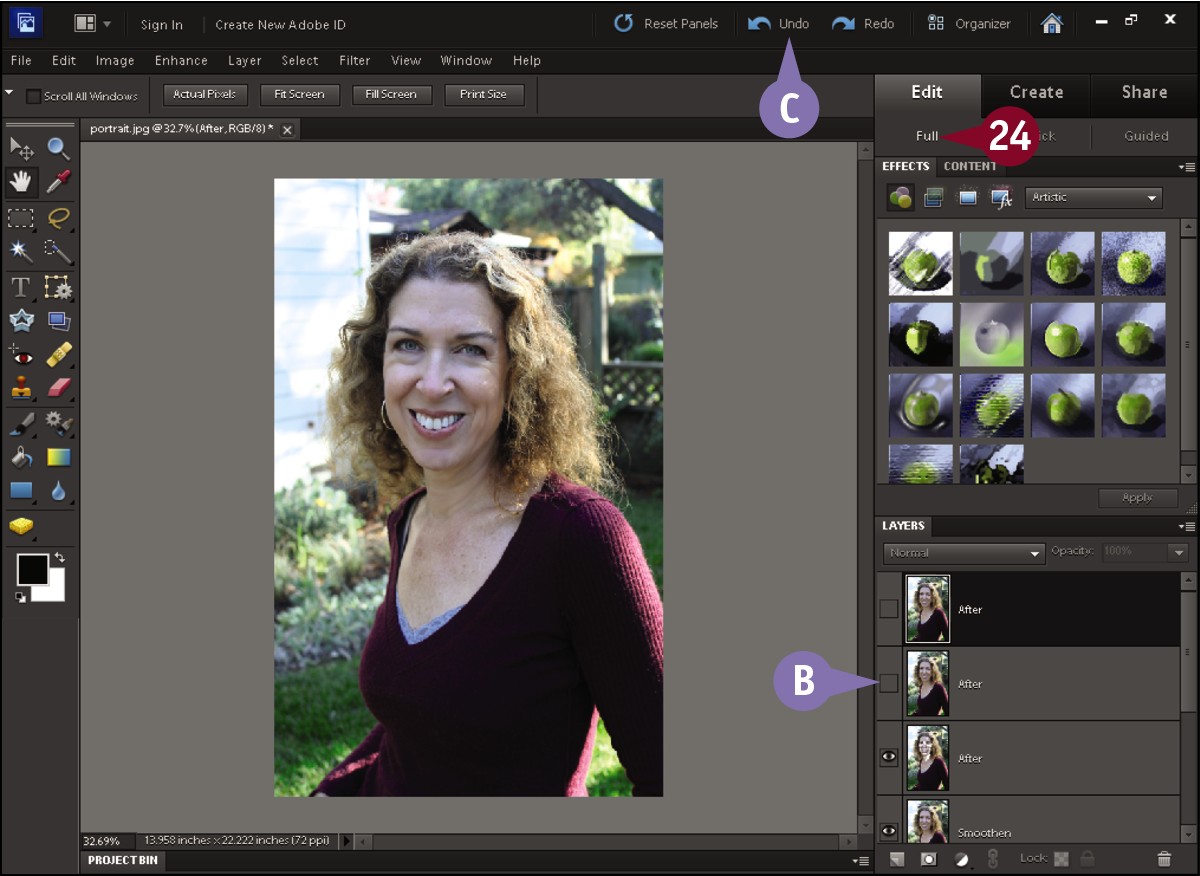
 Click Full to switch to the Full Edit interface.
B The different effects are applied via separate layers.
C You can click  to undo the changes.


