Chapter 10: Improving Lighting and Exposure

This chapter shows you how to correct overall tone, contrast, exposure, and lighting problems by using features in Photoshop Elements. You can also make isolated changes to the lighting of objects in your photo with the Dodge and Burn tools.
Enhance Lighting with Guided Edit
Change Brightness and Contrast
Lighten Areas with the Dodge Tool
Darken Areas with the Burn Tool
Using the Blur and Sharpen Tools
Enhance Lighting with Guided Edit
You can fix simple lighting problems in your images by using the step-by-step instructions and adjustments in the Guided Edit interface in Photoshop Elements. This feature enables you to compare before and after versions of an image as you change the lighting. The Lighten or Darken Guided Edit uses the same editing settings found in the dialog box for the Shadows and Highlights command. For more about this command, see “Adjust Shadows and Highlights.” In addition to lightening or darkening a photo in Guided Edit, you can access adjustments that enable you to correct color, merge content from multiple photos into a single image, and more. For more about color correction, see Chapter 11. For more about merging content, see Chapter 9.
Enhance Lighting with Guided Edit

 In the Editor, click Edit.
 Click Guided.
Note: For more on opening the Editor, see Chapter 1.
The Guided Edit view opens.
A Make sure the Color and Lighting list is open. You can click the  to open it ( changes to
  ).
).
 Click Lighten or Darken.

B You can click Auto to have Photoshop Elements automatically adjust the lighting in your image by using its built-in optimization routines.
 Click the
  and then click a Before & After setting to open before and after views of the image.

 Click and drag the slider (
 ) to lighten shadows in the image.
 Click and drag the slider () to darken highlights in the image.
 Click and drag the slider () to increase or decrease the contrast in the image.
 Click Done.
Photoshop Elements enhances the lighting in the image.
In this example, the underexposed foreground and the overexposed city in the distance are adjusted to bring out details.

C You can click Full to switch to the Full Edit interface.
TIP
How do I automatically adjust lighting and color in one step?

In Full Edit view, click Enhance.
Click Adjust Smart Fix.
The Adjust Smart Fix dialog box opens.
Click and drag the slider ( ) to control the strength of the adjustment.
Click OK.
Photoshop Elements applies the adjustment.
Adjust Levels
You can use the Levels dialog box to fine-tune shadows, highlights, and midtones in your image. Input sliders enable you to manipulate the tonal qualities of an image, and the output sliders let you adjust contrast. The Levels dialog displays a histogram, which is a graph that shows the distribution of lighter and darker colors in the image. The amount of darker colors is represented on the left and the amount of lighter colors on the right. Adjusting the Levels settings changes how the colors are distributed. You can adjust levels in just a part of your image by making a selection or selecting a layer before executing the command. For more on making selections, see Chapter 6. For more on working with layers, see Chapter 8.
Adjust Levels

In the Editor, click Enhance.
Note: For more on opening the Editor, see Chapter 1.
Click Adjust Lighting.
Click Levels.
Alternatively, you can press  +
+ (or
(or  + on a Mac).
The Levels dialog box opens.

Make sure to click the Preview check box ( changes to
  ).
).
The Preview option enables you to see your adjustments as you make them.
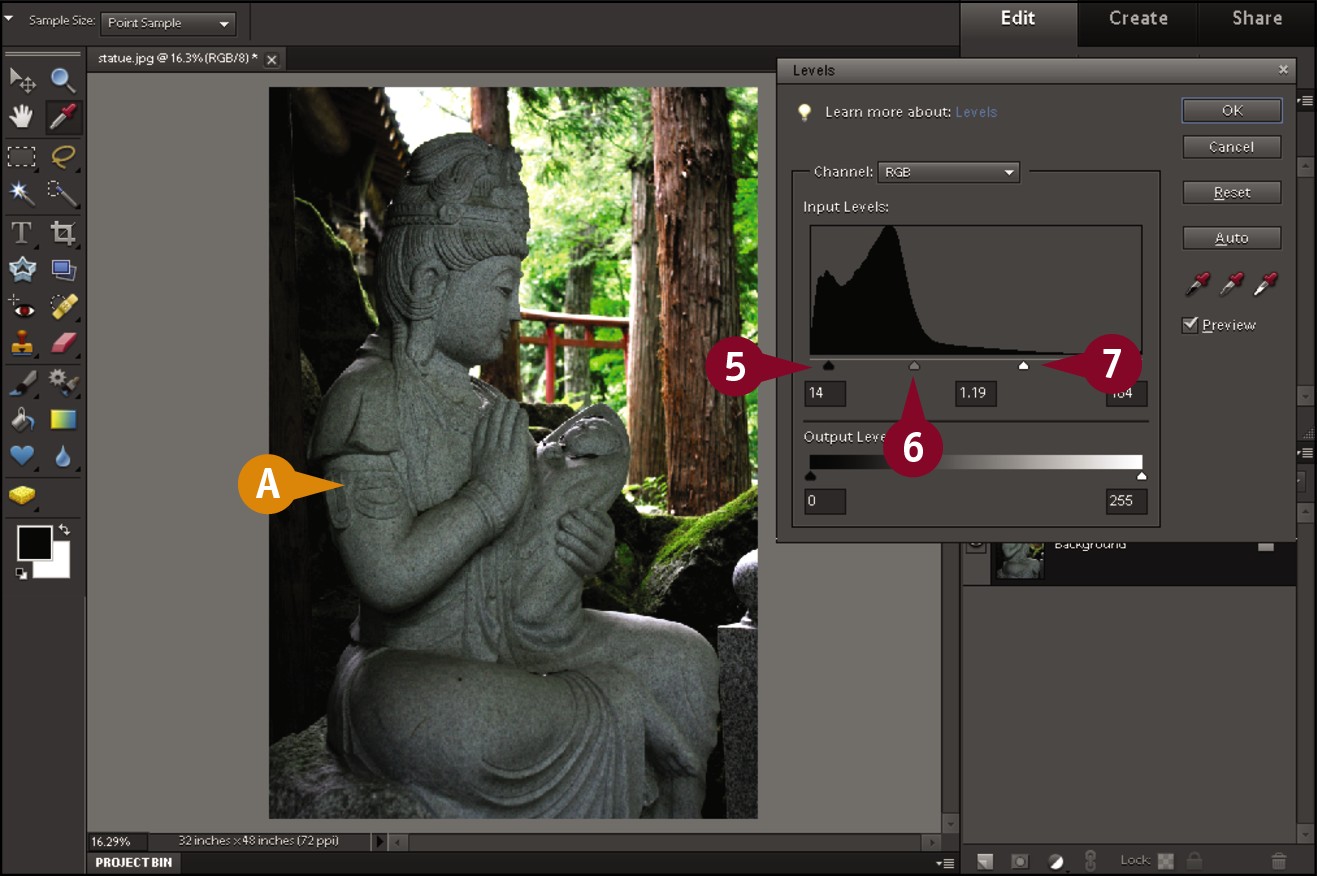
Click and drag the slider ( ) to darken shadows and increase contrast.
Click and drag the slider ( ) to adjust the midtones of the image.
Click and drag the slider () to lighten the bright areas of the image and increase contrast.
You can also type values to control the contrast and midtones.
A Photoshop Elements displays a preview of the adjustments in the workspace.

Click and drag the slider () to the left to darken the image.
 Click and drag the slider () to the right to lighten the image.
 Click OK.
Photoshop Elements applies the adjustments.
TIPS
How do I adjust the brightness levels of an image automatically?
Click Enhance and then Auto Levels. Photoshop Elements sets the lightest pixels to white and the darkest pixels to black and then redistributes the intermediate values proportionately throughout the rest of the image. You can use the Auto Levels command to make immediate corrections to shadows, midtones, and highlights.
Can I tell Photoshop Elements what pixels to use as the darkest, midtone, and brightest levels in my image?
Yes. The Levels dialog box includes three Eyedropper tools, one each for the darkest ( ), midtone (
 ), and lightest tones (
 ). You can click the Eyedropper tool for the tone you want to set and then click the appropriate pixel(s) in your image.
Adjust Shadows and Highlights
You can use the Shadows and Highlights feature to make quick adjustments to the dark and light areas of your image. The feature is less complicated than the Levels tool but also less flexible. The tool can be useful for fixing photos with poor exposure. The Lighten Shadows setting enables you to improve underexposed and overly dark photos, whereas Darken Highlights can help correct overexposed photos that are too light. Making subtle adjustments with the tool can also improve photos by bringing out details in the darker and lighter areas. You can adjust shadows and highlights in just a part of your image by making a selection or selecting a layer before executing the command. For more on making selections, see Chapter 6. For more on working with layers, see Chapter 8.
Adjust Shadows and Highlights

In the Editor, click Enhance.
Note: For more on opening the Editor, see Chapter 1.
Click Adjust Lighting.
Click Shadows/Highlights.
The Shadows/Highlights dialog box opens.

Make sure to click the Preview check box ( changes to ).
The Preview option enables you to view your adjustments as you make them.

Click and drag the slider () to lighten shadows in the image.
Click and drag the slider () to darken highlights in the image.
Click and drag the slider () to adjust midtone contrast in the image.
You can also type values for the shadows, highlights, and contrast.
Click OK.
Photoshop Elements applies the adjustments.

TIPS
How do I cancel my adjustments without exiting the Shadows/Highlights dialog box?
If you press and hold  (
( on a Mac), Cancel changes to Reset. Click Reset to return the settings to their default values.
When I open the Shadows/Highlights dialog box, Photoshop Elements immediately adjusts my image. What is happening?
The Shadows/Highlights filter is set to automatically lighten shadows in your image by 25%. When you open the dialog box, you see this applied. You can reduce the effect by dragging the Lighten Shadows slider () to the left.
Change Brightness and Contrast
You can use the Brightness/Contrast dialog box to adjust the brightness and contrast levels in a photo or a selected portion of a photo. Brightness refers to the intensity of the lighter pixels in an image, and contrast refers to the relative difference between dark and light areas in an image.
The Brightness/Contrast tool is the easiest way to make simple adjustments to the lightness in your image in Photoshop Elements. To make more complex adjustments to the tonal qualities in an image, use the Levels dialog box. See the section “Adjust Levels” for more information.
Change Brightness and Contrast

In the Editor, click Enhance.
Note: For more on opening the Editor, see Chapter 1.
Click Adjust Lighting.
Click Brightness/Contrast.
The Brightness/Contrast dialog box opens.
If you want to restrict changes to a selection or layer, select the layer or make the selection before executing the command.

A The Preview check box is selected by default.
Click and drag the Brightness slider () to adjust brightness.
Drag the slider to the right to lighten the image.
Drag the slider to the left to darken the image.
B You can also type a number from 1 to 150 to lighten the image or from -1 to -150 to darken the image.

Click and drag the Contrast slider () to adjust contrast.
Drag the slider to the right to increase contrast.
Drag the slider to the left to decrease contrast.
C You can also type a number from 1 to 100 to increase contrast or from -1 to -50 to decrease contrast.
Click OK.
Photoshop Elements applies the adjustments to the image, selection, or layer.

Lighten Areas with the Dodge Tool
You can use the Dodge tool to quickly brighten a specific area of an image. Dodge is a photographic term that describes blocking some of the light, thereby reducing the exposure of a print (leaving the paper lighter) when printing from a film negative. For example, you can selectively lighten a dark area of an image by brushing over the area with the Dodge tool. You can limit the pixels affected by the Dodge tool by specifying what tones to correct — midtones, shadows, or highlights. You can also specify the strength of the lightening effect by selecting an exposure setting. Making a selection prior to applying the Dodge tool can be useful so that lighting adjustments are made only to intended areas. For more about making selections, see Chapter 6.
Lighten Areas with the Dodge Tool

In the Editor, right-click the Sponge tool ( ).
).
Note: For more on opening the Editor, see Chapter 1.
The Dodge tool shares space with the Sponge and Burn tools in the Toolbox.
Click the Dodge tool ( ). You can also press the
  shortcut key.

Click the down arrow () and choose the brush you want to use.
A You can click the  and select an exact brush size here.
You can change the brush size while using the tool by pressing  and
and  .
.

B You can click the to choose the range of tones you want to affect.
C You can click the to choose the tool’s exposure, or strength.
Click and drag the mouse pointer ( ) over the area you want to lighten.

D Photoshop Elements lightens the area.
If you continue to click or click and drag over an area, the area is lightened more with each application of the tool.
In this example, a tree in the foreground is lightened.
TIPS
Is there a way to gradually brighten an area?
If you set the Exposure level to a low value, you can drag repeatedly over the area you want to correct to gradually brighten the area, or you can click multiple times to gradually brighten just the area under the cursor.
How can I add extra highlights to the lighter area of an object?
You can apply the Dodge tool with the Range set to Highlights to brighten the lighter areas of an object in your image. Likewise, you can use the Burn tool ( ) with the Range set to Shadows to add shadows to the shaded side of an object. For more on the Burn tool, see the section “Darken Areas with the Burn Tool.”
Darken Areas with the Burn Tool
You can use the Burn tool to darken a specific area of an image. Burn is a photographic term that describes the adding of light, thereby intensifying (darkening) the print when printing from a film negative. For example, you can selectively darken a bright area of an image by brushing over the area with the Burn tool. You can limit the pixels that the Burn tool affects by specifying what tones to correct — midtones, shadows, or highlights. You can also specify the strength of the darkening effect by selecting an exposure setting. Making a selection prior to applying the Burn tool can be useful so that lighting adjustments are made only to intended areas. For more about making selections, see Chapter 6.
Darken Areas with the Burn Tool

In the Editor, right-click the Sponge tool ().
Note: For more on opening the Editor, see Chapter 1.
The Burn tool shares space with the Sponge and Dodge tools in the Toolbox.
Click the Burn tool ().

Click the to choose the brush you want to use.
A You can also select the range of colors you want to affect and the tool’s exposure, or strength.

Click and drag the mouse pointer () over the area you want to darken.
Photoshop Elements darkens the area.
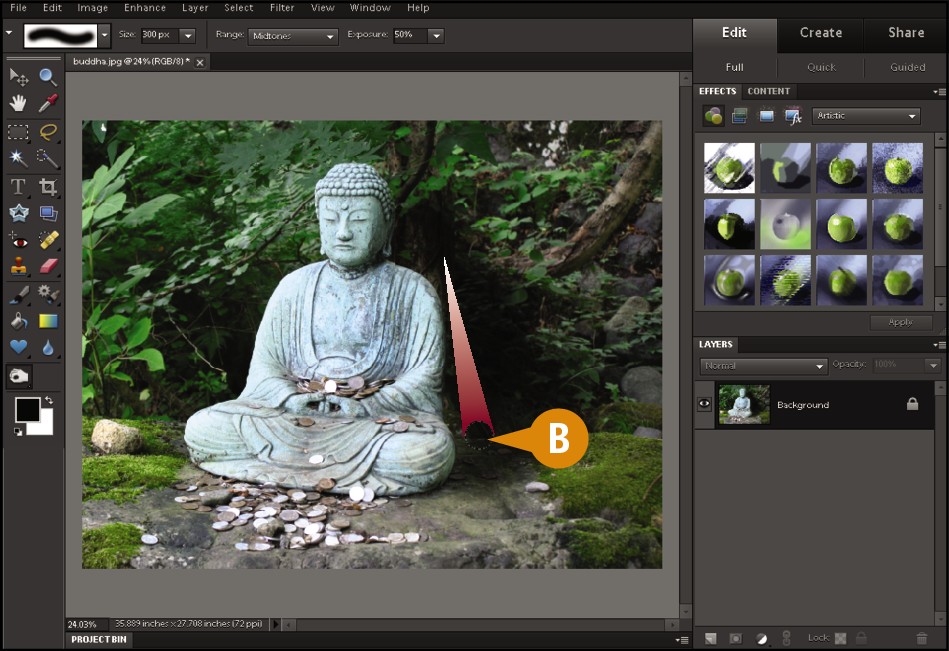
B If you continue to click or click and drag over an area, the area is darkened more with each application of the tool.
In this example, shadows are added behind the statue.
TIP
How do I invert the bright and dark colors in an image?

Click Filter.
Click Adjustments.
Click Invert.
You can also press + (+ on a Mac) to apply the Invert command.
Photoshop Elements inverts the image. For more on filters in Photoshop Elements, see Chapter 13.
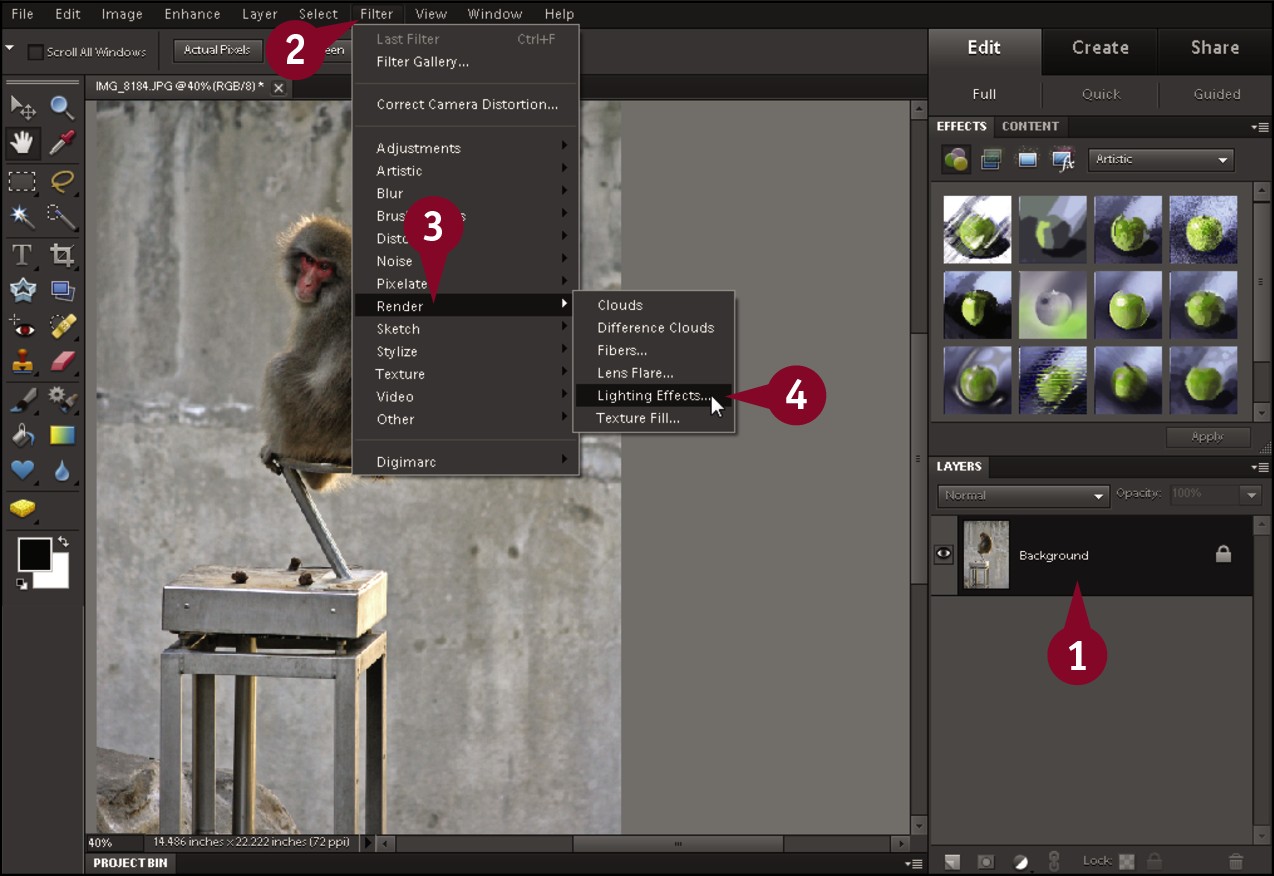
Add a Spotlight
You can use the Lighting Effects filter in Photoshop Elements to create the illusion of spotlights and directional lights in an image. Photoshop Elements offers 17 light styles that can help add ambiance to your images. After you assign a light style, you can control the direction of the light source and the focus of the beam.
You can select different real-world lights from the Light Types menu to achieve different effects. Omni lights shine directly over an object. Spotlights create an elliptical beam of light. Directional lights shine light from one angle.
Add a Spotlight
In the Editor, select the layer to which you want to apply the filter.
Note: For more on opening the Editor, see Chapter 1. For more on layers, see Chapter 8.
Click Filter.
Click Render.
Click Lighting Effects.
The Lighting Effects dialog box opens.

A Photoshop Elements displays a small preview of the effect.
Click the  and choose a lighting style.
Note: Some light styles use multiple lights; you must position each light in the set and adjust the settings individually.

B Optionally, you can click to the and choose a light type.
Adjust the position and shape of the lighting by clicking and dragging the handles in the preview window.
C You can click and drag the center point to change where the light is focused.
Click and drag the Intensity slider ( ) to control the light intensity.
You can also type a value for the intensity.
Click OK.
Photoshop Elements applies the filter.

TIP
How can I add a lens flare to an image?
Lens flare occurs when light entering the lens at an extreme angle reflects off the multiple elements of the lens. To add a lens flare, follow these steps:
Click Filter, click Render, and then click Lens Flare.
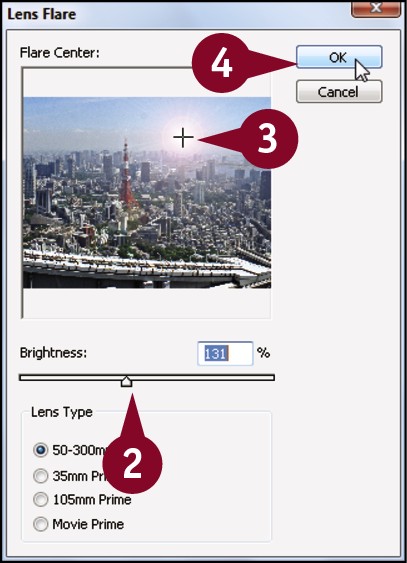
In the Lens Flare dialog box, click and drag the slider () to control the brightness.
Click and drag the cross icon ( ) to position the lens flare in your image.
Click OK.
Photoshop Elements adds the lens flare effect.
Fix Exposure
You can use the Photomerge Exposure tool to combine photos of the same scene taken with different exposure settings if your camera has a manual mode. Photoshop Elements intelligently merges the photos to create an image that has optimal lighting throughout. Photoshop Elements analyzes the lighting in the photos and combines them to produce a single optimized image. The Photomerge Exposure tool also enables you to manually choose areas with good lighting and contrast from one photo and then copy them to another photo where they are poorly lit. Some digital cameras have a feature known as exposure bracketing that automatically takes several photos of a scene, with each photo having a slightly different exposure setting. It is best if you take the photos using a tripod and without zooming between shots, to keep the photos perfectly aligned.
Fix Exposure

In the Editor, click Edit.
Click Guided.
Note: For details about opening the Editor, see Chapter 1.
The Guided Edit view opens.
+click to select the photos in the Project Bin.
A Make sure the Photomerge list is open. You can click the to open it ( changes to ).
Click Exposure.
The Photomerge Exposure panel opens and automatically combines the photos to blend their exposures.
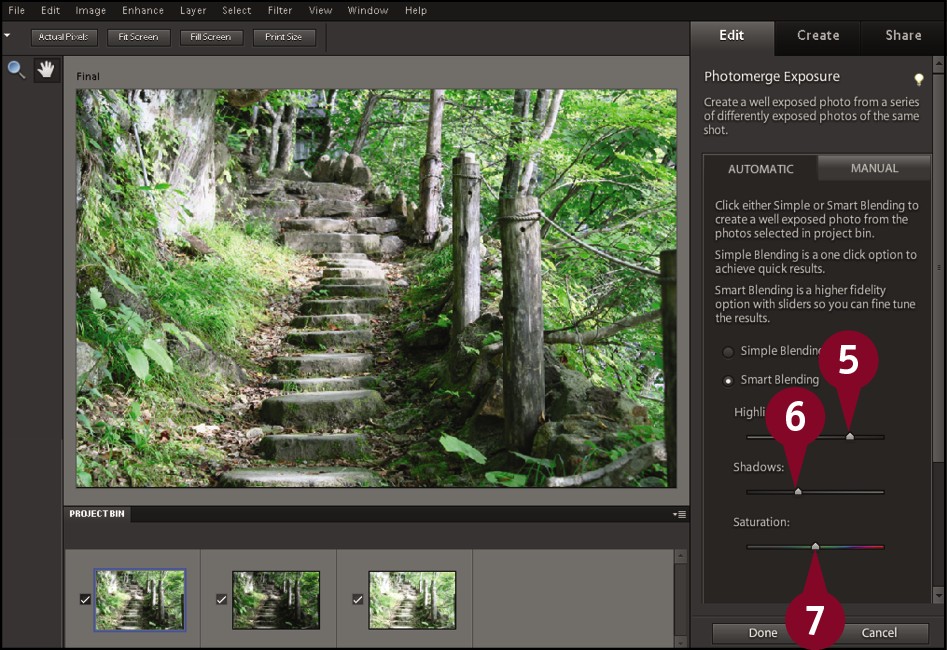
Click and drag the slider () to adjust the details in the lighter areas of the composite.
Click and drag the slider () to adjust the details in the darker areas of the composite.
Click and drag the slider () to adjust the overall color intensity.

B Photoshop Elements applies the adjustments.
C You can click here to remove a photo from the composite.
Click Done to save the changes and return to the Guided Edit view.

D The merged image appears in the Project Bin.
E You can click Full to switch to the Full Edit interface.
TIP
How can I manually combine the elements in my photos?

Click Manual.
Click and drag a photo to the Background window.
Click to select a photo with objects to combine with the background. This photo appears in the Foreground window.
Click the Selection tool ( ).
).
Click and drag over an object to select it.
A Photoshop Elements merges the selected object with the background photo.
Using the Blur and Sharpen Tools
You can sharpen or blur specific areas of your image with the Blur and Sharpen tools. This enables you to emphasize or de-emphasize objects in a photo. You can use the Blur tool to make tiny specks and other small flaws less noticeable in your photos. You can use the Sharpen tool to increase the contrast of edges. However, excessive sharpening can produce noise that can be especially apparent in areas of light, solid colors. You can blur or sharpen the entire image by using one of the Blur or Sharpen filters located in the Photoshop Elements Filter menu. See Chapter 13 for more. Making a selection prior to applying the Blur or Sharpen tools can be useful so that adjustments are made only to intended areas. For more about making selections, see Chapter 6.
Using the Blur and Sharpen Tools
Using the Blur Tool

In the Editor, click the Blur tool ( ).
).
Note: For more on opening the Editor, see Chapter 1.
The Blur tool shares space in the Toolbox with the Sharpen and Smudge tools.
Click the and choose the brush you want to use.
A To change the strength of the tool, type a value from 1% to 100%.

Click and drag the mouse pointer () to blur an area of the image.
Photoshop Elements blurs the area.
Using the Sharpen Tool

Right-click the Blur tool ().
Click the Sharpen tool ( ).
).
The Sharpen tool shares space in the Toolbox with the Blur and Smudge tools.
Click the and choose the brush you want to use.
B To change the strength of the tool, type a value from 1% to 100%.

Click and drag the mouse pointer () to sharpen an area of the image.
Photoshop Elements sharpens the area.
TIPS
What is the Smudge tool?
The Smudge tool ( ) is another tool you can use to create interesting blur effects in your photos. It simulates dragging a finger through wet paint, shifting and smearing colors in your image. The Smudge tool shares space in the Toolbox with the Blur and Sharpen tools.
Is there a filter I can use to sharpen or blur an entire image?
Yes. Photoshop Elements includes a sharpening feature called Unsharp Mask that you can use to sharpen the appearance of pixels in a photo. For more on sharpening an image, see Chapter 9. You can also select from several blurring filters, including Gaussian Blur, to make your image appear blurry. For more on blurring an image, see Chapter 13.