Chapter 11
High-Percentage Plays
Lionel Hollins
Coaches must adapt their offense to the rules of their team’s level of play—particularly to the rules of the clock because there’s a big difference between playing with the 24-second clock of the NBA and the WNBA, the 35-second clock of NCAA men’s basketball (30-second clock of women’s), and no shot clock in high school.
In the NBA the time factor is crucial; the 24-second clock forces every team to create offensive options as quickly as possible. We don’t have the chances to create a continuity of offense as high school and college teams do; we must create plays that offer two or more options within a few seconds.
In professional basketball we base play more on individual matchups and one on one. We use plays to isolate our best offensive players, with fewer passes and players’ movements compared to high school and college basketball.
No matter what level of play you’re coaching, you’re always looking to create the most and best opportunities to score. In this chapter we’ll look at high-percentage scoring plays that have worked with teams I’ve been associated with. You can adapt these plays as necessary for the rules of your team’s level of play and to best use the skills of your players.
Offensive Principles
I would like to describe some high-percentage offensive plays that our team has used effectively in the NBA—our offensive philosophy centers around a few simple principles. Conscious of the 24-second clock, we get the ball as quickly as possible to the man we want to run the play; this allows him time to survey the situation and make a play for himself or a teammate. In keeping with our quick-striking emphasis, we strive to get to the shot with one or two passes to reduce the chance of a steal by our opponents.
We frequently use screen-the-screener plays, where the player who makes the screen then receives a screen himself right away (which forces defenders into difficult recoveries). We also use the staggered screen—a series of two or three screens in a row, which are very difficult for a defender to get through. With these screens, the defender must go through a maze of screens to cover his man. If he’s a poor defender or doesn’t like physical contact, he’ll never get through all the screens, and the shooter will get an open shot. Or, in some cases, another defender must help, which leaves another offensive player open.
Like all NBA teams, we use pick-and-roll in many situations. We set high and middle screens, side screens, “elbow” screens (at the corners of the free-throw lane), and step-up screens. When you have a big defender who doesn’t like to leave the basket area or who isn’t mobile, the pick-and-roll is very effective. If you have a point guard who is a three-point shooter and a penetrator, it’s tough for the defense to decide how to play the screens. We also use any of our big men in the screens and different ball handlers to take best advantage of whomever we want to exploit, such as a weak or slow defender.
Personnel can dictate just how much you rely on the pick-and-roll. One season we had forwards and centers who could shoot from outside. We could force other teams to rotate to cover our big men on the perimeter, which allowed us pick-and-pops for jump shots and fake-and-drive situations. Our opponents were often forced to double team our post, which afforded us open jump shots and drive-and-kick situations on the perimeter.
We call most of our plays from the bench, but our point guard also has opportunities to call plays. We want to have control of the game on offense, but we give our point freedom to alter the play when the defensive situation changes.
We want to attack matchup advantages involving our two or three best offensive players. We also want to fast break after an opponent’s missed shot when we have the numeric advantage. If we lack that advantage, we flow into our early offensive set, a transitional set with different options read by our point guard.
As common sense dictates, if we have a player with a hot hand we want to milk or a matchup we want to exploit, we set up those plays after our opponent’s made field goals or free throws.
Personnel Skills
These are the skills we look for from our starting five:
• 1 is the point guard, with good court vision and passing and dribbling skills. He also needs to be a good penetrator.
• 2 is a big guard, a good outside shooter, a good passer, and able to put the ball on the floor and post up smaller players.
• 3 is the small forward, our best shooter from the three-point range and a capable post player.
• 4 is the power forward, who can score inside and is quick and agile enough to move outside for the shot or drive to the basket.
• 5 is the center—tall but agile, aggressive on the boards, and able to run the floor.
Scoring Plays
We start the game with our “special 1” play for our top scorer. We want him to score the first basket of the game to build his confidence. We then run plays for our other scorers, mainly our 2 (off guard) and 3 (small forward), while trying to include solutions for every player on the court. We want to get everyone involved offensively as early as we can. We use a lot of isolation plays for our top scorer, as well as for the other four players on the court.

Special 1
This is an excellent play to use at the start of a game, usually for your top scorer. Put 5 and 4 outside the three-second lane, 2 at the low post, and 3 at the wing below the free-throw line extended.
1 drives the ball on offense, dribbling to the left side of the court, where the top scorer is set. When 1 reaches the free-throw line extended, 2 makes a diagonal screen for 4, who cuts to the basket to receive the ball from 1. Usually once or twice a game 1 can make a lob pass to 4 when 4’s defender (X4) moves to the top of the screen and no defender can help. If 4 can’t receive the ball off the screen, he sets up at the low post, where 1 hits him with a pass (figure 11.1). If there’s no pass open to 4, 5 screens for 2 (screen-the-screener action), who comes off the screen to receive from 1, or 5 can roll and receive from 1.

Utah
We took this play from the Utah Jazz, who ran it for Karl Malone. Here 2 and 3 form a stack on the left side of the court, 5 is out at the top of the three-second lane extended opposite the stack, and 4 is just outside the three-second lane on the right side of the court. 1 drives the ball on the left side of the court, staying high; 2 curls around 3; and, as soon as 2 rubs around the shoulder of 3, 3 pops out of the lane to receive the ball from 1. 1 can also pass to 2 on the curl. If 2 doesn’t receive the ball on the curl, he continues the cut and screens for 4, who crosses near the baseline and receives the ball from 3.
After screening for 4, if the defenders are cheating too much, 2 is vertically screened by 5 (screen the screener), and 1 holds the ball for a moment before passing to 2 (figure 11.2). Another solution for 3 is the pass to 5, who has rolled to the basket after setting the screen for 2.

You can run this play as described if your point guard draws a lot of defensive pressure and has a difficult time passing the ball to the low post. If you can get your 3 man free, you relieve the pressure on the point guard and get a bigger passer to the post.
Utah Special
We also run a variation of the Utah in which we try to get the ball to 4. Here 4 sets up on the right corner of the free-throw area, 5 is at the top of the key, 2 and 3 form a stack on the left side of the court, and 1 dribbles on the left side. 2 rubs off the shoulder of 3, and 3 moves into the deep corner. 2 continues his cut and screens for 4, who receives a lob pass from 1.
After setting the screen for 4, 2 is screened for by 5 (screen the screener; figure 11.3). 1 also has the option to pass to 2 or to 3 in the corner.

55
This is an excellent play. 2 sets up on the low post on the left side of the court, with 4 on the opposite side outside the three-second lane; 5 is at the corner of the free-throw area on the same side as 4; 3 is outside the top of the key.
1 dribbles to the left side of the free-throw line extended, which signals 2 to make a baseline screen for 4. 1 feeds 4 in the low post, and then 1 and 3 make a fake split—1 screens at the free-throw area for 3, who first fakes to cut to the screen before cutting backdoor to the basket. 1 pops back outside of the lane as a spot-up player in case the defense double teams 4 (figure 11.4).
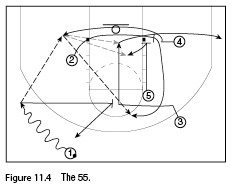
If 3 doesn’t receive the ball, he comes out of the lane and moves to the corner. After setting the screen for 4, 2 receives a vertical screen from 5 (screen the screener) and pops out. 4 plays one on one or passes to 3, 2, or 5, who has rolled to the basket after setting the screen.
You form a triangle on the weak side of the court, with 1 as the spot player on the strong side of the court. If 4 is double teamed, he passes out of the double team to his teammates around the perimeter (1, 3, or 2) or to 5 near the basket. Note the good rebounding positions maintained by the offense.
43 Post
Our defenders tend to bump and switch a lot on our best scorer to keep him away from the post, so we want to get him the ball while he is moving. We run this play out of our flex set.
4 is at the low post, 2 is in the corner, 5 is at the top of the key, and 3 is at the free-throw line extended. 1 dribbles on the right side and passes to 5, while 2 make a flex cut past 4 (figure 11.5).

If 2 is open out of the flex cut, 5 gives him the ball; 5 can also hit 4, who has ducked into the three-second lane.
If there’s no option, 5 dribbles back toward 1. 1 receives a hand-off pass from 5 and dribbles to the center of the floor. In the meantime, 4 screens for 2, and, after the screen, opens up to the ball and receives from 1. Meanwhile, 2 continues his cut and receives a screen from 5. 1 can also hit 2 off the screen of 5, or 5, who has rolled to the ball (figure 11.6).
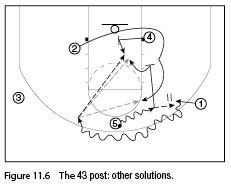
We like to use this play for two purposes: to get our shooting guard’s jump shot or to get the ball to our power forward inside the lane while he is on the move.
3 Quick
This play is run for the 3 player in the post. He posts up in the low-post position on the right of the court. 4 is on the left corner of the free-throw lane; 5 is on the opposite side, outside the three-second lane; 2 is on the right side of the free-throw line extended; and 1, with the ball, is in the middle of the court.
1 passes to 4 and then goes in the opposite direction, spotting up outside the three-point line; 2 runs to the corner.
As soon as 4 receives the ball from 1, 3 makes a flash cut to the lane. If he doesn’t receive the ball right away, he moves to the opposite low-post position, and 4 tries to get him the ball.
After the pass, 4 dives opposite diagonally and replaces 3 at the right low post. 5 holds his position for a moment and then flashes to the left corner of the free-throw lane and, if his defender goes to double team 3, receives the ball to take a jump shot (figure 11.7).

3 has three options for where to start the play: on the right low post, on the left box, or on the left wing.
50
The following play is one of the best for getting the power forward to the front of the basket. Start this play on the right side of the basket with 1 dribbling to the free-throw line extended, 5 at the free-throw line, 3 and 4 forming a stack on the left side of the court, and 2 outside the lane on the left side.
2 fakes a cut into the lane and then cuts off 5 and moves into the right corner. 3 pops out of the stack and moves to the corner. As soon as 2 rubs off his shoulder, 5 steps out. 1 hits 5, who then hits 4, who has flashed into the lane (figure 11.8).
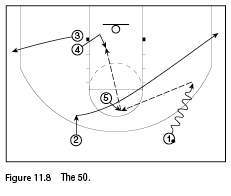
5’s defender can’t help inside on 4 because that leaves 5 open for the outside jumper. We spent a lot of time in practice working on this high–low post play.
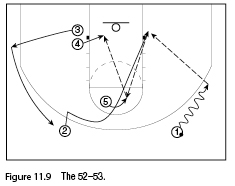
52–53
We run this play for our 2 or 3. The set is the same as the previous one, but this time 2 (or 3), after making the cut on 5, posts up on the low post and receives the ball from 1.
After 2’s cut, 5 opens to the ball and can receive from 1 or 2 (if 2 is double teamed). Meanwhile, 3 pops out of the stack and replaces 2 (figure 11.9).
Fist Out—Isolation 4
This play, usually called “single–double” because it forms a single screen on one side of the lane and a double screen on the other side, is a standard play in the NBA to run along the baseline.
4 is on the left low post, 5 is on the right low post, and 2 and 3 are under the basket. 3 screens for 2, and then 2 runs off, curls around 4, and moves to the opposite corner. 3 cuts off 5 and moves up to the three-point spot.
1 passes the ball to 4, who has popped out to the short corner or to midpoint (halfway between the lane and the sideline). 4 faces the basket. This play works excellently when 4’s defender is a slow post player. If 4 is quick, he can beat his defender and get to the basket with one dribble (figure 11.10). Obviously, if your 4 player is not quick, this play won’t work as well for you.
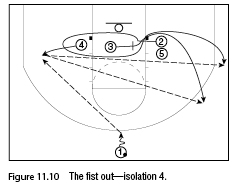
If 4 can’t get a shot off, he can skip the ball to 2 or 3, who have spotted up for the shot. 5 is in good rebounding position, or he can receive the pass.
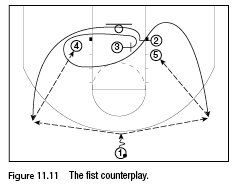
Fist Counterplay
We run this play for our 5, and it is effective if the defenders switch. 5 and 4 are on the opposite low-post positions, 3 screens across for 2, and 2 goes outside the three-second lane.
If there’s a switch of defenders, 3 curls around 4 and goes either over the top or back off and then under 5, making a figure-eight cut. 1 has the ball at the top of the key. After the switch, X2 is guarding 3 on his back side, waiting for 2 to come off 5 (figure 11.11). 3 now turns and comes out on the other side, rubbing off the shoulder of 5. 1 passes to 3, and 3 passes to 5. 1 can also pass to 2, and 2 to 4.
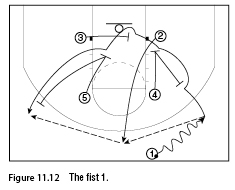
Fist 1
When your point guard is covered by a weaker defender, this play is a good choice. The set is a box formation, with the two big men, 5 and 4, on opposite corners of the free-throw area, and 2 and 3 on the low post at opposite positions.
1 starts to drive to the right side of the court, which signals to 4 to make a vertical screen for 2, who comes high to the middle of the floor to receive the ball from 1.
After setting the screen for 2, 4 steps out and screens for 1, who then also receives a staggered screen from 3 in the middle of the lane, and from 5, also in the lane. 3 then comes out of the lane on the other side of the court. 2 passes to 1 (figure 11.12). If 1 can’t shoot, 5 screens for 1, and the two players play pick-and-roll. 2 can instead pass to 3—or to 4, who has opened up after setting the screen.
Turn 42
This is another play designed for our 4 player that we run after a time-out. 4 and 2 form a stack on the left side of the court, with 2 near the baseline. 5 sets up high in the middle of the court. 3 is on the wing on the free-throw line extended. 1, outside the three-point line, is on the side of the court where the stack is positioned.
2 curls off 4, rubbing against his shoulder, and moves to the wing at the free-throw line extended, receives the ball from 1, and passes it to 4 in the low post. 1 then cuts into the lane and moves to the opposite corner. Normally, when 4 receives the ball in the low post, X2 will sag back and try to help on 4. In this case, 5 will come over and screen for 2, and then roll to the basket or pop out for a jumper (figure 11.13).

We also have another option: 5 makes a screen away from the ball for 3, and then rolls to the ball. 2 can pass to 4, 3, or 5.
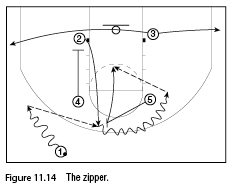
Zipper
4 and 5 are on the corners of the free-throw lane, and 2 and 3 are at the low-post positions. 1 dribbles to the left side of the court, while 4 screens down for 2, who comes up to receive the ball from 1. 3 can either cut near the baseline and go to the opposite corner or clear out to the corner on the same side. 5 brings a high pick for 2, then rolls to the basket to receive from 2 (figure 11.14). If X4 helps on 5, 4 replaces 5, who can receive and shoot.
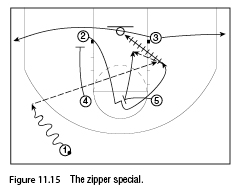
Zipper Special
If 2’s defender overplays him and he can’t receive the pass from 1, we run the same play, but now as soon as 2 comes high, he receives a screen from 5.
1 passes to 2, who can shoot or pass the ball to 5, who rolls to the ball after the pick; or 5 and 2 can play pick-and-roll (figure 11.15).
Open–Close
We run this offensive option versus a blitz defense—when the defense double teams the ball handler coming off the screen.
1 dribbles on the left side of the court. 2 is in the deep corner on the opposite side, 3 is outside the three-point line, 4 is outside the free-throw lane, and 5 is in the middle of the court. 5 runs to set a screen, then slip cuts to the basket and goes to the low post on the opposite side. 4 follows and sets a pick for 1; 4 then rolls to midpoint. 1 can pass to 4 or to 5, who has ducked in (figure 11.16).
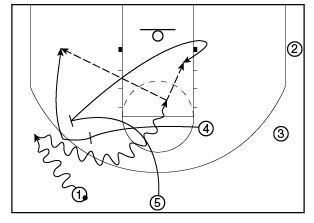
Figure 11.16 The open–close.
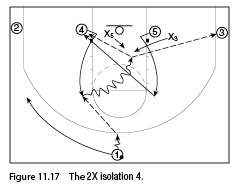
2X Isolation 4
We use the following plays at the end of the quarter but also during the normal course of the game if there are seven to eight seconds left on the clock. The aim of these plays is to create space and isolate one player to give him a chance to play one on one. We call this play to isolate our 4 man or our other big man (5).
Position four players near the baseline: 2 and 3 in the opposite corners, and 4 and 5 in the opposite low-post positions, while the point guard (1) dribbles in the middle of the court. The two post players flash to the corners of the free-throw area. 1 passes to one of the high posts (4 in this case) and then moves to the wing position on the same side as the pass.
As soon as 4 receives the pass, 5 makes a diagonal cut into the lane and goes to the low-post position on the same side of the ball. 4 has the chance to play one on one and drive to the basket. If 3’s defender (X3) helps, 4 dishes the ball off to 3 in the corner for a three-point shot, or he passes to 5, if 5’s defender (X5) tries to help (figure 11.17).
2
This play can be called to isolate the point guard, especially if he has an excellent drive to the basket. Start from the same set as described before, with four players at the baseline.
1 has the ball in the middle of the court and drives right to the basket. If he penetrates on the right side of the lane, 5 clears this side, moving to the other low-post position. Meanwhile, 4 ducks into the lane behind 1 (figure 11.18).
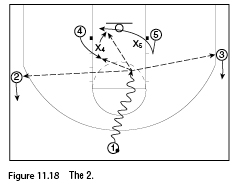
If 1 can’t score, based on the help and reactions of the defenders, he can pass to 4 or 5, or he can dish off to 2 or 3 in the corner for a three-point shot.
2 Clear
This play starts similarly to the 2X isolation 4 play but is run when 4 and 5, who flash cut to the corners of the free-throw area, are overplayed and can’t receive the ball. 1 dribbles toward the free-throw line extended, while 5 makes a diagonal cut into the lane and posts up on the low-post position on the same side as the ball. 3 clears out to the opposite corner, and 2 comes high. 1 passes to 4, who flashes high after the cut of 5, and 4 drives to the basket (figure 11.19).
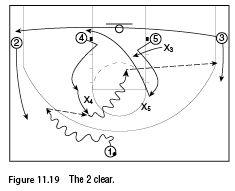
You can also leave 3 in the corner to receive the ball if his defender helps on 4.
Teaching Points
In practice, we teach the whole play and then break each play down to its parts, and players work on these situations, such as the pick-and-roll, the staggered screen, the duck into the lane, and screen-the-screener plays.
We break down sessions at both ends of the court for the big players and the small players. For instance, while the big men work on picking and rolling to the basket and to the midpoint for a jump shot, on the other half-court, the guards work on feeding the screener and the duck-in man. They also work on coming off screens for jump shots.
If we want to practice on a post play, we have our big men work on post position and the guards on feeding the post and cutting. Then we bring them together and put the whole play into action. Doing it this way, we are able to teach the play better, show the different positions their responsibilities, and get players a lot of repetitions.
Final Points
When planning your offensive strategy, strive to create an offense that uses the strengths of your players and also hides their weaknesses. Don’t, for example, use a staggered screen for a player who’s not a good shooter. Don’t base a play on a drive to the basket and a kickout for a player with relatively weak ball-handling and dribbling skills.
Another mistake some coaches make is to adopt a play because it has been used by a famous or winning coach, failing to consider that every team has different players with different skills and that one winning offense doesn’t guarantee success for another team at another level of competition.
Finally, coaches must always remember that the success of a play depends mainly on the sound fundamentals—passing, shooting, dribbling, playing without the ball, the ability to read defensive situations—of the players involved, not on the play itself. The details are important, and the details of any play are the sound fundamentals. Without sound individual and collective fundamentals, such as how to set and use screens, there can be no winning offense.