Chapter 16
Defensive Strategies
Del Harris
There are three phases to consider in planning defensive strategies as you prepare your team for confident team play on the defensive end: pregame strategy, in-game adjustments, and late-game adjustments.
We can’t address each of these phases in depth in one chapter, but we will provide an overview in the hopes of stimulating you to think more deeply about these issues of vital importance to winning basketball.
Pregame Plan
First, you must determine if your primary defense will be man-to-man or zone. No matter which you choose, I recommend teaching the other as well so that your team can switch to its secondary defense when you think it’s called for. Of course you’ll also want to teach a couple of presses. Although many successful coaches have decided to live or die with one chosen defense, we believe (to use a baseball expression) that you need more than one pitch once you have advanced to the highest levels of competition. On the other hand, one fools himself if he thinks he can be equally successful with several defenses.
Use one defense as your bread and butter, and reserve the other for special occasions. When I was in Dallas, our use of multiple defenses over the years was predicated on two factors:
1. You have to play against various defenses in games, so you need to practice playing against them to be prepared. It does little good to practice against a defense that’s not effective, that doesn’t understand what’s supposed to happen in its particular form. Thus, you need to teach something about man-to-man, zones, and presses in order to have an effective offensive practice against each.
2. Once your team learns to use each of the major styles of defense reasonably well, you might as well try your secondary defense occasionally, such as when things aren’t going well for the primary defense against a particular opponent. Changes of pace can upset your opponent’s flow just long enough to allow your team to get back into position to win the game.
Matchups
We’ll assume that the basic defense preferred by most good teams is man-to-man because that’s the case about 90 percent of the time. Other defenses tend to be used when the lack of talent, depth, or athleticism disallows success in one-on-one confrontations. And that’s quite an acceptable decision for the coach to make. Certainly zone adjustments helped the Mavericks win a lot of games over the years.
Within a basic man-to-man defense there are several items of strategy to consider, and the first of these is matchups. While it’s easy to match centers with centers, point guards with point guards, and so on, that’s not always the best strategy. The advantages to that method are in its simplicity and during in-transition defense, when it’s often easier to be matched up than cross-matched. That said, cross-matching is not an insurmountable obstacle and often has advantages. Ideally, you’ll have a perimeter defensive stopper on your team with enough versatility to guard two or even three positions. You can put this player on your opponent’s best perimeter player immediately, or you might decide to switch him over if the player gets on a roll, or you might wait until the last quarter to switch him to save him from foul trouble.
Small, quick point guards can pose problems for many teams, and the normal response is to put small defenders on them to match them speed for speed. But if the opponent is quicker still, the matchup might be an exercise in futility. In such a case, try putting a taller man on the guard and have him leave enough space to contain him but still challenge his shot with his greater length.
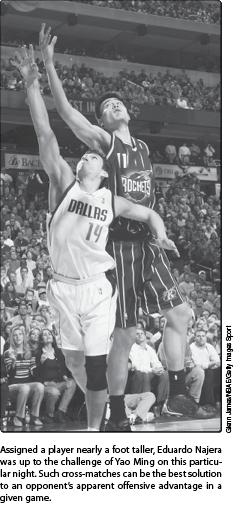
Powerful big players can also be problematic to guard if your bigs are weaker or slower than theirs—though occasionally you can win a matchup for a while with a smaller, quicker player on their big one. Eddie Najera, at 6-foot-7, for example, was instrumental in stopping the great Yao Ming just long enough to get us a victory in a big game. Najera used his quickness to deny Ming the ball and to gain great position to hold him off the board in that game.
Playing a small on a big won’t work every time, but on some nights you need to try something unusual to win the game at hand. You can worry about another strategy once the current one fails. And it’s true that most big players don’t like to have the smaller ants under them, banging on their knees, fronting them, and outrunning them to their favorite spots. Also, playing small and fronting on their big man might give your own big man time to help out when the opponent tries to lob over your small man’s head.
There are many ways that cross-matching can confuse your opponent just long enough to throw the momentum of a game in your favor, and sometimes that’s all you need for the win.
Pressure Defense Adjustments
Another game plan decision is how, when, and where to apply the press. A full-court press can be used to advantage in many situations, and sometimes for totally opposite reasons. For example, you can play full-court pressure man-to-man to disrupt timing, wear a thin opponent down, gear up your own aggressiveness, or speed up a game. On the other hand, you can run a softer position press to slow an opponent down.
When a good ball handler is able to push the ball up the floor against you too easily, a full-court man-to-man or zone press can trap him and get the ball out of his hands. Once he has passed the ball out of the trap, his main defender should try to deny him from getting it back. For that matter, you might try to deny him the ball on the initial inbounds play by playing his defender behind him while the defender of the inbounds player plays in front of him, forcing another player to receive the ball. Once the ball is passed in, the trap is released, but the original defender tries to deny their good ball handler the ball as long as possible.
As mentioned, the irony of pressing is that a team can employ a press such as a 2-2-1 that can either slow down or speed up an opponent’s play. And it’s easier to get into the 2-2-1 after scores or even after some rebounds than many coaches think, especially if you practice it. A team that’s trying to slow an opponent or slow a game’s tempo can get into the 2-2-1 quickly at the three-quarter court and be selective in its trapping, while still being sure to set a few traps to keep the opponent off balance. This is usually a one-trap-only situation, and then you’ll fall back into a half-court man-to-man or zone (zones tend to slow teams better than man-to-man).
If you want to increase tempo, you can be aggressive enough to trap initially and then continue to trap as the ball is advanced downcourt. When I was a young coach at Earlham College (1965-74), we used the full-court press considerably with a team that finished sixth in the NAIA in scoring at over 101 points per game (out of 700 schools in those days). With a different set of players a few years later, our team pressed with a different purpose and finished sixth in fewest points allowed. Both teams used a lot of pressing, but the styles and results were entirely opposite.
Pick-and-Roll Strategy
Further, in pregame strategy you must decide how to play against your opponent’s key plays. For instance, when playing a pick-and-roll team (as is quite prevalent in the NBA and increasingly so in top Division I NCAA schools), you’ll need to determine how to defend in the five areas in which pick-and-roll attacks are initiated: the top of the key, the wing, the high wing (the area between the top of the key and free-throw line extended), and the elbows of the free-throw lane.
While pick-and-rolls along the sideline angles may be covered in the same way (or not, depending on the coach’s decision), the top and elbows generally require different techniques if you want to be successful. (There are even variations within these basic five angles that we can’t go into here.)
There are many types of coverage to choose from when determining your pick-and-roll strategy, but we suggest having one way that you become best at and then also a plan B to revert to when plan A isn’t working.
In the NBA, teams often employ four or five different techniques for certain situations, but the best defensive teams have a basic choice and then a counter or two at most, knowing that most opponents won’t be proficient in stopping too many techniques. Again, the principle applied here is that you can’t do a great job at any one thing in basketball if you try to do too many things. Following are standard choices in pick-and-roll coverage.

Help-and-recover. Some coaches call this hedging or showing. The idea is that the defender on the pick player helps the defender on the ball at a prescribed angle to negotiate (defeat) the screen, and then each defender recovers to his own original man (ideally). There are many variations of this:
• Hard help. Here the helper is right up on the picker as the pick is set in order to jump quickly out at a hard angle (90 degrees facing the sideline) in the path of the ball handler. This prevents the ball handler from “turning the corner” over the pick and getting into the middle of the defense. It forces the ball handler to break his angle of attack or to charge into the defender. Of course, this allows his defender space and timing to go under the defensive helper but over the player setting the pick to reengage the ball handler. The helper then recovers back to the picker, unless he gets too extended and someone has to pick him up, in which case he rotates to the paint to find an open offensive player. In this “hard” help method, the helper might be told to stay with the ball handler until his teammate recovers, until the ball handler passes, or for a certain number of steps, ranging from zero to three.
These are strategic decisions based on the abilities of the opponents and how they attempt to score on their pick-and-roll action—by rolling, popping, or having the ball handler shoot or else penetrate and swing the ball to the weak side to shooters or to a post player.
• Soft help. The helper might help at a much softer angle (45 degrees or less), attempting to jam up the middle with his coverage. “Covering the turn” means that the defender on the picker will drop back roughly in line with the “box” along the strong-side foul lane and give a sort of zone coverage to the ball handler and the foul lane. The defender on the ball must continue a hard pursuit over the pick. This method is less aggressive but prevents splits and tends to offer the jump shot more than the roll or penetration for teams that are strong in that area.
In any coverage, the defender on the ball might be told to go over or under the man setting the pick on him. That decision is made based on two factors: the distance the pick is set on the floor and the ability of the ball handler to shoot behind the screen relative to his skill at penetration. We prefer to go under the picks set far out on the floor and against poor shooters, and we prefer to go over on closer setups and against good shooters. Again, these are strategies that scouting or time-out adjustments must address.
Trap. A more aggressive coverage is to trap the ball handler with the defender of the picker. The most aggressive is for the defender of the picker to trap the ball handler before the pick is actually set, but the more common way is to trap just as the ball handler is coming over the pick. Naturally, with either form of this aggressiveness comes some risk. A rotation is necessary if the ball handler is able to pass the ball to the picker quickly on a pop or roll, with the lowest defender near the goal rotating to him. X5 jumps out to trap 1, and X4 rotates over to pick up 5 as he sees the ball in the air from 1 to 5. X5 rotates opposite the pass into the paint and picks up the open man, normally 4, although X3 has to help until X5 can get there. Sometimes X5 is late, making it necessary for him to cover 3 on the weak side (figure 16.1).

Switching. This method is the easiest form of help-and-recover and is used most often when equal-sized players are involved in the pick-and-roll. However, late in the game, most NBA teams will use the switch with four or even all five defenders to prevent a quick easy shot, especially a three-pointer.
Note that switching is a critical strategy when protecting a lead late in the game. It’s also a good strategy at any time in the game when the possession clock is down to seven seconds. The open shots kill you, especially the threes. Mismatches caused by switching are far less dangerous than giving up an open shot to a good shooter. Teach players to pass off mismatches quickly, or drill them on how to trap out of mismatches when they occur. That is, a big player must automatically trap down for a small teammate being posted by a big post, as X4 does in figure 16.2.

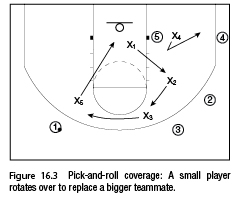
A small player must rotate over to replace a bigger teammate stuck out on the perimeter defending a quick-penetrating, smaller player caused by a switch or emergency coverage, as X3 does for X5. The mismatched man rotates off to the weak side and picks up an open man. X2 rotates to 3, and X1 picks up 2 (figure 16.3).
Overplaying down to the baseline. Another often-employed technique is to push the ball handler down toward the baseline. To do this, the defender on the picker must immediately call out the signal for the coverage (usually a color, or simply “Down!”) as he sees the pick about to be set. He then assumes a position two to three steps below the picker in the direction that the ball defender must push the ball, and the defender on the ball must overplay severly, pushing the ball handler “down” toward the baseline and into the defender on the picker (figure 16.4). This play usually occurs on wing and corner coverage.

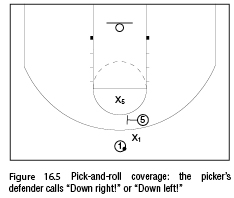
The down play can be used on the top as well, but it’s less safe there. The defender on the picker calls “Down right!” or “Down left!” depending on which way he wants the defender to send the ball handler. The ball defender then gets into a position on the high side to push the ball handler down toward the defender on the picker (figure 16.5).
In either case X1 must maintain contact with the ball handler to keep him from splitting quickly between himself and X5. On the sideline pick-and-roll, you must decide if you want to have X5 recover back to 5 on a pass to him, or to have a player rotate to 5 (figure 16.6). X2 rotates to 5 because the game plan dictated that 5 was a great shooter from 15 to 17 feet out. X4 rotated to 5 on the roll because X5 didn’t get back to 5. The defender (X5) then rotates across to the weak side to pick up an open man, in this case 4 (figure 16.7). The same decisions must be made on the coverage of the top-angle pick-and-roll.


Defensive Strategy Against the Post-Up
Another pregame decision concerns how to best defend the posts. Against teams that dominate with one or more low-post threats, it might be best to stay man to man and give help to the defenders in the low post either when a player catches the ball or when he penetrates toward the free-throw lane. Or it might be preferable to try to front some or all of the players in the low-post area and come to help from the weak side during the air time of the lob pass inside. Another option is to trap a particular player in the post, only to dig back and bother others in the post until they get the ball into an extremely deep position. Yet another possibility is to zone up against a strong low-post team. How to execute the traps and rotations is not the subject here. But your team must be equally prepared to cover the low post as it is to cover the pick-and-roll game.
Isolated Player Strategy
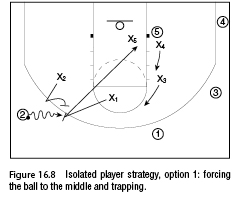
Some teams have one or two good one-on-one players whom they try to isolate in one-on-one attacks. If you’re the coach, you must decide if you’re willing to go one on one with the player, to trap from the top, or to push the player to the baseline to set a trap there. In figure 16.8, X2 is influencing the ball to the middle, and X1 is coming to trap 2 in the isolation. The defenders X3 and X4 rotate accordingly.
In figure 16.9, the ball is being shaded to the baseline; X5 steps out to trap while the defense rotates behind X5, with X4 fronting 5 and X3 V-cutting back to cover 4.

It’s also possible to shift into a zone defense, usually a 2-3, when a player is isolated to be in a position to give help. Players simply fill in the four zone spots around the defender on the ball, ready to give help or to trap on penetration. Figure 16.10 shows players filling in around X2 on the isolated player (2) and forming the 2-3 zone. Naturally, this shift to the zone must be planned for and a verbal signal given on the court.

Clarifying the Switching Concepts
It’s important that a team understand what the strategy in general is relative to rules for switching in the man-to-man defense. Some coaches prefer never to switch, some allow emergency switching when a man is beaten, and others prefer to switch quite readily, whenever the situation allows. Coaches have won championships with each of these techniques (and other variations as well). There’s no one answer on this issue. What’s of utmost importance is to drill your team on the strategy that’s selected, commit to the strategy, and ensure consistent communication so that doubt is eliminated when potential switches arise. Such preparation requires concerted practice time.
Setting Strategy Against the Opponent’s Key Play Actions
To conclude this section: It’s important not only to get the matchups right and to have a system to cover the general offensive situations that will arise, such as pick-and-rolls, post-ups, isolations, and so on, but you must also look at the two to five or so key plays that an opponent employs in its offensive schemes and clarify how you want your defense to adjust to help minimize these plays. Your team won’t be able to study every play a team uses (some NBA teams use more than 60), but there will always be some key actions that the opponent does best, and your defense must prepare for those. Your game plan might involve trapping, switching, or overplaying to make the opponent’s execution more difficult.
Don’t fail to be prepared for an opponent’s out-of-bounds plays. An assistant coach should have a diagram of the key out-of-bounds plays an opponent has used in close, late-game situations. Equally important is to have general concepts of how the team will defend out-of-bounds plays, be they from the side, under their own basket, or at the full court.
Sideline out of bounds. Our basic plan with the Mavericks in this situation was to prevent two particular passes: the direct pass from out of bounds into the low post, and the pass down to the strong-side corner (which sets up either a quick drop pass to the low post or a three-point shot). Figure 16.11 shows X3 (who needs to have active hands) playing in the passing lane to the corner and X5 in denial on 5.

We have used our advantage in numbers for our side out-of-bounds defensive plays to dictate some trick coverage:
• We can call a shift to zone.
• We can call for a trap to be made on the first pass below the foul line.
• We can call for a trap to be made when the ball is passed to the weak side.
• We can call for switching certain players or all players, and so on.
The advantage to tricking up on the defense in this situation after a time-out is that the opponent will normally have set a play, and you want to make it hard for him to run the play easily. It is dangerous to trap the first pass in, particularly if the inbounds passer is a good shooter. After passing the ball, he’s a dangerous man as either a step-in shooter or a slice cutter. A technique we’ve often used is to pressure the inbounds man toward the baseline side for two, or even three, counts and then jump off to face the other four players inbounds to try to deny the pass to the first man who becomes open. The defender must quickly get back to his own man, however, if the ball is passed in. Other times we’ve told the defender on the ball out of bounds to check the ball two counts and then quickly find the one opposing player we don’t want to get the ball, such as a Kobe Bryant type. Again, that defender must get back quickly to the passer once he does this.
Note that some teams prefer to pressure the passer with a man (or even with two men) the entire five seconds. This is most effective when one or two seconds remain and the lob is the most likely scenario. Then, putting a taller player with active hands on the ball out of bounds is necessary.
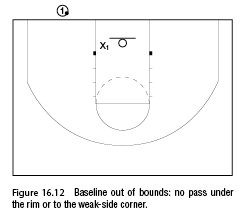
Baseline out of bounds. Our general coverage is man-to-man, and we emphasize trying to prevent two easy looks here as well—the direct pass under the goal and the easy catch-and-shoot in the strong-side corner, where most passes are made. We also have zoned up against the end out but find it to be more risky against great players. Still, in high school and college, the zone can be effective, but the better the skill of players at any level, the more risky the zone under the goal becomes. A mistake can permit a quick layup if the offense overloads the baseline or draws the middle man and cuts a player into an opening.
To help keep the ball from coming inbounds right under the goal, we play man-to-man and have the man on the ball out of bounds move to an angle off the ball and toward the basket. He’ll stand in such a way as to see both the ball and what’s going on behind him toward the goal (figure 16.12). He must have active hands. In this position he can also usually prevent an easy weak-side pass to the corner.
To prevent the easy strong-side corner catch-and-shoot, we have some choices of strategy:
• We might just have our players body up and play their own men, switching only in an emergency.
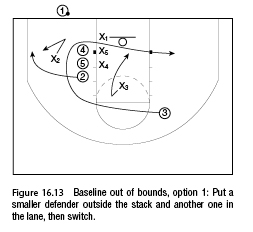
• We might put a smaller player on the outside of a stack or pick and one in the lane area and have them switch. The man on the outside won’t go through with the first cutter, passing him off and getting back to cover the corner area (figure 16.13).
Some teams will have the defender on the ball out of bounds check the middle of the lane and then switch out to the corner to cover there. The player in the lane (X3) will switch into X1’s position, but that’s all predetermined or communicated by X3 and X1 (figure 16.14). While this maneuver can be effective if not overdone, it’s also risky.

Full-court out of bounds. Over the course of a game, a team’s philosophy of pressure defense will dictate how this situation is played. It can vary in a myriad of ways. But when there are short seconds left in a period, regardless of whether a team prefers a full-court man or zone press or a half-court defense, we recommend having the defender of the inbounds player back up to the half-court area to play “centerfield.” He’ll watch the ball and follow the long pass to help the defender on that man contain the man and prevent a shot. If a short inbounds pass is made first, he won’t go for that but will wait to see where the next long pass is made and then go to it on air time to double team. Or, if the receiver tries to drive the ball upcourt for a quick penetration and shot, he’ll give help to stop that.
Alternatively, some teams like to pressure the man out of bounds to bother his vision and pressure the pass; though that’s quite defensible as a strategy, we prefer the centerfield method.
In-Game Adjustments
The three most important strategic elements to monitor during the flow of the game are momentum, game pace, and matchup changes. As the coach reads these, he’ll be led to make or not to make strategic adjustments. Let’s address these situations one at a time.
Momentum
Much of the game should be dictated by momentum, which can be described as having three phases: positive, negative, and zero, which means up for grabs. We like to avoid making changes when we have a positive flow. We stick with our lineup and our coverages and avoid calling time-outs. When there’s zero momentum, we might try to stimulate the game with a play call, a key substitution, or a defensive adjustment. When momentum is negative, we’re definitely on alert to make a change in our matchups, our lineup, or either our offensive or defensive scheme. In general, defensive adjustments tend to be more effective in changing momentum. A change from man to zone or vice versa, to a type of press, to trapping a key player, or some other defensive change can potentially bother the opponent’s offense while stimulating ours. Even when momentum is negative, we usually resist giving up entirely on what we’re doing. A subtle adjustment can be easier to make and less confusing to the team while still getting the job done on the opponent. Don’t let panic be your guide, but also don’t be too stubborn to adjust.
Pace
Most teams find a pace in which they tend to play better, and then they stick with it—though the opponent might like that same pace and be better at it, which is never a pleasant discovery. You can determine your team’s best pace by keeping track of the possessions over a period of time, starting with practice scrimmages, to see how your team plays with more and less possessions per period of play. Averaging over 1.75 possessions per minute marks a faster pace, and less than that indicates a slower pace (at least in our unscientific but experienced opinion). In scoring this way, a possession doesn’t end until a team has given the ball over to the opponent. That is, in this system, a ball that’s knocked out of bounds by the opponent is still regarded as the same possession, as is an offensive rebound. It’s our ball until it’s theirs, basically, is the way we keep the chart.
Determining Momentum and Pace Strategically During the Game
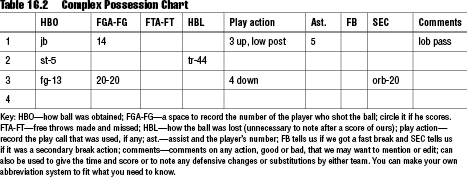
We’ve found it’s best not to trust “feel” for momentum and pace unequivocally. The best way to assess momentum and pace is to use a possession chart that includes multiple bits of information, depending on how in depth you want your stats man to go. He can note various details, including how each possession was attained and how it was lost, who took the shot, who rebounded or stole it or turned it over, what play action was used, and more, if so assigned. But the key elements of the chart are momentum and pace. Tables 16.1 and 16.2 show two ways the chart can be kept. Table 16.1 is the simple chart, and table 16.2 is an example of making your chart more complex and informative.
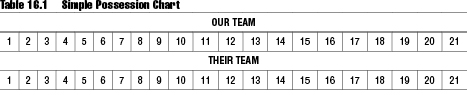
Your chart gives concrete evidence of the pace of the game. Have your chart keeper simply circle the possession if a score occurs, or put an X through the possession number if no score occurs. Have a chart for each period in the game. This kind of charting might seem elementary, but a closer look at what you get out of it gives the system credibility. Knowing the pace of the game can be of significant help. For instance, if you’re a team that prefers to run the ball and get volume shots, you’ll want to know halfway through the period the number of possessions you’ve had. If you want to average somewhat over two possessions per minute, eight possessions after five or six minutes is not your pace. Conversely, if you want to keep your opponent from getting into a full-court game, that number of possessions might be just what you want for your half-court pace that night. If you’re not doing well in a slow-paced game, you can attempt to speed up the pace with either an offensive or defensive adjustment. And, of course, if the fast pace is not working, you can try to slow it down.
The chart keeper should inform the coach or an assistant whenever the team fails to score on four possessions in succession or when the opponent has scored on four possessions in a row (this number is somewhat arbitrary; you might prefer three). The chart keeper’s marks tell you what you need to know about momentum. You might or might not call a time-out or make a change when first given this information, but if negative momentum persists, you have good reason to make some kind of adjustment.
As a head coach, I have often asked my stats man, “How many times have we had the ball?” People near the bench probably wonder what difference that makes, but to a coach it might mean the difference between making a change or not.
Table 16.2 shows a more complex system of charting. This chart is virtually a summary of the game. The table informs us that we got the ball off the jump ball (jb), and player 14 took the shot (if he scored, his number is circled; if he missed, it’s not). The play we used was the 3 up, and the shot came in the low post. If 14 is circled and the comment is “lob pass,” we assume that player 5 assisted (Ast.). We then got our second possession via a steal by our player 5 (st-5). However, we lost the ball because 44 traveled (tr-44) on the fast break. The third possession came as a result of the opposing team’s number 13 scoring (fg-13). Player 20 shot and missed but scored on his own offensive rebound (orb-20).
This chart gives you an idea of some of the details that can be included by a good stats man, if so desired. When I coached at Earlham College many years ago, I had a manager named John Shiffert who could script virtually an entire game. He has gone on to be a successful public relations director and author. When I coached high school basketball, a friend who was a car dealer managed this chart for me, so you don’t have to be a coach to do this.
Matchup Changes
Obviously, one strategy a coach can choose is to change his matchups when the original choices are not effective. Sometimes a change to a “small ball” lineup can be effective to increase the tempo and the pressure on defense in the game. At other times a switch to “big ball,” or the post-up game, can be effective. Maybe one lineup is better with a zone and another better for a press, and so on. Again, sometimes going small on a big man works well; or going big on a small player can at times be a solution because you force him to shoot over the longer defensive hand.
Other Tools to Help Determine In-Game Adjustments
I don’t think that statistics are the tool a coach should use to run a game or to evaluate teams or individuals, but they certainly are one of the tools you can use intelligently. This being the case, we like good chart keeping during the game. The chart information is given to an assistant coach at each time-out and plays a big part in our halftime evaluation. The information most helpful to our team, in addition to the possessions chart, is the following:
• Pick-and-roll chart. We want to know how we’re doing on defense against their pick-and-rolls and how successful we are in using this play action ourselves. We break it down to indicate the participants in the play and the location of the pick—top, wing, corner, elbow, and the high-wing area. We also keep track of transition pick-and-rolls set on the move. We want to keep the scoring ratio below one point per possession on defense. If we’re not doing that, we change our coverage or put in a different player.
• Man-to-man versus zone chart. We want to know how many possessions we’ve used in our different defenses and how many points we’ve given up on each. We also include variations such as pressing defenses and combination defenses that we might use, such as box and one, triangle and two, or switching from man to zone during a possession or, conversely, from zone to man during a particular play action.
• Low-post defense chart. We want to know how many times we’ve allowed the ball into the low post and what’s happened. We chart whether we’ve trapped, dug, or played it one on one and how many points have been given up on each attempt. The results determine whether we increase or decrease our tactics in the post.
• Fast-break game. We keep close track of how our transition defense is holding up. We also want to know whether we’re getting our share of fast breaks and what percentage we’re converting.
• Penetration game. We’re quite concerned about how many penetrations we’re allowing off the dribble in the front court. If we’re giving up too many, we might soften our man-to-man defense or go to a zone for a time, though that defense might allow penetration as well. If a particular player is having trouble, we might sub him out or perhaps try to trap the player who’s beating our guys one on one.
Many other details can be tracked, but these are the main ones we want to see; they indicate to us that a strategic move might be in order to begin the second half or during the flow of the game.
Using Combination and Alternating Defenses
While we can’t show the dynamics of the techniques involved here in this chapter, the flow of a game can often be changed in your favor by deviating some from your standard defenses. We don’t suggest trying anything too unusual when you can overpower a team with your basic system. Such defensive tactics are more suited to the underdog role. But sometimes your team, especially if you’re at the high school or college level, is put into situations in which your normal bag of tricks just isn’t enough to produce a victory. Many an upset has been staged by teams applying some of the following strategic defensive moves:
• Box-and-one defense is used in a 2-2 or a 1-2-1 zone formation for chasing a particularly dominant player, with one man who’s trying to prevent that player from getting the ball. When coaching college ball in the late ‘60s and early ‘70s, I used a “matchbox-and-one” defense that complemented our matchup zone and our man-to-man defenses. The four men in the box used matchup rules to stay matched to the other four players, while we chased the hot man with one player.
• Triangle-and-two defense is a variation of the box and one that uses two chasers in the man-to-man.
• Zone to man adjustment is a technique in which a team shows a zone defense and then shifts into a man-to-man on a particular key, such as when the ball goes to the high post, when the ball is swung from the first side to the wing area on the second side, or when the ball is passed to the corner. The advantage here is that the team may stay with its zone attack against your man to man, and most zone attacks are much easier to cover than man-to-man sets.
• Man to zone is an adjustment that reverses the one just described and is used when an opponent is having success with a certain man-to-man action. Here, when the ball goes to a predetermined spot or player, the team shifts into a zone. This adjustment can be effective against certain pick- and-roll combinations, especially against a player who’s a good isolation one-on-one attacker. It’s also useful against some low-post attacks.
• Alternating defenses keeps opponents guessing and perhaps disrupts an offense that’s clicking a little too efficiently. We’ve had success at confusing opponents by changing defenses in various ways other than during time-outs. For instance, we’ve played man-to-man when the ball comes across the half-court (in a non-fast-break situation) depending on which side of the floor we’re on—the right side might be man-to-man and the left side a zone. We’ve also changed from zone to man-to-man when the ball swings to the weak-side wing or when it’s passed to certain areas or certain players. We’ve changed our defense based on whether we scored on our last possession or whether our score ended in an even or odd number. Remember that these kinds of tactics are reserved mainly for an underdog team or for situations when your team is behind and your normal stuff is not working. These are not ways a good team will start a game but are tactical adjustments only.
Late-Game Adjustments
You’ll generally want to plan your late-game strategies well in advance to avoid coming up with something desperate and ill-advised when you’re under pressure at the end of a big game. Here are some late-game considerations you might want to mull over from the security of your office rather than in the heat of the moment:
• When to foul when trailing late in the game. The lower the level of competition, the sooner a team should try to stop the clock by fouling. That said, a wise coach also teaches how to foul while going for the ball in an aggressive defense. Sometimes the referee will swallow the whistle when a team is aggressive and is forging a comeback; you might get a steal or turnover without having the foul called. In any case, the lower the level, the less likely teams are to make their pressure free throws. If the opponent’s stats are available to your team, you should always know who the best and worst foul shooters are. In the NBA, our teams have made some news with the “Hack-a-Shaq” approach of fouling Shaquille O’Neal and other poor foul shooters intentionally to force them to score via the free throw rather than the dunk.
Of course, a primary factor to consider in this situation is the number of points you’re behind. By the time your team is in these situations, you should have made decisions on when to start fouling with a 10-plus point deficit, a 7- to 9-point deficit, and a 6- to 1-point deficit. The larger the deficit, the sooner the fouls must start to stop the clock and lengthen the game. A deficit in the 6- to 1-point range is a one- or two-possession game with far different considerations for fouling than you’ll have with larger deficits. The time remaining in which you choose to foul will depend on the level of competition and their ability to shoot free throws. The important thing is to have a formula ahead of time. In the NBA, we like to foul at three minutes with a deficit of 10 points or more and at the 90-second mark with a 9- to 7-point spread. We foul with 30 seconds or less in a two-possession game. In every situation we try to steal the inbounds pass before fouling.
• When to foul with a three-point lead. Many people argue the pros and cons of fouling late in a game with a three-point lead to send your opponent to the free-throw line instead of risking its scoring on a three-pointer to tie the game. When I was at Dallas, we had owner Mark Cuban’s favorite stats genius figure this problem out over a cross section of many games. According to him, the odds favor you (though not by a lot) to foul with 6 or fewer seconds remaining, even if the opponent makes 90 percent of his free throws. Before getting this information, our tendency had always been to foul at 5 seconds or less, and that had been effective for us. Whatever your decision on this matter, figure it out ahead of time and have your players practice it.
• Switching to defend the three-point line. In protecting a lead late in the game, it becomes even more important to protect against the three-point shot. When the opponent needs a three-pointer in the waning seconds, good switching techniques are vital. Put in a lineup that can switch readily, taking out a bigger, slower player or a poor defender. You have the game won if you can stop the shot. But it’s important to remind your players not to perform the normal defensive maneuver of dropping back to help on penetration or to trap in the low post or foul a shooter. The natural tendency to drop to the level of penetration allows the opportunity for penetration followed by a pass out to a three-point shooter for a nice rhythm-up catch-and-shoot. Resisting this natural urge takes some discipline and repetitions in practice.
There are three plays that tend to beat a defense that’s trying to hold onto its lead late in a game:
• the three-pointer, which gives the quickest route to the opponent;
• the quick two-point score that takes little time off the clock; and
• the offensive rebound put-back, which is the single play that decides most 1- or 2-point games.
A team trailing by 5 points with a minute or less to go and a chance for two possessions will often try to get the quick 2 points first and then go for the three-pointer later, knowing that if they miss on the lower-percentage three-pointer first and then foul, two more points for the opponent makes it a three-possession game. Thus, although you must tell your players to be ready to switch out to three-point shooters and to switch all switchables in pick situations, they must still be in containment mode, defending the ball against the quick score, and must be reminded to block out to prevent giving up the rebound that leads to the second shot.
Many a game has been lost, even despite good defense, because the opponent had nothing to lose and crashed the board with all players for a second shot. Naturally, in a 2-point game, the chance for a tie is obvious. But if the rebounder is fouled or if he can pass it out deep to a player standing behind the three-point line, the game can still be lost. And the careless foul of a two- or three-point shooter can be a game-breaker as well.
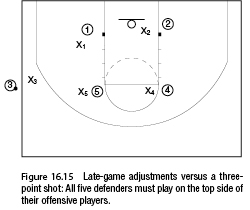
When an opponent needs a three-point basket to tie with short seconds remaining, all defenders must play on the top side of their assignments (figure 16.15) and prevent the pass to the strong-side corner. Your team should drill this situation—and we have some suggestions for doing so in the drill section that follows.
Players will switch out on picks, but they must communicate. A strategy to use—but try it in practice first—is to have all five players line up in an arc above the three-point line, as shown in figure 16.16.

Remember that it’s only the three-point shot that ties you, and that you have the option to foul with under 6 seconds, but the foul must come in a situation in which the player can’t go into a quick shooting motion and get three free throws or, much worse, a chance for a four-point play.
Drills for Strategies
If you’re going to be successful in winning close games, you must drill your players so they’re accustomed to playing in strategic pressure situations. Below is a list of some of our techniques for teaching. Use this abbreviated list to set up your own extended program.
• Play a game or series of three games to three baskets from the various out-of-bounds positions—side out, end out, full court, three-quarter court, and in the corners of the front court along the baseline. Change the time on the clock in these games from 20 to 10 to 5 to1 seconds remaining. In this drill every change of possession starts an out-of-bounds play.
• Two-minute game. Just as football players have done for years, basketball players can benefit from playing two-minute games. These can be structured in various ways. You can play as you would a regular game, puting a score on the board and playing the game out. Or you can try a variation we like: Let the situation stay the same for the entire two minutes. That is, the defense is always 2 points behind, for example, regardless of which team is on defense. This way, each time possession changes, the team with the ball will be playing to protect a 2-point lead and the team on defense will be playing to catch up. The only change in the situation is that the time will continue to decrease. By playing this way, you can work on how to play when your team is 2 points ahead and 2 points behind. Of course, you’ll want to vary the situation from one practice to the next. Play two-minute games with a tied score, with the team 3 points up/behind, 1 point up/behind, 5 points up/behind, and so on.
• Seven- or nine-possession game. We will have already drilled the offense playing against no defense on some play actions to perform in these situations, so now it’s up to the defense in this drill. Each team keeps the ball for either seven or nine possessions. The possessions go like this:
Full-court inbounds play versus a man-to-man press.
Full-court inbounds play going back the other way versus a zone press.
Three-quarter court inbounds play versus either a man defense or a zone going the other way.
Front-court side inbounds play versus man-to-man.
End inbounds play on the same end versus man-to-man.
Set play versus man-to-man with a need to score.
Set play versus zone with a need to score.
You can add two more possessions if you prefer, such as side and end inbounds plays versus the zone, a half-court inbounds play needing the three-pointer, or an inbounds plays with only 5 seconds on the clock, and so on.
• Three-possession offense-defense-offense game (O-D-O). The coach determines the score and the time situation. One team starts a possession wherever the coach instructs: full court, side, or end out of bounds, or from a rebound or steal. The offense gets a point if it scores, and the defense gets a point if it gets a stop. Either way, the ball goes to the other team, and it goes to the other end in the same situation with the same scoring opportunities. The original offensive team then advances the ball for the third possession under the same conditions. After three possessions there is a winner, with a score of either 2-1 or 3-0. The winning team gets the ball to begin the next game, and the coach picks a new situation.
• Set up a series of 1-, 2-, 3-, 4-, and 5-point situations. Some of the basic situations in a series would look like this:
1 point behind and opponent shooting two free throws.
1 point behind and opponent’s ball out on the side.
1 point ahead and opponent’s ball under the goal.
1 point ahead and opponent’s ball out at full court.
• Do the same with 2-, 3-, 4-, and 5-point deficits. Now the offense is in the opposite situation, playing with a lead. Change the time on the clock to anything from one minute down to a few seconds.
• Draw cards describing various situations. We have printed up 100 game situations on cards and will mix up our late-game drills by having a player pick a card and having the team play out the situation described. The player who has picked the card might even be the coach of his team and tell it what to do, as will the “coach” of the other team, who will pick a card also. See which team is able to succeed in the two possessions drawn up and then discuss what went right and wrong.
The main goal is to use a variety of strategic defensive situations and to work on them as often as possible in practice. Coach Jim Calhoun of the University of Connecticut drills nine of them per practice, and his teams are always prepared.