Chapter 21
Modern Conditioning Methods
Rich Dalatri
There are many ways to train. If you’re reading this book, however, I’ll assume you’re interested in my specialty—training specifically for basketball performance. To build a good base of strength and provide a solid foundation to build on, the work we recommend will start out high in volume and low in intensity. With weekly progress, we gradually lower the distance and increase the speed so that in the weeks just ahead of the competitive season, the training regimen is close to the competitive speed encountered on the court. All training should follow this principle.
Exercises progress from general movements over longer distances and time to more basketball-specific movements performed faster. In weight training, start with 10 to 15 repetitions with weights of 40 to 60 percent of maximum, and as the season nears, lower the reps and increase the weight being lifted. This basic principle might be adjusted depending on the strength level and experience of the player.
When working with someone just beginning a program, emphasize the basic movement skills of running, maneuvering, and lifting. In running, proper arm movement and stride length are especially important. In footwork and on-court movements, coordination is reflected in adjusting one’s center of gravity effectively and starting and stopping properly. In weight training, lifts involving multiple muscle groups and total body movements are a good place to start.
High-Level Competition Conditioning Program
The emphasis of this chapter is on players who play at a high level of competition. For these athletes, setting a good base is always a major part of the program. As I mentioned, they begin with longer, slower runs and with higher volume and less intensity in their lifting. The starting point is taken from their past performances in all areas. The starting point of any player’s current program is higher than that of the last program he completed. The starting point of his next program will be higher than his current program.
We begin with warm-up and flexibility training and follow that with movement skill work and aerobic and anaerobic work. In running, we start with general running at slower interval times and longer distances. We progress to running with acceleration, stopping, and changing direction, and become more sport specific. Once we’re sure the muscles are conditioned well enough, we add functional strength exercises, which are at a higher level of intensity and place more stress on the muscles.
Warm-Up
At the start of every good practice or workout is a good warm-up to prepare the body for the upcoming work. The warm-up raises the body’s temperature from within and increases blood flow to the working muscles. After a proper warm-up, the body can move more freely through all ranges of motions and movements. Your warm-up can be anything you choose, specific to basketball or otherwise, as long as you’re working the muscles and joints you’ll use in the workout.
We always do a basketball-type warm-up using the ball and movements we focus on in practice. An example of a warm-up drill we like to use is called X with the ball tossed ahead.
X With the Ball Tossed Ahead
A player starts in the corner of the court. He sprints to the free-throw line extended and closes out. He then slides on a diagonal to the pro-lane line and baseline. From there, he sprints to the elbow and then slides on a diagonal to the initial start corner. At this point, the coach (or the next player in line) tosses the ball ahead down the court, and he chases it down and dribbles to score a layup at the other end of the court (figure 21.1). From there, he repeats the routine to return to the original side of the court.

Flexibility
Flexibility is a term used to define range of motion through a certain movement pattern. Flexibility helps all athletes in reducing risk of injury, both acute injury and that which occurs from overuse. Flexibility exercises are generally done as part of a warm-up routine. For athletes, flexibility workouts should be sport specific. Basketball players need to be able to move with ease in all directions and to change directions at top speed, so they require full-body flexibility with emphasis on the hips, back, and legs.
Movement Skills
When we think of movement in regard to basketball, we think of the first step—because no matter what you’re doing, the first step puts you either ahead or behind.
Footwork exercises enhance foot–mind coordination and balance and make us more accustomed to moving our feet in all directions at a high rate of speed. These exercises are to be done at maximum speed for 6 to 10 seconds, before fatigue sets in and the body slows down. These exercises train the neuromuscular system to elicit a stronger, faster response.
We start with stationary exercises in which movements occur in only one plane, forward and backward or side to side. Use tape to make the lines on the court that you need for these drills.
Three-Line Drill
Refer to figure 21.2 for guidance on this drill. Players begin with both feet to one side of the lines. They put the inside foot in the first space, and then the second foot in the same space. Both feet go between each line, and the drill is completed when both feet are outside the third line. Player should not cross over and should move their feet as quickly as possible, going back and forth laterally.

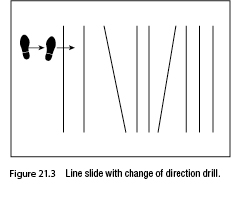
Line Slide With Change of Direction
See figure 21.3 for the configuration of this drill. Lines are straight and at 45 degrees. Players slide through the lines on the court, putting both feet in each space. At the 45-degree angle line, they pivot to turn around and face the opposite direction and continue without stopping. They should pick up the front foot as quickly as possible.
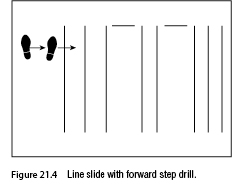
Line Slide With Forward Step
Players slide through the lines, putting both feet in each space. When they come to a line that’s in front of them, they step forward with both feet and then back into the square space, and continue without pausing to the rest of the lines (figure 21.4).
Now we can progress to movements in two or more planes and then to exercises in which players move through a predetermined sequence of movements, which in our case are movement patterns specific to basketball. These exercises can be done early in practice while the body is still fresh to ensure maximum speed of movement.
Through drills we can get the body accustomed to many of the situations we see in a game. Working on these movements with quality and intensity helps our neuromuscular system react and respond more easily in game situations. In the drills that follow we have mapped out movement patterns from basketball, taking them out of the game so we can work on them individually to improve them. We can then apply the improvements during play on the court. One example is help defense on the weak side.
Weak-Side Help
One player starts at the weak side of the basket. A player with a ball is on the other baseline, just inside the three-point line. When the player with the ball starts to dribble to the basket, the weak-side defender sprints to him, closes out, and forces him to make a decision. The offensive player now passes to another player or coach at the free-throw line. When the ball is swung to the top, the defender turns and sprints to close out on the coach or the player at the top. The offensive player now drives left or right, and the defender cuts off his penetration (figure 21.5).

Aerobic and Anaerobic Work
To make the best use of their skills and play at the highest level, basketball players must be conditioned both anaerobically and aerobically. As mentioned earlier, we start our off-season with longer, slower distances in our workouts and week by week get shorter and faster, with specificity of movement also increased each week. As we near the competitive season, we are using the same muscles and energy systems in the same movements as we must use in our games.
Functional Strength
To gain functional strength for basketball, we choose exercises that replicate movements performed on the court but overload them for a certain number of repetitions. We then immediately follow with repetitions in an unloaded state, which replicates movements in basketball precisely. This method of overloading followed by unloading excites the neuromuscular system to a higher level.
In the overload segment, the muscles are put through movement that’s more difficult than the normal task, so they must push harder and adapt to doing so. Then, during the unload, the muscles, after adapting to the overload, are preparing to push the same load they had pushed in the first few reps, but now without the overload, and as a consequence, they demonstrate a much greater force than they could generate during the previous reps. In fact, the force demonstrated now in the underload is greater than it would have been had the muscles not first experienced the overload.
The key to this type of training is to not fatigue the muscles too much with the loaded reps, so that when the muscles are unloaded, a strong and forceful repetition at higher speeds than the previous reps can be generated. Usually I use two to four loaded reps, followed by one to two unloaded. This is very high-quality work, and you don’t want lactic acid buildup in the muscles to slow the actions down.
An example of this type of work as applied to basketball is to put a player under the basket with a medicine ball of 12 to 16 pounds (6 to 8 kg). The player with outstretched arms taps the backboard three to five times, jumping as fast and high as he can. After the last tap, the medicine ball is immediately replaced with a regular basketball, which is dunked or shot from under the basket as explosively as possible.
Another example is to put an elastic band around a player’s waist. He starts at the elbow facing the basket with a ball. The player drives to the basket and dribbles against the resistance of the elastic, held by a teammate or a coach at the other end. He returns back to the start as quickly as possible and repeats this process twice. On the fourth repetition, the elastic is removed, and he drives to the basket at top speed and lays the ball in.
Conditioning Workout
The conditioning workout load should depend on the level and expertise of your team. An experienced team can handle a longer, more difficult and taxing workout than a team that is at a low level.
Most of the conditioning we do is restricted to the confines of the basketball court. We use offensive, defensive, and transition situations to make up most of our conditioning drills. There are rare situations in which a circumstance, such as limited facilities at the basketball complex or a player’s condition, such as a particular injury, requires us to work on a treadmill or a track or in a pool, but for the most part we condition on the court.
By conditioning on the court on which we play, we use the exact muscles in the exact speed and movements that we use for our sport. Even the smaller muscles of the legs and feet are worked by all the starting, stopping, and changing of directions that we do.
Also, by working on the court you eliminate the physical problems that can arise when a player trains on grass or on a track, such as shin splints, plantar fasciitis, and tendonitis.
By emphasizing skill work during conditioning, you bring a much more heightened level of concentration to the task. When a player starts to fatigue, he must really focus and push to complete the task at hand. At the same time, he is improving his conditioning. Mental toughness, which is a quality all coaches look for, is also developed in this kind of workout. The nature of the drills, combining skill with overloading the body past its comfort zone, measured by results of familiar aspects of the sport, is a way your players can see progress day to day.
Some conditioning drills we have used with success are a sprint, catch, and shoot drill and an offense-transition-defense sequence.
Sprint, Catch, and Shoot
This drill focuses on offensive skills. A player starts at the baseline. He sprints down the wing to a spot where he’ll catch and shoot. After the shot, he turns and sprints to the other end and repeats. He then immediately sprints down the court to the wing, where he catches the ball, dribbles once or twice, and then pulls up and shoots. He does the same at the other end. The last sequence has the player sprinting, catching, and driving to the basket, where he either dunks or shoots a layup.
Offense-Transition-Defense Sequence
Here we try to simulate a game condition by using offensive and defensive movements and a transition in the same drill. The player starts at the baseline, sprints downcourt to receive a pass, and shoots from a random spot inside the three-point line. After the shot, he immediately sprints in transition to the other paint area, where he will do a defensive movement for 4 to 10 seconds. This movement can be as simple as lane slides or as complex as a help-and-recover defense. After this defensive movement, the player again sprints in transition to the other end, where he receives the ball and takes a shot with or without a dribble (figure 21.6).
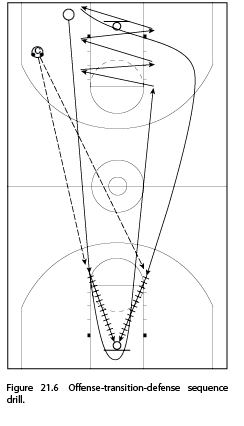
The offensive movements can be predetermined to replicate offensive moves in your offense, or they can just be random jump shots. The player continues this offense-transition-defense sequence for the prescribed amount of reps, usually four to six.
Weight Training
The last part of our program is weight training. When weight training with basketball players, we must keep in mind that we train with weights to help us in our sport. We are not weight lifters. We are basketball players lifting to become better basketball players. Too often I see coaches get way too carried away with weight lifting and actually hinder the performance of their players by making them less flexible and mobile or adding too much bulk without working to keep the players’ movement and agility at a high level.
Your program must be balanced among its parts, and weight training should not be overemphasized. Basketball is predominately a sport of hips, back, and legs. Most movements—posting up, running, shooting, defending the post, rebounding, and maintaining a good stance—involve these parts. The upper body is always important for balance and is used to hold off opponents offensively and defensively, but for the most part, the rules of the game take a lot of upper body use away.
Strength Exercises
When we work the legs, we use a variety of exercises that we switch from workout to workout, including squats, step-ups, and split squats, which we’ll describe here.
Squat
The player starts with feet in the same position he jumps from, with toes slightly pointed out. The bar rests on the shoulders at the base of the neck. The player’s hands are close to the shoulders. Hands kept close will aid in keeping the shoulders, back, and chest out. Back is tight. From here, he lowers the body into a sitting position while always keeping the shoulders, back, and chest out, with the back tight. It’s very important that he keep the heels on the ground and the knees in a position behind the feet. His shins should be in a vertical position. He rises back to the start position after a moment at the bottom position. He does not bounce at the bottom of the squat.
Coaching Point
To help the player stay in a good power position with weight over his midfoot, he should widen his feet slightly and turn his toes a little more. To help keep his back straight, he can place a small disk under his heels or use a 2-×-4 piece of wood.
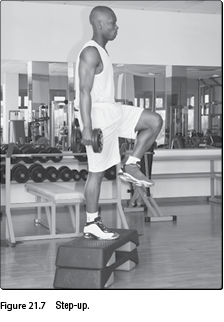
Step-Up
Holding dumbbells (or a bar on the shoulder), the player places one foot completely on a 24- to 30-inch (61-76 cm) box or a step. The other foot should be far enough back on the ground that he has to take a step similar to the length he takes when running. He keeps the back straight and the shoulders back on the way up and on the way down. He pushes off the back foot to start the motion and continues by pushing the body upward, driving the knee high as in a layup (figure 21.7). When up, he places the other foot on the box also. Then he descends by letting the leg go up through a full negative repetition, which means he must go down to the floor in complete control of the body.
Coaching Point
To add difficulty to the lift in the down position, the player could start the movement by raising up on his toes on the back foot. From here he steps up. In doing this, he eliminates all momentum and intensifies the work of the front leg.
Split Squat
The player starts by holding dumbbells (or a bar on the shoulders). For balance, he places one foot ahead of the other in a slightly staggered position, not in a straight line. The front foot is placed far enough ahead so that in the down position, the heel remains down and the knee stays behind the foot, with the shin in a vertical position. The back foot is placed on a 12-inch (30 cm) box with the leg slightly bent (figure 21.8). When descending, hips are pushed forward and the back leg is kept as straight as possible. He’ll go down to a 90-degree angle with the front leg, then push back up to the starting position. The movement is done slowly and under control.

Coaching Point
If it bothers the player’s back foot to have it on the top of the box, he can place it at the edge so the toes are off and the ball of the foot rests on the corner of the box. He must keep the shoulders back while descending to help him keep the back straight and the hips forward.
Strength Exercise Program Progression
We start the early weeks with higher reps with lower weights and, as the program progresses, move to heavier weights with fewer repetitions. A program might progress as shown in table 21.1.

When we have a good base of strength, we superset our leg work with an explosive speed type of movement. For example, we’ll do a set of squats, immediately followed by a set of box jumps (in which we jump up to a box and step down).
When doing this sequence, we load the body and muscular system with an overload of weight and perform the movement. Immediately after putting the weight down, we do the same movement with no overload, and the body explodes and elicits a much more forceful contraction because it has prepared to push the overload again. We do this with the other lifts for the legs as well.
Explosive Exercises
The explosive movement can be anything that simulates the lift you just did with the weight. Explosiveness is a major component in basketball. We work on it in most facets of our program. In the weight room, we do Olympic lifts to improve in this area.
Following are a few of the lifts we do. These are all total body movements generated by a strong explosive push and extension of the legs, hips, and lower back (the areas identified earlier as the most important in basketball). These all use the fast-twitch muscle fiber, which is key in the development of speed and explosiveness.
Clean
The player starts with the bar above the knees, holding the bar with the hands just outside the knees. Feet are shoulder-width apart, and the back is straight; the chest is out and the arms fully extended. From this position, he pulls the bar by extending the back, hips, knees, and ankles simultaneously. The bar is pulled in a straight line close to the body. When the body is fully extended, he continues the pull with the arms and shoulders. At the last moment of the pull, before the bar starts to descend, he dips under the bar by bending the knees and hips. At this moment, he also flips the wrists and pushes the elbows forward. He catches the bar at his shoulders and stands erect with the lift completed (figures 21.9a and b).

Coaching Point
He should drop as fast as he pulls. When he finishes the pull, he must drop immediately because the bar will begin to descend, and the slower the drop, the harder it is to finish the lift.
Snatch
The start is the same as for the clean (see figure 21.9a) From this position, he extends the body by extending the back, hips, legs, and ankles. When the body is fully extended, he begins the pull with the arms and shoulders. He’ll pull the elbows high with the bar moving in a straight line close to the body. At the height of the pull, he drops under the bar, catching it overhead with arms extended and locked at the elbows. The bar should be caught lightly behind the line of the shoulders in a line even with the back of the head.
Coaching Point
To get a good starting grip, he should place the fingers together at the midpoint of the bar. He lays the arms along the bar, flat against it. Where his elbows touch is where he should grip the bar. As he becomes more experienced, he can widen the grip.
Push Press
The player takes the bar from the rack at shoulder height. He holds the bar above the shoulder. From this position, he bends the knees and hips slightly. Now he pushes with the legs to get the bar moving. The bar goes up overhead by continuing the push with the arms and shoulders. As the bar goes past the chin, he tucks the chin to the chest so to not look up and lean back. By doing this, he’ll avoid putting too much pressure on the lower back. The leg bend is just enough to get the bar started and moving upward (figures 21.10a and b). The push must be enough, but not too much, so the upper body does not work.

Coaching Point
The player rests the bar on the front deltoids by keeping the elbows high. If the bar isn’t touching the shoulders as he pushes up, the bar will probably go down and then upward, slowing the movement.
Clean and Press
The player starts the lift by doing a clean (see figure 21.9 on p. 331). With the weights now at the shoulders, he bends the knees slightly and drives the weight upward to an arm-extended position, using the coordinated push from his whole body. As he pushes upward, he keeps his head in a neutral position and does not look upward. (Looking upward causes his shoulders to go back and his back to arch backward.) He lowers the weight under control to the shoulders and then back to the thighs.
Coaching Point
At the end of the clean he must be balanced and under control before starting the press portion of the lift. On the dip for the press, he pushes the butt backward slightly to keep the weight over the center of gravity.
Developing the Upper Body
To develop the upper body, we’ll do traditional lifts such as the bench press, incline press, and shoulder press, as well as other assisted lifts, such as lat pull-downs, rows, and rear deltoid work. We also do medicine ball throws, pull-ups, and band work to supplement the program.
In the weight program it’s important to emphasize all three parts of the lift on all repetitions (concentric: way up; isometric: holding; eccentric: way down). Technique should always be stressed before weight is lifted to reduce risk of injury. We use dumbbells as much as we use the regular barbell. We do unilateral one-arm and -leg movements as well as bilateral movements using either arms or legs at the same time. Remember to vary the stimulus to the neuromuscular system.
Core Development
Core development is a part of the strength program that can’t be omitted. The core includes the abdominals and obliques, which make up a girdle of muscle that anchors the body through the moves we make in basketball. The core of every movement changes because of angles and forces involved, but we try to train in many planes and movements to better prepare our bodies for the rigors of the sport.
Core Stability Circuit
The core stability circuit is a series of exercises that strengthen the core of the body by constantly changing the base of the posture and the position of the limbs. The key is to keep the body aligned as long and straight as possible throughout the sequence of exercises. Through the constant change of position, the player changes the center of the posture and strengthens all the surrounding muscles. Here are some exercises to perform for improving the strength of the core of the body.
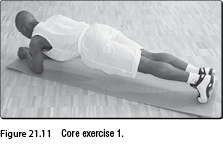
Core Exercise 1
Lie facedown on the floor with the body extended as long as possible. Lay the forearms on the floor, under the shoulders. Raise up and support the weight on the forearms and toes with the body as straight as possible. Keep the hips at or above body level, but don’t let them drop down to cause an arch in the back. It’s better to have the hips up in a bridge position (figure 21.11). Hold this position for 3 to 10 seconds, then lower the knees to the floor to rest.
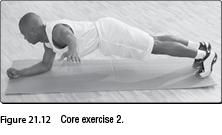
Core Exercise 2
From the same starting position as in the previous exercise, raise one arm up and extend it to the side. After holding it out to the side for 3 to 5 seconds, extend the same arm forward and hold for another 3 to 5 seconds. Repeat with the other arm (figure 21.12). Keep the body level to the floor, not twisted to the side with the raised arm.
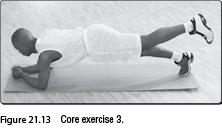
Core Exercise 3
From the same starting position, raise one foot off the floor and hold it up with the leg straight for 3 to 5 seconds (figure 21.13). Repeat with the other leg. Keep the body level to the floor, not twisted to the side of the raised foot.
Core Exercise 4
From the same starting position, raise one arm forward and the opposite foot off the floor. Hold for 3 to 5 seconds and then do the opposite side (figure 21.14). Try to keep the body as long and straight as possible. Don’t allow the hips to drop below the level of the body. It’s better to keep the hips slightly arched up.

Core Exercise 5
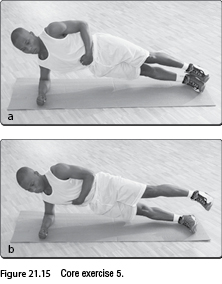
Lie on the floor on one side with legs straight, one on top of the other, and the upper body leaning on the elbow. Place the elbow under the shoulder to give a strong base and protect the shoulder. From this position, raise hips off the floor and hold the body in a straight position, resting on the elbow and the side of the foot. Hold this position for 3 to 5 seconds, and then raise the upper leg about 6 to 12 inches (15-30 cm) and back three times (figures 21.15a and b). Repeat the two movements on the other side.
Pilates Abdominal Circuit
Pilates is a form of conditioning that uses a stick or a machine called a reformer. Based on the research of Joseph Pilates, a German self-defense instructor who immigrated to the United States in the late 1920s, Pilates training is a way to accomplish much of our necessary core development. Each movement incorporates the player’s whole body in synchronicity instead of concentrating on one precise muscle group. Although the core is the central part of each movement, the player is working it in conjunction with the rest of his body, as he would on the court.
Here we’ll show only five of the several examples of Pilates exercises, which can be performed with or without the reformer machine. Perform 6 to 10 repetitions of each exercise.
Pilates Exercise 1
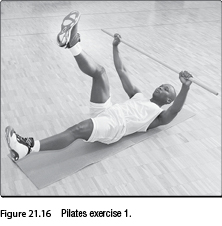
The player lies on his back with one leg up straight and the other one down. He holds the stick overhead, keeping arms straight. He raises the upper body and the arms; when the arms come up, he changes legs, and when the arms and upper body come down, he changes legs again (figure 21.16). Then he repeats the movement.
Pilates Exercise 2
The player lies on his back with one knee bent to the chest and the other one straight and holds the stick overhead, keeping his arms straight. He raises the upper body and the arms, and when the arms come up, he pulls the other knee to the chest and extends the bent leg (figure 21.17). He then repeats in a continuous fashion. The legs are in a bicycle pumping motion.

Pilates Exercise 3
The player lies on his back with legs 45 degrees from the floor and open. He holds the stick overhead, keeping arms straight. He raises the upper body; as the arms come up, he closes the legs; as the arms go down, he opens the legs (figure 21.18). He repeats in a continuous fashion.

Pilates Exercise 4
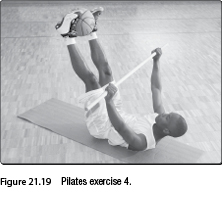
The player lies on his back with legs 45 degrees from the floor with a basketball between the ankles. He holds the stick overhead, keeping arms straight. The legs remain in the same position, while the arms, always straight, come up and down (figure 21.19). He then repeats in a continuous fashion.
Pilates Exercise 5
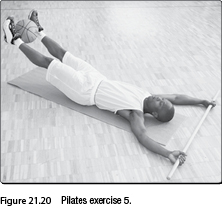
The exercise starts as the previous one, but now as the arms come up, the legs also raise about six inches (15 cm), and, as the arms come down, the legs lower to the starting position (figure 21.20). Repeat in a continuous fashion.
Program Design
When designing your program, map out each day, week, and month. Each part of the program must fit with the others. When setting up your program, first evaluate the level of each player. You can’t go day by day without a real picture of where you want to be at the end of your workout period or, for that matter, how to get there. To map out the workouts is called periodization. You set up a workout schedule that contains heavy days, light days, and days off to recuperate. Varying the intensity and volume of your workouts is a must.
You can’t do the same workouts day after day and expect to see long-range improvements. You would improve initially, as anyone would who starts a program, but after a period of time, you would level off and become stagnant, bored, and in many cases overfatigued. The initial development you saw won’t increase, and in some cases performance becomes worse. The body needs a variety of stimuli to develop. Your neuromuscular system develops much better with stimuli from a variety of exercises at different intensities and volumes.
For example, in the off-season we use a four-day-per-week workout schedule: Monday, Tuesday, Thursday, and Friday. The total work of the week is broken down into four days of work, with a different workout each day. The work represents 100 percent of the work to be done for the week—we just do it over four days. The days are broken down as follows regarding the volume of work done on a particular day:
Monday: 32 percent
Tuesday: 22 percent
Thursday: 27 percent
Friday: 19 percent
As you see, we have heavy days, lighter days, and days off on Wednesday, Saturday, and Sunday. The body can’t respond to a heavy workout every day. You need to back off or rest the day after a heavy workout if you plan to continue over time.
The body begins to recuperate on the lighter days (Tuesdays and Fridays) but is still being developed at a lesser intensity or volume. We follow the principle of periodization in most aspects of our workout (conditioning, weight training, movement drills, footwork drills, and functional strength).
Final Points
You want to use a sound strength and conditioning program that includes the following characteristics:
• Training drills and activities specific and functional for basketball
• Level of training that matches the physical maturity of players
• A variety of workouts and exercises
• Progression from longer and slower to shorter and faster
• High reps at lower intensity progressing to fewer reps at higher intensity
• Emphasis on speed and explosiveness
• Periodization of workouts
• Balance among all parts of the program
Conditioning is a major factor in a team’s success over a long season. Implemented as described in this chapter, a training program is a big advantage for any basketball player or team.