
TEXTURE MAPPING
5.1Loading Texture Image Files
5.4Constructing Texture Coordinates
5.5Loading Texture Coordinates into Buffers
5.6Using the Texture in a Shader: Sampler Variables and Texture Units
5.7Texture Mapping: Example Program
5.12Textures – Additional OpenGL Details

Texture mapping is the technique of overlaying an image across a rasterized model surface. It is one of the most fundamental and important ways of adding realism to a rendered scene.
Texture mapping is so important that there is hardware support for it, allowing for very high performance resulting in real-time photorealism. Texture Units are hardware components designed specifically for texturing, and modern graphics cards typically come with several texture units included.
Figure 5.1
Texturing a dolphin model with two different images [TU16].
5.1LOADING TEXTURE IMAGE FILES
There are a number of datasets and mechanisms that need to be coordinated to accomplish texture mapping efficiently in OpenGL/GLSL:
•a texture object to hold the texture image (in this chapter we consider only 2D images)
•a special uniform sampler variable so that the vertex shader can access the texture
•a buffer to hold the texture coordinates
•a vertex attribute for passing the texture coordinates down the pipeline
•a texture unit on the graphics card
A texture image can be a picture of anything. It can be a picture of something man-made or occurring in nature, such as cloth, grass, or a planetary surface; or, it could be a geometric pattern, such as the checkerboard in Figure 5.1. In videogames and animated movies, texture images are commonly used to paint faces and clothing on characters or paint skin on creatures such as the dolphin in Figure 5.1.
Images are typically stored in image files, such as .jpg, .png, .gif, or .tiff. In order to make a texture image available to shaders in the OpenGL pipeline, we need to extract the colors from the image and put them into an OpenGL texture object (a built-in OpenGL structure for holding a texture image).
Many C++ libraries are available for reading and processing image files. Among the popular choices are Cimg, Boost GIL, and Magick++. We have opted to use a library designed particularly for OpenGL called SOIL2 [SO17], which is based on the very popular but now outdated library SOIL. The installation steps for SOIL2 are given in Appendices A and B.
The general steps we will use for loading a texture into an OpenGL application are: (a) use SOIL2 to instantiate an OpenGL texture object and read the data from an image file into it, (b) call glBindTexture() to make the newly created texture object active, and (c) adjust the texture settings using the glTexParameter() function. The result is an integer ID for the now available OpenGL texture object.
Texturing an object starts by declaring a variable of type GLuint. As we have seen, this is an OpenGL type for holding integer IDs referencing OpenGL objects. Next, we call SOIL_load_OGL_texture() to actually generate the texture object. The SOIL_load_OGL_texture() function accepts an image file name as one of its parameters (some of the other parameters will be described later). These steps are implemented in the following function:

We will use this function often, so we add it our Utils.cpp utility class. The C++ application then simply calls the above loadTexture() function to create the OpenGL texture object as follows:
GLuint myTexture = Utils::loadTexture("image.jpg");
where image.jpg is a texture image file, and myTexture is an integer ID for the resulting OpenGL texture object. Several image file types are supported, including the ones listed previously.
5.2TEXTURE COORDINATES
Now that we have a means for loading a texture image into OpenGL, we need to specify how we want the texture to be applied to the rendered surface of an object. We do this by specifying texture coordinates for each vertex in our model.
Texture coordinates are references to the pixels in a (usually 2D) texture image. Pixels in a texture image are referred to as texels, in order to differentiate them from the pixels being rendered on the screen. Texture coordinates are used to map points on a 3D model to locations in a texture. Each point on the surface of the model has, in addition to (x,y,z) coordinates that place it in 3D space, texture coordinates (s,t) that specify which texel in the texture image provides its color. Thus, the surface of the object is “painted” by the texture image. The orientation of a texture across the surface of an object is determined by the assignment of texture coordinates to object vertices.
In order to use texture mapping, it is necessary to provide texture coordinates for every vertex in the object to be textured. OpenGL will use these texture coordinates to determine the color of each rasterized pixel in the model by looking up the color stored at the referenced texel in the texure image. In order to ensure that every pixel in a rendered model is painted with an appropriate texel from the texture image, the texture coordinates are put into a vertex attribute so that they are also interpolated by the rasterizer. In that way the texture image is interpolated, or filled in, along with the model vertices.
For each set of vertex coordinates (x,y,z) passing through the vertex shader, there will be an accompanying set of texture coordinates (s,t). We will thus set up two buffers, one for the vertices (with three components x, y, and z in each entry) and one for the corresponding texture coordinates (with two components s and t in each entry). Each vertex shader invocation thus receives one vertex, now comprised of both its spatial coordinates and its corresponding texture coordinates.
Texture coordinates are most often 2D (OpenGL does support some other dimensionalities, but we won’t cover them in this chapter). It is assumed that the image is rectangular, with location (0,0) at the lower left and (1,1) at the upper right.1 Texture coordinates, then, should ideally have values in the range [0..1].
Consider the example shown in Figure 5.2. The cube model, recall, is constructed of triangles. The four corners of one side of the cube are highlighted, but remember that it takes two triangles to specify each square side. The texture coordinates for each of the six vertices that specify this one cube side are listed alongside the four corners, with the corners at the upper left and lower right each composed of a pair of vertices. A texture image is also shown. The texture coordinates (indexed by s and t) have mapped portions of the image (the texels) onto the rasterized pixels of the front face of the model. Note that all of the intervening pixels in between the vertices have been painted with the intervening texels in the image. This is achieved because the texture coordinates are sent to the fragment shader in a vertex attribute, and thus are also interpolated just like the vertices themselves.
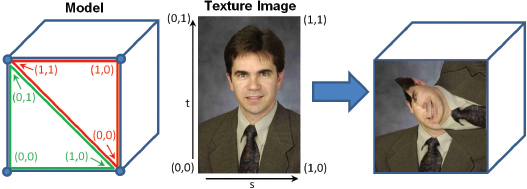
Figure 5.2
Texture coordinates.
In this example, for purposes of illustration, we deliberately specified texture coordinates that result in an oddly painted surface. If you look closely, you can also see that the image appears slightly stretched—that is because the aspect ratio of the texture image doesn’t match the aspect ratio of the cube face relative to the given texture coordinates.
For simple models like cubes or pyramids, selecting texture coordinates is relatively easy. But for more complex curved models with lots of triangles, it isn’t practical to determine them by hand. In the case of curved geometric shapes, such as a sphere or torus, texture coordinates can be computed algorithmically or mathematically. In the case of a model built with a modeling tool such as Maya [MA16] or Blender [BL16], such tools offer “UV-mapping” (outside of the scope of this book) to make this task easier.
Let us return to rendering our pyramid, only this time texturing it with an image of bricks. We will need to specify: (a) the integer ID referencing the texture image, (b) texture coordinates for the model vertices, (c) a buffer for holding the texture coordinates, (d) vertex attributes so that the vertex shader can receive and forward the texture coordinates through the pipeline, (e) a texture unit on the graphics card for holding the texture object, and (f) a uniform sampler variable for accessing the texture unit in GLSL, which we will see shortly. These are each described in the next sections.
5.3CREATING A TEXTURE OBJECT
Suppose the image shown here is stored in a file named “brick1.jpg” [LU16].
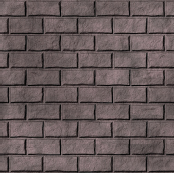
As shown previously, we can load this image by calling our loadTexture() function, as follows:
GLuint brickTexture = Utils::loadTexture("brick1.jpg");
Recall that texture objects are identified by integer IDs, so brickTexture is of type GLuint.
5.4CONSTRUCTING TEXTURE COORDINATES
Our pyramid has four triangular sides and a square on the bottom. Although geometrically this only requires five (5) points, we have been rendering it with triangles. This requires four triangles for the sides, and two triangles for the square bottom, for a total of six triangles. Each triangle has three vertices, for a total of 6x3=18 vertices that must be specified in the model.
We already listed the pyramid’s geometric vertices in Program 4.3 in the float array pyramidPositions[ ]. There are many ways that we could orient our texture coordinates so as to draw our bricks onto the pyramid. One simple (albeit imperfect) way would be to make the top center of the image correspond to the peak of the pyramid, as follows:
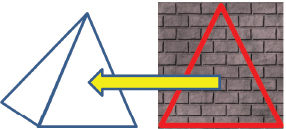
We can do this for all four of the triangle sides. We also need to paint the bottom square of the pyramid, which is comprised of two triangles. A simple and reasonable approach would be to texture it with the entire area from the picture (the pyramid has been tipped back and is sitting on its side):
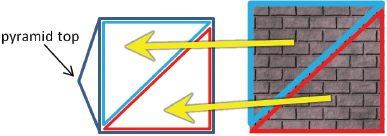
Using this very simple strategy for the first eight of the pyramid vertices from Program 4.3, the corresponding set of vertex and texture coordinates is shown in Figure 5.3.
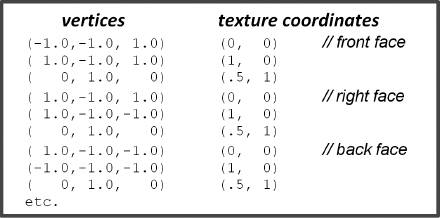
Figure 5.3
Texture coordinates for the pyramid (partial list).
5.5LOADING TEXTURE COORDINATES INTO BUFFERS
We can load the texture coordinates into a VBO in a similar manner as seen previously for loading the vertices. In setupVertices(), we add the following declaration of the texture coordinate values:

Then, after the creation of at least two VBOs (one for the vertices, and one for the texture coordinates), we add the following lines of code to load the texture coordinates into VBO #1:
glBindBuffer(GL_ARRAY_BUFFER, vbo[1]);
glBufferData(GL_ARRAY_BUFFER, sizeof(pyrTexCoords), pyrTexCoords, GL_STATIC_DRAW);
5.6USING THE TEXTURE IN A SHADER: SAMPLER VARIABLES AND TEXTURE UNITS
To maximize performance, we will want to perform the texturing in hardware. This means that our fragment shader will need a way of accessing the texture object that we created in the C++/OpenGL application. The mechanism for doing this is via a special GLSL tool called a uniform sampler variable. This is a variable designed for instructing a texture unit on the graphics card as to which texel to extract or “sample” from a loaded texture object.
Declaring a sampler variable in the shader is easy—just add it to your set of uniforms:
layout (binding=0) uniform sampler2D samp;
Ours is named “samp”. The “layout (binding=0)” portion of the declaration specifies that this sampler is to be associated with texture unit 0.
A texture unit (and associated sampler) can be used to sample whichever texture object you wish, and that can change at runtime. Your display() function will need to specify which texture object you want the texture unit to sample for the current frame. So each time you draw an object, you will need to activate a texture unit and bind it to a particular texture object, for example:
glActiveTexture(GL_TEXTURE0);
glBindTexture(GL_TEXTURE_2D, brickTexture);
The number of available texture units depends on how many are provided on the graphics card. According to the OpenGL API documentation, OpenGL version 4.5 requires that this be at least 16 per shader stage, and at least 80 total units across all stages [OP16]. In this example, we have made the 0th texture unit active by specifying GL_TEXTURE0 in the glActiveTexture() call.
To actually perform the texturing, we will need to modify how our fragment shader outputs colors. Previously, our fragment shader either output a constant color, or it obtained colors from a vertex attribute. This time instead, we need to use the interpolated texture coordinates received from the vertex shader (through the rasterizer) to sample the texture object, by calling the texture() function as follows:
in vec2 tc; // texture coordinates
. . .
color = texture(samp, tc);
5.7TEXTURE MAPPING: EXAMPLE PROGRAM
Program 5.1 combines the previous steps into a single program. The result, showing the pyramid textured with the brick image, appears in Figure 5.4. Two rotations (not shown in the code listing) were added to the pyramid’s model matrix to expose the underside of the pyramid.
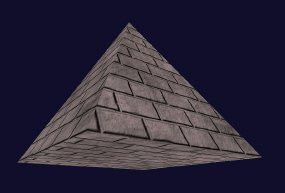
Figure 5.4
Pyramid texture mapped with brick image.
It is now a simple matter to replace the brick texture image with other texture images, as desired, simply by changing the filename in the loadTexture() call. For example, if we replace “brick1.jpg” with the image file “ice.jpg” [LU16], we get the result shown in Figure 5.5.
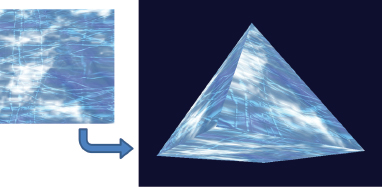
Figure 5.5
Pyramid texture mapped with “ice” image.
Program 5.1 Pyramid with Brick Texture

5.8MIPMAPPING
Texture mapping commonly produces a variety of undesirable artifacts in the rendered image. This is because the resolution or aspect ratio of the texture image rarely matches that of the region in the scene being textured.
A very common artifact occurs when the image resolution is less than that of the region being drawn. In this case, the image would need to be stretched to cover the region, becoming blurry (and possibly distorted). This can sometimes be combated, depending on the nature of the texture, by assigning the texture coordinates differently so that applying the texture requires less stretching. Another solution is to use a higher resolution texture image.
The reverse situation is when the resolution of the image texture is greater than that of the region being drawn. It is probably not at all obvious why this would pose a problem, but it does! In this case, noticeable aliasing artifacts can occur, giving rise to strange-looking false patterns, or “shimmering” effects in moving objects.
Aliasing is caused by sampling errors. It is most often associated with signal processing, where an inadequately sampled signal appears to have different properties (such as wavelength) than it actually does when it is reconstructed. An example is shown in Figure 5.6. The original waveform is shown in red. The yellow dots along the waveform represent the samples. If they are used to reconstruct the wave, and if there aren’t enough of them, they can define a different wave (shown in blue).
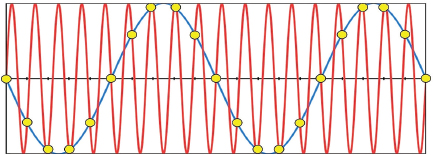
Figure 5.6
Aliasing due to inadequate sampling.
Similarly, in texture-mapping, when a high-resolution (and highly detailed) image is sparsely sampled (such as when using a uniform sampler variable), the colors retrieved will be inadequate to reflect the actual detail in the image, and may instead seem random. If the texture image has a repeated pattern, aliasing can result in a different pattern being produced than the one in the original image. If the object being textured is moving, rounding errors in texel lookup can result in constant changes in the sampled pixel at a given texture coordinate, producing an unwanted sparkling effect across the surface of the object being drawn.
Figure 5.7 shows a tilted, close-up rendering of the top of a cube which has been textured by a large, high-resolution image of a checkerboard.
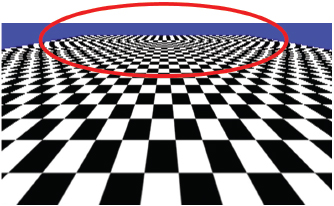
Figure 5.7
Aliasing in a texture map.
Aliasing is evident near the top of the image, where the under-sampling of the checkerboard has produced a “striped” effect. Although we can’t show it here in a still image, if this were an animated scene, the patterns would likely undulate between various incorrect patterns such as this one.
Another example appears in Figure 5.8, in which the cube has been textured with an image of the surface of the moon [HT16]. At first glance, this image appears sharp and full of detail. However, some of the detail at the upper right of the image is false and causes “sparkling” as the cube object (or the camera) moves. (Unfortunately, we can’t show the sparkling effect clearly in a still image.)
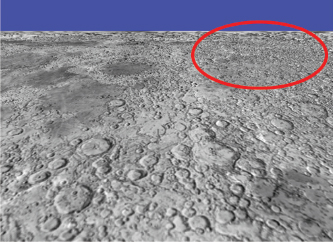
Figure 5.8
“Sparkling” in a texture map.
These and similar sampling error artifacts can be largely corrected by a technique called mipmapping, in which different versions of the texture image are created at various resolutions. OpenGL then uses the texture image that most closely matches the resolution at the point being textured. Even better, colors can be averaged between the images closest in resolution to that of the region being textured. Results of applying mipmapping to the images in Figure 5.7 and Figure 5.8 are shown in Figure 5.9.
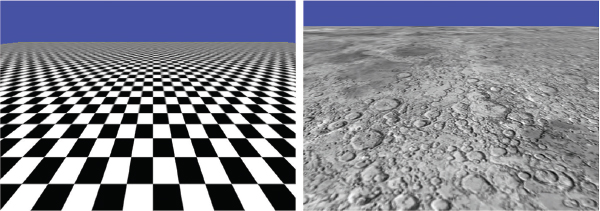
Figure 5.9
Mipmapped results.
Mipmapping works by a clever mechanism for storing a series of successively lower-resolution copies of the same image in a texture image one-third larger than the original image. This is achieved by storing the R, G, and B components of the image separately in three-quarters of the texture image space, then repeating the process in the remaining one-quarter of the image space for the same image at one-quarter the original resolution. This subdividing repeats until the remaining quadrant is too small to contain any useful image data. An example image and a visualization of the resulting mipmap is shown in Figure 5.10.
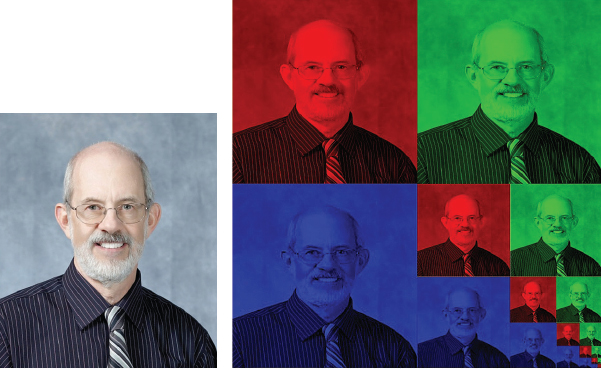
Figure 5.10
Mipmapping an image.
This method of stuffing several images into a small space (well, just a bit bigger than the space needed to store the original image) is how mipmapping got its name. MIP stands for Multum In Parvo [WI83], which is Latin for “much in a small space.”
When actually texturing an object, the mipmap can be sampled in several ways. In OpenGL, the manner in which the mipmap is sampled can be chosen by setting the GL_TEXTURE_MIN_FILTER parameter to the desired minification technique, which is one of the following:
•GL_NEAREST_MIPMAP_NEAREST
chooses the mipmap with the resolution most similar to that of the region of pixels being textured. It then obtains the nearest texel to the desired texture coordinates.
•GL_LINEAR_MIPMAP_NEAREST
chooses the mipmap with the resolution most similar to that of the region of pixels being textured. It then interpolates the four texels nearest to the texture coordinates. This is called “linear filtering.”
•GL_NEAREST_MIPMAP_LINEAR
chooses the two mipmaps with resolutions nearest to that of the region of pixels being textured. It then obtains the nearest texel to the texture coordinates from each mipmap and interpolates them. This is called “bilinear filtering.”
•GL_LINEAR_MIPMAP_LINEAR
chooses the two mipmaps with resolutions nearest to that of the region of pixels being textured. It then interpolates the four nearest texels in each mipmap and interpolates those two results. This is called “trilinear filtering” and is illustrated in Figure 5.11.
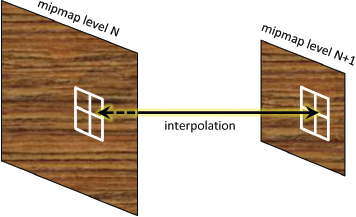
Figure 5.11
Trilinear filtering.
Trilinear filtering is usually preferable, as lower levels of blending often produce artifacts, such as visible separations between mipmap levels. Figure 5.12 shows a close-up of the checkerboard using mipmapping with only linear filtering enabled. Note the circled artifacts where the vertical lines suddenly change from thick to thin at a mipmap boundary. By contrast, the example in Figure 5.9 used trilinear filtering.
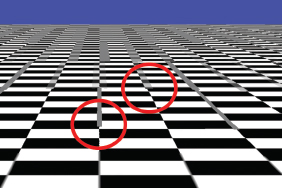
Figure 5.12
Linear filtering artifacts.
Mipmapping is richly supported in OpenGL. There are mechanisms provided for building your own mipmap levels or having OpenGL build them for you. In most cases, the mipmaps built automatically by OpenGL are sufficient. This is done by adding the following lines of code to the Utils::loadTexture() function (described earlier in Section 5.1), immediately after the getTextureObject() function call:
glBindTexture(GL_TEXTURE_2D, textureID);
glTexParameteri(GL_TEXTURE_2D, GL_TEXTURE_MIN_FILTER, GL_LINEAR_MIPMAP_LINEAR);
glGenerateMipmap(GL_TEXTURE_2D);
This tells OpenGL to generate the mipmaps. The brick texture is made active with the glBindTexture() call, and then the glTexParameteri() function call enables one of the minification factors listed previously, such as GL_LINEAR_MIPMAP_LINEAR shown in the above call, which enables trilinear filtering.
Once the mipmap is built, the filtering option can be changed (although this is rarely necessary) by calling glTexParameteri() again, such as in the display function. Mipmapping can even be disabled by selecting GL_NEAREST or GL_LINEAR.
For critical applications, it is possible to build the mipmaps yourself, using whatever is your preferred image editing software. They can then be added as mipmap levels when creating the texture object by repeatedly calling OpenGL’s glTexImage2D() function for each mipmap level. Further discussion of this approach is outside the scope of this book.
5.9ANISOTROPIC FILTERING
Mipmapped textures can sometimes appear more blurry than non-mipmapped textures, especially when the textured object is rendered at a heavily tilted viewing angle. We saw an example of this back in Figure 5.9, where reducing artifacts with mipmapping led to reduced detail (compared with Figure 5.8).
This loss of detail occurs because when an object is tilted, its primitives appear smaller along one axis (i.e., width vs. height) than along the other. When OpenGL textures a primitive, it selects the mipmap appropriate for the smaller of the two axes (to avoid “sparkling” artifacts). In Figure 5.9 the surface is tilted heavily away from the viewer, so each rendered primitive will utilize the mipmap appropriate for its reduced height, which is likely to have a resolution lower than appropriate for its width.
One way of restoring some of this lost detail is to use anisotropic filtering (AF). Whereas standard mipmapping samples a texture image at a variety of square resolutions (e.g., 256x256, 128x128, etc.), AF samples the textures at a number of rectangular resolutions as well, such as 256x128, 64x128, and so on. This enables viewing at various angles while retaining as much detail in the texture as possible.
Anisotropic filtering is more computationally expensive than standard mipmapping and is not a required part of OpenGL. However, most graphics cards support AF (this is referred to as an OpenGL extension), and OpenGL does provide both a way of querying the card to see if it supports AF, and a way of accessing AF if it does. The code is added immediately after generating the mipmap:
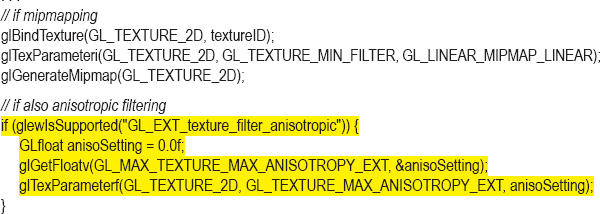
The call to glewIsSupported() tests whether the graphics card supports AF. If it does, we set it to the maximum degree of sampling supported, a value retrieved using glGetFloatv() as shown. It is then applied to the active texture object using glTexParameterf(). The result is shown in Figure 5.13. Note that much of the lost detail from Figure 5.8 has been restored, while still removing the sparkling artifacts.
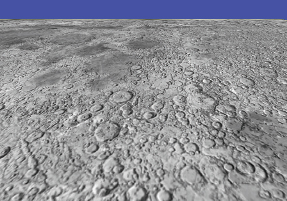
Figure 5.13
Anisotropic filtering.
5.10WRAPPING AND TILING
So far we have assumed that texture coordinates all fall in the range [0..1]. However, OpenGL actually supports texture coordinates of any value. There are several options for specifying what happens when texture coordinates fall outside the range [0..1]. The desired behavior is set using glTexParameteri(), and the options are as follows:
•GL_REPEAT: The integer portion of the texture coordinates are ignored, generating a repeating or “tiling” pattern. This is the default behavior.
•GL_MIRRORED_REPEAT: The integer portion is ignored, except that the coordinates are reversed when the integer portion is odd, so the repeating pattern alternates between normal and mirrored.
•GL_CLAMP_TO_EDGE: Coordinates less than 0 and greater than 1 are set to 0 and 1 respectively.
•GL_CLAMP_TO_BORDER: Texels outside of [0..1] will be assigned some specified border color.
For example, consider a pyramid in which the texture coordinates have been defined in the range [0..5] rather than the range [0..1]. The default behavior (GL_REPEAT), using the texture image shown previously in Figure 5.2, would result in the texture repeating five times across the surface (sometimes called “tiling”), as shown in Figure 5.14:
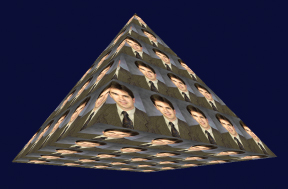
Figure 5.14
Texture coordinate wrapping with GL_REPEAT.
To make the tiles’ appearance alternate between normal and mirrored, we can specify the following:
glTexParameteri(GL_TEXTURE_2D, GL_TEXTURE_WRAP_S, GL_MIRRORED_REPEAT);
glTexParameteri(GL_TEXTURE_2D, GL_TEXTURE_WRAP_T, GL_MIRRORED_REPEAT);
Specifying that values less than 0 and greater than 1 be set to 0 and 1 respectively can be done by replacing GL_MIRRORED_REPEAT with GL_CLAMP_TO_EDGE.
Specifying that values less than 0 and greater than 1 result in a “border” color can be done as follows:
glTexParameteri(GL_TEXTURE_2D, GL_TEXTURE_WRAP_S, GL_CLAMP_TO_BORDER);
glTexParameteri(GL_TEXTURE_2D, GL_TEXTURE_WRAP_T, GL_CLAMP_TO_BORDER);
float redColor[4] = { 1.0f, 0.0f, 0.0f, 1.0f };
glTexParameterfv(GL_TEXTURE_2D, GL_TEXTURE_BORDER_COLOR, redColor);
The effect of each of these options (mirrored repeat, clamp to edge, and clamp to border), with texture coordinates ranging from -2 to +3, are shown respectively (left to right) in Figure 5.15.

Figure 5.15
Textured pyramid with various wrapping options.
In the center example (clamp to edge), the pixels along the edges of the texture image are replicated outward. Note that as a side effect, the lower-left and lower-right regions of the pyramid faces obtain their color from the lower-left and lower-right pixels of the texture image respectively.
5.11PERSPECTIVE DISTORTION
We have seen that as texture coordinates are passed from the vertex shader to the fragment shader, they are interpolated as they pass through the rasterizer. We have also seen that this is the result of the automatic linear interpolation that is always performed on vertex attributes.
However, in the case of texture coordinates, linear interpolation can lead to noticeable distortion in a 3D scene with perspective projection.
Consider a rectangle made of two triangles, textured with a checkerboard image, facing the camera. As the rectangle is rotated around the X axis, the top part of the rectangle tilts away from the camera, while the lower part of the rectangle swings closer to the camera. Thus, we would expect the squares at the top to become smaller and the squares at the bottom to become larger. However, linear interpolation of the texture coordinates will instead cause the height of all squares to be equal. The distortion is exacerbated along the diagonal defining the two triangles that make up the rectangle. The resulting distortion is shown in Figure 5.16.
Fortunately, there are algorithms for correcting perspective distortion, and by default, OpenGL applies a perspective correction algorithm [OP14] during rasterization. Figure 5.17 shows the same rotating checkerboard, properly rendered by OpenGL.
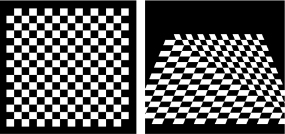
Figure 5.16
Texture perspective distortion.
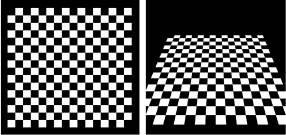
Figure 5.17
OpenGL perspective correction.
Although not common, it is possible to disable OpenGL’s perspective correction by adding the keyword “noperspective” in the declaration of the vertex attribute containing the texture coordinates. This has to be done in both the vertex and fragment shaders. For example, the vertex attribute in the vertex shader would be declared as follows:
noperspective out vec2 texCoord;
The corresponding attribute in the fragment shader would be declared:
noperspective in vec2 texCoord;
This syntax was in fact used to produce the distorted checkerboard in Figure 5.16.
5.12TEXTURES – ADDITIONAL OPENGL DETAILS
The SOIL2 texture image loading library that we are using throughout this book has the advantage that it is relatively easy and intuitive to use. However, when learning OpenGL, using SOIL2 has the unintended consequence of shielding the user from some important OpenGL details that are useful to learn. In this section we describe some of those details a programmer would need to know in order to load and use textures in the absence of a texture loading library such as SOIL2.
It is possible to load texture image file data into OpenGL directly, using C++ and OpenGL functions. While it is quite a bit more complicated, it is commonly done. The general steps are:
1.Read the image file using C++ tools.
2.Generate an OpenGL texture object.
3.Copy the image file data into the texture object.
We won’t describe the first step in detail—there are numerous methods. One approach is described nicely at opengl-tutorials.org (the specific tutorial page is [OT18]), and uses C++ functions fopen() and fread() to read in data from a .bmp image file into an array of type unsigned char.
Steps 2 and 3 are more generic and involve mostly OpenGL calls. In step 2, we create one or more texture objects using the OpenGL glGenTextures() command. For example, generating a single OpenGL texture object (with an integer reference ID) can be done as follows:

In step 3, we associate the image data from step 1 into the texture object created in step 2. This is done using the OpenGL glTexImage2D() command. The following example loads the image data from the unsigned char array described in step 1 (and denoted here as “data”) into the texture object created in step 2:

At this point, the various glTexParameteri() calls described earlier in this chapter for setting up mipmaps and so forth can be applied to the texture object. We also now use the integer reference (textureID) in the same manner as was described throughout the chapter.
SUPPLEMENTAL NOTES
Researchers have developed a number of uses for texture units beyond just texturing models in a scene. In later chapters, we will see how texture units can be used for altering the way light reflects off an object, making it appear bumpy. We can also use a texture unit to store “height maps” for generating terrain, and for storing “shadow maps” to efficiently add shadows to our scenes. These uses will be described in subsequent chapters.
Shaders can also write to textures, allowing shaders to modify texture images, or even copy part of one texture into some portion of another texture.
Mipmaps and anisotropic filtering are not the only tools for reducing aliasing artifacts in textures. Full-scene anti-aliasing (FSAA) and other supersampling methods, for example, can also improve the appearance of textures in a 3D scene. Although not part of the OpenGL core, they are supported on many graphics cards through OpenGL’s extension mechanism [OE16].
There is an alternative mechanism for configuring and managing textures and samplers. Version 3.3 of OpenGL introduced sampler objects (sometimes called “sampler states”—not to be confused with sampler variables) that can be used to hold a set of texture settings independent of the actual texture object. Sampler objects are attached to texture units and allow for conveniently and efficiently changing texture settings. The examples shown in this textbook are sufficiently simple that we decided to omit coverage of sampler objects. For interested readers, usage of sampler objects is easy to learn, and there are many excellent online tutorials (such as [GE11]).
Exercises
5.1Modify Program 5.1 by adding the “noperspective” declaration to the texture coordinate vertex attributes, as described in Section 5.11. Then rerun the program and compare the output with the original. Is any perspective distortion evident?
5.2Using a simple “paint” program (such as Windows “Paint” or GIMP [GI16]), draw a freehand picture of your own design. Then use your image to texture the pyramid in Program 5.1.
5.3(PROJECT) Modify Program 4.4 so that the “sun,” “planet,” and “moon” are textured. You may continue to use the shapes already present, and you may use any texture you like. Texture coordinates for the cube are available by searching through some of the posted code examples, or you can build them yourself by hand (although that is a bit tedious).
References
[BL16] |
Blender, The Blender Foundation, accessed October 2018, https://www.blender.org/ |
[GE11] |
Geeks3D, “OpenGL Sampler Objects: Control Your Texture Units,” September 8, 2011, accessed October 2018, http://www.geeks3d.com/20110908/ |
[GI16] |
GNU Image Manipulation Program, accessed October 2018, http://www.gimp.org |
[HT16] |
J. Hastings-Trew, JHT’s Planetary Pixel Emporium, accessed October 2018, http://planetpixelemporium.com/ |
[LU16] |
F. Luna, Introduction to 3D Game Programming with DirectX 12, 2nd ed. (Mercury Learning, 2016). |
[MA16] |
Maya, AutoDesk, Inc., accessed October 2018, http://www.autodesk.com/products/maya/overview |
[OE16] |
OpenGL Registry, The Khronos Group, accessed July 2016, https://www.opengl.org/registry/ |
[OP14] |
OpenGL Graphics System: A Specification (version 4.4), M. Segal and K. Akeley, March 19, 2014, accessed July 2016, https://www.opengl.org/registry/doc/glspec44.core.pdf |
[OP16] |
OpenGL 4.5 Reference Pages, accessed July 2016, https://www.opengl.org/sdk/docs/man/ |
OpenGL Tutorial, “Loading BMP Images Yourself,” opengl-tutorial.org, accessed October 2018, http://www.opengl-tutorial.org/beginners-tutorials/tutorial-5-a-textured-cube/#loading-bmp-images-yourself | |
[SO17] |
Simple OpenGL Image Library 2 (SOIL2), SpartanJ, accessed October 2018, https://bitbucket.org/SpartanJ/soil2 |
[TU16] |
J. Turberville, Studio 522 Productions, Scottsdale, AZ, www.studio522.com (dolphin model developed 2016). |
[WI83] |
L. Williams, “Pyramidal Parametrics,” Computer Graphics 17, no. 3 (July 1983). |
1This is the orientation that OpenGL texture objects assume. However, this is different from the orientation of an image stored in many standard image file formats, in which the origin is at the upper left. Reorienting the image by flipping it vertically so that it corresponds to OpenGL’s expected format is accomplished by specifying the SOIL_FLAG_INVERT_Y parameter as was done in the call that we made to SOIL_load_OGL_texture() in our loadTexture() function.