
INSTALLATION AND SETUP FOR PC (WINDOWS)
A.1Installing the Libraries and Development Environment
A.2Developing and Deploying OpenGL Projects in MS Visual Studio
As described in Chapter 1, there are a number of installation and setup steps that must be accomplished in order to use OpenGL and C++ on your machine. These steps vary depending on which platform you wish to use. The code samples in this book are designed to be run as-given on a PC (Windows); this Appendix provides step-by-step detailed setup instructions for the Windows platform. For information on setting up and running the code samples in the book on a Mac, see Appendix B: Installation and Setup Details for the Macintosh Platform.
A.1INSTALLING THE LIBRARIES AND DEVELOPMENT ENVIRONMENT
A.1.1Installing the Development Environment
Since we implement several projects throughout the course of the book, and because there are so many libraries to coordinate in OpenGL, it will be useful to set up our C++ development environment in such a way as to minimize the number of configuration steps needed for each new project we create. Here, we will assume that Visual Studio 2017 [VS17] is being used; similar steps may be possible for other IDEs.
The first step is to download and install Visual Studio 2017 on your machine. Once this is done, our approach will be to install as many libraries as possible in a single shared location, and then create a Visual Studio custom template so that each new project we create will already have the necessary libraries and dependencies in place without having to be redefined. We describe creating such a template in Section A.2.1.
A.1.2Installing OpenGL / GLSL
It is not necessary to “install” OpenGL or GLSL, but it is necessary to ensure that your graphics card supports at least version 4.3 of OpenGL. If you do not know what version of OpenGL your machine supports, you can use one of the various free applications (such as GLView [GV16]) to find out.
A.1.3Preparing GLFW
An overview of the window management library GLFW was given in Chapter 1. As indicated there, GLFW needs to be compiled for the machine on which it will run. (Note that although the GLFW website includes the option of downloading pre-compiled binaries, these frequently do not work adequately.) Compiling GLFW requires first downloading and installing CMAKE (available at https://cmake.org [CM17]). The steps for compiling GLFW are relatively straightforward:
1.Download the GLFW source code (www.glfw.org) [GF17].
2.Download and install CMAKE (https://cmake.org) [CM17].
3.Run CMAKE and enter the GLFW source location and the desired build destination folder.
4.Click “configure”—if some of the options highlight in red, click “configure” again.
5.Click “generate.”
CMAKE produces several files in the “build” folder specified previously. One of the files in that folder is named “GLFW.sln”. This is a Visual Studio project file. Open it (using Visual Studio, of course), and compile (build) GLFW as a 32-bit application (currently more stable than 64-bit).
The resulting build produces two items that we need:
•the glfw3.lib file produced by the previous compilation steps
•the “GLFW” folder in the original GLFW downloaded source code (it is found in the “include” folder, and it contains two header files that we will use)
An overview of the GLEW “extension wrangler” library was given in Chapter 1. Download the 32-bit binaries from glew.sourceforge.net [GE17]. The items in particular we will need to obtain are:
•glew32.lib (found in the “lib” folder)
•glew32.dll (found in the “release” folder)
•the GL folder, which includes several header files (found in the “include” folder”)
A.1.5Preparing GLM
An overview of the math library GLM was given in Chapter 1. Visit glm.g-truc.net/0.9.8/index.html [GM17] and download the latest version that includes release notes. The download folder, after being unzipped, contains a folder named “glm”. That folder (and its contents) is the item that we will need to use.
A.1.6Preparing SOIL2
An overview of the image loading library SOIL2 was given in Chapter 1. Installing SOIL2 [SO17] requires utilizing a tool called “premake” [PM17]. Although the process involves several steps, they are relatively straightforward:
1.Download and uncompress “premake.” The only file in it is “premake4.exe.”
2.Download SOIL2 (use the “downloads” link at the bottom of the left panel), and uncompress it.
3.Copy the “premake4.exe” file into the soil2 folder.
4.Open a command window, navigate to the soil2 folder, and enter:
premake4 vs2012
It should display a number of files that are then created.
5.In the soil2 folder, open the “make” folder, then the “windows” folder. Double-click SOIL2.sln.
6.If prompted by VisualStudio to upgrade libraries, do it by clicking “ok.”
7.In the panel on the right, right-click on “soil2-static-lib” and select “build.”
8.Close VisualStudio and navigate back to the soil2 folder. You should notice some new items.
A.1.7Preparing Shared “lib” and “include” Folders
Choose a location where you would like to house the library files. It could be a folder anywhere you prefer; for example, you could create a folder “C:\OpenGLtemplate”. Inside that folder, create subfolders named “lib” and “include”.
•In the “lib” folder, place glew32.lib and glfw3.lib.
•In the “include” folder, place the GL, GLFW, and glm folders described previously.
•Navigate back to the soil2 folder, and go into the “lib” folder inside it. Copy the “soil2-debug.lib” file into the “lib” folder (where glew32.lib and glfw3.lib are).
•Navigate back to the soil2 folder, then into “src”. Copy the “SOIL2” folder into the “include” folder (where GL, GLFW, and GLM are). This SOIL2 folder contains .c and .h files for soil2.
•You might find it handy to also place the “glew32.dll” file in this “OpenGLtemplate” folder as well, so that you’ll know where to find it—although that isn’t strictly necessary.
The folder structure should now look something like this:
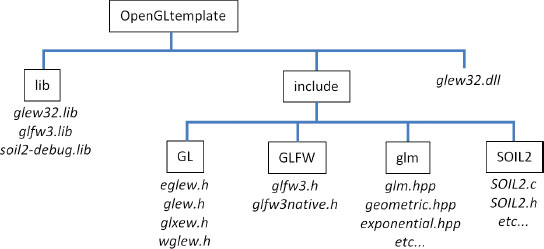
Figure A.1
Suggested library folder structure.
A.2DEVELOPING AND DEPLOYING OPENGL PROJECTS IN MS VISUAL STUDIO
A.2.1Creating a Visual Studio Custom Project Template
Because we are using so many special-purpose libraries in our C++/OpenGL programs, creating a Visual Studio template will make it significantly easier to start new OpenGL projects. This section describes the steps for creating and using this template.
Start Visual Studio (we will assume the 2017 version). Create a new, empty C++ project. At the top center, under the menu bar, there are two pull-down menus next to each other:
•The one on the right allows you do specify “x86” or “x64”—choose “x86”.
•The one on the left allows you to specify whether compilation is to be done in “debug” mode or “release” mode. Several steps need to be done for BOTH modes. That is, they should be done in “debug” mode, and then repeated in “release” mode.
In “debug” mode (and then afterward in “release” mode), go into “project properties” and make the following changes:
•Under “VC++” (it may alternatively say “C/C++”), click on “General”, then under “Additional Include Directories” add the “include” folder you created previously.
•Under “linker”, there are two changes to make:
•Click on “General”, then under “Additional Library Directories”, add the “lib” folder you created previously.
•Click on “Input”, then under “Additional Dependencies”, add the following four filenames: glfw3.lib, glew32.lib, soil2-debug.lib, and opengl32.lib (this last one should already be available as part of the standard Windows SDK).
After making the previous changes to the project properties, for both the “debug” and “release” modes, you are ready to create the template. This is done by going into the “Project” menu and selecting “Export template”. Choose that this is a “project” template, and give the template a useful name, such as “OpenGL project”.
Once the libraries are installed and the custom template is in place, creating a new OpenGL C++ project is straightforward:
1.Start Visual Studio, and under File select “New → Project”.
2.Use your OpenGL template (now appearing as an option), to create your project.
3.In the solution explorer on the right, add a “main.cpp” under “source files”.
4.In the solution explorer on the right, right-click on the project name, and in the pop-up menu, select “Open Folder in File Explorer”. You should see the main.cpp file here. Shader files will also be placed in this folder during development.
5.Navigate up one level to the parent folder and copy the “glew32.dll” file into either the “Release” or “Debug” folder, depending on the desired solution configuration.
After developing, testing, and debugging your application, it can be deployed as a stand-alone executable by building the project in “Release” mode and then placing the following files in a single folder:
•the .exe file generated from building your project
•all shader files used by your application
•all texture images and model files used by your application
•glew32.dll
References
[CM17] |
CMake homepage, accessed December 2017, https://cmake.org |
[GE17] |
OpenGL Extension Wrangler (GLEW), accessed December 2017, http://glew.sourceforge.net/ |
[GF17] |
Graphics Library Framework (GLFW), accessed December 2017, http://www.glfw.org/ |
[GM17] |
OpenGL Mathematics (GLM), accessed December 2017, http://glm.g-truc.net/0.9.8/index.html |
[GV16] |
GLView, realtech-vr, accessed July 2016, http://www.realtech-vr.com/glview/ |
[PM17] |
premake homepage, accessed December 2017, https://premake.github.io/ |
[SO17] |
Simple OpenGL Image Library 2 (SOIL2), SpartanJ, accessed December 2017, https://bitbucket.org/SpartanJ/soil2 |
[SW15] |
G. Sellers, R. Wright Jr., and N. Haemel, OpenGL SuperBible: Comprehensive Tutorial and Reference, 7th ed. (Addison-Wesley, 2015). |
[VS17] |
Microsoft Visual Studio – downloads, accessed December 2017, https://www.visualstudio.com/downloads/ |