Chapter 6: Sharing Photos
Print a Photo
You can print your iPhoto photos to create hard copies of your work. You can then add the photos to a physical photo album or scrapbook.
Print a Photo


 -click to select what to print in the photo browser.
 Click File and then Print.
The print settings appear.
 Click a theme.
 Select your printer settings.
• You can select a common print size or create a custom size here.
• You can click Print to print the photo as shown.
 Click Customize.
iPhoto opens the customize settings.
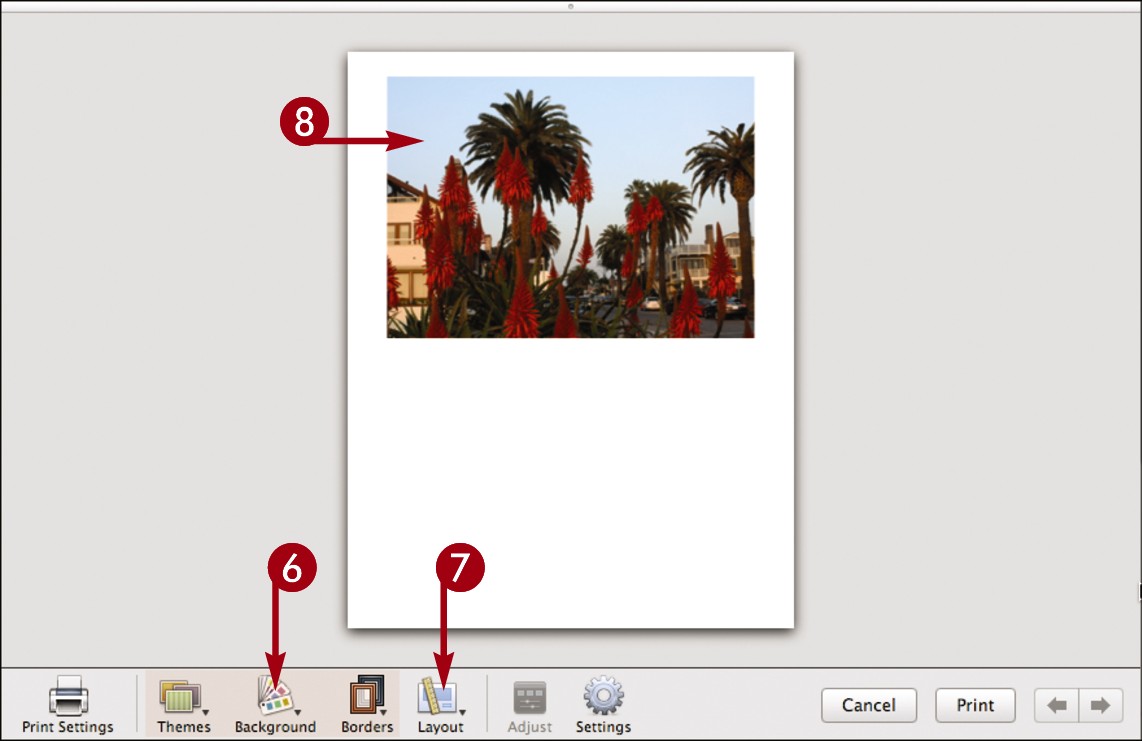
 Click here to change the theme, background, and border.
These features enable you to add matting, colored backgrounds, and borders around photos.
 Click Layout to adjust the orientation of the photo.
This enables you to crop a photo in a portrait or landscape orientation.
 Click a photo.
The adjustment tools appear.

 Click and drag the slider to zoom the photo in or out.
 Click
Click  and then click and drag to specify how a zoomed photo is cropped.
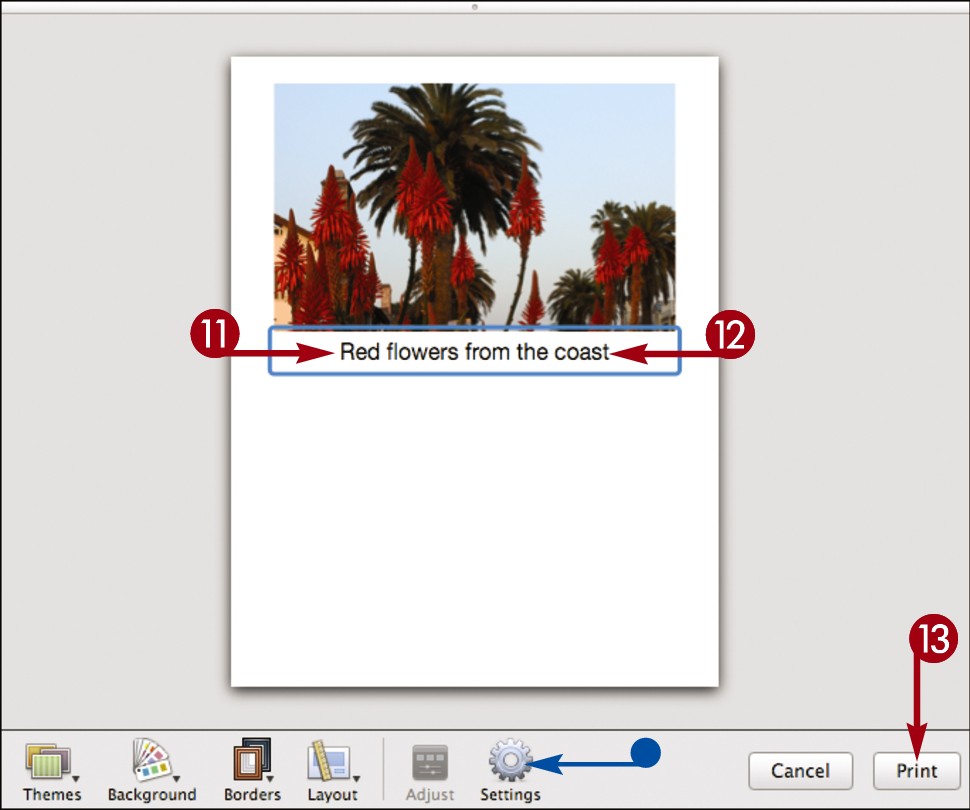
 Some layouts include caption text. Click the text to edit it.
The caption text becomes editable.
 Type a caption.
• You can click Settings to change the font style and size.
 Click Print.
The photo prints.
Share by E-mail

You can embed your images in an e-mail message and send them to others. This feature requires you to already have an e-mail program such as Mail configured on your Mac. See the documentation for your e-mail program for details.
Share by E-mail

 Click a photo to share by e-mail.
 Click Share.
 Click Email.
A Mail Photo dialog appears.

 Select a photo size to send in the e-mail.
Note: Selecting a smaller size makes delivery faster.
 Click to select photo information to include in the e-mail (
 changes to
  ).
).
 Click Compose Message.
An e-mail message window opens with the photo added.

 Type the e-mail address of the recipient.
 Type a subject.
 Click Send (
 ).
).
Note: The commands may differ depending on the e-mail program.
The e-mail message and photo are sent.
Create a MobileMe Gallery

You can publish your photos to your MobileMe gallery. You can then send your friends and family a Web address where they can access the photos on MobileMe.
To use this feature, you must have a MobileMe account. See Chapter 2 for details.
Create a MobileMe Gallery

 Sign in to your MobileMe account.

 -click the photos to publish.
• You can also click an album to publish.
 Click Share.
 Click MobileMe Gallery.

 Select a privacy setting.
 Click to select your album settings (
 changes to
  ).
).
 Click Show Advanced.
The advanced settings appear.

• You can hide the gallery on your main MobileMe gallery page ( changes to
  ).
).
• If you allow downloading, you can select a quality.
 Click Publish.
iPhoto uploads the photos.
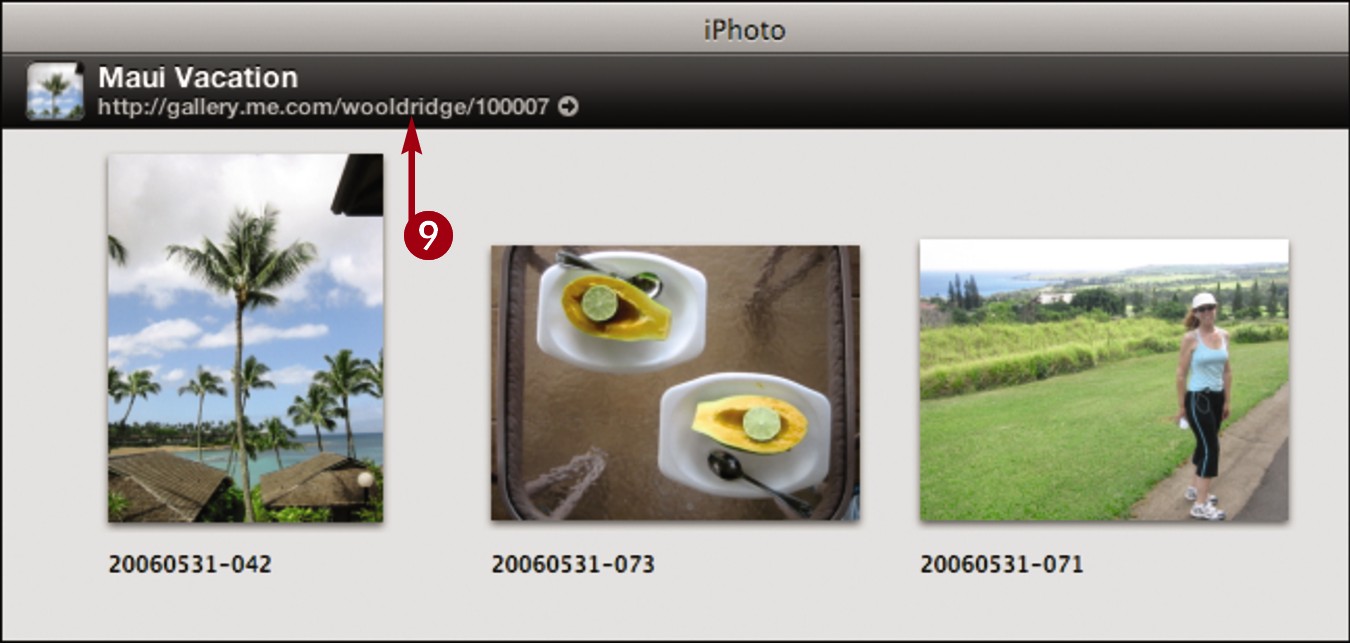
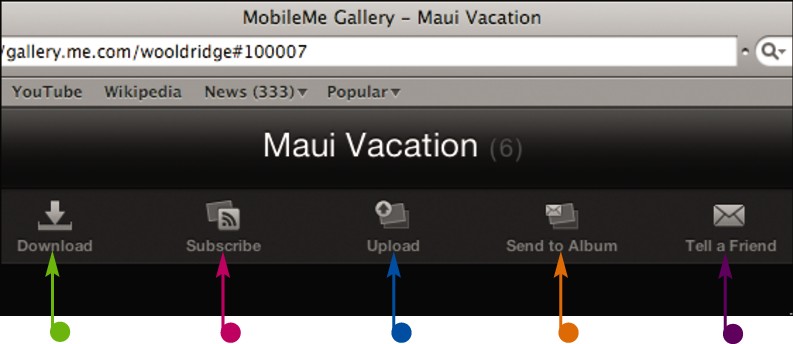
 Click the Web address of the gallery to view it online.
Share with Facebook

You can upload your iPhoto images directly to your account on Facebook, the popular social network site. People connected to you on Facebook can then view and comment on the photos.
To use this feature, you must have an active Internet connection and a Facebook account.
Share with Facebook


 -click to select the photos to share.
 Click Facebook.
• The first time you share on Facebook, you are prompted to set up access.
 Click Set Up.
A login screen appears.
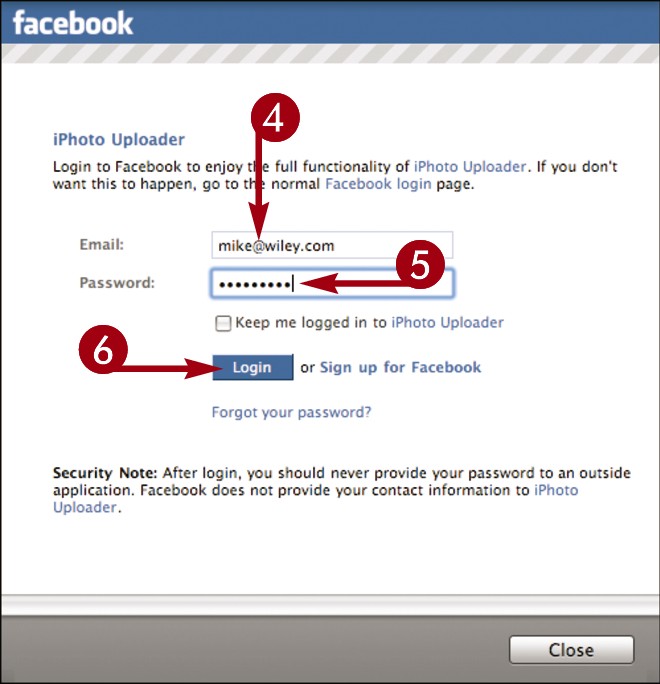
 Type the e-mail address associated with your Facebook account.
Note: To set up a Facebook account, visit www.facebook.com.
 Type your password.
 Click Login.
An Allow Access dialog appears.
For iPhoto and other applications to interact with Facebook, you must allow them access to your account information.

 Click Allow.
 In the confirmation dialog that follows, click Close.

 Select who can see your photos.
To access the photos, users also need to have Facebook accounts.
 Click Publish.
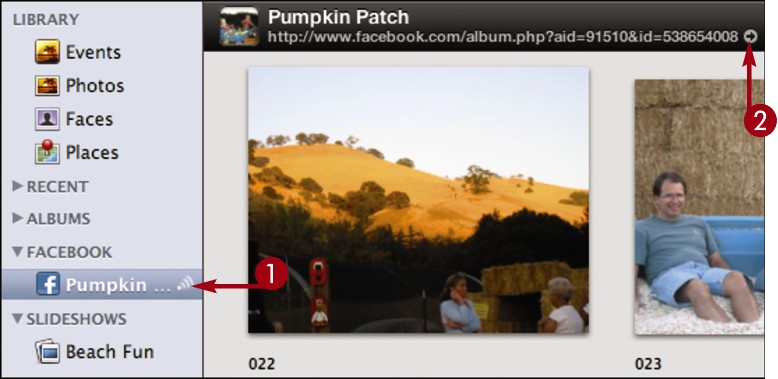
iPhoto uploads the photos to your Facebook account.
Share with Flickr

You can upload your iPhoto images directly to your account on Flickr, the popular photo hosting site. Others can visit Flickr to view and comment on the photos.
To use this feature, you must have an active Internet connection and a Flickr account.
Share with Flickr
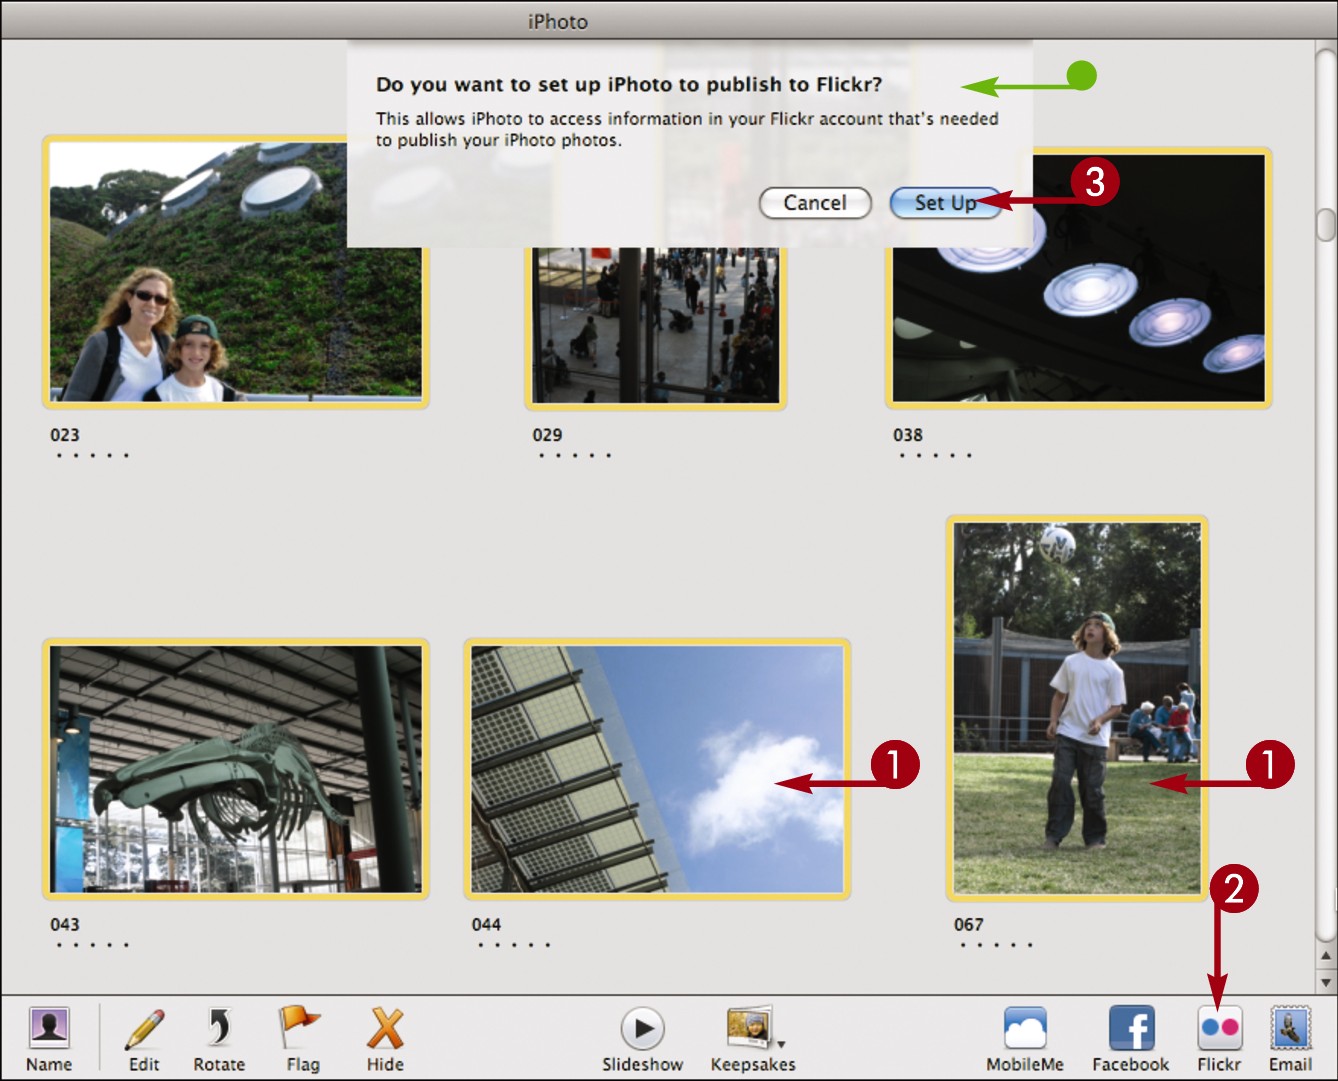

 -click to select the photos to share.
 Click Flickr.
• The first time you share on Flickr, you are prompted to set up access.
 Click Set Up.
A login screen appears in your Web browser.

 Type your Yahoo ID.
Note: Flickr is owned by Yahoo so you use a Yahoo ID to log in. To set up a Flickr account, visit www.flickr.com.
 Type your password.
 Click Sign In.
An access page appears.
For iPhoto and other applications to interact with Flickr, you must allow them access to your account.

 Click OK, I’ll Allow It.
A confirmation page appears.
 Return to iPhoto from the Web browser. You can click iPhoto on the Dock.

 Select who can view your photos.
You can select Anyone to make the photos public.
 Select a photo size to upload.
 Click Publish.
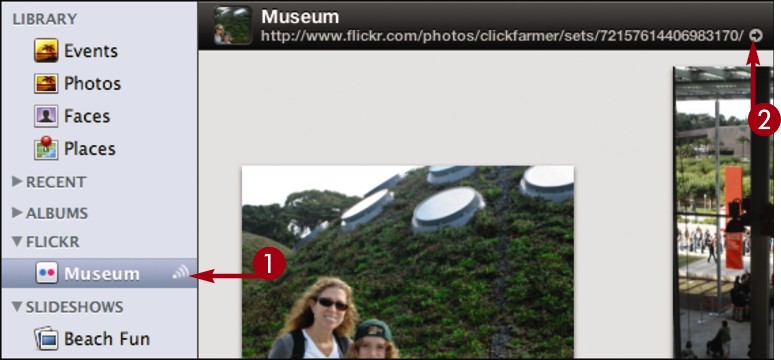
iPhoto uploads the photos to your Flickr account.
Create an Instant Slideshow

You can quickly create a slideshow in iPhoto with a custom theme, music, and transitions. You can then display the slideshow in full-screen mode to automatically cycle through the photos.
To have more control of your slideshow options, see “Create a Slideshow Project.”
Create an Instant Slideshow


 -click to select the photos for the slideshow.
• You can also select an Event, Places or Faces group, or album.
 Click Slideshow.
The first time you create an instant slideshow, the slideshow dialog appears.
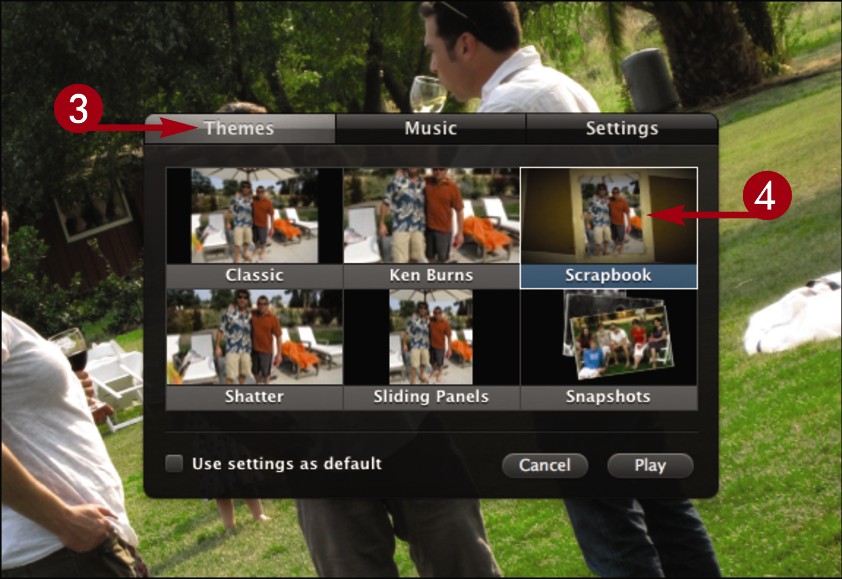
 Click Themes.
 Click to select a presentation style.
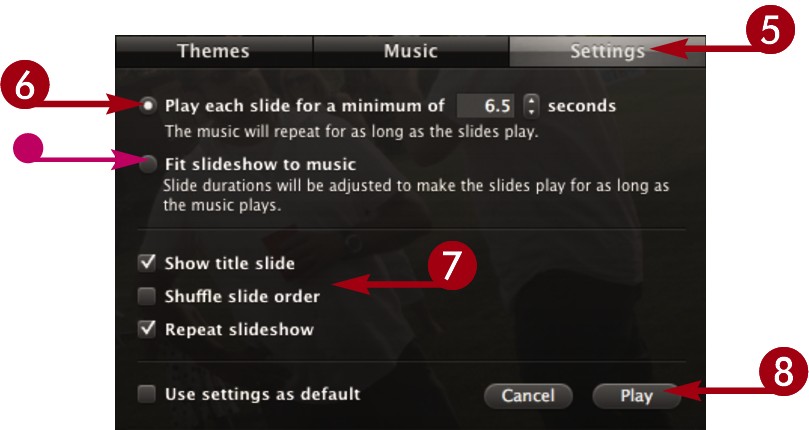
 Click Settings.
 Click to select the slide duration (
 changes to
  ).
).
• If your slideshow has music, you can sync the slide duration to the music ( changes to
  ).
).
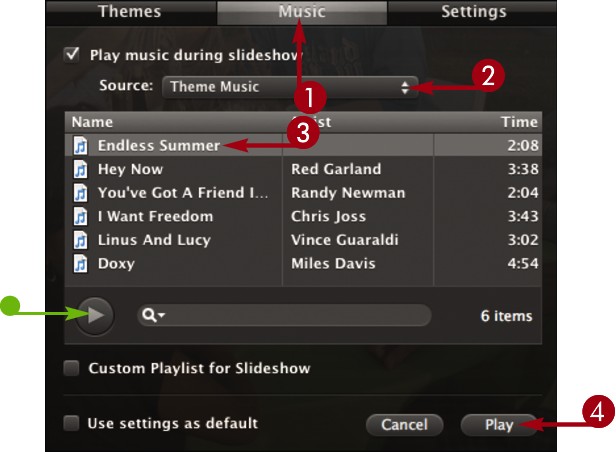
See the tip below to add music.
 Select your other slideshow settings (
 changes to
  ).
).
 Click Play.
iPhoto plays the slideshow.
 Move your cursor.
iPhoto displays the slideshow controls.
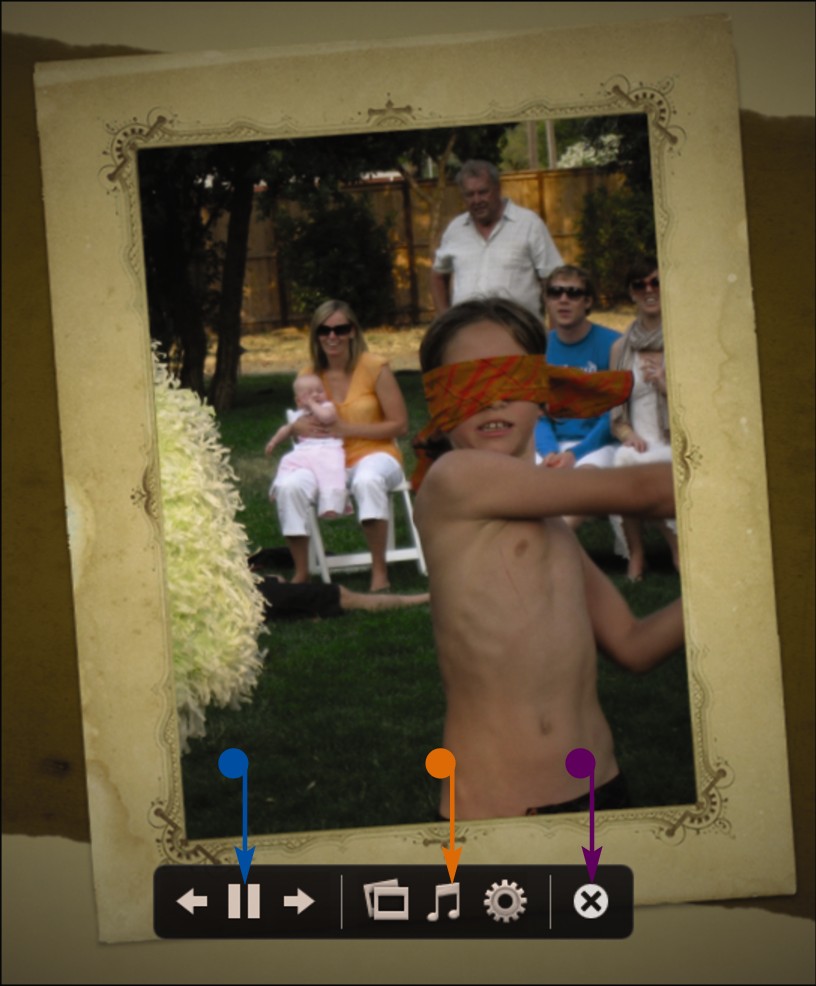
• You can click here to navigate the slideshow.
• You can click here to open the slideshow Themes, Music, and Settings options.
• You can click here to exit the slideshow.
Create a Slideshow Project

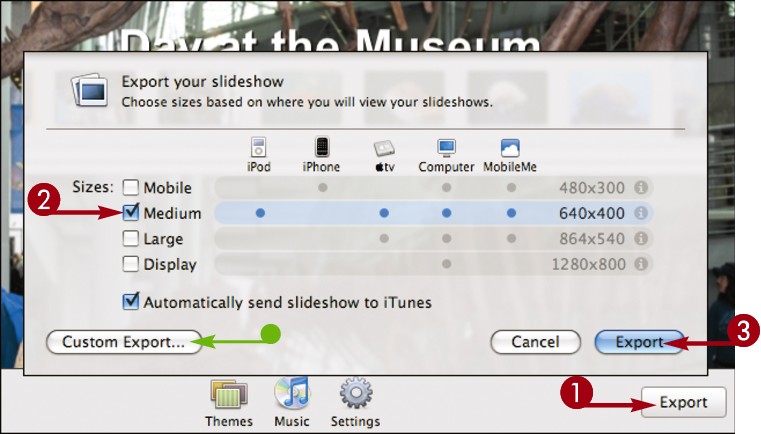
You can create a custom slideshow project that allows you to add a theme, transitions, and music and also order your slides. You can export the project as a separate movie file when you are finished. A slideshow project appears in the source list so you can play or edit it later.
Create a Slideshow Project


 -click to select the photos for the slideshow.
• You can also select an Event, Places or Faces group, or album.
 Click
Click  .
.

 Click Slideshow.
 Type a name for the slideshow.
 Click Create.

• iPhoto adds the slideshow to the source list.
 Click and drag the thumbnails to rearrange the slide order.
• The first slide shows the slideshow name. You can double-click the name to edit it.
 Click here to select the theme, music, and other settings. For more details, see “Create an Instant Slideshow.”
• You can click Preview to preview the slideshow in the project window.
 Click Play.
iPhoto plays the slideshow at full screen.
Create a Book

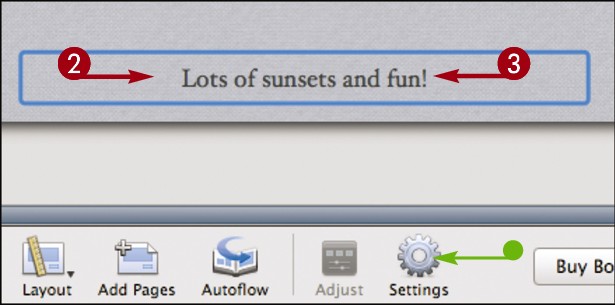
You can create a photo book that showcases the images from a vacation, party, or other event. You can customize the book with a number of colorful themes and page layouts. iPhoto can even create a map page to display where photos were taken. See “Create a Travel Map in a Book” for details.
You can purchase a printed version of the book through Apple’s printing services.
Create a Book


 -click to select the photos for the book.
• You can also select an Event, Places or Faces group, or album.
 Click
Click  .
.
 Click Book in the dialog that appears.
 Type a name for the book.

 Select a hardcover, softcover, or wire-bound format.
 Click a theme to choose the colors and layout for your book.
• Example pages appear here.
 Click Choose.
 If a dialog about adding photos appears, click OK.

• The book name appears in the source list.
• Thumbnails of the selected photos appear here.
• Book pages appear here.
 Click and drag a thumbnail to add a photo to a page.
• You can click Autoflow to add all the photos in order automatically.
 Click the arrows to view other pages in the book, to which you can then add photos.

 Click the Page View button (
 ) to view the pages as thumbnails.
 Click a page that you want to redesign.
 Click here to change the page background or layout.
 When you are finished customizing the pages, click Buy Book.
iPhoto prompts you for your Apple account information for purchasing the book.
Create a Travel Map in a Book

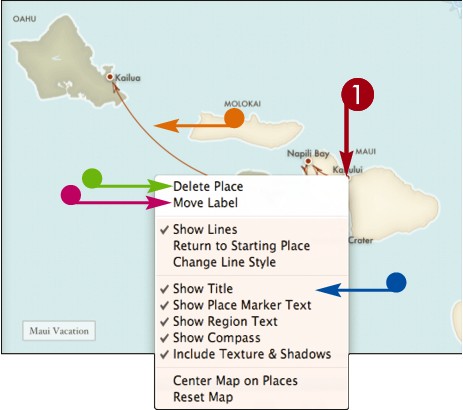
You can create a map page in an iPhoto book that illustrates the locations of your book photos. You can edit the places on the map and even connect them to show a journey.
For more about associating your photos with places, see Chapter 4.
Create a Travel Map in a Book
 Create a photo book.
Note: See “Create a Book” for details.

 Click to select the page to which you want to add a map.
 Click Layout.
 In the menu that appears, click Map and then the map icon.
iPhoto adds a map to the page.

• If your book photos include place information, iPhoto automatically adds the places.
 Click the map to edit it.
An edit dialog appears.
 Type a title for the map.
• You can click plus to add a place.
• You can select a place and then click minus to remove it.

 To connect the places in the order they are listed, click Show lines (
 changes to
  ).
).
• iPhoto connects the places.
• You can click and drag the places in the list to reorder them.
Create a Calendar

You can create a calendar that features photos from your iPhoto library. You can customize the pages with a colorful theme and add one or more photos to each month. iPhoto can also automatically add national holidays or information from your iCal calendar to the dates.
You can purchase a printed version of the calendar through Apple’s printing services.
Create a Calendar


 -click to select the photos for the calendar.
• You can also select an Event, Places, or Faces group, or album.
 Click
Click  .
.
 Click Calendar in the dialog that appears.
 Type a name for the calendar.
 Click to select a theme.
 Click Choose.
 If a dialog about adding photos appears, click OK.
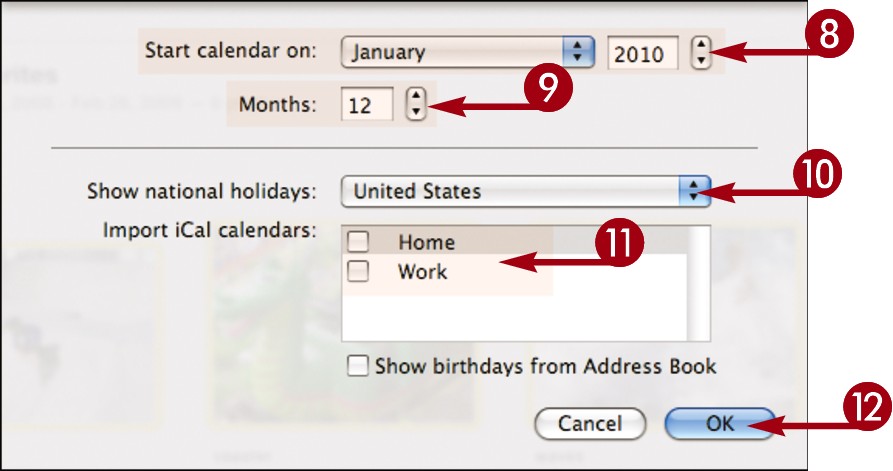
 Select when to start the calendar.
 Select the number of months in the calendar.
 Select a country to display national holidays or None to display none.
 If you use iCal, you can import iCal data into your calendar.
 Click OK.

• The calendar name appears in the source list.
• Thumbnails of the selected photos appear here.
• Calendar pages appear here.
 Click and drag a thumbnail to add a photo to a page.
• You can click Autoflow to add all the photos in order automatically.
 Click can click placeholder text on the pages to add text to your calendar.
 Click the arrows to view other pages in the calendar, to which you can then add photos.
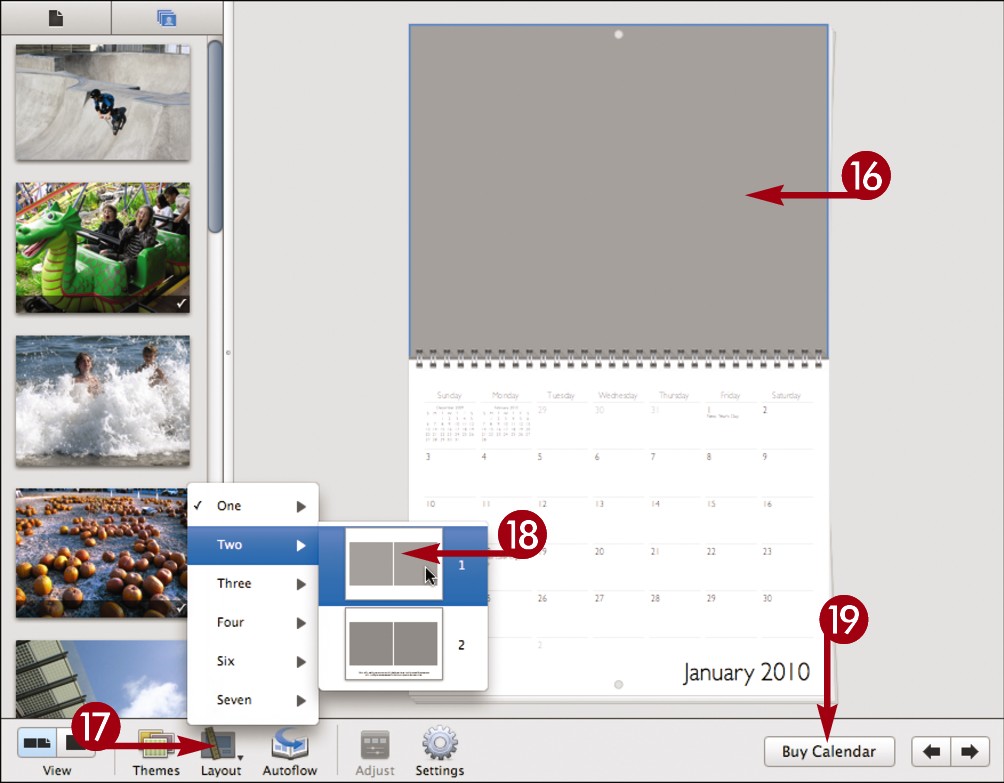
 Click to select a calendar page whose layout you want to edit.
 Click Layout.
 In the menus that appear, click a layout.
iPhoto applies the layout to the page.
 When you are finished customizing the pages, click Buy Calendar.
iPhoto prompts you for your Apple account information for purchasing the book.
Export Photos

You can save photos from iPhoto to separate files so you can open them in another application or on a non-Mac computer. You can control the file format, image size, and file names used for the export.
Export Photos

 Select the photos, Event, Places or Faces group, or album you want to export.
 Click File.
 Click Export.
The Export Photos dialog appears.

 Select a file type.
iPhoto allows you to export to three common formats: JPEG, TIFF, or PNG. You can also export photos as they were originally imported or as their current file type in iPhoto.
 If you are exporting to JPEG, select a quality.
 If you are exporting to JPEG or TIFF, you can click to include descriptive information in the files (
 changes to
  ).
).

 Click a size.
You can select a setting other than Full Size to decrease file size. Choosing this also decreases the image quality.
 Click a file name.
• If you select Sequential, you can specify a prefix to be placed before the number.
 Click Export.
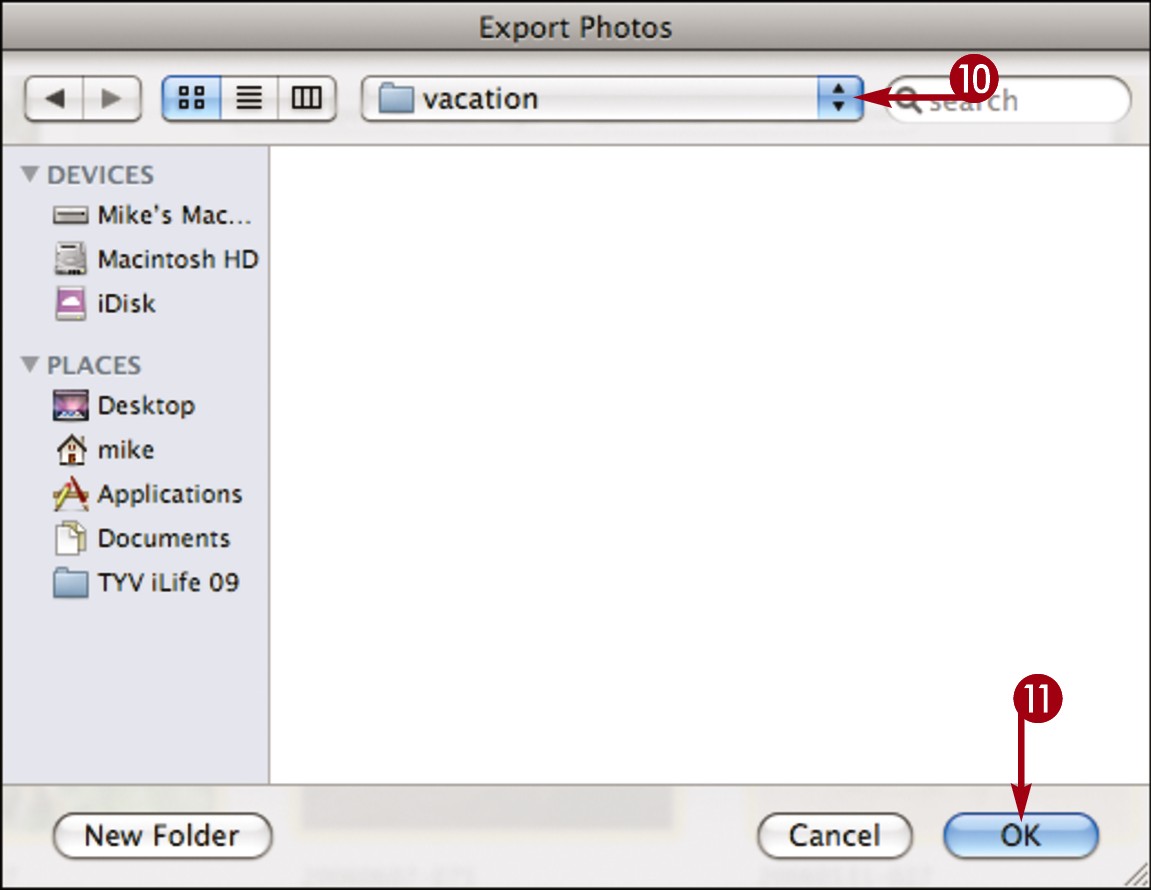
 Select where to save the files.
 Click OK.
iPhoto saves the files.
After the export is complete, you can view the files in the Finder.
Burn to a Disc

You can write your image files from iPhoto to a CD or DVD for archiving or to give to a friend. This process creates a disc that can be viewed only in iPhoto.
Burn to a Disc

 Select the photos, Event, Places or Faces group, or album you want to burn to a disc.
 Click Share.
 Click Burn.
iPhoto prompts you to insert a disc.
 Insert a blank, recordable CD or DVD into your disc drive.

 Click OK.

• iPhoto reads the disc and displays summary information.
 Type a title for the disc.
 Click Burn.
iPhoto displays a Burn Disc dialog.

 Click Burn.
iPhoto writes the selected photos to the disc.
• You can click Eject to eject the disc without burning the photos.
• You can click Cancel to close the dialog without burning the photos.

