Chapter 7: Importing and Organizing Movies
Understanding the iMovie Workspace
iMovie enables you to import and organize video clips taken with a camcorder, digital camera, or other device. You can then assemble the clips into professional-looking movies that have transitions, background music, special effects, and more. Take a moment to familiarize yourself with the iMovie workspace.

Event Browser
iMovie organizes video clips into events based on the time they were created. You can select an event in the event library to display the associated clips. See “Import Video from Your Computer” for more information.
Project Browser
You build a movie by selecting clips in the event browser and then adding them to your project, which is built using the project browser. Here, you can rearrange the clips, add special effects, preview your movie, and more. See Chapter 8 for more about creating a project.
Viewer
When you play a clip from the event browser or project browser, the clip appears in the viewer. You can also view clips in full-screen mode. See “View a Clip at Full Screen” for details.
Content Browsers
You can click here to open panes for adding music, still photos, text overlays, and more to your project. Chapter 10 goes into detail about these features.
Play Project
You can click here to view the clips in your project plus any special effects you have added.
Play Event Clips
You can click here to play a video clip from your event library to help decide how to use it in your project.
Evaluate Clips
You can click buttons to mark clips in your library as favorites if you want to use them later, or reject clips to unclutter your workspace. See the tasks in this chapter to find out more.
Adjust Thumbnails
You can click and drag sliders to display more or fewer thumbnails in the event and project browsers.
Get Video to Use in iMovie
In order to edit your video clips into an award-winning movie, you must first acquire them.
Taped-based Camcorder
iMovie can import video content captured on videotape from miniDV and Digital-8 camcorders. You can connect your camcorder to your Mac using a FireWire cable. You can operate the camera while it is connected using the iMovie controls and then capture the content as the camera plays it. If you have an older camcorder that does not include a FireWire connection, you may have to purchase extra hardware to capture your recordings.
Memory-based Camcorder
Newer camcorders capture video content on miniDVDs or flash-based or miniature hard drives instead of on traditional tape. iMovie can import video from those as well. These memory-based cameras are advantageous in that you can preview clips quickly because the camera can access the clips directly like a computer accesses files, instead of having to scan through a tape from start to finish. Memory-based camcorders connect using a USB cable.
Digital Still Camera
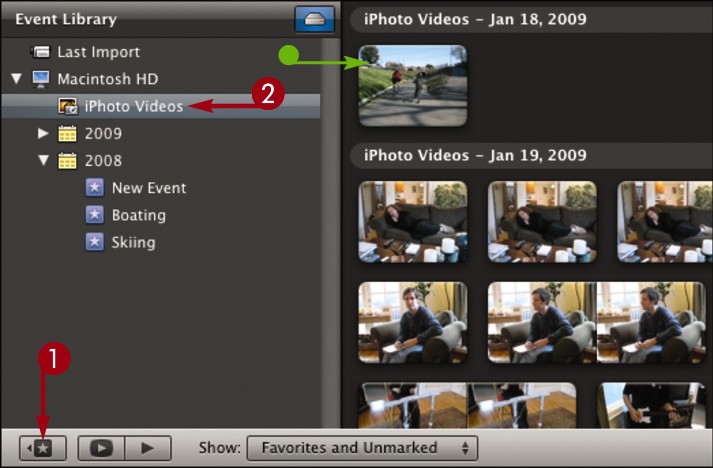
Nowadays, many digital cameras that take still photos can also record video. You can download both still photos and video clips from such cameras into iPhoto. iMovie can access those iPhoto video clips in the event library. See “Import Video from Your Computer” for details. For more about iPhoto, see Part II of this book.
Web Cam
If your Mac has an iSight camera, or you have a FireWire-based Web camera connected to your Mac, you can capture video to use in iMovie. Click Open Camera Import Window ( ) to select the camera and then use the Capture and Stop commands to record video clips.

Import Video from a Tape-based Camcorder
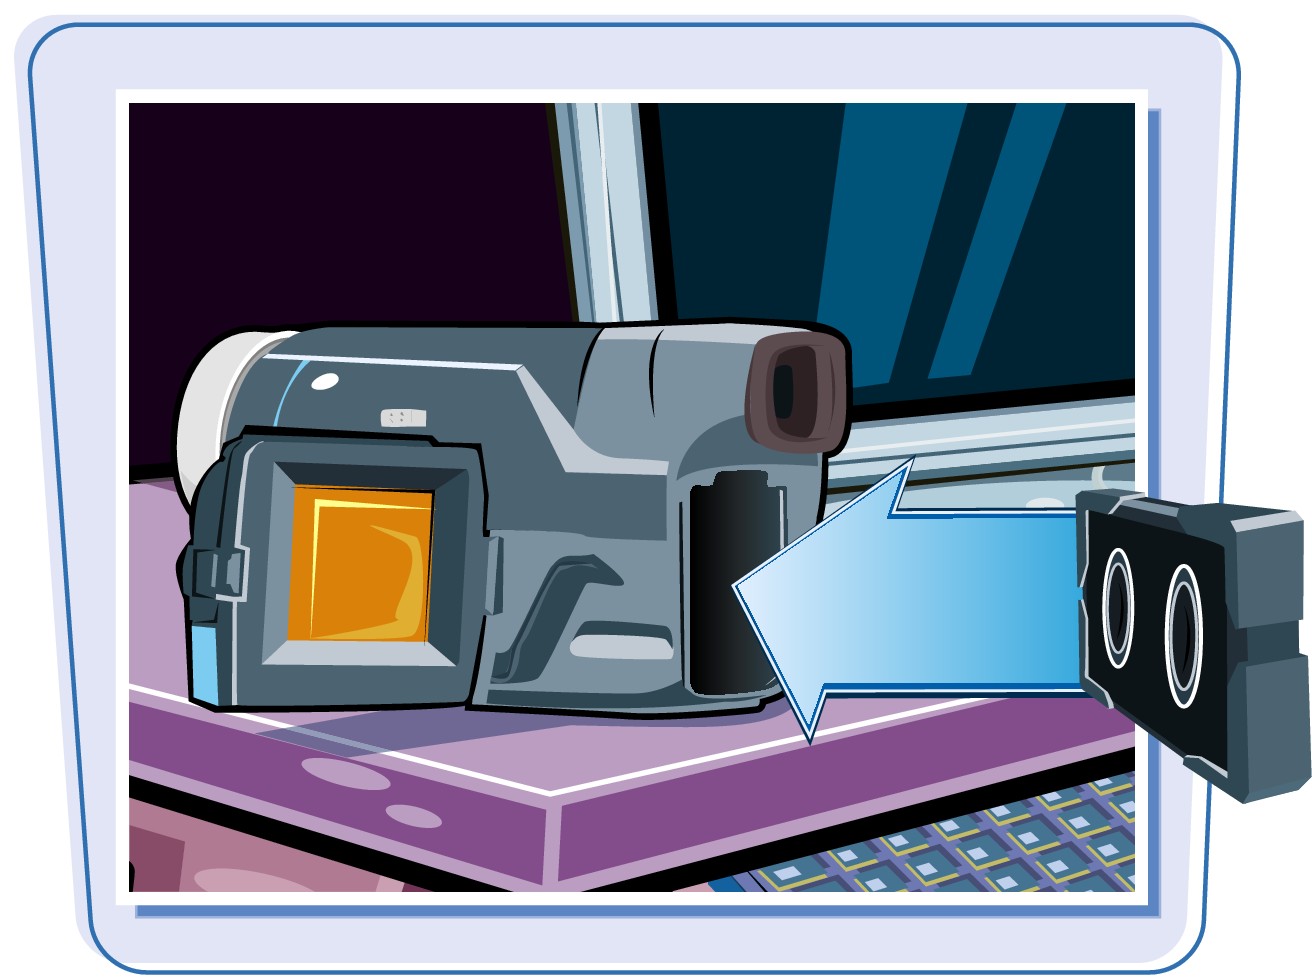
You can connect a tape-based camcorder to your Mac and import video into iMovie as the camcorder plays. iMovie saves the video clips as digital files that you can then assemble into professional-looking movies.
For details about connecting your specific camcorder, see the documentation that came with the device.
Import Video from a Tape-based Camcorder
 Turn your tape-based camcorder on and connect it to your Mac.
Connect the camera using a FireWire cable.
Note: Make sure your camcorder is switched to VTR, VCR, or Play mode. The terminology may vary depending on the model of your camcorder.
The import window opens.
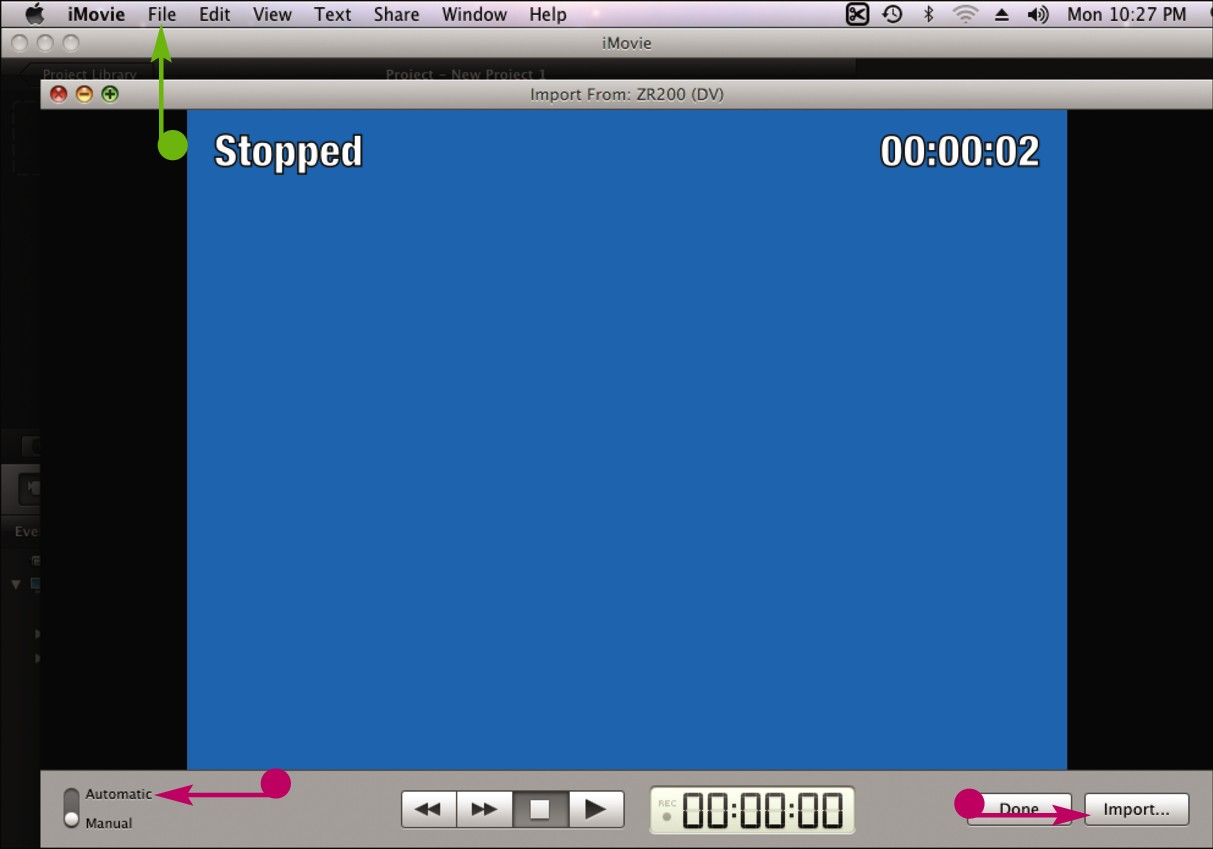
• If the import window does not open, click File and then Import from Camera to open it.
• To import all the video on the camcorder, select Automatic and then click Import.
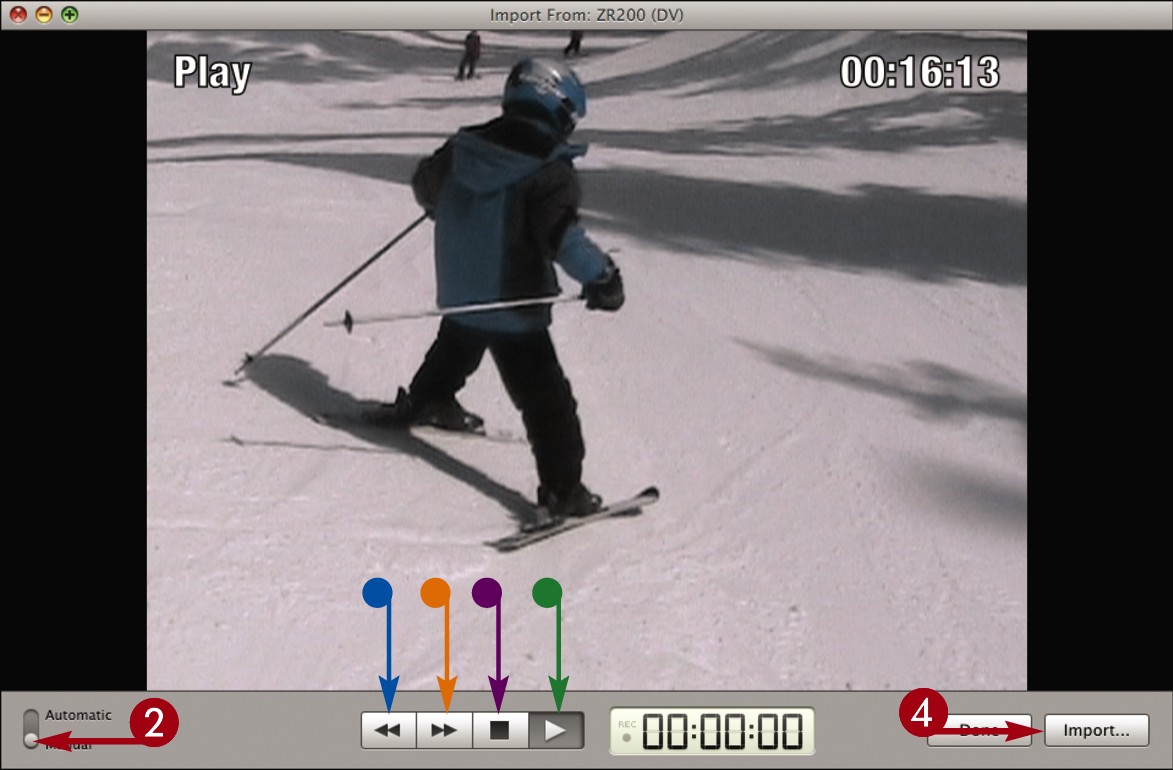
 If Manual is not selected, click to select it.
 Use the controls to play the movie to where you want to begin recording.
• You can click  to rewind.
• You can click  to fast-forward.
• You can click  to stop.
• You can click  to play.
 Click Import.
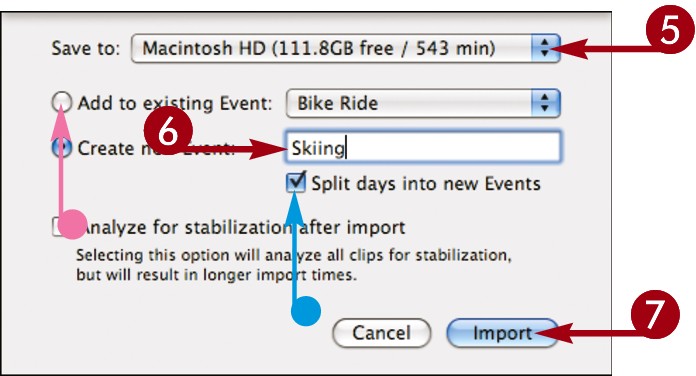
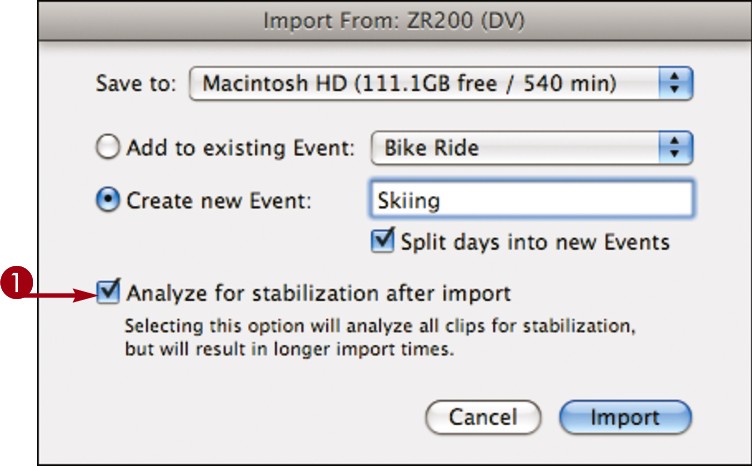
 In the dialog that appears, select a save location.
iMovie organizes imported content as events. The default is to save imported clips taken on the same day to separate events.
 Type the event name.
• You can optionally save to an existing event ( changes to
  ).
).
• You can click to keep all clips in one event instead of dividing clips by day ( changes to
  ).
).
 Click Import.
iMovie imports the video.
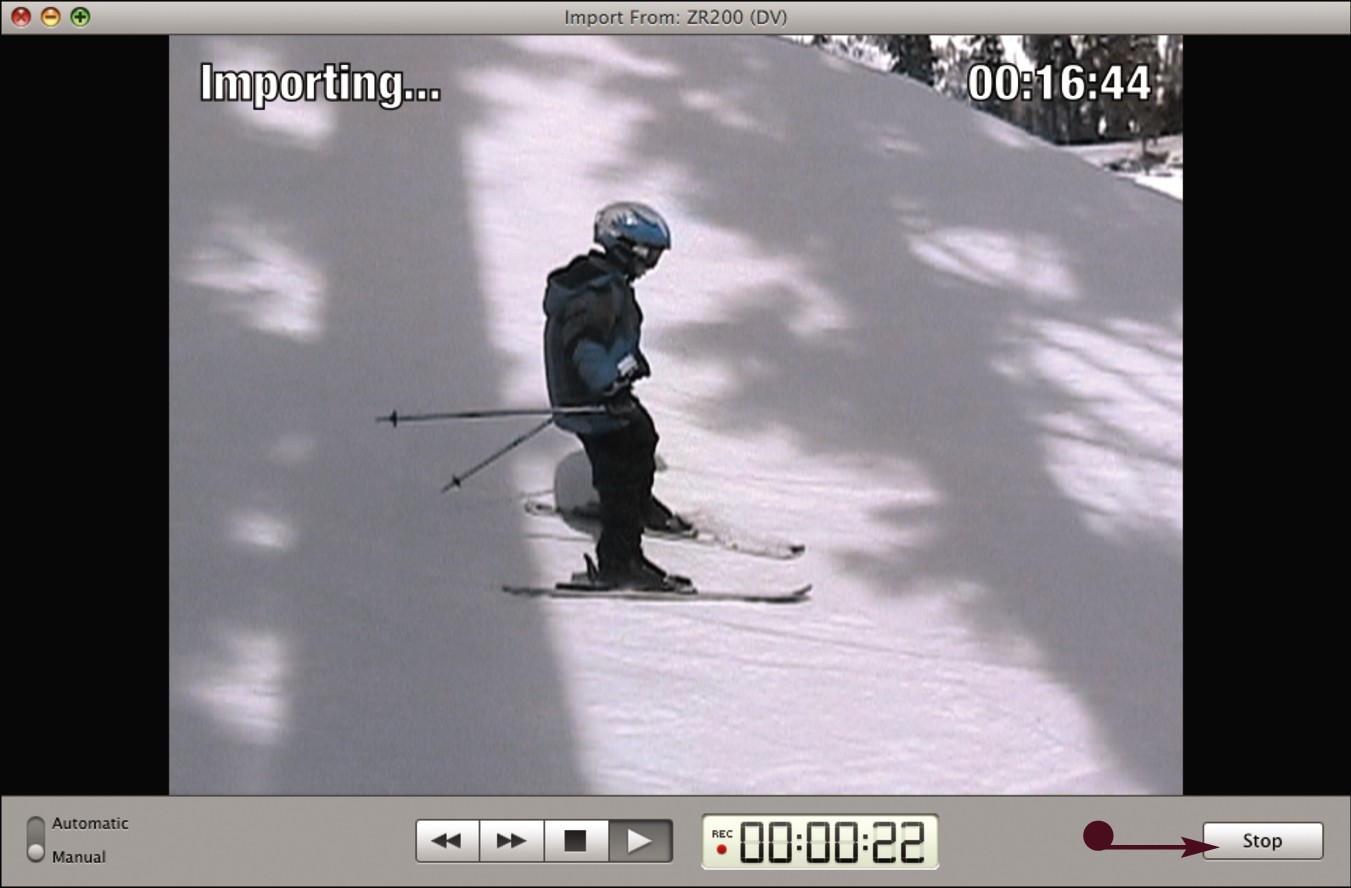
• You can click Stop to stop the video before the end of the tape.
 When the importing is complete, click Done to close the import window.
Import Video from a Memory-based Camcorder
You can connect a memory-based camcorder to your Mac and import video into iMovie. You can import all the clips from the camcorder or just selected ones. iMovie saves the video clips as digital files that you can then assemble into professional-looking movies.
For details about connecting your specific camcorder, see the documentation that came with the device.
Import Video from a Memory-based Camcorder
 Turn your memory-based camcorder on and connect it to your Mac.
Connect the camera using a USB cable.
Note: Make sure your camcorder is switched to PC Connect mode. The terminology may vary depending on the model of your camcorder.
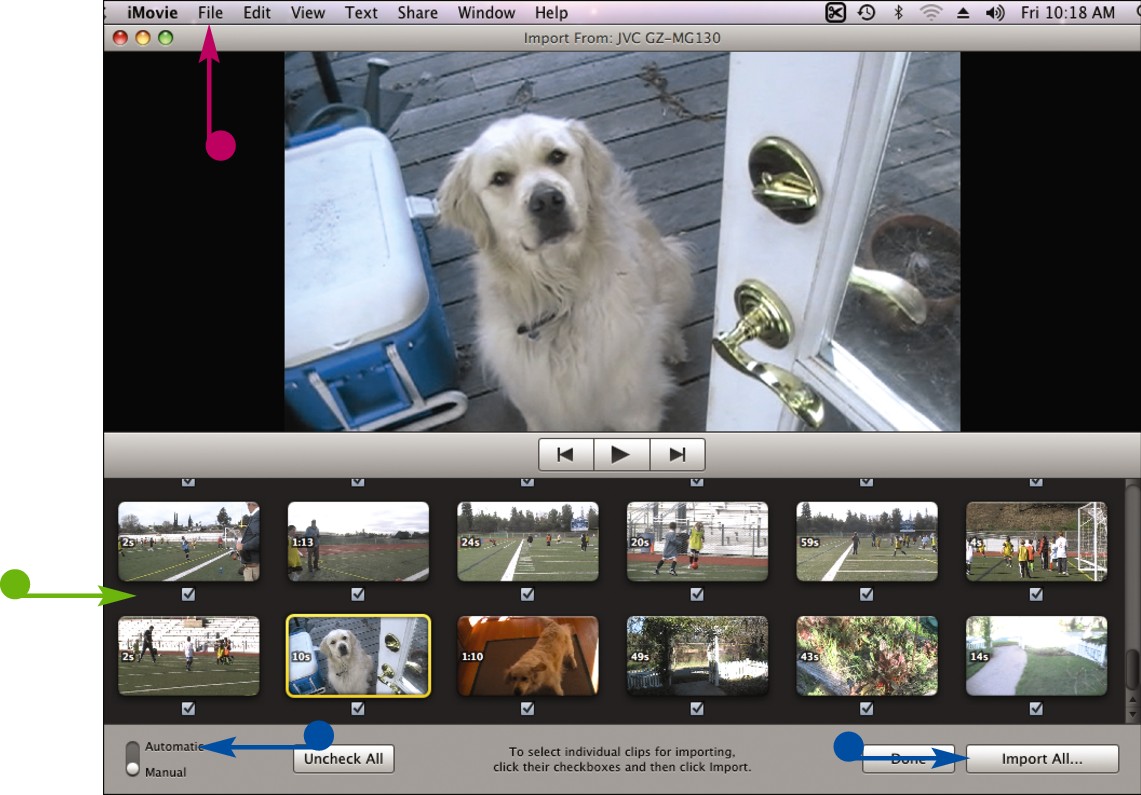
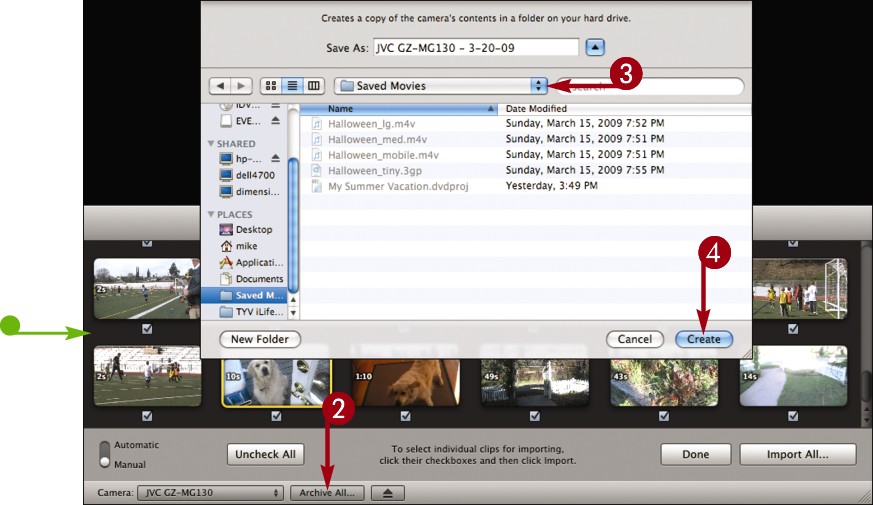
• The import window opens and displays the video clips on the camcorder.
• If the import window does not open, click File and then Import from Camera to open it.
• To import all the video on the camcorder, select Automatic and then click Import All.
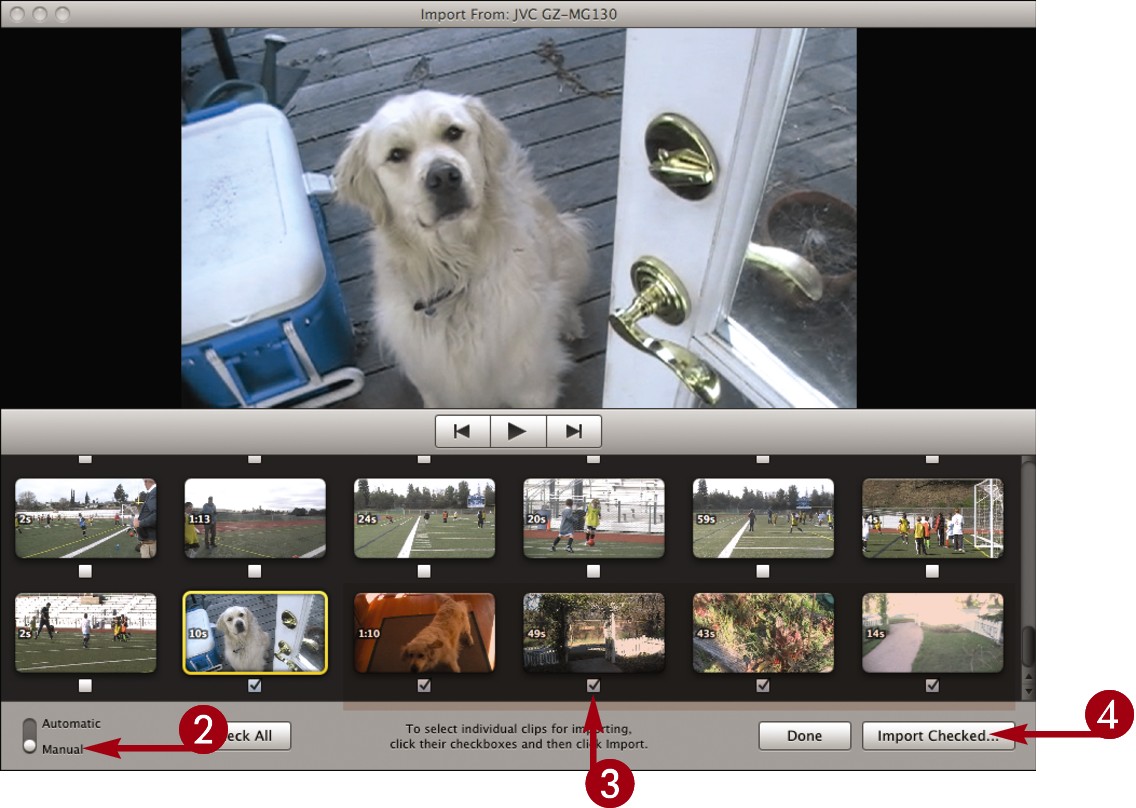
 If Manual is not selected, click to select it.
 Select the check boxes for the clips you want to import. All the clips are selected initially by default.
 Click Import Checked.
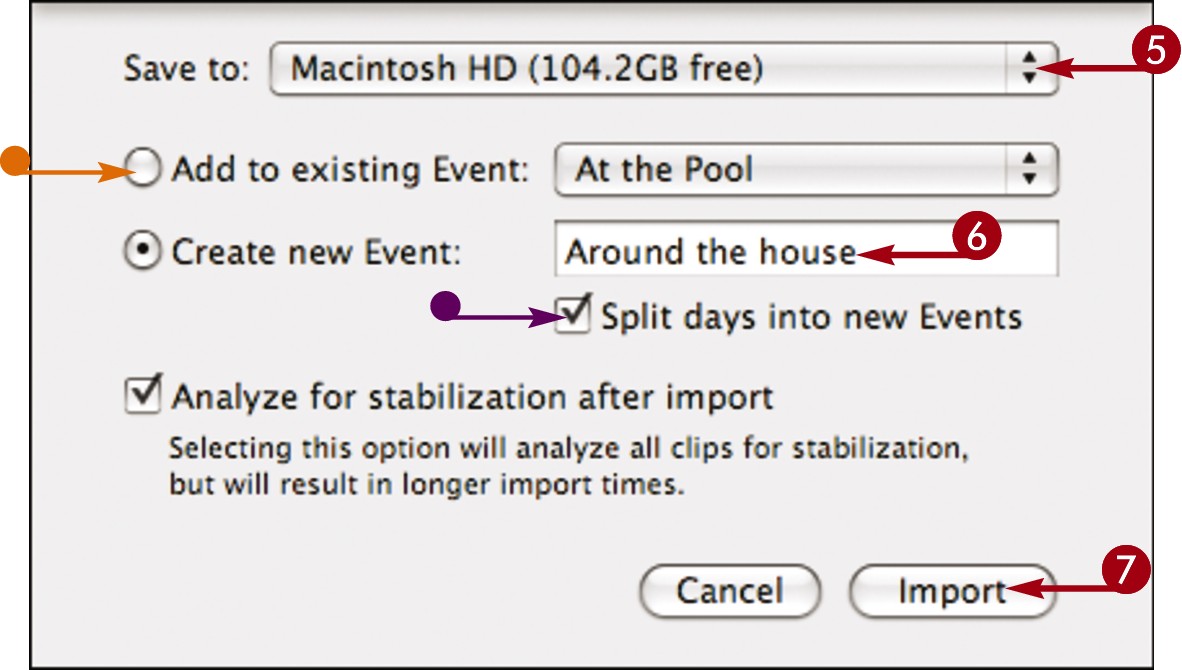
 In the dialog that appears, select a save location.
iMovie organizes imported content as events. The default is to save imported clips taken on the same day to the same event.
 Type the event name.
• You can optionally save to an existing event ( changes to
  ).
).
• You can click to keep all clips in one event instead of dividing clips by day ( changes to
  ).
).
 Click Import.
iMovie imports the video clips and marks them.
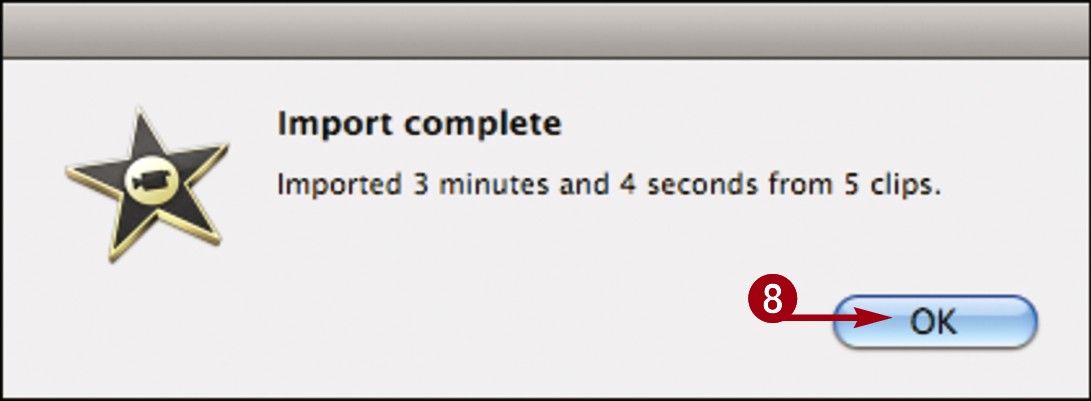
 Click OK.
 Click Done to close the import window.
Import Video from Your Computer

You can import video clips that already exist on your Mac. When you import the clips, iMovie creates thumbnails and performs other analysis required to work with the clips.
iMovie supports the import of most MPEG, AVI, DV, and MOV video files. Some variants of these file formats are not supported or require plugins.
Import Video from Your Computer
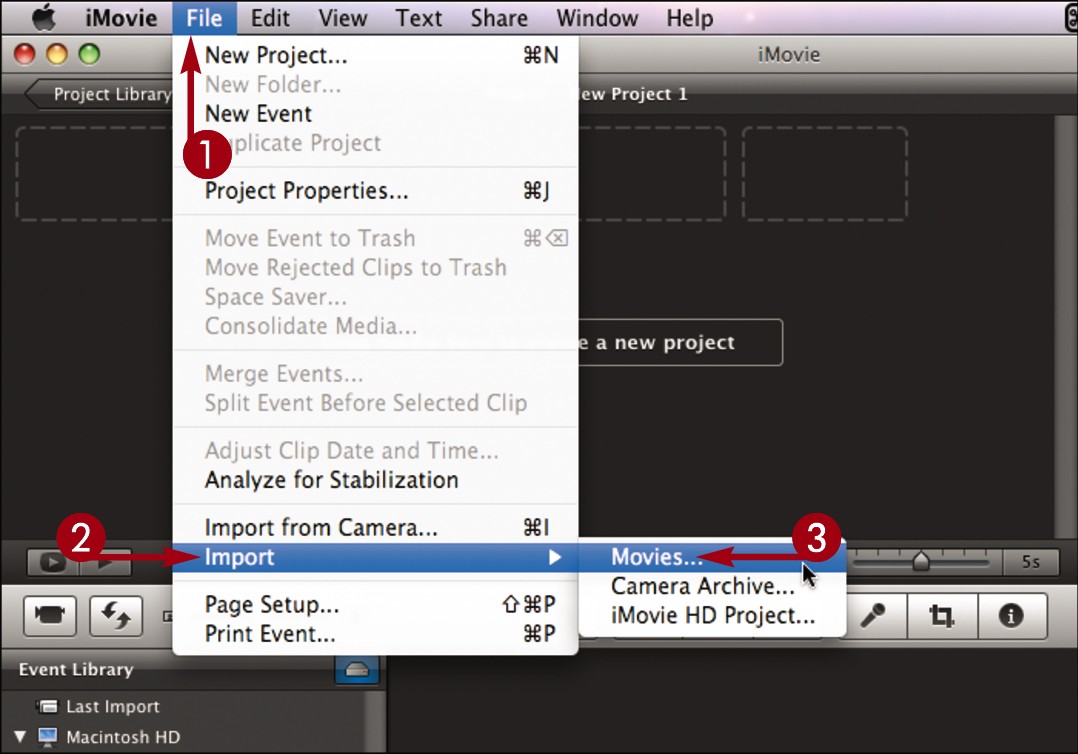
 Click File.
 Click Import.
 Click Movies.

 Select the location of the video files.

 -click to select the files to import.
 Select a save location.
iMovie organizes imported content as events.

 Click to create a new event (
 changes to
  ).
).
 Type a name for the event.
By default, iMovie makes copies of the imported files.
• You can click to move the files instead and save space ( changes to
  ).
).
 Click Import.
iMovie imports the files.
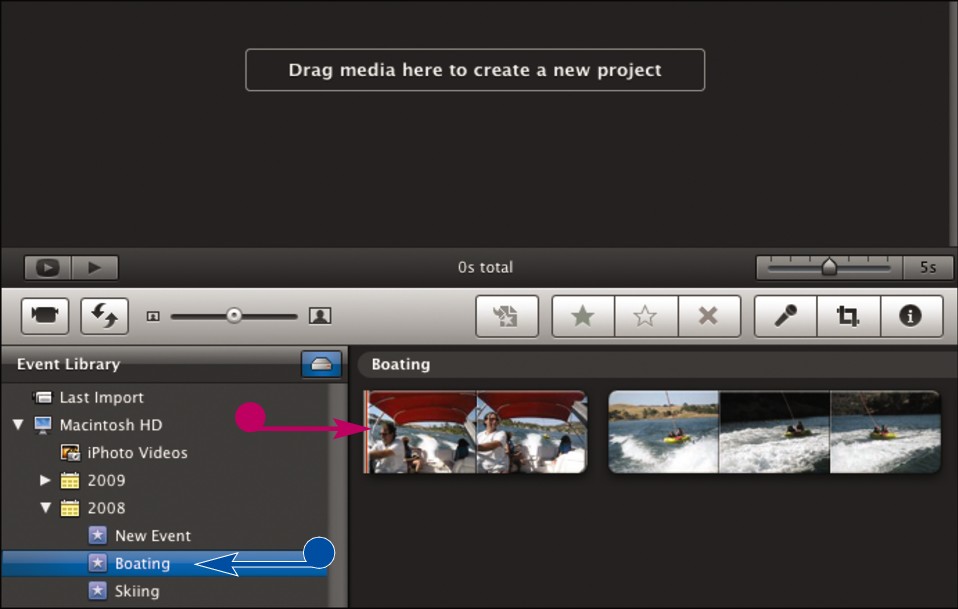
• When the process is complete, the imported clips appear.
• A new event is created in the event library.
View a Clip
You can play the video content that you have imported into your iMovie library to determine what you want to use in your project. You can play all the clips in an event in sequence or just a small selection of a single clip.
View a Clip
View all the clips in an event
iMovie organizes clips taken at the same time into events.
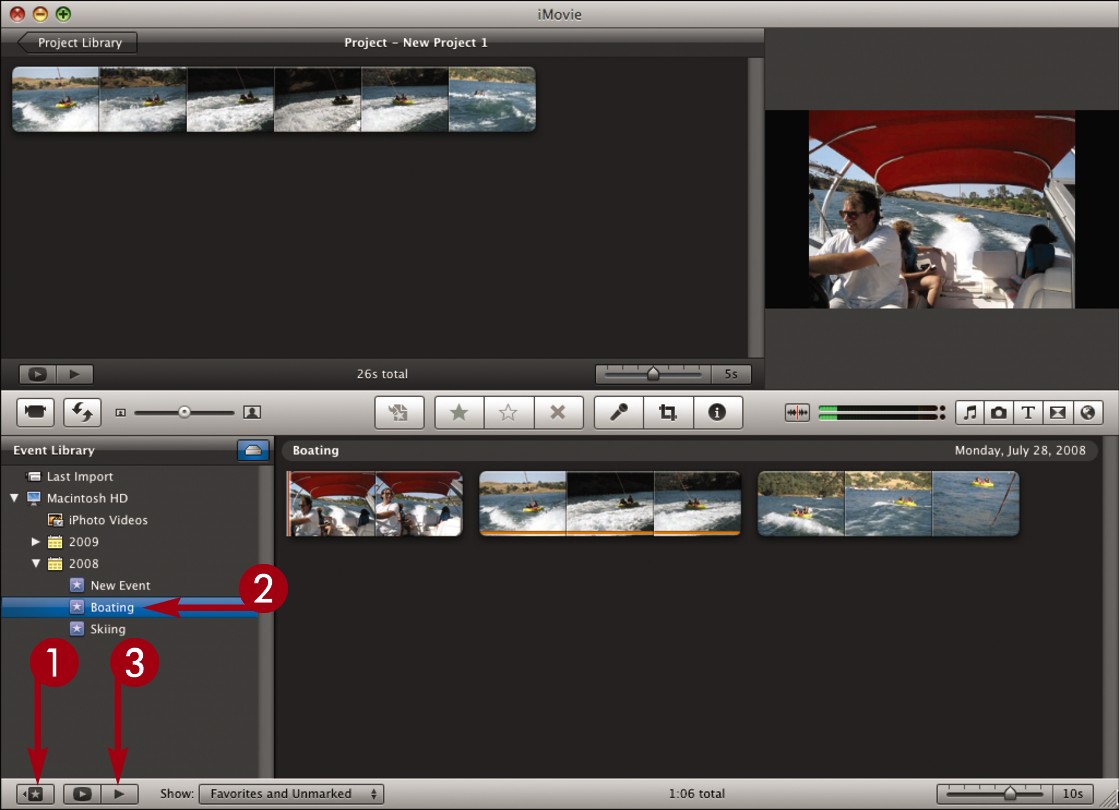
 If the event library is not open, click
  to open it.
 Select an event.
 Click
Click  .
.
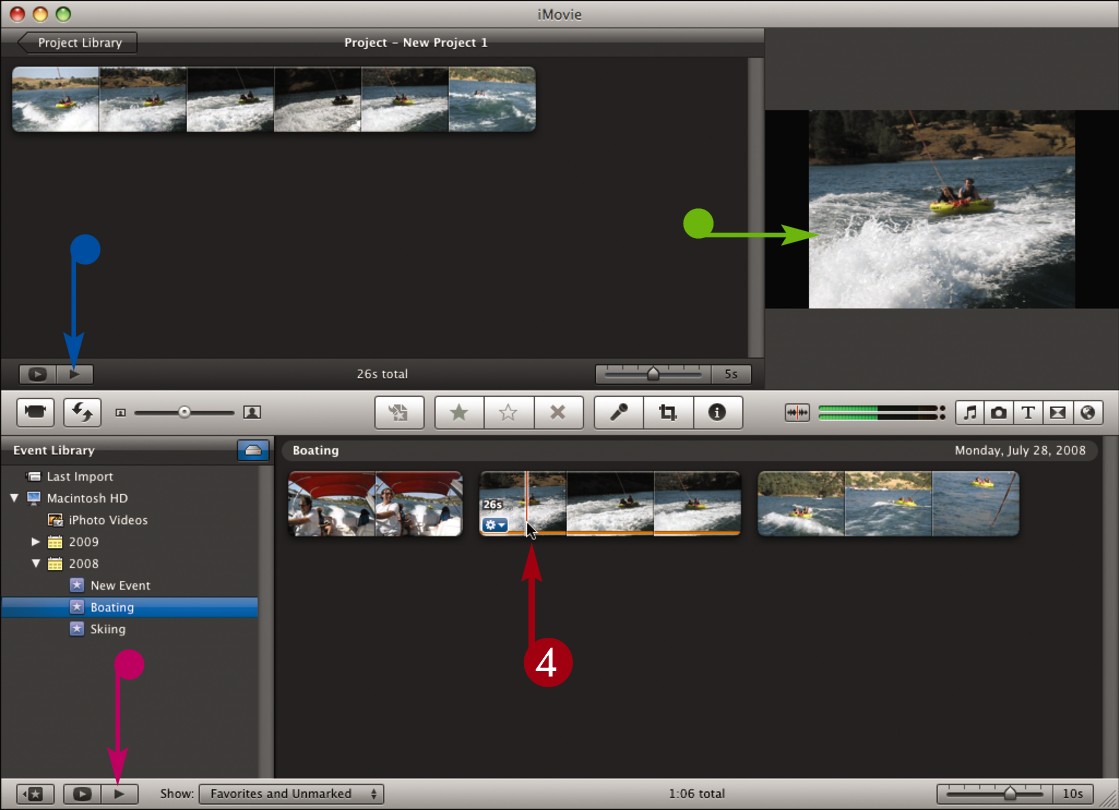
• iMovie plays the clips in the event, starting from the first clip.
• You can click  again or press
  to pause.
• Similarly, you can click  to play a project from the beginning.
Play from a specific point
 Position the cursor over a point in a clip.
 Press
Press  .
.
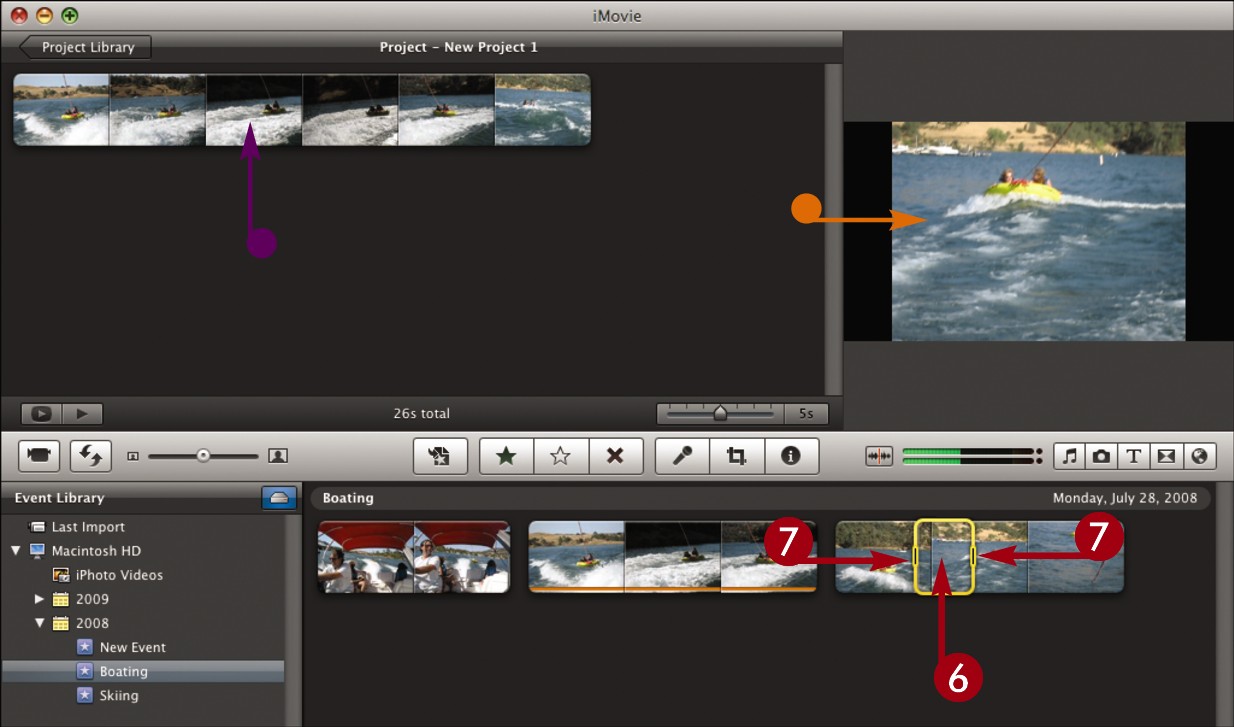
• iMovie plays the clip, beginning at that point.
You can press  again to pause.
• Similarly, you can position your cursor over a clip in your project and press  to play.
Play a selection
 Click inside a clip in the event browser.
iMovie selects four seconds of video, surrounding it with a yellow box. You can adjust this default time length in the iMovie preferences.
 Click and drag the box edges to adjust the selection duration.
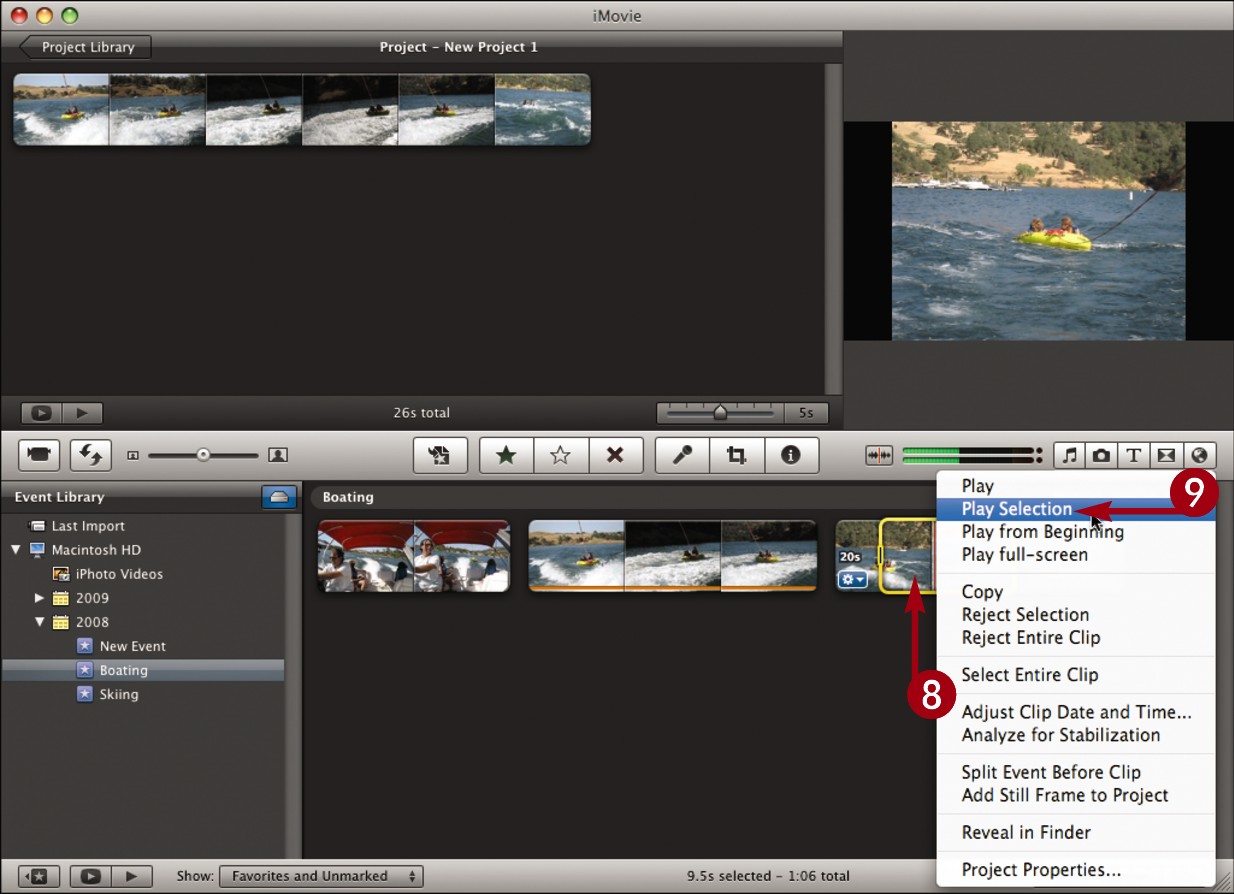

 -click inside the selection.
 In the menu that appears, click Play Selection.
iMovie plays the selection.
View a Clip at Full Screen

You can preview imported video clips or your project in full screen to get a clear view of how your work looks. While in full screen, you can scan through parts of your clip or switch to other clips in the iMovie project library.
View a Clip at Full Screen
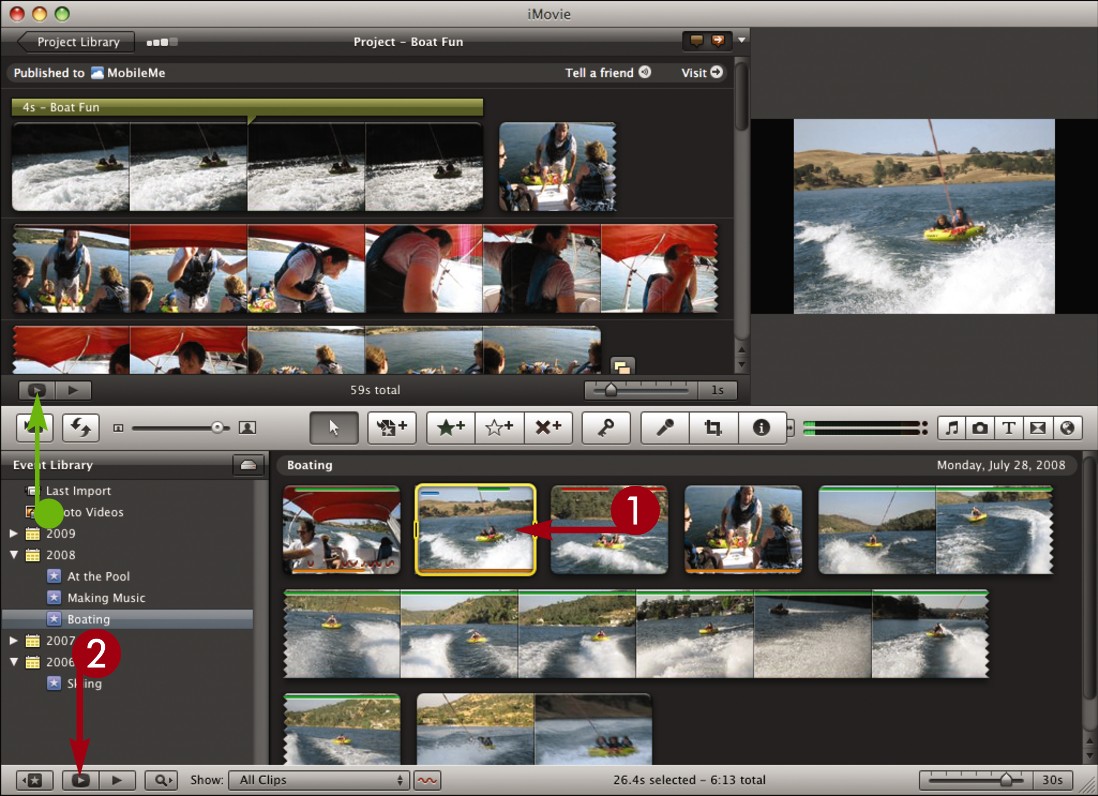
 Select a video clip in the event browser.
 Click
Click  .
.
• You can click  to play a project at full screen.
The clip opens and plays at full screen.
 Move your cursor.
iMovie displays a thumbstrip view of the clip.
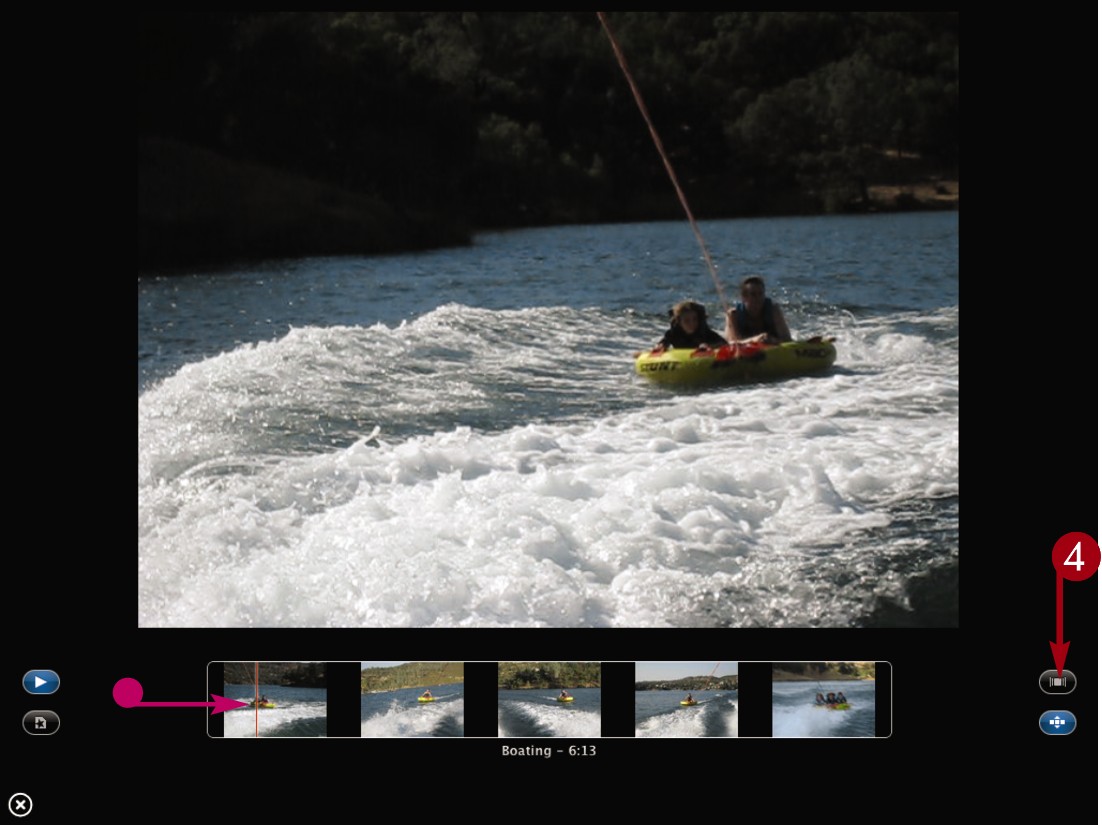
• A playhead shows the part of the video being played.
 Click
Click  to switch to coverflow view.

• iMovie displays the coverflow view with thumbnails showing other clips in the event library.
• You can click  to switch between showing events and projects.
 Click
Click  or press
  .
.
iMovie pauses the clip.
• You can drag the cursor across the thumbnail to skim through the video.
 Click a different thumbnail.
iMovie switches to a new video clip.
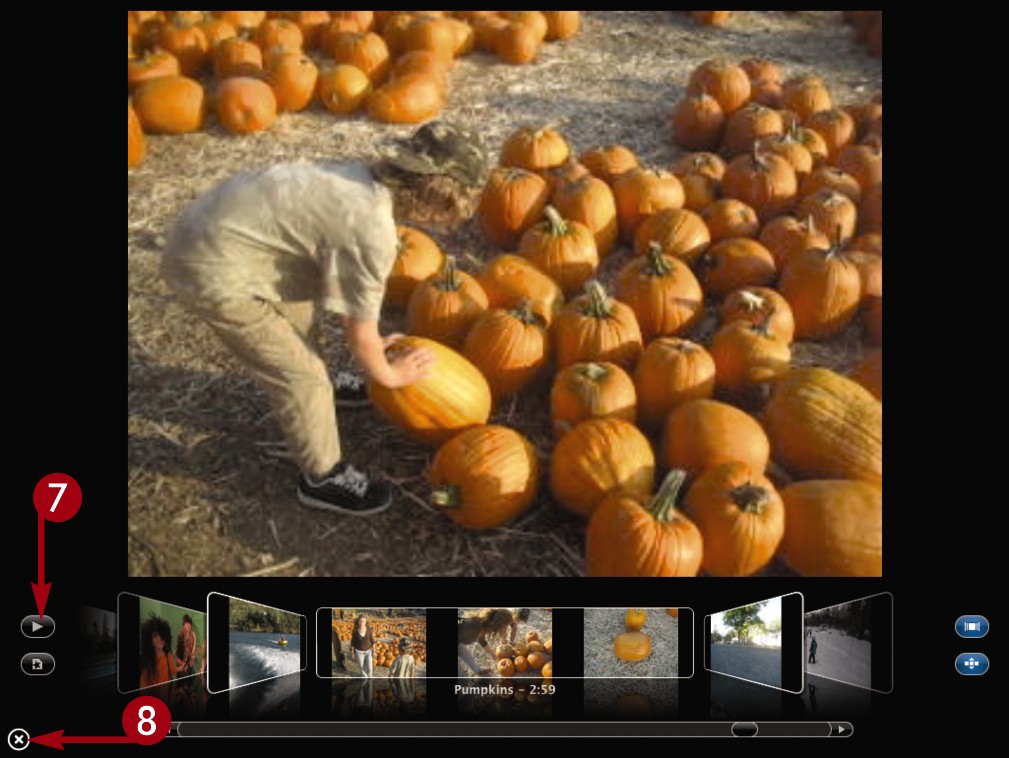
 Click
Click  or press
  to play the new clip.
 Click
Click  or press
  to exit full-screen view.
Mark a Clip as a Favorite

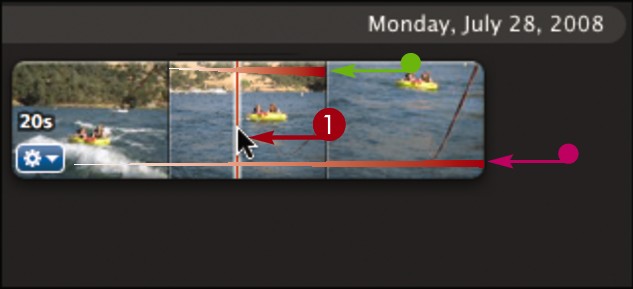
You can mark as a favorite a clip or a portion of a clip that you want to use later. Favorite clips are highlighted with a green line. You can choose to display only favorite clips in the workspace. See “Show Different Types of Clips” for details.
Mark a Clip as a Favorite
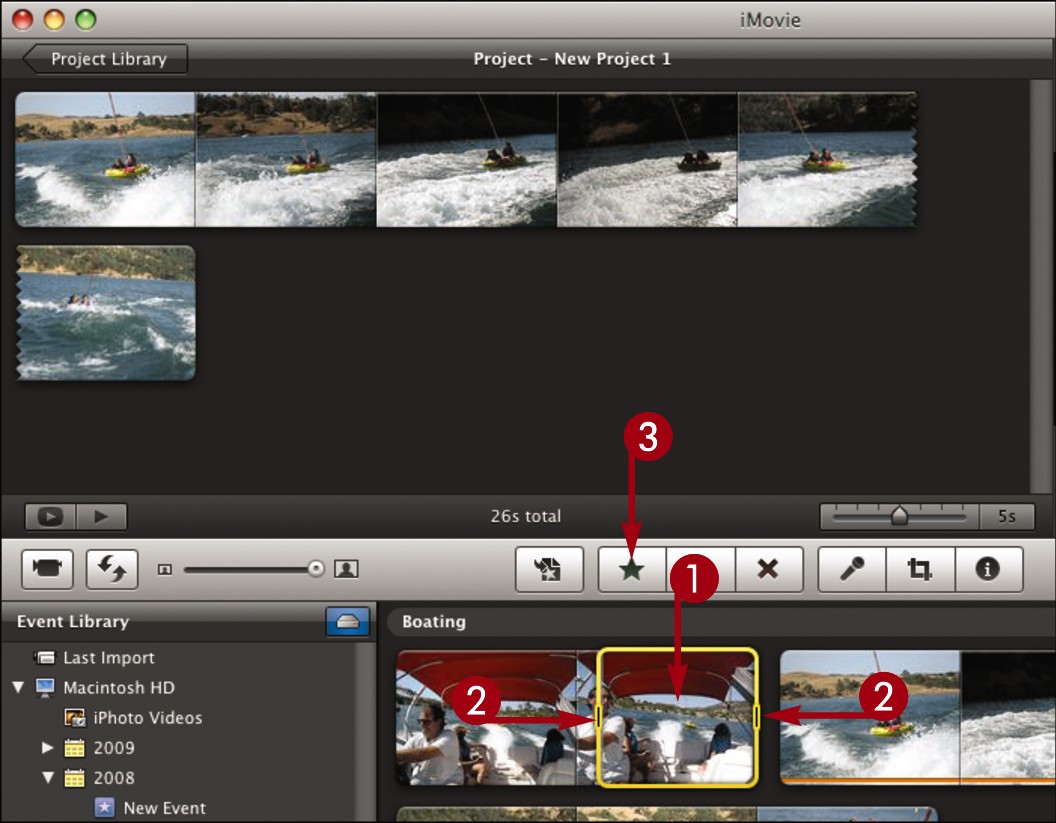
 Click a clip.
iMovie displays a selection box.
 Click and drag the box edges to select the range that you want to mark.
To choose the whole clip, you can  -click the selection and then click Select Entire Clip.
 Click
Click  or press
  .
.
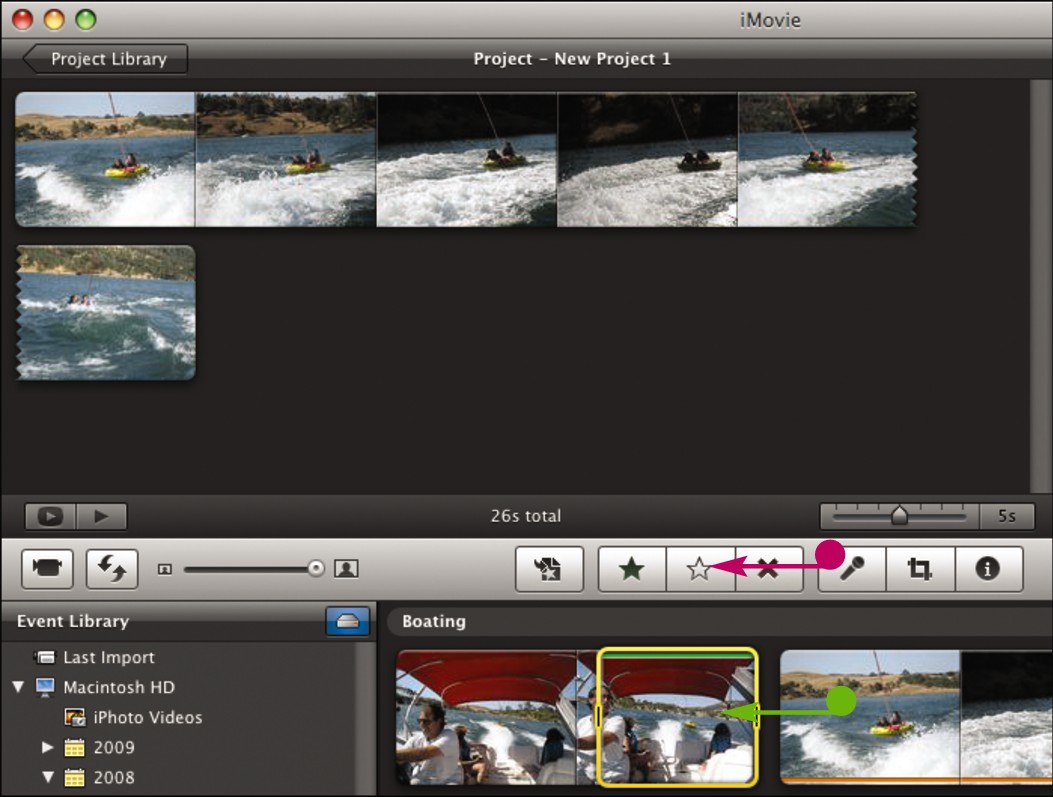
• iMovie marks the selection as a favorite, highlighting it with a green line.
• You can click  or press
  to unmark a selected clip as a favorite.
Reject a Clip

You can reject a clip that you do not want to use in your project. Rejected clips are removed from view in the iMovie workspace but still remain the library. You can view rejected clips using a show setting. See “Show Different Types of Clips” for details.
Reject a Clip
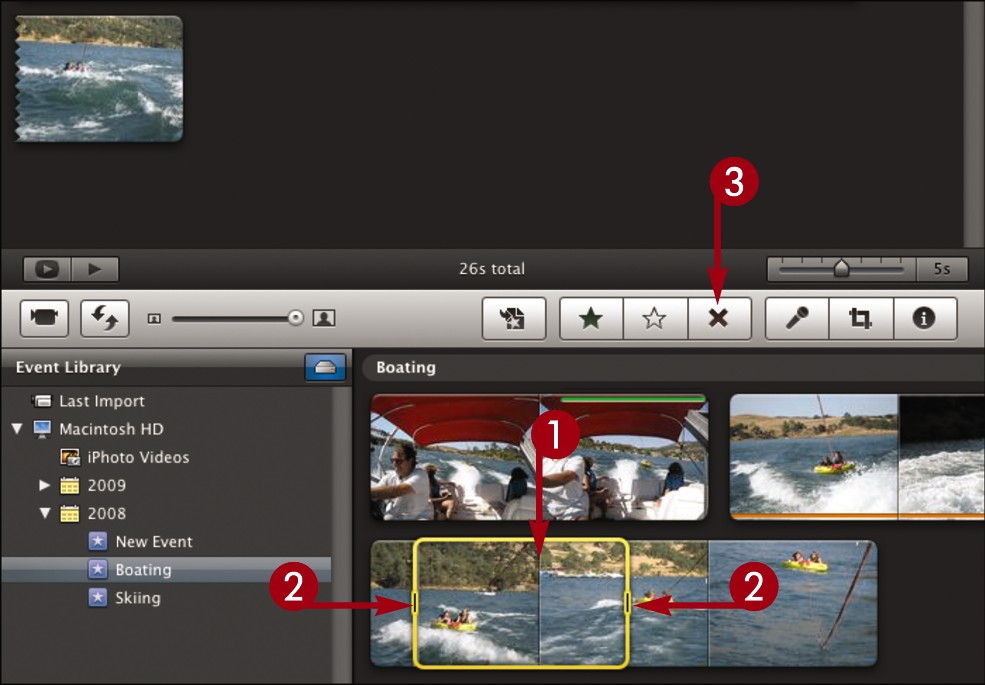
 Click a clip.
iMovie displays a selection box.
 Click and drag the box edges to select the range that you want to reject.
To choose the whole clip, you can  -click it and select Select Entire Clip.
 Click
Click  or press
  .
.
iMovie removes the selection from view.
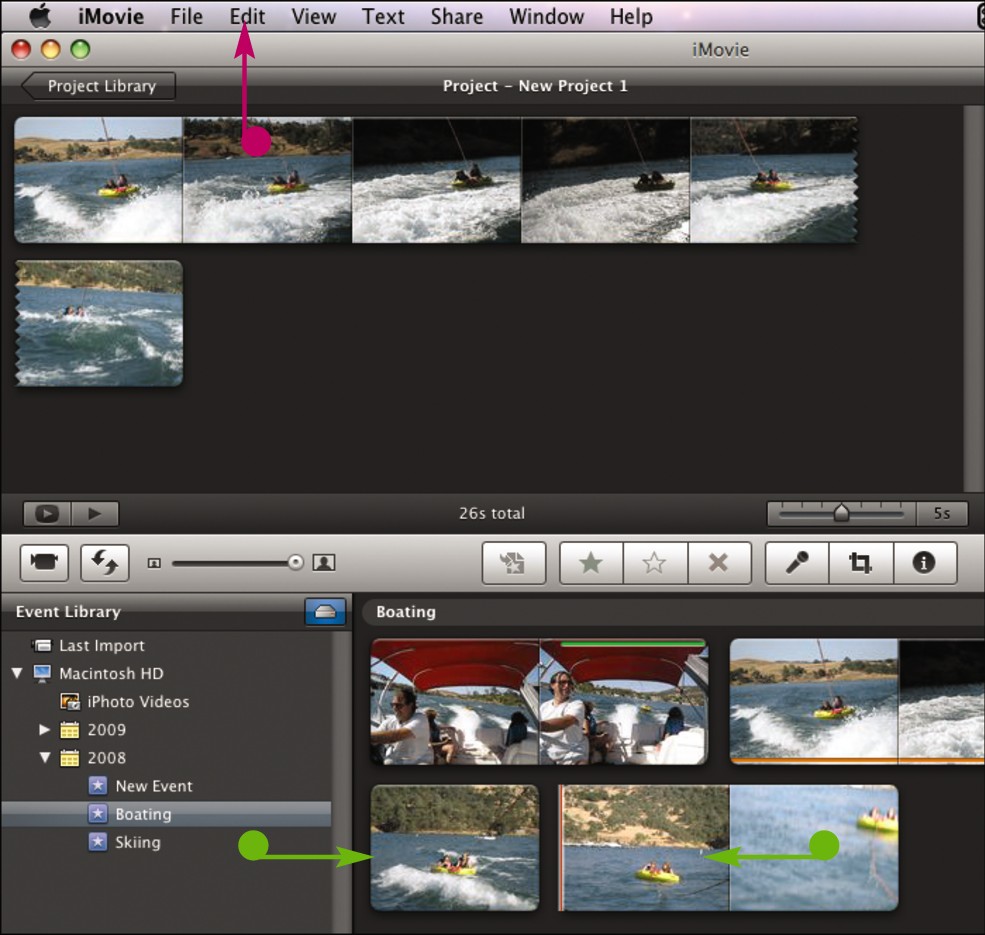
• In this example, the parts of the clip that were not rejected remain.
• You can click Edit and then Undo to undo the rejection.
Show Different Types of Clips

You can set your iMovie library to show just the clips you have marked as favorites and want to use in your project. You can also view your rejected clips in case you want to revert a rejection.
Show Different Types of Clips
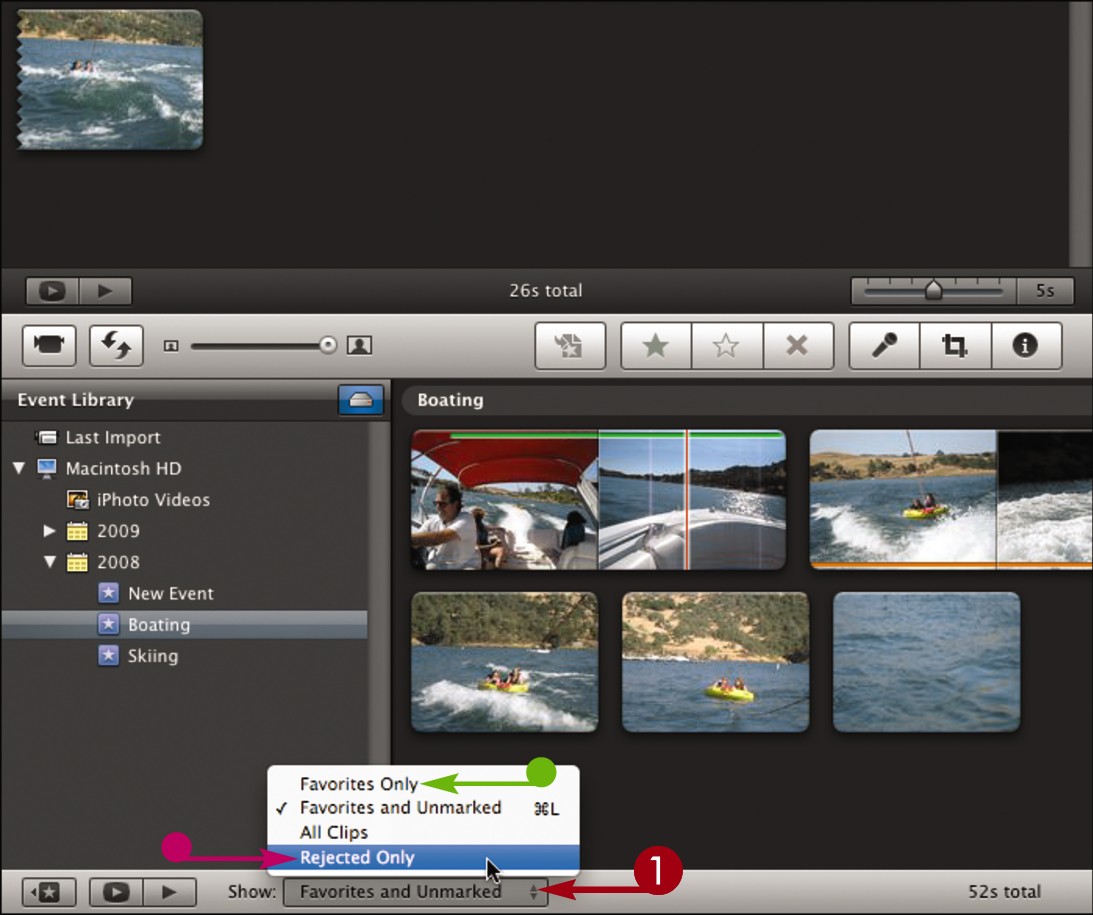
 Click here to select a show setting.
• You can select Favorites Only to display only your good clips.
• You can select Rejected Only to view the clips you have rejected, which are usually hidden.
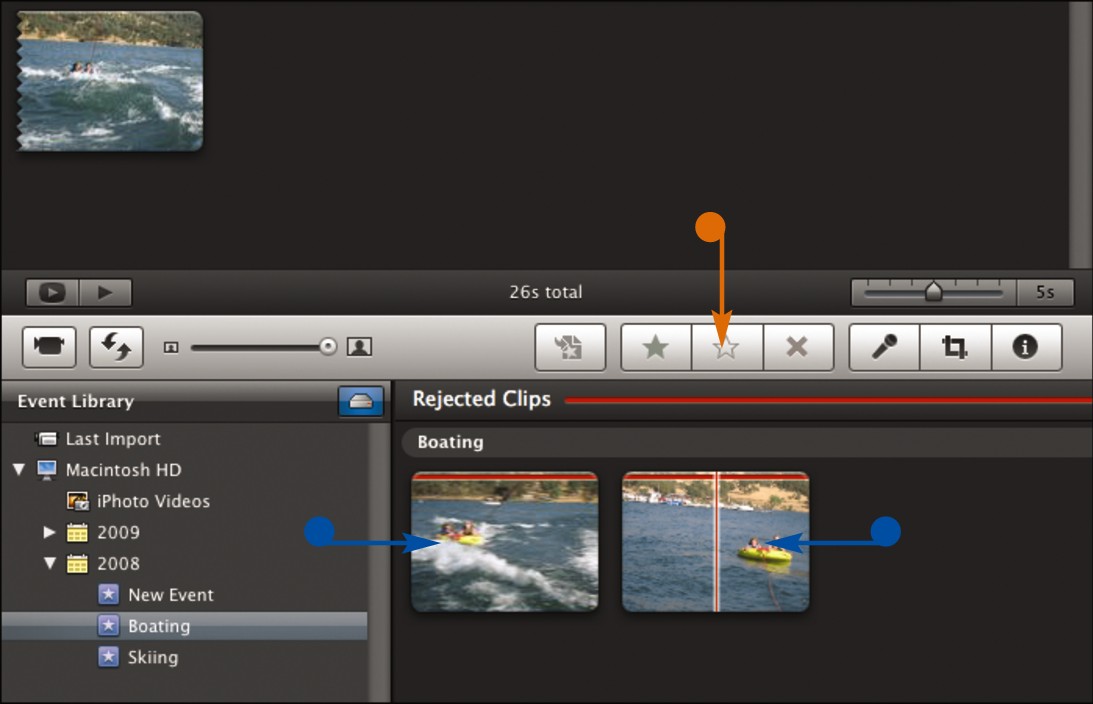
• iMovie shows the selected type of clips.
• To revert a rejection, you can select a rejected clip and then click  or press
  .
.
Delete a Clip

You can delete a clip from your library when you are sure you have no need for it. iMovie moves the clip to the Trash on your Mac. If you think you may still have a need for the clip and want to keep it accessible, you can reject it. See “Reject a Clip” for details.
Delete a Clip
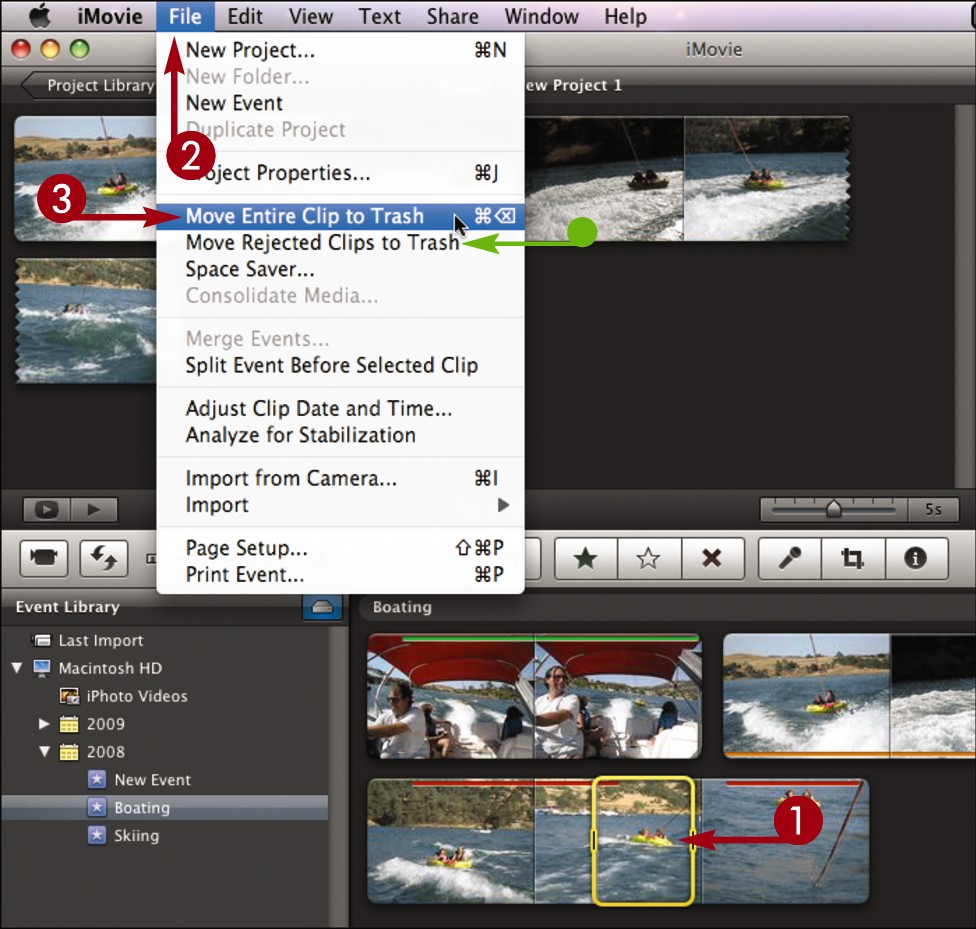
 Click to select the clip you want to delete.
Note: iMovie selects a four-second portion by default. However, these steps delete the entire clip.
 Click File.
 Click Move Entire Clip to Trash.
You can also select a clip and press  to move it to the Trash.
• You can click Move Rejected Clips to Trash to move everything marked as rejected.
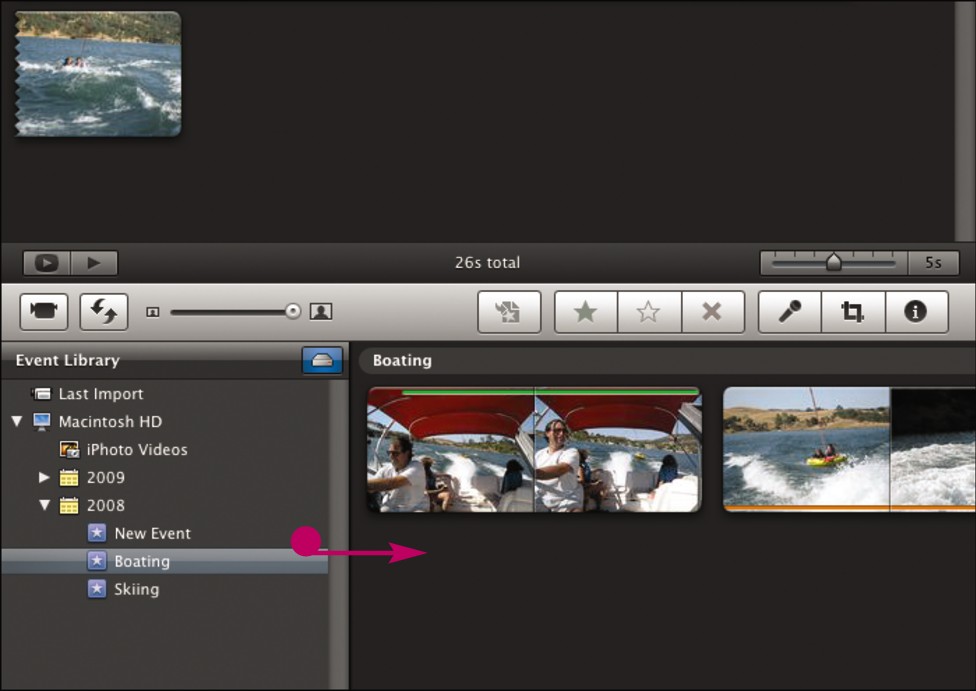
• The clip disappears from the library and is moved to the Mac Trash.
To delete the clip entirely from your computer, empty the Trash in the Mac Finder.
