Chapter 9: Adding Audio to Movies
Add Background Music

You can add background music to your iMovie project to complement the theme of your movie. You can use songs from iTunes or GarageBand for your background music.
For more about creating songs in GarageBand, see Part IV of this book.
Add Background Music
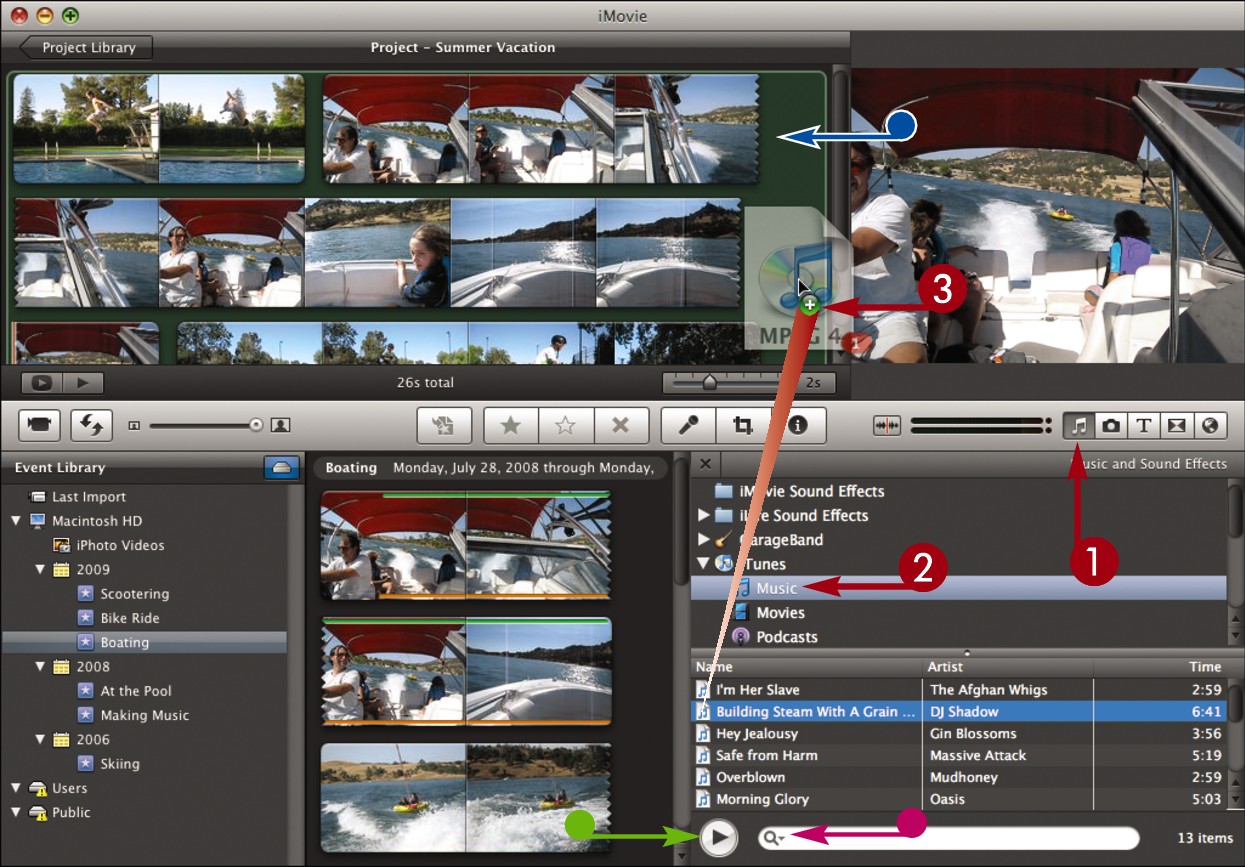
 Click
Click  to open the music and sound effects browser.
 Click the list to view available songs.
• You can click  to play a selected song.
• You can type a song or artist name to search for a song.
 Click and drag a song to the outside edge of the project browser.
Note: To add a song as background music, do not drag it onto a clip.
• The project browser background turns green or purple, depending on the type of song you are adding.
 Release the mouse button.
iMovie adds the song as background music.
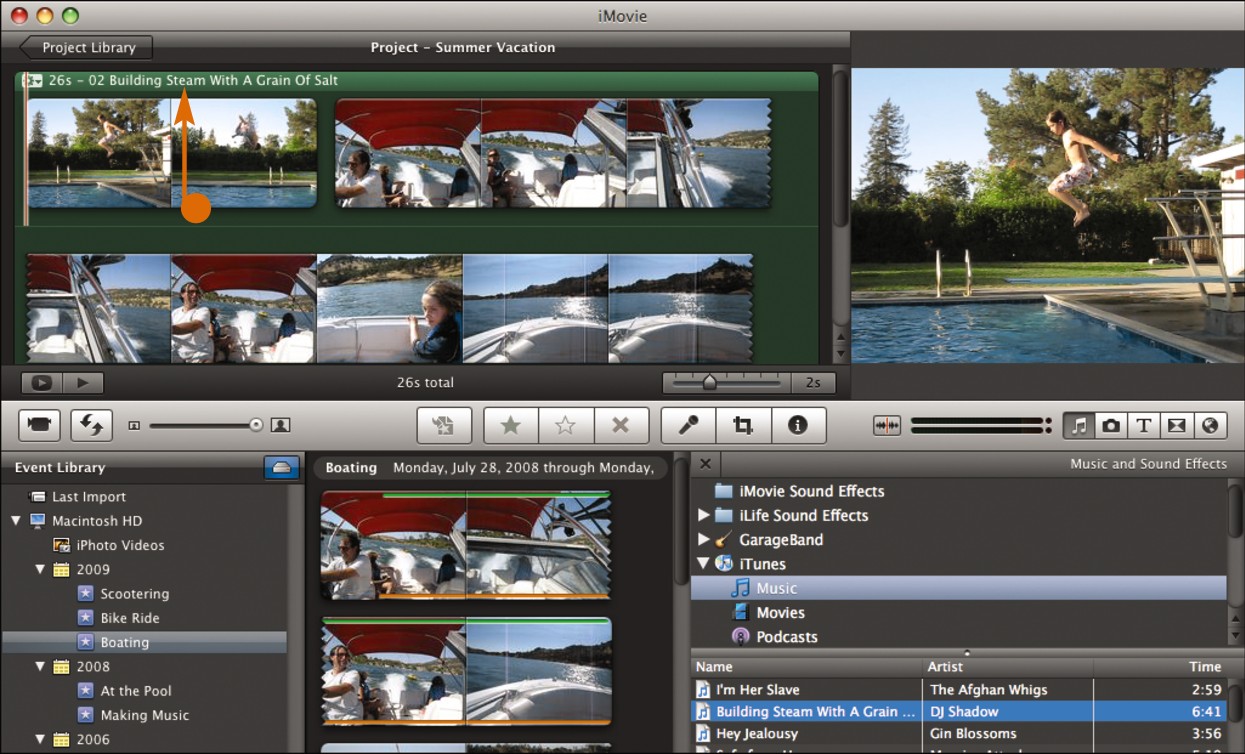
• The name and how long the song plays appear here.
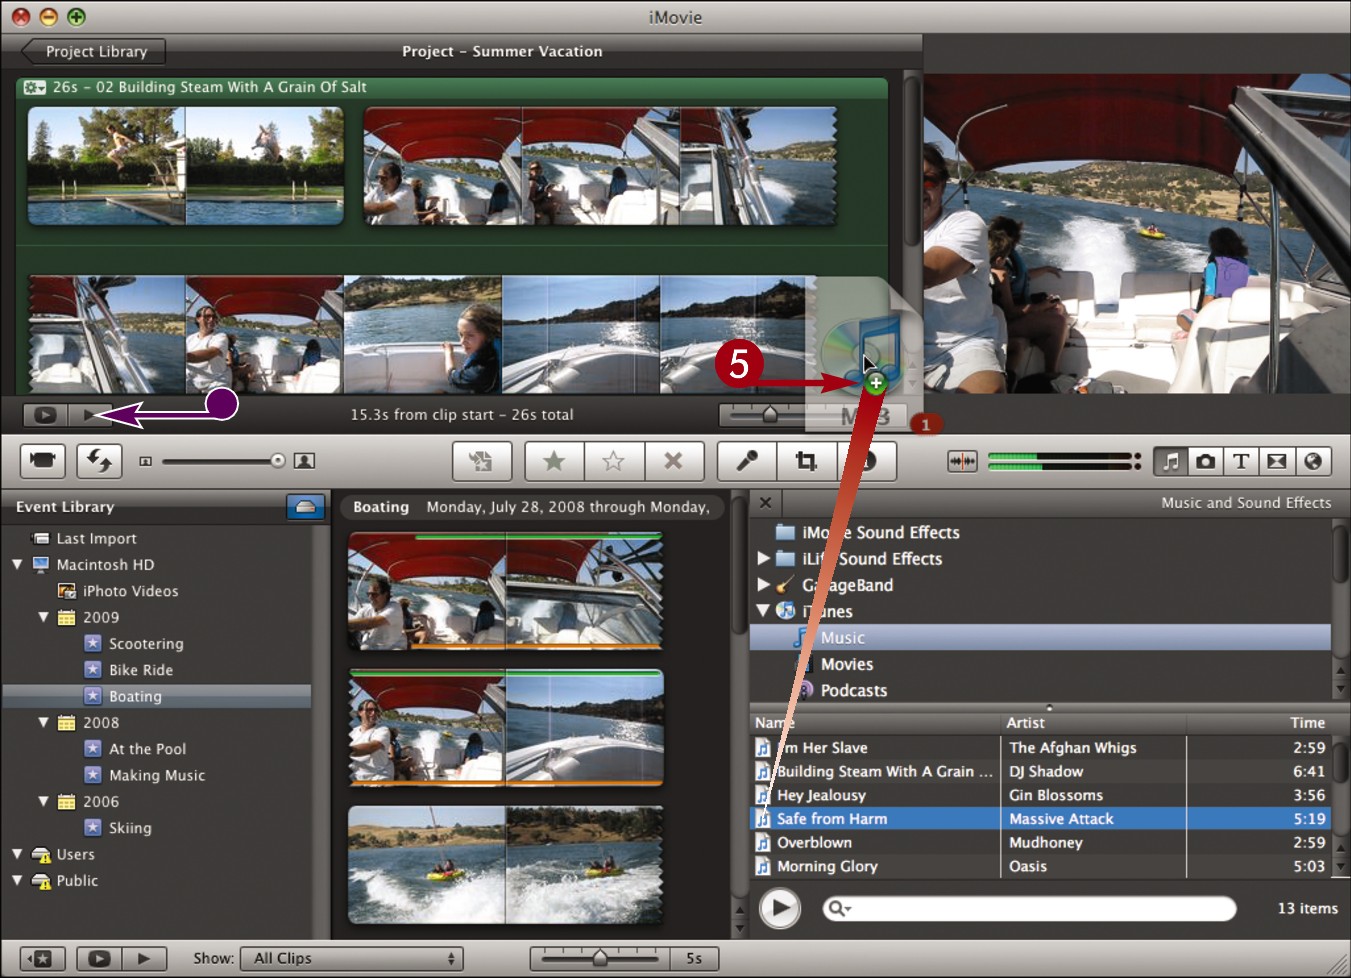
• You can click  to play your movie with the new music.
 If your movie is longer than the song, you can click and drag additional songs to fill the entire project with music.
Note: To change the volume of the background music and other audio in your project, see “Adjust Volume.”
Add a Sound Effect

You can choose from a variety of sound effects to accentuate the action occurring in your movie. After you add a sound effect, you can move it to just the right frame in your movie and also adjust the volume.
Add a Sound Effect
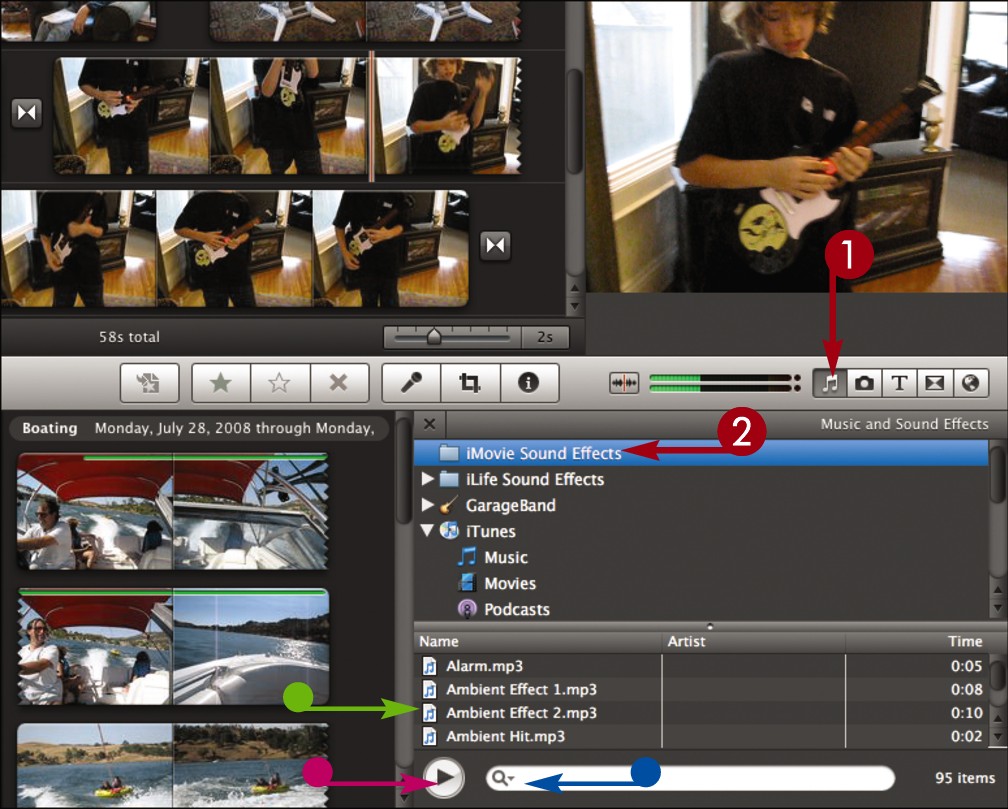
 Click
Click  to open the music and sound effects browser.
 Click a list item to view the available sound effects.
• The sound effects appear here.
• You can click  to play a selected sound effect.
• You can type a keyword to search for a sound effect.

 Click and drag a sound effect to the location in a clip where it plays.
 Release the mouse button.
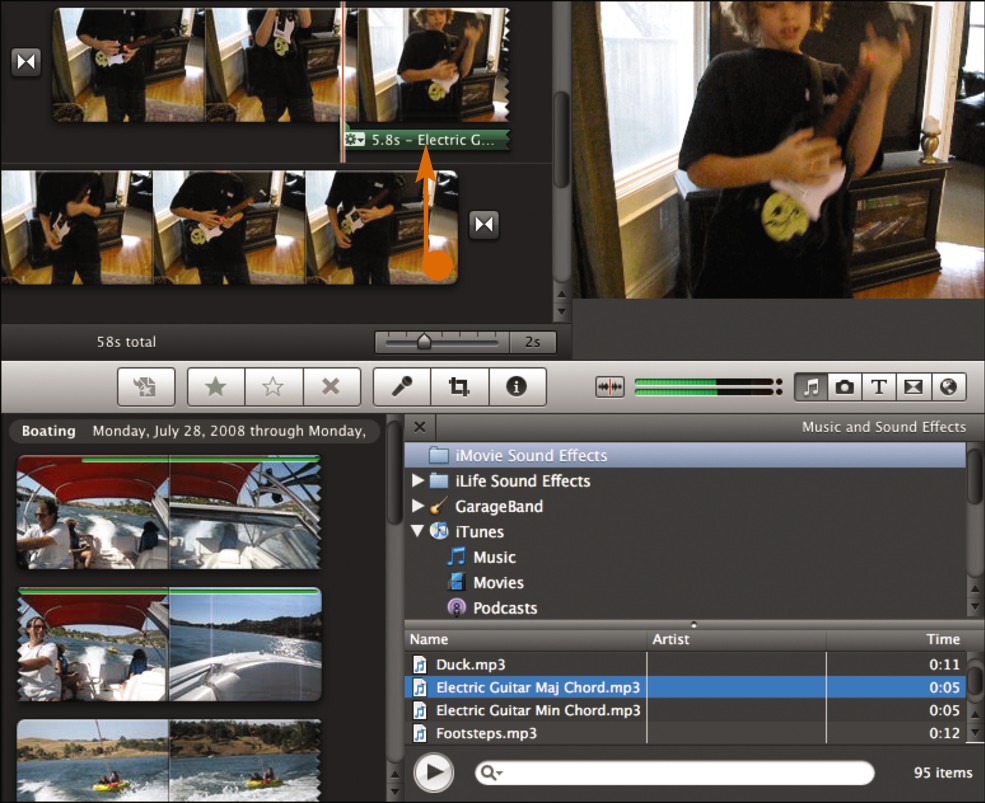
• iMovie displays a green icon where the sound effect is added.
You can click and drag the icon to change when the effect plays.
You can click the icon and press  to preview the new effect.

 Click and drag to add more sound effects from the music and sound effects browser.
Sound effects can overlap one another in a project.
Note: To change the volume of a sound effect and other audio in your project, see “Adjust Volume.”
Adjust Volume

You can adjust the volume of the different sounds in your movie, including sounds from the video clips, background music, and sound effects. iMovie gives you control over overall volume as well as how audio fades in and out.
Adjust Volume
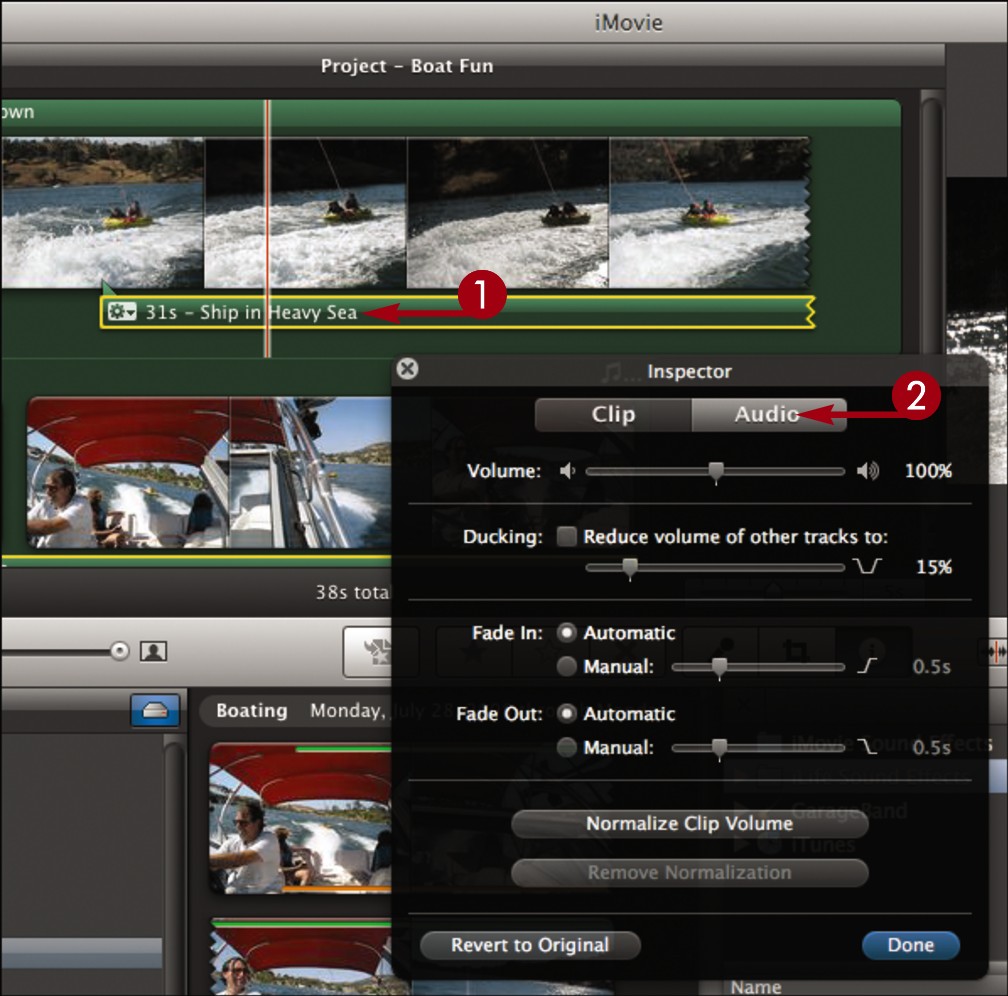
 Double-click the music, sound effect, or clip whose volume you want to adjust.
The Inspector opens.
 Click Audio.
The audio volume controls appear.
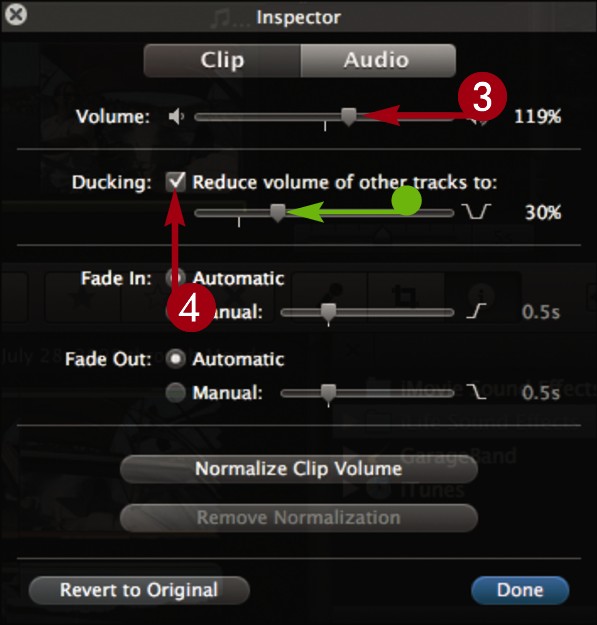
 Click and drag the slider to adjust the overall volume of the music, sound effect, or clip.
You can drag the slider all the way to the left to mute the clip.
 Click to reduce the sound of other clips as a selected item plays (
 changes to
  ).
).
• You can use the slider to adjust how much the other sounds are reduced.
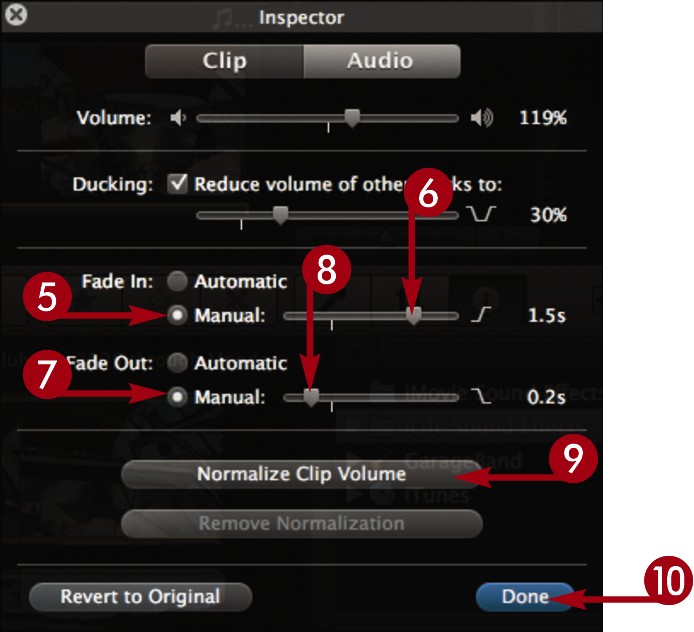
 Click to adjust how the audio fades in (
 changes to
  ).
).
 Click and drag the slider to the left to fade it in quickly or to the right to fade it in gradually.
 Click to adjust how the audio fades out (
 changes to
  ).
).
 Click and drag the slider to the left to fade it out quickly or to the right to fade it out gradually.
 You can click Normalize Clip Volume to normalize the selection, making its volume consistent with the other audio in the project.
 Click Done.
iMovie adjusts the volumes.

• You can click  to play the project and listen to the results.
Add a Beat Marker

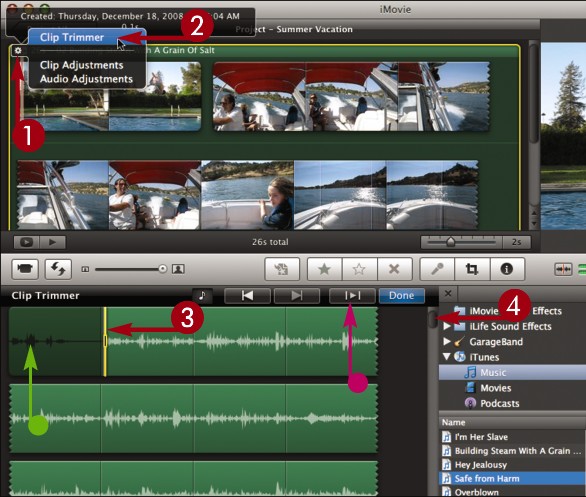
You can add beat markers where audio beats occur to synchronize action in the clip with the rhythm of the music. You add beat markers in the Clip Trimmer.
Add a Beat Marker

 Click
Click  for the audio you want to mark.
 Click Clip Trimmer.
The Clip Trimmer opens.
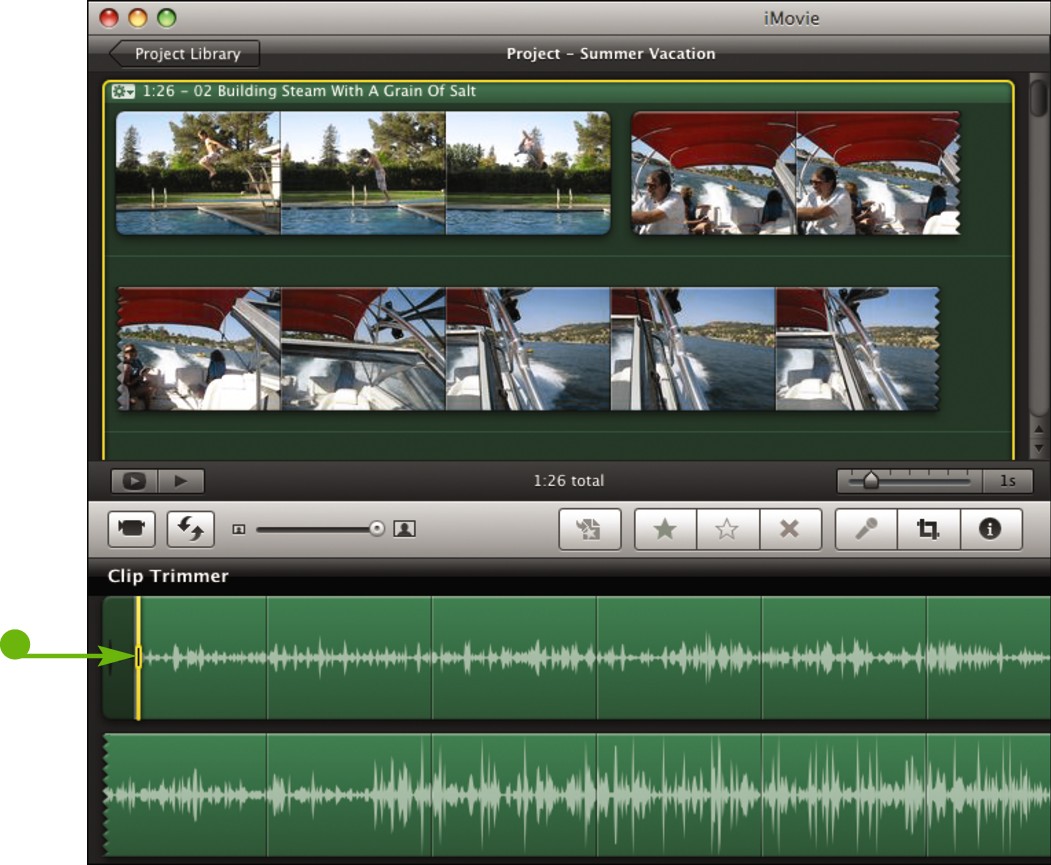
• iMovie displays the music as a waveform, which is a graphical representation of the song.
You can move your cursor across the waveform to find the beats.

 Click and drag
  to a beat in the song.
• You can also click  to play the song and press
  to add beat markers as it plays.

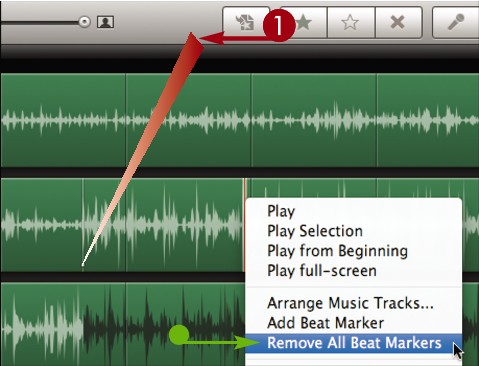
• iMovie adds a beat marker to the audio clip, which appears as a vertical white line in the waveform.
• If the audio overlays a clip, iMovie also splits the clip at the beat marker. This allows you to easily replace content between beats in your project.
Synchronize Content to Beats

After you add beat markers to the beats in your song, you can easily synchronize your clips to play between the markers. When the snap-to-beats setting is turned on, iMovie automatically trims clips and still photos to fit between the next two markers.
Synchronize Content to Beats
 Set beat markers in a song in your project. See “Add a Beat Marker” for details.
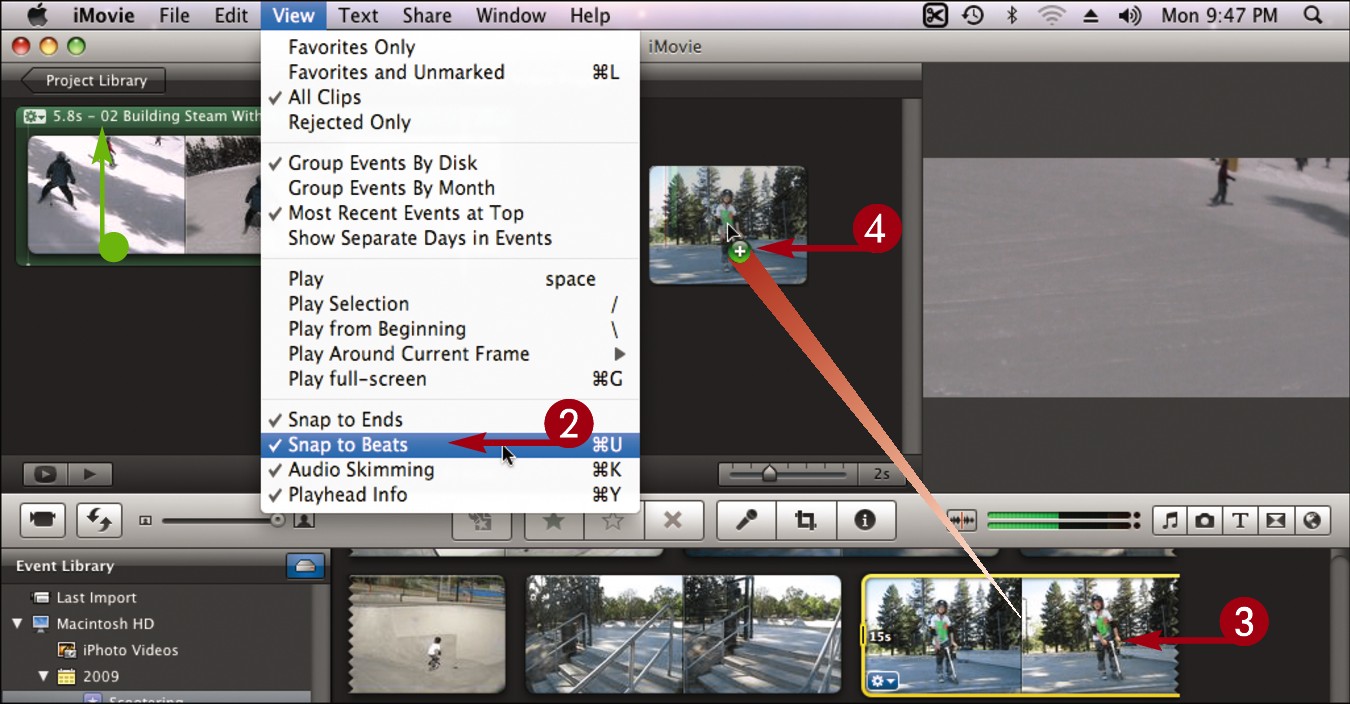
• In this example, beat markers have been added to the background music.
 Click View and select Snap to Beats if the setting is not already checked.
 Select a video clip to add. Make sure it is longer than the duration between beats.
Note: For more about adding clips to a project, see Chapter 8.
 Click and drag the selection to add it to the end of the project.
iMovie adds the clip to the project.
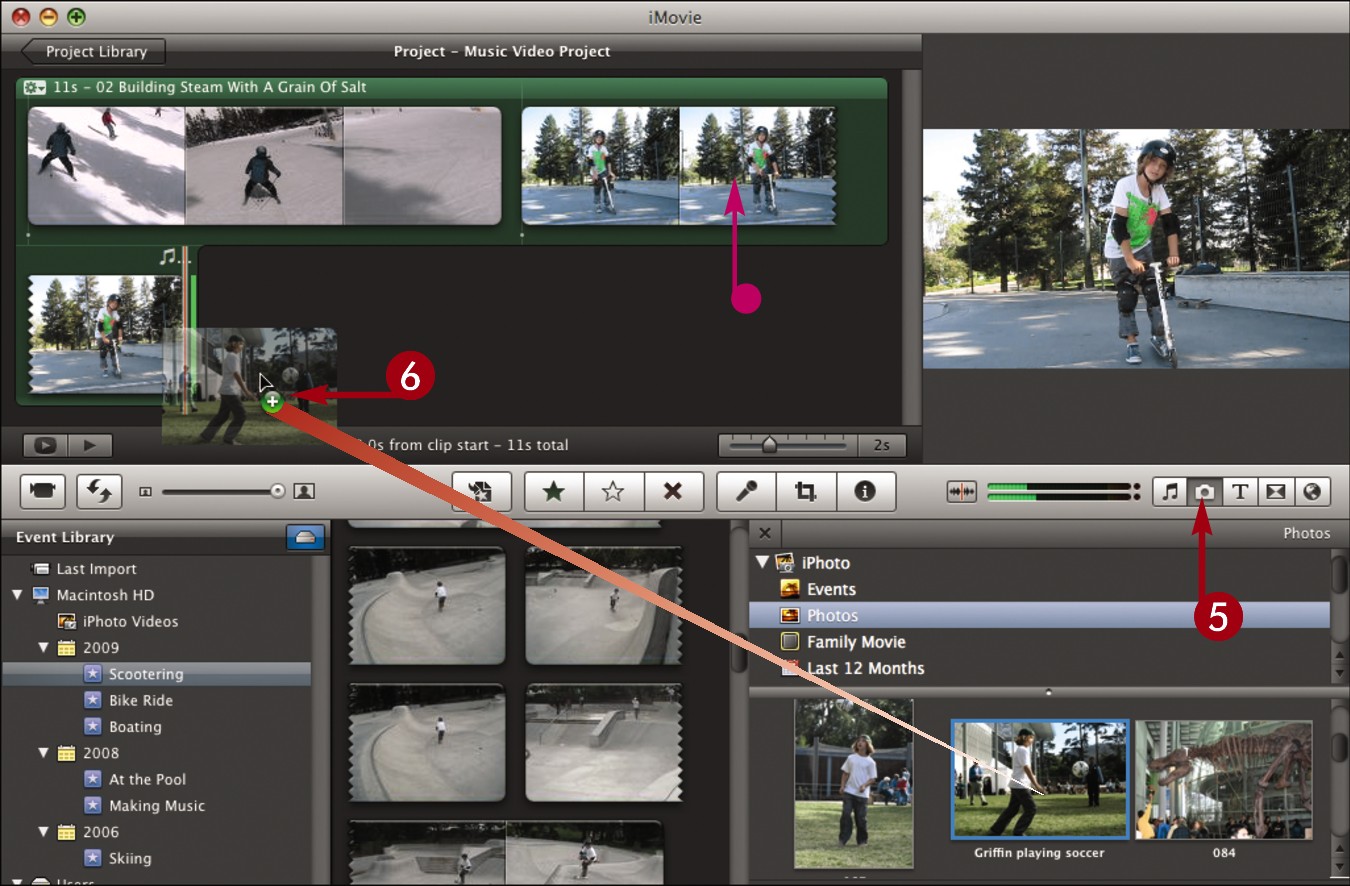
• The clip is truncated to fit between the next two beat markers.
 Click
Click  to open the photos browser.
 Click and drag a photo to add it to the end of the project.
iMovie adds a still photo to the project.
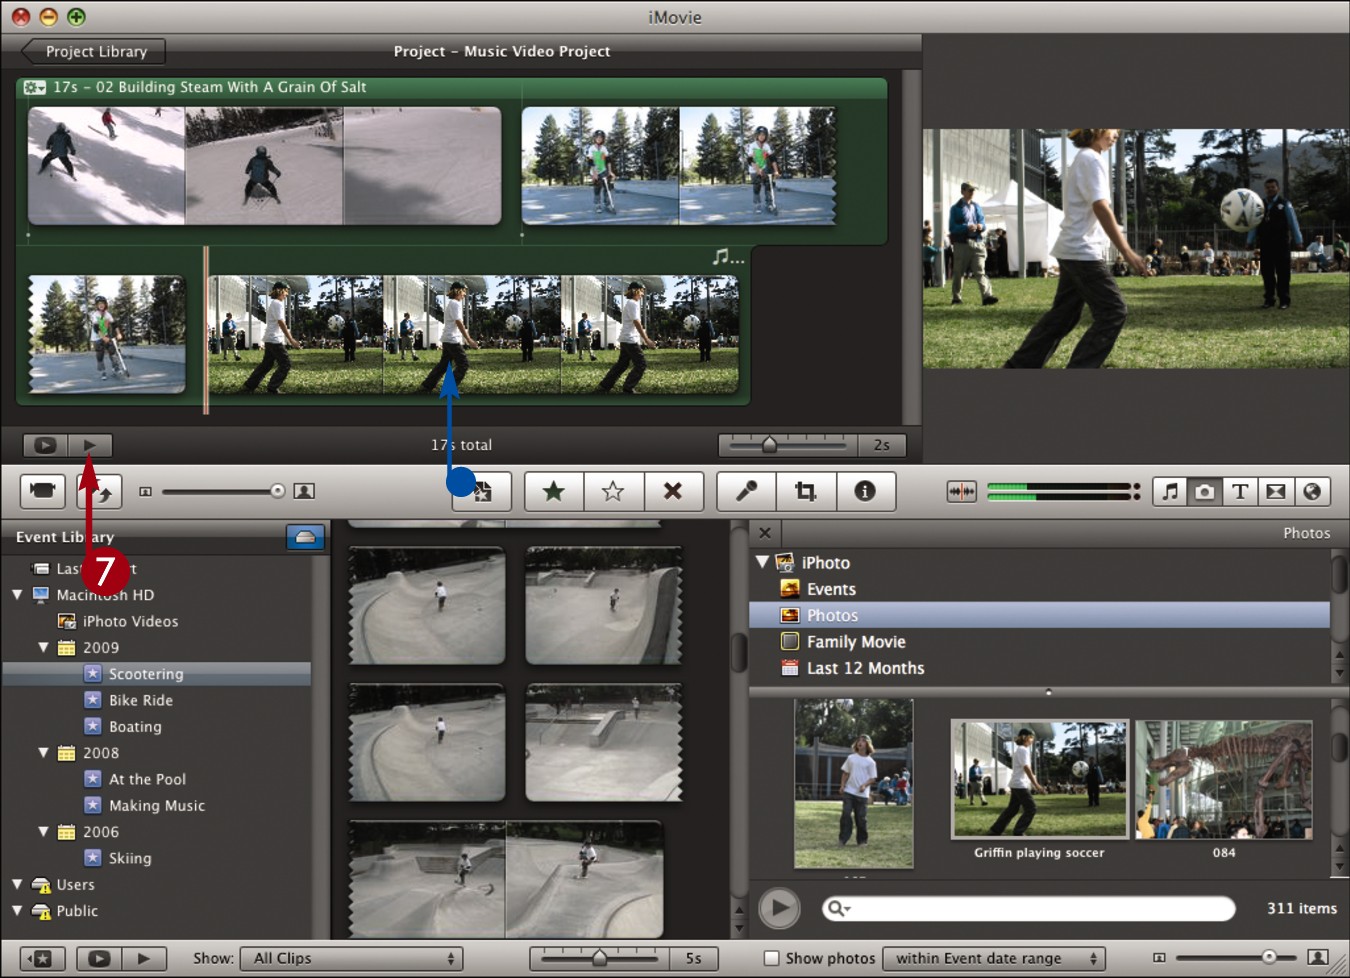
• The photo is shown for the duration between the next two beat markers.
For more about adding still photos to a project, see Chapter 8.
 Click
Click  to preview the project.
Because the content was snapped to the beats as it was added, the transitions match the rhythm of the background music.
Record a Voiceover
You can add voiceover audio using a built-in or external microphone on your Mac. You record a voiceover within iMovie as your project plays. The recording is then added to your project.
Record a Voiceover
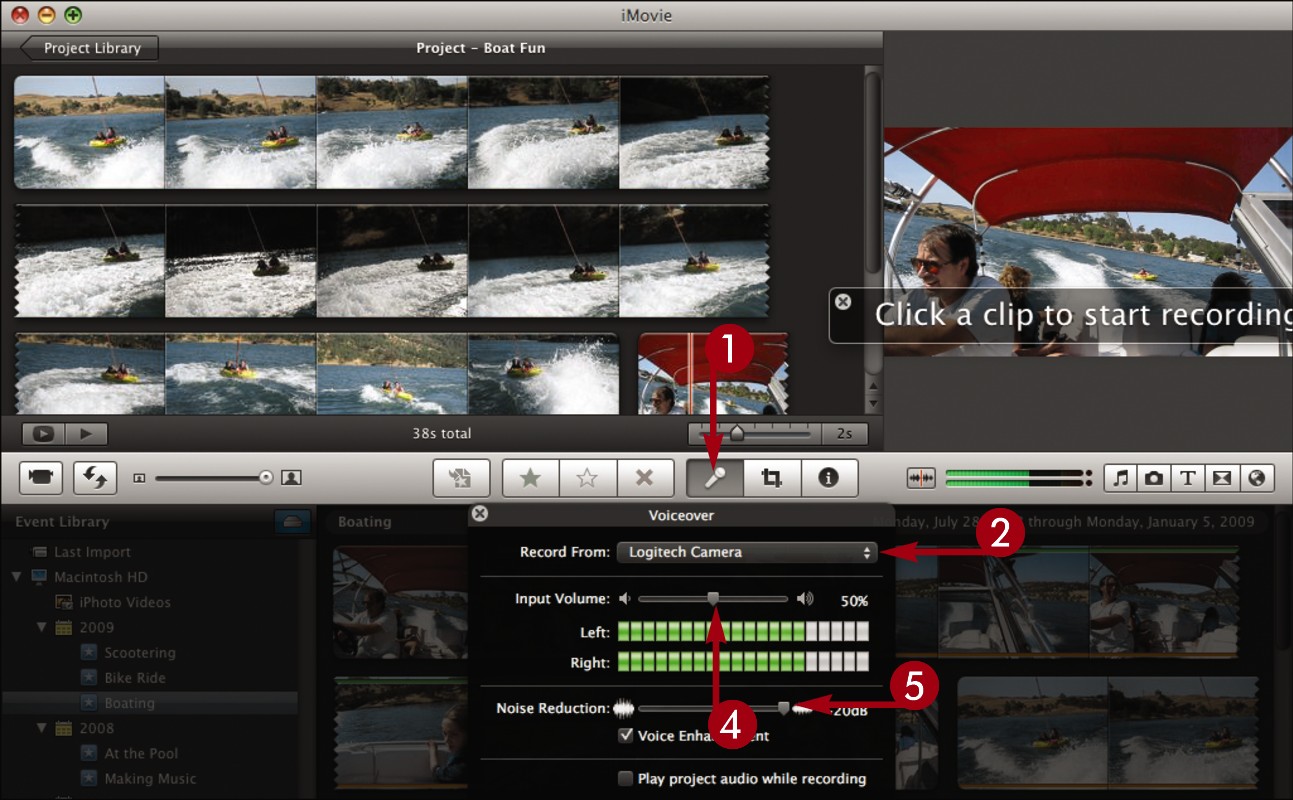
 Click
Click  to open the voiceover settings.
 Click here to select a microphone.
 Speak into the microphone to adjust the recording levels.
 As you speak, click and drag the slider so that your voice generates a strong green signal in the meter without turning the meter red.
 You can click and drag the slider to control noise reduction, which can reduce background noise.
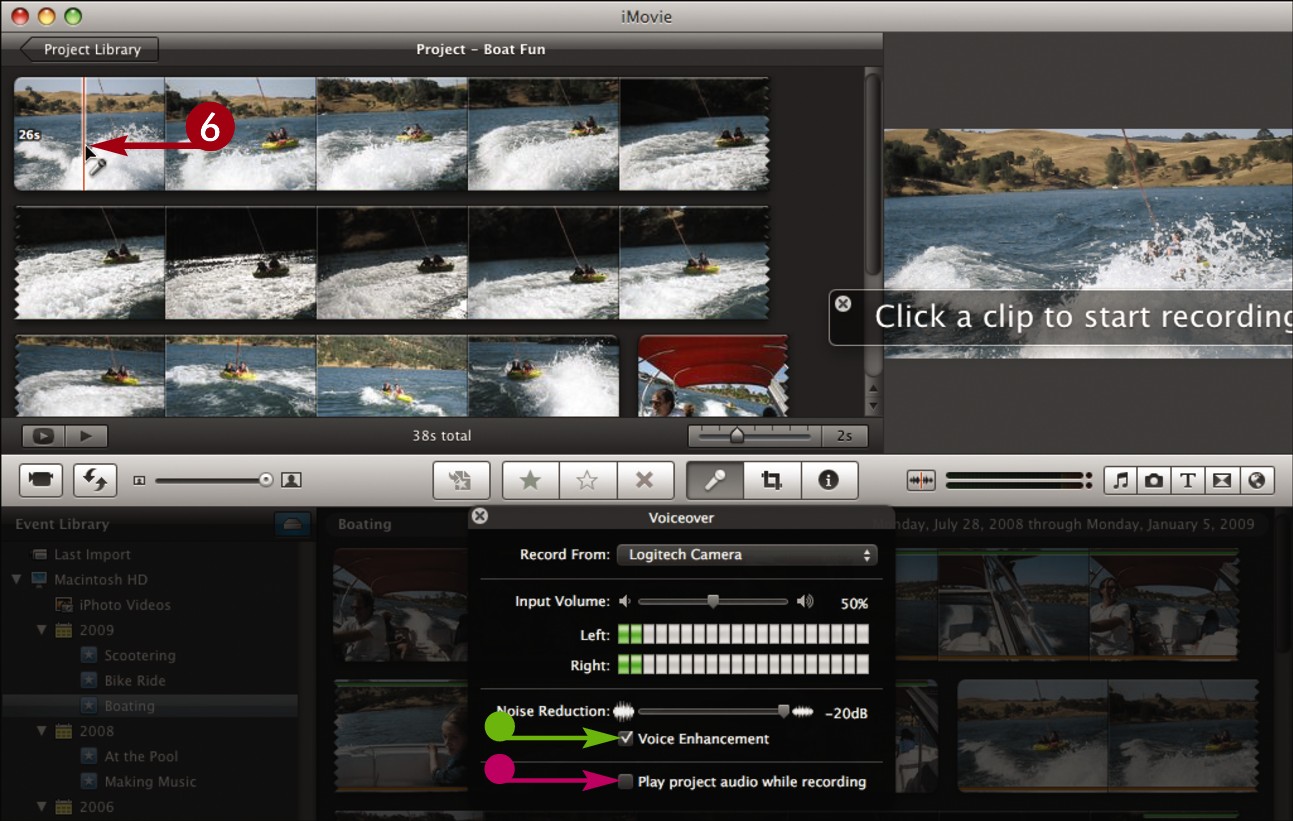
• You can click to turn off voice enhancement ( changes to
  ), which can electronically smooth your voice.
• You can click to play project audio as you record ( changes to
  ). Because your microphone can pick up this sound, you need to wear headphones if choosing this option.
 Click a clip at the point where you want to start the voiceover.
iMovie counts down from three and then starts recording.
 Speak into the microphone to create your voiceover.
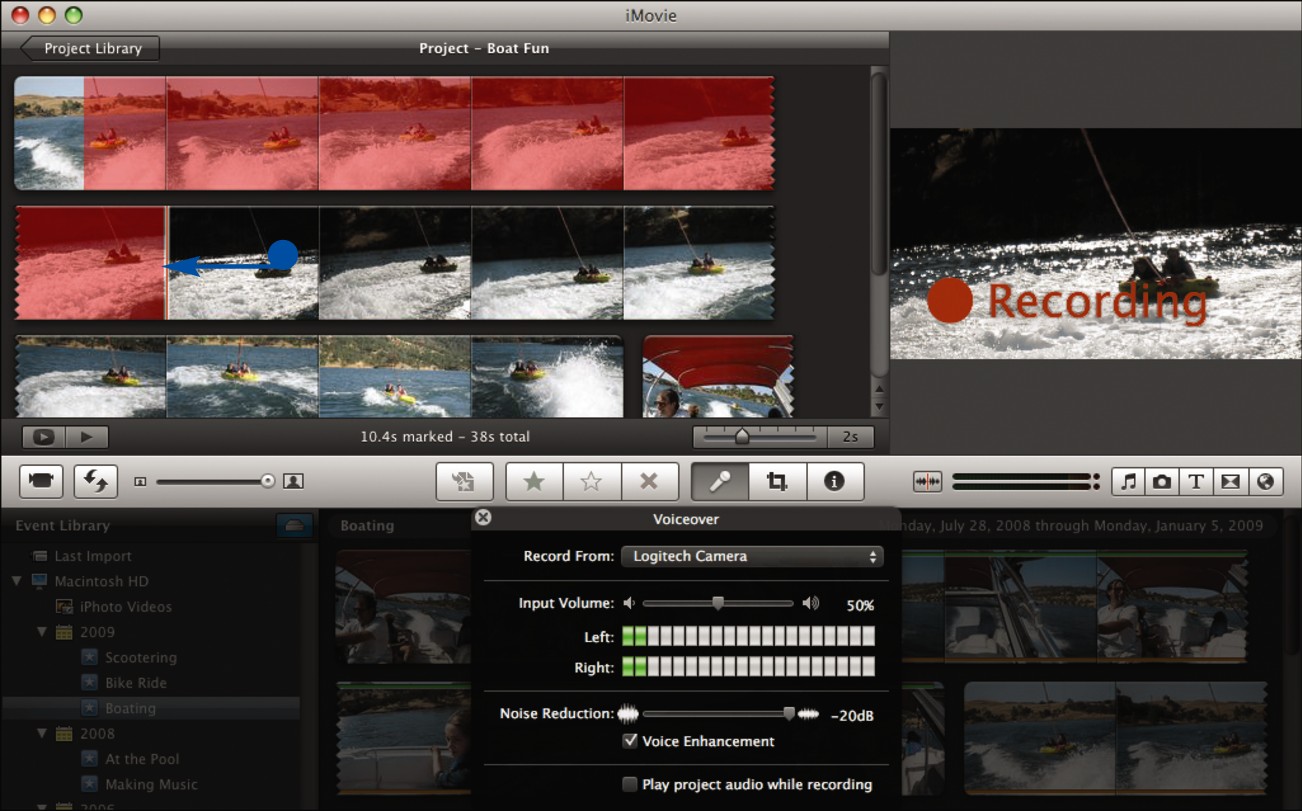
• iMovie displays red where it has recorded in the project.
 Click anywhere in the workspace to stop recording.
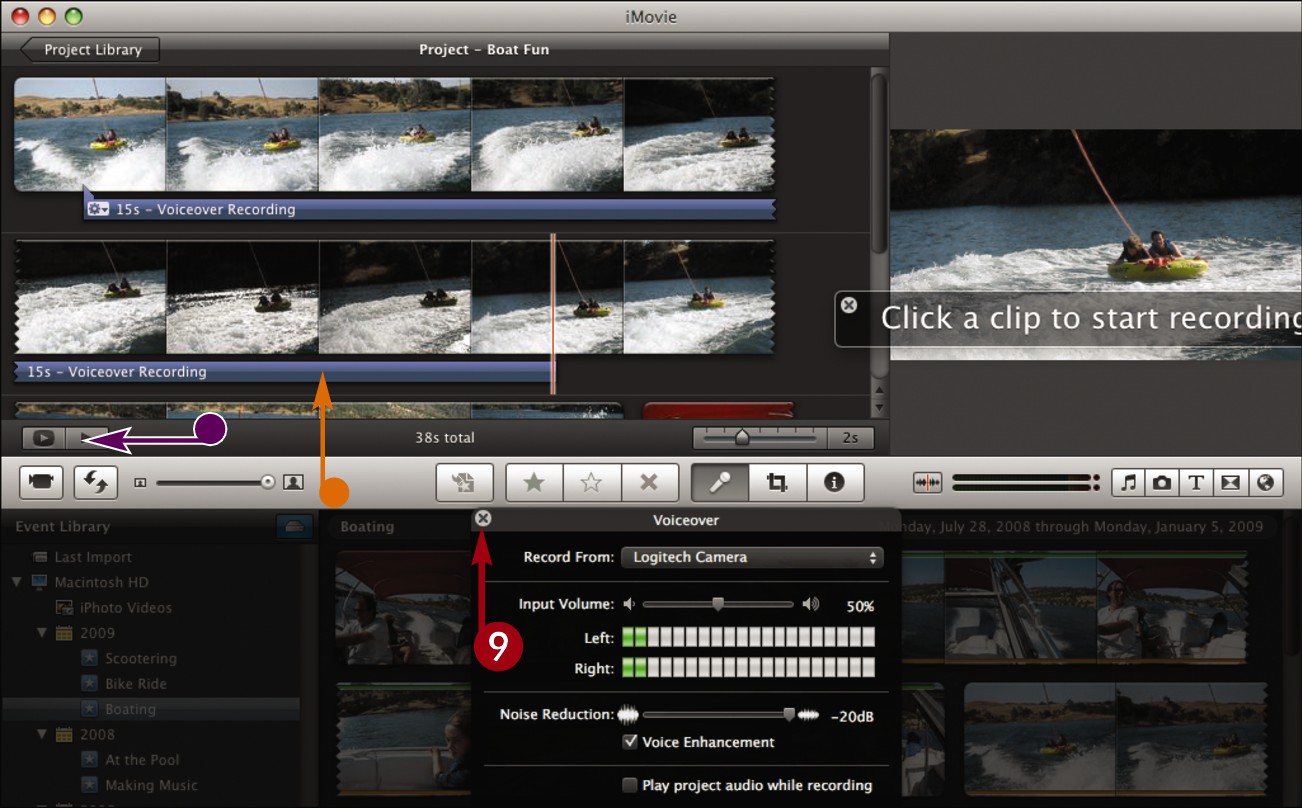
• iMovie adds the voiceover to your project as a purple icon.
 Click
Click  to close the settings.
• You can click  to play the project.
Note: To change the volume of the voiceover, see “Adjust Volume.”
