Chapter 12: Editing and Mixing Music
Understanding the GarageBand Workspace

GarageBand lets you assemble songs from prerecorded audio loops and music that you record yourself. You can adjust the volume and stereo placement of each instrument, also known as mixing a song, add special effects, edit individual notes, and more. Before starting a GarageBand project, familiarize yourself with the program workspace.

Timeline
The timeline is where you arrange music loops and recordings to create your GarageBand project. Each row in the timeline represents a track where you can place a different instrument. When you play a project, a vertical line called a playhead shows the progress along the timeline.
Tracks
GarageBand displays the types of instruments in your project as tracks. There are three types of tracks in GarageBand: real instrument tracks made up of instrument recordings or prerecorded loops of instruments, software instrument tracks where music is defined programmatically, and electric guitar tracks that can be modified using various guitar-specific settings.
Regions
When you add a segment of audio to your project, GarageBand creates a region in the timeline. You can arrange and rearrange the regions on the timeline to suit your tastes. Regions are colored differently depending on the type of music: Real instrument loops are blue, recorded real instruments are purple, software instruments are green, and imported audio files are orange. See “Add a Loop to the Timeline” for more details.
Track Info
Double-clicking a track opens a track info panel. Here you can make changes to the instrument that corresponds to the track. For example, you can add predefined special effects that change an instrument’s sound. See “Add an Effect” for details.
Track Editor
The track editor gives you a low-level view of your project. Music is represented either as a waveform, for audio created from real instruments, or discrete notes, in the case of software instruments. In the editor you can change the pitch of a track to shift all the notes in a track or edit notes one at a time. See “Adjust the Pitch” or “Edit Musical Notes” for details.
Play Controls
You can preview your project to hear how the loops and recordings that you have assembled sound. See “Play a Project” for more information.
LCD
The LCD, or liquid crystal display, lets you monitor a song as it plays. It shows you the progress of the song in terms of time or musical measures. You can also display tuning, chord, tempo, and other basic information in the LCD.
Volume Controls
Volume sliders enable you to control the loudness of the music in your project. Besides controlling the overall volume, you can control the loudness of individual instruments in tracks. See “Change the Volume” for more details.
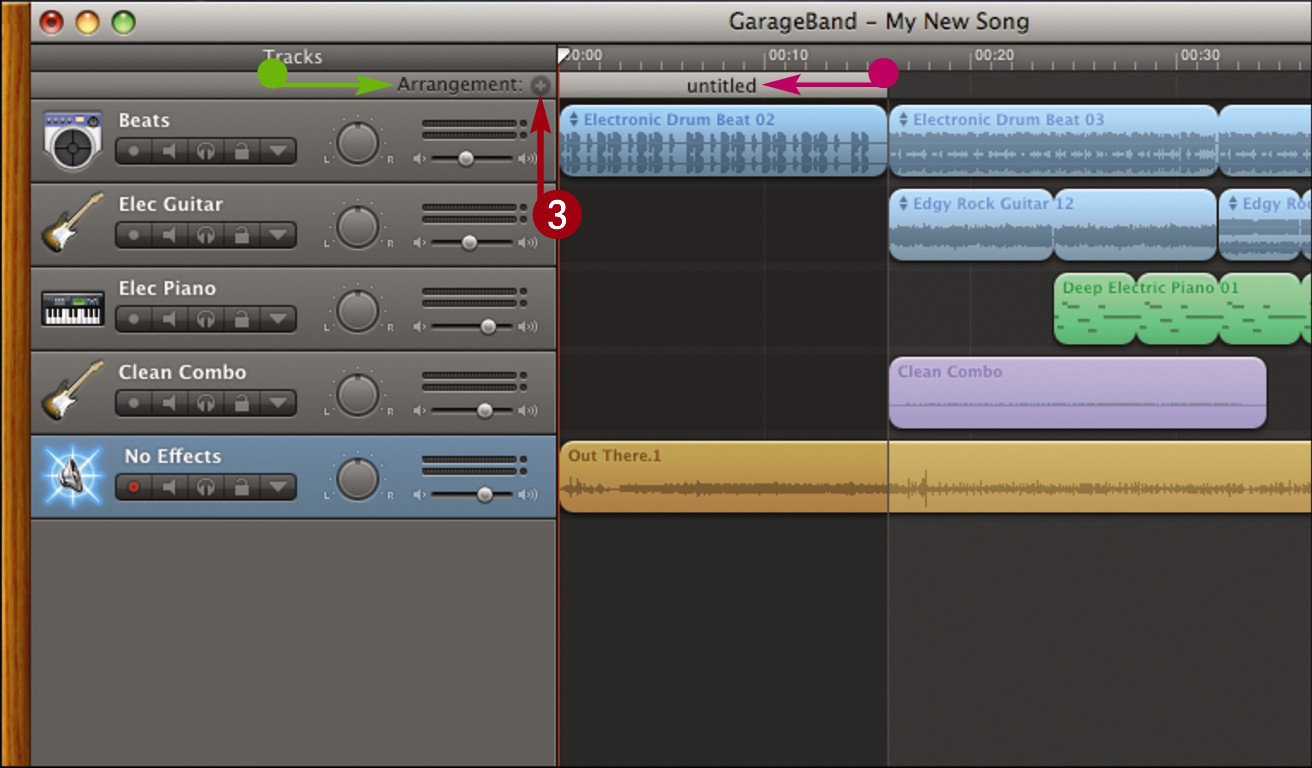
Create a New Project
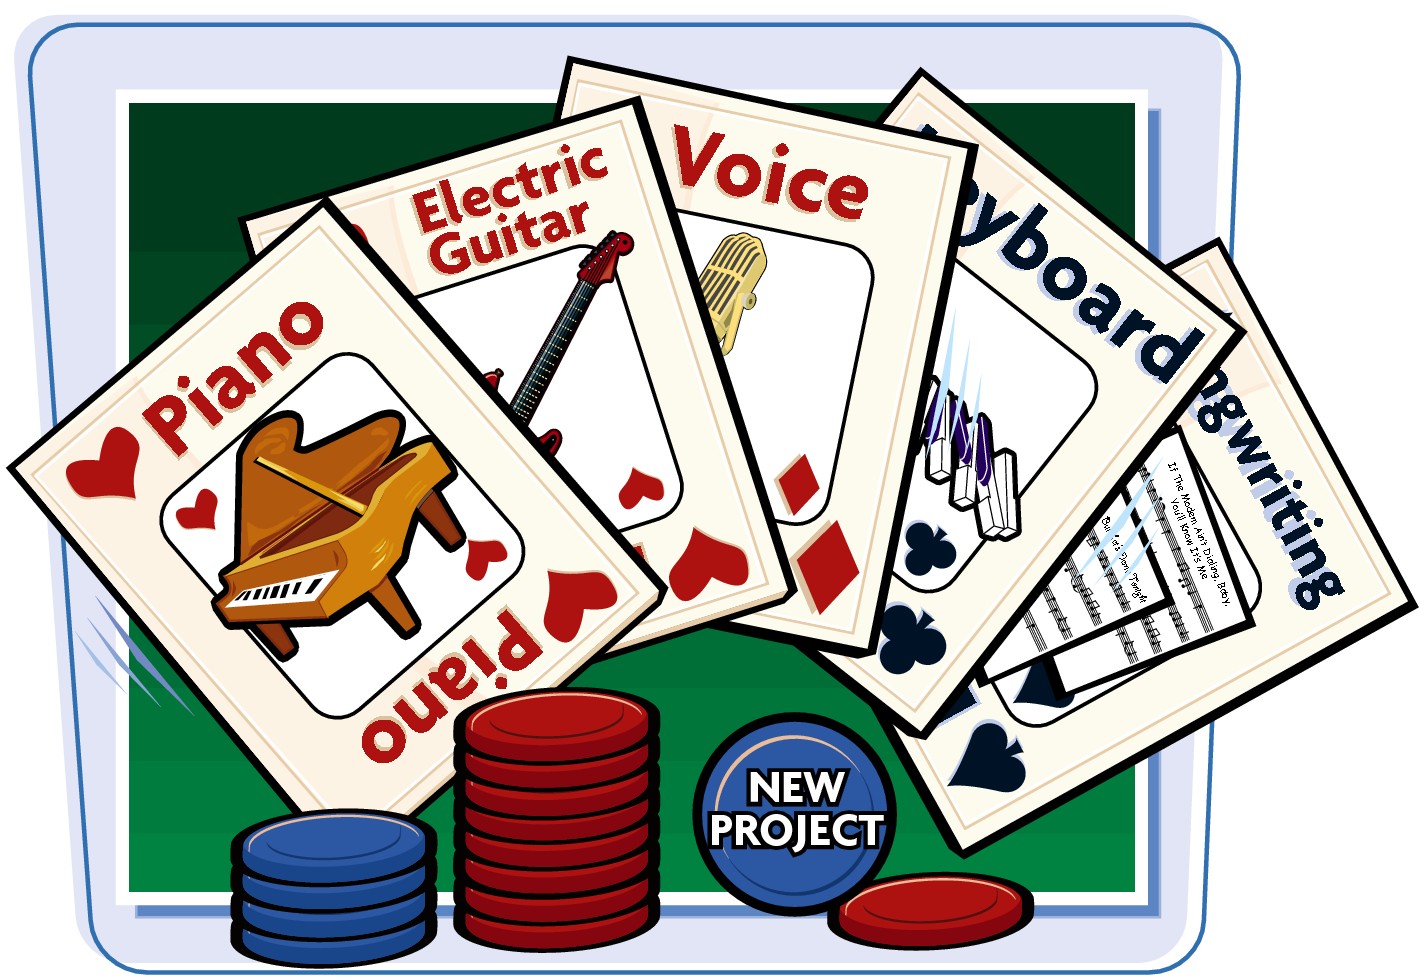
You can start assembling music in GarageBand by creating a new project. You select a project template based on the type of audio you want to work with. You can work with GarageBand’s predefined loops, work with a specific type of instrument, write a song for multiple instruments, or create a podcast.
Create a New Project
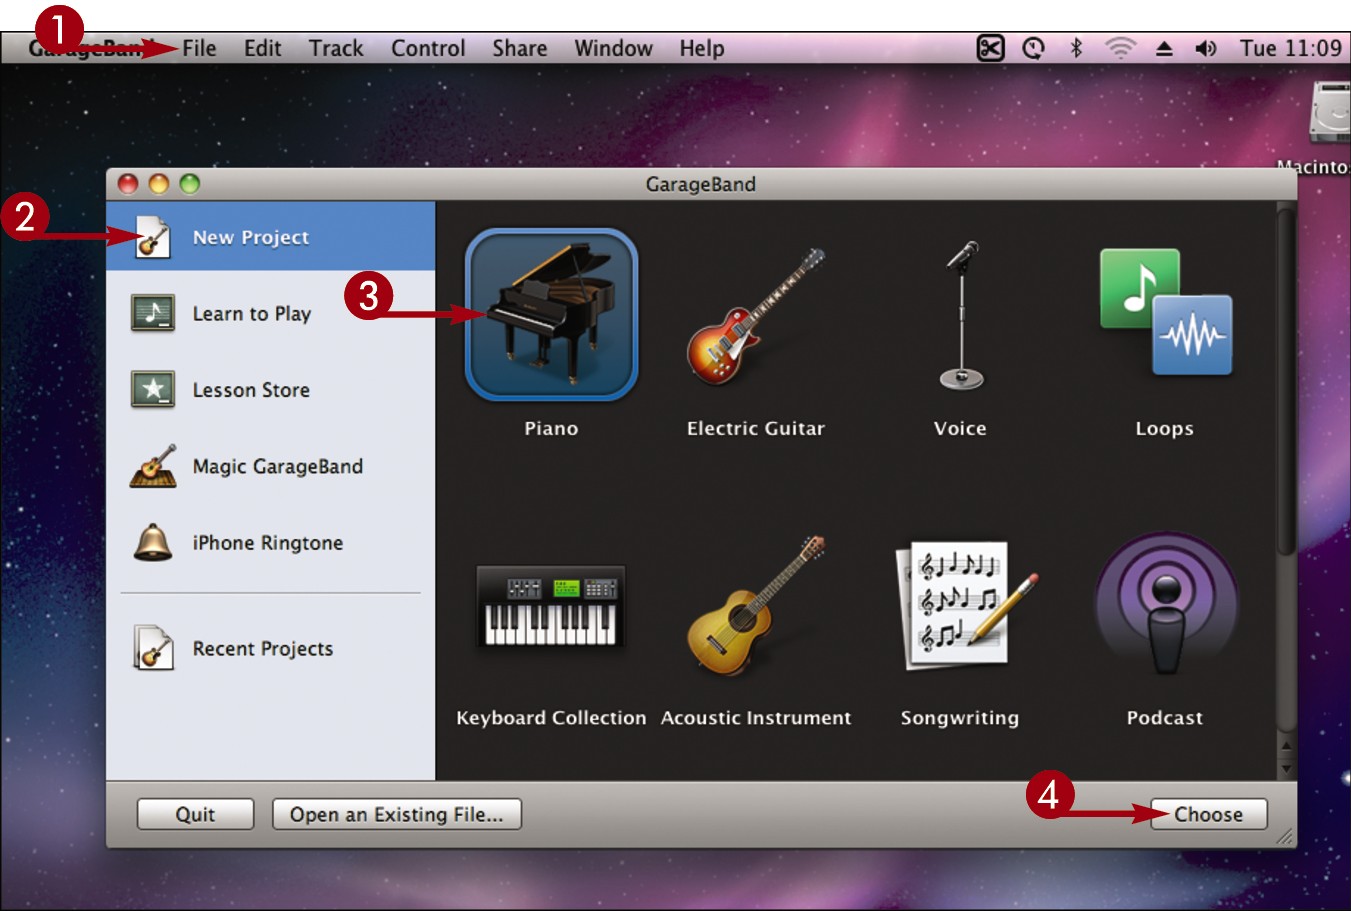
 Click File and then New.
The GarageBand window appears. This window also appears when you first start GarageBand.
 Click New Project.
 Click a project template.
 Click Choose.
The New Project from Template window appears.

 Type a name for your project.
 Select where to save the project.
• You can click  to save your project in other locations on your computer.
• You can optionally adjust the tempo, signature, and key settings for your project. See the tip for details.
 Click Create.
GarageBand creates a new project.

• You arrange the different loops and recordings that make up your song in the timeline.
Tracks enable you to separately control the instruments in a song.
• In this example, a piano template was used, so GarageBand inserts a single piano track.
• You can click and drag loops from the loop browser to the timeline to add predefined music to your project.
Note: See “Browse for and Preview Loops” for details.

 Click File.
 Click Save.
GarageBand saves the project.
![]()
What are the tempo, time signature, and key settings?
These settings determine the timing and other fundamental aspects of your project. You can adjust them when you create a new project.

• The tempo is the rate at which beats occur. The tempo is measured in beats per minute (bpm). You can set the tempo for a project to between 60 and 240 bpm.
• The time signature, such as 4/4 or 6/8, determines the relationship between beats and measures. Measures are the divided sections in the project timeline. The first number is the number of beats in each measure and the second number the length of the note that gets one beat.
• The key defines the central note of a project. You can set the key to any note between A and G sharp (G#). Along with the key, you can choose to use either the major or minor scale.
Browse for and Preview Loops
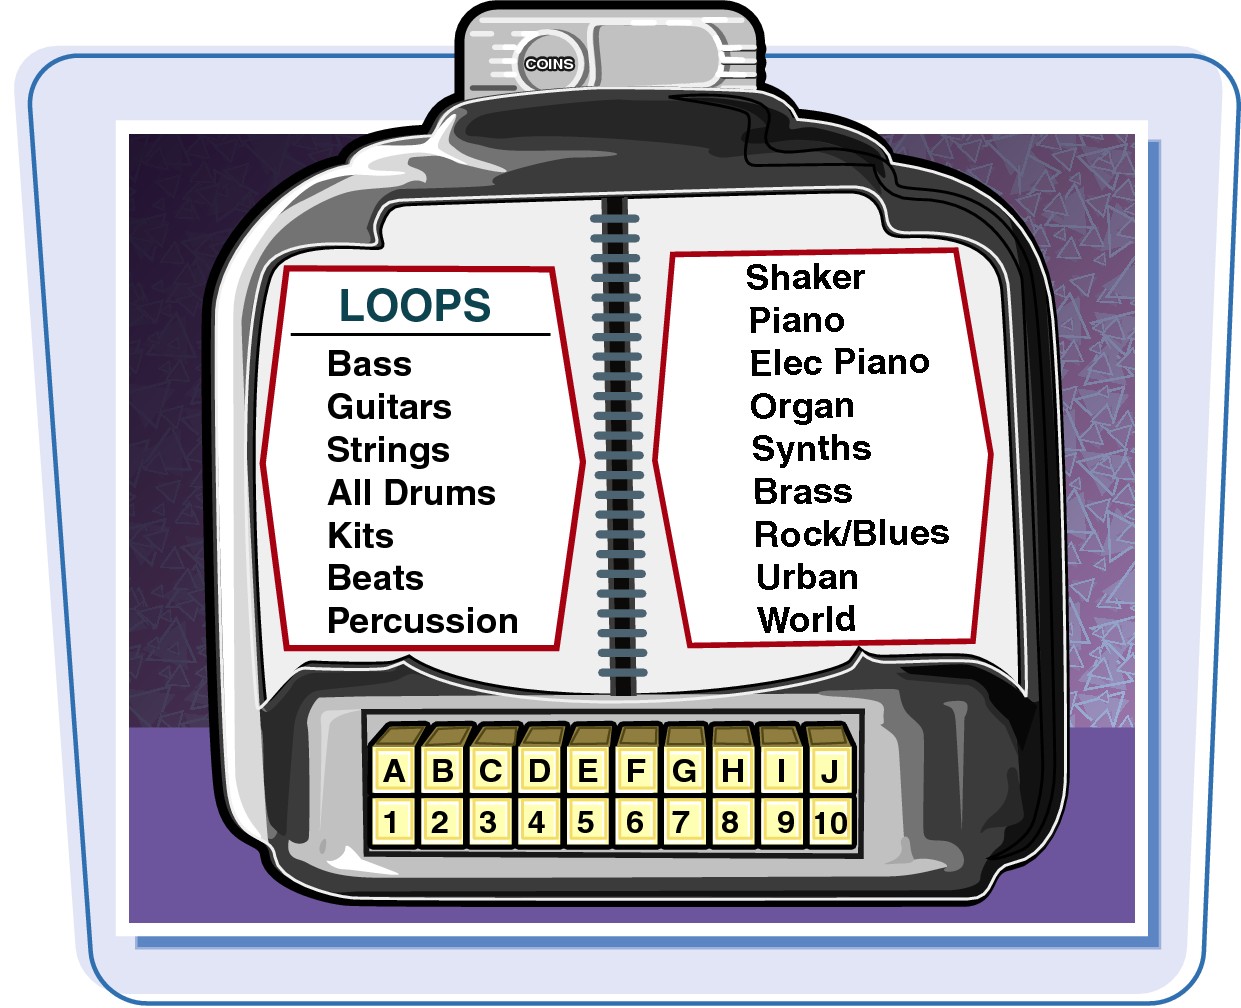
GarageBand comes with hundreds of predefined music snippets, or loops, that you can combine to create a song. You can view the loops based on instrument, musical style, and more in the loop browser.
Browse for and Preview Loops
Browse in Button View

Click  to display the loop browser.
Click  to show musical button view.
Click a button to display loops in a category.
• GarageBand displays the loops in the category.
Click another button.
GarageBand filters the loops by the second category.
• You can click Reset to reset the buttons.
Browse in Column View

Click  to show column view.
Click a category.
GarageBand displays a set of subcategories.
Click a subcategory.
GarageBand displays a list of keywords.
Click a keyword.
• GarageBand displays the loops.
Preview a Loop

• Loops with colored icons are already installed and can be previewed and added to a project immediately.
• You can click the arrow ( ) to download and install a loop.
Click a loop.
GarageBand plays the loop.
You can click the loop again to pause it.

• You can click the column headers to sort the loops by different criteria.
• You can click and drag the slider to adjust the volume.
• You can search for a loop by typing a keyword.
![]()
How do I mark a loop as a favorite?
Because hundreds of clips are available in GarageBand, it can be helpful to mark interesting ones that you find as you browse. Click the check box in the Fav column ( changes to
  ) for the loop you want to mark as a favorite. To view your favorite loops, click the Favorites button in musical button view or the Favorites category in column view.

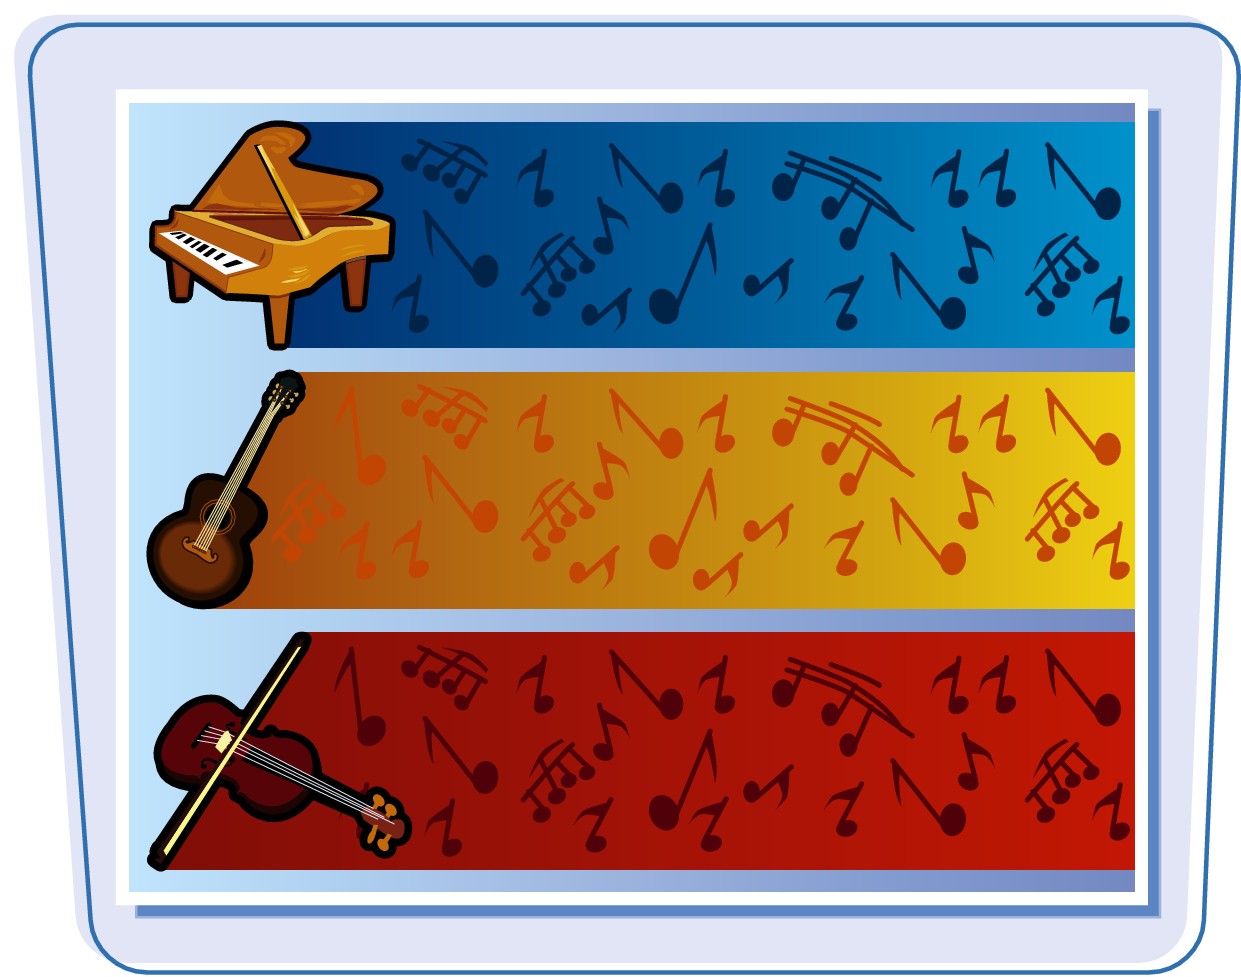
What is the difference between a real instrument and software instrument?
There are two types of music in GarageBand. Real instrument music, which is marked with a blue icon ( ) in the browser, is a digital recording of a real instrument such as a guitar, a piano, or vocals. Software instrument music, which is marked with a green icon (
 ) in the browser, is defined by code that describes how to play sounds, not actual recorded music. Real instruments and software instruments must be on separate tracks in the timeline.

Add a Loop to the Timeline
You can add loops to the GarageBand timeline to create a song. You can add loops in sequence so they play one after the other. You can also add them as separate tracks so that they play in parallel.
Add a Loop to the Timeline
Add a Loop to a New Project
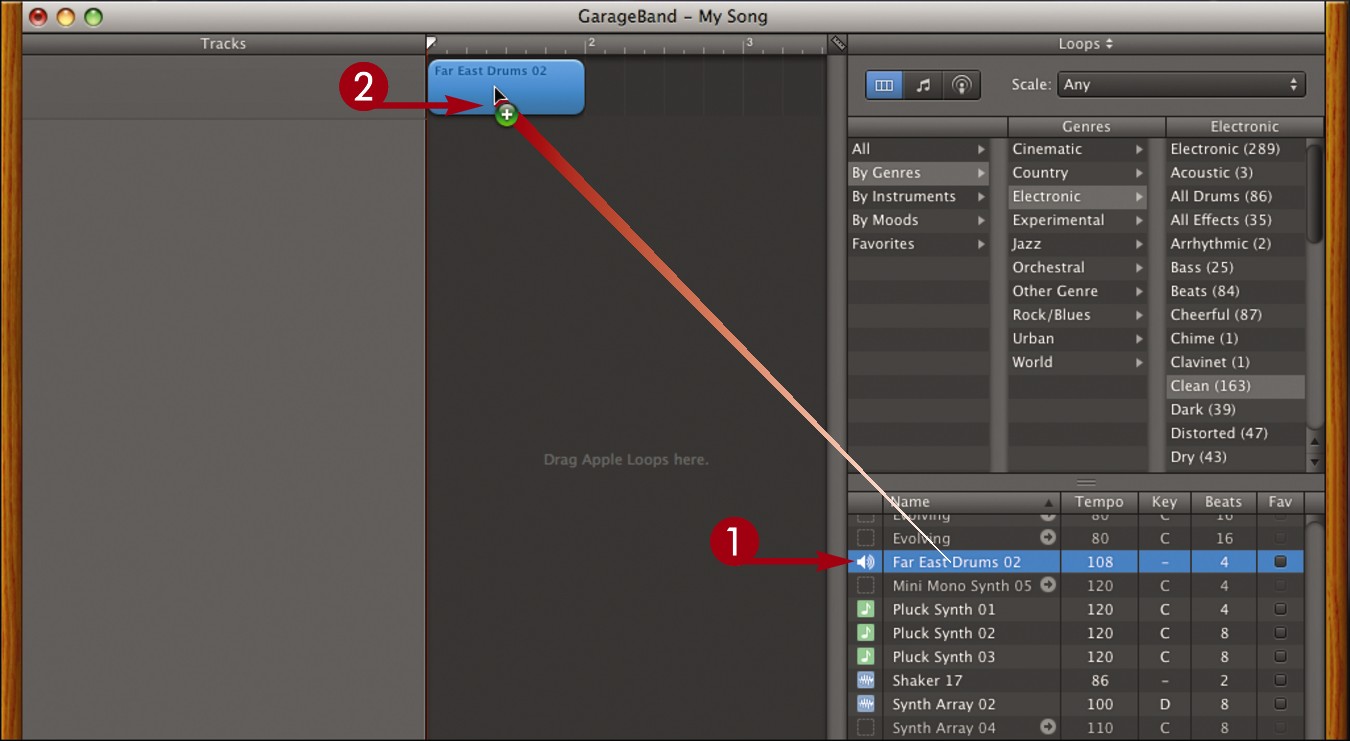
Find a loop you want to add in the loop browser.
Note: See “Browse for and Preview Loops” for details.
Click and drag the loop to the timeline.
Note: You can also add music that you recorded yourself. See Chapter 13 for details.

• GarageBand adds the loop to your project.
A loop added to the timeline is called a region.
When you edit a region in your project, the edits do not affect the original loop.
Add a Loop in Sequence
Click and drag the loop to the area just before or after an existing region.
A track can only contain either real instrument loops or software instrument loops. For example, you can add real instrument loops only to loops that already contain real instruments.

• GarageBand adds the loop to the existing track.
Add a Loop to a new track
Click and drag a loop to the area below any existing tracks.

• GarageBand adds the loop to a new track.
Regions that are above or below one another play at the same time.
![]()
How do I rearrange regions in the timeline?
You can click and drag regions to rearrange them in the timeline. You can move regions within the same track or move them from one track to another. To delete a region, click to select it, click Edit, and then click Delete. To duplicate a region so that it repeats, see “Repeat a Region.”

How can I make it easier to align my clips with one another?
By default, the “snap to grid” feature is turned on in GarageBand. This means regions in the timeline automatically snap into alignment with beats and measures in the timeline. You can turn snapping on and off in the Control menu. You can also turn on alignment guides, which are vertical lines that appear when region edges align with one another. Click Control and then Show Alignment Guides.

Repeat a Region

You can make a region in the timeline repeat. This allows you to extend a drum beat or guitar riff throughout a song. You can cause a region to repeat by dragging its edge or by copying and pasting it.
Repeat a Region
By Clicking and Dragging
Click and drag the zoom slider to view the area of the song you want to work with.
Move the cursor to the upper-right corner of a region ( changes to
  ).
).
Click and drag to the right.

• GarageBand repeats the region.
• Notches appear where the region repeatedly starts and ends.
By Cutting and Pasting

Click to select a region.
Click Edit.
Click Copy.
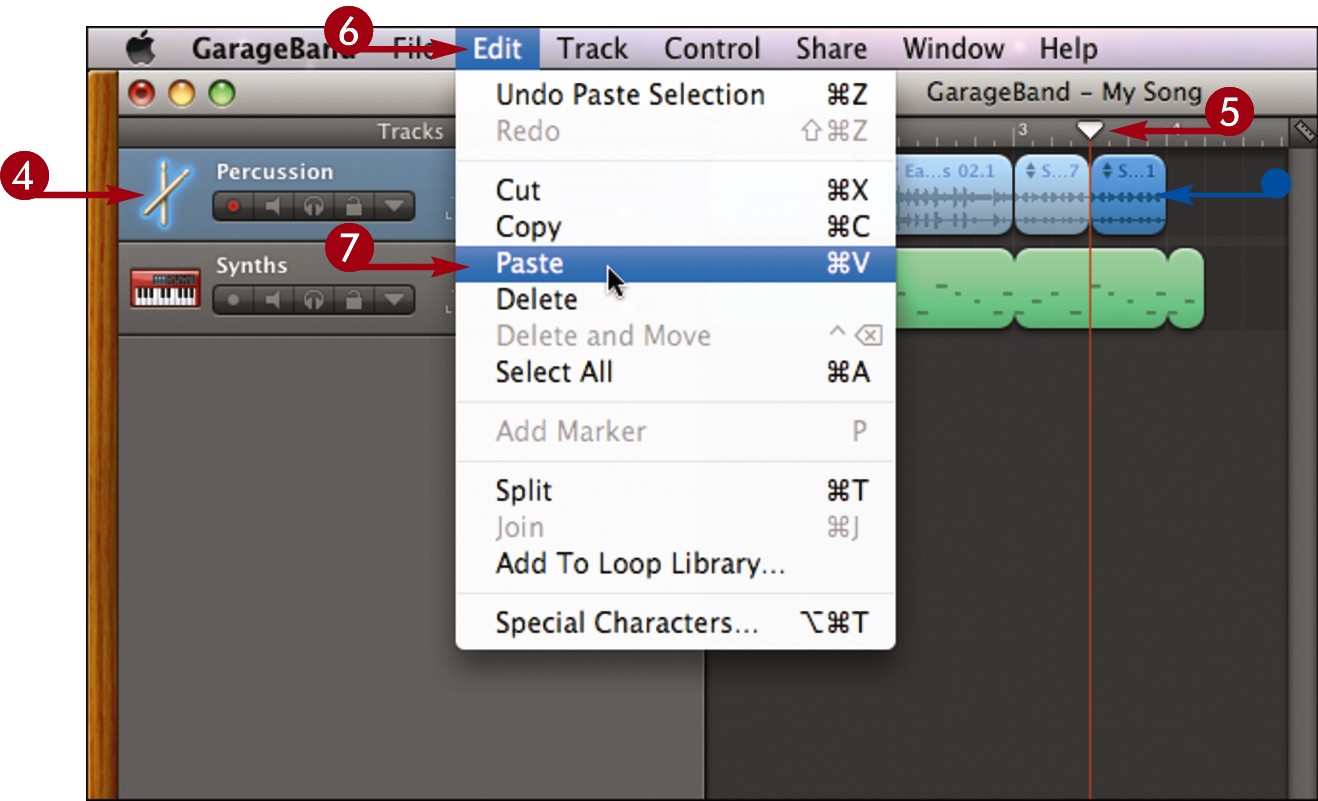
Click the track where you want to duplicate the region.
Click and drag the playhead to the place where you want to add the duplicate.
Click Edit.
Click Paste.
• GarageBand pastes the copy into the timeline.
![]()
How can I change a region to a loop that is musically similar?
Some loops in GarageBand belong to a family of similar loops. Loops in a family have the same name but a different number at the end. You can easily change a region to another loop in the family.

Click the arrows ( ).
).
A menu showing related loops appears.
Click a loop name.
GarageBand changes the region.
Split or Join Regions

You can split a region in two and then rearrange the split sections or apply different settings to each section. You can also join two regions to move the regions as a single unit or apply the same settings to the regions.
Split or Join Regions
Split A Region

Click to select a region.
You can split both real instrument regions () and software instrument regions ().
Click and drag the playhead to mark where to split the region.
Click Edit.
Click Split.

• GarageBand splits the region.
The split sections can be edited independently.
• You can select a region, click Edit, and then click Delete to remove it from the timeline.
Join Regions

 -click to select multiple regions in the timeline.
You can join regions created from software instrument loops (). The regions can be on the same or different tracks.
Click Edit.
Click Join.

• GarageBand joins the regions and applies the name from the leftmost region to the result.
You can click and drag to move the joined region.
![]()
How can I adjust the resolution of the timeline to change how regions are shown?
You can drag the zoom slider to adjust how much of a region is shown in the timeline.

Click and drag left.
• The timeline zooms out, showing more regions at once. This can be helpful when shuffling regions to different parts of a song.
Click and drag right.
• The timeline zooms in, magnifying the regions. This can be helpful when precisely placing regions in a project.
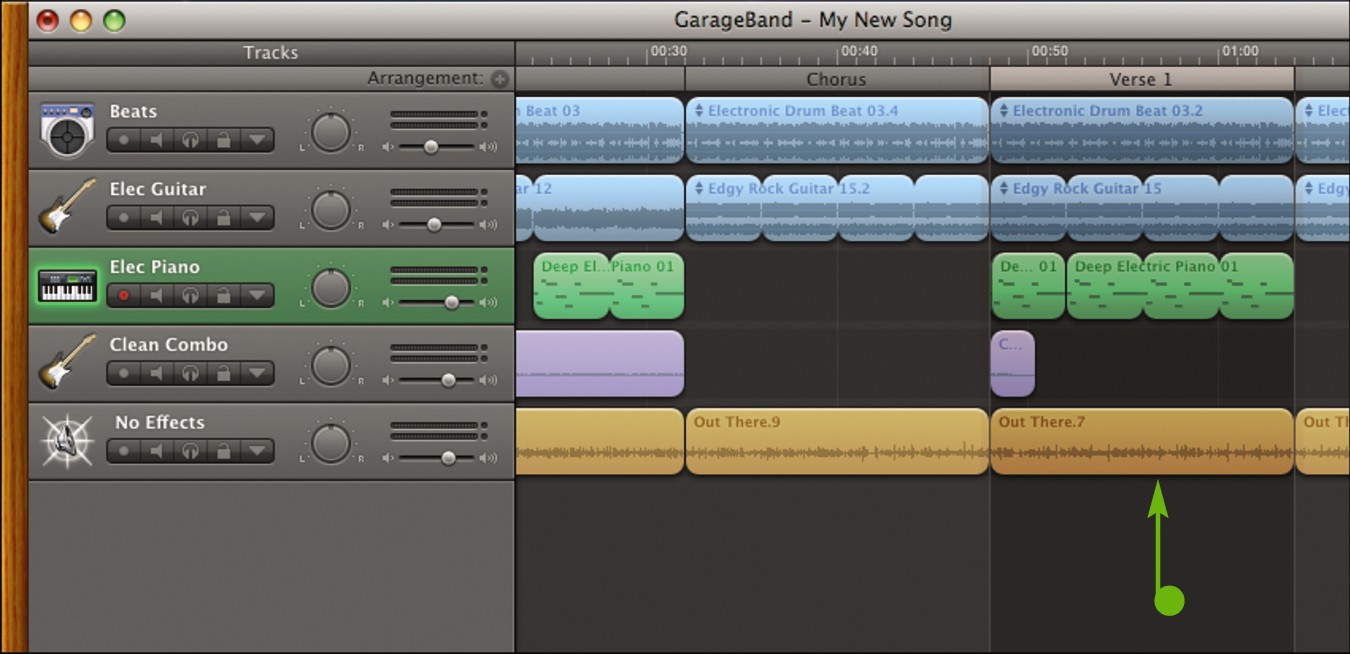
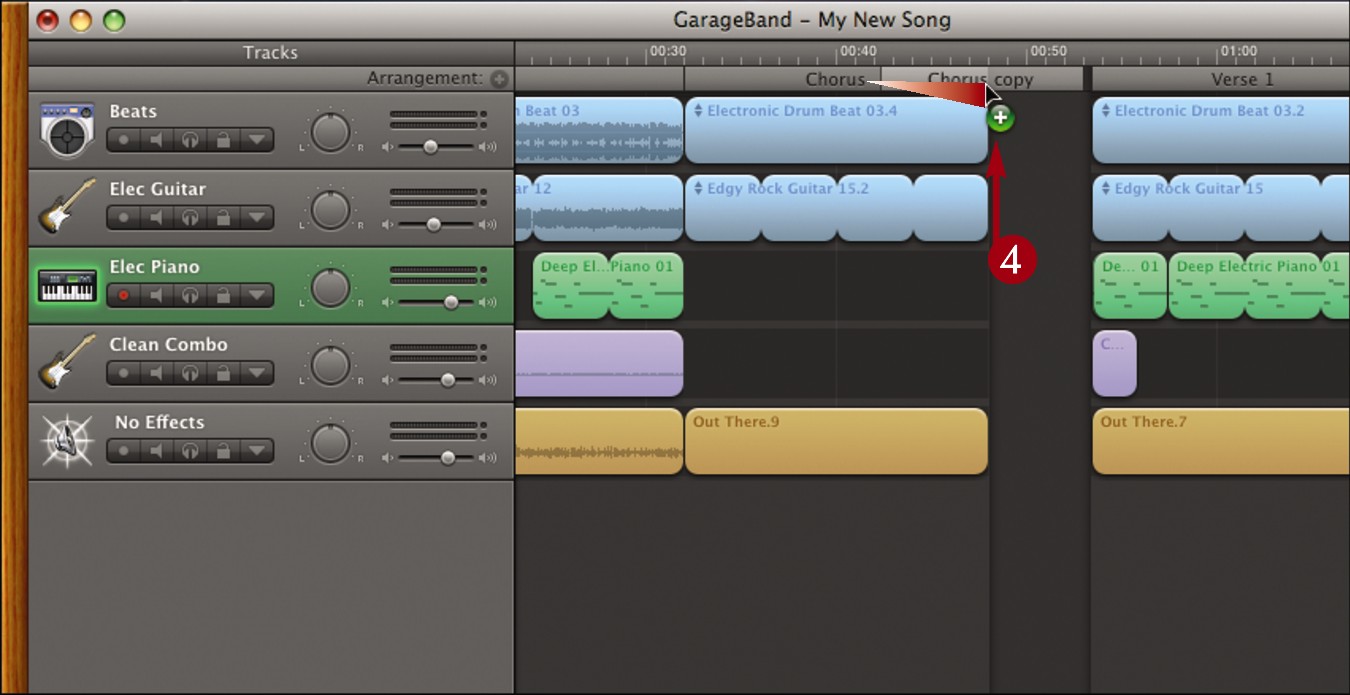
Create an Arrange Region

You can create an arrange region to identify a section of the project containing multiple regions. You might create an arrange region to mark the introduction, verse, or chorus of a song.
Create an Arrange Region

Click Track.
Click Show Arrange Track.
• GarageBand displays the arrange track.
Click the plus sign ( ).
).
• GarageBand adds an arrange track to the beginning of the song.

Click and drag the edge of the arrange track to resize it.
GarageBand resizes the arrange track.
Double-click the arrange track title.
The title becomes editable.

Type a name for the arrange track.
Press  .
.
• The arrange track is renamed.
![]()
How do I delete an arrange track?
Click to select the arrange track, press  to delete all the regions within it and then press again to delete the arrange track itself.
How do I convert a software instrument to a real instrument when adding it to the timeline?
Real instrument loops require less processing power than software instruments, so converting software instruments can help your computer run more efficiently. You can press  and then click and drag a software instrument from the loop browser to the empty area at the bottom of the timeline to convert the instrument.

Edit Using Arrange Regions

You can click and drag arrange regions in your project to quickly rearrange multiple music regions within a song. You can also duplicate arrange regions to extend the length of your project.
Edit Using Arrange Regions
Move an Arrange Region

If arrange regions are not visible, click Track and then Show Arrange Track to display them.
Click and drag an arrange region horizontally to another part of the song.
Release the mouse button.
• The arrange region and all of the regions within it are moved.
Duplicate an Arrange Region
Press and then click and drag an arrange region to another part of the song.
Release the mouse button.

• The arrange region and all the regions within it are duplicated in the new location.
![]()
How can I replace an arrange region in the timeline?
Press and hold  .
.

Click and drag one arrange region directly over another arrange region.
Release the mouse button.
GarageBand replaces the second arrange region with the first one.
Play a Project
You can play a project to hear the music you have added to the timeline. A vertical line called a playhead moves along the timeline with the music showing the region currently being played. You can click and drag the playhead to a specific part of the song to hear it.
Play a Project

Click the Play button ( ).
).
You can also press  to play a project.
GarageBand plays the regions in the order they are arranged, from left to right.
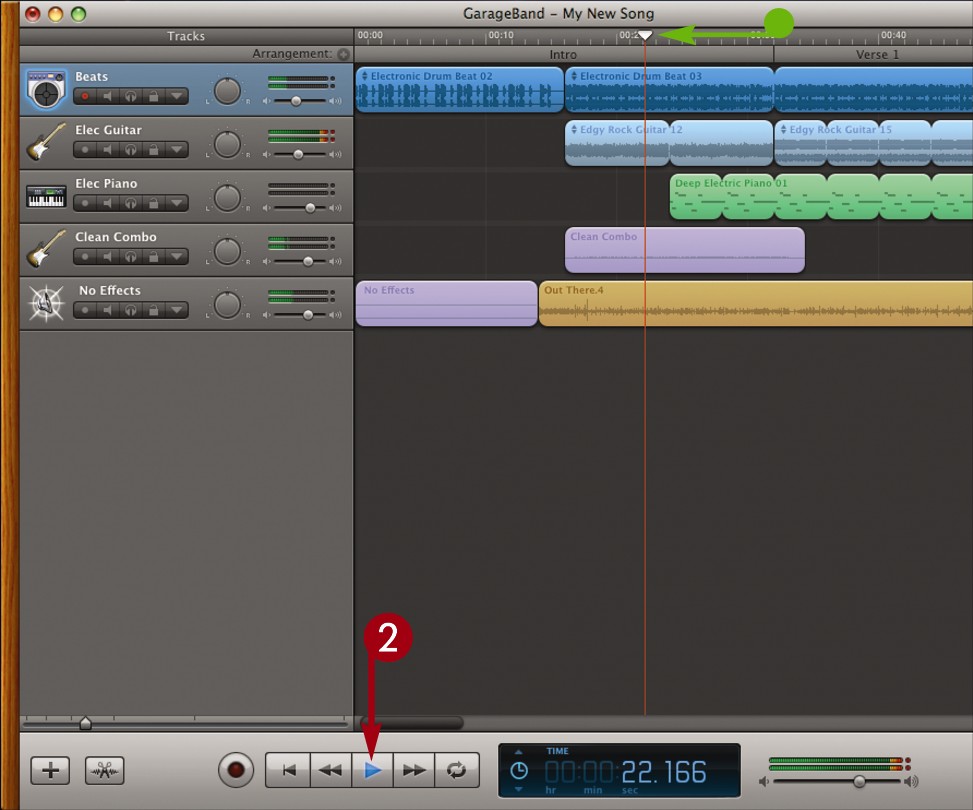
• The playhead moves with the music as it plays.
Click the Play button () or press .
GarageBand pauses the music.

Click and drag the playhead to a different part of the song.
• You can also click  to move the playhead to the beginning.
• You can click  to move the playhead backward.
• You can click  to move the playhead forward.
Click the Play button () or press .
GarageBand resumes playing the song.
• Click  to repeat the song after it finishes.
![]()
How else can I monitor a song as it plays?
You can monitor the song as it plays using the LCD, which stands for liquid crystal display.
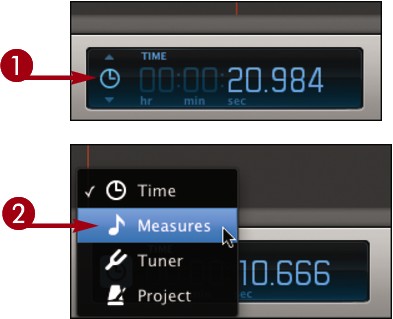
Click the clock icon ( ) to display the LCD modes.
Click a mode.
• Selecting Time displays the absolute time in hours, minutes, seconds, and fractions of a second.
• Selecting Measures displays musical time in measures, beats, and beat divisions.
• Selecting Tuner allows you to tune an instrument when it is connected through an instrument track.
• Selecting Project shows the tempo, key, and time signature information. See the “Create a New Project” tip for details.
Change the Volume

You can adjust the volume of your project to change the loudness at which it plays. You can change the master volume to adjust the volume of all the tracks in the project. You can also change the volumes of individual tracks. Adjusting the volumes of the tracks in a song is also known as mixing a song.
Change the Volume
Change the master volume

Click the Play button.
GarageBand plays the project.
Click and drag the master volume slider.
Drag it to the left to lower the volume or to the right to raise the volume.
• You can click  to mute the project.
• You can click  to set the track to its maximum volume.
GarageBand changes the volume.
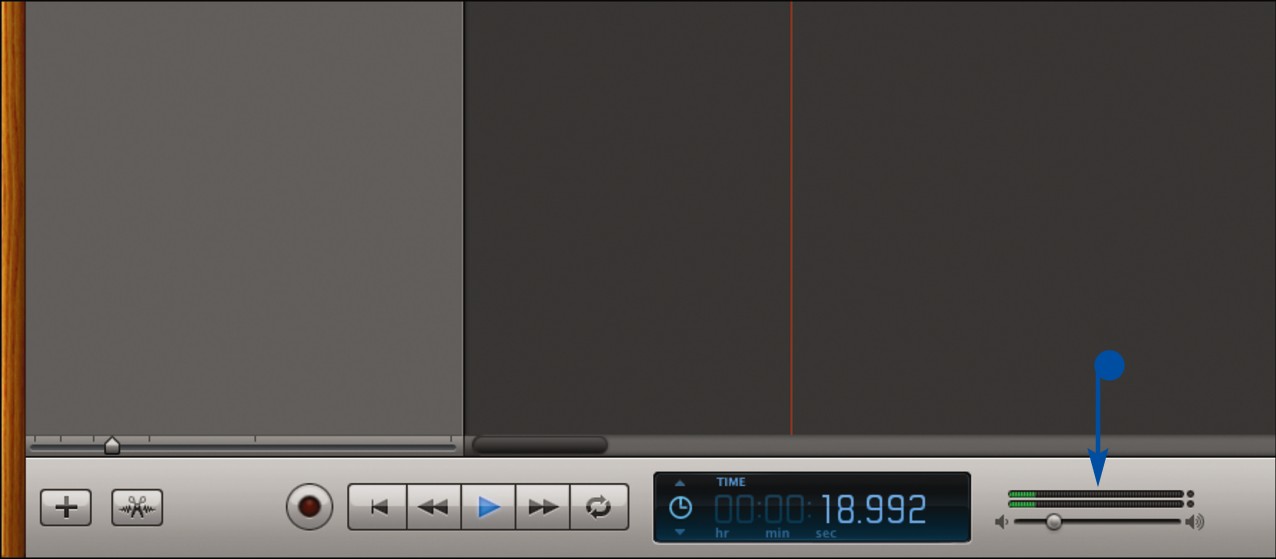
• When you play the project, the current volume levels are shown as colored bars. The volume from the left side is shown on the top and the volume from the right side on the bottom.
Change The volume of a Track

Click and drag a track volume slider.
Drag the slider to the left to lower the volume or to the right to raise the volume.
• You can click to mute the track.
• You can click to set the track to its maximum volume.
• GarageBand changes the volume of the track.
Note: For more about changing track volume, see “Mute Tracks.”
![]()
How do I set different volume levels at different points in a track?
You can set different volume levels using the automation curves for a track. Automation curves let you change track settings such as volume over time.

Click the automation icon ( ).
).
• The automation curves appear.
Click here and select Track Volume.
Click on the curve where you want the volume to change.
GarageBand inserts a control point ( ).
).
Click and drag the control point up or down to change the volume at that point in the track.
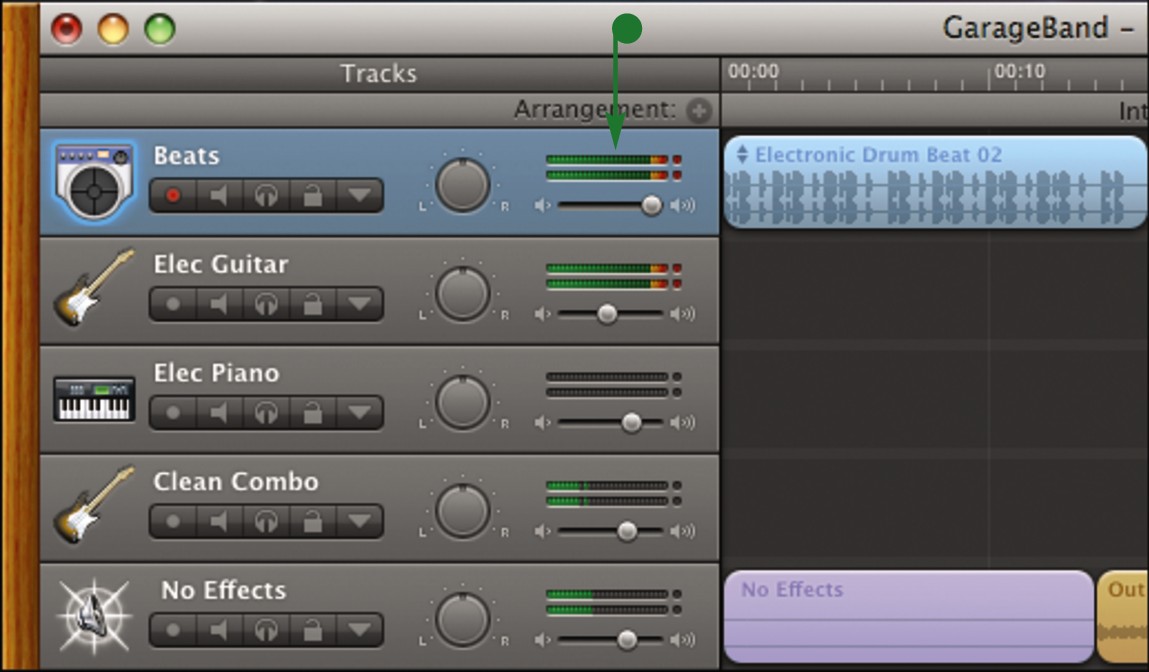
Mute Tracks
You can mute a track to listen to your project without a specific instrument playing. You can also mute all tracks except one, which is known as soloing. Soloing lets you make adjustments to a specific instrument without the distraction of other instruments.
Mute Tracks
Mute a specific track

Click Mute Track ( ).
).
GarageBand mutes the track.

• When the project is played, the colored level bars for the track disappear.
• Regions in the track are grayed.
You can click the button again to unmute the track.
Mute all tracks but one

Click Solo Track ( ).
).
GarageBand solos the selected track and mutes the others.

• When the project is played, only the colored level bars for the soloed track appear.
• Regions in the other tracks are grayed.
You can click the button again to unmute the other tracks.
![]()
How can I set the pan position?
The pan position for a track determines the left-to-right placement of a track in the stereo field. For example, you can adjust the pan of a track to play it mostly out of the left or right speaker. Adjusting pan positions is part of mixing a song.
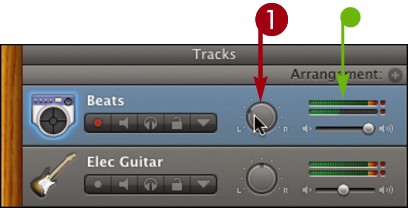
Click and drag the pan dial counterclockwise to pan to the left or clockwise to pan to the right.
GarageBand adjusts the pan position.
• When you play the track, the colored level bars show the pan levels. The top bar displays the sound coming from the left side and the bottom bar the sound coming from the right side.
Adjust the Pitch

You can adjust the pitch of a track to make it play at a different key. This is also called transposing a track. Changing the pitch shifts all the notes in a track higher or lower.
Adjust the Pitch
Change a real instrument

Select a real instrument region ().
• You can also click a track to select an entire track of music.
Click the Track Editor button ( ).
).
The track editor opens.

• For real instruments, the music is shown as a waveform.
• Make sure Follow Tempo & Pitch is selected.
Click and drag the slider.
GarageBand adjusts the pitch.
Change a Software instrument

Select a software instrument region ().
• You can also click a track to select an entire track.
Click the Track Editor button ().
The track editor opens.

• For software instruments, the music is shown as discrete notes.
• You can click Score to view the notes as sheet music.
Click and drag the slider.
GarageBand adjusts the pitch.
![]()
How do I adjust the pitch of an entire project?
You can adjust the pitch of all the tracks at once using the Master Pitch setting.
Click Track and then click Show Master Track.
The Master Track appears.

Click here and select Master Pitch.
Click where you want the pitch to change.
GarageBand inserts a control point ().
Click and drag the control point up or down to change the pitch of the project.
Edit Musical Notes

You can edit the individual notes of software instruments, making them higher or lower, changing where they are played in the song, and making the note duration longer or shorter.
Edit Musical Notes
Play a Note

Select a software instrument region ().
Click the Track Editor button ().
The track editor opens.
• The music is shown as discrete notes in piano roll view.
Click a note to play it.
• You can click Score to edit the notes as sheet music.
Change the pitch

Click and drag a note up or down.
GarageBand changes the pitch of the note, making it higher or lower.
Change When a note is played

Click and drag a note left or right.
GarageBand changes the position of the note in the song.
Change the note duration

Click and drag the right edge of a note to the left or right.
GarageBand changes the how long the note is played.
• You can click and drag the slider to change the velocity, or loudness, of a selected note.
![]()
How do I add, copy, or delete a note?
To add a note, -click in the editor. You can then click and drag the note to adjust its pitch, position, and duration. To copy a note, -click it and then drag. To delete a note, click to select it and then press  .
.
How do I edit notes as music notation?
In the track editor, click Score (•) to view the region as music notation. You can click and drag notes to rearrange them just as you can in piano roll view. Right-clicking in score view displays a menu for adding different types of notes.

Add an Effect
You can apply echo, reverberation, distortion, and dozens of other special effects to tracks. You can fine-tune the effect settings or layer multiple effects to get the sound you want.
Add an Effect

Double-click a track.
• GarageBand opens the info pane for the track.
Click Edit.
The effects are shown.

• You can click to turn off an effect ( changes to
  ). You can click it again to turn it back on.
Click an empty box.
A menu appears.
Click an effect name.

• GarageBand adds the effect.
Click here.
A menu of effect presets appears.
Choose a preset to customize the effect.
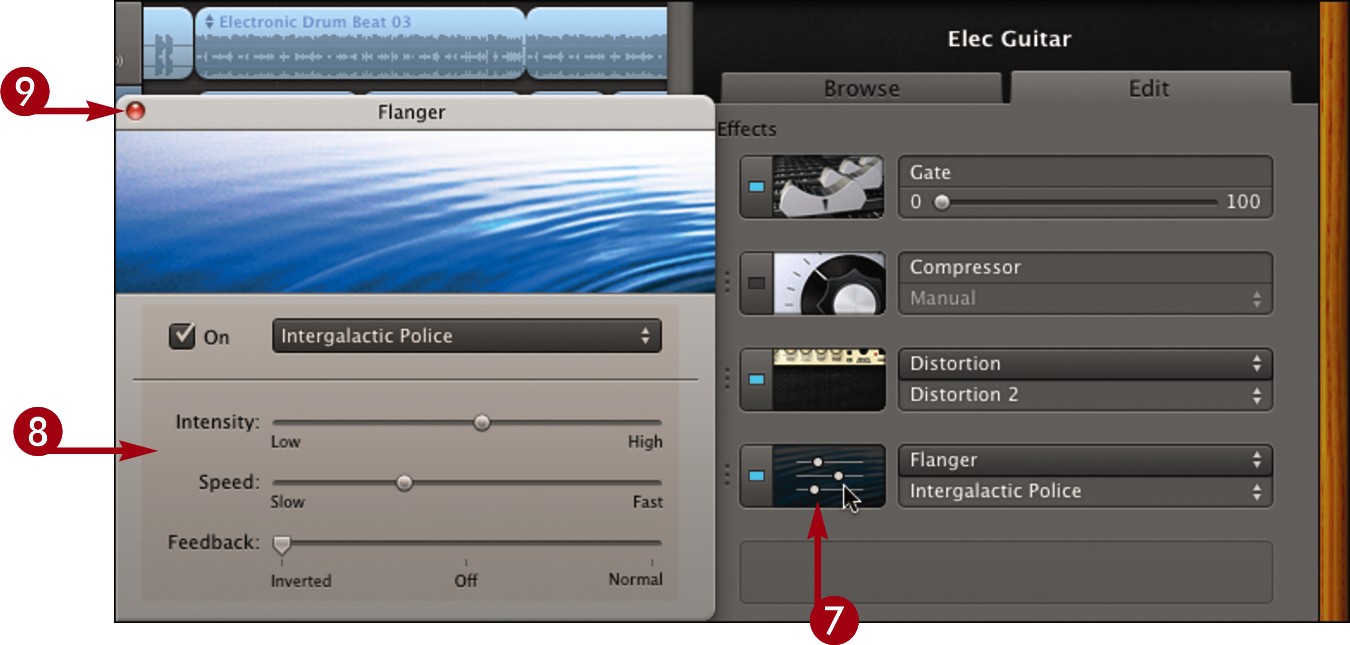
Double-click the effect icon.
The effect settings appear.
Adjust the settings to customize the effect.
Click  to close the settings.
GarageBand applies the effect to the track.
![]()
How do I apply effects to all the tracks in a project at once?
Follow these steps to use the Master Track settings:
Click  to show the Track Info pane.
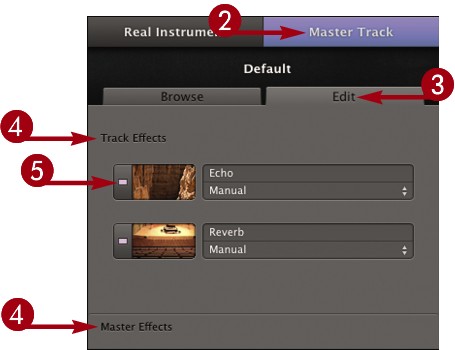
Click Master Track.
The Master Track settings appear.
Click Edit.
Select from menus in the Track Effects and Master Effects areas to apply effects to the entire project.
Click to turn an effect on ( ) or off ().