Chapter 21: Editing a DVD Project
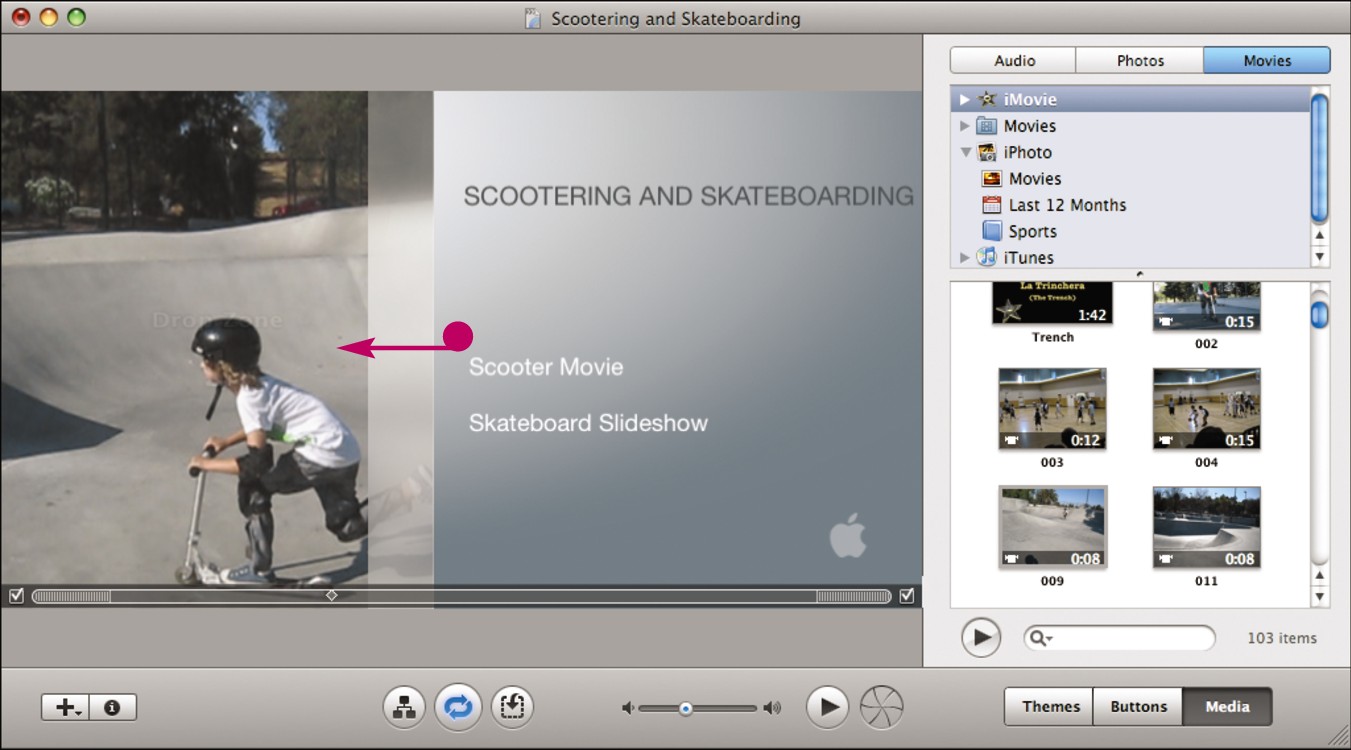
Add a Movie
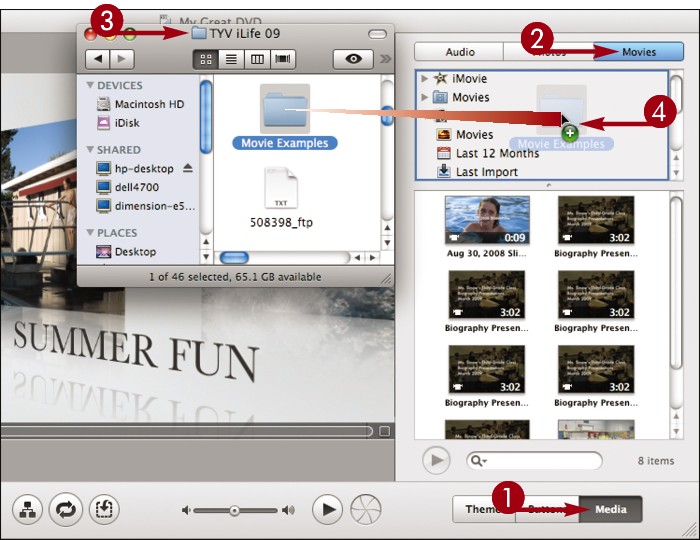
You can include a movie in your iDVD project and view the movie when you play your DVD. When you add a movie, iDVD creates a clickable button in your project menu. You can choose movies from iMovie, iPhoto, iTunes, or folders on your computer.
Add a Movie
Click and drag
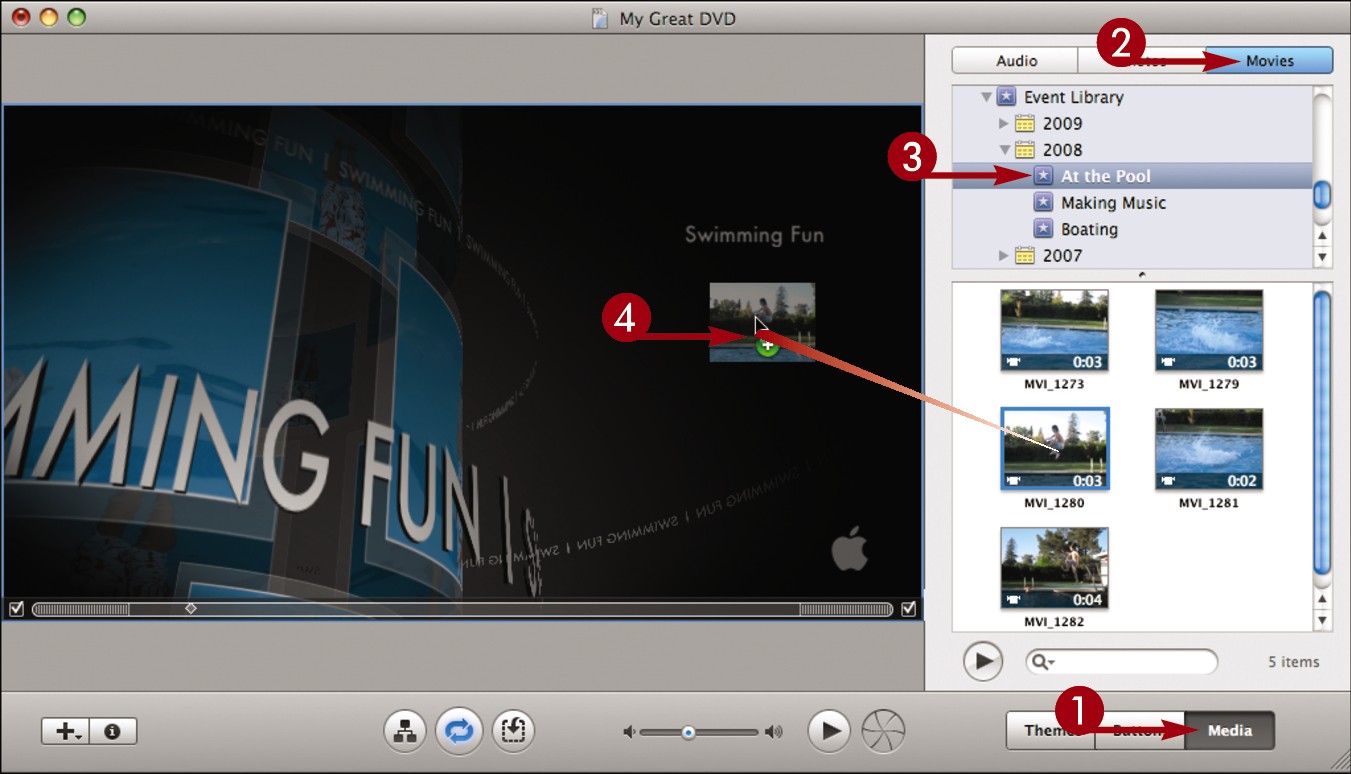
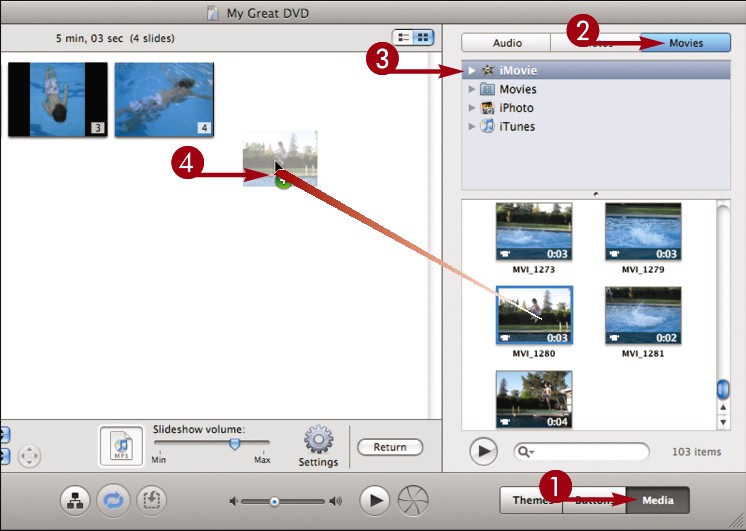
 Click Media.
 Click Movies.
 Click a list item to display the available movies from an iMovie event.
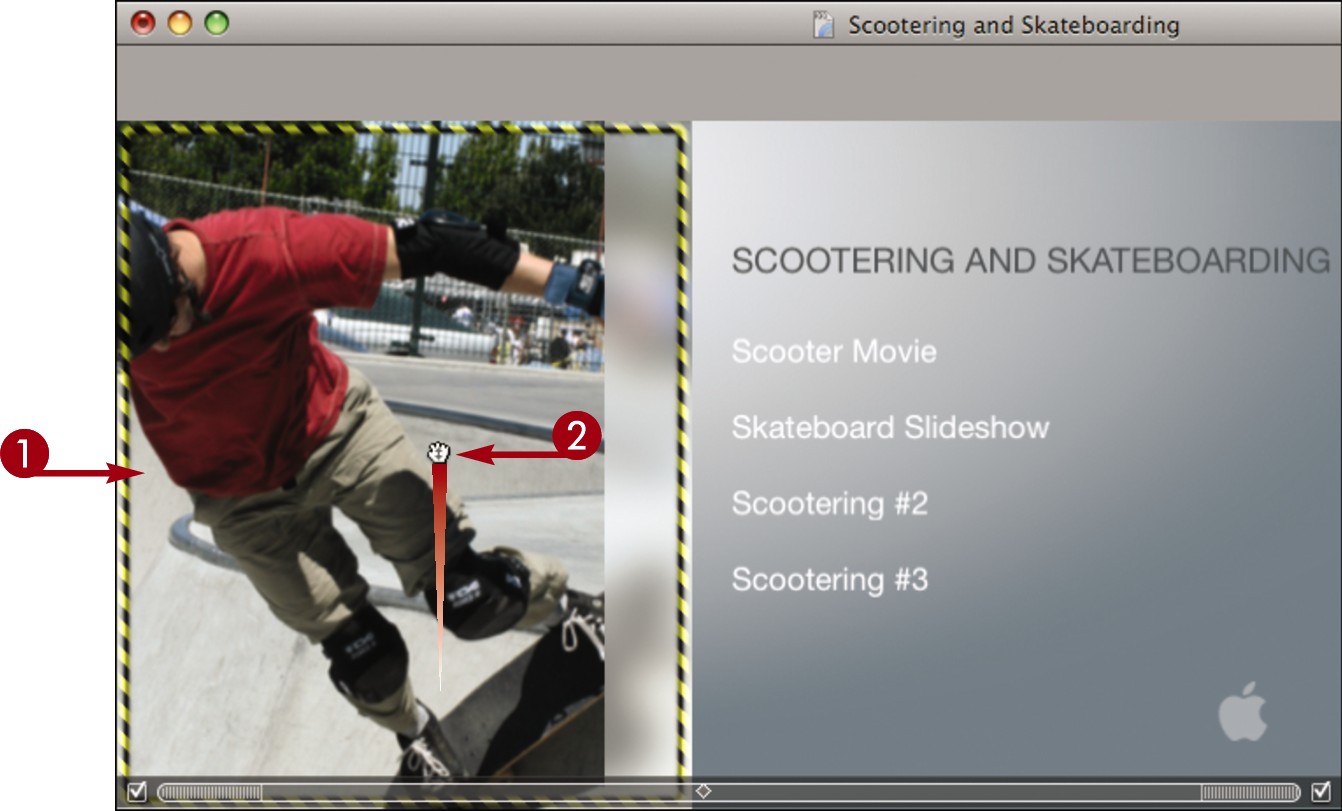
 Click and drag a movie to the project menu.
• iDVD adds a button to the menu labeled with the movie file name.
Note: To edit the button, see “Customize a Button.”
 Double-click the button to play the movie.
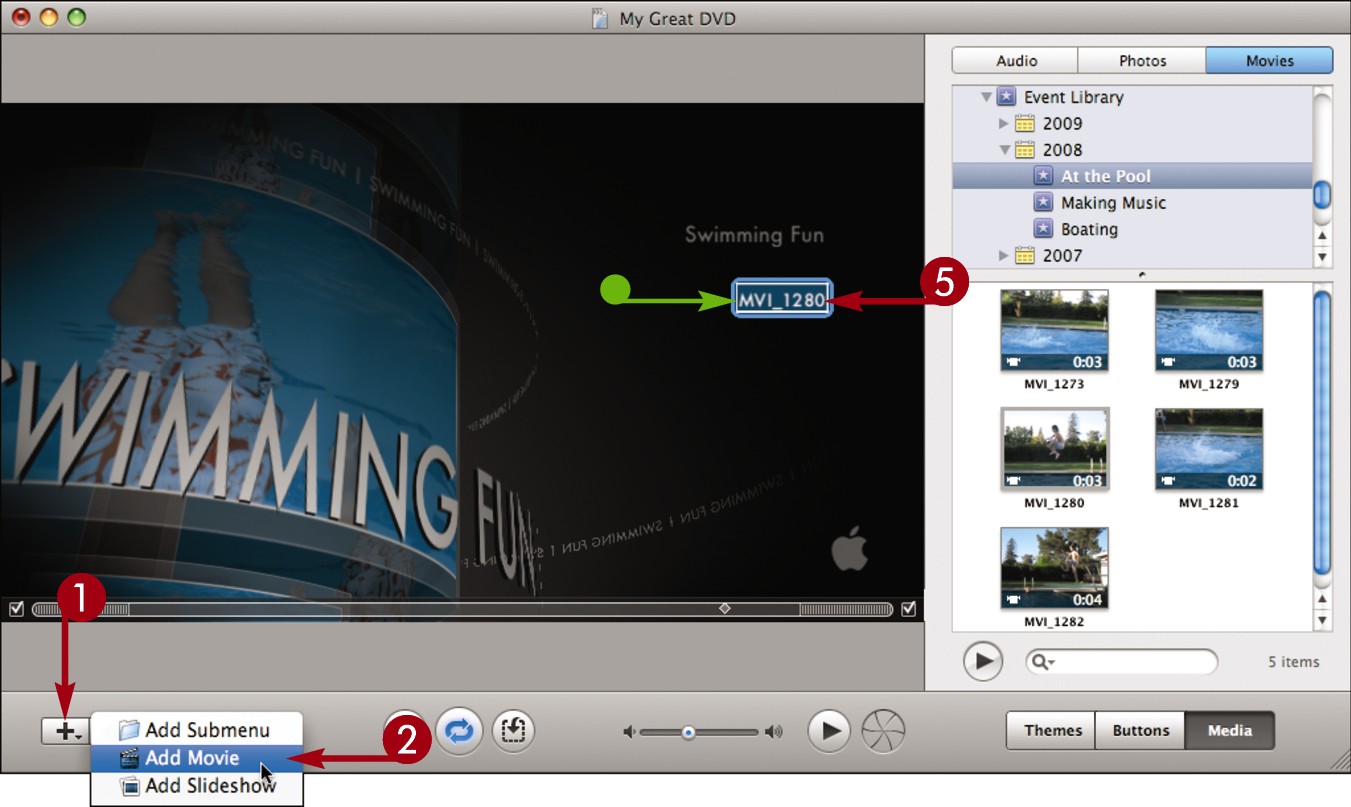
Use the add icon
Click the add icon ( ).
).
Click Add Movie in the menu that appears.
• iDVD adds an empty button to the menu.
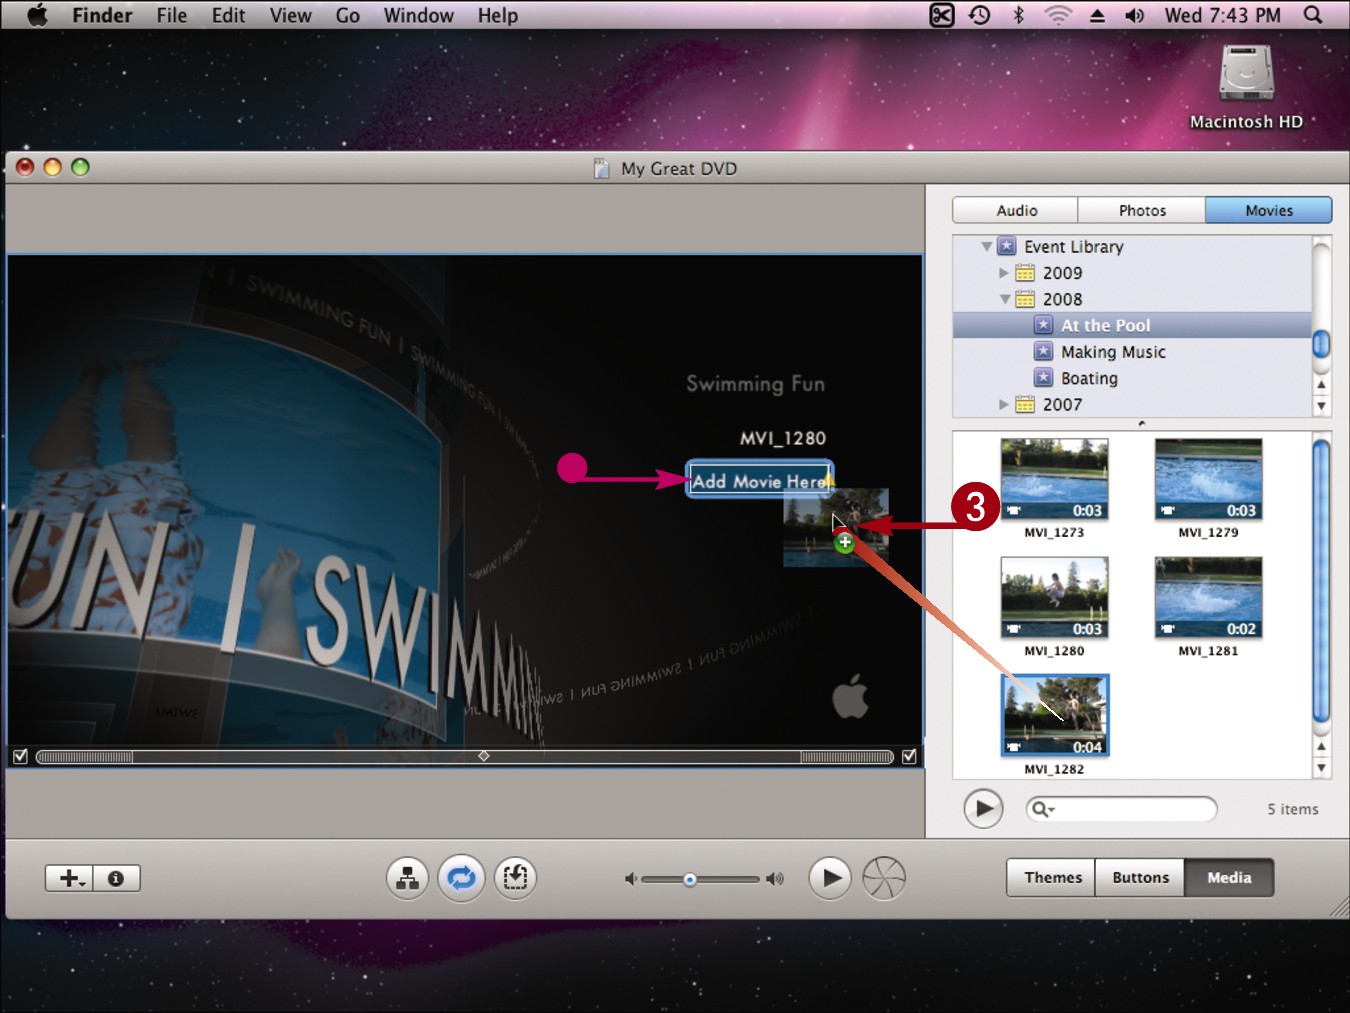
Click and drag a movie from the media pane to the empty button.
iDVD associates the movie with the button.
Note: To edit the button, see “Customize a Button.”
![]()
How can I make more content available in the media pane?
The media pane lists the movies, photos, and music that you can add to your DVD project. You can add specific folders from the Finder to the media pane to make them accessible.
Click Media.
Click the type of media to which you are adding.
Access the folder you want to add in the Finder.
Click and drag the folder to the media pane.
iDVD adds the folder to the media pane inside a folder titled Folders.
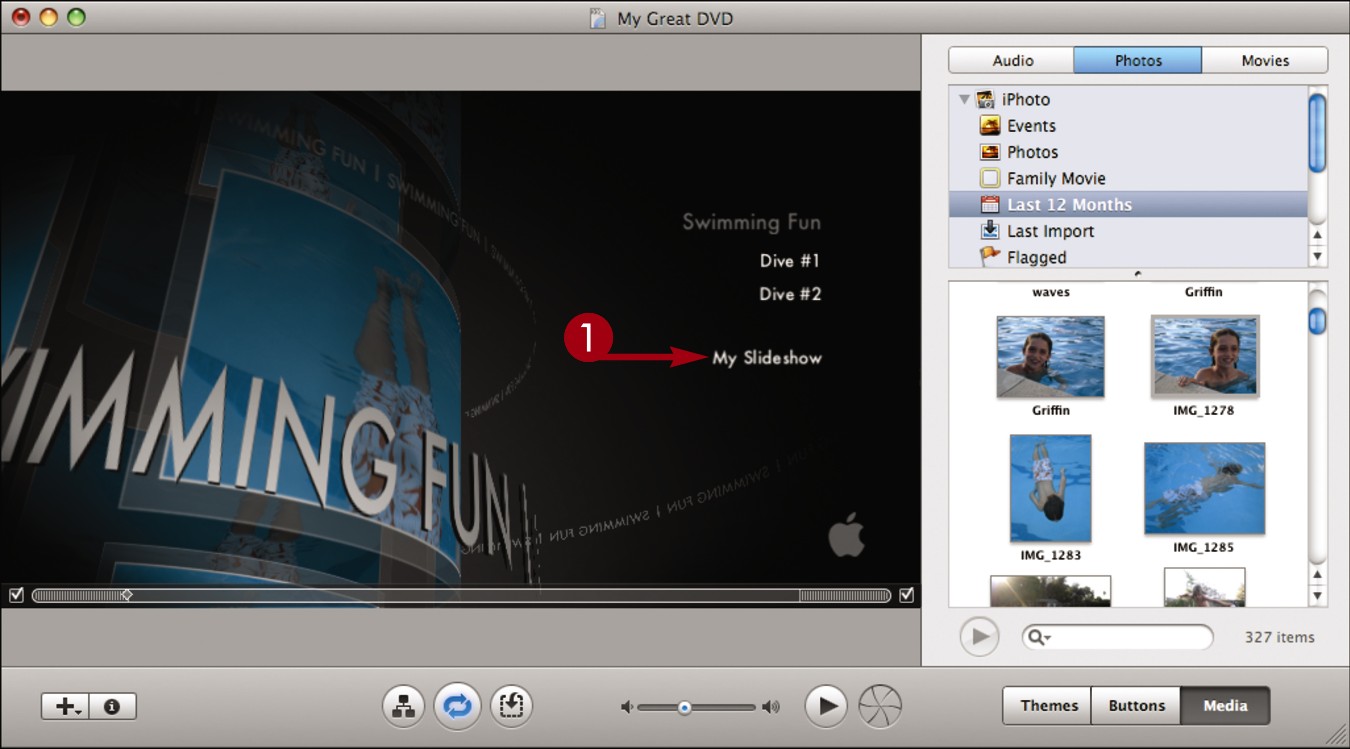
Add a Slideshow

You can include still photos in your iDVD project as a slideshow. You can view the slideshow when you play your DVD. iDVD creates a clickable button for the slideshow in your project menu.
Add a Slideshow
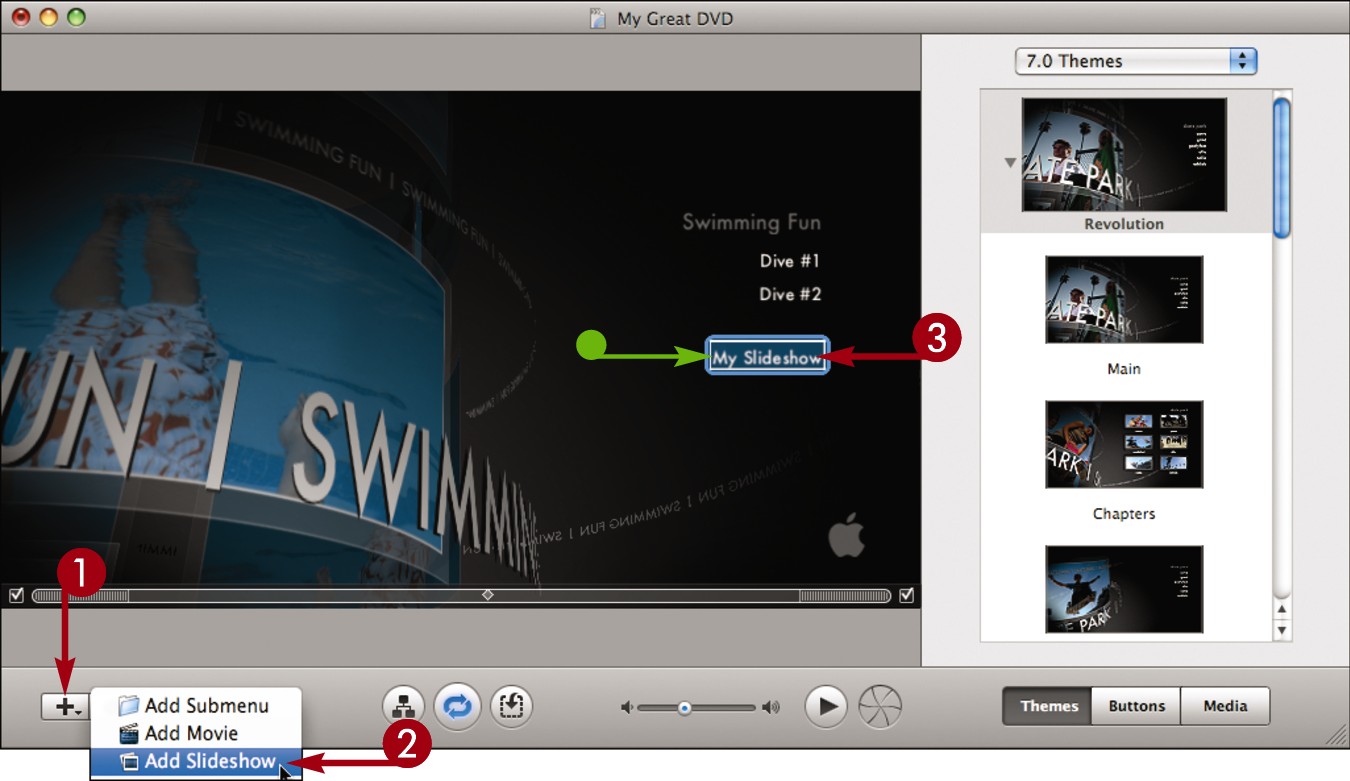
Click the add icon ().
Click Add Slideshow in the menu that appears.
• iDVD adds a button to the menu labeled My Slideshow.
Note: To edit the button, see “Customize a Button.”
Double-click the button.
iDVD opens the slideshow editor.
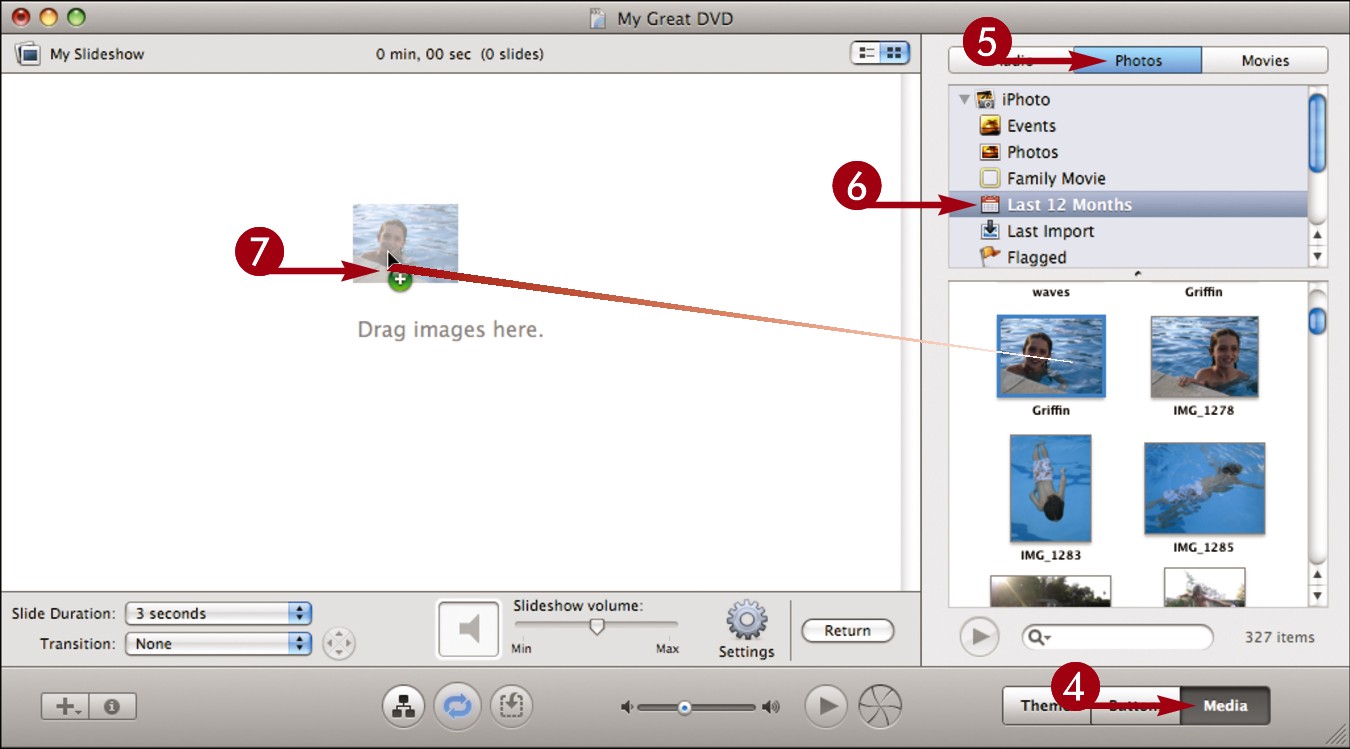
Click Media.
Click Photos.
 Click a list item to display the available photos in an iPhoto category.
 Click and drag to add photos to the slideshow.
You can  -click to select multiple photos.
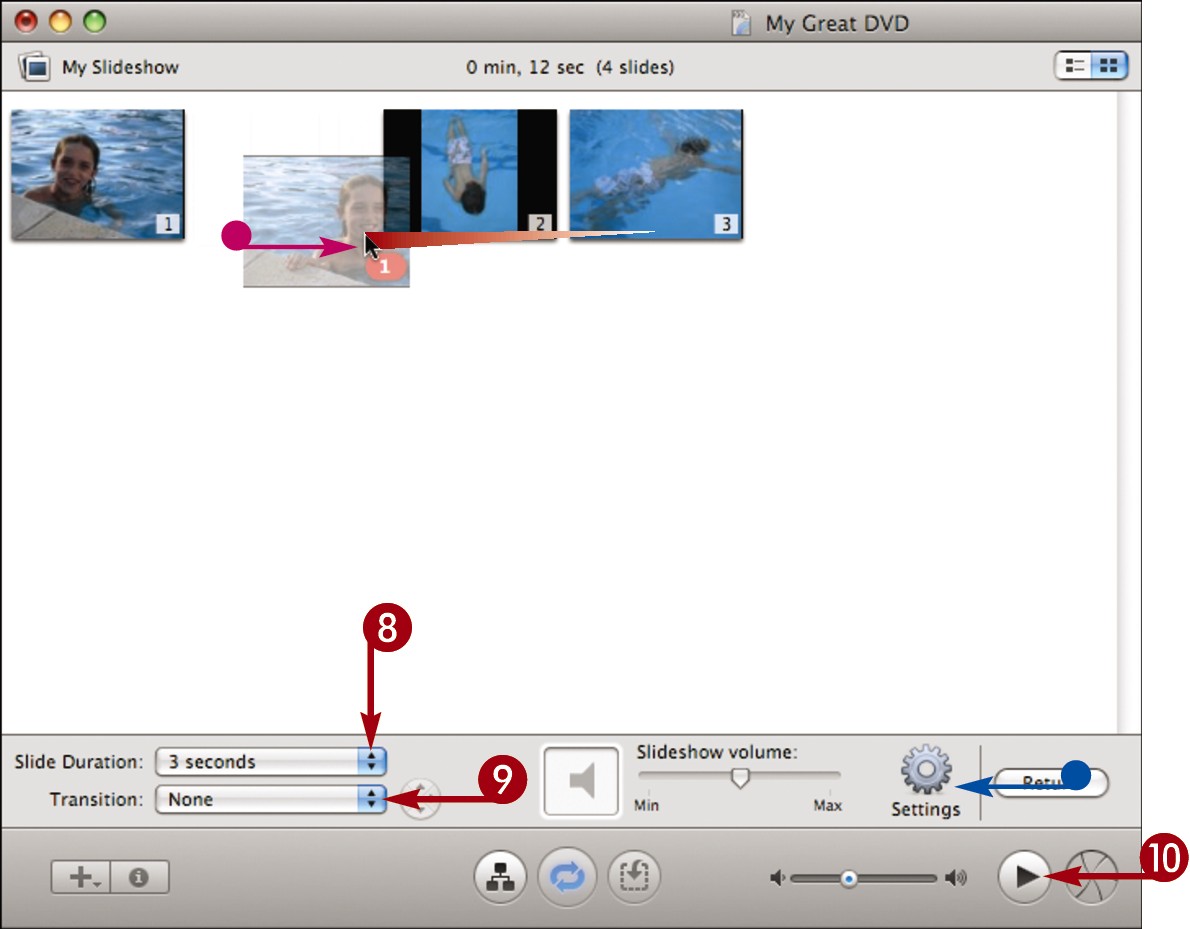
• You can click and drag in the editor to rearrange the order of the slides.
 Select the slide duration.
 Select a transition to play between slides.
• You can click Settings to change additional settings.
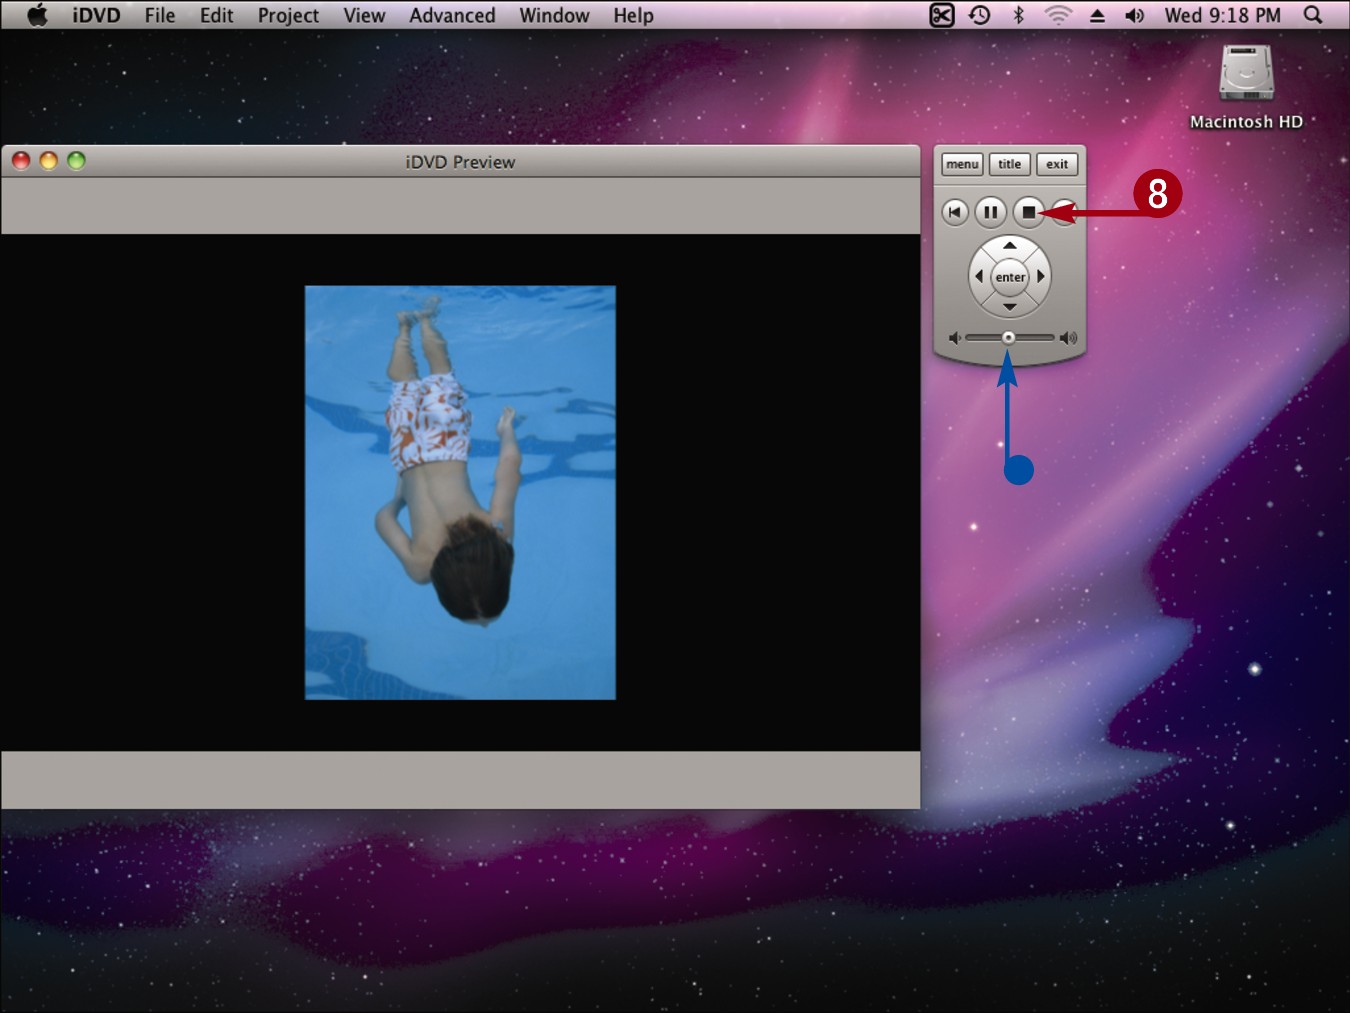
 Click the Preview button (
 ).
).
iDVD displays the slideshow and a controller.
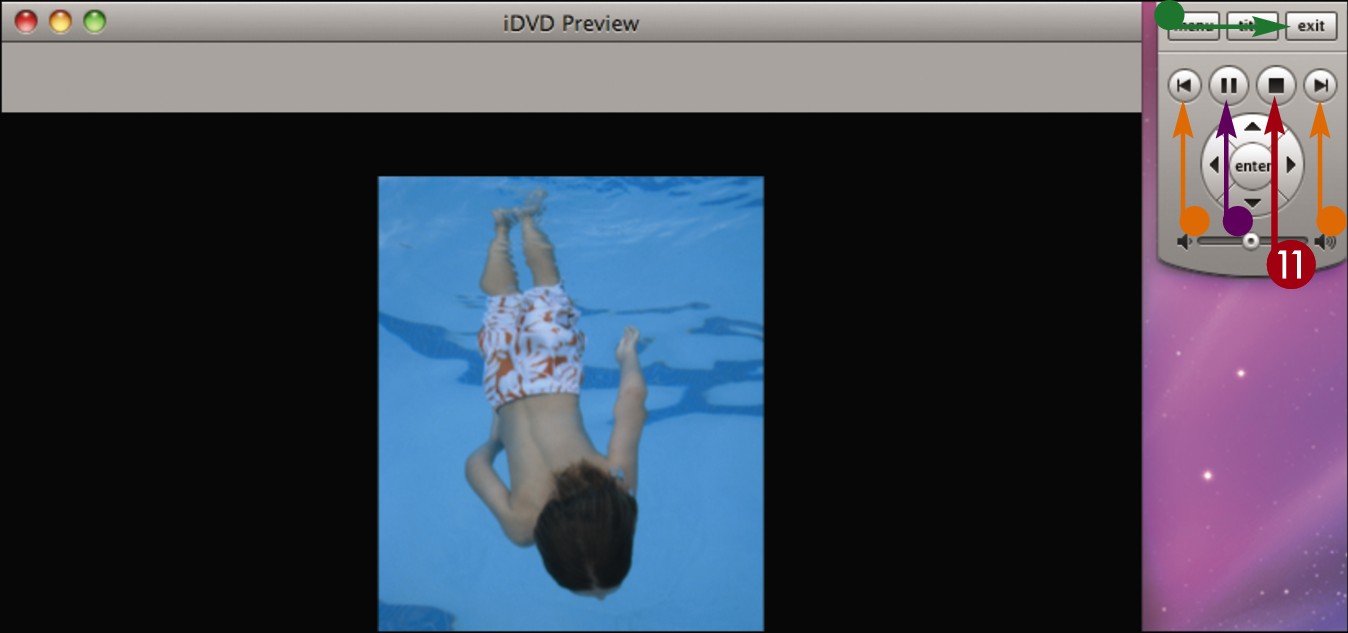
• You can click  and
and  to move through the slides.
• You can click  to pause the slideshow.
• You can click Exit to return to the slideshow editor.
 Click
Click  to stop the slideshow and return to the menu.
![]()
How do I add text to the slides in my slideshow?
You can add titles and comments to your slides.
In the slideshow editor, click Settings.
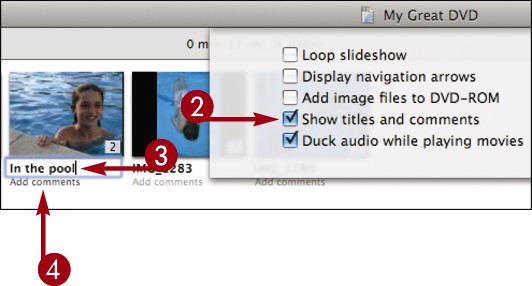
Click to show titles and comments ( changes to
  ).
).
iDVD displays file names for titles.
Click here to edit a title.
Click here to edit a comment.
The titles and comments appear in your slideshow.
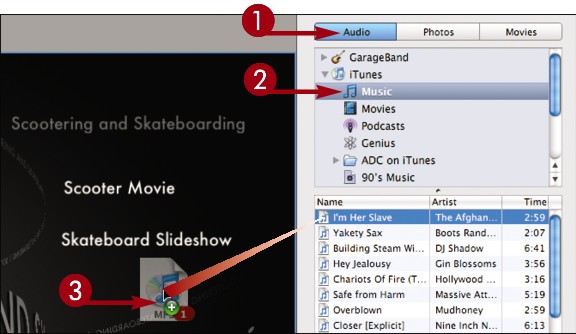
Add Music to a Slideshow

You can add a song from iTunes or GarageBand as background music for your slideshow. This can help add a mood to your slideshow and make it more interesting. You can automatically time the slideshow duration so that it is the same as that of the song.
Add Music to a Slideshow
Double-click a slideshow button.
Note: To create a slideshow, see “Add a Slideshow.”
iDVD opens the slideshow editor.
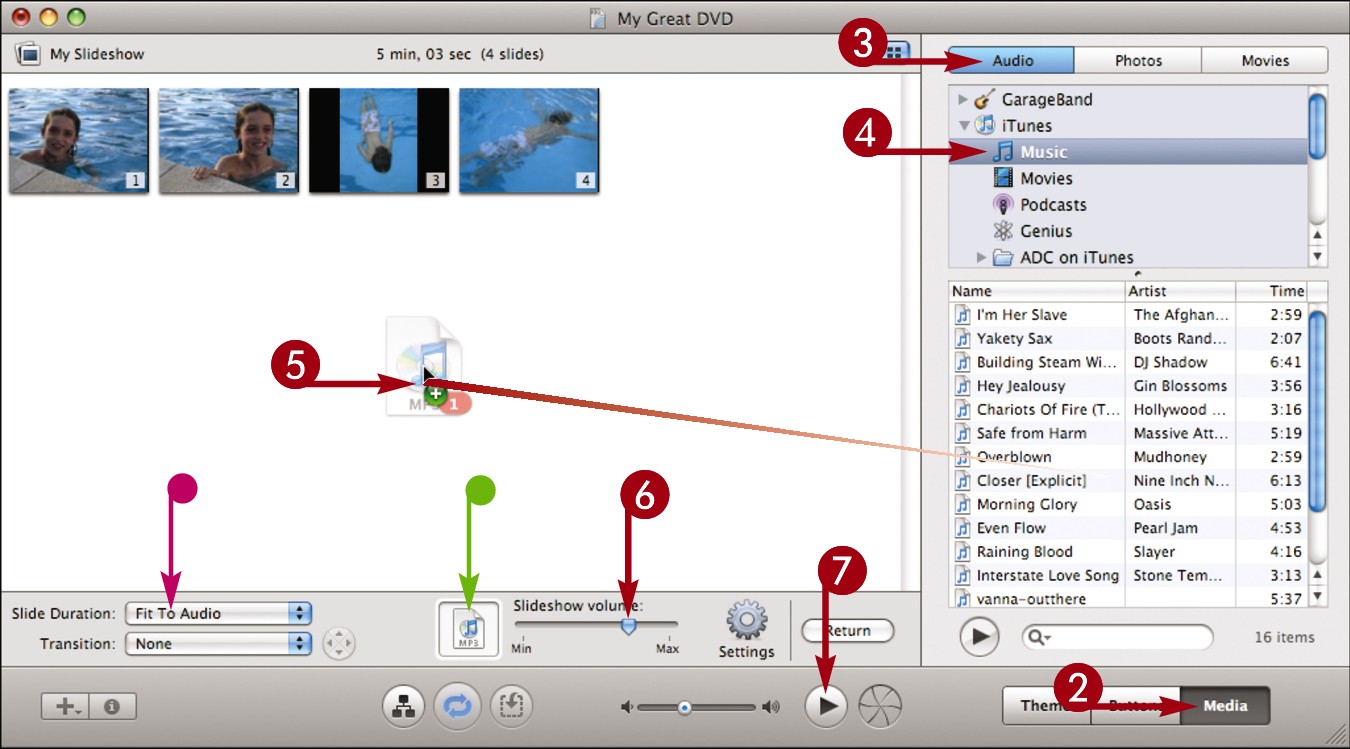
Click Media.
Click Audio.
Click a list item to display the available songs from GarageBand or iTunes.
Click and drag a song to the slideshow pane.
Note: You can also click and drag an iTunes playlist, which is a collection of songs.
• iDVD adds the song as background music.
Click the slider to adjust the music volume.
• You can select Fit To Audio to make the slideshow duration fit that of the song.
Click the Preview button ().
iDVD displays the slideshow and controller and plays the music.
• You can click and drag the slider to adjust the audio as it plays.
Click to stop the slideshow and return to the menu.
![]()
How do I add movies to a slideshow?
Follow these steps:
With the slideshow editor open, click Media.
Click Movies.
Click a list item to display the available movies on your computer.
Click and drag a movie to the slideshow.
iDVD adds the movie.
Note: The slide duration setting does not apply to movies in a slideshow. The entire movie plays.
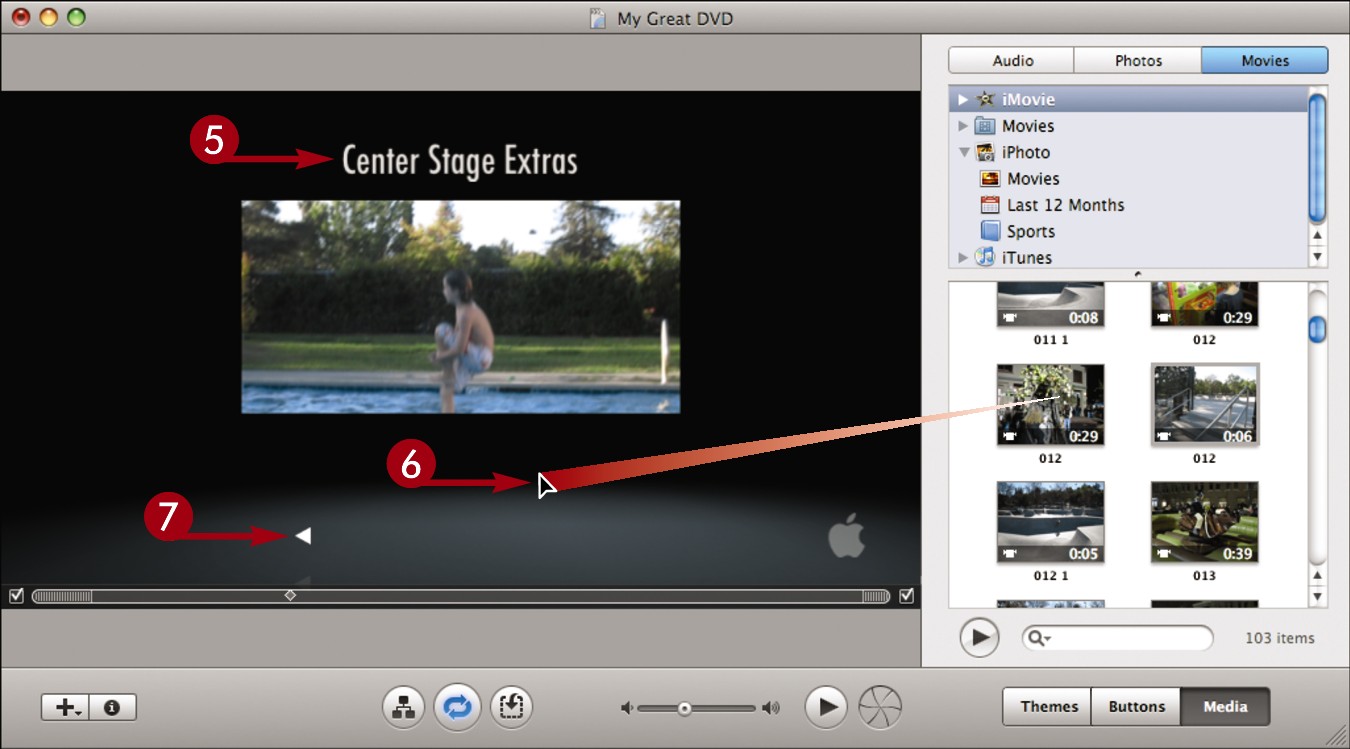
Add Media to a Drop Zone
You can add videos and still images to drop zones, which are sections in iDVD menus that can show previews of the content on a disc. The number and layout of drop zones in menus are determined by the theme you choose for the project.
Add Media to a Drop Zone
Click and Drag to Add
Display a menu in an iDVD project.
• Drop zones are labeled in the menu.
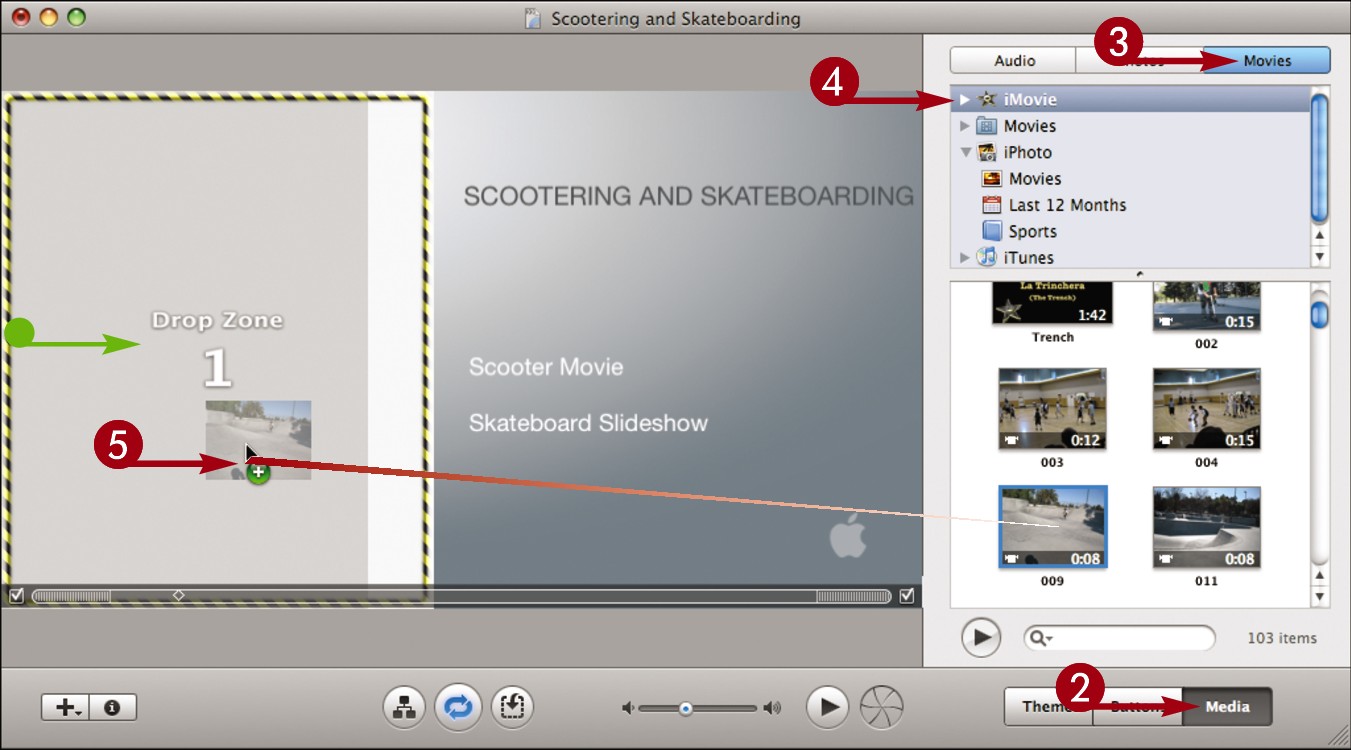
Click Media.
Click Photos or Movies.
You can add movies, still images, and slideshows to a drop zone. You cannot add audio.
Click a list item to display the available content in the media pane.
Click and drag a media file to a drop zone.
• iDVD adds the media to the drop zone.
To replace the media, click and drag another file to the drop zone.
To remove media from a drop zone,  -click a drop zone and click Clear Drop Zone Contents.
Use the Drop Zone editor
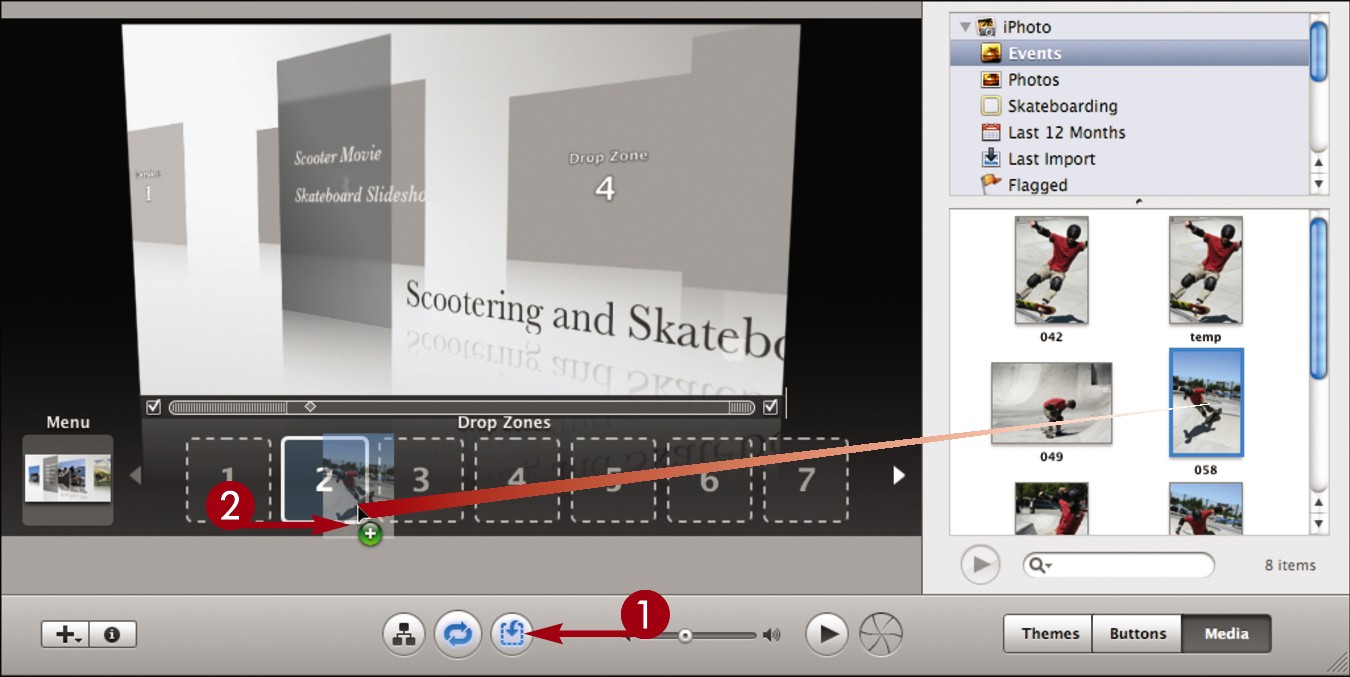
Click Edit Drop Zones to open the drop zone editor.
iDVD displays icons for the drop zones in the menu.
Click and drag a file from the media pane to a drop zone icon.
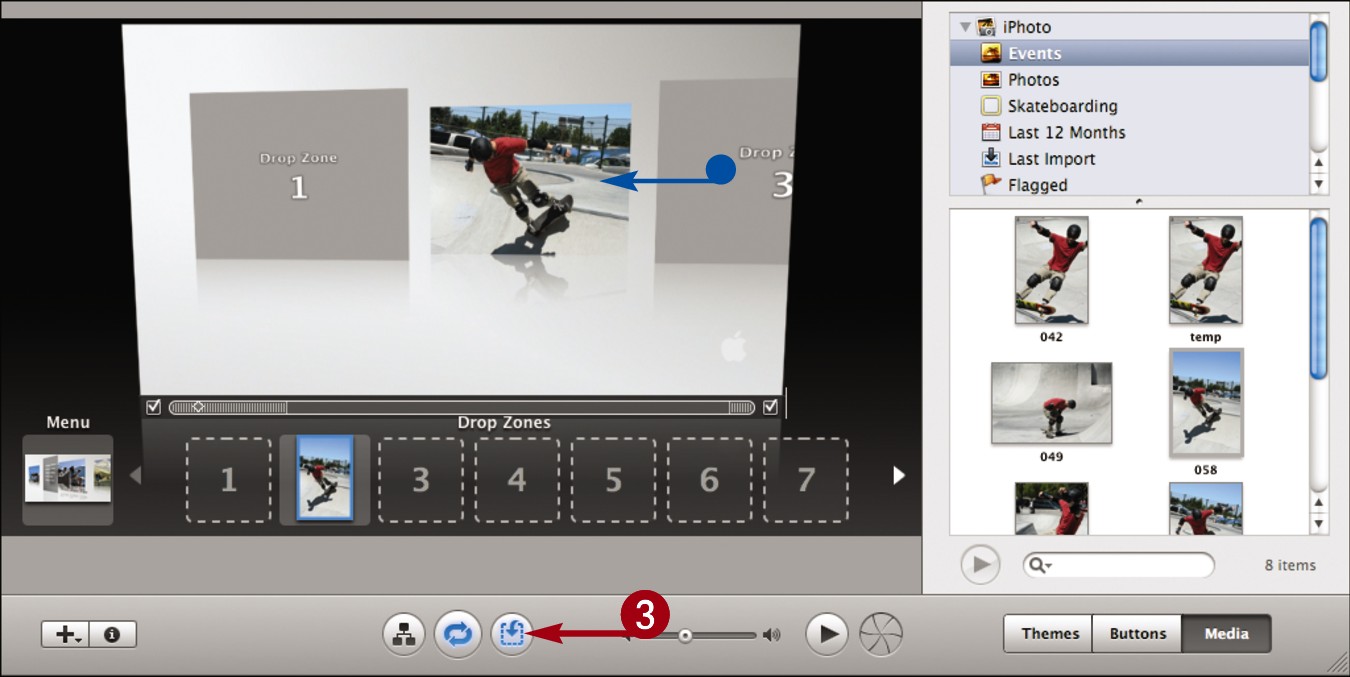
• iDVD adds the media to the drop zone.
To replace content, click and drag another file to a drop zone icon.
To remove media from a drop zone, click and drag the media from the drop zone icon to outside the drop zone editor.
Click Edit Drop Zones to exit the drop zone editor.
![]()
How do I add background music to a menu?
Follow these steps:
Click Audio.
Click a list item to display the available music from GarageBand or iTunes in the media pane.
Click and drag an audio file to the menu background.
iDVD adds the audio file as background music. To adjust the volume, see “Change Menu Settings.”
Autofill Drop Zones
iDVD can automatically fill the drop zones in your project with movie and photo content from your project. You can make changes to the autofilled content using the drop zone editor.
Autofill Drop Zones
Display a menu in an iDVD project. The project should already have media associated with it.
Note: To add media, see “Add a Movie” or “Add a Slideshow.”
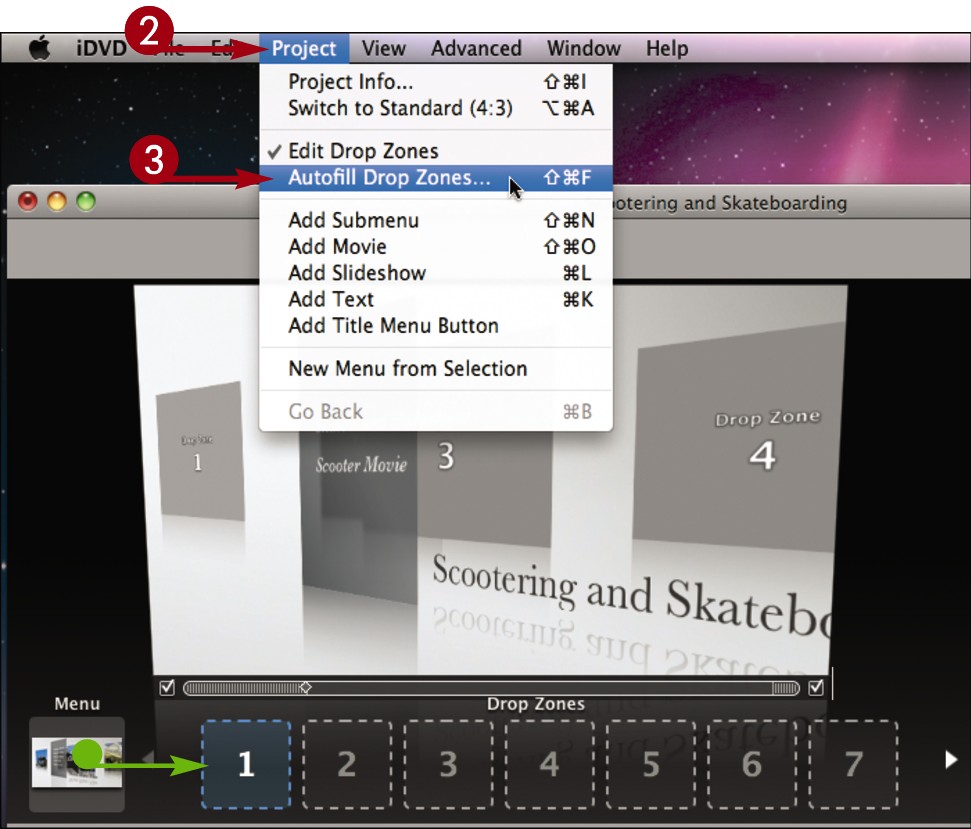
• In this example, the drop zone editor is open. See “Add Media to a Drop Zone” for details.
Click Project.
Click Autofill Drop Zones.
• iDVD fills the drop zones in the menu with media from the project.
• You can edit the selections by clicking and dragging media files to the editor icons.
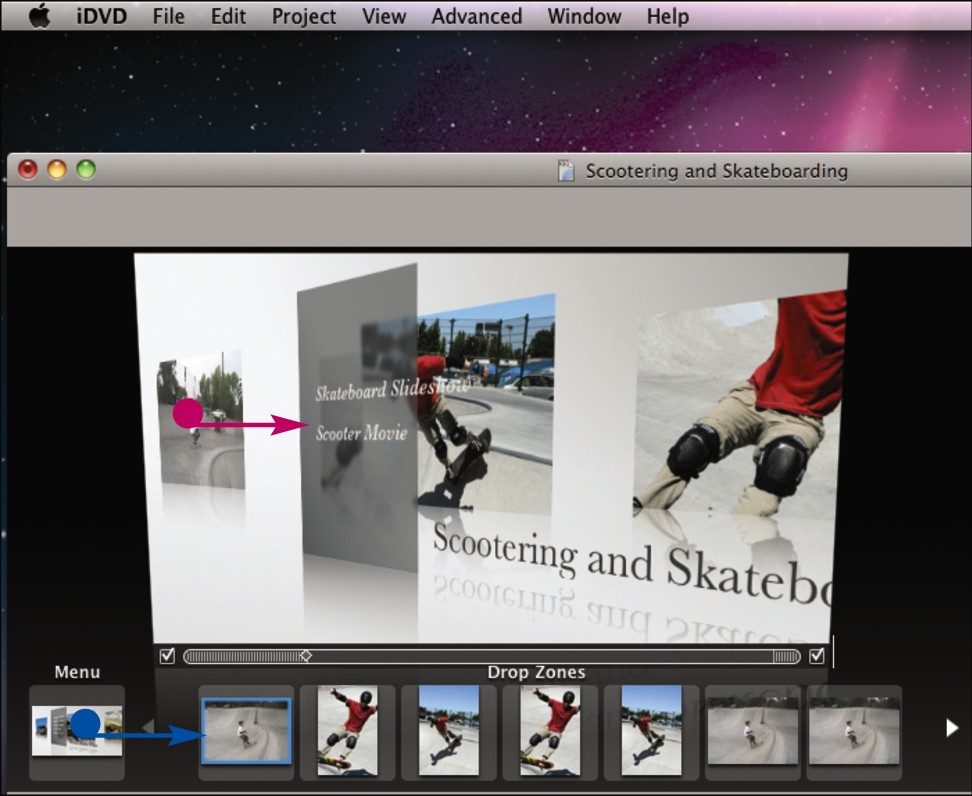
Edit Media in a Drop Zone

You can change how a movie is played or how a still photo is oriented in a drop zone. This helps you focus on specific actions or subjects in drop zones.
Edit Media in a Drop Zone
Edit a Movie
Click a movie in a drop zone.
• A line representing the movie appears.
Click and drag a slider to specify where the movie starts.
Click and drag a slider to specify where the movie ends.
Click away from the drop zone to save the movie edit.
Edit a Still PHOTO
Click a still photo in a drop zone.
iDVD selects the photo.
Press and click and drag inside the photo to reposition it.
Click away from the drop zone to save the photo edit.
Customize a Button

You can customize the clickable buttons that allow you to play movies and slideshows or view submenus in your project. You can edit the text, change the font, or add graphics to suit the style of your project.
Customize a Button
Edit the text
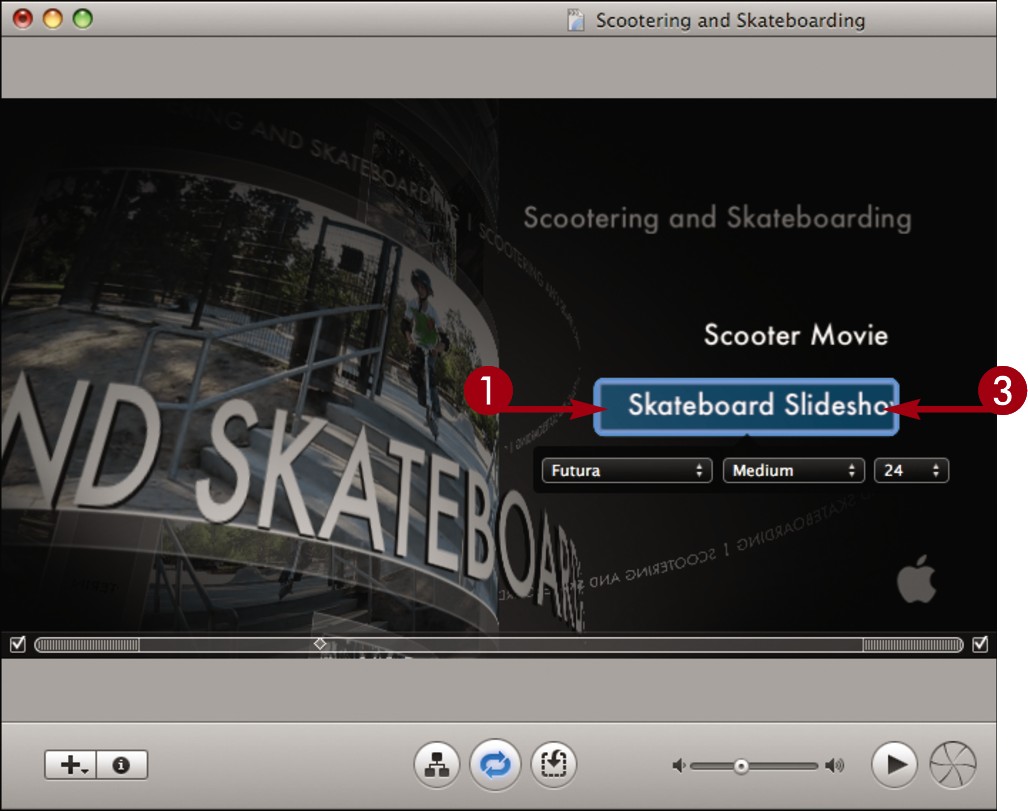
Click a button in a menu to select it.
Click the button again to make it editable.
Note: Do not double-click the button, which opens the content.
Type a label for the button.
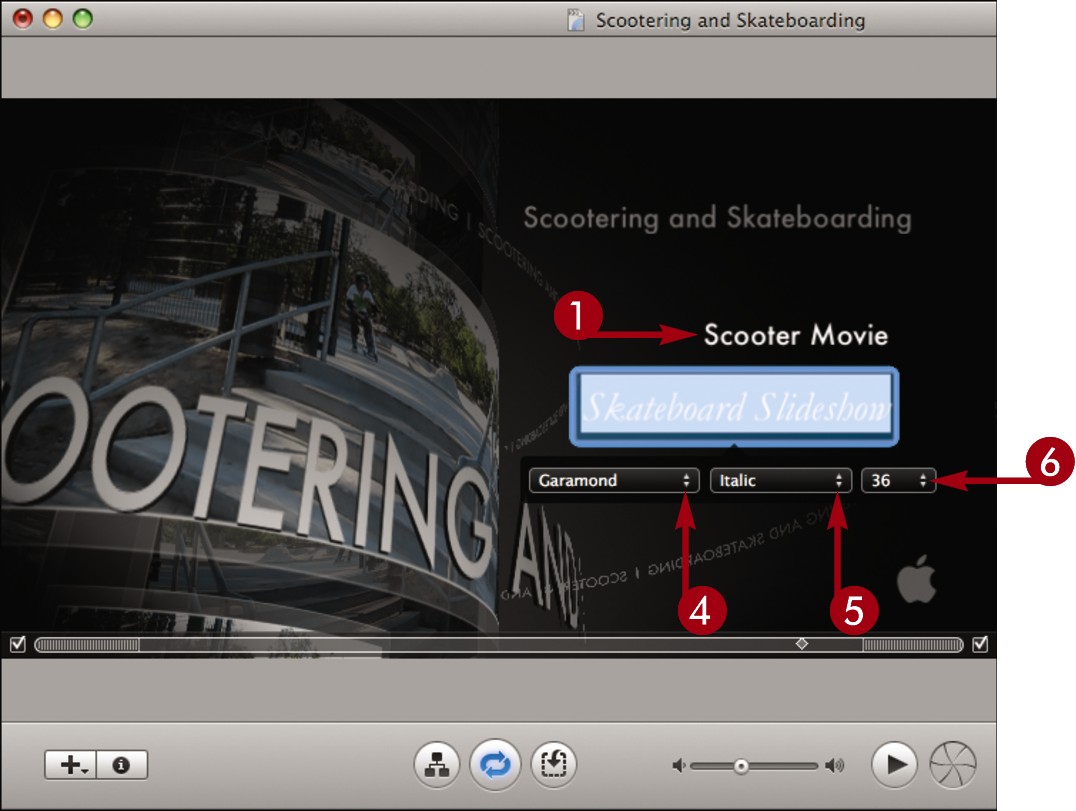
Select a font for the button.
Select a font style.
Select a font size.
Click away from the button to save the changes.
Add a Graphic
Click a menu button to select it.
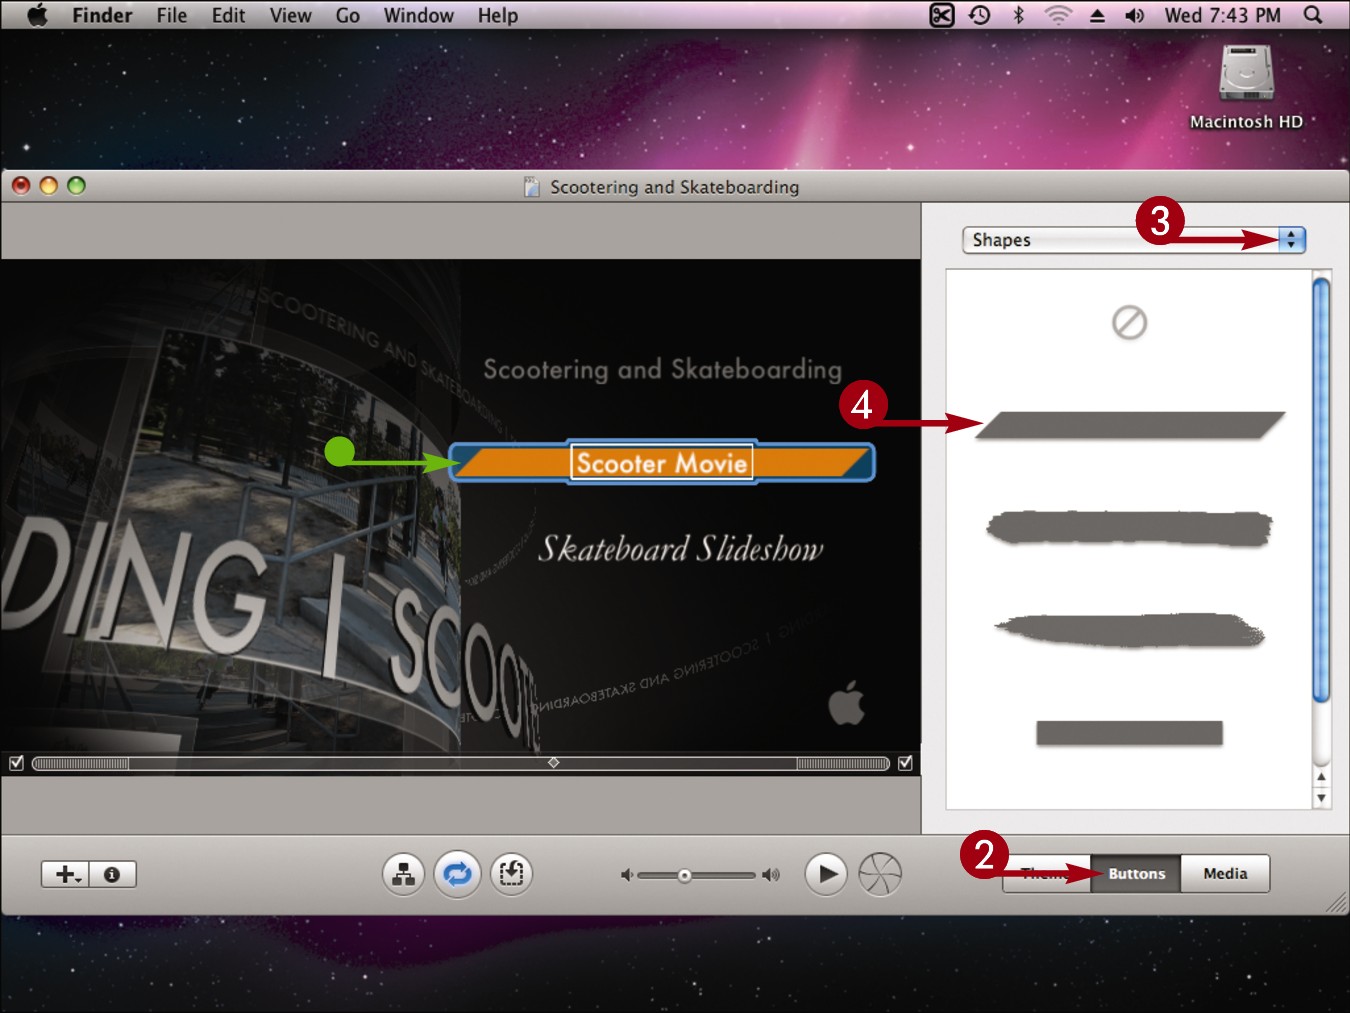
Click Buttons.
Select a button category.
Click a button style.
• iDVD customizes the button in the menu.
You can click and drag the button to reposition it.
![]()
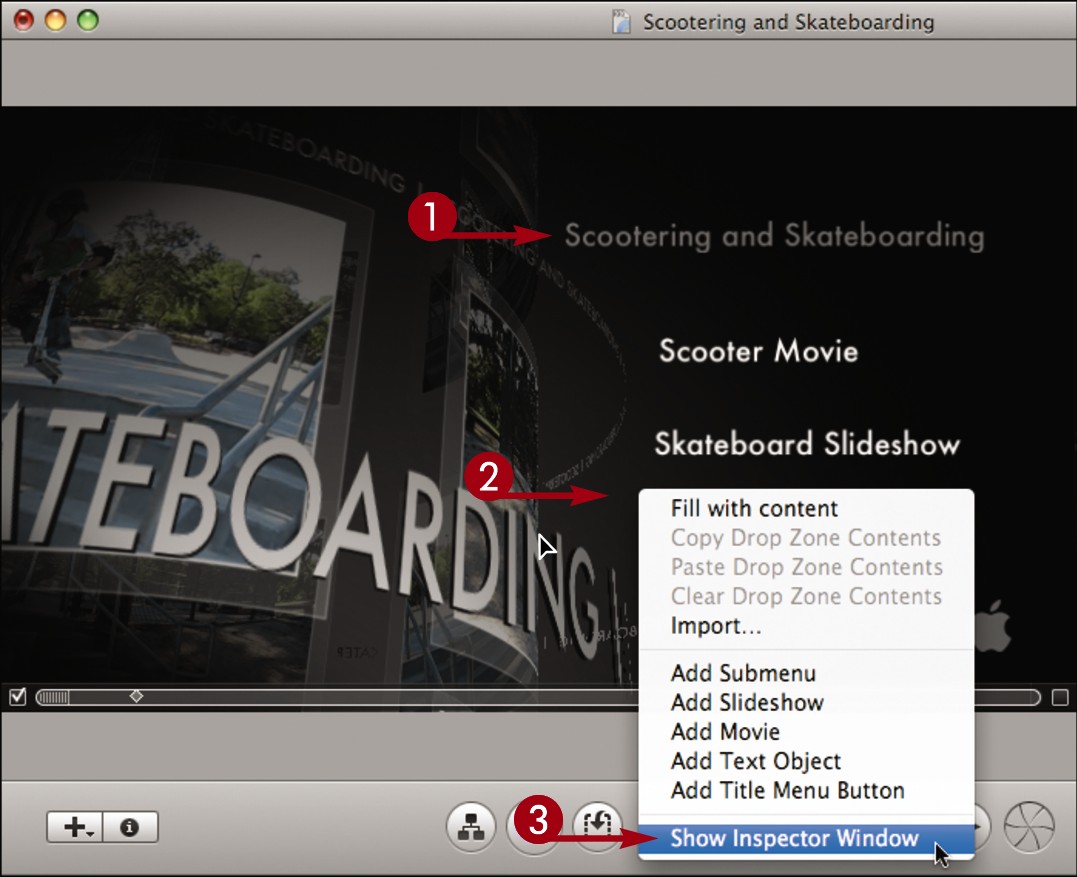
How do I change the size of a button?
You can change the size of a button shape to make it fit in with the other buttons and graphics on the page.
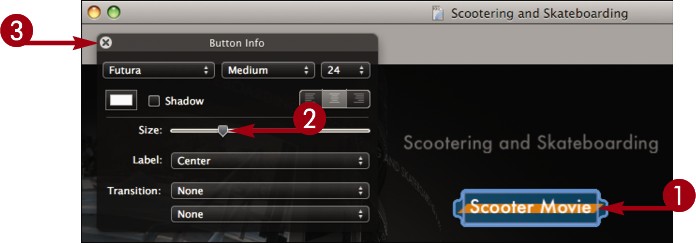
-click a button and select Show Inspector Window in the menu that appears.
The inspector appears. The inspector options vary depending on the button style.
Click and drag the slider to adjust the size of the button shape.
Click  to close the inspector and save the change.
Add a Submenu
When you create a new project from within iDVD, the program adds a single main menu to that project. You can add submenus to your project to organize your media content in a hierarchical fashion. You access a submenu by clicking a button on the main menu. Submenus can also have their own submenus.
Add a Submenu
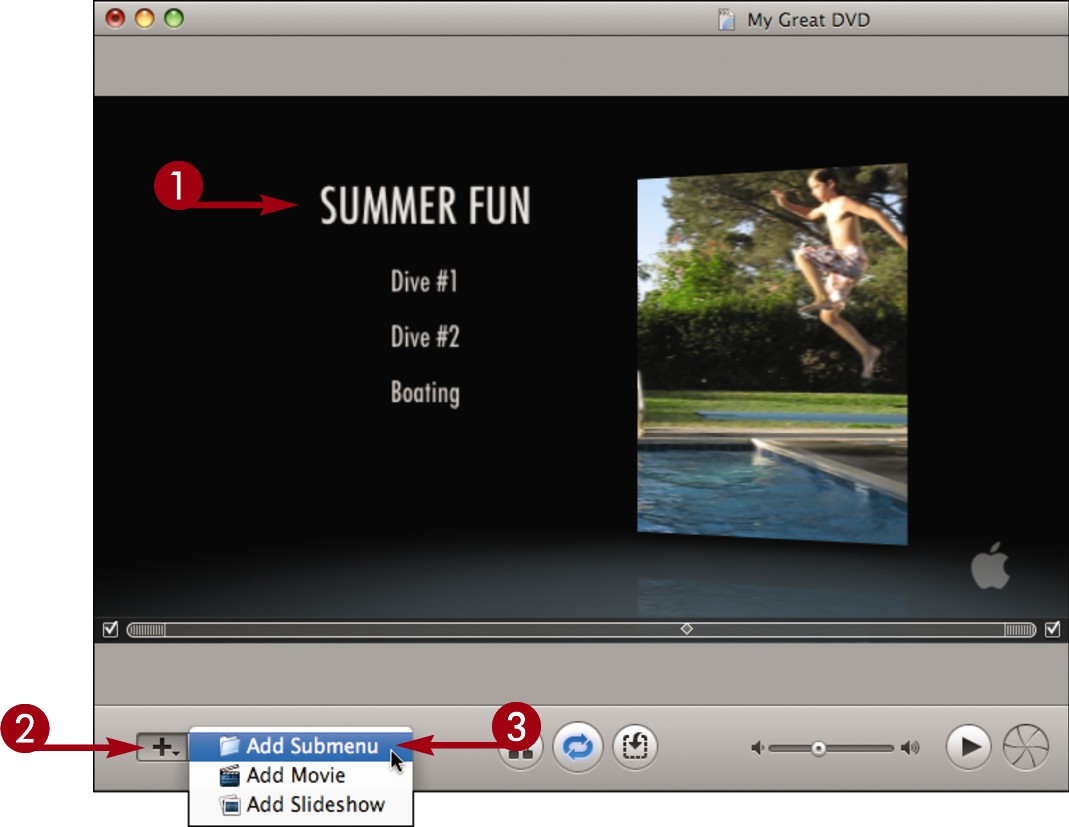
Display the menu to which you want to add a submenu.
Click the add icon ().
Click Add Submenu in the menu that appears.
iDVD adds a button for the new submenu.
Note: To edit the text and style of the button, see “Customize a Button.”
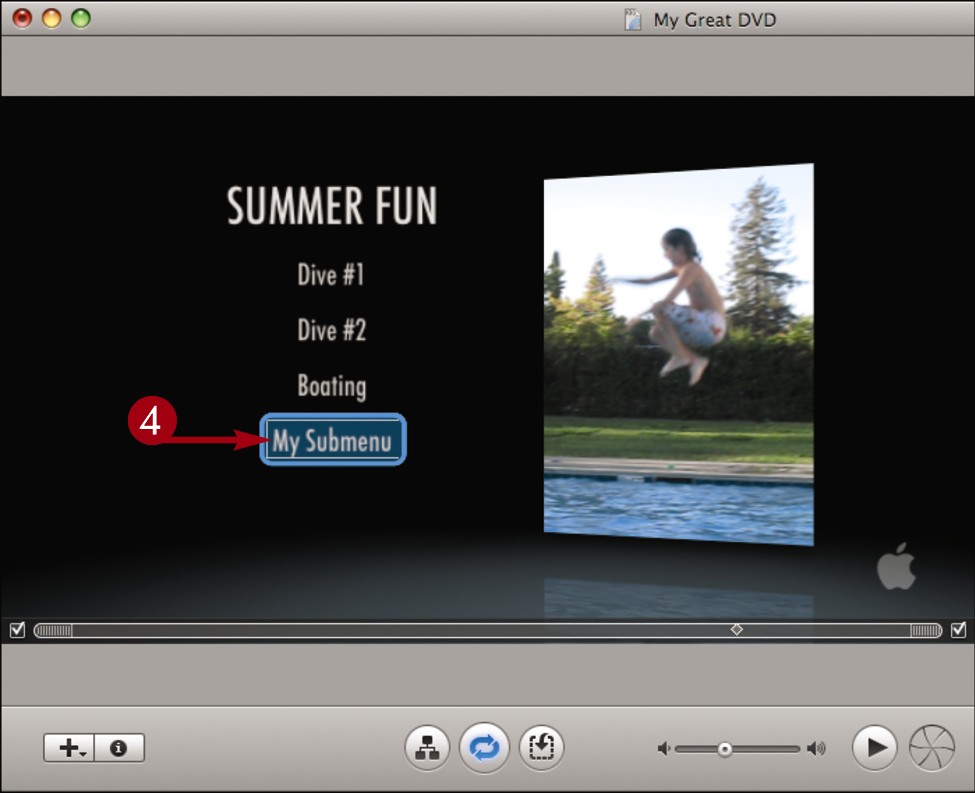
Double-click the submenu button.
iDVD opens the new submenu.
Double-click the title to edit it.
Click and drag content from the media pane to add content to the submenu.
Note: For details, see “Add a Movie,” “Add a Slideshow,” and “Add Media to a Drop Zone.”
Note: To change the theme of a submenu, see Chapter 20.
Double-click the back button ( ).
).
The style of the back button varies depending on the theme of the menu.
iDVD displays the parent menu from which the new submenu is linked.
• You can click Show the DVD Map to view your menu organization in map view.
Note: For details, see “Use Map View.”
![]()
How do I create a submenu from existing buttons?
You can select one or more buttons in an existing menu and move them to a new submenu.

 -click to select the buttons you want to add.
Click Project.
Click New Menu from Selection.
iDVD creates a new submenu and moves the selected buttons to it. You can double-click the new submenu button to access it.
Note: To edit the button, see “Customize a Button.”
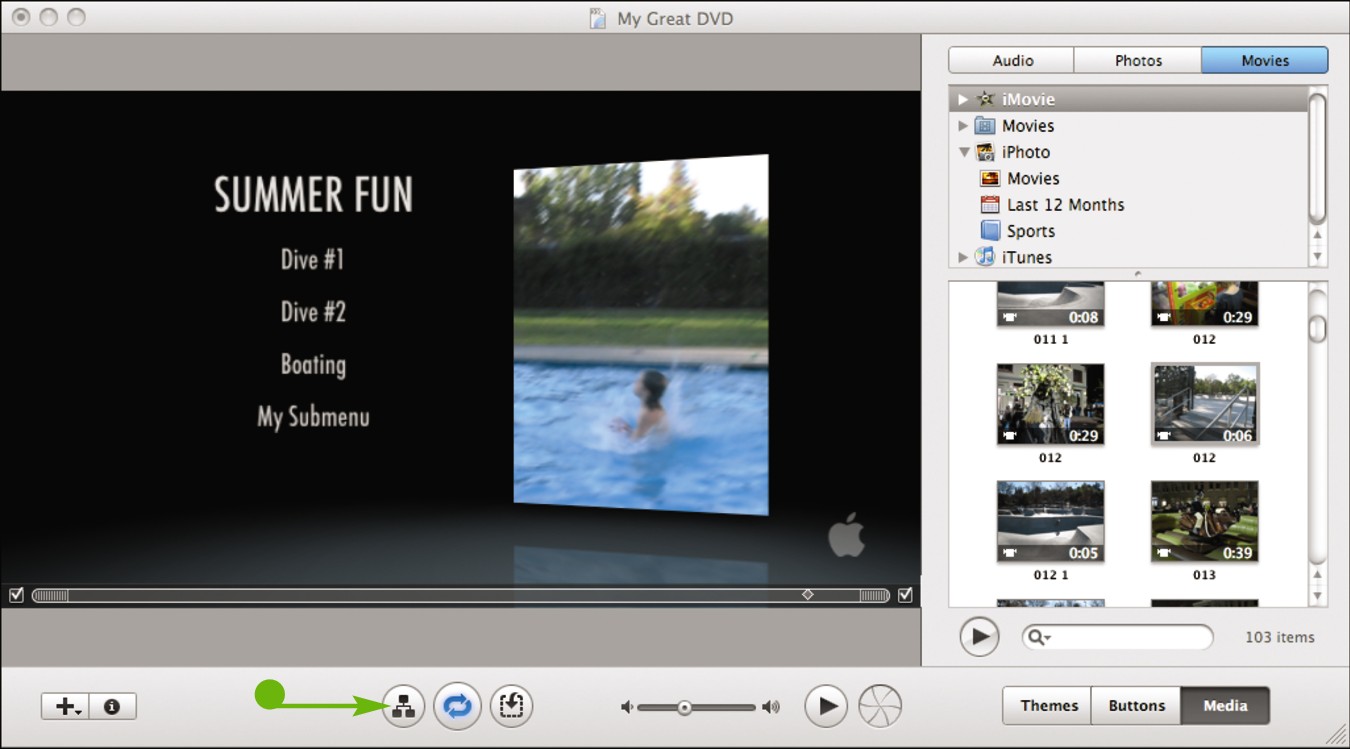
Change Menu Settings
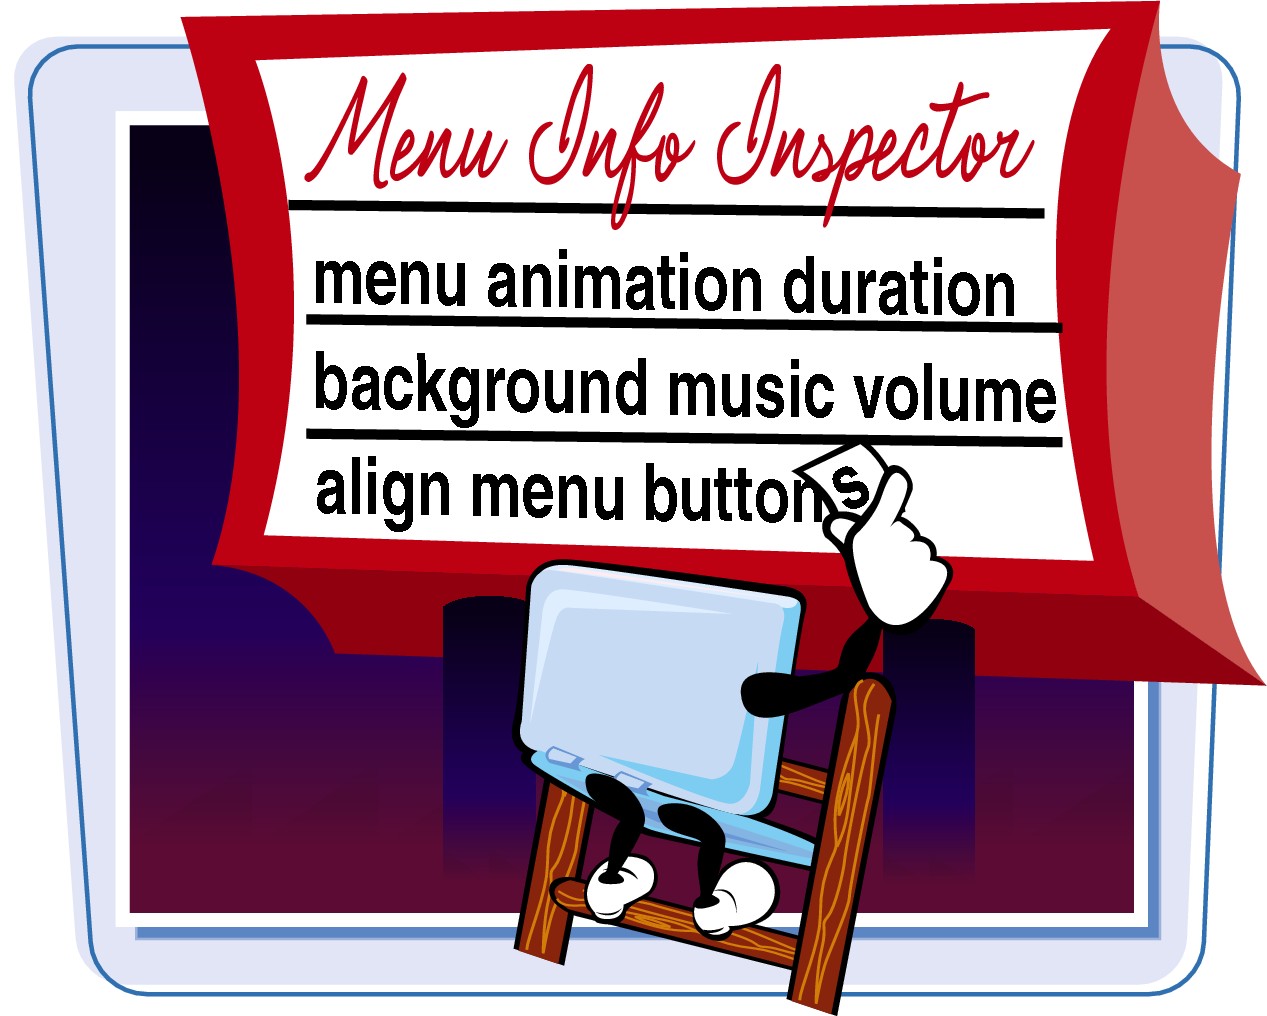
You can open the Menu Info inspector to configure a menu. You can change the duration of a menu animation, control the volume of background music, and turn on a grid to help align menu buttons.
Change Menu Settings
Display the menu whose settings you want to change.
-click the menu background.
Click Show Inspector Window.
Note: You can also click the Inspector button ( ) in the toolbar.
iDVD opens the Menu Info window.
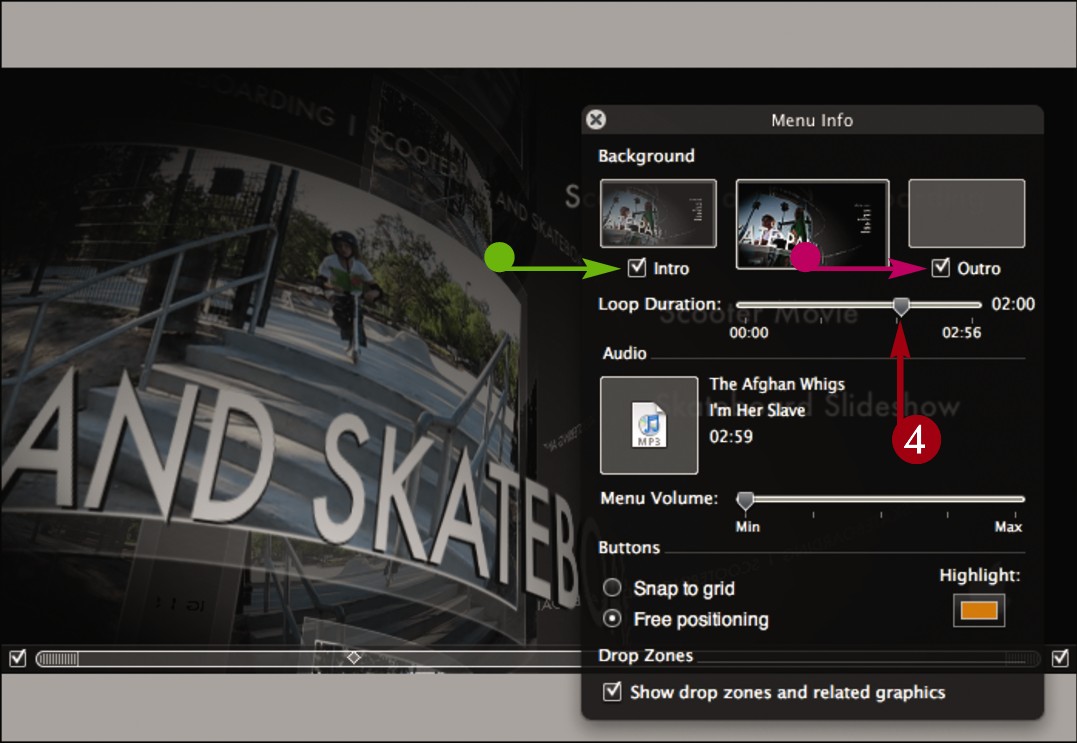
Click and drag the slider to adjust the duration of the menu animation.
Some menus include an intro and an outro as part of the animation.
• You can click to disable the intro ( changes to ).
• You can click to disable the outro ( changes to ).
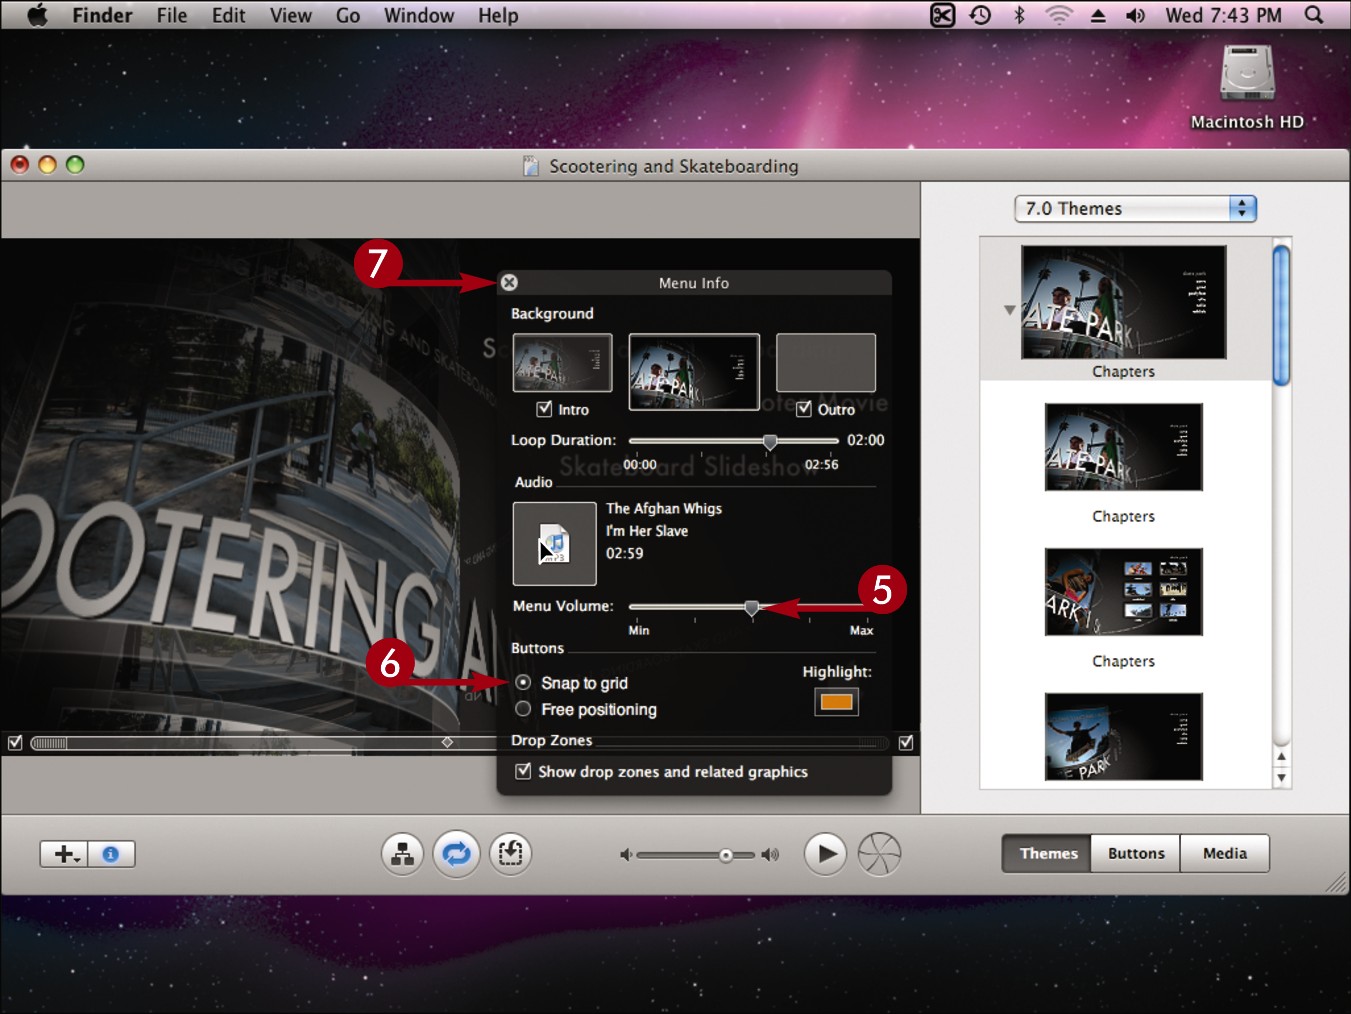
Click and drag the slider to adjust the volume of background music, if it exists.
iDVD can use an invisible grid to align the buttons you add to a DVD menu.
Click to turn on the grid ( changes to
  ).
).
Click to close the inspector and save the changes.
![]()
How do I change the highlight color for menu buttons?
iDVD uses color highlighting to show which button in a menu is active. You can change the color in the Menu Info window.
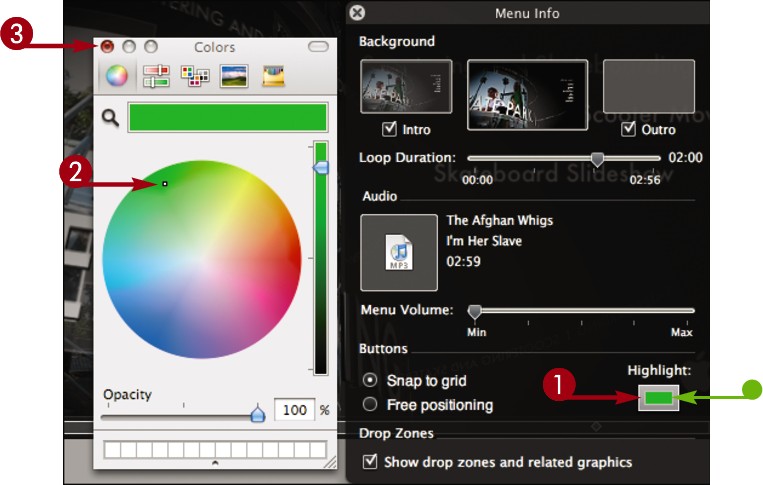
In the Menu Info window, click the highlight swatch.
iDVD opens the Colors dialog.
Click a highlight color.
Click  to close the dialog.
• The highlight color is updated.
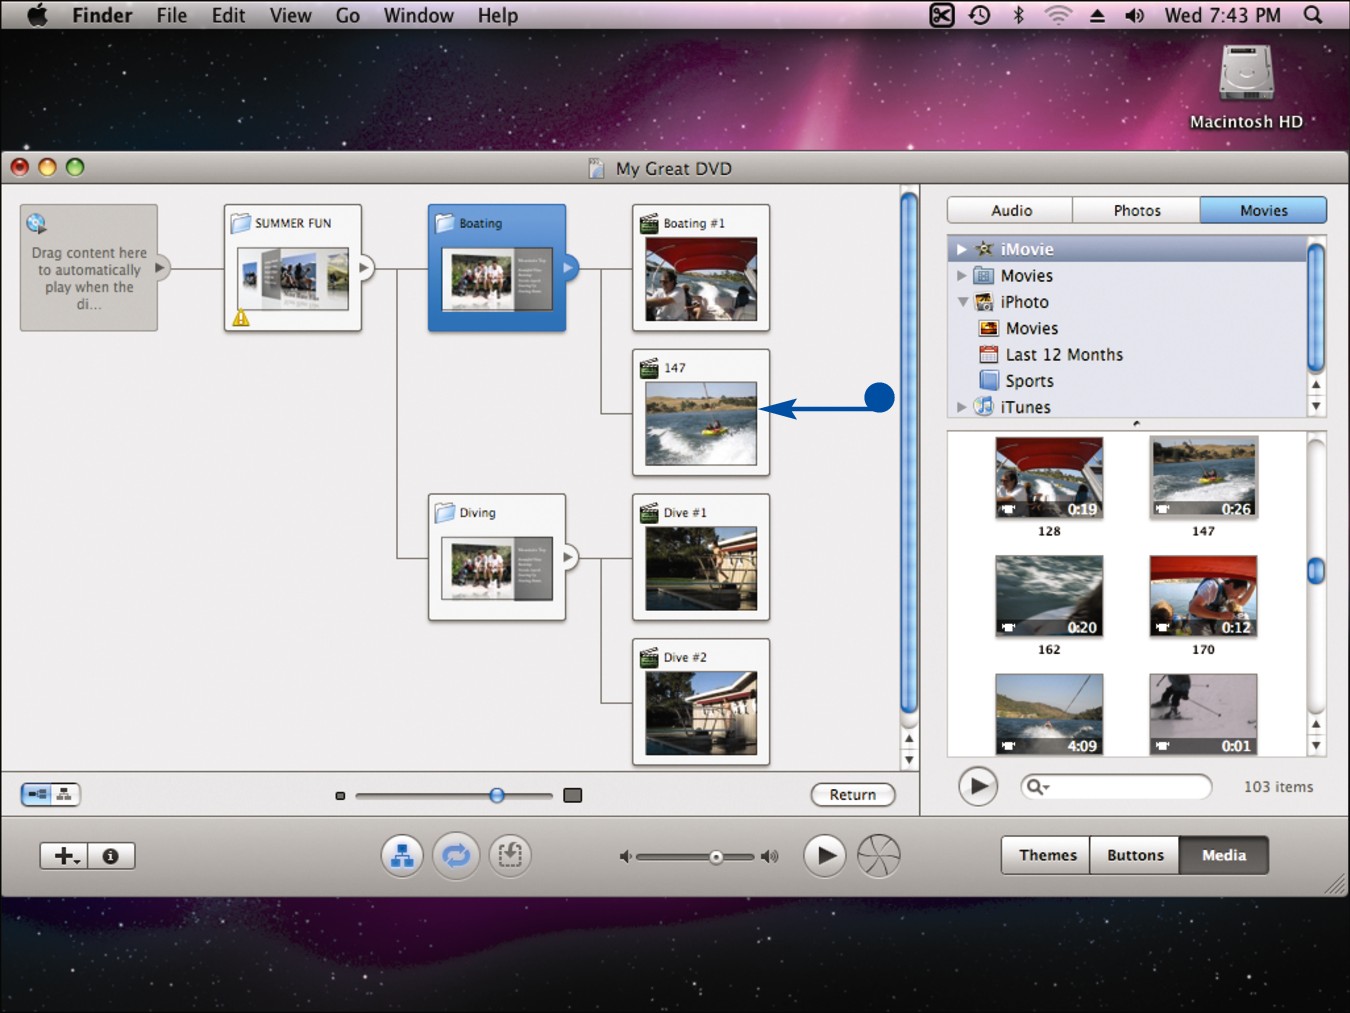
Use Map View

You can view your iDVD project as a chart by opening map view. In map view, boxes represent menus, movies, and slideshows. Lines represent the connections between the media items. You can add new content in map view as well as reorganize existing content.
Use Map View
Add Media
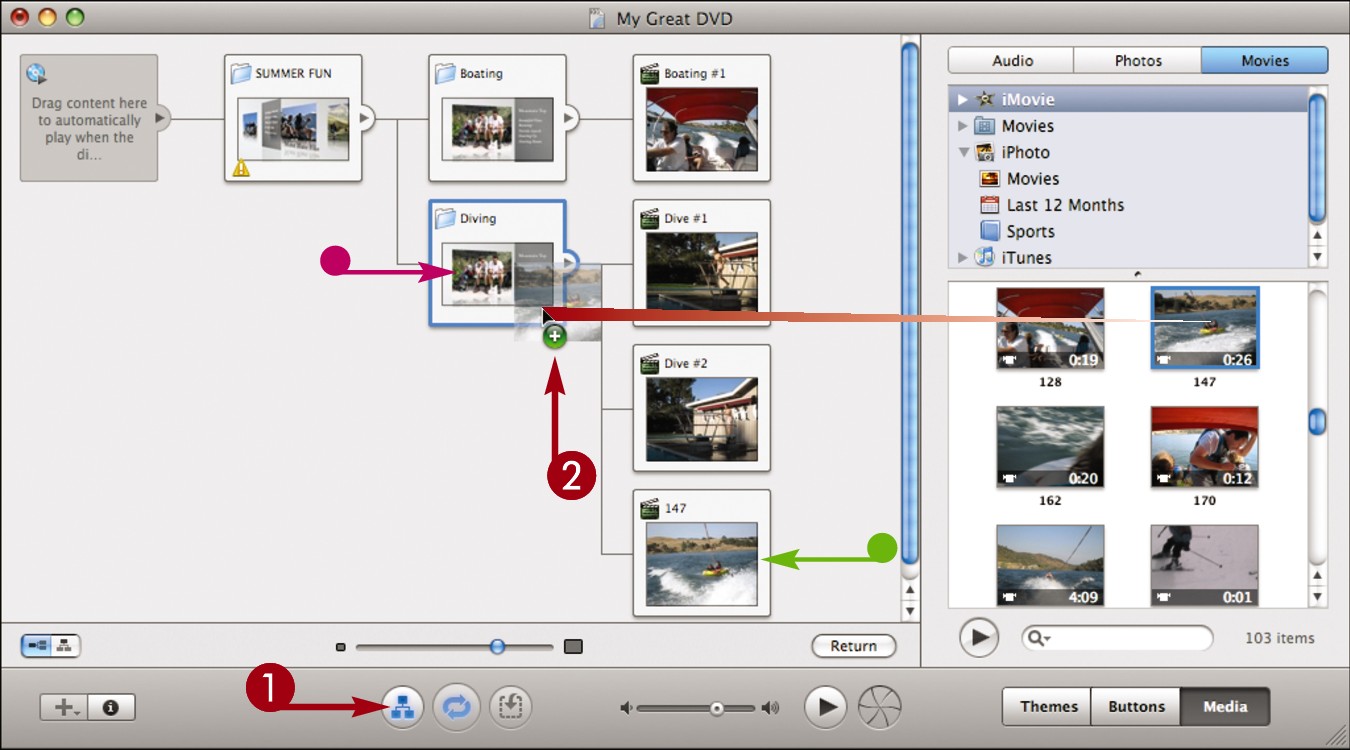
Click Show the DVD Map to open your project in map view.
iDVD displays the menus, movies, slideshows, and other content hierarchically, as boxes connected by lines.
Click and drag an item in the media pane to a menu box.
• iDVD adds the item to the map, connecting the item to the menu with a line.
A button for the item is added to the menu.
• You can double-click the menu to view it.
To delete content in map view, select the content and then press  .
.
Rearrange Media

Click and drag a media item in the map to a new menu.
iDVD adds a button for the item to the new menu and deletes the button for the item in the old menu.
• The box for the item is connected to the new menu in map view.
![]()
How do I change the map view layout?
You can change the size of the boxes in map view and also switch the layout from horizontal to vertical.

Click and drag the slider to change the size of the boxes.
Click  to switch to a vertical layout.
• A vertical layout is displayed.
• You can click  to switch back to a horizontal layout.