FLOWERS
MASTERING FLOWERS
There is something almost magical about a beautifully drawn flower, particularly one rendered in pencil. The absence of color makes you really look at the delicate forms and lovely nuances of value, just as a black-and-white photo allows you to focus on the subject and ignore extraneous details. When drawing flowers, as with any subject, take it one step at a time: blocking in the overall shape, refining the lines, and then developing the form with shading.
SHADING THE SUBJECT
My favorite technique for shading in flowers and leaves is hatching, which is essentially just a series of parallel lines. I draw them close together when I want a dark value and space them farther apart when I want a lighter look. Hatch marks drawn quickly and loosely have a lively effect, while controlled, evenly spaced marks are best for more formal arrangements and flowers with a lot of precise detail.
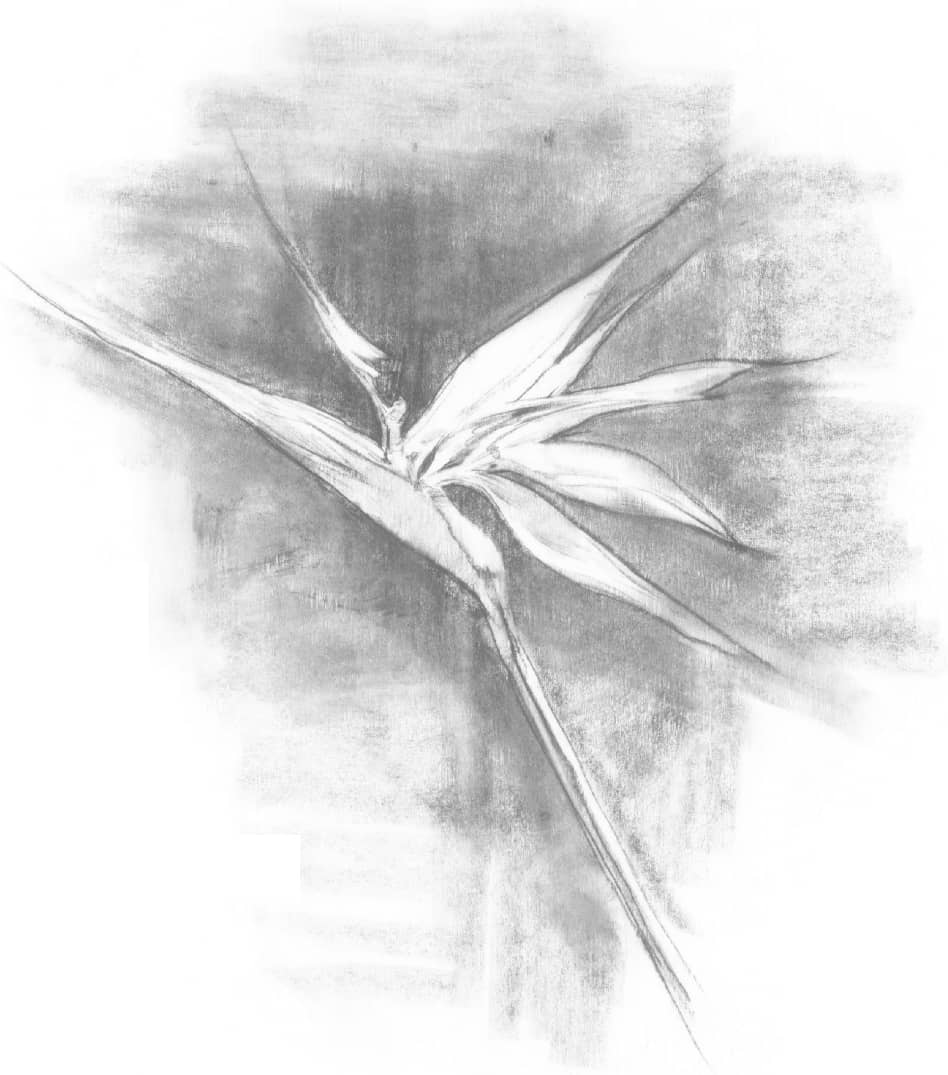
Producing Soft Shading To create this softly shaded background, hold your pencil in the underhand position and make light vertical and horizontal strokes. Vary the pressure for soft light and dark areas, and build up the darks by layering. Then shade between the bird of paradise’s spiky petals with the side of a sharp-pointed pencil. Finish with broad blending strokes using the side of a stump.
Shading with Hatch Strokes Begin by using the side of an H or HB lead, and apply wide, light strokes. Following the shape of the leaf or flower, build up the shading in layers until you get the value you want. Then accent the darkest areas using both the side and the point of a 2B pencil.
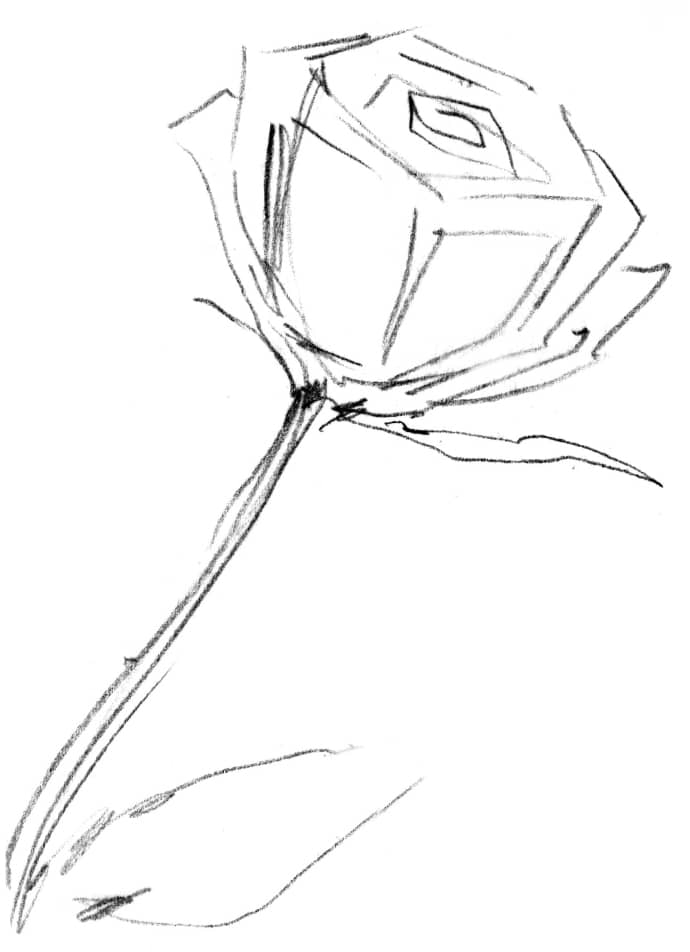
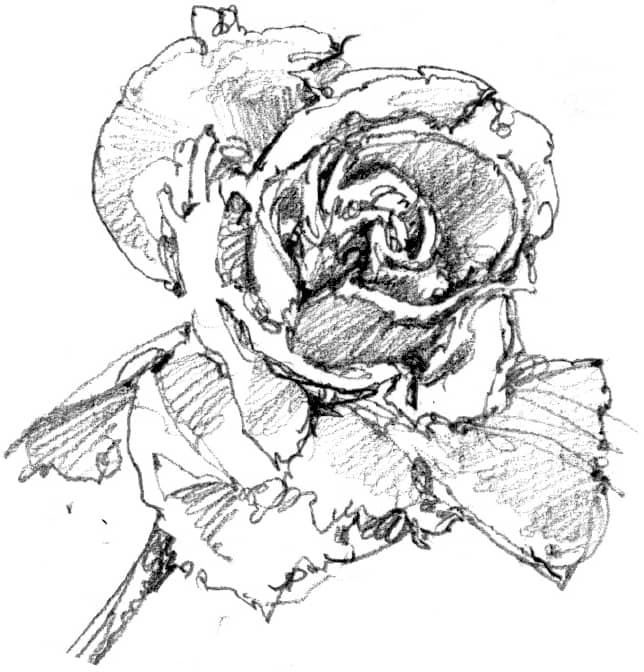
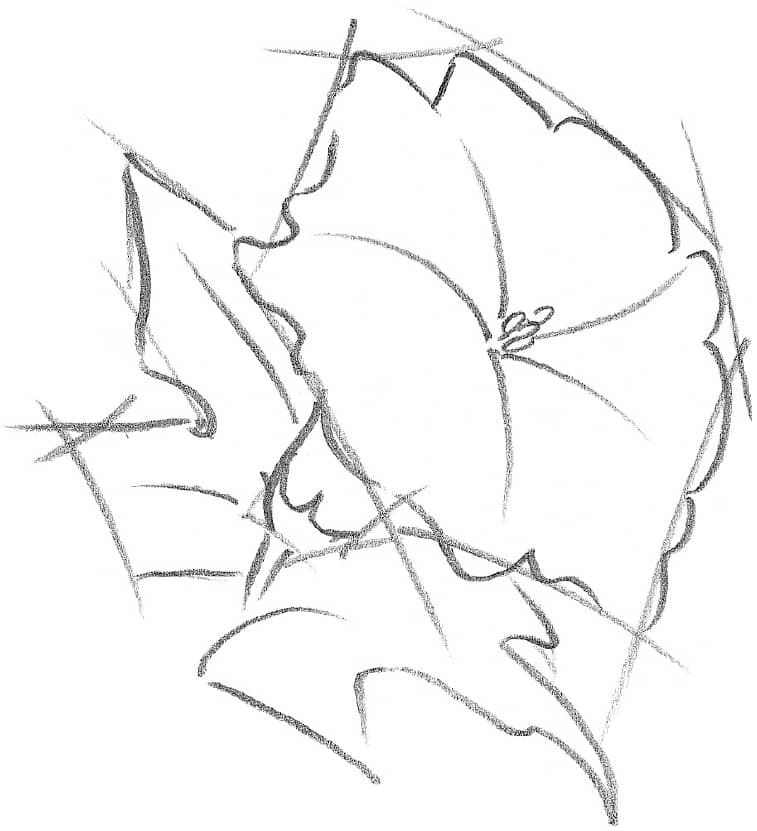
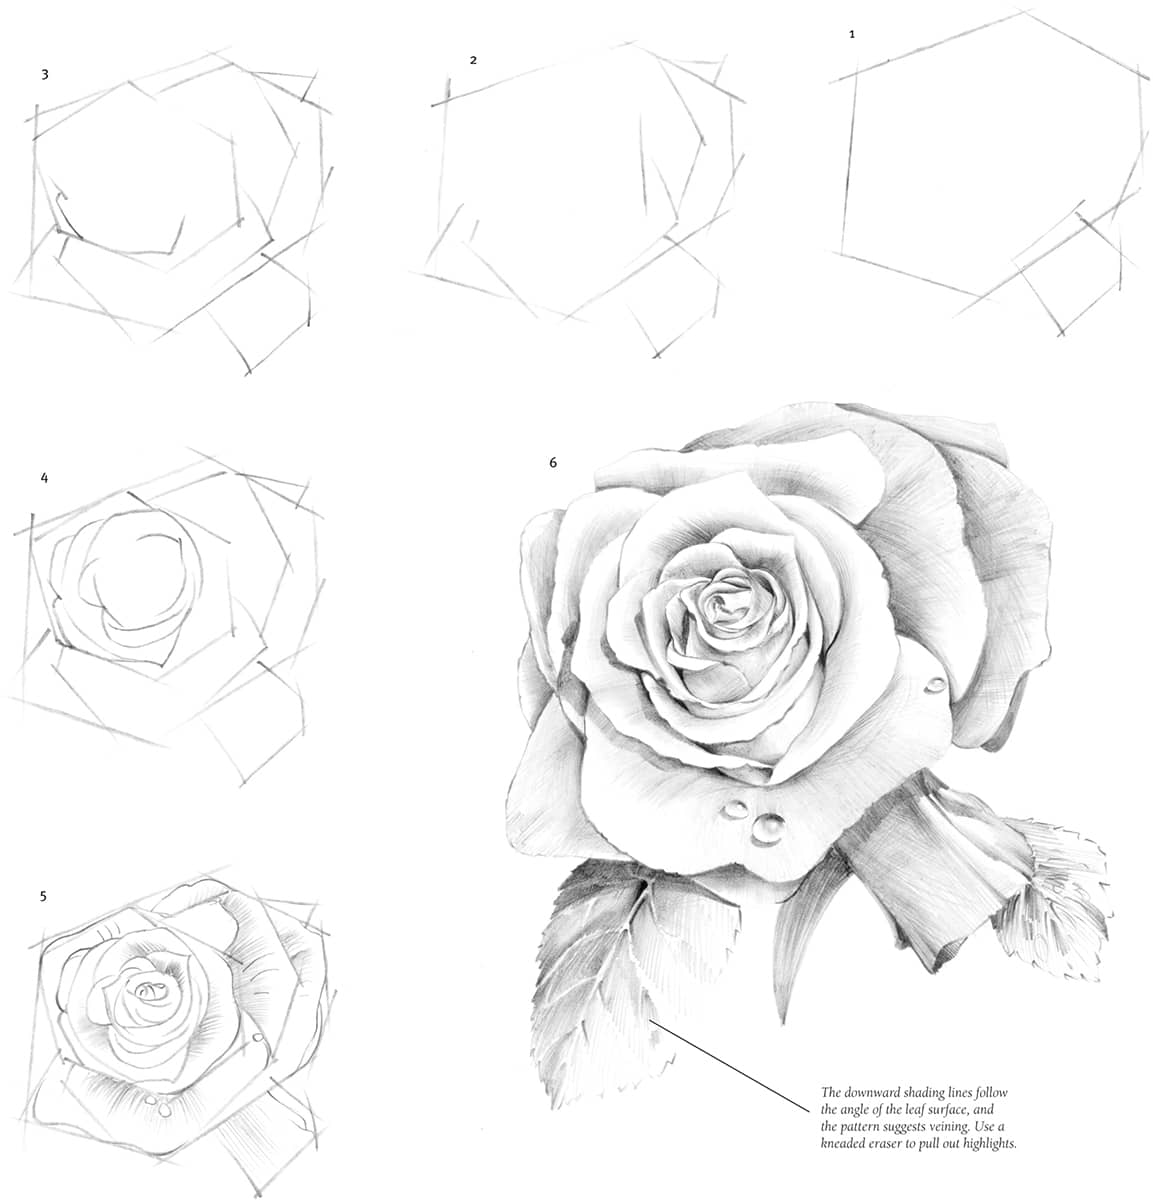
Sketching I began this rose with a light, loose sketch using a sharp HB pencil to capture the general shape of the blossom and the placement of the leaves and the stem.
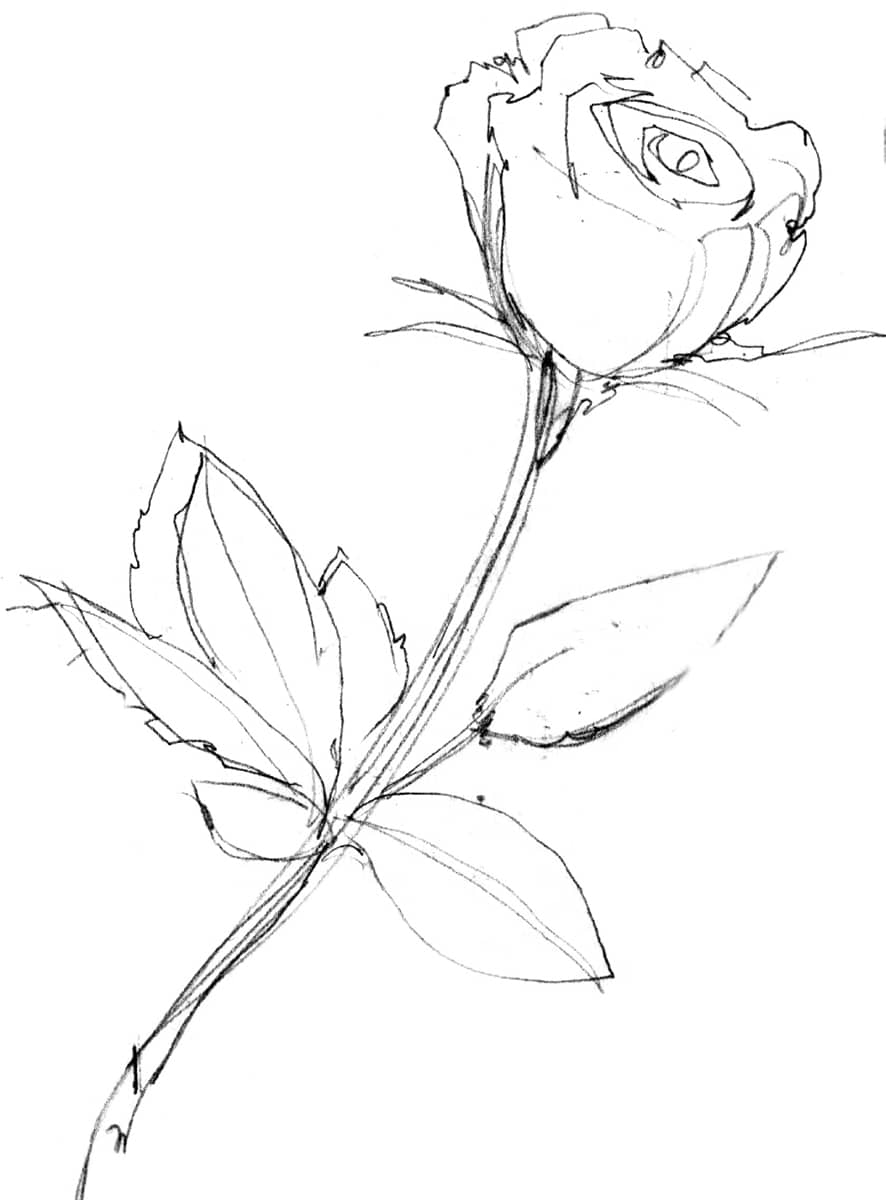
Refining Next I added the outlines of the leaves and started to round out and refine the lines of the petals, erasing my original lines where necessary.
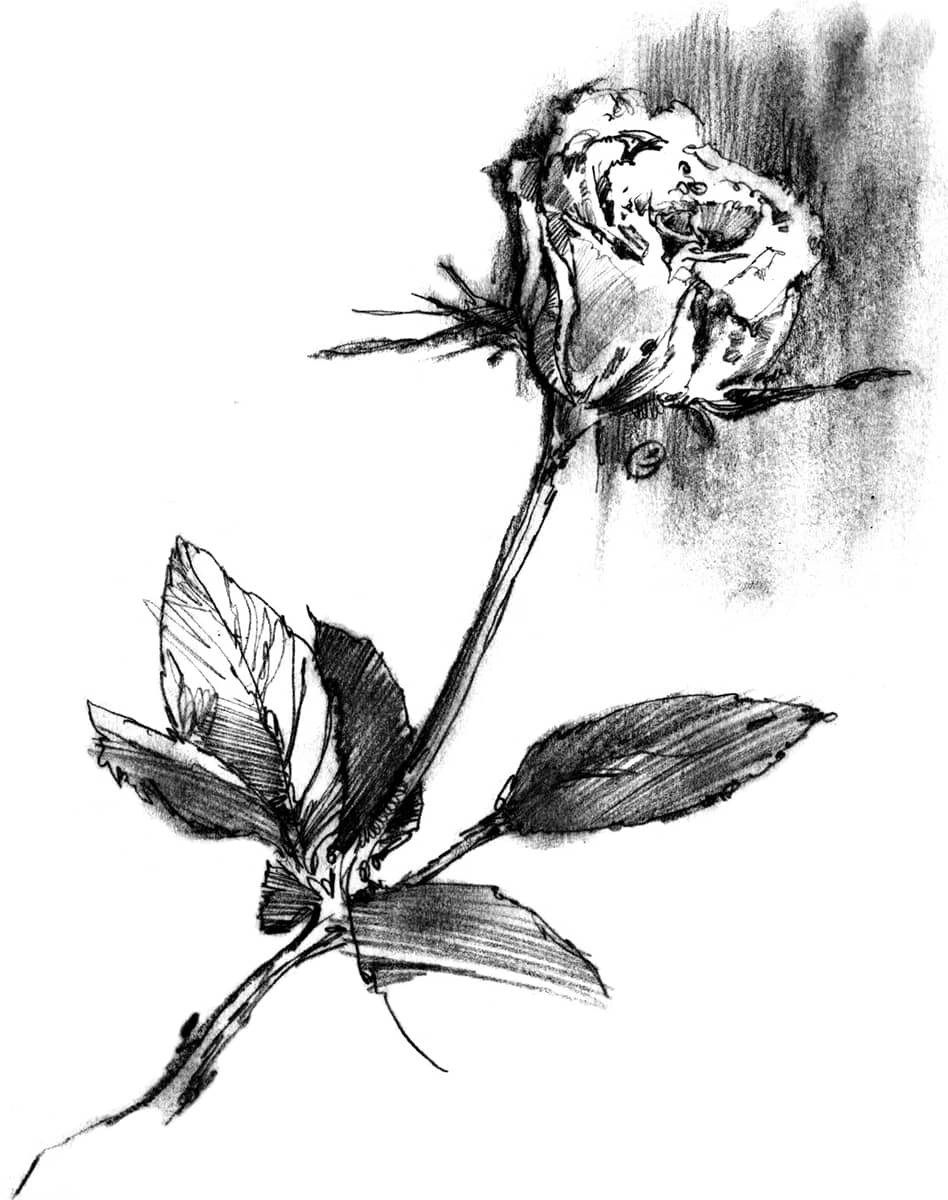
Building Up the Forms I shaded the rose using the side and point of a soft 2B pencil. I darkened the edges of the leaves and petals to differentiate them from one another, and then smudged some of the edges with a paper stump so they wouldn’t look like outlines. Finally, I added a suggestion of texture in the shadows on the petals to keep them from looking flat and lifeless.
VARYING LINE QUALITY
All edges are not created equal and should not be drawn that way unless you want a coloring-book look. I try to use a variety of lines to avoid giving my flower drawings an overly uniform, mechanical feel. I also either vary the pressure to make some lines thin and others thick, or I switch back and forth between hard and soft leads. Whatever flower subject you choose to draw, decide what feeling you want to convey, and use the pencil techniques to help you express yourself.
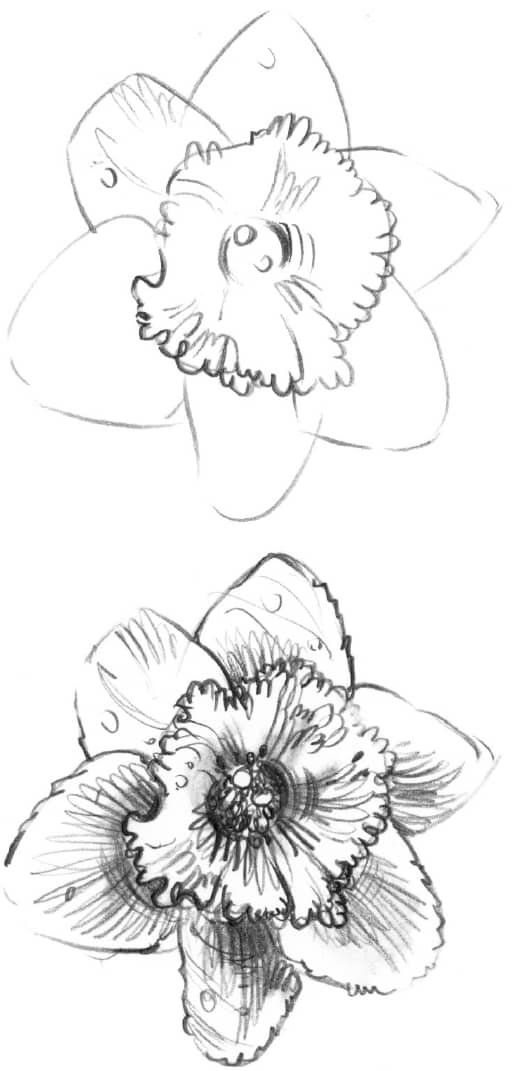
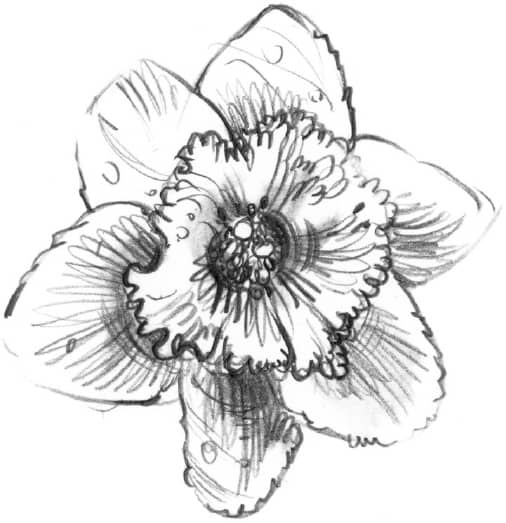
Making Irregular Edges I adapt my pencil technique to fit the type of flower I’m drawing. This daffodil has ruffled edges, so I “scribbled” around the edges of the center with an irregular curly pattern and used a more controlled scallop for the outer petals.
Using Contrasting Lines This rose has smoother petals than the daffodil, but I didn’t want them to look like cookie-cutter shapes. Here I changed the pressure on my pencil to get a variety of lines: thick and thin, dark and light. I also alternated between straight strokes and loose, circular lines to add some personality.
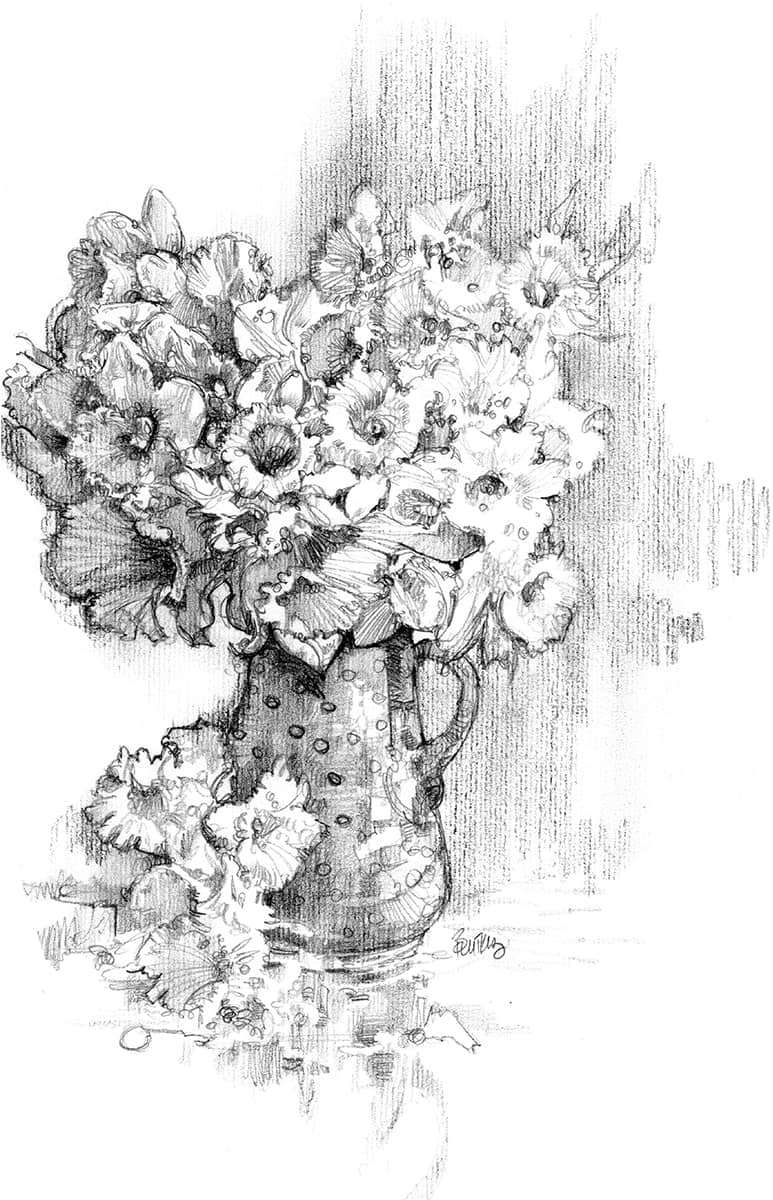
Losing Edges Sometimes you can delineate a form without drawing its outline. “Drawing the negative shapes” means drawing the areas around an object rather than drawing the object itself. For example, in the bouquet above, I let the background strokes define the edges of the brightly lit flowers on the right, whose details have largely disappeared in the glare.
BASIC FLOWER SHAPES
As you can see, even the most complicated flowers can be developed from simple shapes. Select a flower you wish to draw and study it closely, looking for its overall shape. Sketch the outline of this shape, and begin to look for other shapes within the flower. Block in the smaller shapes that make up details, such as petals or leaves. Once you’ve completed this, smooth out your lines, and begin the shading process.
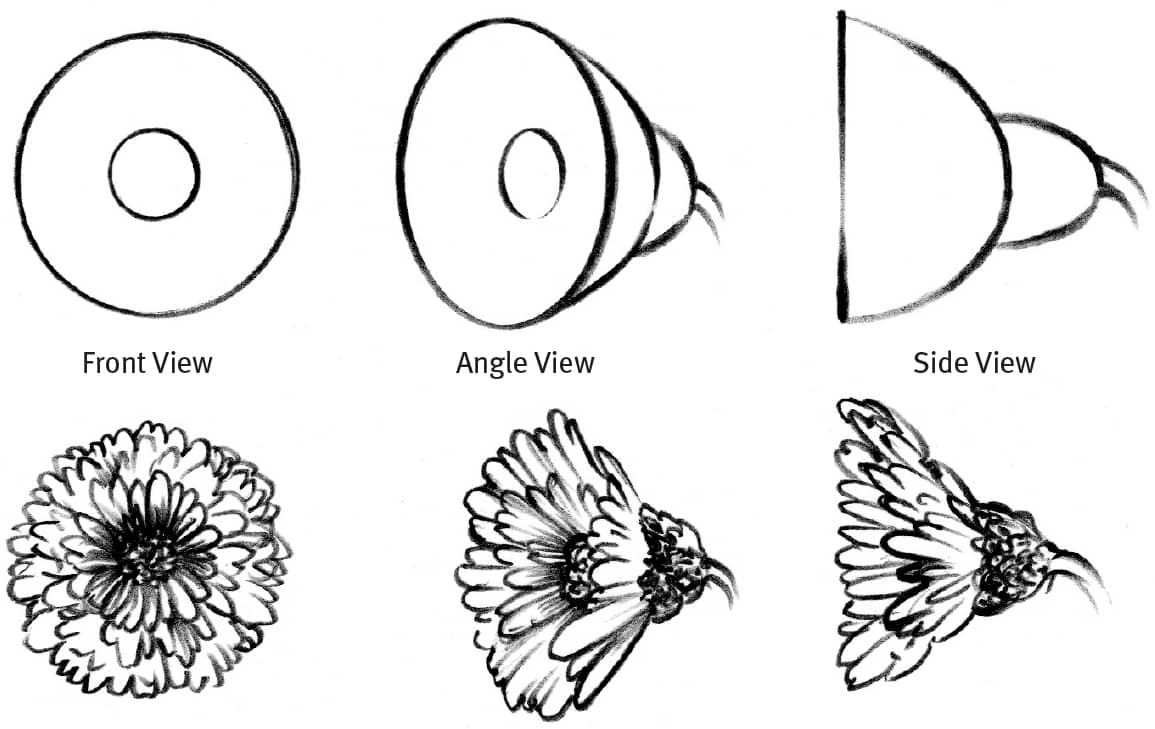

With an HB pencil, sketch the cuplike shape of the flower first; then place the petals and stem, as shown above. Begin developing the form with shading.
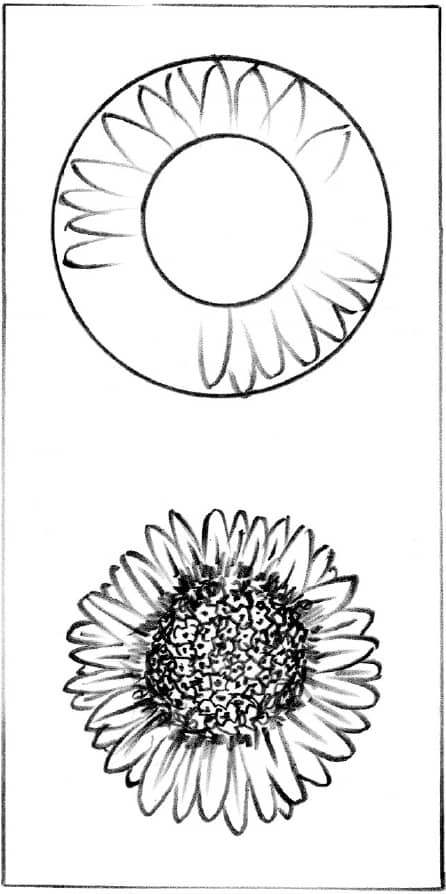
Circles enable you to draw round flowers. Set the size with a large circle, and place a smaller one inside. Using them as a guide, shade the details.
This three-quarter view may seem more difficult to draw, but you can still bring out its basic shapes if you study it carefully. Begin each petal with short lines drawn at the proper angles.
Drawing flowers with many overlapping petals is more involved but, once the basic shapes are sketched in, the details can easily be drawn.
SIMPLE FLOWERS
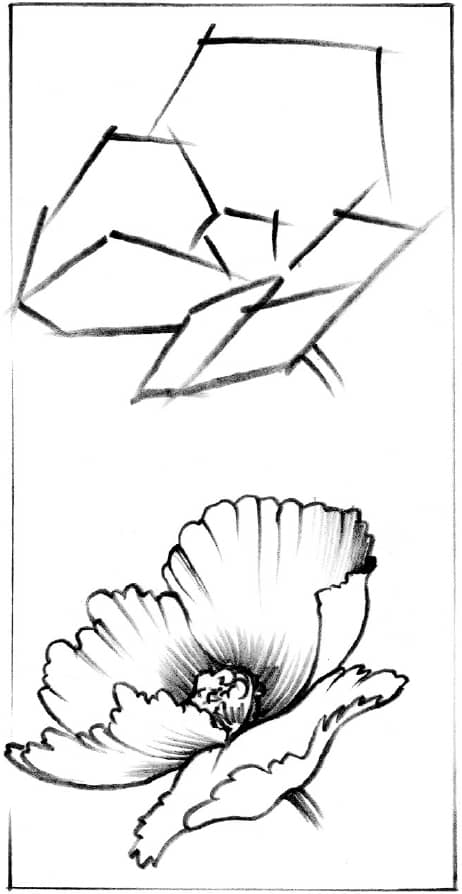
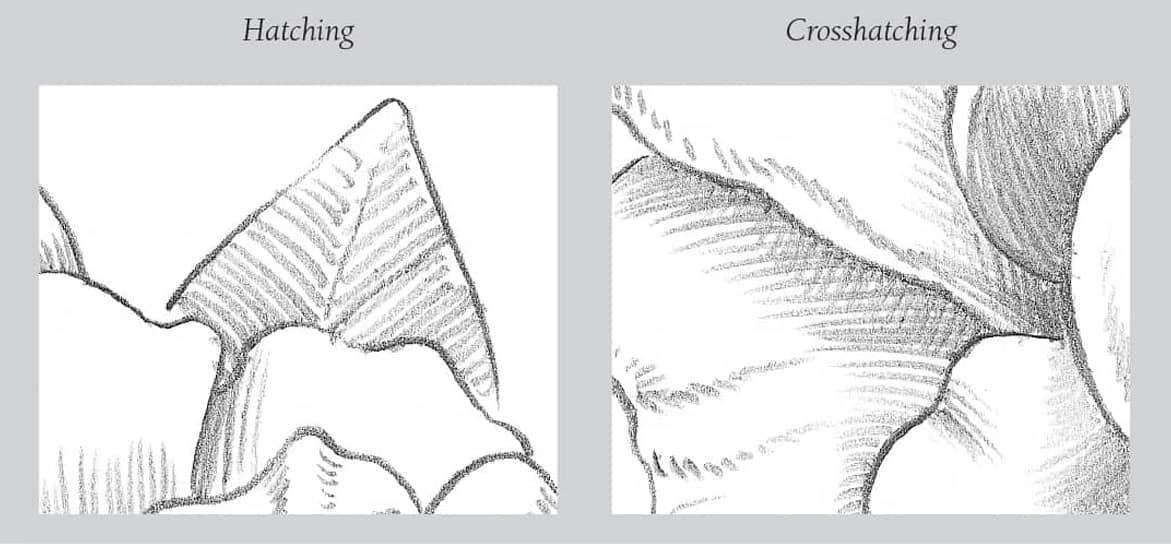
This morning glory and gardenia are great flowers for learning a few simple shading techniques called “hatching” and “cross-hatching.” Hatch strokes are parallel diagonal lines; place them close together for dark shadows, and space them farther apart for lighter values. Cross-hatch strokes are made by first drawing hatch strokes and then overlapping them with hatch strokes that are angled in the opposite direction. Examples of both strokes are shown in the box at the bottom of the page.
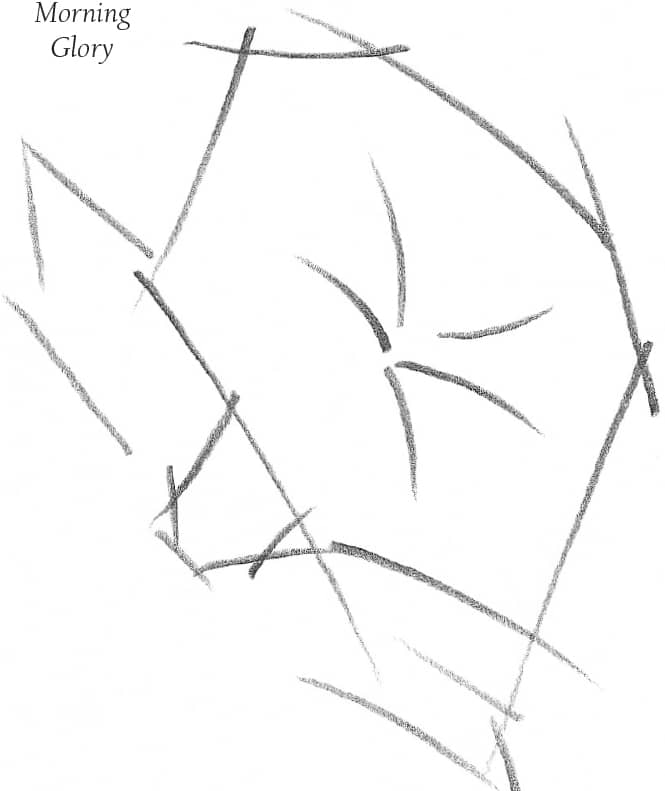
Step 1 Look carefully at the overall shape of a morning glory, and lightly sketch a polygon with the point of an HB pencil. From this three-quarter view, you can see the veins that radiate from the center, so sketch in five curved lines to place them. Then roughly outline the leaves and the flower base.
Step 2 Next draw the curved outlines of the flower and leaves, using the guidelines for placement. You can also change the pressure of the pencil on the paper to vary the line width, giving it a little personality. Then add the stamens in the center.
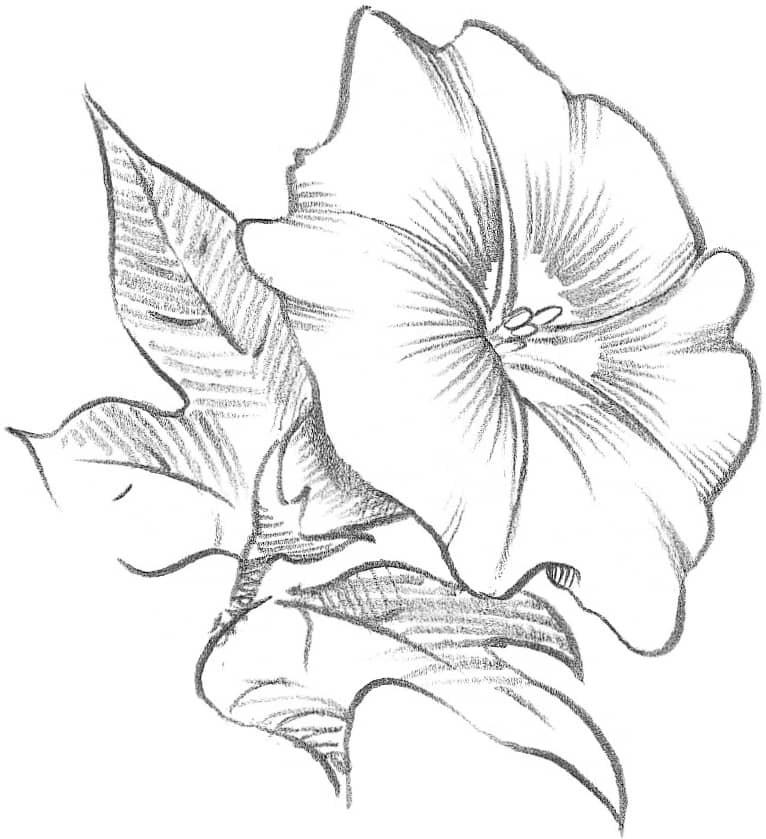
Step 3 Now you are ready to add the shading. With the rounded point and side of an HB pencil, add a series of hatching strokes, following the shape, curve, and direction of the surfaces of the flower and leaves. For the areas more in shadow, make darker strokes placed closer together using the point of a soft 2B pencil.
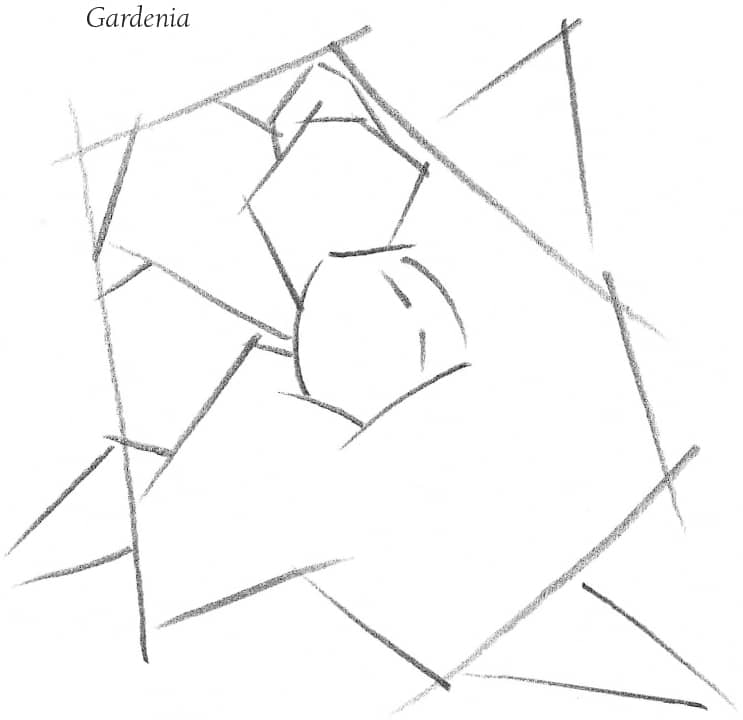
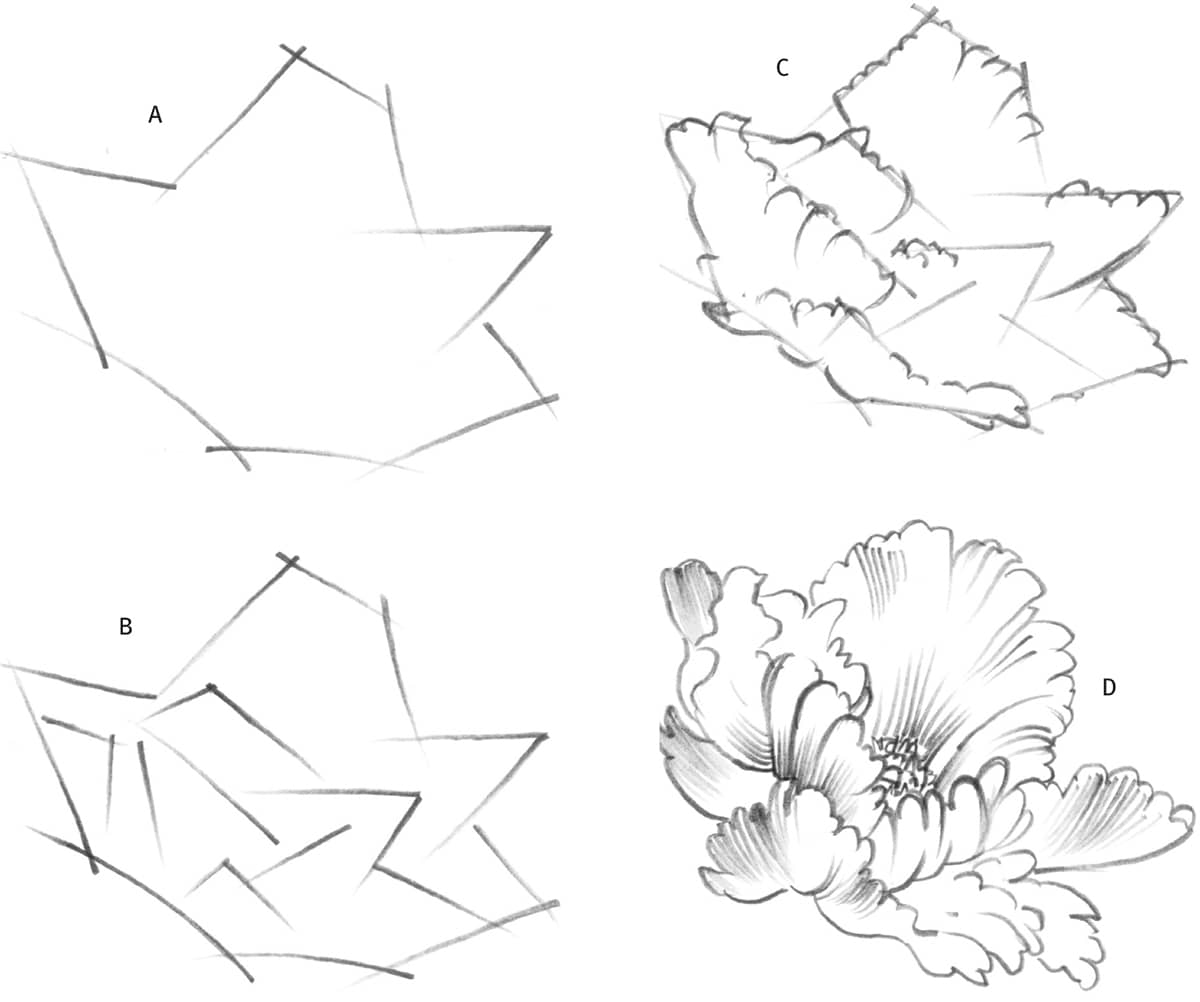
Step 1 The gardenia is a little more complicated to draw than the morning glory, but you can still start the same way. With straight lines, block in an irregular polygon for the overall flower shape, and add partial triangles for leaves. Then determine the basic shape of each petal and begin sketching in each, starting at the center of the gardenia.
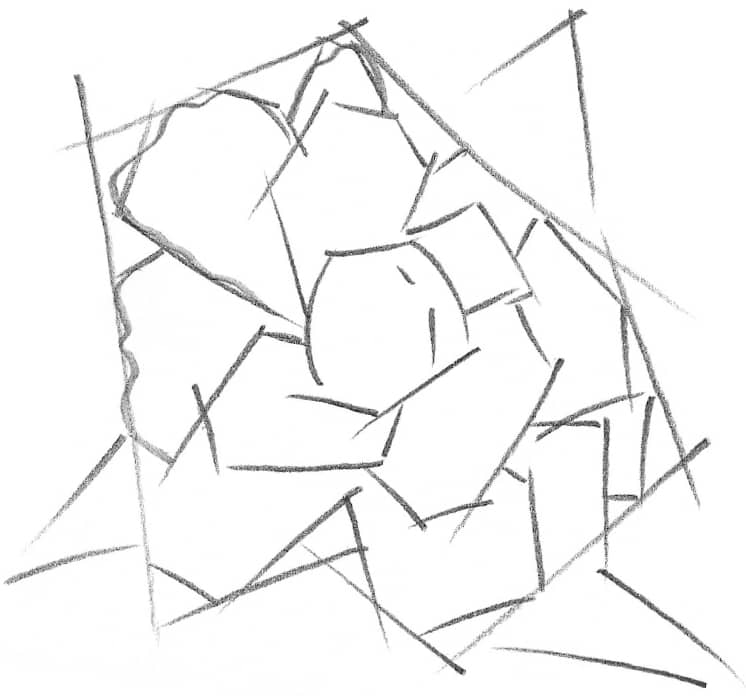
Step 2 As you draw each of the petal shapes, pay particular attention to where they overlap and to their proportions, or their size relationships—how big each is compared with the others and compared with the flower as a whole? Accurately reproducing the pattern of the petals is one of the most important elements of drawing a flower. Once all the shapes are laid in, refine their outlines.
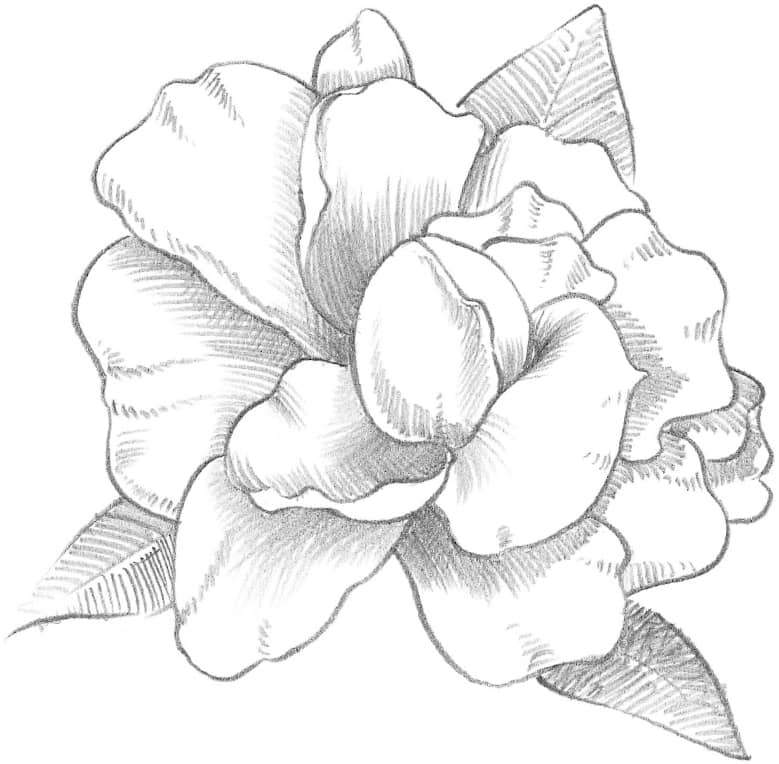
Step 3 Again, using the side and blunt point of an HB pencil, shade the petals and the leaves, making your strokes follow the direction of the curves. Lift the pencil at the end of each petal stroke so the line tapers and lightens, and deepen the shadows with overlapping strokes in the opposite direction (called “crosshatching”) with the point of a 2B pencil.
TULIPS
There are several classes of tulips with differently shaped flowers. The one below, known as a parrot tulip, has less of a cup than the tulip to the right and is more complex to draw. Use the layout steps shown here before drawing the details.
For the tulip above, begin step A using straight lines from point to point to capture the major shape of the flower. Add petal angles in step B. Draw in actual petal shapes in step C, and complete with simple shading in step D.
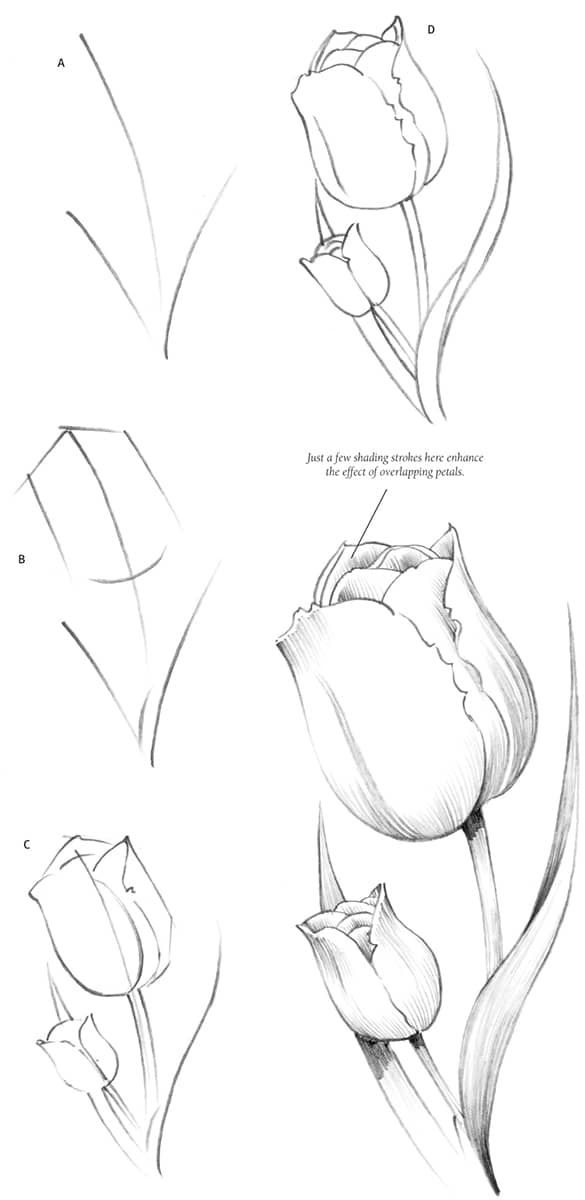
Look for the rhythm of line in this next tulip. It begins with the three simple lines in step A, which set its basic direction. Step B demonstrates how to add lines to build the general flower shape. Step C adds more to the shape and begins to show the graceful pose of the flower. Step D shows more detail and leads to shading, which gives the flower its form.
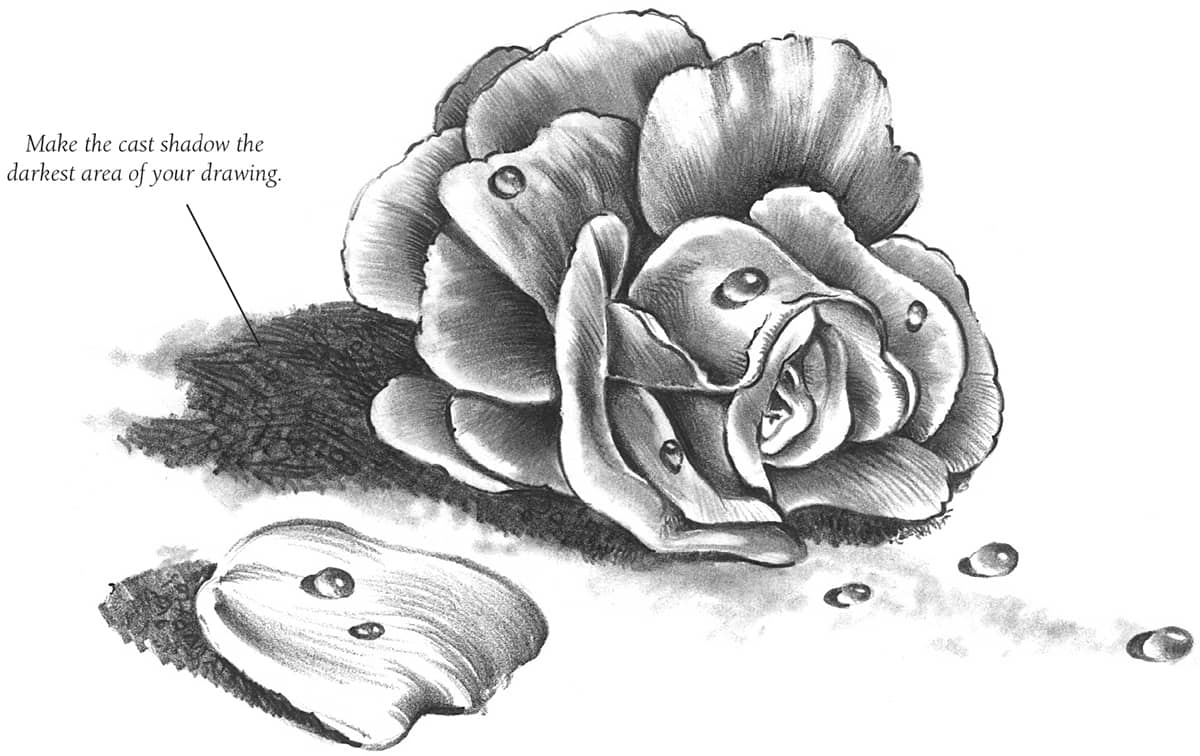
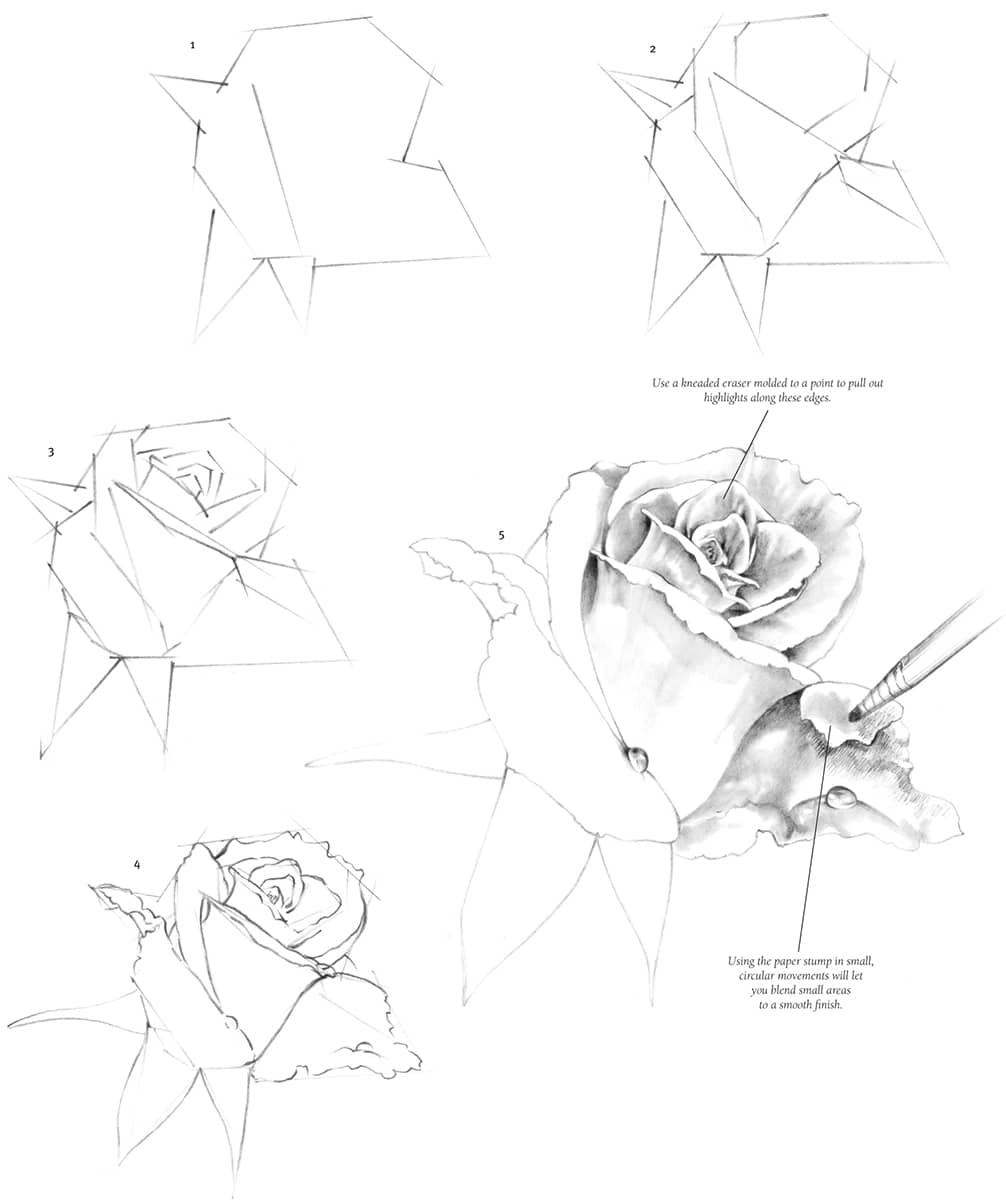
ROSE & WATER DROPS
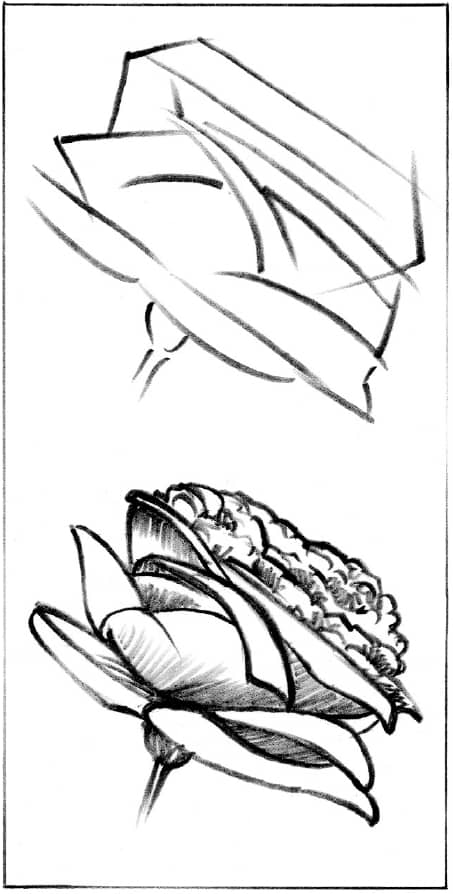
Many beginning artists believe a rose is too difficult to draw and therefore shy away from it. But like any other object, a rose can be developed step by step from its most basic shapes.
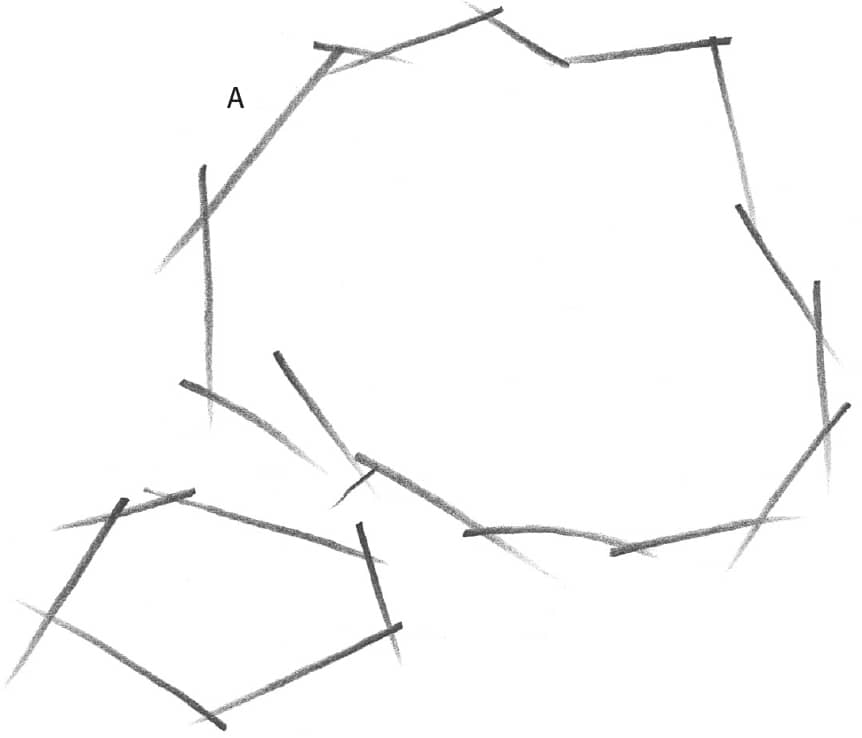
In step A, use an HB pencil to block in the overall shapes of the rose and petal, using a series of angular lines. Make all guidelines light so you won’t have trouble removing or covering them later.
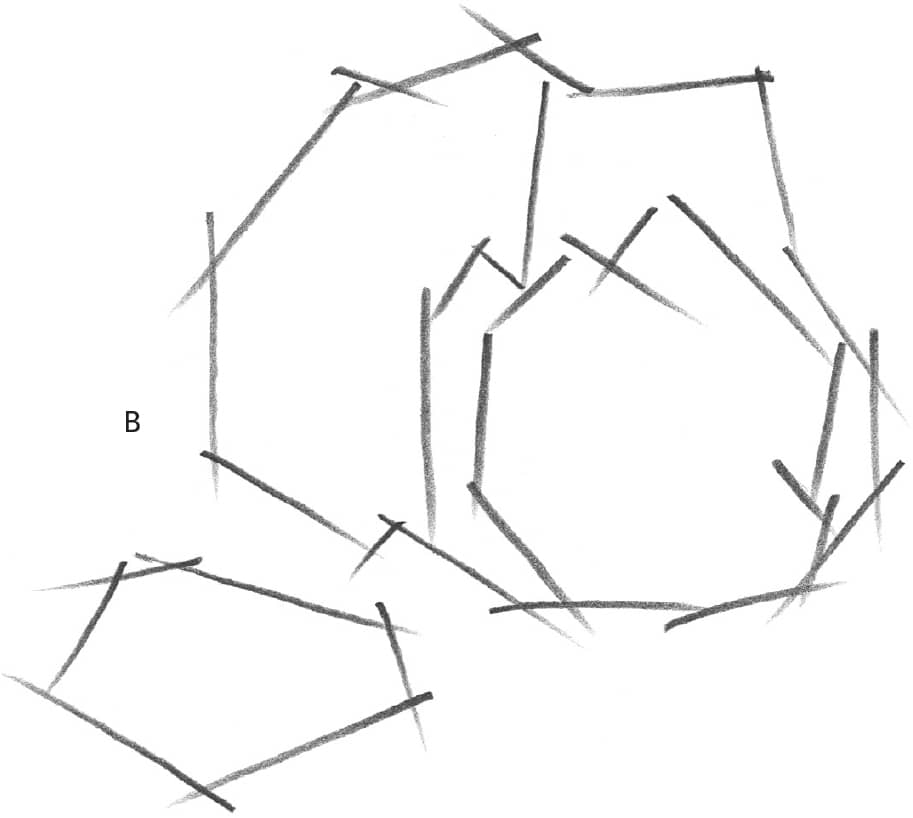
In steps B and C, continue adding guidelines for the flower’s interior, following the angles of the petal edges.
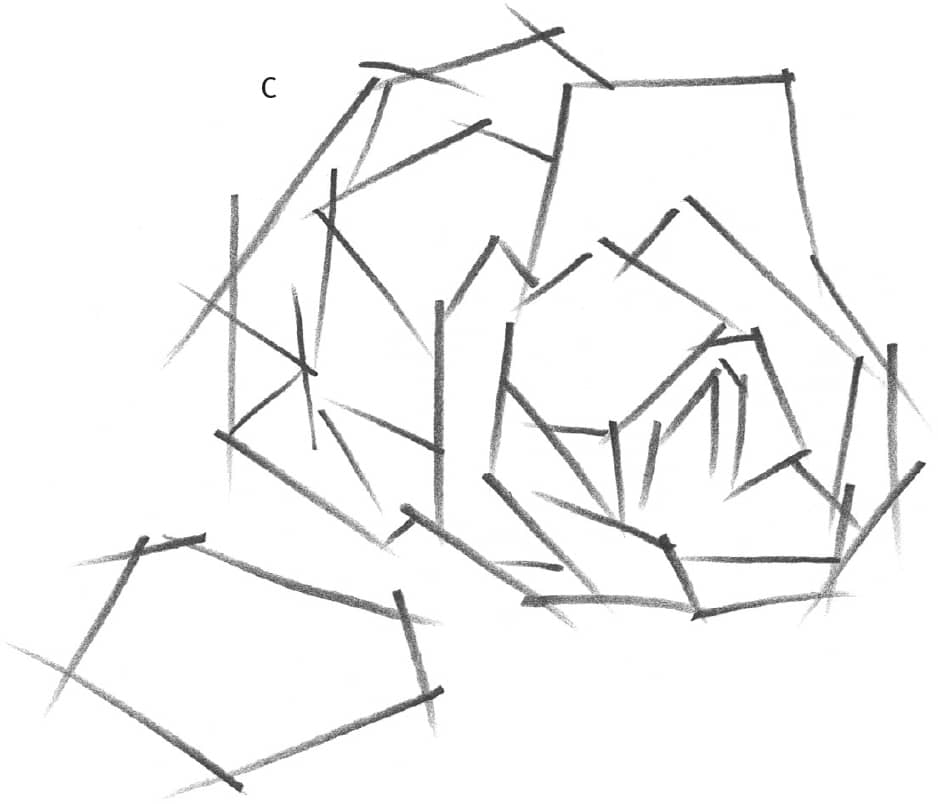
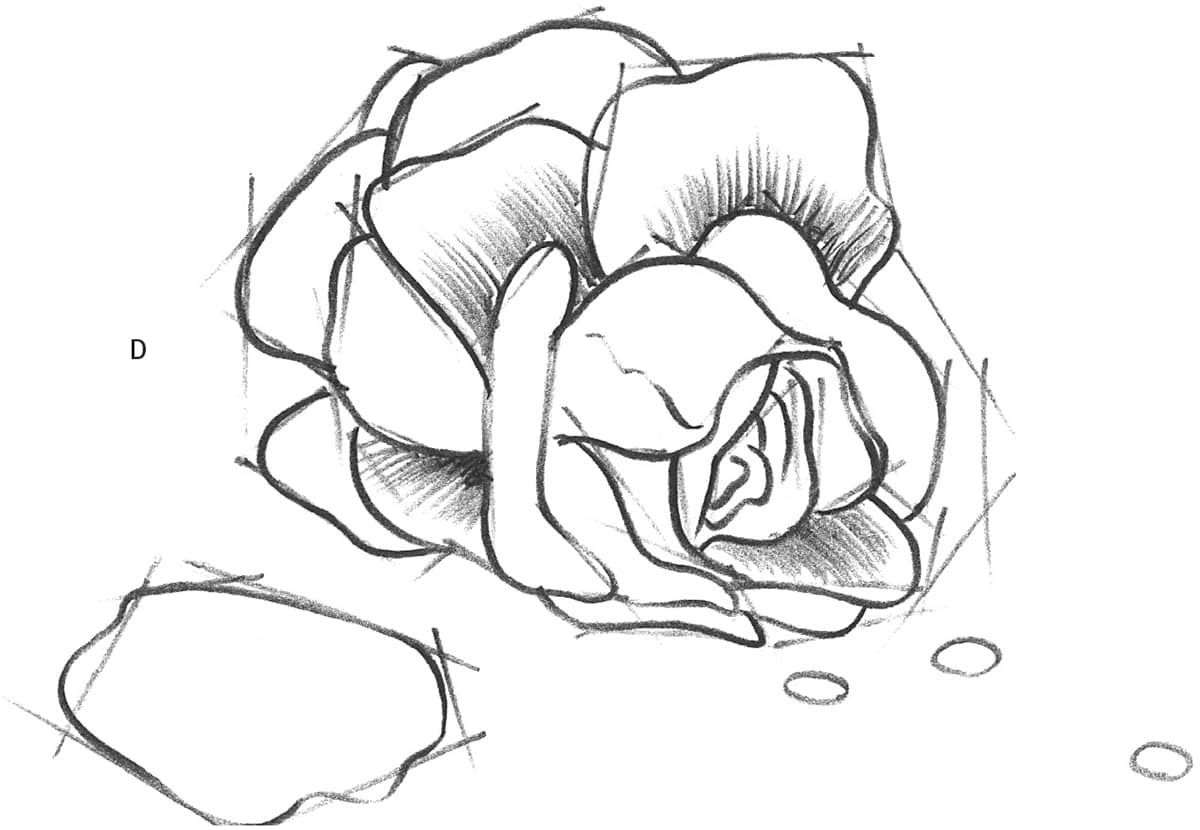
Begin shading in step D. Stroke from inside each petal toward its outer edge.
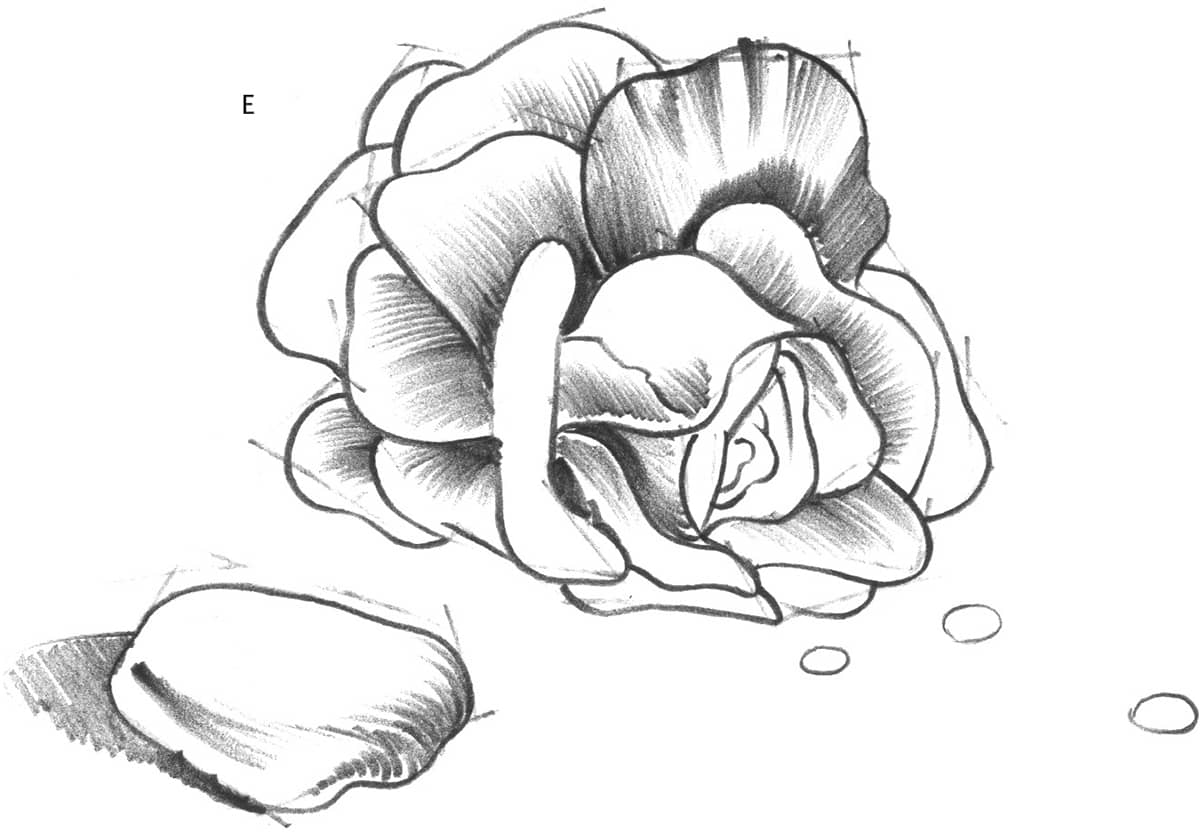
In step E, shade from the outer edge of each petal, meeting the strokes you drew in the opposite direction. Use what is known as a stroke-and-lift technique. For this technique, you should draw lines that gently fade at the end. Just press firmly, lifting the pencil as the stroke comes to an end.
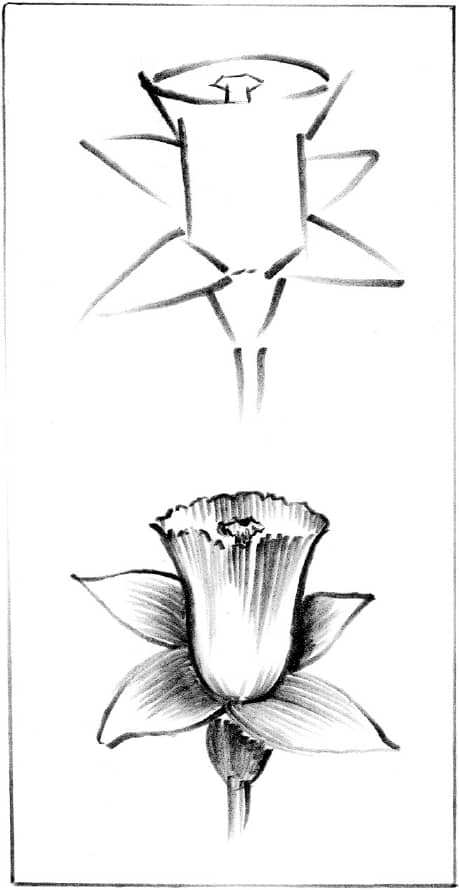
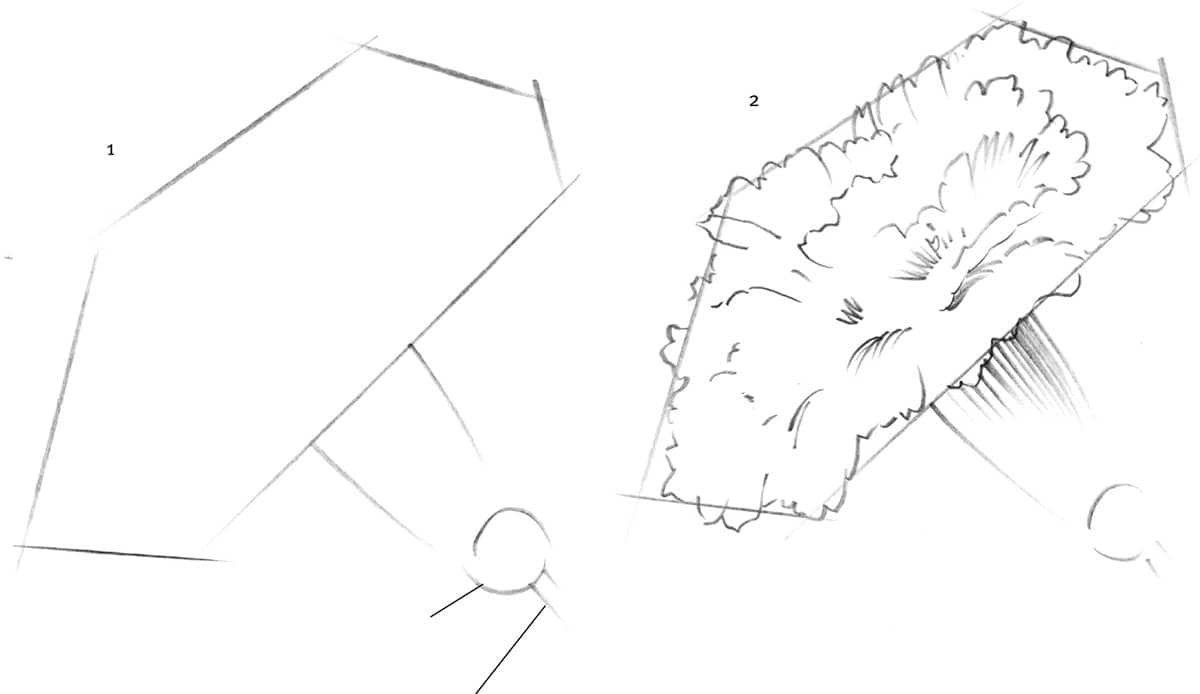
DAFFODIL
The flower shown here is a trumpet daffodil, of which there are large- and small-cupped varieties. The hornlike opening of this flower enhances its charm. Follow the steps closely in this exercise and you will end up with a perfect drawing. Begin step A by drawing the horn shape.
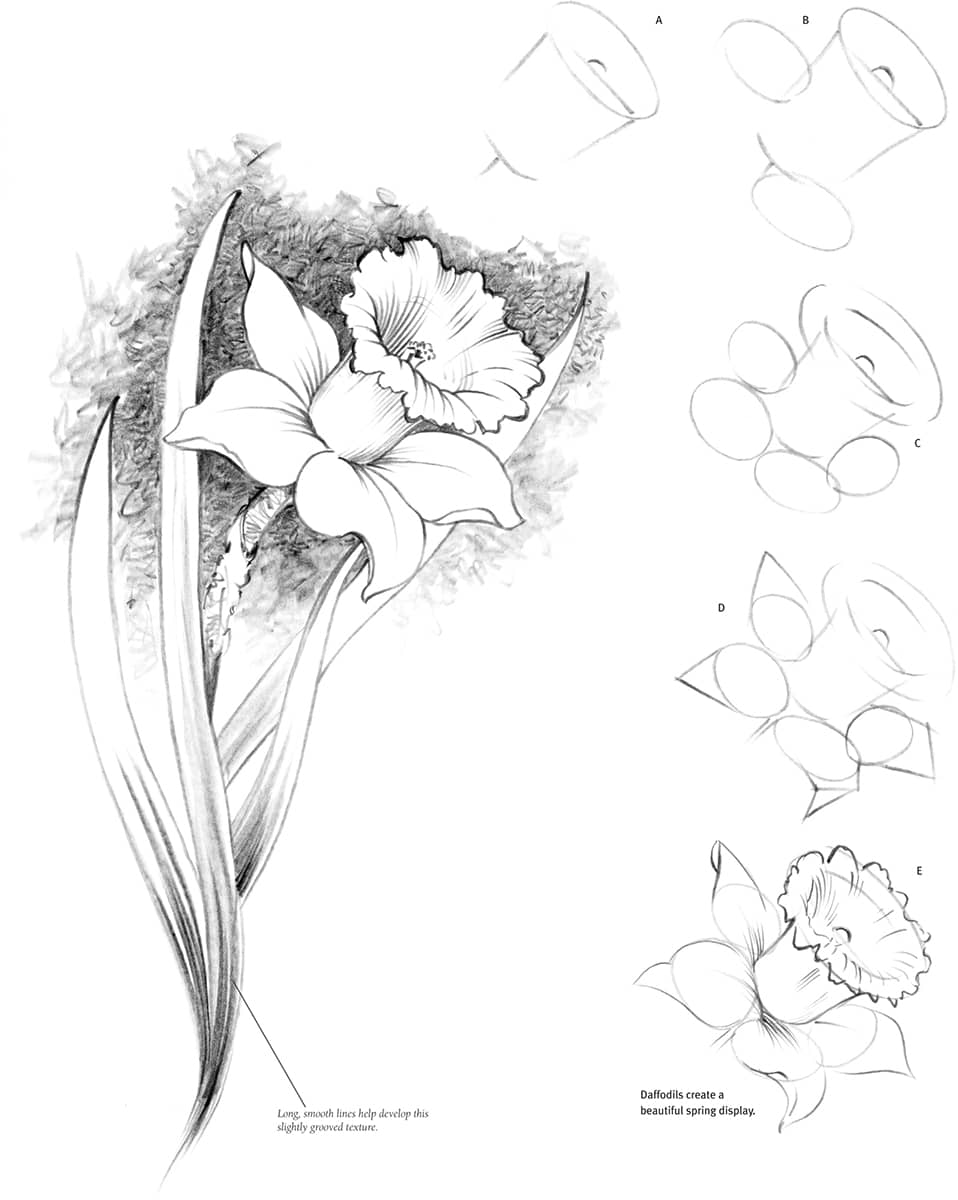
In steps B and C, develop the outer petals by drawing circles around the horn shape. Then add triangle points to the circles in step D. Many kinds of flower petals can be developed this way.
Use a flat sketching pencil to build the background and shade the leaves. Apply the strokes randomly, and set a loose pattern while shading the leaves in the direction they lie. Vary pressure for light and dark areas.
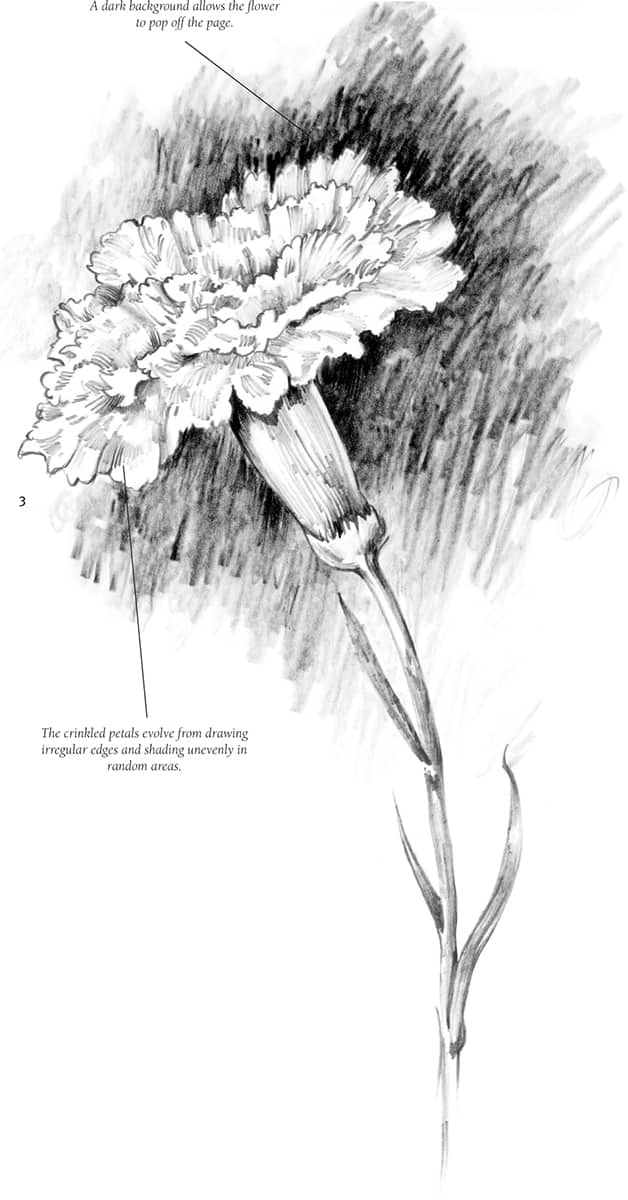
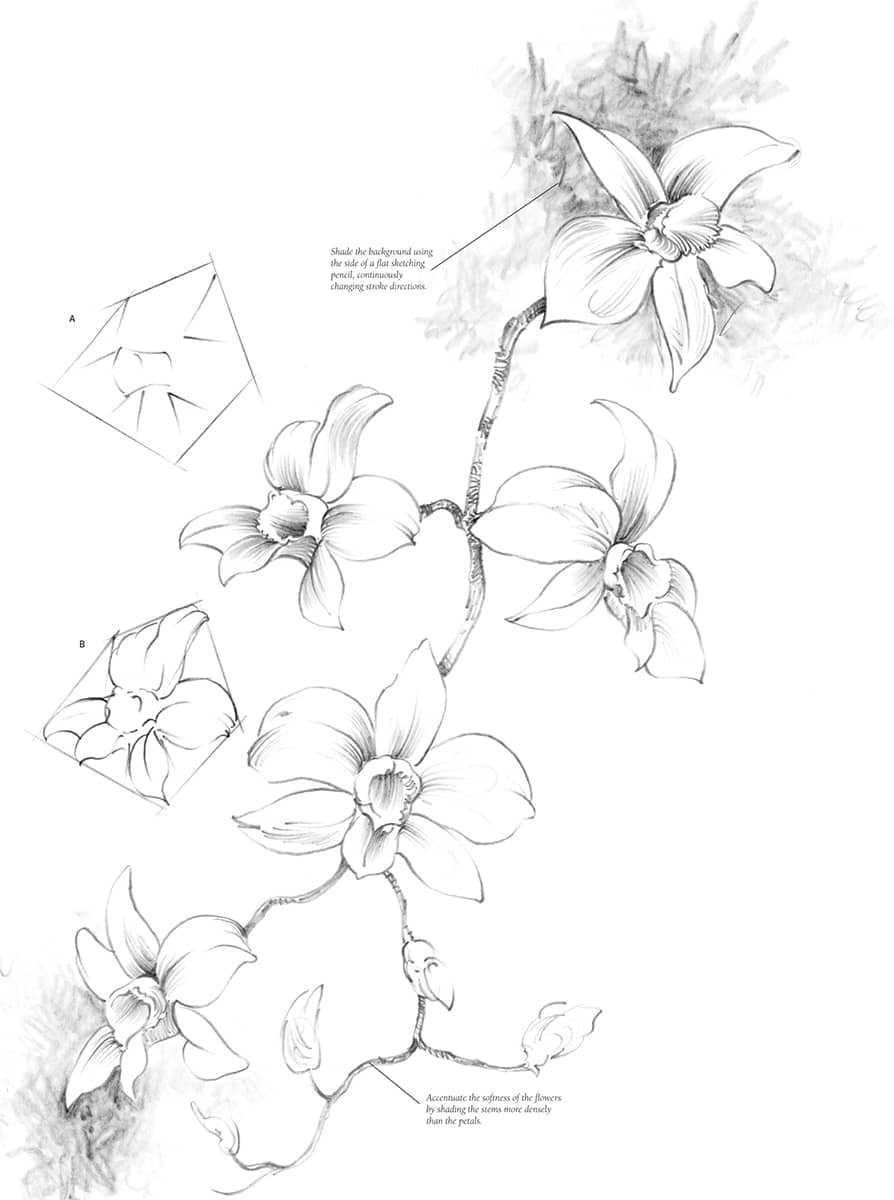
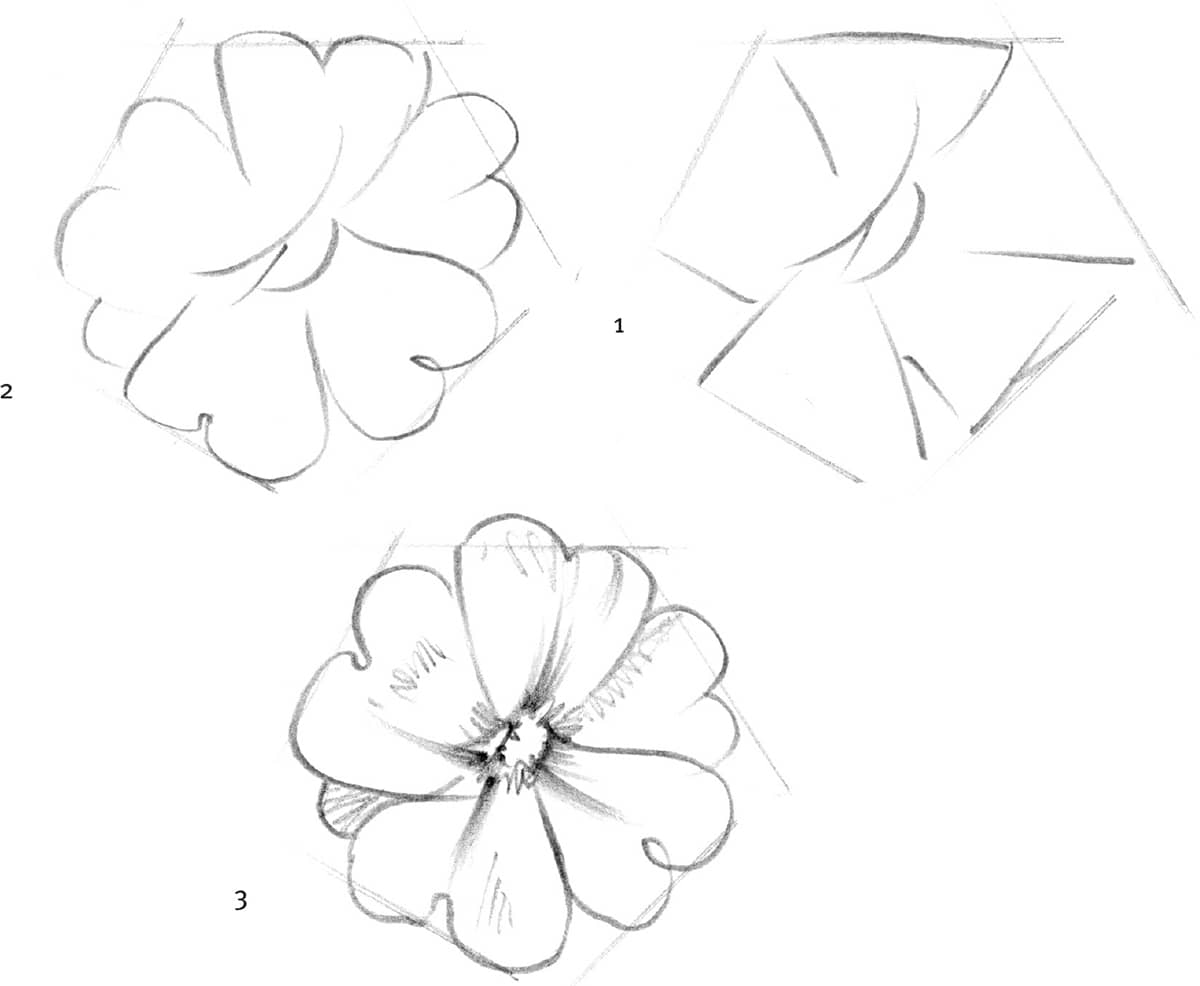
CARNATION
Carnation varieties range from deep red to bicolored to white. They are very showy and easy to grow in most gardens, and they are also fun and challenging to draw because of their many overlaying petals. Shade them solid, variegated, or with a light or dark edge at the end of each petal.
Replicating Patterns and Shapes The front view above shows the complex pattern of this type of carnation. Step 1 places the basic shapes seen within the flower. From here, begin drawing the actual curved petal shapes. Once they are in place, shade the flower.
Establishing the Basic Shapes Develop the overall shape of the side view, including the stem and sepal. Begin drawing the intricate flower details in step 2, keeping them light and simple.
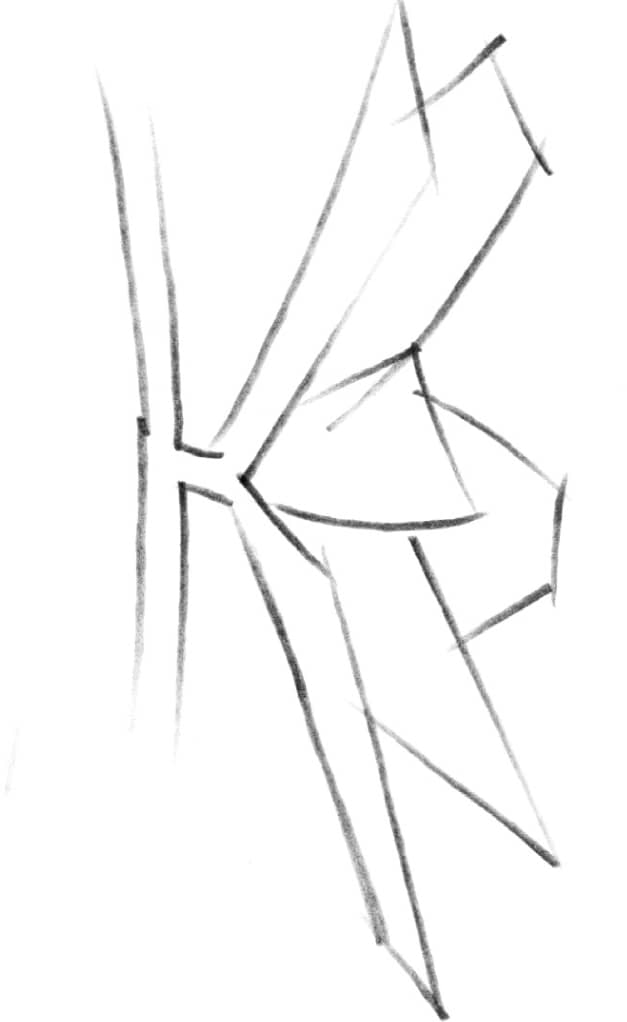
DENDROBIUM
The dendrobium is an orchid variety native to tropical climates. It has slender stems that can grow up to 2 feet long and 21/2 to 31/2 inches across. Colors range from blends of mauve, containing deeper colored veins, to maroon and pale purple.
For simplicity, keep the shading on these flowers to a minimum. You can also enhance the artistic quality of your drawing by adding a background in select areas.
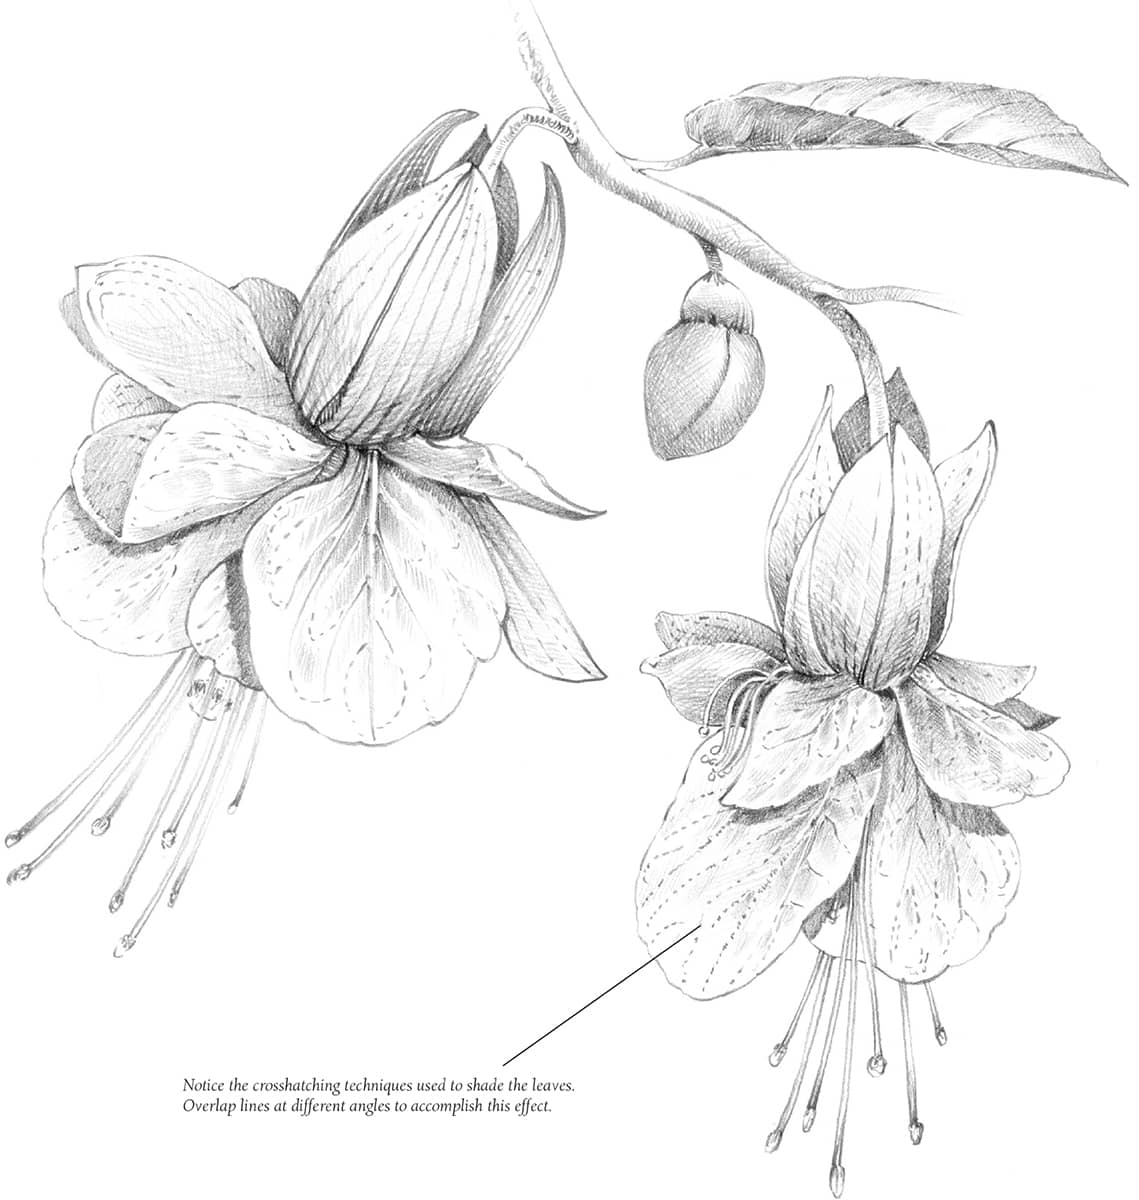
FUCHSIA
Fuchsias present a beautiful color variety including greens, reds, and purples. This exercise should be drawn on vellum-finish (rough) bristol board to enhance the irregular texture of the flowers. Use the side of an HB pencil to lightly block in the basic shapes and build the details of the petal pattern.
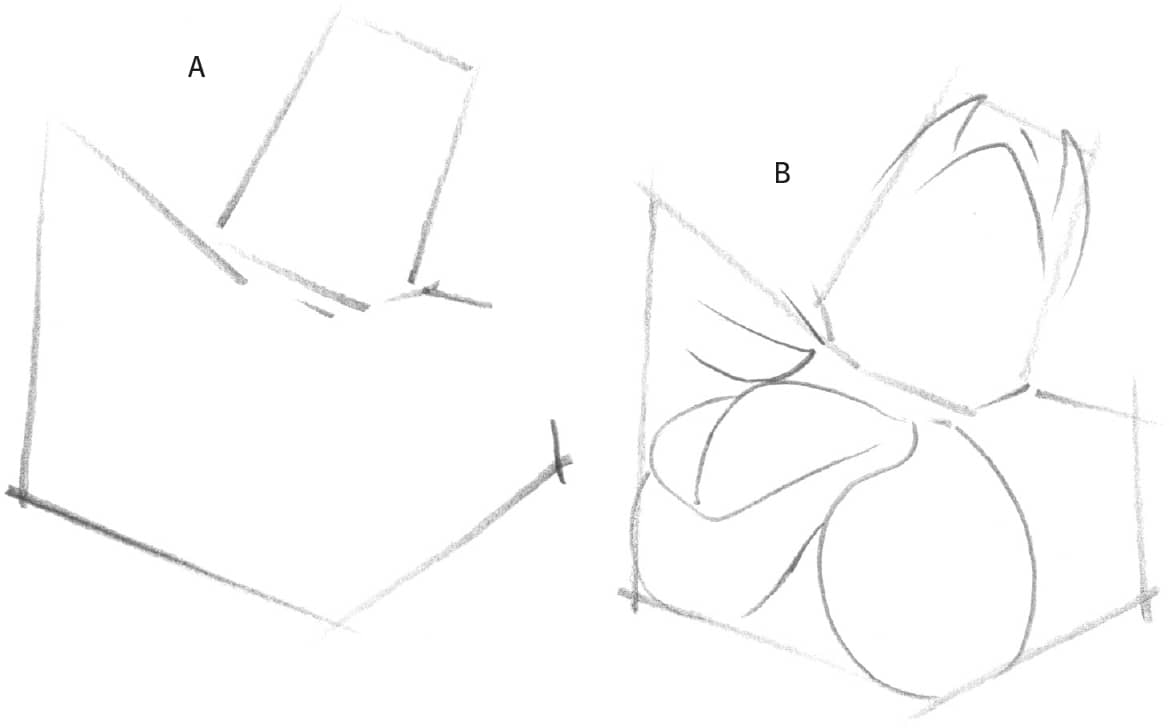
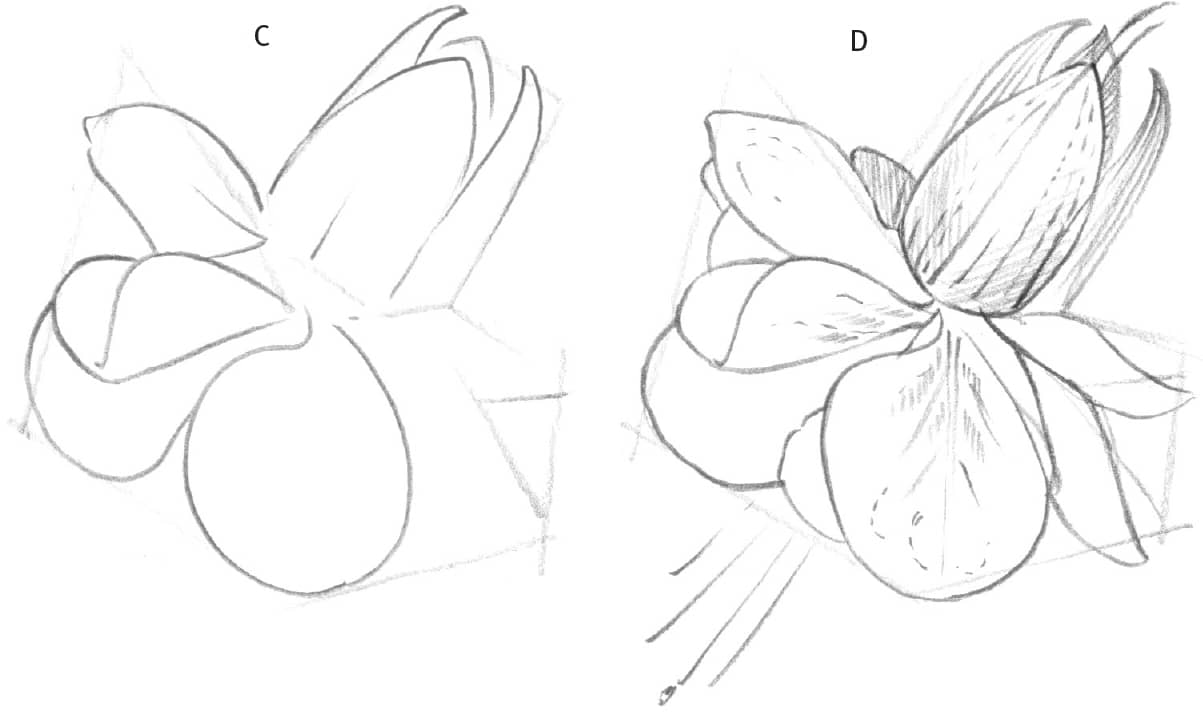
Start light shading using the tip of an HB pencil, making sure to shade with the surface direction. Develop large shading areas using the side of the lead, and darken creases and lines using a sharpened 2B.
PRIMROSE
There are many primrose varieties with a wide range of colors. This exercise demonstrates how to draw a number of flowers and buds together. Take your time when placing them.
Forming the Primrose Blossom Draw a main stem first, and add smaller ones branching outward. Keep them in clusters, curving out in different directions from the same area.
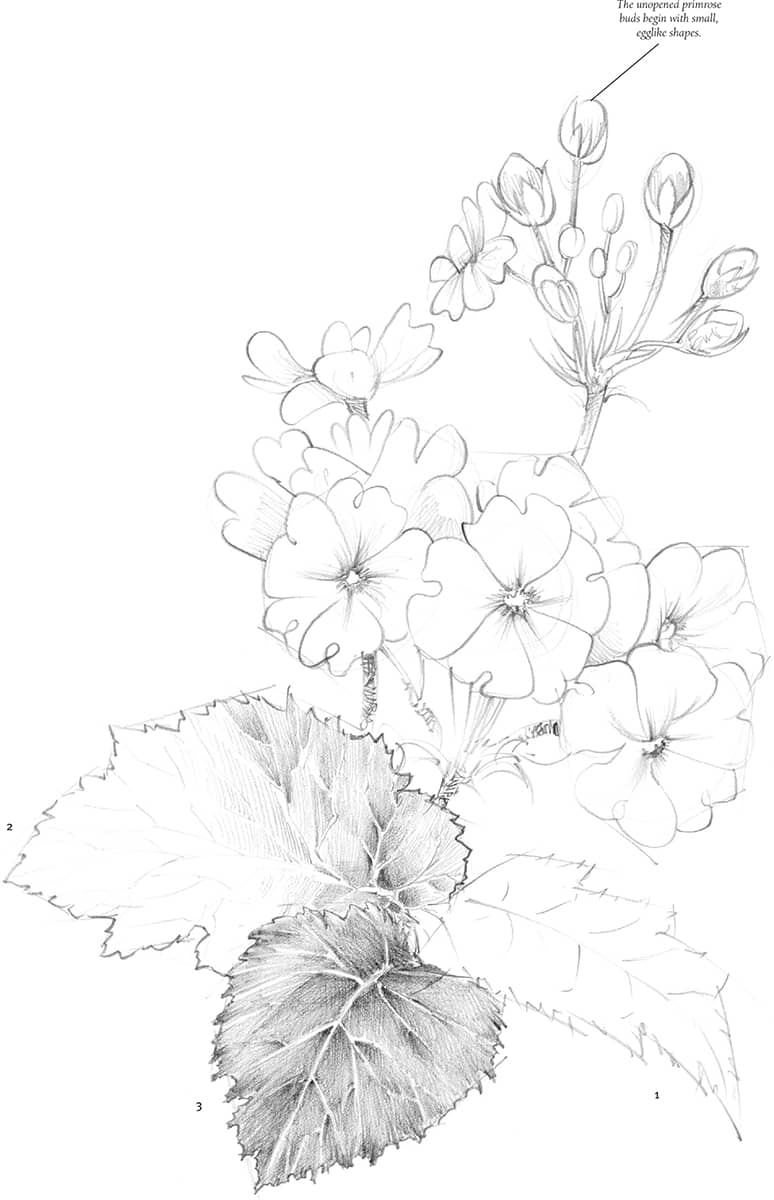
Developing the Leaves These steps show three shading stages of leaves. In step 1, lightly outline the leaf shape. Begin shading in step 2, sketching where the leaf veins will be. Then shade around those areas, leaving them white, to bring out the veins. When you reach step 3, clean up the details, and add a few darker areas along some of the veins.
HIBISCUS
Hibiscus grow in single- and double-flowered varieties. Their colors include whites, oranges, pinks, and reds—even blues and purples. Some are multi- or bicolored. The example here is a single-flowered variety.
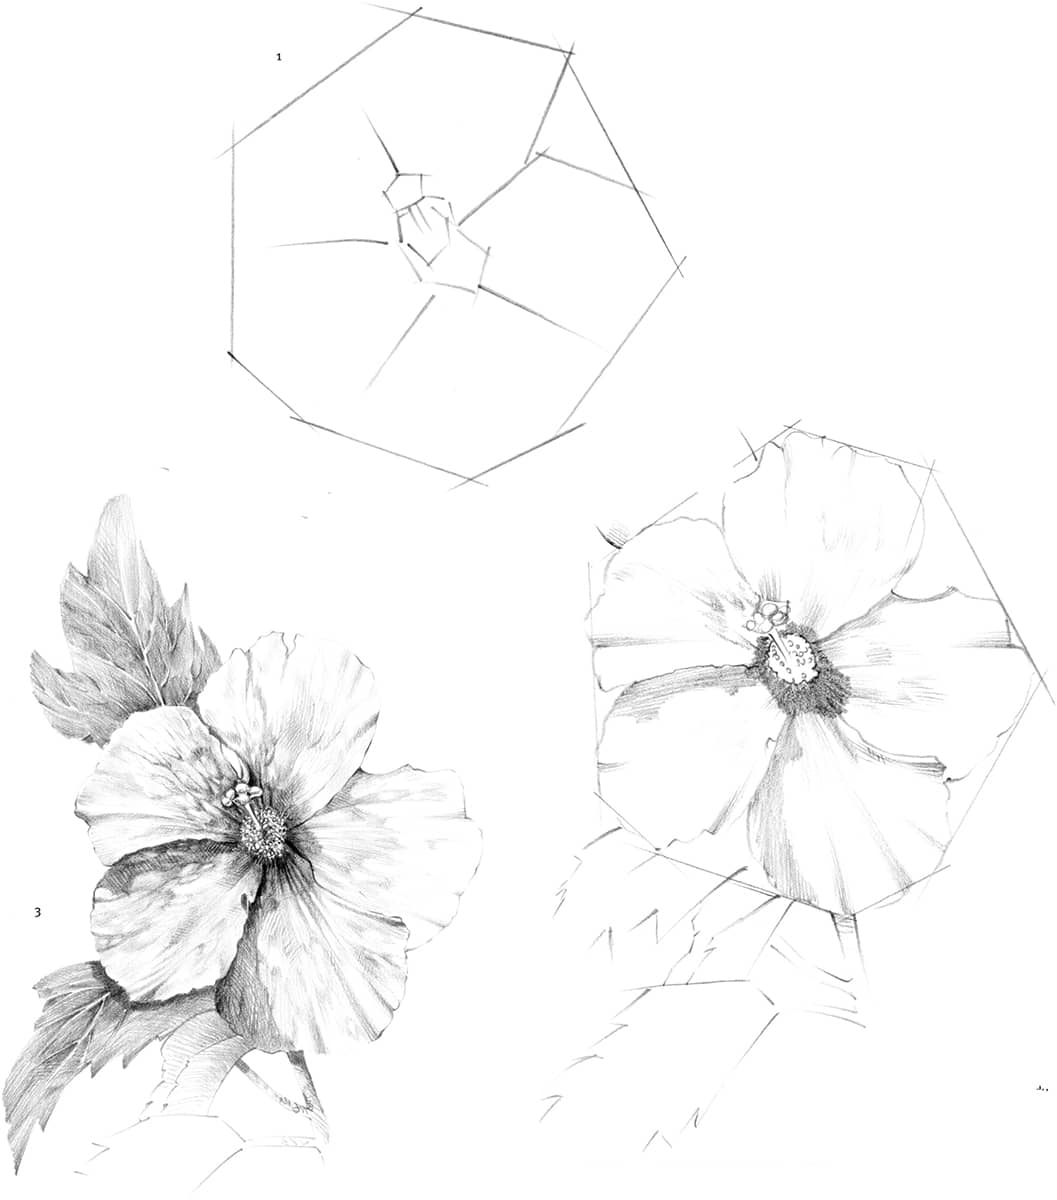
Shading Before shading the petals in step 2, study where the shading falls and how it gives the petals a slightly rippled effect. Add the details of the flower center, and block in the stem and leaves.
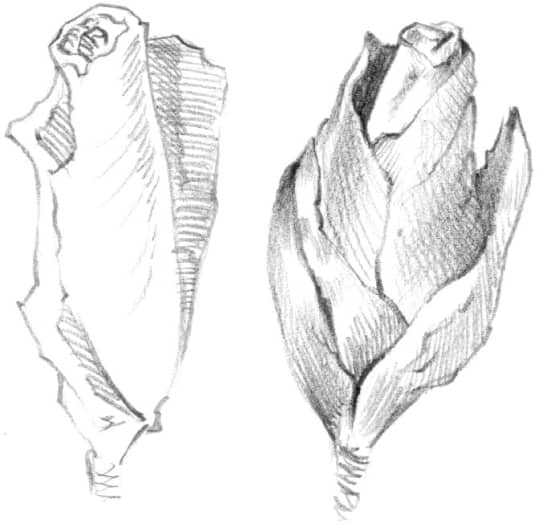
Hibiscus Bud Detail Try drawing a few buds, and attach them to stem branches around your drawing for variety.
Planning Your Drawing Even though the hibiscus has a lot of detail, it isn’t difficult to draw. Steps leading up to the finished drawing must be followed closely to get the most out of this exercise. Step 1 shows the overall mass, petal direction, and basic center of the flower. Consider the size of each flower part in relation to the whole before attempting to draw it.
HYBRID TEA ROSE
Hybrid tea roses have large blossoms with greatly varying colors. When drawing rose petals, think of each fitting into its own place in the overall shape; this helps position them correctly. Begin lightly with an HB pencil, and use plate-finish Bristol board.
Making Choices The block-in steps are the same no matter how you decide to finish the drawing, whether lightly outlined or completely shaded. For shading, use the side of a 2B pencil and blend with a paper stump.
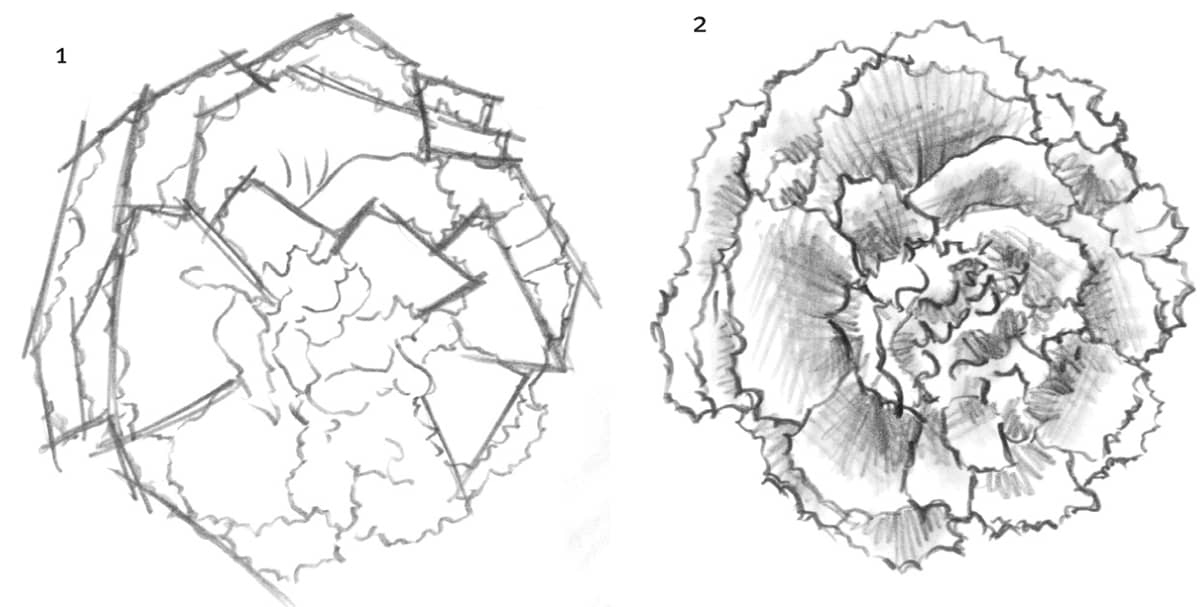
FLORIBUNDA ROSE
Floribunda roses usually flower more freely than hybrid tea roses and grow in groups of blossoms. The petal arrangement in these roses is involved; but by studying it closely, you’ll see an overlapping, swirling pattern.
Drawing the Rose Use a blunt-pointed HB pencil lightly on plate-finish Bristol board. Outline the overall area of the rose mass in step 1. Once this is done, draw the swirling petal design as shown in steps 2 and 3. Begin fitting the center petals into place in step 4. Use the side of an HB to shade as in step 5, taking care not to cover the water drops. They should be shaded separately.
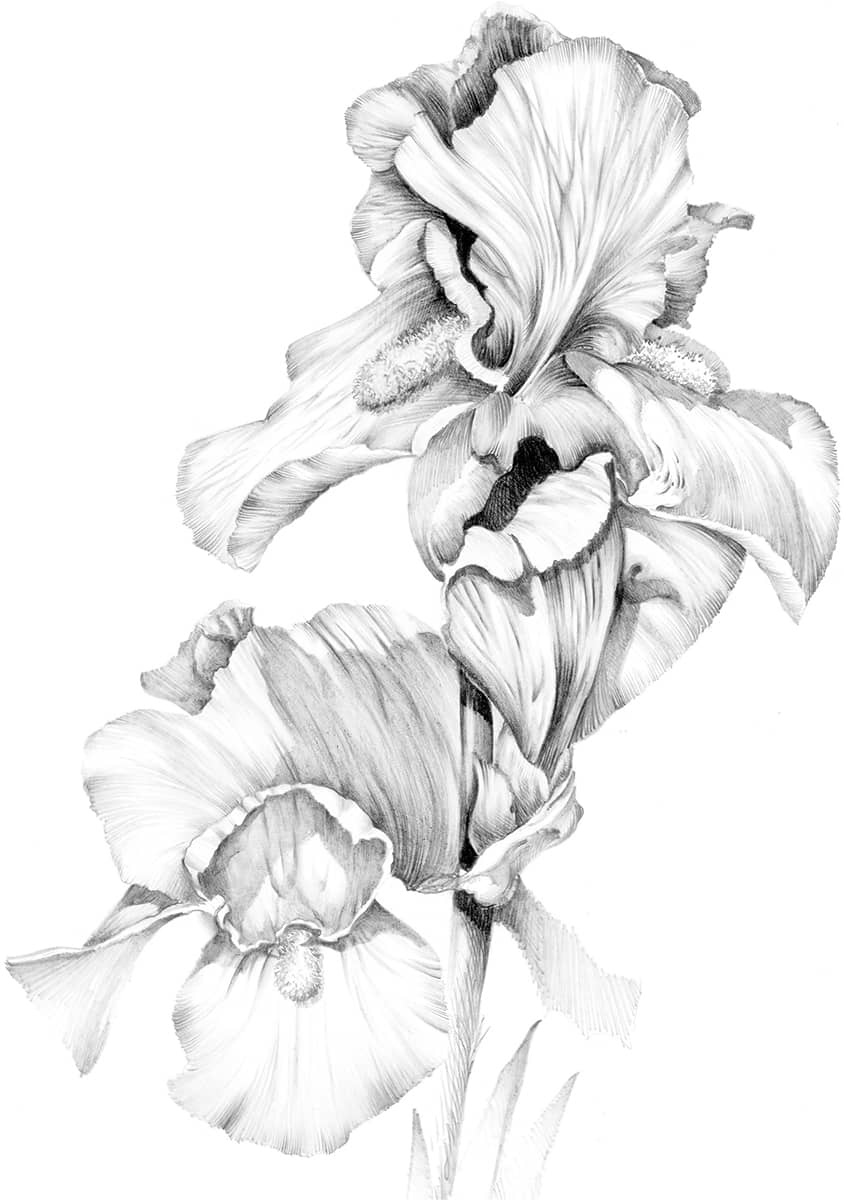
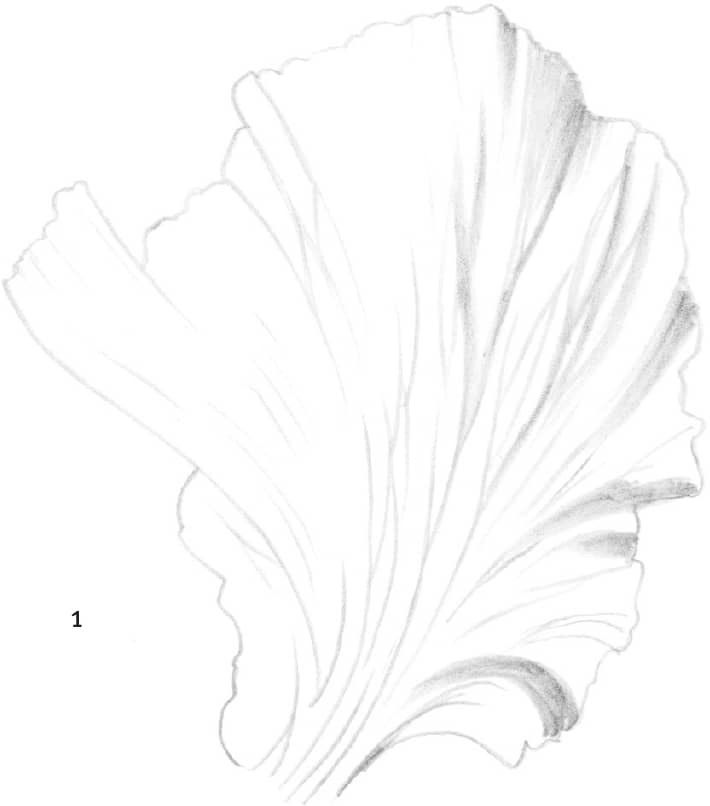
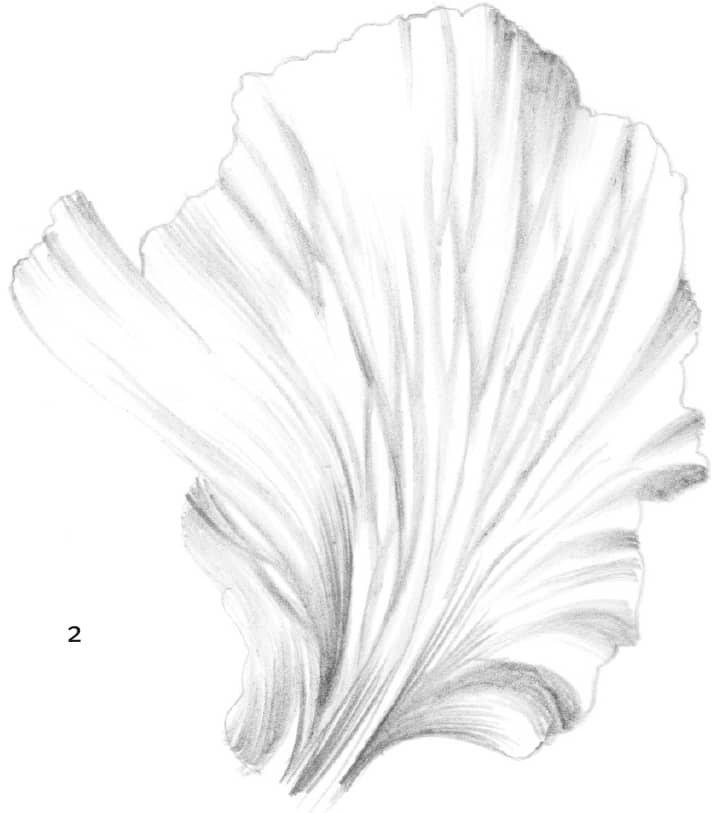
BEARDED IRIS
The bearded iris is one of the most beautiful of the iris varieties. Its colors range from deep purples to blues, lavenders, and whites. Some flowers have delicate, lightly colored petals with dark veining. They range in height from less than 1 foot to over 3 feet.
Using Guidelines Step 1 (above) shows the block-in lines for a side view of the iris, whereas step 1 (below) shows a frontal view. Whichever you choose to draw, make your initial outline shapes light, and use them as a general guide for drawing the graceful curves of this flower’s petals.
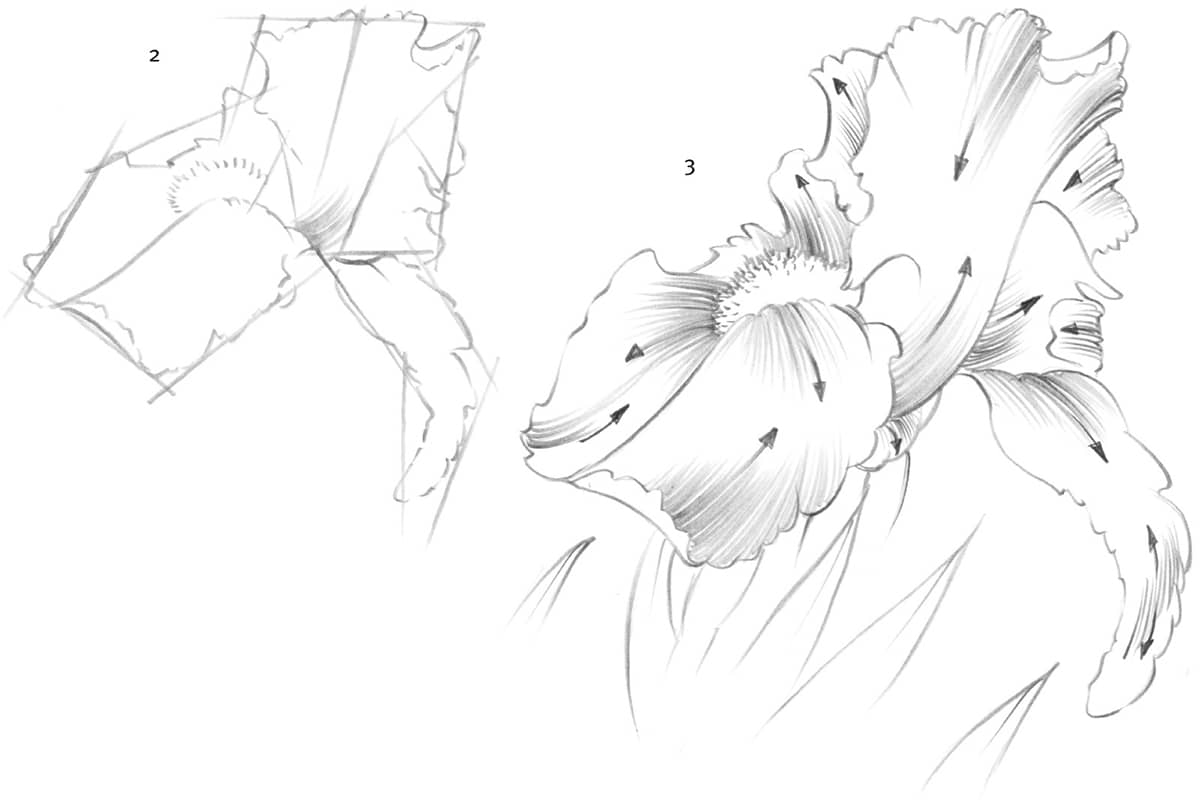
Beginning to Shade Follow the arrow directions in step 3 for blending and shading strokes; these strokes make the petal surfaces appear solid. Darken shadowed areas using the point of a 2B.
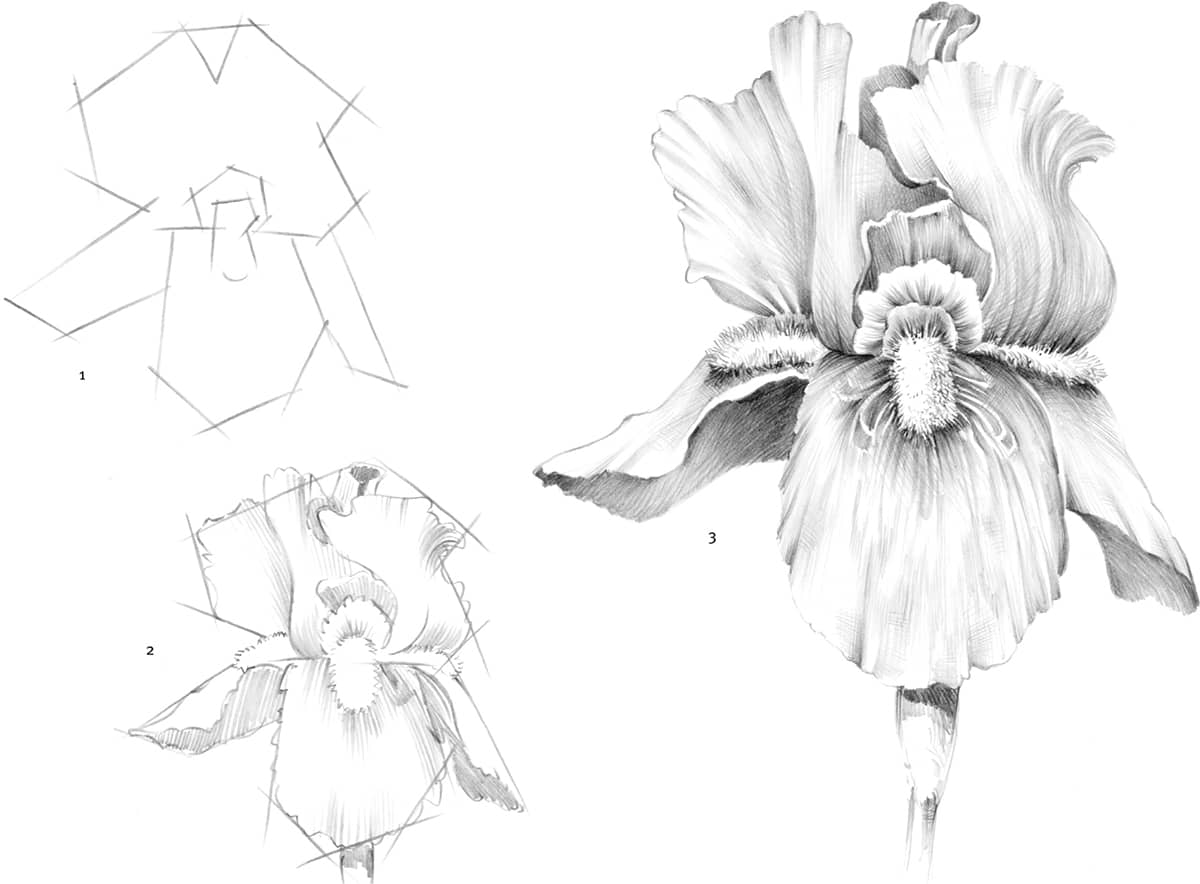
Good, clean block-in lines are helpful for shading an involved subject. Take your time, and plan ahead to save correction time.
Drawing the Petals Sketch the ridge lines in the petals; they are necessary for accurate shading. Develop the shading in stages by filling in the grooved areas first. Then make the whole flower slightly grayer by adding what is known as a “glaze” over it. To glaze, use the side of an HB lead very lightly, shading with smooth, even strokes over completed sections of the drawing. To make petal surfaces appear even smoother, blend them with a paper stump.
Focusing on Details This final drawing is quite involved, but it’s no more difficult than the previous drawings; it just has more flowers and shading steps. Once again, we must first draw the overall layout of the flowers before attempting any shading.
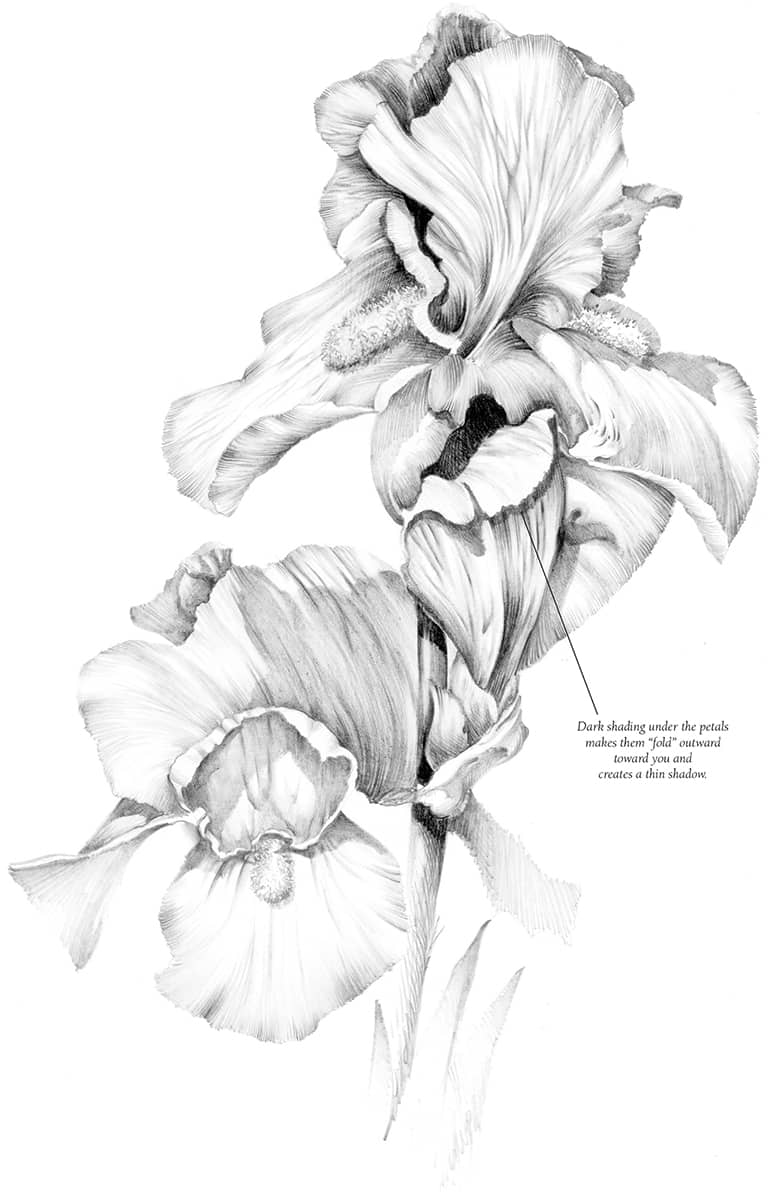
Adding Shading and Highlights This drawing was done on a plate-finish Bristol board using HB, 2B, and flat sketching pencils. Create highlights by molding a kneaded eraser into a sharp wedge, “drawing” with it in the same direction as the shading.