Yoga Asanas—Striking the Balance Between Strength and Flexibility
Practicing yoga asanas benefits so many aspects of our being. Yoga nourishes the mind by encouraging present-moment focus. If you are truly one-pointed in executing a posture and linking your breath with movement you cannot be thinking of anything else. In this way yoga asana practice helps to rid the mind of unnecessary chatter, giving you reprieve from everyday stressors as well as other challenges you may be facing in your life. The addition of the ball to yoga practice provides variety for your asana workout, helping to keep the mind stimulated. It also provides you with new opportunities for developing concentration and discipline.
As we’ve already discussed, yoga asana practice improves the health of the body in countless ways. Like many other forms of exercise yoga strengthens the muscles, ligaments, and joints. Yoga asana practice also improves the health of the organs and the adrenal and other endocrine glands. The exercise ball allows you to experience yoga postures in ways not possible on the mat alone. With the exercise ball as a partner some yoga postures will become more accessible to you; others will provide a unique challenge, given the unstable base that the ball provides. Working with the ball sharpens our proprioception, the body’s sense of where it is in space at any given moment in time. We’ve not yet discussed this remarkable system. An athlete relies on her proprioceptors, sensory organs housed in the skin, muscles, and joints, to give her information that will make her efficient at her sport. Consider the mountain biker riding downhill who must negotiate challenging terrain so that she does not fall off her bike. Like any athlete that biker must constantly change her center of gravity to match the movements integral to her sport.
Proprioceptors provide information to the brain, which is then relayed to the muscles, so that a person can fine-tune his movements to address what is required of him spatially at any given moment. By introducing the element of mobility the ball encourages keenness in the body’s proprioceptive sense.
The health of the spirit is also addressed through asana practice. Linking breath with movement balances the nervous system and helps us to relax into the moment. Contemplation and inner reflection come easier to us at these times. Executing yoga postures on the ball can be a movement meditation. The asanas in chapter 8 are designed to bring about deep relaxation. If deepening your spiritual sensibility is one of your goals in practicing yoga, these asanas will help you relax your body enough that you naturally move into spiritual thought and contemplation.
Vinyasa—The Practice of Sequencing
In a hatha yoga practice the postures are sequenced specifically for optimum benefit to the body. The syllables that make up the word hatha are ha, meaning “sun,” the masculine energy, and tha, “moon,” the female energy. According to yogic theory every person has both energies present within; the practice of yoga unites these opposites and complements.
The organization of postures into a sequence is called vinyasa. In building a yoga practice each posture should either complement or counterbalance the previous one. For instance, one posture may extend only the upper part of the body; Cobra is a good example. The Cobra posture extends the back and stretches the chest. In asana practice Cobra would be followed by Locust, a complementary posture that extends the lower part of the body. Locust asana stretches the hip flexors and quadriceps and strengthens the gluteal muscles.
For optimal benefit to the body a counterbalancing posture, such as Forward Fold, would follow both of these asanas. A counterbalancing posture is one that engages the muscles opposite those you have just been using. In this example the back-bending series would be followed by a forward bend series. In other words, extension is followed by flexion, which is followed by extension again.
One of the outstanding benefits of the Yoga on the Ball sequence outlined in this chapter is that the exercises were carefully chosen to develop and maintain muscular balance throughout the entire body. As a fitness trainer and yoga teacher I am vigilant about this in my work with students. In Yoga on the Ball we sequence the postures to emphasize creating balance in the musculature given our twenty-first-century lifestyles.
Most people in our culture use the front of the body more than the back. Consider that when you push a shopping cart, lift and carry a bag of groceries, or open a car door you are training your pectoral (chest) muscles. When you climb stairs or even shift your legs under your desk you are training your quadriceps (thigh) muscles. For many the weak back muscles brought on by slouching over a desk or putting in lots of driving miles are paired with these tight chest muscles and quadriceps, along with tight hip flexors and hamstrings. Carrying the body with poor posture can also bring about muscular imbalance, as can your sport or preferred fitness activity.
The asanas in this chapter focus on strengthening muscles that are typically weak and creating flexibility in areas of the body that are most often tight. Flexibility needs are relative to the joint(s) being worked. To function optimally the body needs some muscles to be flexible whereas others need to be tighter in order to support the function of the joint. It is actually possible to have too much flexibility—in a situation like this the joint becomes hyper-mobile and thus vulnerable to injury. A delicate balance between strength and flexibility is needed for the body’s optimal functioning. The functional workout trains the body for mobility and stability. We cannot sacrifice one for the other.
The Asanas
For each asana in this chapter and the chapters that follow you will be given specific instruction regarding how to enter the pose, how to maintain the pose, and how to exit it safely. When you practice a posture on one side it needs to be repeated exactly the same way on the opposite side of the body in order to promote symmetry and balance. Pay careful attention to the instructions given for the use of the breath in each posture. Working with the breath and linking it with the movements involved in the asana are essential ingredients of any yoga practice. Many of my students have shared with me that their practice comes alive when they really begin to feel their movements inextricably linked with their inhales and exhales. Be patient with yourself here—it can take time to develop the skill of yoking your breath with your movement and lengthening the inhale and exhale to make that linking feel natural.
Before launching into the full practice of an asana I advise that you first spend time learning the mechanics of the pose. Practice it without being concerned about the breath and then, once you understand how the posture is to be executed, begin to link the breath with the movement. Approach the process of pairing breath with movement with a sense of fun and a willingness to play and experiment. Perfection is not the point; embodiment, fluidity, and the recognition that inspiration literally flows through us are the gifts of linking breath and movement in yoga.
In each day’s yoga practice you want to find what the Buddha called the “middle way,” the path between two extremes. Full expression of an asana is strong and steady, yet comfortable enough to not cause a reflexive tightening in parts of the body that are not being directly worked by the posture. Feel free to challenge yourself, to feel your muscles working hard and your joints opening, but at the point at which you feel anything more than moderate tension, back off a bit. If you press into a stretch beyond gentle tension you will actually cause the muscle that you are stretching to tighten rather than release, in order to protect itself from tearing. Refraining from harming yourself or others (ahimsa) is an essential part of the practice of yoga. There is no more immediate place to internalize this important tenet than moment to moment in the strong work of asana practice. Stay sthira (steady) and sukha (comfortable), letting prana flow through your body with each breath.
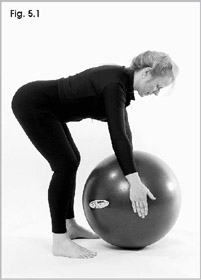
Standing Forward Fold (Uttanasana)
In a traditional yoga practice the Forward Folds are usually practiced immediately after the preparatory pranayama (breathing) work and the Sun Salutation. Forward Fold is always followed by a counterbalancing asana, such as Cobra. Forward folds help to massage the internal organs by giving them a gentle kneading when the trunk moves toward the lower limbs. Blood is wrung out of the organs; the organs are then bathed with fresh oxygenated blood that flows in as the body opens after the forward-squeezing motion. Yogic theory tells us that Forward Folds decrease bloating and promote clear thinking.
When performing forward folds it is important to customize the fold to fit your individualized levels of strength and flexibility. If your forward bends go beyond 60 degrees of flexion you need to support yourself with a chair, against a wall, or with an exercise ball. Without that support you are literally hanging off the passive structures of the spine—the discs and ligaments—and this can cause damage to the spine. Properly executed forward folds can help strengthen your back, since the erector spinae muscles are required to pull you back up into extension. When practicing the Forward Fold bend only as far down as will allow you to maintain a neutral, well-aligned spine. If you are about to lose neutral spine you should not lower yourself any farther toward the floor, but rather stop where you are able to maintain correct alignment.
Purpose To strengthen the muscles of the back and stretch the hamstring muscles (the back of the thighs). This asana teaches the practitioner how to maintain neutral spine while performing folds.
Watchpoints • Maintain a lengthened spine throughout. • Do not flex the spine. • Keep the knees soft; make sure not to lock them. • Once you have found neutral spine, make sure to keep the retraction at the shoulder blades.
starting position
Stand with your feet shoulder-distance apart and your knees slightly bent, the ball in front of you on the floor. Use Postural Setup to find neutral spine.
movement
1. On an exhale, gently engage the transverse abdominis.
2. Maintaining a lengthened spine, fold forward from the hips. Fold only as far as you can while maintaining neutral spine (fig. 5.1).
3. Hold this position for three full breaths.
4. Return to the starting position.
5. Repeat one more time. Notice whether you are able to fold farther in the second repetition.
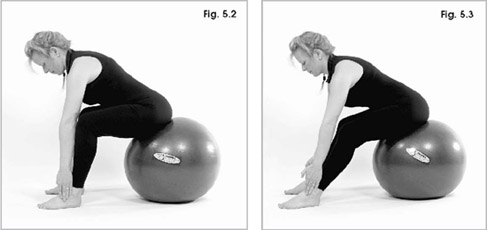
This asana provides a welcome stretch for the hamstrings. It is easier to limit the degree of flexion in the seated Forward Fold because the trunk is closer to the ground than it is in standing Forward Fold. Current exercise science suggests that the trunk be supported at flexion that exceeds 60 degrees to prevent damage to the spine. Where you are comfortable placing your hands—on the ball, on your knees or ankles, or on the floor—is directly related to the flexibility of your hamstrings. This placement of the hands provides a baseline for comparing how much the hamstrings lengthen through repeated practice.
Purpose To stretch the hamstring muscles. To strengthen the erector spinae, the muscles that run alongside the spine, and to massage the internal organs.
Watchpoints • Make sure to keep the back straight and the neck long. • Once you have found neutral spine be sure to keep the retraction at the shoulder blades.
starting position
Sit tall on the ball, feet parallel and shoulder-distance apart. Use Postural Setup to find neutral spine.
movement
1. On an exhale gently engage the transverse abdominis and fold forward from the hip joint without flexing the spine (fig. 5.2). Place your hands on the ball, or on your knees, your ankles, or the floor to support your trunk.
2. Inhale as you roll the ball backward until you feel a gentle stretch in the hamstrings (fig. 5.3).
3. Exhale and gently engage the transverse abdominis again. Roll the ball forward.
4. Repeat two to three times.
We follow the flexion of the forward bends with back extension, the movement essence of Cobra asana. Supported extension is most therapeutic for the back—this asana strengthens the erector spinae muscles, which extend the spine, and the rhomboids, the muscles that position the scapulae relative to the spine. By extending the back this asana also provides a strong stretch to the front of the body, expanding the rib cage and lengthening the muscles of the chest, including the muscles involved in breathing. This can be welcoming relief to those who deal with asthma. If you are to maintain proper muscle balance in the body in terms of the flexibility and strength ratio this posture is a must do.
One of the most common errors in executing this pose is overarching the back. If you experience a pinching sensation or any pain or discomfort in the back while executing this posture you are overarching. As you work with this pose try to remain cognizant of lengthening the spine at all times—visualize yourself creating space between each vertebrae with every breath you take. This focus will help to counteract any tendency to overarch. If you are a beginning exerciser or are new to yoga you may find that you rely on your arm muscles to lift your trunk rather than allowing the erector spinae to do their job of extending the back (and thus raising the chest). Avoid the temptation to use the arm muscles here; keep the extension low instead. As the back muscles strenghten you will be able to lift your upper body higher off the ball without the assistance of the arms. Progress to level two when you feel you have both the balance and strength necessary to be able to execute and maintain the posture for six seconds.
I find Cobra to be an exhilarating pose to execute. I practice it often when I am facing new challenges, reminding myself that I am opening to new opportunities and all that is good and available to me in the vast magnificence of this universe.
Purpose To help maintain proper alignment of the vertebrae. To strengthen the erector spinae muscles of the back, which extend the spine, and the rhomboids, the muscles between the spine and the shoulder blades that retract the shoulder blades. To stretch the muscles of the chest and the abdominals.
Watchpoints • Focus on the muscles of your back—rather than relying on your arm muscles—to lift your chest. • Keep the spine and neck lengthened at all times. Do not overarch the back; this can result in compression of the vertebrae, causing harm to the spine. • Keep the scapulae stabilized. • Maintain an active transverse abdominis throughout the entire movement.
starting position
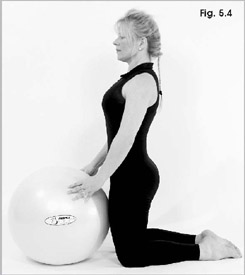
1. Kneel behind the ball and draw the ball in close to your body (fig. 5.4).
2. Drape yourself over the ball, resting your chest on the ball (fig. 5.5). Your hands are at the top sides of the ball.
movement—level one
1. Lengthen the spine. On an exhale engage the transverse abdominis by gently drawing the navel toward the spine.
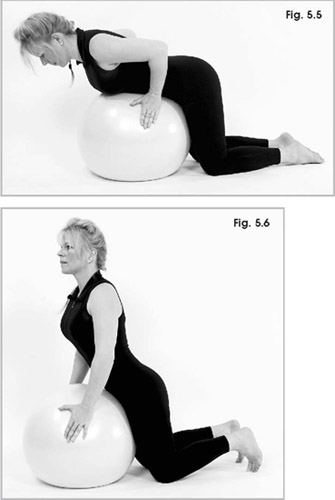
2. On the inhale engage the erector spinae muscles alongside the spine to slowly lift your upper body off the ball, arching into a back extension (fig. 5.6). The ball will roll slightly forward with this move. Knees remain in contact with the floor. If you feel pinching or pain in the back you are arching your spine too much.
3. Hold this posture for 6 seconds if you can. Remember to keep breathing. Try to work up to holding the pose and breathing for 1 minute.
4. Exhale as you lower your chest to the ball.
5. Repeat the asana three times.
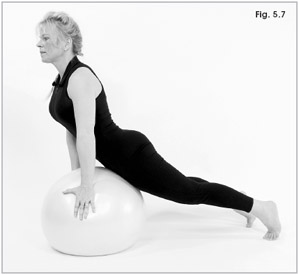
movement—level two
1. Lengthen the spine. Kneel behind the ball and draw the ball close to the body (see fig. 5.4).
2. Drape yourself over the ball, resting your chest on the ball. Your hands are on the top sides of the ball (see fig. 5.5).
3. On an exhale engage the transverse abdominis by gently drawing the navel toward the spine.
4. Curl the toes under and press off the feet to roll the ball forward, straightening your knees as you simultaneously inhale and engage the muscles along the spine to lift your upper body off the ball (fig. 5.7). You’re now arched in a gentle backbend, legs long and strong behind you. Resist your thigh muscles away from the floor without overtightening your buttocks.
5. Hold this posture for 6 seconds. Don’t forget to keep breathing. Try to work up to holding the pose and breathing for one minute.
6. Exhale as you lower your chest to the ball.
7. Repeat three times.
Down Dog (Adhomukha Svanasana)
Down Dog is the perfect counterbalance to Cobra. In this asana gravity provides traction for the elongation of the spine, taking pressure off the intervertebral discs and creating space between the vertebrae while maintaining the spine in a neutral position. Down Dog is an excellent posture for people who need to lengthen the spine to ease the pain associated with degenerative disc disease.
The most common training error in this pose is failing to stabilize the shoulder blades. It is easy to lose stabilization when you are in this inverted position because the shoulder blades want to drop toward your ears (that is, toward the ground) due to the effect of gravitational forces. For many people the shoulder blades are already in the undesirable protracted position as a result of daily activities—slouching over a desk, driving a car—that stretch rather than strengthen the scapular muscles. Engage the rhomboids, the muscles between the shoulder blades and the spine, to maintain a slight retraction of the shoulder blades. Use discipline and discernment to sense where your shoulder blades are at all times when executing Down Dog.
Moving in and out of this pose as well as maintaining the pose require using muscles of both the upper and lower body. Every time I practice this pose I am reminded that there is a delicate balance that needs to be maintained in life. Down Dog may show you to be strong, but if you are not flexible you may have some trouble initially negotiating this pose. On the other hand, if you are flexible but lack in strength you will not be able to hold the pose for very long. Regular practice of this asana develops the strength and the flexibility required to execute this pose properly. This pose reminds us that we are continually challenged to maintain a balance in our lives in terms of the energies we direct toward family, career, and the other things that are important to us. Overabundance in one area can lead to deficiency in other areas. It is important to be patient, to set our trajectories, and to move in the direction that seems most right in each moment.
Purpose To strengthen the chest, arm, and shoulder muscles, as well as the quadriceps (front of the thighs). To lengthen the spine through gravity-induced traction. To stretch the front of the shoulders (the deltoids), the back of the thighs (the hamstrings), the buttocks, and the calves.
Watchpoints • Keep the scapulae stabilized throughout the entire pose. • Maintain a slight bend in the knees and the elbows. Limit the anterior tilt of the pelvis if you lack flexibility in the hamstrings and calves. • Be careful not to press the upper body into the stretch too intensely if you have tight chest or shoulder muscles or have problems with your shoulder joint. • People with high blood pressure or glaucoma should not practice inverted poses without first consulting a physician.
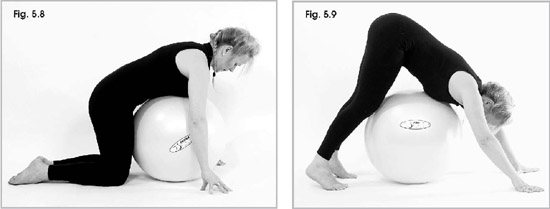
starting position
Kneel behind the ball on your hands and knees, the ball positioned under your trunk to support your body weight (fig. 5.8). Your hands are lined up directly under the shoulder joints and knees are directly under the hip joints. Engage the rhomboid muscles to stabilize the shoulder blades.
movement
1. On the exhale gently engage the transverse abdominis, curl the toes under, and lift the buttocks toward the ceiling so that the trunk and legs form an inverted V (fig. 5.9). Let the ball roll with your body to support the chest. Do not worry if your heels don’t touch the floor.
2. Breathe rhythmically in this position, maintaining length through the spine. Do not flex or hyperextend the neck; rather, keep the head in line with the spine.
3. You may wish to alternately reach the heels toward the floor to increase the stretch in the calf muscles.
4. You can increase or decrease the intensity of the hamstring stretch in this pose. If you drop your hips slightly (the ball will roll toward your hands) you will decrease the stretch in the top of the hamstrings. If you lift your hips (the ball rolls slightly toward your feet) and reach your heels to the floor you will increase the tension in the hamstring muscles.
5. Attempt to hold the pose for 10 seconds to start. Work up to holding for 30 seconds or more, breathing rhythmically throughout the stretch.
6. Lower your belly to the ball on an exhale.
7. Perform up to three repetitions of Down Dog. Take note of the intense activation in the arm muscles as well as the stretch that occurs through the back as traction does its job in this asana.
Reverse, or Inclined, Plank (Purvottanasana)
This asana is a good counterbalance to Down Dog. Whereas Down Dog strengthens the front shoulder muscles and the quadriceps, Reverse Plank tones the rear part of the shoulders and arm (particularly the posterior deltoid muscles) and stretches the chest. Reverse Plank is also very efficient at improving core stability. Kundalini yoga theorists tell us that this posture strengthens the kidneys.
This posture can be intimidating to the beginner. If you are new to yoga you may not have the strength to execute a full Plank; if this is the case follow the instructions provided for level one. I am reminded when practicing this posture that we need to accept where we are today while still embracing our dreams for tomorrow.
Purpose To strengthen the rear deltoid muscles and stretch the chest (the pectorals) and front shoulder muscles. To develop core stability.
Watchpoints • Keep the shoulder blades gently drawn together. • Distribute the body’s weight evenly between the hands. • Throughout the posture keep your head in line with your spine, chin retracted. • Concentrate on maintaining the activation of the transverse abdominis to keep the ball from rolling. • Be careful not to hold the breath. • If you have a hernia in the digestive canal or you have an acute rotator cuff (shoulder joint) problem seek the counsel of your health care professional before practicing this pose.
starting position
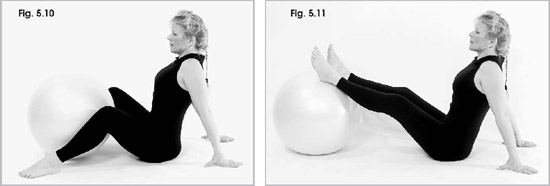
1. In a sitting position secure the ball between your feet. Place your hands behind your hips, fingers pointing away from the body (fig. 5.10).
2. Place one heel at a time on the top surface of the ball.
3. Balance at this point for one breath cycle (fig. 5.11).
movement—level one
1. On an exhale, engage the transverse abdominis by gently drawing the belly toward the spine.
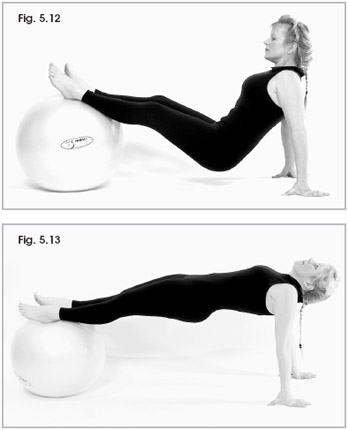
2. Inhale as you lift the buttocks a few inches from the floor (fig. 5.12).
3. Attempt to hold the pose for 3 seconds, breathing rhythmically. Try to work up to holding the posture for 12 seconds.
4. Exhale, lowering the buttocks to the floor.
5. Repeat six to eight times, or move directly to level two.
movement—level two
1. On an exhale engage the transverse abdominis, gently drawing the navel to the spine.
2. Inhale as you lift the buttocks from the floor until the body forms an unbroken plane (fig. 5.13).
3. Attempt to hold this posture for 3 seconds. Don’t forget to breathe. Work up to holding the pose for 12 seconds.
4. Exhale, lowering the buttocks to the floor.
5. Perform six to eight repetitions.
Camel Pose (Ustrasana)
The Camel is a complementary posture to the Plank due to the fact that it adds a backbend to the equation. This posture could be a staple in almost everyone’s body-maintenance system because it opens the chest, extends the back, and tones core musculature, targeting areas that for most people need to be both stretched and strengthened.
Yogic theory holds that this posture stimulates the lungs and the heart. The abdominal stimulation imparted by this pose enhances functioning of the gastrointestinal system and decreases gas and constipation.
Purpose To strengthen the core muscles and tone the abdominals. To stretch the chest and the anterior shoulder muscles.
Watchpoints • Place a rolled towel under the knees if they are pained in this position. • Keep the scapulae stabilized. • Do not overarch the back. • Maintain transverse abdominis activation throughout the posture.
Rest on the knees and roll the ball around your body (fig. 5.14). Place the ball behind your body, between the ankles.
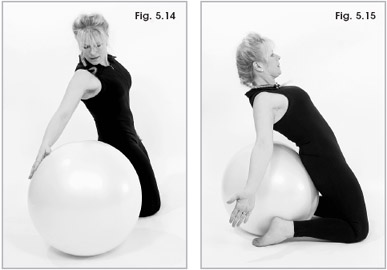
movement
1. On an exhale engage the transverse abdominis by gently drawing the navel to the spine and lean back just far enough so that you feel the abdominal muscles contracting to keep you in position (fig. 5.15).
2. Strive to hold this position for 12 seconds, breathing rhythmically.
3. Release the pose and roll the ball in front of you for a rest phase.
4. Perform Camel for a total of six to eight repetitions.
Forward Fold with Spinal Twist (Prasarita Padottanasana 1)
This forward fold is an effective counterbalance to the Camel. Since the spine is warm now it is safe to introduce the spinal twist. The twist keeps the spine supple and is an excellent tension-releasing pose for people who work long hours and are prone to developing tightness and spasm in the back and shoulders. I find that the spinal twists “pump” tension out of my spine. Asanas that incorporate twists are also excellent for developing the stabilized yet free movement necessary for activities that involve rotation—especially if it is an instantaneous movement such as the rapid fire uncoiling of the golf swing.
It is imperative that this twist be executed slowly and thoughtfully. It is dangerous to perform any spinal twisting movement quickly. I often see spinal twists executed in the gym in a kind of ballistic fashion while the person holds on to a pole. This is a recipe for disaster—the vertebrae and discs must rotate perfectly and without fail to adequately protect the spine from being damaged. The controlled, gentle rotation presented in this asana is a more intelligent approach to stretching the rotators of the spine.
With the aid of a ball the Forward Fold with Spinal Twist is easy for most people to execute. The ball supports much of the body’s weight, thereby decreasing the load on the upper extremities and the spine. Yogis believe that forward folds create tapas (heat) in the body and help prana to circulate throughout the body. When I practice this pose I visualize the compression massage my organs receive as I flex into the forward bend.
Purpose To stretch the spinal rotators and recognize supported movement through the spine. To stretch the hamstrings and the muscles of the chest, especially the pectorals. To strengthen the upper body.
Watchpoints • Keep the neck and spine in a lengthened position. Do not bend the spinal column while twisting. • Avoid dropping the head. • Keep the scapulae stabilized. • Move slowly when twisting the spine.
starting position
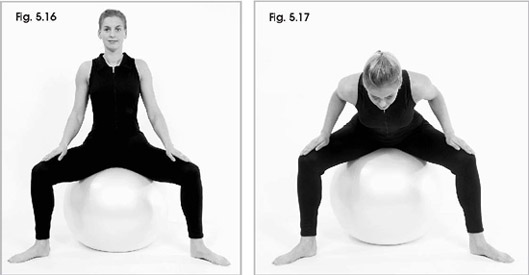
Sit on the ball with your feet on either side of the ball, toes pointed outward, hands on the knees (fig. 5.16). Gently engage the rhomboid muscles to stabilize the shoulder blades.
movement
1. On an exhale engage the transverse abdominis by gently drawing the navel to the spine. Breathe rhythmically and diaphragmatically from this point to the end of the posture.
2. Fold forward from the hip joint while maintaining a straight back (fig. 5.17). The hands stay on the knees to support the weight of the upper body.
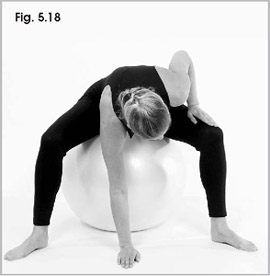
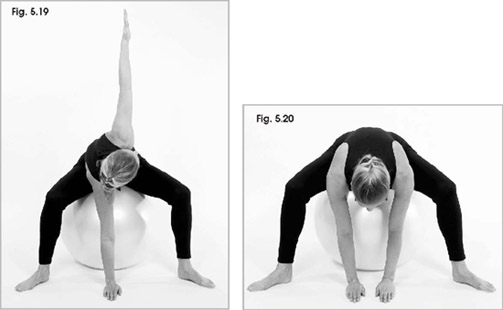
3. Place the right hand in the center of the space between your feet (fig. 5.18). Gently twist your spine as you reach the left arm toward the ceiling, the palm facing away from the body (fig. 5.19). Create one long line from the fingertips of the lower arm to the fingertips of the top arm.
4. Look up. Concentrate on lengthening through the spine and positioning the top arm to fully open and stretch out the chest without torsioning through the hips.
5. Hold the posture for five full breaths.
6. Gently and slowly release the twist as you draw the top arm back toward the floor. Bring both hands to the floor in front of you (fig. 5.20).
7. Once you are balanced here, place the left hand on the floor at the midline of the body and execute the twist on the opposite side.
8. Perform at least two repetitions on each side of the body.
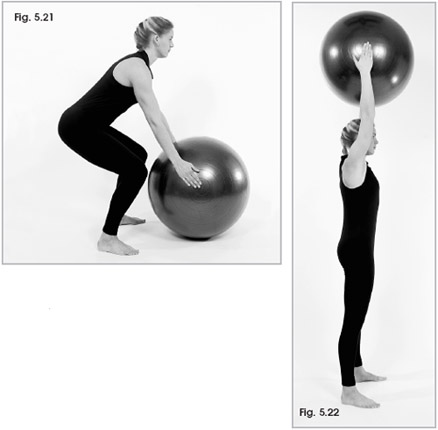
Yoga Chair Pose (Uktatasana)
Chair Pose is a midrange spinal movement that returns the spine to a neutral position after a forward fold; it is an effective linking posture between a forward bend and a backward bend. In this posture the buttocks press out behind you as you lower your body toward the floor in a half squat. This is in no way a passive exercise—it requires that you actively use your back and legs to hold the position. Literally translated Uktatasana means “raised posture.” Some yoga traditions refer to this as the lightning bolt pose, and if you look at a side profile of this posture you can see why.
If you lack flexibility in the shoulder joint you might find it difficult to hold your arms in alignment with your ears. Listen to what your body tells you. If it causes you discomfort to draw the arms that far back situate them so that you feel a gentle stretch in the shoulder with no discomfort.
Yoga theory states that this pose massages the heart and diaphragm. As I practice this pose I like to visualize that a mystical healing power housed in the heavens beams energy into my fingertips and is directed to whatever area of my body, mind, or spirit needs it on that particular day.
Purpose To strengthen the legs, buttocks, and the back of the arms. To stretch the latissimus dorsi, the widest muscle of the back. To return the spine to neutral position following the Forward Fold with Spinal Twist.
Watchpoints • Keep the neck long and the scapulae stabilized. • Ensure that the knees are lined up over the ankles in the “down” phase of the movement and that the knees do not press out over the toes.
starting position
1. Stand with your feet shoulder distance-apart and your knees slightly bent. Use Postural Setup to find neutral spine and a gentle retraction of the shoulder blades.
2. Bend the knees and squat to pick up the ball, maintaining a neutral spine (fig. 5.21).
3. With the ball secured between your palms extend your arms overhead, aligning your arms with your ears. Your shoulders, elbows, and hands create a straight line (fig. 5.22).
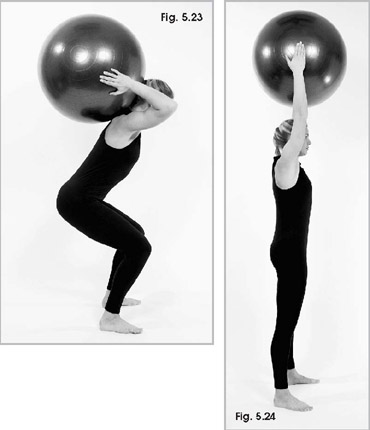
1. On an exhale engage the transverse abdominis, then lower the buttocks toward the floor as you bend your elbows to lower the ball behind the head (fig. 5.23). Maintain the elbows and shoulders in a straight line and continue reaching the buttocks toward the floor until your knees are directly over your ankles.
2. Inhale as you straighten the arms and legs to come back to vertical (fig. 5.24).
3. Repeat six to eight times.
Bow Pose (Dhanurasana)
This pose is a suitable counterbalance to any forward fold. This posture beautifully stretches the commonly overtight chest and extends the back, making it easier for the muscles involved in breathing to do their job. I particularly like this modified version of the Bow because the ball helps to prevent you from compressing the discs in the spine, which is often the mistake that yoga practitioners make when they yank at the ankles or hyperextend the back in this pose. This is also a superb posture for defining and lifting the gluteals.
People who lack strength in the back may find it difficult to raise the chest at first. Those who have weak gluteal muscles may have difficulty raising the legs off the floor. A lack of flexibility in the chest or hip flexor muscles (the psoas major, iliacus, and rectus femoris) can also create a challenge for moving into this posture. Being patient and practicing regularly will pay its dividends, and gradually the posture will become easier to execute.
I enjoy working with the image of the Bow. I like to think that when I treat my body to performing this revitalizing pose I am generating vital energy, just as the cord of the bow does before it releases the arrow. I then imagine myself storing the energy of the pose in my body so that it can be released at a later date, when I need to direct my vitality toward a predetermined goal.
Purpose To stretch the chest, the front of the thighs, and the deep psoas muscles; to strengthen and tone the back of the upper thighs, the buttocks, and the back.
Watchpoints • Keep the neck long. • Maintain scapular stabilization. • Do not overarch the back. • Maintain transverse abdominis activation throughout the movement.
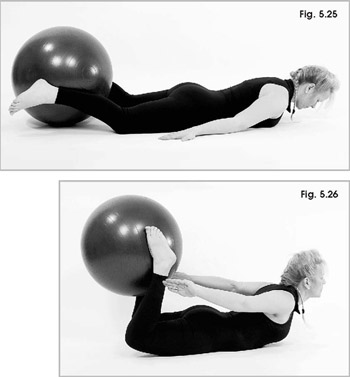
starting position
Lie on your belly with the ball between the ankles. Arms are at your sides, palms down (fig. 5.25). Gently engage the rhomboid muscles to stabilize the shoulder blades.
movement
1. On an exhale engage the transverse abdominis by gently drawing the navel up and in toward the spine.
2. Breathe rhythmically as you simultaneously lift the upper body from the floor and bend the knees, bringing the ball close to the buttocks. Allow the arms to lift with the upper body into a gentle backbend, palms facing out (fig. 5.26). Press the heels toward the ceiling as you lift the upper thigh from the floor.
3. Hold for 6 seconds.
4. Lower the upper body, arms, and upper thighs to the floor.
5. Repeat six to eight times.
The hip folding involved in this stretch is a good counterbalance to the work of the Bow pose. This posture provides a wonderful release in the hip and buttock area and I have therefore always found this to be a relaxing posture to sink into. You can control the intensity of the stretch by simply monitoring the roll of the ball—rolling the ball forward and dropping closer to the ground increases the stretch. This posture is thought to rid the body of lethargy. It helps relieve tension and soreness in the buttocks when you have been sitting for any significant length of time.
Purpose To stretch the buttocks and strengthen the thighs.
Watchpoints • Make sure that the knees are aligned over the ankles throughout the posture. • Maintain a gentle retraction through the shoulder blades.

starting position
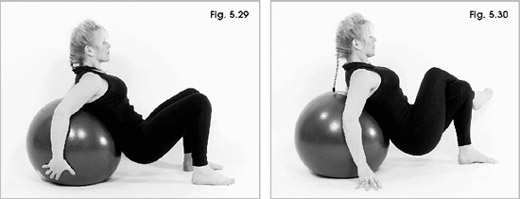
1. Sit in the center of your ball with your feet shoulder-distance apart. Use Postural Setup to find neutral spine and a gentle retraction of the shoulder blades.
2. Walk your feet out and then bend the hips and knees to sink down toward the floor (fig. 5.27). Your feet should be flat on the ground and pointed forward. The buttocks are two to three inches off the floor; arms hug the sides of the ball.
movement—level one
1. On an exhale engage the transverse abdominis.
2. Inhale, lifting your body into a tabletop position, the front of your body from your head to your knees in an unbroken plane (fig. 5.28). As you lift into tabletop the ball will roll toward the head. Keep your hands in place on the ball. Once you’re in tabletop position readjust your arms for comfort if necessary. Make a nice straight line from head to knee.
3. Exhale to return to the squatting position (fig. 5.29).
4. Repeat six to eight times.
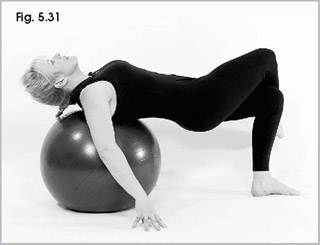
movement—level two
1. From the squat position, wrap the right leg over the left and bring the hands to the floor for balance (fig. 5.30).
2. Lift and lower yourself with this increased balance challenge (fig. 5.31).
3. Repeat six to eight times.
4. Repeat on the other side.
Modified Locust Pose (Salabhasana)
Locusts (grasshoppers) lift their hind ends up and down. When you practice this pose be mindful that you do not hyperextend the low back. As the hips raise you will want to bring your attention to the low back and buttocks—if you feel any pain or pinching in that area lower the hips toward the floor. As with the Bow pose, this asana is a wonderful pose for strengthening and toning the gluteal muscles.
Locust pose is said to improve digestion and elimination due to the increase in yogic digestive fire that is stimulated by the massage to the internal organs. When I practice this pose I visualize the strong legs that the grasshopper must have in order to propel himself from place to place, and I imagine the strength that my own body develops from performing this pose regularly.
Purpose To stretch the front of the thighs; to strengthen and tone the but tocks and the back of the thighs.
Watchpoints • Keep the neck long. • Stabilize the shoulder blades. • Do not overarch the low back. If you feel any pinching or tightening in the back make incremental adjustments in the hips, bringing them a bit closer to the floor.
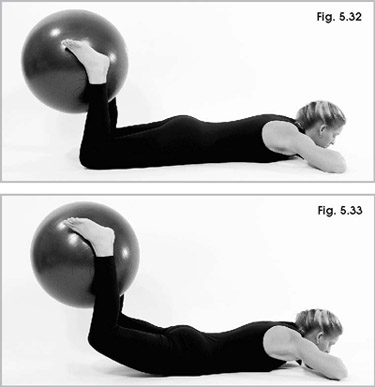
starting position
1. Lying on your belly with knees bent at a 90-degree angle, secure the ball between the ankles (fig. 5.32).
2. Place one hand over the other and rest your chin on your hands.
movement
1. On an exhale engage the transverse abdominis. Squeeze the buttock muscles and lift the thighs slightly off the floor (fig. 5.33).
2. Breathe as you hold this position for 3 seconds.
3. Inhale as you release to the starting position.
4. Repeat six to eight times.
Side Plank or Arm Balance (Vashishthasana)
This is an effective pose to place at this point in your practice because it provides effective counterbalancing work. Side Plank works the upper body; it also complements the Locust by toning the muscles of the outer thigh. This asana is extremely useful for developing core stability and all-around upper body strength. People involved in skulling, kayaking, and other rowing sports find this posture beneficial to their training. If you do not have adequate strength in the stabilizing muscles of the shoulder girdle you won’t be able to balance in this posture for long, but do persevere. This posture is great for toning and strengthening these small albeit most important muscles. Side Plank challenges a host of muscles: the triceps, shoulder stabilizers, pectorals, trapezius, lattisimus dorsi, hip abductors, ankle evertors, and iliotibial band. The additional movement pattern described here helps to tone the outer thigh.
It is easy to see how this posture got its name. When practiced properly the body forms an unbroken plane from head to toe that resembles a plank. The weight of the body is balanced on the arm. Yogic benefits derived from this posture are increased concentration and nonattachment. For me this posture takes a great deal of intention and determination to execute properly. I feel that by practicing it regularly I strengthen my ability to focus and my sense of self-direction.
Purpose To strengthen the core musculature. To strengthen the arms and shoulders. The movement variation allows you to tone your outer thighs at the same time that you challenge your core.
Watchpoints • Maintain scapular stabilization and keep the shoulders down and away from the ears. • Maintain length through the neck. Do not let the head drop. • As you position your body in one long, straight line from the tip of your head to your toes do not let the hip sag. • Actively utilize your core muscles to maintain balance.
starting position
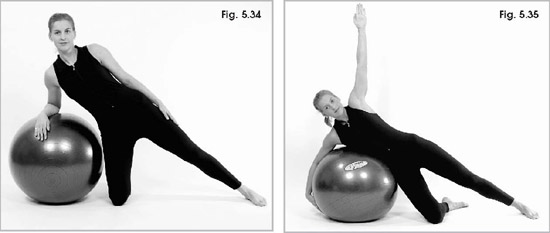
1. Kneel with the ball positioned on your right side. Engage your rhomboid muscles to stabilize the scapulae.
2. Extend the left leg out to the side, resting your right arm on the top of the ball and the left arm on your left thigh (fig. 5.34).
movement—level one
1. Exhale as you engage the transverse abdominis and drape your right side over the ball, your right arm sliding down the ball and your left arm reaching toward the ceiling. Create a straight line from the shoulder joint to the fingertips (fig. 5.35). The fingers point toward the ceiling.
2. Hold this position for five breaths.
3. Release the left arm to the side of the left thigh, pressing down for resistance. Exhale, engage the transverse abdominis, and lift the top thigh until it is parallel with the floor (fig. 5.36).
4. Inhale as you lower the leg.
5. Repeat six to eight times, then switch to the left side by lowering yourself into a kneeling position and rolling the ball around to that side.
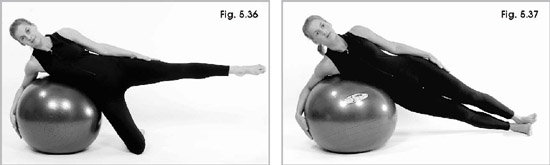
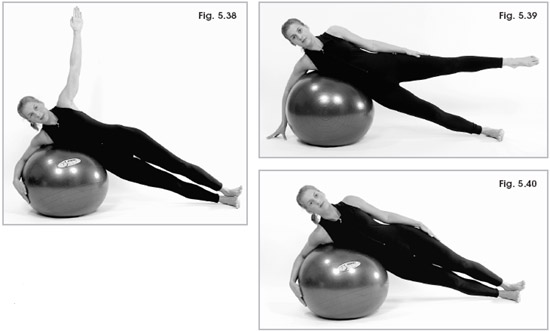
movement—level two
1. Begin by draping your body sideways over the ball. Extend both legs long and align the ankle and hip of the top leg with the ankle and hip of the bottom leg. The left arm rests lightly on the upper thigh (fig. 5.37). Inhale.
2. Exhale and engage the transverse abdominis as you reach your top arm toward the ceiling, creating a straight line from the shoulder joint to the fingertips (fig. 5.38). Fingertips reach toward the ceiling.
3. Hold for five breaths.
4. Release the arm to the side of the top thigh, pressing down to add resistance to the movement.
5. Exhale and lift the top thigh parallel to the floor (fig. 5.39).
6. Lower the left leg to rest on top of the right leg (fig. 5.40).
7. Repeat six to eight times, then switch to the other side by moving into a kneeling position and rolling the ball around to that side.
Boat Pose (Paripurna Navasana)
Boat pose furthers the work of strengthening the core musclulature and toning the transverse abdominis. The core musculature is called upon in this asana to stabilize the spine while the body is challenged to hold the legs in a position unsupported by the floor or the ball. I have included several different levels of difficulty here—it is imperative that you determine which level is right for you. In level one you are instructed to raise your feet off the ball. Level two directs you to change your foot placement as well as your arm placement, intensifying the pose by changing your center of balance. Tremendous challenge is created in level three as you raise both the ball and the arms off the floor, significantly increasing the demands on the stabilizing musculature of the body. You will want to be careful that the movement level you choose as a starting point enables you to hold your spine in neutral position without the back being yanked into an excessive arch—which can be damaging to the spine—when you raise your legs.
According to yogic theory, Boat pose is thought to stimulate the kidneys, thyroid, prostate gland, and intestines. It also improves digestion.
Purpose To strengthen the core muscles and flatten the abdominals.
Watchpoints • Be sure not to round the back. • Be careful not to arch the back when you lift the feet from the floor. • Maintain transverse abdominis activation throughout the posture. • Do not practice this asana if you have high blood pressure, heart disease, or glaucoma.
starting position
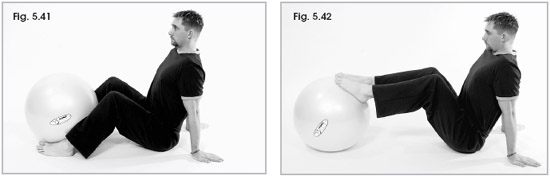
Begin in a seated position on the floor, knees bent and feet flat on the ground. Secure the ball between the feet. Hands are placed at the sides of the body behind the buttocks (fig. 5.41).
movement—level one
1. Lean back and shift your weight to your arms and upper buttocks as you place the soles of your feet on the top of the ball (fig. 5.42). Align your spine in ideal posture.
2. Exhale and engage the transverse abdominis. Retract your chin and externally rotate your arms a bit. Inhale a full breath.
3. Check your transverse abdominis activation. Exhale as you lift the feet an inch off the ball (fig. 5.43).
4. Hold for six seconds, breathing rhythmically.
5. Release by lowering the feet to the ball.
6. Repeat two more times.
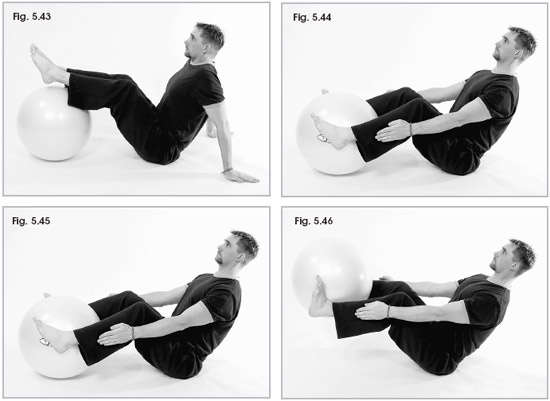
movement—level two
1. From the same starting position, exhale as you engage the transverse abdominis and raise the feet so that they grip the ball midway. Once you find your balance raise your arms so that they are in line with your feet (fig. 5.44).
2. Hold for six seconds. Make sure that you do not hold the breath but rather breathe smoothly and comfortably.
3. Release by lowering the arms to the side and relaxing the grip on the ball.
4. Repeat two more times.
movement—level three
1. Begin in the seated position with feet gripping midway on the outer sides of the ball, arms lined up nearly parallel with the lower legs (fig. 5.45).
2. Exhale, as you engage the transverse abdominis and lift the ball off the floor so that the ankles are almost parallel to the knees (fig. 5.46).
3. Attempt to hold for six seconds. Try to keep the breath rhythm smooth.
4. Release by lowering the arms and relaxing the grip on the ball.
5. Repeat two more times.
Bridge Pose (Sethu Bhandasana)
The hip extension involved in Bridge pose provides a simple counterbalance to the hip flexion in Boat pose. Bridge pose is an effective toner for the buttocks and hamstrings and is useful for people who take part in sports that require training of the “push-off ” musculature of the gluteals, responsible for propelling the body forward in an upright position.
Yogic benefits of this pose are thought to be increased circulation of blood and nutrients to the pituitary, thyroid, and adrenal glands. When you press up into this pose your body weight should be distributed between your feet and your upper back and shoulder blades: you should not feel that you are supporting your body weight in the neck area.
Purpose To strengthen and tone the muscles of the torso, the gluteals, and the hamstrings.
Watchpoints Keep your kneecaps facing toward the ceiling throughout the movement. • Maintain scapular stabilization. • Maintain a straight line from shoulders to buttocks to heels in the “up phase” of this asana. • Engage the transverse abdominis by drawing navel to spine. Fully utilize this core musculature to keep the ball steady. • Relax the neck. Position yourself so that you are not supporting your body weight in the neck area.

starting position
1 .Lie on your back with your heels on the top surface of the ball (fig. 5.47). Gently draw the shoulder blades toward the spine. Make sure that the neck is long and shoulders are drawn down away from the ears.
2. Inhale.
movement—level one
1. On an exhale engage the transverse abdominis. Lift the buttocks off the floor until they are lined up with the heels, the body forming a straight line from the head to the feet (fig. 5.48).
2. Hold for two breaths.
3. Repeat six times at level one or move on to level two.
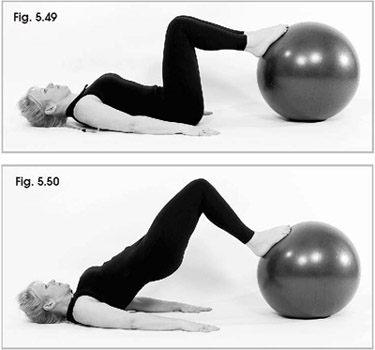
1. Lie on your back with the soles of your feet resting on the surface of the ball (fig. 5.49). Your knees are directly above the hip joint, forming a 90-degree angle. Hands are resting at your sides.
2. Gently draw the shoulder blades toward the spine. Make sure that the neck is long and the shoulders are drawn down away from the ears.
3. Inhale.
4. On an exhale engage the transverse abdominis.
5. Lift the buttocks from the floor until they line up with the soles of the feet (fig. 5.50).
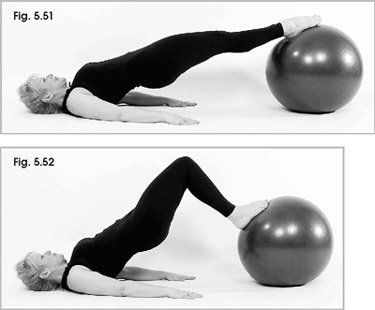
6. Roll the ball away from the body by straightening the legs, bringing the shoulders, buttocks, and heels into a straight line (fig. 5.51). Utilize the core muscles to maintain control of the ball. Do not lock the knees, and do not let the buttocks droop.
7. Roll the ball back toward your body (fig. 5.52).
8. Repeat the exercise six to eight times.
This asana provides a good counterbalance to the Bridge by changing the focus from the strengthening of the hamstring muscles to the stretching and strengthening of the reciprocal musculature, the quadriceps. In addition to being an effective toner for the thighs, Warrior pose provides a good stretch for the hip flexor muscles (the iliacus, psoas, and rectus femoris), which for most people are tight from frequent sitting. This posture also stretches the latissimus dorsi, the largest muscle of the back.
The Sanskrit root word for virabhadrasana can be translated as “hero.” Bhadra means of “good omen.” I am struck by the beauty of the body in this position, the arms reaching skyward to embrace the heavens while the feet remain firmly planted on Mother Earth. I interpret the placement of the arms in this posture to be a salute to the heavens, which to me symbolizes that the practitioner is seeking counsel from spirit above to learn how to carry on his or her duties here on Earth in the most noble and wise fashion possible.
Purpose To strengthen the quadricep muscles of the front leg. To stretch the quadriceps and hip flexor muscles of the back leg. To tone the stabilizing muscles of the inner thigh in both legs.
Watchpoints • Maintain scapular stabilization. • Maintain length through the neck and back. • Keep the knees aligned with the ankles, pevis in neutral alignment. If you begin to lose ideal form, stop. Increase your number of repetitions as you get stronger.
starting position
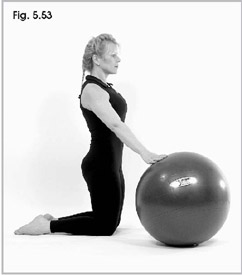
Kneel with the ball in front of you, arms resting lightly on the ball. Engage the rhomboid muscles to gently draw the shoulder blades toward the spine, stabilizing the scapulae (fig. 5.53).
movement—level one
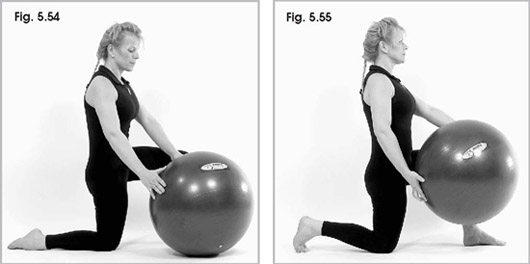
1. Exhale and engage the transverse abdominis. Bring your left knee forward into a lunge position (fig. 5.54). The ball is to the right of center.
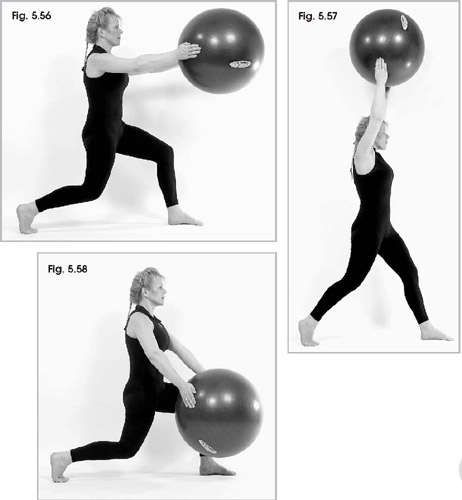
2. Raise the ball overhead as you lift out of the lunge (figs. 5.55, 5.56, and 5.57). Make sure not to overarch the spine.
3. Release the ball to your right side and return to the lunge position (see fig. 5.54).
4. Return to the start position (see fig. 5.53) and execute on the opposite side.
5. Repeat eight to fifteen times, depending on your comfort level.
movement—level two
1. Begin in lunge position with the back knee raised from the floor. The ball is lifted off the floor and positioned in front of the right thigh (fig. 5.58).
2. On an exhale engage the transverse abdominis and raise the ball overhead with both hands as you raise yourself from the floor (see figs. 5.56 and 5.57). Inhale as you rise.
3. Exhale and lower the ball in front of your body (see fig. 5.58). Touch the ball to the midpoint of your knee as your knee lowers to the floor.
4. Repeat six to eight times.
5. Repeat on the other side of the body.
I view Warrior 2 as a progression of Warrior 1. The benefits of this posture are very similar to Warrior 1. Lifting and lowering your body in the Warrior position tones the quadriceps, gluteals, and hamstrings. This posture is useful for athletes who need to strengthen the quadriceps and stretch the inner thigh. It is also a good all-around strengthening pose for a beginning yoga practitioner because it trains a number of different muscle groups at once.
The Warrior 1 posture symbolizes to me that the practitioner is seeking counsel from the heavens to know how to approach his duties. In Warrior 2 the posture denotes to me that the practitioner has the answers he needs and is honing the skills needed to approach the challenge effectively. Practicing this posture can help to draw out and reinforce the admirable qualities of the warrior within you—inner strength, courage, and integrity. I have found this posture useful for helping me to connect with my inner strength, and I am left with a sense of grounded empowerment after practicing it.
Purpose To strengthen the quadriceps, gluteals, and hamstrings. To stretch the inner thigh.
Watchpoints • Maintain scapular stabilization. • Maintain length through the neck and back. • Be sure that the knee stays in line with the ankle.
starting position
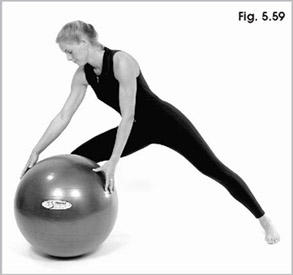
1. Begin in a strong standing position with the feet wide (three to four feet) apart. Turn the right foot 45 degrees outward; position the left foot so that the toes point in the same direction as the hips. You should be able to envision a straight line connecting the heel of your right foot with the arch of your left foot. The ball is on the floor by your right knee (fig. 5.59).
2. Place the ball on your right knee and sink into a lunge. The right knee is over the right ankle; there is a 90-degree angle between the shin and the back of the thigh. The right arm is long across the ball; the left arm is on the thigh (fig. 5.60).
movement
1. On an exhale engage the transverse abdominis. Press your right arm down on the ball to create resistance as you elongate through the spine and deepen into the lunge. At the same time raise your left arm to create a straight line from fingertips to fingertips (fig. 5.61).
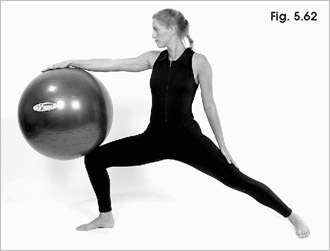
2. Inhale as you release the left arm and relax the lunge slightly (fig. 5.62).
3. Repeat six to eight times.
4. Return to the starting position and change sides: turn the left foot 45 degrees outward; position the right foot so that the toes point in the same direction as the hips. Envision a straight line connecting the heel of your left foot with the arch of your right foot. Place the ball on your left knee and sink into a lunge. The left knee is over the left ankle; notice the 90degree angle between the shin and the back of the thigh. The left arm is long across the ball; the right arm is on the thigh.
5. Repeat Warrior 2 on the left side of the body.

Extended Side Angle (Parshvakonasana)
Parshvakonasana gets its name from the kona, or angle, that the posture forms. This long, reaching asana provides a strong stretch for the oblique abdominals and other muscles that wrap around the side of the body, providing a fitting balance to the many forward and backward bends of a traditional yoga practice. When practicing this pose bring your attention to creating one long yogic line that extends from your heel to your fingertips. Actively use your muscles to reach through the fingertips, feeling the energy of the pose radiate through the fingertips. This maximizes the stretch through the oblique abdominals.
Purpose To stretch the muscles that wrap around the side of the body. To strengthen the quadriceps and the inner thigh.
Watchpoints • Make sure to stabilize the scapula by engaging the rhomboid muscles. • Maintain a straight spine throughout the asana.

starting position
Straddle the ball with legs wide, toes pointed out to sides. The arms rest lightly on the knees (fig. 5.63).
movement
1. Maintain the position of the right foot, toes pointing to the right. Rotate the left foot so that the toes point forward.
2. Exhale and engage the transverse abdominis. Extend the left hip to the left as you lean your upper body to the right, extending the left arm overhead and placing the right arm on the knee to support the upper body (fig. 5.64). You should feel one long, unbroken line extending from the heel of the left foot to the fingertips of the left hand. The fingers are long and straight.
3. Enjoy five diaphragmatic breaths as you fill out the shape of this asana, reaching long and strong through the fingertips.
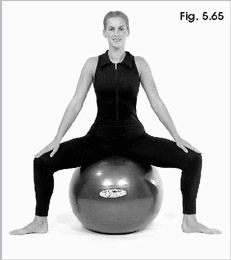
4. Lower your arms to your thighs and raise your trunk so that the body weight is centered over the center of the ball. Return to the start position (fig. 5.65).
5. Rotate your left leg outward so that the toes point to the left. Rotate the right foot so that the toes point forward.
6. Repeat the posture on the left side.
This variation of Warrior 1 offers the practitioner a gentle spinal rotation. All spinal rotations help eliminate tension from the spine and promote mobility and suppleness through the spine and the surrounding musculature. This spinal twist is a relaxing way to wind down your practice. As with any spinal twist, move slowly and carefully with control.
Purpose To release tension from the spine and promote spinal mobility.
Watchpoint • As with all spinal rotations, execute this pose slowly and with great attention to the alignment of the vertebrae.
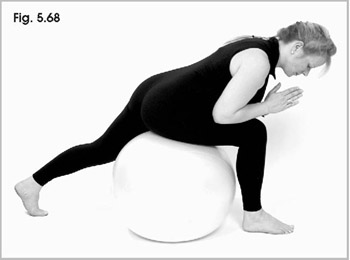
starting position
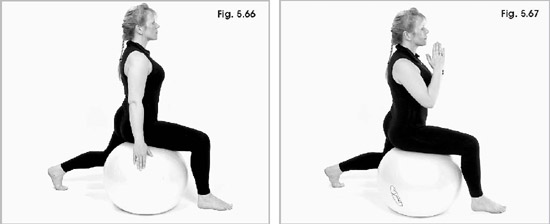
Begin in lunge position on the ball, right leg forward (fig. 5.66).
movement
1. On an exhale engage the transverse abdominis. Breathe rhythmically.
2. Place the hands in prayer position at the breastbone (fig. 5.67). Inhale.
3. Exhale as you lower your upper body toward the right thigh, maintaining ideal alignment through the spine (fig. 5.68).
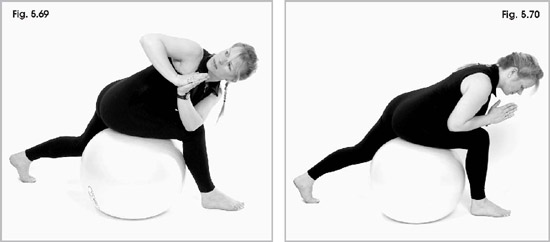
4. Beginning at the base of the spine, slowly rotate the trunk to the right (fig. 5.69). With each inhale lengthen through the spine; with each exhale deepen the rotation. The neck and head will be the last to turn.
5. Hold the rotation for five breaths, then slowly release your spinal twist (fig. 5.70). Lift the trunk to come into seated neutral position.
6. Repeat the asana with the left leg forward, rotating the trunk to the left.

As you become familiar with the idiosyncrasies of your body you will understand better how to fully utilize the asanas presented in this chapter to create that important balance between strength and flexibility.
Take your time with the process of getting to know your body. Use the feedback you receive in your asana practice to glean information necessary to make determinations about the relative strength and flexibility of various muscle groups. You deserve to live in a strong and balanced body. Know that both your body and your mind will benefit from yoga practice and this kind of information gathering, but the reaping of these rewards can only come through time, patience, and careful observation of what is specific to your body. Therefore, carefully consider the activities you take part in: what type of stretching and strengthening work is dictated by the activities of your life in order to create balance throughout your body? You might also want to examine the innate strengths, deficiencies, and areas of inflexibility with which you came into this life. And remember, if you are like most of us in the Western world you probably do a great deal of sitting every day—crouching over a desk, a computer, or a steering wheel. You will want to focus on formulating your yoga practice to address the muscular imbalances created by these activities.
Attempt to fully utilize yogic discipline in this process of balancing your body: be patient. Once you discover the specifics of your body and know where you are tight and what you want to strengthen, know and work graciously on accepting the fact that your body will not change overnight. It is important in yoga practice to accept where you’re at at any given time. Yoga teaches us to face the circumstances of our current existence with faith, courage, nobility, and calm. Walk gently amid the obstacles that seem to stand in the way of where you think you ought to be. Work with your body, not against it, and have patience with your process and the lessons inherent therein. It is these very lessons that spin the rich fabric of our lives. Having patience with our process and the circumstances in which we find ourselves gives us the opportunity to touch into the energy that helps us to forge the traits that assist us in approaching life with courage and nobility, as well as with the steadiness (sthira) and comfort (sukha) of the peaceful yogic warrior.
Go forth. Walk gently on your path.