The Advanced Postures
The asanas in this chapter are designed to meet the needs of the advanced exerciser. I recommend to people who want to attempt the challenging postures here that they already be well conditioned and have considerable experience working with both the exercise ball and hatha yoga postures. Combining yoga postures with the ball takes a yoga practice to a completely new level, one that can provide unique challenges to even the most seasoned exercisers and athletes.
People who wish to work with the asanas in this chapter quite likely have a predetermined goal relevant to their preferred sport or fitness activity. For instance, my friend Alex, who was fortunate enough to retire younger than most folks, spends many of his leisure hours windsurfing along the coastlines of the countries he travels. Practicing advanced yoga postures on the unstable surface of the ball replicates the conditions Alex experiences on his windsurfing board. This allows him to train for his favorite leisure-time activity without even entering the water.
For Teri, an aspiring professional figure skater, executing the advanced yoga ball postures helps condition her vestibular system as well as her muscles for most efficiently utilizing the momentum she generates in her jumps and spins.
Kathi’s goal is completely different. She is continually on the lookout for new physical challenges that will help her maintain a positive mind-set. Three years ago Kathi’s husband was killed in a tragic accident; Kathi began running marathons to help her cope with her grief. The advanced Yoga on the Ball postures presented in the book provide her with a satisfying ongoing challenge that she can work at during any season of the year. Her well-conditioned body needs novel training opportunities to support her goals with respect to running marathons, and her determined spirit needs to be fed.
The various training needs of these individuals can be accomplished with regular practice of the asanas presented in this chapter. Consider your own training needs. Is there a particular sport you want to excel at? Are you trying to find your competetive edge, or is your desire to develop a training program that can support a lifestyle choice?
The advanced Yoga on the Ball postures can be the ultimate training tool. Athletes who rely solely on machine training suffer from a disadvantage because they do not reap the benefits of the increased nervous system activation brought about by the Yoga on the Ball advanced asana training. Also, because machines have stable contact with the floor the athlete does not get the experience of stabilizing his body on various planes—which is exactly what he needs to do in his playing environment. This allows his body to essentially practice many of the motor-recruitment patterns that will be demanded of him in performing his sport.
As in the earlier part of the workout outlined in the book, pay close attention to engaging the transverse abdominis as you work your way through the various asanas ahead. Engaging the transverse abdominis is particularily important to athletes as it helps the body to maintain its balance on the vertical axis. The moment an athlete engages the transverse abdominis she is creating greater containment and compression in her body, which helps to generate more control and power with respect to movement.
Before you practice any of the asanas here be certain that you are stabilized in the starting position. Progress slowly. If you are unable to complete an exercise, note it in your journal and pursue it again when you feel you have greater stability, coordination, strength, or flexibility.
The Asanas
Supine Straight Leg Spinal Twist
This pose stretches the rotator muscles of the spine. This posture also challenges the core muscles to stabilize the trunk properly as the legs are incrementally lowered toward the floor.
The adductor muscles, the muscles of the inside thigh that move the legtoward or across the midline of the body, are also worked in this posture, as they must contract isometrically in order to grip the ball. I find this to be a very artistic pose to observe from the top of the body when the asana is executed properly, with the body aligned in ideal posture and the pose being performed with precision and control. It is beautiful to see the angles of the leg relative to the trunk and the work the core musculature must do to stabilize the body as the legs lower to the floor.
Purpose To stretch the spinal rotator muscles and the muscles of the inner thigh. To stretch the muscles of the outer thigh.
Watchpoints • Maintain scapular stabilization throughout the asana. • Ensure that you actively control the lowering of the legs with the activation of the transverse abdominis so that there is no torque put on the spine that could leave it vulnerable to injury. • Be sure to move slowly and with control.
starting position
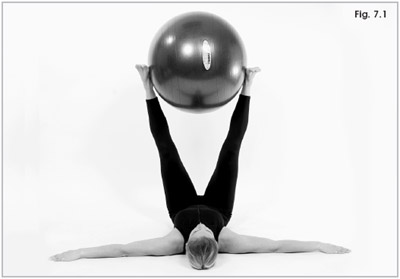
1. Lie on your back on the floor. Extend the arms long from the shoulder girdle and engage the rhomboid muscles to retract the shoulder blades. The ball is positioned between the ankles.
2. Exhale and engage the transverse abdominis, then lift the legs to form a 90-degree angle to the trunk (fig. 7.1).
3. Inhale.
movement
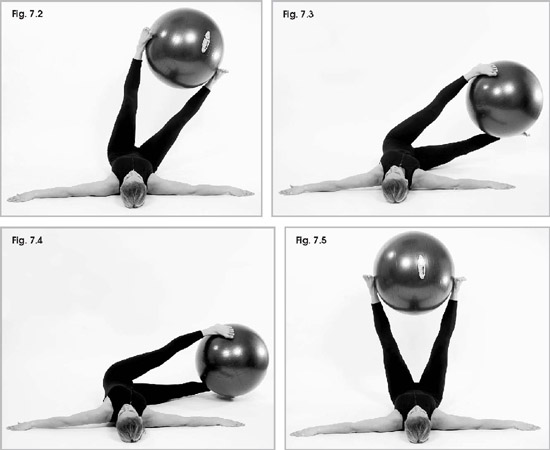
1. On the exhale, engage the transverse abdominis as you slowly lower your legs to the right, maintaining the 90-degree angle of the legs and trunk. Your eventual destination is the floor, but you want to take three moves to get there (figs. 7.2, 7.3, and 7.4). Control the lowering of the legs with an active transverse abdominis so you do not torque the spine. Attempt to hold each incremental change for 3 seconds.
2. Once the legs are at the floor, inhale, exhale, and inhale, maintaining a strong transverse abdominis activation.
3. Exhale as you lift the legs to return to the start position (fig. 7.5).
4. Repeat on the other side.
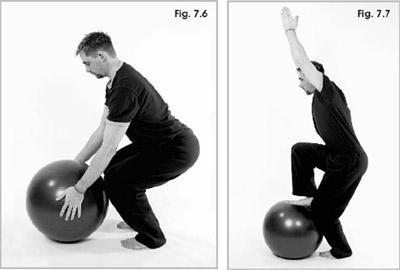
This is an advanced version of the Chair Pose—lifting one leg off the ground and placing it on the ball adds challenge to the traditional Chair pose. As you press the buttocks out behind you pretend that you are sitting back into a chair. When I practice this posture I am struck by the amount of control it takes to hold this posture once I have lowered myself into the “down” phase.
Purpose To improve core stability and tone the abdominal muscles. To tone the quadriceps, the gluteals, and the hamstrings. To stretch the latissimus dorsi.
Watchpoints • Make sure the knee is lined up over the ankle and does not press out over the toe. • Maintain scapular stabilization throughout the asana.
starting position
1. Stand with your feet slightly wider than hip-distance apart, the ball on the ground in front of you. Engage the rhomboid muscles to draw the shoulder blades toward the spine and stabilize the scapulae.
2. Squat down and take hold of the ball (fig. 7.6). Press your buttocks out behind you as if you were going to sit in a chair. Maintain an elongated spine and scapular retraction.
movement
1. Exhale and engage the transverse abdominis, then raise the arms overhead and place one foot on the ball (fig. 7.7). Continue to press the buttocks out behind you. Pause for 3 seconds, breathing and maintaining a strong transverse abdominis.
2. Return to the starting position.
3. Repeat on the other side.
4. Repeat up to eight times on each side.
Balancing Yogi is a challenging exercise. Your skill will improve rapidly with practice once you sense how to situate your body and use your core musculature to balance properly. Those who engage in sports such as windsurfing, skateboarding, or roller blading will find this posture useful because it coaxes the body to replicate the same movements necessary to maintain balance in those sports. Balancing Yogi is almost certain to bring out the playful side of you. If I have had a particularily stressful day I begin my workout with this posture as it never fails to help me crack a smile. And once my brain changes from the experience of that first smile the rest of my workout is much more manageable and pleasurable.
Purpose To train balancing skills. To tone and strengthen the abdominal muscles and improve core stability.
Watchpoints • Keep the spine lengthened and in neutral position. • Maintain scapular stabilization throughout the asana.
starting position
1. Sit on the ball with the feet parallel and hip-distance apart. Find neutral spine by using the Postural Setup.
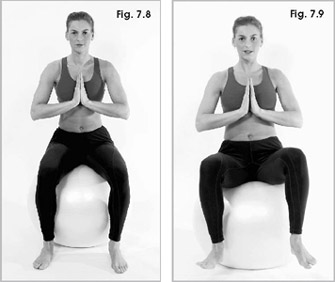
2. Place your hands in prayer position at your breastbone (fig. 7.8).
movement
1. Exhale and engage the transverse abdominis.
2. With your hands in prayer position lift both feet off the ground simultaneously (fig. 7.9). See how long you can balance in this position.
3. Move your arms as you need to in order to fine-tune your momentto-moment balancing skills.
4. When you wish to exit from this posture simply allow the weight of your body to pull you forward so that your feet touch the ground.
In this asana you work to maintain balance while moving your arms as if they were the hands of a clock moving through time in that predictable circular motion. This is an effective balancing exercise—move slowly with impeccable control. Make sure you do not begin to droop at the midriff after a shift in your clock motion. This is a useful exercise for self-care of the back if you have back problems that are a result of instability in the spine.
Purpose To improve core stability. To tone the abdominals, arms, chest, and shoulders.
Watchpoints • Maintain a straight and elongated spine through this asana. • Breathe smoothly and calmly throughout the exercise. • Maintain scapular stabilization.
starting position
1. Stand with your feet shoulder-distance apart, the ball on the ground in front of you. Initiate scapular stabilization.
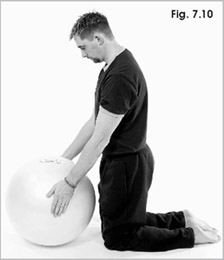
2. Come down to a kneeling position on the floor, your hands resting on either side of the ball (fig. 7.10).
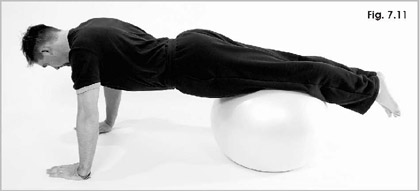
3. Lay over the ball and walk out until the ball rests at the upper thighs (fig. 7.11). The hands are directly below the shoulder joints.
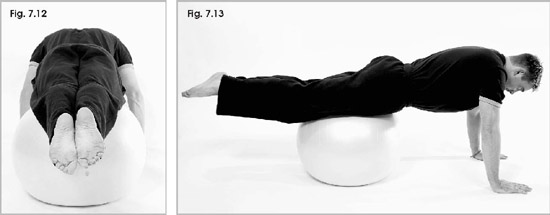
4. Engage the buttocks and squeeze the thighs together so that the sides of the knees are lightly touching each other. Imagine that your body is pointing at the 12-o’clock position (fig. 7.12).
1. On the exhale engage the transverse abdominis. Begin slowly “walking” your hands to the right. Allow your ball and your body to move with you as you travel.
2. Continue traveling until you complete one-quarter of the circle; stop at 3 o’clock and hold for 6 seconds (fig. 7.13).
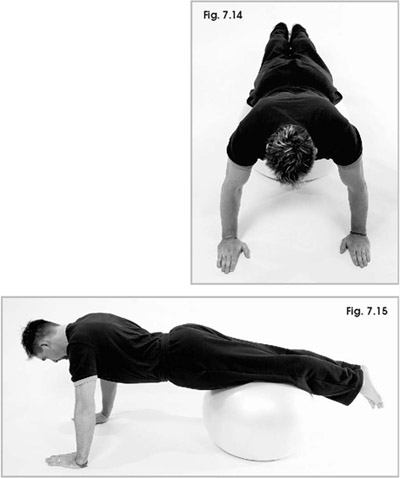
3. Rest if you need to and then walk another quarter circle to 6 o’clock (fig. 7.14). Hold for 6 seconds.
4. Proceed to the next quarter hour when you are ready (fig. 7.15).
5. Continue on to the 12 o’clock position.
6. Rest here and then continue in the other direction when you are ready.
7. Perform one rotation in each direction.
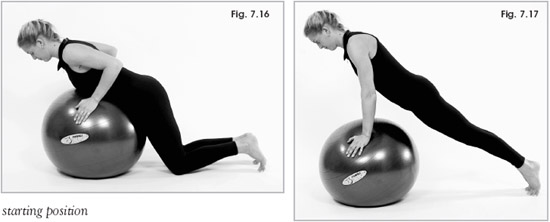
This is another advanced variation of Plank pose. It is extremely challenging to keep yourself steady on the ball while executing push-ups. This posture requires upper body strength and a great deal of core stability to be able to maintain steadiness on the ball. The body should remain in one long line throughout the exercise, and shoulders should remain down and relaxed at all times.
This is an excellent exercise for wind surfers as it not only strengthens the muscles responsible for holding the sail in place but also strengthens the core musculature responsible for keeping the surfer in the upright position.
This asana is also useful for bodybuilders. Bodybuilders are known for their pectoral strength but often lack in the ability to stabilize the body to sustain holding heavy loads.
Purpose To tone and strengthen the abdominals, arms, chest and shoulders. To improve core stability.
Watchpoints • Maintain a straight spine throughout the posture. Do not arch the back. • Maintain scapular stabilization.
starting position
1. Stand with your feet shoulder-distance apart, the ball on the ground in front of you. Engage the rhomboid muscles to draw the shoulder blades toward the spine and stabilize the scapulae.
2. Come down to a kneeling position on the floor, your hands resting on either side of the ball.
3. Lay over the ball and walk out until your chest is centered over the ball (fig. 7.16).
movement
1. Exhale and engage the transverse abdominis.
2. Inhale and lift your body up off the ball by straightening the arms (fig. 7.17). Maintain a strong lift through the spine and transverse abdominal engagement to keep you steady on the ball.
3. Exhale as you lower your body to the starting position.
4. Repeat this movement up to eight times.
The next three asanas require the body to maintain stabilization as movement is introduced. These asanas are useful for training core musculature.
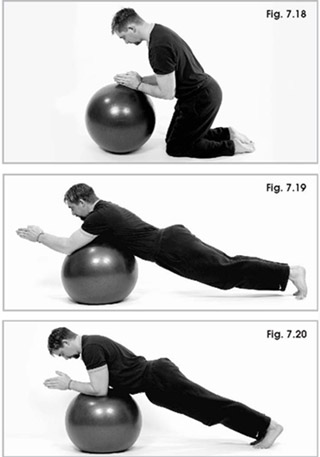
Prayer Roll Out will challenge those who have superb balancing skills and a strong upper body. The most common training error with this asana is arching the back as you roll out into the pose or losing transverse abdominis activation while executing the posture. Be certain that you have mastered the basic version of Prayer Roll Out before attempting this asana.
Purpose To improve core stability. To strengthen the abdominal muscles.
Watchpoints • Do not arch your back when rolling into this posture. • Maintain scapular stabilization throughout the asana. • Avoid this exercise if you have shoulder or rotator cuff problems.
starting position
1. Stand with your feet shoulder-distance apart, the ball on the ground in front of you. Engage the rhomboid muscles to draw the shoulder blades toward the spine and stabilize the scapulae.
2. Come down to a kneeling position in front of the ball. Bend your elbows and place your hands and wrists on the ball, palms facing inward in prayer position (fig. 7.18).
movement
1. Exhale and engage the transverse abdominis.
2. Keeping your hands in place on the ball, inhale as you lift the hips and extend the legs behind you, rolling the ball away from the body (fig. 7.19). The ball will be under the upper arms. Think of creating a straight, strong line from the heels to the fingertips.
3. Exhale as you roll the ball back in toward the body, maintaining neutral spine (fig. 7.20).
4. Repeat up to eight times.
In this advanced version of the Bridge asana you will need to focus your present-moment awareness on moving slowly and with control. Most students find it a challenge to remember to breathe while executing this exercise.
Purpose To tone and strengthen the abdominals and hamstrings. To improve core stability.
Watchpoints • Make sure you don’t arch the back or lift your hips too high in the air. The idea is to make a straight line with the shoulders, hips, and knees. • Be sure the neck is relaxed and the shoulders are drawn away from the ears. • Maintain scapular stabilization throughout the asana.

starting position
1. Lie on your back with your knees bent, heels resting on the ball and arms resting by the side of your thighs (fig. 7.21).
2. Engage the rhomboid muscles to draw the shoulder blades toward the spine and stabilize the scapulae.
movement
1. Exhale and engage the transverse abdominis.
2. Lift your hips from the floor so that your buttocks line up with the heels (fig. 7.22).
3. Inhale and extend the legs to roll the ball away from the body (fig. 7.23). Hold for 3 seconds.
4. Exhale as you roll the ball back in toward the body, maintaining the lift through the buttocks and hips (fig. 7.24).
5. Inhale and exhale here. On the exhale engage the transverse abdominis.
6. Repeat the asana up to eight times.
Advanced Bridge with Roll Out and Leg Raise
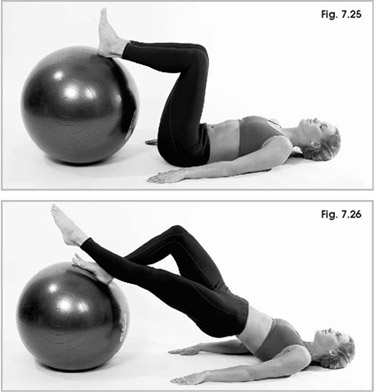
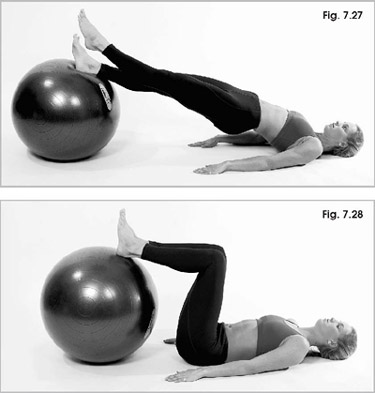
In this exercise your balance is challenged even more than in the previous asana because you have the support of one leg only. When practicing this posture be certain that you do not sacrifice your form. It is essential that you maintain neutral spine and pelvis throughout the entire execution of this posture. If you feel yourself struggling excessively you need to breathe in a more relaxed fashion. If this does not help, work at the previous posture until you improve your strength and stability.
Purpose To tone and strengthen the abdominals. To improve core stability.
Watchpoints • Don’t arch the back or lift the hips too high in this asana. The idea is to make a straight line with the shoulders, hips, and knees. Don’t let the buttocks drop toward the floor. • Relax the neck and draw the shoulders away from the ears. • Maintain scapular stabilization throughout the asana. • If you are not able to use the breath rhythm as it is described just simply breathe smoothly and calmly without holding your breath.
starting position
1. Lie on your back with your knees bent, heels resting on the ball and arms resting by the side of your thighs (fig. 7.25).
2. Engage the rhomboid muscles to draw the shoulder blades toward the spine and stabilize the scapulae.
movement
1. Exhale and engage the transverse abdominis, then lift the hips from the floor. Extend the left leg and extend the right ankle to rest the right foot on the ball (fig. 7.26). Keep the ball in position.
2. Inhale and straighten the right leg to roll the ball away from the body (fig. 7.27).
3. Hold this position for up to 3 seconds.
4. Exhale and, using the right leg only, roll the ball back in toward the body. Lower the buttocks to the floor. Knees are bent and aligned over the hips. Both heels rest on the ball (fig. 7.28). Repeat on the other side.
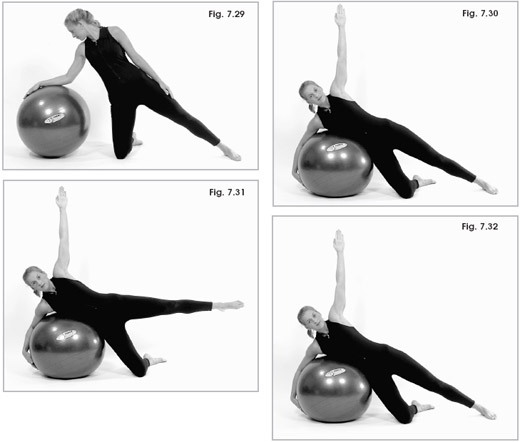
Side-Lying Plank
This variation of Plank pose gives you an option for strengthening the hip abductors, the muscles that move the leg away from the body’s midline. The abductors include the gluteus muscles, the tensor fasciae latae, sartorius, and the deep muscles of the hip. You will need to experiment to find out which level of this exercise is appropriate for you. Use your balancing skills to maintain a long, lean line throughout the duration of the yoga exercise.
Purpose To strengthen the hip abductors. To improve core stability.
Watchpoints • Keep the top hip stacked over the bottom hip. • Don’t twist or sidebend the spine. • Maintain scapular stabilization throughout the asana.
starting position
1. Kneel upright with your ball to the right of you. Engage the rhomboid muscles to draw the shoulder blades toward the spine and stabilize the scapulae.
2. Exhale and engage the transverse abdominis. Maintaining the spine in a straight line, lean toward the ball as you extend your left leg to the side (fig. 7.29). Inhale.
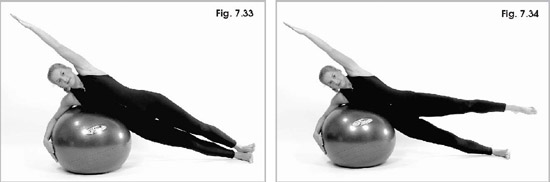
3. Exhale and drape the right side of your body over the ball, stacking the top hip over the bottom hip. Raise the left arm so that it is directly in line with the shoulder joint (fig. 7.30). Inhale.
movement—level one
1. On the exhale engage the transverse abdominis.
2. Inhale. Exhale and engage the gluteal and thigh muscles to lift the top leg (fig. 7.31). Hold for 3 seconds.
3. Exhale as you release the top leg (fig. 7.32).
4. Repeat on the other side.
movement—level two
1. Kneel upright with your ball to the right of you. Engage the rhomboid muscles to draw the shoulder blades toward the spine and stabilize the scapulae.
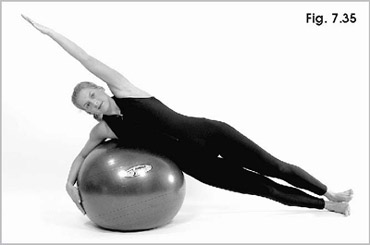
2. Exhale and engage the transverse abdominis. Maintaining the spine in a straight line, lean toward the ball as you extend both legs out to the side, stacking the hips and ankles. Extend the left arm above your head at a diagonal; feel a long, straight line from ankle to hip to fingertips (fig. 7.33).
3. Inhale and raise the top leg so that it is parallel with the floor (fig. 7.34). Hold for 3 seconds.
4. Exhale and release the leg to starting position (fig. 7.35).
5. Repeat on the other side.
Side-Lying Plank with Twist
This advanced version of Side Plank is a challenging balance posture. It is difficult to simply hold the Side Plank, let alone keep control when you add movement to the equation. It is important to move through this asana slowly—maintaining a diaphragmatic breathing pattern makes it easier to achieve proper positioning. Be careful not to hold your breath as you work with this exercise.
Purpose To improve core stability. To tone the abdominal muscles. To strengthen the muscles of the arms and shoulders.
Watchpoints • Maintain the spine in a long, straight line. • Maintain scapular stabilization throughout the asana.
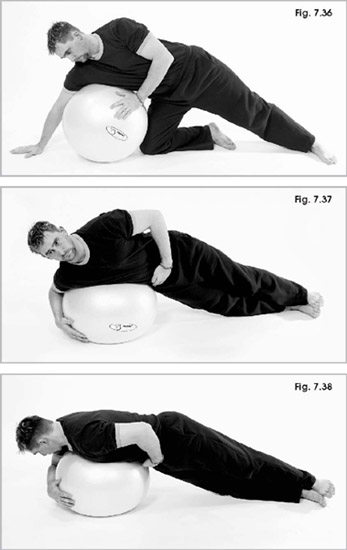
starting position
Kneel upright with the ball to the right of you. Engage the rhomboid muscles to draw the shoulder blades toward the spine and stabilize the scapulae.
movement
1. Exhale and engage the transverse abdominis.
2. Lean to the right and drape your upper body over the ball so that the trunk rests securely on the ball. The right hand supports you on the floor, the left leg extends long (fig. 7.36). Inhale.
3. Exhale as you straighten the right leg and place the left hand on the belly (fig. 7.37). Make sure the hips are stacked.
4. Inhale and make a slight twist of your trunk toward the ball (fig. 7.38). This is a spinal rotation—make sure to maintain the spine’s vertical axis as you rotate.
5. Hold this position for only a second.
6. Perform up to eight repetitions of this asana.
7. Repeat on the other side of the body.
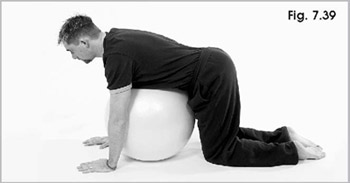
Be certain you have mastered the basic Down Dog (see page 64) before you progress to this advanced version. It is extremely challenging to work a posture when the body is inverted; breathe smoothly and calmly. This version of Down Dog tones the gluteals and strengthens the core and upper body.
Purpose To tone and strengthen the arms, shoulders, chest, and buttocks. To create space between the vertebrae by providing slight traction for the spine.
Watchpoints • Maintain a lengthened spine throughout this asana. • Keep the knees and shoulders slightly bent. • Maintain scapular stabilization. • Use relaxed yoga breathing throughout the asana.
starting position
1. Stand with your feet slightly wider than hip-distance apart, the ball on the ground in front of you. Initiate scapular stabilization.
2. Kneel in front of the ball. Place your hands palms down on the floor. Walk out until the ball is supporting the chest and the wrists are directly under the shoulder joints (fig. 7.39).
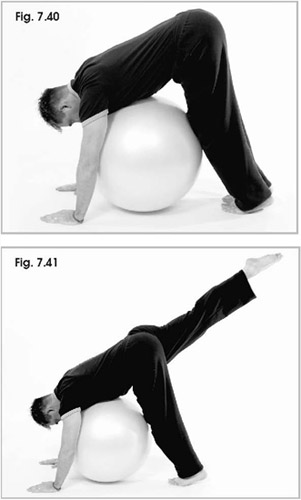
3. Exhale and engage the transverse abdominis. Press into the hands as you flex the hips and lift the buttocks into the air. Your upper body and trunk will form an inverted V (fig. 7.40).
movement
1. Exhale and engage the transverse abdominis.
2. Inhale. Exhale as you extend your right leg back, aligning the ankle with the shoulder joint (fig. 7.41).
3. Hold this leg extension for 3 seconds.
4. Return to the starting position.
5. Repeat for up to eight repetitions.
6. Repeat on the other side.
The following asanas are directed at the abdominals. These postures will help to develop an aeshetically pleasing look through the trunk and improve the stability of the spine.
Yoga Plank Hover is a variation of Plank pose. This exercise improves core stability and tones the abdominals. Record the length of time that you are able to hold this pose when you first try it, and then work to slowly increase the time you are able to maintain it. I recommend that you hold the posture for a minimum of 30 seconds and work up to holding it for 1 minute, but the first few times you practice the asana you may not get anywhere near this holding time.
Purpose To strengthen the spinal stabilizers. To tone the abdominal muscles.
Watchpoints • Work to create a straight line from head to toe. • Maintain scapular stabilization throughout the asana.
starting position
1. Stand with your feet slightly wider than hip-distance apart, the ball on the ground in front of you. Initiate scapular syabilization.
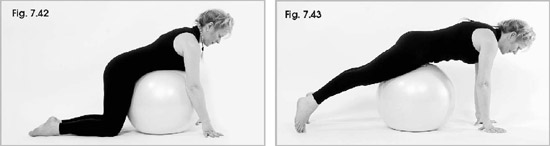
2. Come to kneeling. Drape your trunk over the ball and roll forward into Cat position (fig. 7.42).
movement—level one
1. Exhale and engage the transverse abdominis. Slowly walk out on the ball until the ball is underneath the hips and upper thighs (fig. 7.43). Inhale.
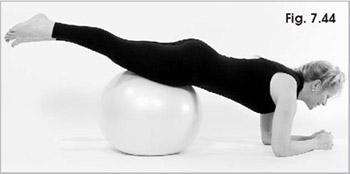
2. Exhale as you bend the elbows and lift the legs from the floor to center your upper body weight on your forearms (fig. 7.44).
3. Attempt to hold the position for at least 30 seconds and up to 1 minute.
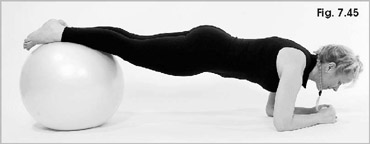
1. From the same starting position, slowly walk out on the ball until the ball is underneath the shins and ankles. Inhale.
2. Exhale as you bend the elbows and center your upper body weight on your forearms (fig. 7.45). Maintain strong transverse abdominis engagement.
3. Attempt to hold this position for at least 30 seconds and up to 1 minute.
Rolling Tabletop
We finish our survey of advanced Yoga on the Ball postures with this intensive version of the Tabletop asana. This posture provides an extreme balance challenge; the key is to maintain transverse abdominis activation and neutral spine and pelvis throughout the asana. This asana promotes the development of coordination and agility. It is useful to those who take part in “extreme” sports, as it challenges the body to maintain control throughout an exercise that requires agility, coordination, and risk taking. The risk-taker who wants greater challenge can continue to incrementally increase speed as her skill improves.
Purpose To tone and strengthen the abdominal muscles. To improve core stability.
Watchpoints • Maintain an elongated, straight spine throughout the asana. • Keep the buttocks lifted. • Breathe smoothly and calmly throughout the asana.
starting position
1. Sit on the ball with the feet parallel and hip-distance apart. Find neutral spine by using the Postural Setup.
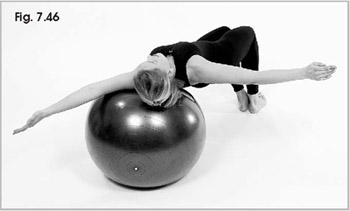
2. Walk your feet out and carefully let the ball roll under you until your head and neck are totally supported by the ball. Make sure your hips and buttocks are lifted.
3. Extend your arms out to your sides.
movement
1. Exhale and engage the transverse abdominis. Keep the buttocks lifted as you begin to slowly walk your feet to the right (fig. 7.46). The ball will roll as you move.
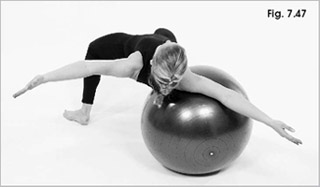
2. When you reach your far right position, resituate yourself securely on the ball and then walk your feet back to the center.
3. Repeat on the other side (fig. 7.47).
4. Repeat two or three more times on each side.

Improvement in execution of the asanas in this chapter is all about refinement of the postures. Work diligently at using your muscles actively to create long, lean yoga lines for each and every posture. Each time you practice, attempt to sculpt even more distinct linear creations with your body. If you have the luxury of practicing in front of a mirror you will want to see strong angles and lines. Regardless of whether you are training for sport or leisure activity, for physical conditioning or mental toughness, choose the postures that uniquely match the demands placed on your body and mind. Refrain from overpracticing the poses at which you excel in order to prevent muscle imbalance and overtraining of specific muscle groups.