There are some cases where the options offered by these entries are not enough. Look at these following examples:
- Moving only the files created in the current month
- Copying a list of files listed in a .csv file
- Deleting text files that don't have a predefined header
In cases like these, you have to choose a different approach. There are basically three ways to handle this:
- Implement the operation with a PDI Transformation
- Work with result file lists
- Use arguments in the Job entries
Let's look at an example of the first approach. We will learn about the other two in Chapter 14, Creating Advanced Jobs.
The next example will recreate the Job where we copied the files to the MUSIC folder, but in this case, we will change the name of the files to lowercase, which is not possible to do with a Job.
In the following instructions, we assume that you have the original set of files ready to be moved:
- Open Spoon and create a new Transformation.
- From the Input category of steps, drag the Get File Names step to the work area. This step will allow us to specify a starting list of files to work with.
- Double-click the step and fill the first row of the grid. Under the File/Directory column, type D:/LearningPDI/SAMPLEFILES. Under the Wildcard (RegExp) column, type ARTIST_.*\.MP3
- Click on Show filename(s)... You will see the list of files that match the settings:

- Now click on Preview rows. You will see the output of this step, that is, information associated with the file names on the file system. This output includes filename, size, and last modified time, among others. Close the window.
- Just for simplicity and demonstration purposes, let's keep only those fields that are relevant to the exercise. After the Get File Names step, add the Select Values step and select the filename and short_filename fields.
- We already have the source files. Now we have to build the full path for the destination files. We will do it with a User Defined Java Expression step from the Scripting category. So, after the Select Values step, add the UDJE step.
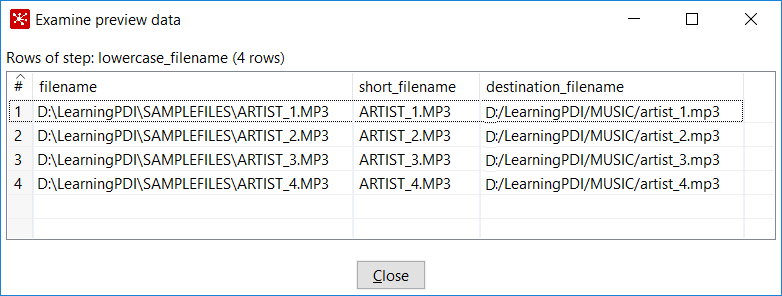
- Double-click the step and add a new field named destination_filename. As Java expression, type "D:/LearningPDI/MUSIC" + short_filename.toLowerCase(). As Value type, select String.
- Close the window and preview the Transformation. You should see this:

- Finally, from the Utility category, add the Process files step. This is the step that will move the files. Double-click the step and configure it as follows: As Operation, select Move. As Source filename field and Target filename field, select filename and destination_filename respectively.
- Close the window, save the Transformation, and run it. If you browse your file system, you will see that all the files matching the settings were copied, but the names were changed to lowercase.