[5]
Abstract Collage
KIM METHENY & SUE WEIR
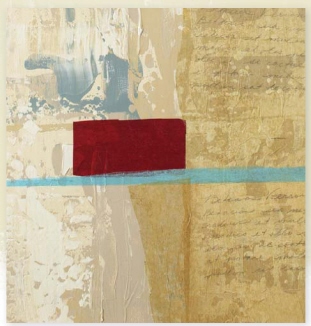
The inspiration for this finish came from a client’s desire to incorporate her contemporary style with memories of her childhood in Italy. The paint was troweled onto the wall, which created a look of texture and defined areas of color. A recipe handwritten in Italian and transferred onto tissue paper, along with unexpected bits of red and blue tissue paper, brought in pops of color while complementing her kitchen style. This idea can easily be customized by changing out the recipe we used with a special saying, poem or letter.
MATERIALS
 Basecoat: Neutral White SetCoat or equivalent off-white 100% acrylic paint
FauxCrème Color: Dark Brown
AquaGlaze
Benjamin Moore latex:
Richmond Gold, Santorini Blue and Hot Spring Stone
Sherwin-Williams Extra White ready mix color, and Macadamia
9-inch (23cm) taping trowel
Colored tissue paper (including natural for the recipe) no. 2 pencil
Mod Podge glue
Chip brushes
Cheesecloth
 PRO TIPS
1. Color Tips
Start with darker colors and place them randomly around your wall. These are your accent colors and will peek out from under the lighter colors and create depth. Pick one to two lighter colors for overall effect and use colors that are in line with your decor.
2. Trowel Tips
The angle in which you hold your trowel will dictate how much coverage and what pattern you will achieve, as does the pressure you apply. Pushing hard at a 45° angle will give you a smooth look and a lot of coverage. Lightly skipping over the surface at a 20-30° angle will give you more texture and less coverage. Test your technique on a board to see what effect you like best.
3. Blending Tips
There is no reason to wait for the paint to dry as you move through the steps. This will help blend the colors as much or as little as you want. It is difficult to make a mistake with this finish. If you would like more or less of a color—just apply more of that color or cover the color you do not want with one that you like better. This allows you to have a lot of control.
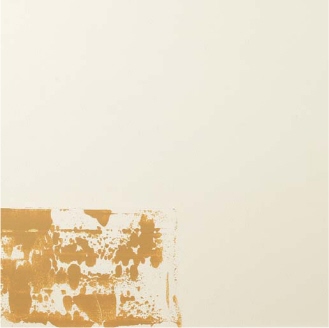
STEP 1: Basecoat the walls with two coats of Neutral White SetCoat or any off-white, 100 percent acrylic paint. Let dry. Then, using a taping trowel, scoop up a small amount of Richmond Gold latex paint on the trowel and apply to the wall. Hold the blade at a 45° angle and pull the trowel in a downward motion. Apply the gold color in random areas, reloading the trowel as needed. Try to balance your placement, keeping in mind that you will be layering many colors. It will look spotty at this point.
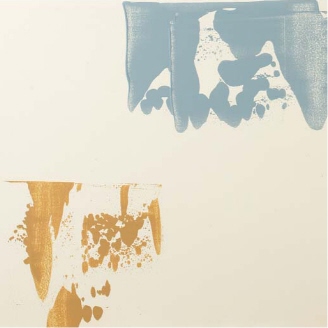
STEP 2: Next, load the taping trowel with Santorini Blue latex paint. Again, hold the blade at a 45° angle and pull the trowel in a downward motion. Watch your placement and balance the colors against each other.
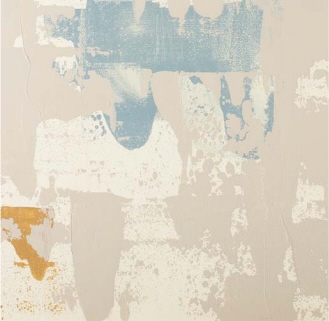
STEP 3: Repeat the application, this time with Hot Spring Stone latex paint, increasing the coverage and starting to fill in larger areas of color but still leaving the blue and gold peeking out from underneath.
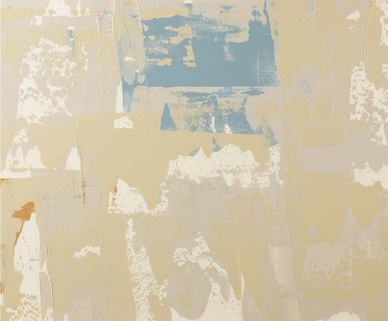
STEP 4: Use the Macadamia latex paint in the same manner, again filling in larger areas of paint but allowing the previous colors to come through.

STEP 5: Apply the Extra White paint in the same way, randomly filling in areas to your liking.
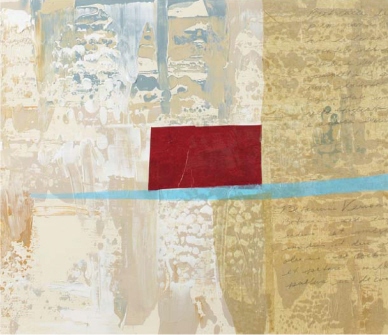
STEP 6: Using colored tissue paper, cut out the burgundy rectangles and the long, blue streaks. The recipe collage pieces use sewing pattern paper or natural color tissue with the recipe written on it in pencil. Apply these pieces using a paint brush dipped in Mod Podge and cover the top of the tissue as well with the Mod Podge. This creates a barrier for the final step which is a finishing glaze.
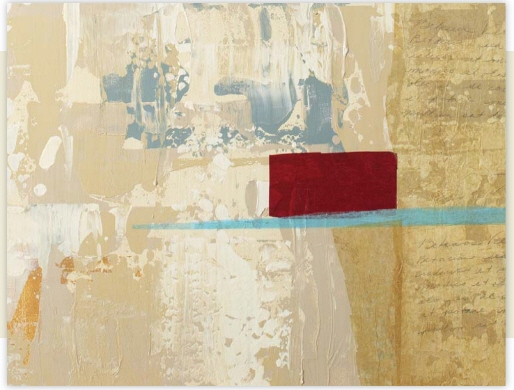
FINISH: The finishing glaze consists of 2 cups of AquaGlaze, 1 tablespoon of Dark Brown Faux-Crème Color, thinned with about a fourth of a cup of water. Apply the glaze with a chip brush and smooth the surface with a piece of cheesecloth.

Home of Laurie Overby. Photo courtesy of Jeanna Shepard Photography.