[22]
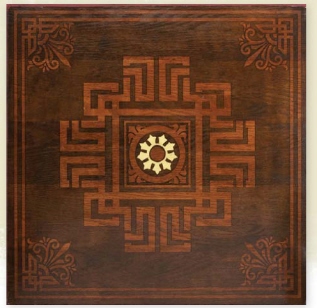
Stained Wood Modello Floor
GARY LORD
The classic custom look of inlaid wood has been around for centuries. Originally it was all hand cut and inlaid pieces of varieties of wood stained with different colors to create the pattern. Today with the use of a Modello (which is a design masking film) you can simulate the look of a hand inlaid floor at a fraction of the cost. The designs are unlimited and are custom made to fit your exact floor space. This is a fantastic option to dress up a floor or any other large wooden surface that can be stained.
MATERIALS
 2-foot (61cm) square Modello (ORN Tile 124 Negative) by Modello Designs
Burnishing tool
Stain & Seal: Van Dyke Brown and Antique Mahogany
Lambskin staining pad
Pick-out tool
Rolco Waterbased Size
Clear acetate
Stencil brush
22k Gold Leaf
AquaGard sealer
Faux Effects C-500 Urethane (gloss)
 PRO TIPS
1. Removing the Transfer Paper
Wetting the face of your Modello’s transfer paper with a damp sponge allows easier removal of the transfer paper.
2. Removing the Backing Paper
Be careful when removing the backing paper of the Modello so the design does not stick to itself because it is almost impossible to fix if it does. Now why do you think I might know that?
3. Check Your Design Placement
Make sure you have your placement just right before you press it down onto the surface because, once again, when it is pressed in place there is very little chance to change it.
4. Fixing a Mistake
If you do make an error, lay tape or Contact paper in the space that needs correction and use an X-acto knife to cut the design you need, then remove the excess material.
5. For More Information...
Need more information on Modellos? Visit www.modellodesigns.com(or see the Resources section).
STEP 1: Using your burnishing tool, burnish both sides of the Modello. This helps ensure that the Modello adheres to your transfer paper and does not remain on the backing paper. Then while removing the Modello, always watch to ensure the design is adhered to the transfer paper; you may have to re-burnish some areas periodically to make this happen.
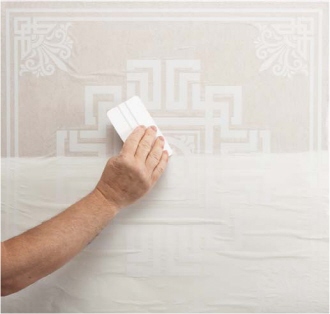
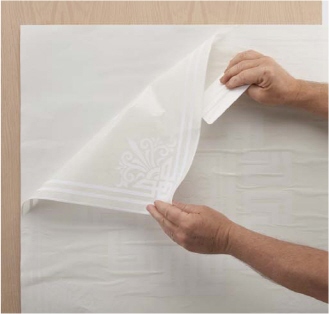
STEP 2: If your Modello is large, remove just one-half of the backing paper, being careful not to let the transfer paper stick to anything. (The transfer paper is sticky but the backing paper has no adhesive on it.) Then carefully align the transfer paper to the surface. Gently tack it in place with your fingers; once the Modello is pressed down, there is no adjustment possible. Now that the Modello is placed, use the burnishing tool to press the transfer paper and the Modello down onto your surface. Lift up the loose side that has the backing paper and remove the backing paper; carefully lay down the transfer paper and burnish it in place.
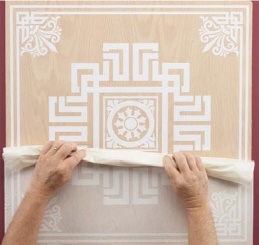
STEP 3: Remove the transfer paper, making sure the Modello stays onto the surface and doesn’t lift with the transfer paper. Roll it back at a 180° angle. As you remove it, roll it into itself. It’s very sticky and this helps keep it from tearing off any pieces of the design.
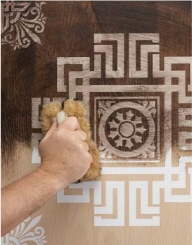
STEP 4: Using a lambskin staining pad, apply the Van Dyke Brown Stain & Seal to the surface. Rub hard and firm to make sure the stain gets into all the grain of the wood.

STEP 5: Take a clean rag and wipe away excess stain from the entire surface. Let it dry for about 2 hours or longer.

STEP 6: Use a pick-out tool to remove all of the Modello from the surface. If you don’t have a pick-out tool, use a pocket knife or X-Acto knife. Depending on the design, the Modello comes up in pieces. Throw them away—they can’t usually be reused.
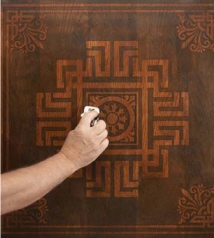
STEP 7: Using a lambskin staining pad, apply Antique Mahogany Stain & Seal, cut with about 10 percent FX Thinner, to the entire design. Then use a clean rag to wipe off the excess stain, rubbing hard over the entire design.

STEP 8: Cut an acetate stencil for the center flower petal design. Cut a circle stencil for the center of the flower to act as a shield over the center circle. Using tape, place them on the center of the design. Using a stencil brush and Rolco Waterbased Size, tap sizing onto the wooden surface and let it set up about 25 minutes until tacky. Apply 22k Gold Leaf onto the flower petals using a soft stencil brush. Carefully brush off the excess gold leaf.

FINISH: Before applying the sealer, let the surface dry overnight. To protect the design, apply a waterbased clear polyurethane for your finish. The sheen level can be your choice. I used one coat of high gloss Aqua-Gard and let it thoroughly dry, and one finish coat of Faux Effects C-500 Urethane gloss. I used my lambskin staining pad to apply the Sealer and the finish coat.