A major addition to the Java ecosystem when dealing with Scala is Simple Build Tool (SBT), a flexible build system written in Scala that also powers both Typesafe Activator, which we used in the previous chapters, and the Play framework that we will cover later on in this book. In contrast to the existing XML formats used by Ant and Maven in Java environments, SBT build definitions are written in Scala in the form of a Domain Specific Language (DSL), having the benefit of compile-time checking. As we will see in this section, SBT provides a number of additional convenient features. In addition to its dependency management ability based on Ivy and supporting Maven-format repositories, SBT offers both incremental compilation and an interactive shell (that is, the REPL we were using earlier). It also supports continuous testing and deployment, and integrates with many Scala test frameworks, making it the de facto build tool for the Scala community.
SBT consists of a single .jar archive as well as a very small start script. Therefore, it can be installed and run on any platform that supports JVM. Installation instructions are available at http://www.scala-sbt.org/.
Once SBT is in your path (we used Version 0.13.0 at the time of writing this book), create a directory called SampleProject anywhere in your filesystem by entering the following commands in a terminal window:
> cd <your_filesystem_dir> (e.g. /Users/Thomas/projects/)
> mkdir SampleProject
> cd SampleProject
> sbt
[info] Set current project to sampleproject
> set name := "SampleProject"
[info] Defining *:name
[info] ...
> session save
To end the SBT session, enter the following command:
> exit (or press CTRL-D)
This will create a build.sbt file under the project root. This file gathers information about the project, that is, the equivalent of the Maven's .pom file in the Java world except that build.sbt compiles to Scala rather than being XML. The whole file structure of the project is illustrated in a diagram later on, once we have added some library dependencies.
Open and edit build.sbt to fill out the basic information as follows:
name := "SampleProject"

version := "1.0"

scalaVersion := "2.10.3"
Note that the extra line between each statement is important. The .sbt files are not Scala programs; they are a list of Scala expressions, where a blank line is the delimiter between these expressions.
We are now going to import our empty project into our IDE before we start writing some code.
The sbteclipse plugin is available to adapt a pure SBT project to an Eclipse project. You just need to create a plugins.sbt file under the project/ directory and type the following line into it to import the sbteclipse plugin:
addSbtPlugin("com.typesafe.sbteclipse" % "sbteclipse-plugin" % "2.4.0")
The preceding given string is a way in SBT to express a dependency to a Maven library; it is the equivalent to what you would normally write into a pom file:
<groupId>com.typesafe.sbteclipse</groupId>
<artifactId>sbteclipse-plugin</artifactId>
<version>2.4.0</version>
You see, downloading libraries and their dependencies in SBT is pretty much the same as working with Maven; they will be fetched from Maven repositories (Maven central and some other common repositories are already referenced by default in SBT; this is why you do not have to write them explicitly).
Note that eventually you should use a different version number as this plugin evolves from time to time. The current version is available together with the plugin documentation at https://github.com/typesafehub/sbteclipse.
Once SampleProject/project/plugins.sbt is present in your project, you can simply execute the following command to generate an Eclipse compliant project (still from the root of the project):
> sbt eclipse
...
[info] Successfully created Eclipse project files for project(s):
[info] SampleProject
Now just start your Eclipse IDE if you haven't already done so, then select File |Import.... Navigate to General | Existing Projects into Workspace. Browse to the root directory of your project as you would do in Java and click on OK. Then, click on Finish to complete the import of the project, which will appear in the Project Explorer window.
IntelliJ also has its plugin, which is available at https://github.com/mpeltonen/sbt-idea.
Note
Note that for the various IDEs, there are two plugin concepts: SBT plugins for particular IDEs and IDE plugins for SBT.
The sbteclipse, sbt-idea, and nbsbt (https://github.com/dcaoyuan/nbscala/wiki/SbtIntegrationInNetBeans) plugins are all SBT plugins that require modifications to your plugins.sbt file. When you run the appropriate SBT command, they generate project files to be used by Eclipse, IntelliJ, or NetBeans. When you update your SBT files, you may need to rerun the plugin in order to update your IDE configuration.
However, if an IntelliJ user browses the available IntelliJ plugins, then they will see a different Scala plugin there (http://confluence.jetbrains.com/display/SCA/Scala+Plugin+for+IntelliJ+IDEA). This is an add-on for IntelliJ, rather than an add-on for SBT. It helps IntelliJ to configure itself around an SBT project automatically, without the need for any modification to your SBT files or extra commands. This approach is arguably more popular in the IntelliJ community.
If you use Maven and Eclipse in the Java world, then this is pretty much the same story as the m2eclipse Eclipse plugin versus the eclipse: eclipse Maven plugin.
Similar to Eclipse, you should edit a plugins.sbt file under project/ and place the dependency to the sbt-idea plugin as follows:
addSbtPlugin("com.github.mpeltonen" % "sbt-idea" % "1.5.2")
The command to create an IntelliJ-compliant project is as follows:
> sbt gen-idea
Sometimes newer versions of the plugin that are not present (yet) in the default Maven repositories exist. In this case, you have to add such a repository for SBT to be able to upload the plugin/library. You can do this by having an extra line as follows:
resolvers += "Sonatype snapshots" at "http://oss.sonatype.org/content/repositories/snapshots/"

addSbtPlugin("com.github.mpeltonen" % "sbt-idea" % "1.6.0-SNAPSHOT")
Since Scala Version 2.10+, NetBeans also has its plugin:
addSbtPlugin("org.netbeans.nbsbt" % "nbsbt-plugin" % "1.0.2")
The plugin itself can be downloaded and built from a GitHub repository as follows:
> git clone git@github.com:dcaoyuan/nbsbt.git
> cd nbsbt
> sbt clean compile publish-local
The publish-local command will deploy it locally on your filesystem. Then, creating the files for your project is done using the following command:
> sbt netbeans
We are going to continue the chapter adopting Eclipse as our IDE, but most of the tools should also work under the other IDEs. Moreover, if you need additional integration with other editors such as ENSIME and Sublime Text, browse the documentation at http://www.scala-sbt.org.
Once the project is imported into Eclipse, you will notice that the file structure is the same as for Maven projects; source files have the default directories src/main/scala and src/test/scala, and this is the same structure for Java too.
Among the growing list of available SBT plugins is the xsbt-web-plugin (available at https://github.com/JamesEarlDouglas/xsbt-web-plugin), a useful plugin to create traditional web apps that runs on a servlet container (such as Jetty). As for the plugins we've previously seen, installation consists of adding single line to the plugins.sbt file as follows:
addSbtPlugin("com.earldouglas" % "xsbt-web-plugin" % "0.4.2")
Then, add the following line to the build.sbt file:
seq(webSettings :_*)
We also need to include Jetty in the container classpath as follows:
libraryDependencies += "org.mortbay.jetty" % "jetty" % "6.1.22" % "container"
The whole minimal build.sbt file is given as a summary, as follows:
name := "SampleProject"

organization := "com.samples"

version := "1.0"

scalaVersion := "2.10.3"

seq(webSettings :_*)

libraryDependencies += "org.mortbay.jetty" % "jetty" % "6.1.22" % "container"

libraryDependencies += "javax.servlet" % "servlet-api" % "2.5" % "provided"
As we have updated our build file with new dependencies, we need to rerun sbteclipse to update the Eclipse files for our project. This operation can be achieved by re-entering from the SBT command prompt:
> eclipse
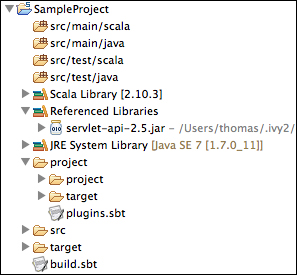
Let's now write a tiny servlet in Scala in the IDE to exhibit our small sample logic, which mimics the Java syntax. Right-click on the root of the project in the Package Explorer window, and select Refresh to make sure the new dependencies are picked up. The whole structure of the project is shown in the following screenshot:
We can now start editing a new Scala file under src/main/scala (in a new com.samples package) as follows:
package com.samples
import scala.xml.NodeSeq
import javax.servlet.http._

class SimpleServlet extends HttpServlet {
  override def doGet(request: HttpServletRequest, response: HttpServletResponse) {

    response.setContentType("text/html")
    response.setCharacterEncoding("UTF-8")

    val responseBody: NodeSeq =
      <html><body><h1>Hello, world!</h1></body></html>

    response.getWriter.write(responseBody.toString)
  }
}
Finally, we need to add a web.xml file as we would normally do in Java to configure the servlet deployment (to be put under the src/main/webapp/WEB-INF directory) as follows:
<?xml version="1.0" encoding="UTF-8"?>
<web-app
xmlns="http://java.sun.com/xml/ns/javaee"
xmlns:xsi="http://www.w3.org/2001/XMLSchema-instance"
xsi:schemaLocation="http://java.sun.com/xml/ns/javaee http://java.sun.com/xml/ns/javaee/web-app_2_5.xsd"
version="2.5">
  <servlet>
    <servlet-name>simpleservlet</servlet-name>
    <servlet-class>com.samples.SimpleServlet</servlet-class>
  </servlet>
  <servlet-mapping>
    <servlet-name>simpleservlet</servlet-name>
    <url-pattern>/*</url-pattern>
  </servlet-mapping>
</web-app>
From the root of the project, in our command prompt, we are now ready to deploy and execute our little example in the Jetty container by invoking sbt as follows:
> sbt
> container:start
2014-03-15 14:33:18.880:INFO::Logging to STDERR via org.mortbay.log.StdErrLog
[info] jetty-6.1.22
[info] NO JSP Support for /, did not find org.apache.jasper.servlet.JspServlet
[info] Started SelectChannelConnector@0.0.0.0:8080
[success] Total time: 20 s, completed Mar 15, 2014 2:33:19 PM
>
By default, the container will listen on localhost at port 8080.
You can now open http://localhost:8080/ on a web browser and verify whether we get the Hello, world! message as shown in the following screenshot:

You may also run the package command from SBT that will assemble a .war archive and put it under target/scala-2.10/sampleproject_2.10-1.0.war as follows:
> package
The sbt-assembly plugin can gather all your project code and its dependencies into a single .jar file that can be published into a repository or deployed on other environments.
Installing the plugin consists of adding sbt-assembly as a dependency in project/assembly.sbt (from SBT 0.13), as follows:
addSbtPlugin("com.eed3si9n" % "sbt-assembly" % "0.11.2")
To be able to run the assembly command within SBT, you just need to create an assembly.sbt file in the project root directory as shown in the following code snippet:
import AssemblyKeys._ // put this at the top of the file

assemblySettings
// your assembly settings here
Assembly settings are documented at https://github.com/sbt/sbt-assembly. They enable you to modify, for example, the
jarName or the outputPath, variables as well as skipping tests during the assembly phase or setting a main class explicitly if you wish to create a runnable .jar file.
Automatic code formatting is a useful feature not only for its ability to apply the same formatting rules to code written by various individuals but also to make the differences appear more consistently in a source management tool.
The Scala IDE for Eclipse uses Scalariform as its code formatter, which is also available as an sbt-plugin that can be added to the plugins.sbt file as follows:
addSbtPlugin("com.typesafe.sbt" % "sbt-scalariform" % "1.2.0")
Once you have it in place, Scalariform will format your source code automatically whenever you run compile or test:compile in SBT.
In Eclipse, formatting code is performed the same way as with Java, that is, right-clicking in the editor and then navigating to Source | Format (or Ctrl + Shift + F).