Chapter 13
Graphics for Business
No matter what your business, at some point you are likely to show a product, concept, or idea visually. This used to be possible only by hiring an artist or graphics designer. Graphics are not nearly so hard as they used to be. From its very inception, graphics designers embraced the Mac. As Macs have become more powerful and software more sophisticated, all Mac workers now have the ability to create compelling diagrams and graphics with very little time and effort. This chapter presents easy-to-use applications for business graphics. Although Adobe Photoshop and Illustrator are impressive, their expense and complexity don’t lend them to business graphics and so I do not cover them in this chapter.
OmniGraffle
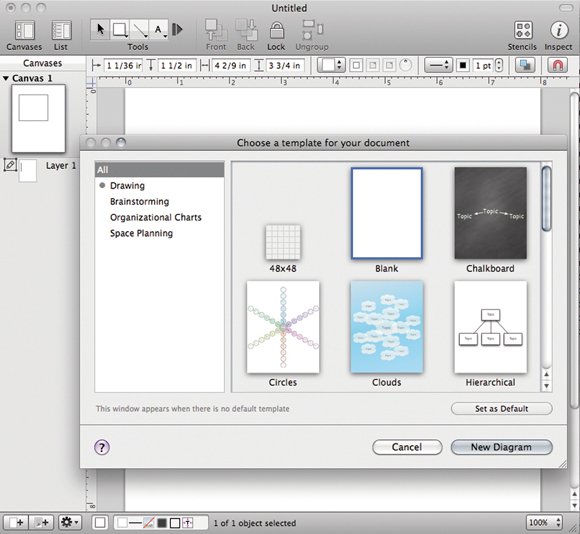
OmniGraffle ($100; www.omnigroup.com/products/omnigraffle) is the premier diagramming tool on the Mac. As shown in Figure 13-1, when you first open OmniGraffle, it gives you a choice of 16 template forms. The templates include organizational charts, hierarchical structures, and mind-mapping. You can also create custom templates.
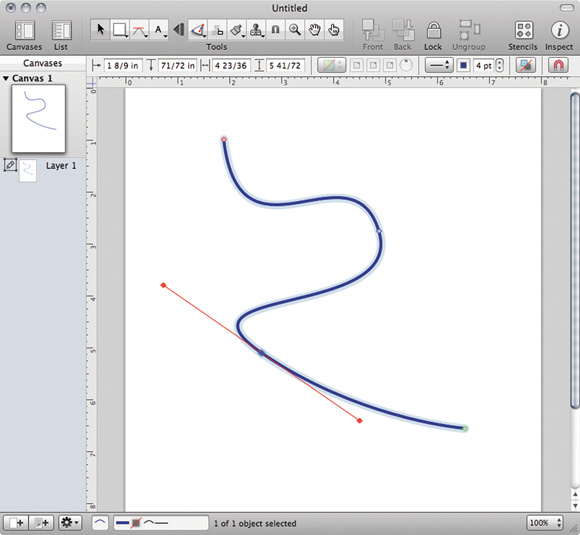
Once you start a new project, OmniGraffle opens the main window, shown in Figure 13-2. The toolbar includes the most frequently used tools. With OmniGraffle, you can create multipage diagrams. Each page is called a canvas. You can display or hide the canvases using the Canvases iconic button in the toolbar.
Figure 13-1
Opening a new document in OmniGraffle
The drawing tools
The toolbar also has several basic drawing tools, including the Selection tool, Shape tool, Line tool, and Text tool. Each tool has a small triangle icon in the lower-right corner; clicking the triangle displays additional options for each tool.
Clicking on the tool divider (to the immediate right of the Text tool in Figure 13-2) opens the remaining drawing tools in the toolbar. The expanded toolbar is shown in Figure 13-2. (You can also customize which tools appear in the toolbar in the Drawing Tools pane in the Preferences dialog box.)
Figure 13-2
The OmniGraffle Main Window
The Selection tool
This tool looks like the standard Mac OS X mouse pointer. Using this tool, you can select and move objects around the screen. You can also select multiple objects (by clicking the objects while holding the Shift key or clicking and dragging a selection box around the desired objects) and move them as a group.
If your object is resizable, it will sprout eight selection handles when you click on it with the Selection tool. You can then resize the object by grabbing a handle and dragging it with the mouse or trackpad. If you Shift+drag the handle, the object is resized proportionally. If you Command+drag a handle, you can rotate an object.
When resizing or moving objects, you can take advantage of OmniGraffle’s smart guides. To activate smart guides in OmniGraffle, choose Arrange ➧ Guides ➧ Smart Alignment Guides and then choose Arrange ➧ Guides ➧ Smart Distance Guides. Smart guides automatically generate measurement guides that show the spacing and sizing of objects as you move objects around your OmniGraffle canvas, similar to the guides in Keynote (covered in Chapter 14).
The Shape tool
You create shapes with the Shape tool. To do so, pick a shape, then click and drag on the canvas. There are several shapes available. More can be added using the Stencil tool, covered later in this chapter.
By default, if you choose the Shape tool, it remains selected so you can draw multiple objects. If you just want to draw one shape, click the Shape tool; a small blue circle with the numeral 1 appears, which indicates the Shape tool will work only once and then OmniGraffle will revert to the Selection tool.
The Line tool
There are several styles of lines you can draw with the Line tool, including straight, curved, orthogonal (perpendicular), and Bézier (highly customizable curves). A Bézier curve is shown in Figure 13-2.
When drawing a line in OmniGraffle, you can constrain the line to 45-degree increments by holding down the Shift key. (When the line is at the length and at the location you want, release the mouse button and then the Shift key.) You can also add labels to lines by creating a text item (with the Text tool explained on the next page) and dragging it onto the line until the line becomes highlighted.
If you want to connect two shapes with a line, select the Line tool and then, rather than drawing a line, click the two shapes you want to connect; OmniGraffle creates a line between the two shapes. Afterward, when you move the shape with the Selection tool, the line follows.
The Text tool
Clicking the Text tool turns the pointer into a cursor-insertion point. You can click anywhere on your canvas and start typing text. That is not the only way to add text in OmniGraffle: You can also add text to a shape by double-clicking inside it. You can make adjustments to the text using the Text inspector (covered later). Interestingly, OmniGraffle adds all text inside your canvas to the file’s Spotlight index, so you can then search your OmniGraffle documents using Spotlight (covered in Chapter 1).
The Pen tool
You use the Pen tool to create custom shapes in OmniGraffle. To create a custom shape, click anywhere on the canvas. Then continue clicking to add points to your shape. When you double-click (or press Return), the shape is completed. You can drag and adjust your shape points or use the Bézier handles to customize the shape.
The Diagramming tool
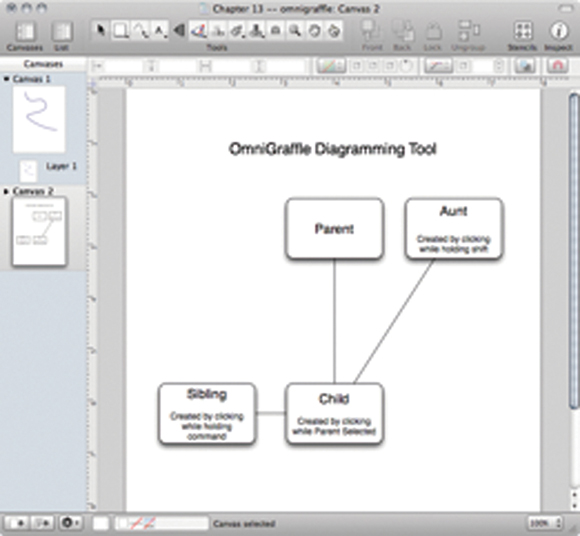
This tool is helpful when quickly assembling a diagram (such as during a meeting). With the Diagramming tool is selected, click on any empty space on the canvas to create a generic shape that is automatically selected. With that first shape selected, click any empty spot and a new shape is connected to the original. If you leave the second shape selected and Option+click another empty space, OmniGraffle creates a sibling shape (connected to the same parent). Holding the Shift key instead of Option creates an aunt (connected as a sibling to the parent). Holding the Command key creates a separate, disconnected shape. Once you master the modifier keys, you can assemble professional-looking diagrams quickly, as shown in Figure 13-3.
Figure 13-3
A diagram created with OmniGraffle
The Style Brush tool
Say you just created a diagram using the Diagramming tool, with seven different shapes that are all plain white boxes. You then use inspectors to give one of the boxes just the right shading, shadow, and other graphic elements. You don’t want to repeat that task for each of the other six boxes. Using the Style Brush tool, you can copy the styling of your customized box and paste it to each of the remaining six. Select the Style Brush tool, click the source shape that has the styling you want to copy, and then click on each of the remaining shapes to paste that formatting.
In addition to the Style Brush tool, the lower-left corner of the main OmniGraffle window holds the Styles tray, shown in Figure 13-2. The Styles tray also lets you copy and paste styles.
The Rubber Stamp tool
This tool lets you take any existing object and duplicate it, multiple times. Select the tool and click any object. Once selected, the dot on the Rubber Stamp tool icon changes from white to dark. The dark dot indicates the Rubber Stamp tool has an image and is ready to duplicate it. In other words, when the dot is dark, the stamp has ink. After that, every click on the canvas with this tool creates an exact copy of the original object.
The Magnet tool
When attaching lines to different shapes, the default connection point is the center of the shape. The Magnet tool allows you to adjust the point. If, for example, you want all your lines to be attached to the lower-right corner of a box, select the Magnet tool and move the magnet to the lower-right corner and you are in business.
The Zoom tool
Sometimes you need to zoom in on your diagram to make fine adjustments. Select the Zoom tool and click anywhere on the canvas to center on that point and double the zoom percentage. Use multiple clicks to zoom in quickly and Option+click on the canvas to zoom out. To select a specific portion of your canvas, click and drag a box while the Zoom tool is active. If you click and drag while holding the Option key, the selection centers itself on your starting point. Shift+click the Zoom tool to return your canvas to its actual size.
In addition to the Zoom tool, you can adjust the zoom level of your OmniGraffle document with the Zoom iconic button in the lower-right corner of the main canvas window, shown in Figure 13-2.
The Hand tool
This tool lets you grab and move the canvas. It is most helpful when you are zoomed in for detail work.
The Browse tool
You can build interactive OmniGraffle presentations that transition between diagrams. Use the Browse tool to set specific actions to objects on your canvas for the presentation. In practice, my OmniGraffle diagrams are always a part of a bigger presentation in Keynote. As a result, I find little use for this feature.
To get a separate floating tool palette with all the available drawing tools, choose Window ➧ Tool Palette.
The remaining tools in the toolbar include the Front and Back iconic buttons to set the order of objects in your OmniGraffle diagram, and Group and Ungroup iconic buttons to combine (or separate) multiple objects.
Using stencils
The Stencils tool is one of OmniGraffle’s best features. When you activate the Stencils inspector using the Stencils iconic button in the toolbar, you get the window shown in Figure 13-4. The Stencil library includes several prebuilt objects that you can drag and drop on your OmniGraffle document.
Figure 13-4
The OmniGraffle Stencil inspector
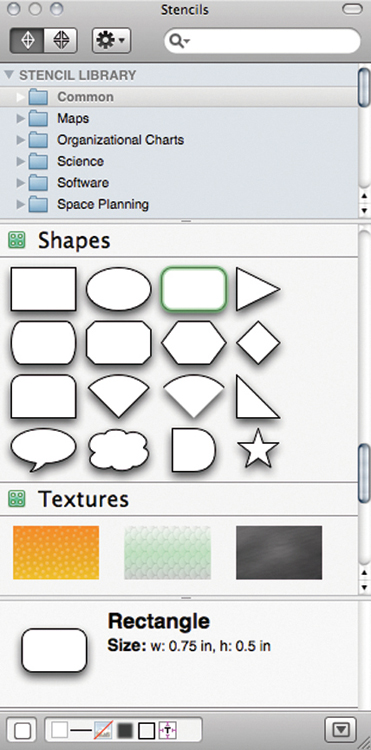
Using stencils takes the drudgery out of creating diagrams. You just drag in a series of prebuilt elements and arrange them on the OmniGraffle canvas. OmniGraffle ships with several stencil sets, including shapes, connections, textures, and flowcharts. Additional stencils are available at www.graffletopia.com, including network diagramming, shapes and figures for presentations, wireframe models for programming, and mind-mapping. As of this writing, the Web site has 80 pages of downloadable OmniGraffle stencils. Whether you are designing a new kitchen or creating the next great iPhone app, there are stencils for you.
The most recent version of OmniGraffle has built-in support for Graffletopia. (Choose Help ➧ Visit Graffletopia.) You can also search www.graffletopia.com from the Stencil inspector and import new stencil sets without leaving OmniGraffle. To search Graffletopia from within OmniGraffle, click the selection triangle iconic button in the Stencil inspector’s search bar and choose Graffletopia.
Inspectors
OmniGraffle’s inspector, activated by clicking the Inspector iconic button in the toolbar (shown in Figure 13-2), includes many fine controls for your shapes. If, for example, you want to change the shape of the arrows at the end of your lines, go to the inspector.
OmniGraffle also has the Mini Inspector, a context-sensitive bar just below the toolbar that displays attributes and tools for the selected object. The Mini Inspector is similar to the context-sensitive toolbar in the iWork applications. If, for example, you select a rectangle, the Mini Inspector indicates the size, location, line size, and other elements of the rectangle. The Mini Inspector also allows you to make adjustments, including adding fills, shadows, line weight, and other rectangle attributes.
Organizational charts
Making organizational charts is easy with OmniGraffle. To do so, start with one of the organizational chart templates. You can create an organizational chart on the OmniFocus canvas with the graphic objects (using the Diagramming tool covered earlier is helpful here) or create it as an outline in the View mode. As you type in parent and children outline levels, OmniGraffle automatically creates a graphic representation on the canvas, as shown in Figure 13-5.
Figure 13-5
Creating an organizational chart with OmniGraffle

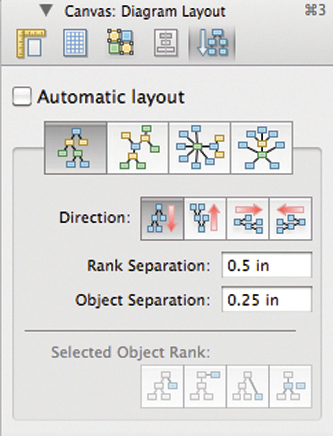
After you are done, you can change the look and orientation of the organizational chart using the Diagram Layout inspector, shown in Figure 13-6.
Figure 13-6
OmniGraffle Diagram Layout inspector
The magic of OmniGraffle is the ability to quickly create diagram elements and arrange them on the screen in relation to one another. You can label, connect, and color elements to create impressive-looking diagrams. There is an iPad version that lets you create, view, and edit OmniGraffle diagrams on the iPad. You can also add downloaded stencil sets to the OmniGraffle iPad application through iTunes (see Chapter 7).
Once your diagram is complete, OmniGraffle offers several export options, including Photoshop (.psd), PDF, JPEG, and vector images. Normally, I export completed OmniGraffle images as PNG files and deselect the Include Non-Printing Layers check box. The image has a transparent background and can be imported into Keynote or Pages without a background.
OmniGraffle also has a professional version that costs $200. It includes several additional features, including subgraphs (which can be contained inside larger graphs), shared layers, support for multiple windows, and greater export options, such as to Microsoft Visio.
OmniGraffle is one of my secret weapons. Often, in advance of an important meeting or presentation, I will spend just a few minutes putting together a diagram of important points. It doesn’t take long once you get the mechanics of OmniGraffle down. Then inevitably someone who attended the meeting will ask what company I used to produce my graphics. My answer is always the same. “You can’t afford my graphics department.”
Apple Preview
Apple Preview comes free on every new Mac. Chapter 12 covers Preview’s PDF features, but it has more capabilities than just working with PDF files or looking at other images. Although you cannot create graphics with Preview like you can with OmniGraffle, it is handy for working with existing images.
Quite often you have an image that needs resizing, cropping, or other tweaking before you can use it in a graphic or a presentation. Previously, Mac users used expensive image applications for this purpose. But for most needs, you can now get away with using Preview.
Preview image tools
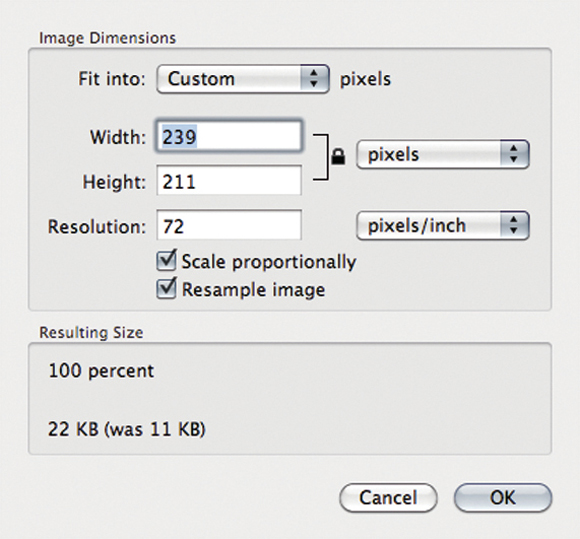
To change an image’s size, open the image in Preview and choose Tools ➧ Adjust Size. You then get the dialog box shown in Figure 13-7, which lets you resize an image. You can change the size using pixels, inches, centimeters, and several other units of measure. To keep the image proportional, select the Scale Proportionally check box. Selecting the Resample image check box helps keep the image quality as you make it smaller. It is usually a bad idea to make an image bigger in Preview: The enlargement process makes the image look pixelated (blocky).
Figure 13-7
Resizing an image in Preview
Cropping is also easy with Preview. Click the Select button in the Preview toolbar, then (using the mouse) select the portion of the image you want to keep. If the Select button’s icon is not a square, click and hold it and choose the Rectangle Selection tool. Once you’ve selected the portion of the image to crop, choose Tools ➧ Crop or press Command+K.
The annotation tools covered in Chapter 12 are also available for images. You can add lines, ovals, and rectangles to your pictures. You can also type in labels and annotations. Preview lets you adjust colors, brightness, exposure, and other image settings. Using Preview, you can avoid loading a separate image editor for most small adjustments.
Removing backgrounds
Preview also lets you remove backgrounds from images. Let’s say you have an image of a baseball and you want to include it in a presentation. You only want the round ball in the Keynote slide, though. You don’t want a rectangular image and the background.
First, you need to extract the image, so choose the Smart Lasso tool from the Select pop-up menu in the Preview toolbar. Then use the mouse to trace the edge of the image you want to extract (in this case, the ball). Make sure the thick lasso line does not touch the edge of the ball.
Once you complete the circle with the Lasso tool, you can delete the background, as shown in Figure 13-8. First, reverse the selection (choose Edit ➧ Invert Selection), then press Delete.
Figure 13-8
Removing a background in Preview
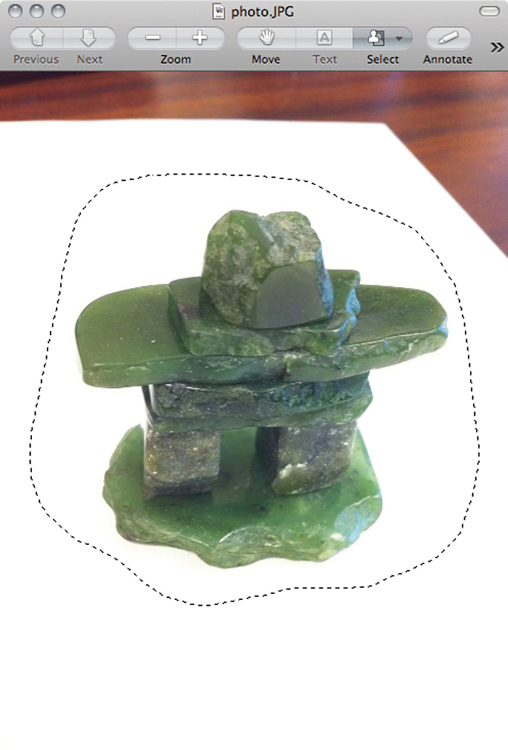
If the Smart Lasso tool doesn’t completely remove the background, Preview has another tool, Instant Alpha, that will finish the job. The Instant Alpha tool, found in the Select pop-up menu in the Preview toolbar, looks at an image and tries to remove the background. To use the Instant Alpha tool, place the cursor in the background and then hold down the mouse button as you slowly drag the mouse away from the point of origin; Preview removes the background. The further away you drag the mouse, the more aggressive Preview is about removing the background. If you go too far, move the mouse back toward the point of origin. Once you have it just right, press Return. Although not perfect, Instant Alpha does a good job removing the background.
The Instant Alpha tool is also available in Keynote (covered in Chapter 14), Pages (covered in Chapter 11), and Numbers (covered in Chapter 15); in Keynote, Instant Alpha is really helpful for pulling the background off images. Figure 13-9 shows the finalized image in a Keynote slide.
Removing backgrounds from images used to be a painstaking process accomplished only with expensive graphics software. Using Preview’s Smart Lasso and Instant Alpha tools, you now have this ability on every Mac.
Figure 13-9
An image in Keynote after removing the background with Preview

Other Graphics Software
Adobe Photoshop ($700; www.adobe.com/products/photoshop) and Adobe Illustrator ($700; www.adobe.com/products/illustrator) are the leading photo and drawing applications for Mac OS X. They are also very expensive and, for the types of graphics contemplated by this book, something like killing a gnat with a hand grenade. These applications are powerful and complicated. Some users spend years perfecting their skills with these tools but they are not necessary for making simple graphs, charts, and illustrations.
Pixelmator ($60; www.pixelmator.com) and Acorn ($50; www.flyingmeat.com/acorn) are both less-expensive alternatives to Photoshop and Illustrator with smaller feature sets. Both applications are good options for drawing and working on images. Pixelmator uses more of the look and feel of Adobe Photoshop, while Acorn has its own unique interface.
Using OmniGraphSketcher for graphs ($30; www.omnigroup.com/products/omnigraphsketcher) and Timeline 3D for timelines ($65; www.beedocs.com) are also useful niche graphics applications. OmniGraphSketcher is covered in more detail in Chapter 15, and Timeline 3D is covered in Chapter 14.

