Logcat is an important part of everyday development. Its purpose is to display all logs coming from your device. It displays logs from an emulator or a live device connected. Android has several levels of log messages:
- Assert
- Verbose
- Debug
- Information
- Warning
- Error
You can filter log messages by these log levels (for example, when you need to see only errors--application crash stacktrace) or log tag (we will explain this later); or by keyword, regex, or the application package. Before we apply any filter, we will configure Android Studio so the log messages are colored differently.
Choose Android Studio | Preferences. In the search field, enter Logcat. Logcat coloring preferences appears, as shown in the following screenshot:
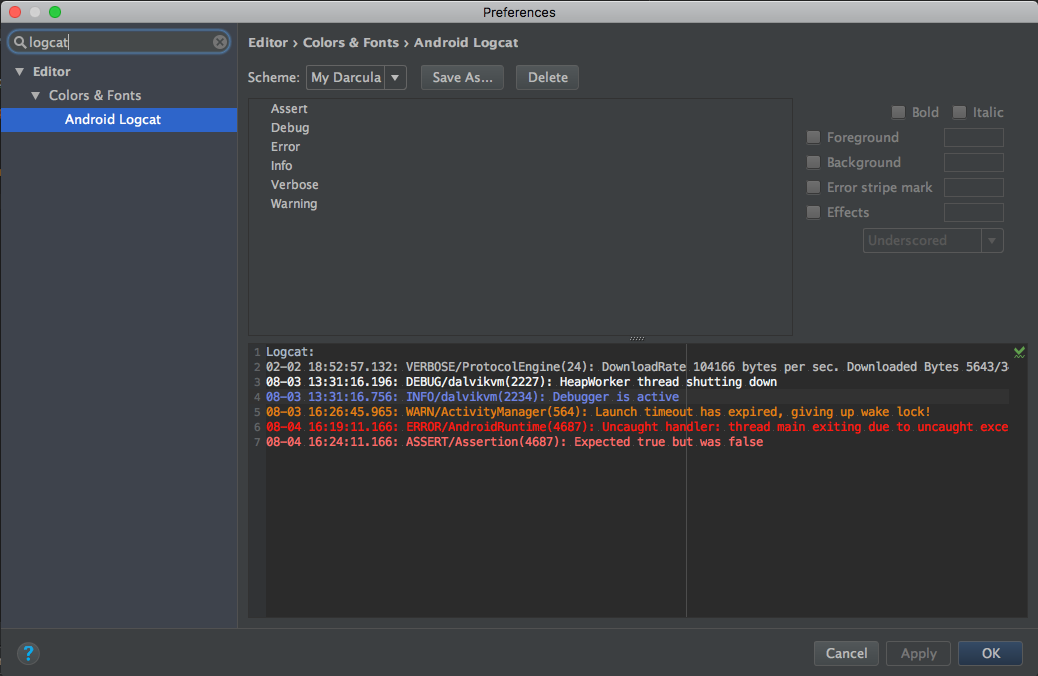
To edit coloring, you must save a copy of the current coloring theme. Choose your theme from the drop-down list and choose Save As. Choose some proper name and confirm:

Choose Assert from the list and uncheck Use inherited attributes to override the color. Make sure that the Foreground option is checked and click on Color located to the right of checkbox to choose a new color for the log text. We will pick some tone of pink, as shown in the following screenshot:

For the Assert level, you can enter the hex code manually: FF6B68. For maximal readability, we recommend the following colors:
- Assert: #FF6B68
- Verbose: #BBBBBB
- Debug: #F4F4F4
- Information: #6D82E3
- Warning: #E57E15
- Error: #FF1A11
To apply changes, click on Apply and then OK.
Open Android Monitor (View | Tool Windows | Android Monitor) and take a look at the messages printed in the Logcat pane. They are colored with different tones for each log level, as shown here:

Now we will define our own log messages, which is also a good opportunity to work with the Android lifecycle. We will put proper log messages for each lifecycle event for the Application class and the screen (activity) we created.
Open your main Application class, Journaler.kt. Extend the code like the following:
    class Journaler : Application() {

      companion object {
        val tag = "Journaler"
        var ctx: Context? = null
      }

      override fun onCreate() {
        super.onCreate()
        ctx = applicationContext
        Log.v(tag, "[ ON CREATE ]")
      }

      override fun onLowMemory() {
        super.onLowMemory()
        Log.w(tag, "[ ON LOW MEMORY ]")
      }

      override fun onTrimMemory(level: Int) {
        super.onTrimMemory(level)
        Log.d(tag, "[ ON TRIM MEMORY ]: $level")
     }
    }
Here, we introduced some important changes. We overrode the main lifecycle event for the onCreate()application. We also overrode two additional methods: onLowMemory(), triggered in critical memory situations (actively running processes should trim their memory usage), and onTrimMemory(), when the memory is trimmed.
To log events in our application, we use Log class with static methods, each exposed for a proper log level. Based on this, we have the following methods exposed:
- For Verbose level:
        v(String tag, String msg)
        v(String tag, String msg, Throwable tr)
- For Debug level:
        d(String tag, String msg)
        d(String tag, String msg, Throwable tr)
- For Information level:
        i(String tag, String msg)
        i(String tag, String msg, Throwable tr)
- For Warning level:
        w(String tag, String msg)
        w(String tag, String msg, Throwable tr)
- For Error level:
        e(String tag, String msg)
        e(String tag, String msg, Throwable tr)
Methods accept the following parameters:
- Tag: This is used to identify the origin of a log message
- message: This is the message we want to log
- throwable: This represents an exception to log
Beside these log methods, there are some additional methods that you can use:
- wtf(String tag, String msg)
- wtf(String tag, Throwable tr)
- wtf(String tag, String msg, Throwable tr)
Wtf stands for What a Terrible Failure! Wtf is used to report an exception that should never happen!
We will play some more with the Log class. Open the only screen you have created so far and update the MainActivity class with the following changes:
    class MainActivity : AppCompatActivity() {
      private val tag = Journaler.tag

      override fun onCreate(
        savedInstanceState: Bundle?,
        persistentState: PersistableBundle?
       ) {
          super.onCreate(savedInstanceState, persistentState)
          setContentView(R.layout.activity_main)
          Log.v(tag, "[ ON CREATE ]")
         }

       override fun onPostCreate(savedInstanceState: Bundle?) {
         super.onPostCreate(savedInstanceState)
         Log.v(tag, "[ ON POST CREATE ]")
       }

       override fun onRestart() {
         super.onRestart()
         Log.v(tag, "[ ON RESTART ]")
       }

       override fun onStart() {
         super.onStart()
         Log.v(tag, "[ ON START ]")
       }

       override fun onResume() {
         super.onResume()
         Log.v(tag, "[ ON RESUME ]")
       }

       override fun onPostResume() {
         super.onPostResume()
         Log.v(tag, "[ ON POST RESUME ]")
       }

       override fun onPause() {
        super.onPause()
        Log.v(tag, "[ ON PAUSE ]")
      }

      override fun onStop() {
        super.onStop()
        Log.v(tag, "[ ON STOP ]")
      }

      override fun onDestroy() {
        super.onDestroy()
        Log.v(tag, "[ ON DESTROY ]")
      }
    }
We overrode all important lifecycle methods by the order they execute during the activity's lifecycle. For each event, we print the proper log message. Let's explain the purpose of the lifecycle and each important event.
Here, you can see the official diagram from the Android developers' website, explaining the activity lifecycle:
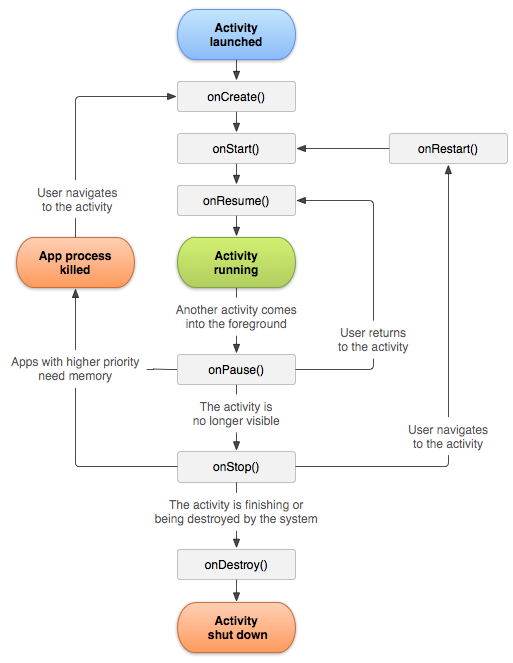
You can find the image at https://developer.android.com/images/activity_lifecycle.png:
- onCreate(): This is executed when the activity is first created. This is a place where we usually do main UI elements initialization.
- onRestart(): This is executed if your activity was stopped at some moment and then resumed. For example, you turn off your phone screen (lock it) and then unlock it again.
- onStart(): This is executed when the screen becomes visible to the application user.
- onResume(): This is executed when the user starts interaction with the activity.
- onPause(): Before we resume our previous activity, this method is executed on the current one. This is a good place to save all the information you will need when you resume again. If there are any unsaved changes, you should save them here.
- onStop(): This is executed when an activity is no longer visible to the application user.
- onDestroy(): This is executed before an activity is destroyed by Android. This can happen, for example, if somebody executed the finish() method of the Activity class. To know if the activity is finishing at a particular moment, Android provides a method for that check: isFinishing(). If an activity is finishing, the method will return Boolean true.
Now, when we wrote some code using the Android lifecycle and put proper log messages, we will execute two use cases and look at the logs printed out by Logcat.