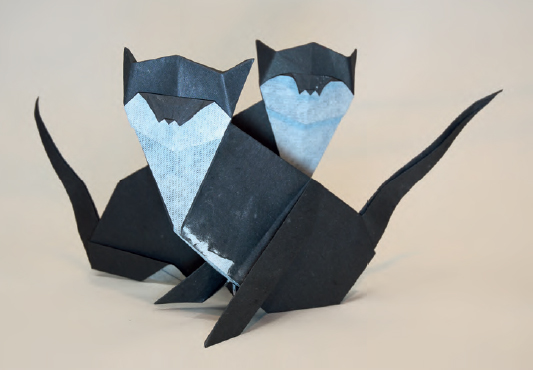
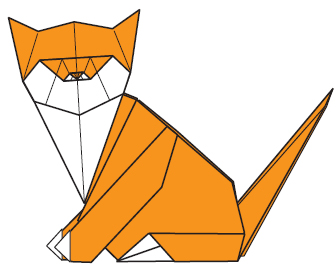
Enough of this Cat!
designed by Michael G. LaFosse
LESSON: CHOOSING PROPORTIONS, IMPACTS OF VARIATION
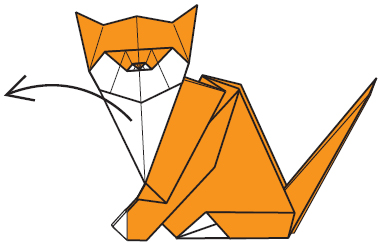
This rascal is fun to fold and to pose in different ways, to explore a wide range of attitudes. Michael prefers the countenance of the abstract seated cat, to that of so many standing four-legged counterparts. This étude is designed to have you explore different ways to convey your cat’s mood or personality with subtle folds: tweaking the ears, adjusting its posture, and exploring the variety of expression on its face. These all work together to convey a cat’s mood. A cat also uses its tail to express emotions, so have some fun with experimentation. Your choices will determine if it appears relaxed and friendly, or threatening. (It may be the only cat to ever obey you!) Folded as diagrammed makes an adult cat. What proportions could you change to produce a kitten? It’s more involved than just selecting a smaller square — it also has to do with the line of the back, the proportion of the head to the body, and other factors. A crimp placed between the back of the neck and the arm changes both the attitude and the proportion of the head to the body. This is just one way to make your cat appear younger.
Also try different textures of papers to match this model to your vision. Some cats are slender and sleek. Others aren’t: My Aunt Katie had a monster cat named Smokey, who terrorized and attacked any visitors. For Smokey, I would fold a big square of rough-surfaced, gray art paper (perhaps roughing it up even more with a kitchen scrubber). My favorite cat was Zeek, a half-Siamese vocal companion, so be sure to give him an open mouth, because Zeek loved to speak!
Takeaways: Don’t Smash a Square Peg into a Round Hole
Origami can be a useful answer to a problem, but it shouldn’t be expected to solve every problem. We would love everybody to understand origami enough to find it interesting, entertaining and enjoyable. A little knowledge helps us appreciate what goes into designing and folding a piece of origami art. Here’s a design that will permit you to shape the peg to fit the hole.
This lesson is about taking charge of artistic decisions, such as selecting the degree of complexity, and controlling the subject’s poise through judicious, subjective folds that dictate critical ratios and proportions. Michael’s simple, yet versatile origami cat base can be quickly folded to grace a greeting card, or it may be further developed in a host of ways to communicate a wide variety of felines of different ages and demeanors.
The name, “Enough of this Cat!”, implies the utility of this origami cat design, which we believe will provide “just enough cat” to be useful in many ways due to its adaptability. Our video shows several jumping-off-points, from simple and quick, to advanced versions that incorporate added detail, color changes, and different postures. We let you decide just how much cat meets your needs.
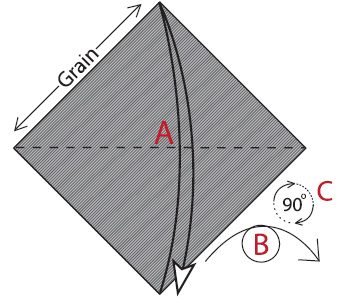
1 Begin with the paper right side up, diamond-wise, and with the grain running parallel to the top left edge. (A) Valley-fold diagonally in half. Unfold. (B) Turn over, left to right. (C) Rotate 90 degrees clockwise.

2 (A) Valley-fold diagonally in half. Unfold. (B) Rotate 90 degrees clockwise.
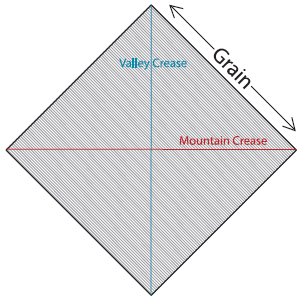
3 Check to see that the horizontal and vertical creases are mountain and valley respectively, and that the grain is running parallel to the top right edge.

4 Valley-fold the bottom right edge to align with the horizontal crease. Stop the fold at the vertical center crease. Here, you have the chance to employ both hands and focus your attention on coaxing the paper to a fine point at the right corner.
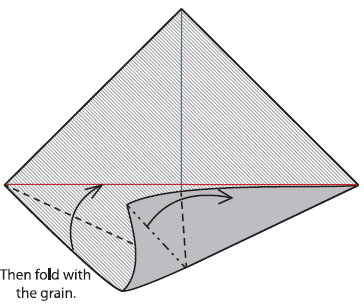
5 Mountain-fold the center square corner in half and pivot it to the right. Valley-fold the bottom left edge to align with the horizontal crease. Here, your hands have multiple tasks. Nevertheless, you will notice how easily this set of folds takes shape. This is no accident! Your careful preparation of orienting the valley crease vertically, and the grain parallel to the bottom left edge, combine to condition the paper to easily accept this otherwise tricky maneuver.
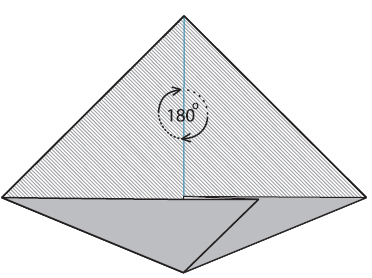
6 Rotate the paper 180 degrees.
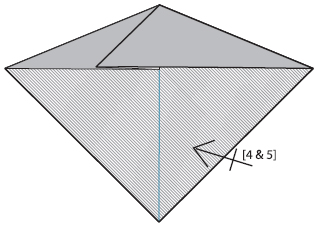
7 Repeat steps 4 and 5 on the bottom half of the paper.
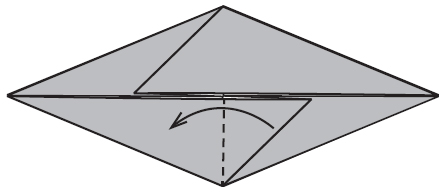
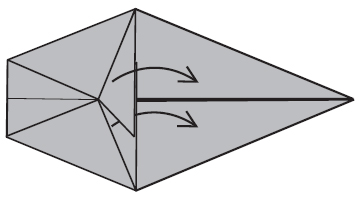
8 Valley-fold the bottom flap to the left.

9 Valley-fold the longest edge of the flap to align with the vertical crease.
10 (A) Valley-fold the longest edge of the top flap to align with the vertical folded edge of the bottom flap. (B) Valley-fold the left corner to the obtuse corner of the folded flaps.
11 Unfold the top and bottom flaps to make them point to the right.
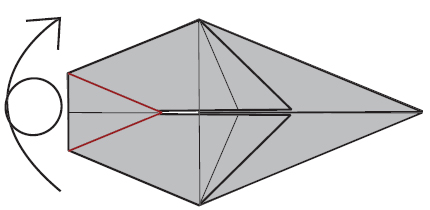
12 Notice and remember the position of the left-side triangular flap. Turn the paper over, bottom to top.
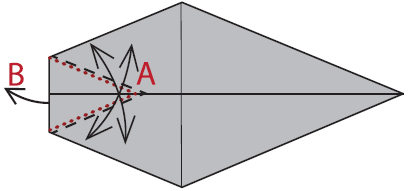
13 (A) Valley-fold and unfold along the top and bottom outlines of the hidden, left-side triangular flap. (B) Unfold the hidden triangular flap out and to the left.
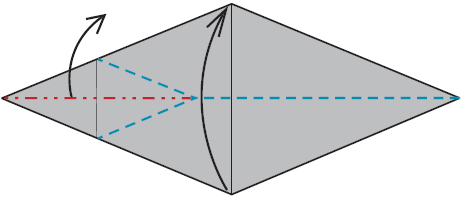
14 Use the indicated mountain and valley creases to inside-reverse-fold the left corner upward, valley-folding the paper in half lengthwise.
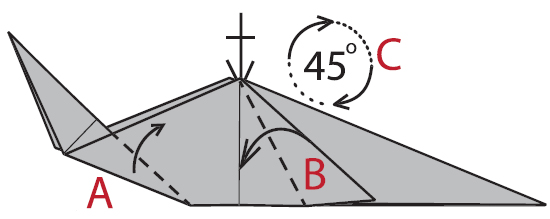
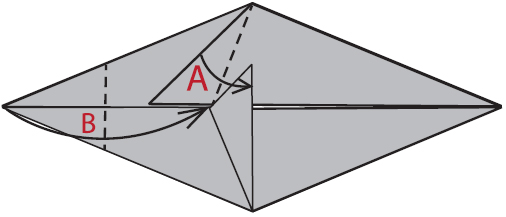
15 Your paper should look like this. (A) Valley-fold the top layer of the left end of the paper upward and to the right. (B) Valley-fold the longest edge of the triangular flap to align with the vertical center crease. Repeat on the flap behind. These will become the cat’s front legs. (C) Rotate the paper 45 degrees clockwise.
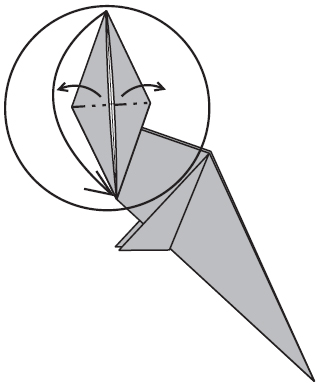
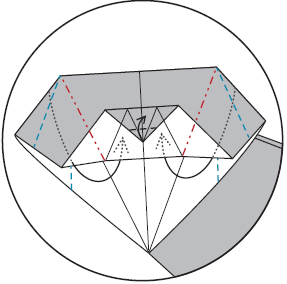
16 Open the top layers of the rhombus form and move the top corner to the bottom, folding the area in half and forming a pentagon. This area will become the head. Folding details for the head follow.
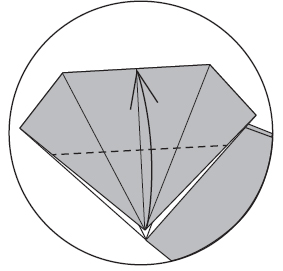
17 Valley-fold the bottom corner of the pentagon up to the middle of the top edge.
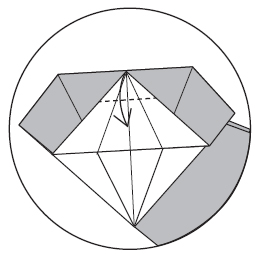
18 Valley-fold down about one-third of the top corner of the triangular flap.
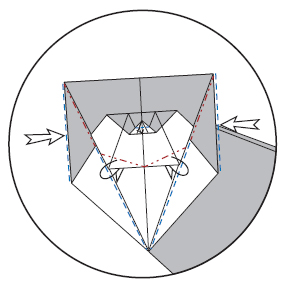
19 Valley-fold up about one-third of the square corner of the topmost triangular flap. Inside-reverse-fold the sides of the head. Look at the next drawing for the shape
20 Valley-fold the square corner of the topmost triangular flap down for a nose. Inside-reverse-fold the left and right flaps behind the triangular-shaped layer of the neck. Mountain-fold the left and right corners of the head to form the chin.
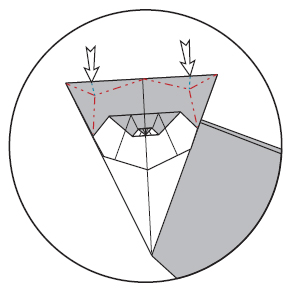
21 Mountain- and valley-fold the top left and right corners to form the ears and to round the top of the head.
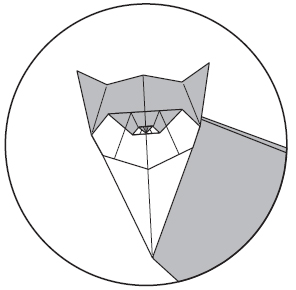
22 The completed cat’s head.
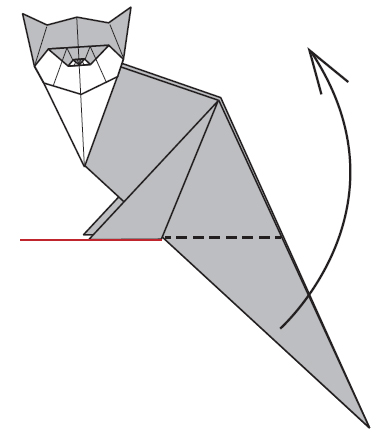
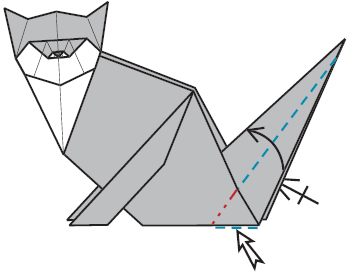
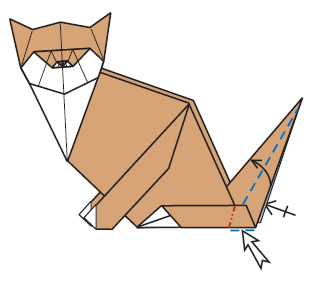
23 Valley-fold the bottom right-side corner up, folding at the level of the bottom edge of the cat’s front legs, to prepare the paper for a tail.
24 Valley-fold the cat’s legs over. Unfold the tail flap.
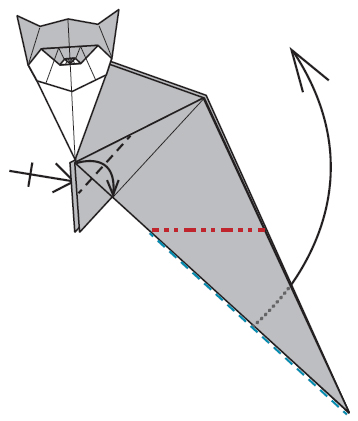
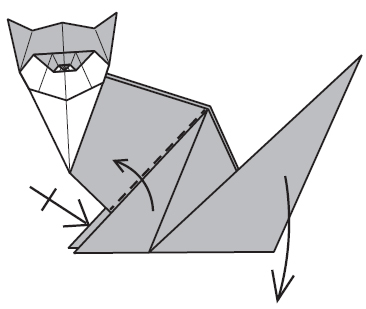
25 Valley-fold the obtuse corner of the cat’s leg flap to the bottom end of the hinge crease. Repeat behind. Inside-reverse-fold the tail to point up.
26 Valley-fold the cat’s legs down. Valley-fold the long, outside edge of the tail to nearly align with the tail’s spine line. Notice the indication to stop the fold short of the tip. Repeat on the other side. Unfold.
27 Inside-reverse-fold the front and back flaps on the tail.
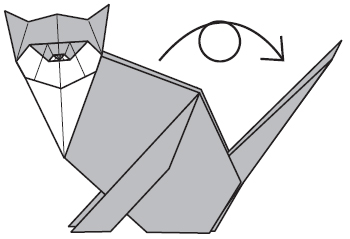
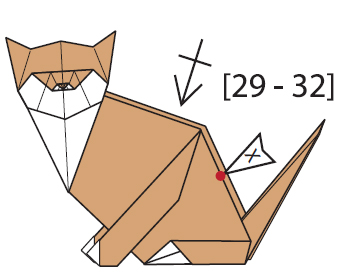
28 At this point, you may be satisfied and have had enough of this cat. If not, turn over, left to right to learn how to change the shape of and to lock the back closed.

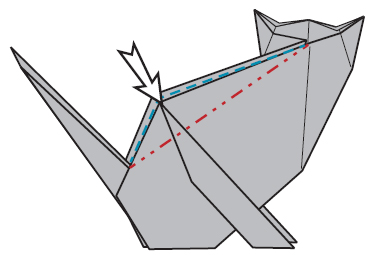
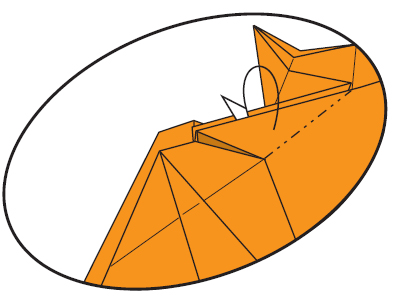
29 Valley-fold the corner of the topmost layer down. Make the fold span the base of the tail up to the neck joint. Unfold.
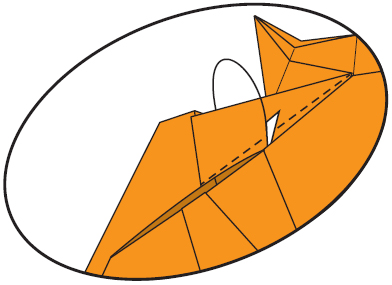
30 Push the corner inside, sinking the triangular flap to form a pocket.
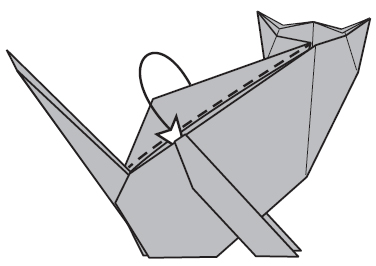
31 Valley-fold the exposed corner tightly inside the pocket, closing the back.

32 Turn over.

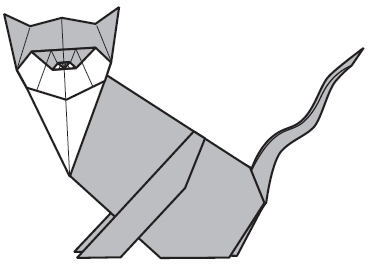
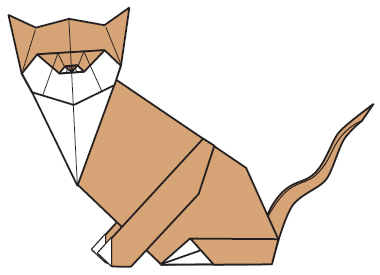
33 Gently curve the tail.
34 You may be satisfied with Enough of this Cat. If this is not quite enough of this cat for you, follow along to add a pair of hind feet, and some color-change paws!
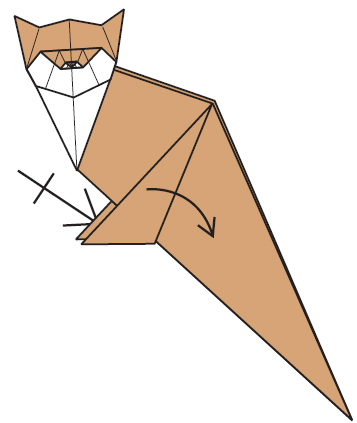
35 Follow this alternate plan, beginning with step 23. Unfold the front and back triangular flaps.

36 Open the triangular flap from the bottom edges and squash-fold to form a kite shape. Repeat behind.
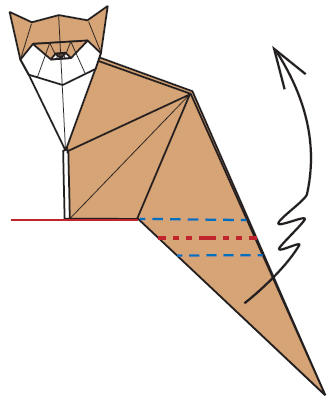
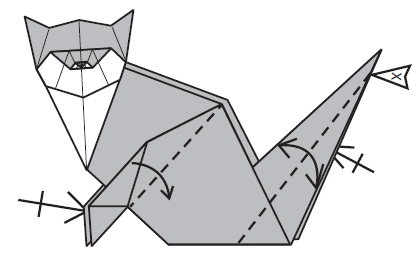
37 Valley-, mountain- and valley-fold the base of the tail flap, making the first valley fold at the level of the bottom edge of the kite. Look ahead at the next drawing for the proportions of these folds. Are they of a reasonable size, relative to the length of the hind feet and the length of the tail?
38 Valley-fold a small portion of the square corner of the kite. Repeat behind. Unfold the tail flap.

39 Pull the kite flap downward and mountain-fold the top layer in half. Repeat behind. Look ahead for the shape of these flaps.
40 Valley-fold the long edge of the flap to the crease line, forming the front leg paper, then repeat steps 24 through 26 to refine the front legs.

41 The front legs should look like this. Tail folding details follow.
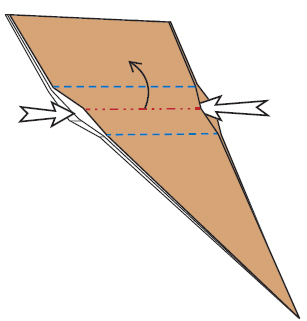
42 Open the center at each end of the valley-mountain-valley crease set. Crimp to flatten the set, forming a parallel set of new flaps. Look ahead at the next drawing for the configuration.
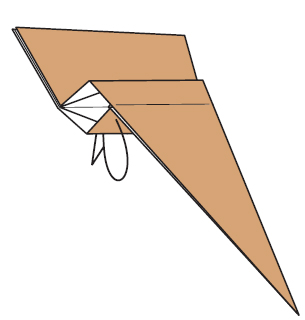
43 Your paper should look like this. Fold the bottom half of the crimped flap up on the backside.
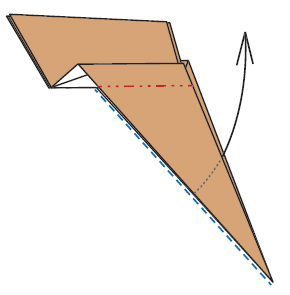
44 Inside-reverse-fold the tail flap up.
45 Inside-reverse-fold the outer edges of the tail and the back of the hind feet.
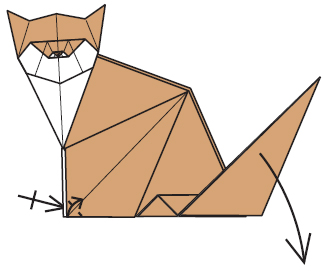
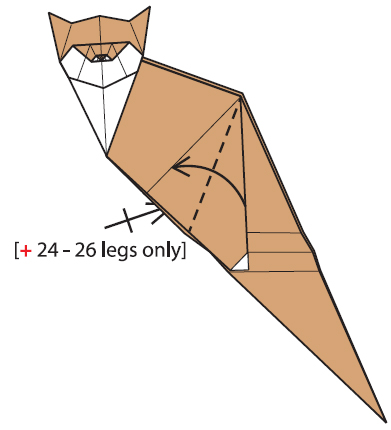
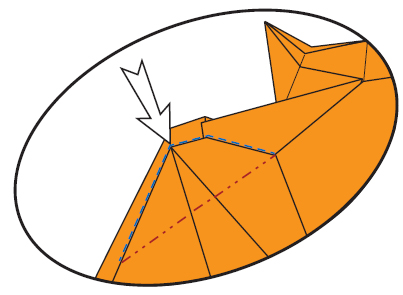
46 You may have had enough of this cat by now and so you may stop here. Should you wish to continue, you may move directly to step 48 from here to make a kitten by changing proportions of the neck. Or, you may repeat steps 29 through 32 to change the shape of and to lock the back. If you do, you should be careful to first notice the “X” arrowhead in this drawing, which indicates the limit for the bottom end of the fold for the back.
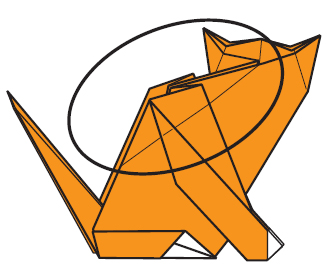
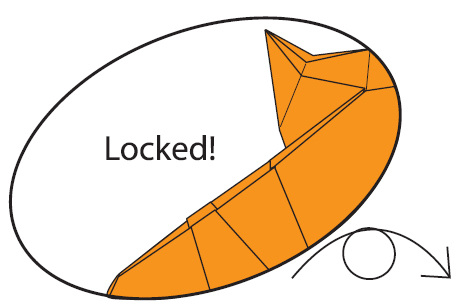
47 Here is the locked back version. Gently curve the tail if you so desire.
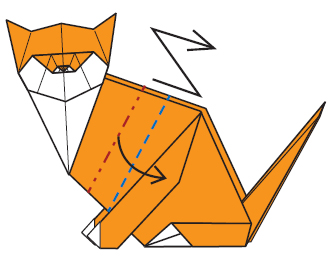
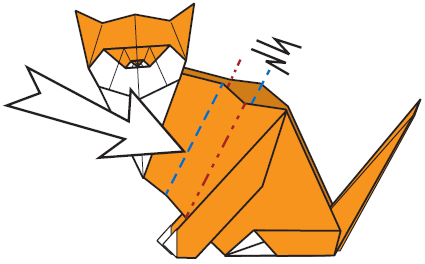
48 Make a kitten style version using paper folded through step 46 and without locking the back. It is all about proportions: Your cat can look younger by shortening the length of the upper back (just below the neck), making the head relatively larger for the body size. Valley-fold and mountain-fold a set of precreases to enable a crimp to shorten the section of the cat’s back closest to the neck.
49 Your paper should look like this. Pull the pleats open.
50 Using the pre-creases that you just made, crimp the model inside to shorten the length of the neck and the back.

51 Your paper should look like this. Turn over left to right.

52 Valley-fold the top layers down at the top to the back, from the head, to the “X” arrow. Unfold.
53 Let’s take a closer look at the back.
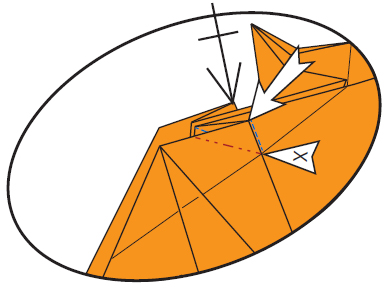
54 Inside-reverse-fold the indicated corner, pivoting at the crease line formed in step 52, indicated by the “X” arrow. Repeat behind (and by the same amount).
55 Mountain-fold the indicated flap inside.
56 Sink the flap (form a pocket), using the indicated crease line from step 52.
57 Valley-fold the indicated flap inside the back-neck area.

58 Fold and tuck the indicated flap into the open pocket formed by the sink in step 56, locking the back.
59 The flap is locked. Turn the model over, left to right.
60 By now, you must have folded Enough of this Cat!