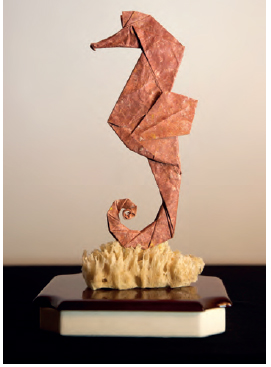
A Seahorse for Al Miyatake
designed by Michael G. LaFosse
LESSON: DEVELOPING FINE MOTOR CONTROL
Seahorses are remarkable creatures that have nothing in common with horses except for the shape of their heads. Even those head features make them look like caricatures or cartoon versions, carved in cuteness. Nobody every got bucked by a briny bronco, nor stampeded by a saltwater stallion. We hope every reader has a chance to watch the behavior of real live seahorses. The males “give birth” to the young, and there is no shortage of variety in size, appearance or favorite habitat. If we discover anything like these creatures on another planet, we would no doubt write books and make movies about them. We depend upon our oceans for food, recreation, transportation and even climate moderation, but the oceans’ health requires healthy nursery reefs and coastal wet-lands. Millions of tropical fish fanciers decorate their homes with saltwater tanks populated with colorful and fascinating fish. When they purchase wild creatures, it puts immense pressure on the natural populations of seahorses. Al Miyatake is a long-time friend and supporter living on the Kona coast of the Big Island of Hawai‘i. Al pointed out that aquaculture has come to the rescue, and they now have a seahorse farm to supply the aquarist’s demand for “reef ponies”!
This étude exposes you to a folding algorithm, the sequential crimping pattern to produce a spiral tail. Origami spirals are fun to fold, and they produce beautiful, interesting angles and shadows. We participated in an exhibit called “Spiritual Geometry,” where artists contributed works that explored “magical” relationships of shapes and proportions that have fascinated artists and mathematicians for centuries. Origami can be a useful tool for understanding some of these relationships, such as the Pythagorean theorem, and various spiral folding algorithms, such as the one used to shape this Seahorse’s tail.
Takeaways: The Power of Art to Change Behavior
We are often invited to discuss the possibilities of incorporating origami into an educational program about the Earth’s unique habitats and their iconic creatures. Being biologists by training, we are always eager to participate. Museums have hired us to design origami versions of creatures from New England, the Sonoran Desert, the polar extremes, East Coast flyways, the Florida Everglades and our fragile reefs and oceans. In every case, the hope is that by folding origami versions of these subjects, youngsters will take a closer look at those creatures and their habitats, develop an understanding of the issues surrounding their very survival, and hopefully seek out more information about how they can make a positive difference for our future.
Even more engaging is when the origami is made by the visitor’s own hands, because Origami renditions of subject species become tangible icons that visitors fold, hold and keep. Origami art has recently proven to be an engaging way to raise the level of public awareness to the pending extinction of the polar bear, elephant, rhino and several endangered butterflies. Can you identify a creature or plant, struggling for existence, that might be helped if people were made just a little more aware about how their choices impact the lives of the other inhabitants that share this special speck in the universe? It need not be rocket science: we designed origami dogs to help raise awareness (and money) for a local no-kill animal shelter. Go local and start small. Have fun while helping a critter!
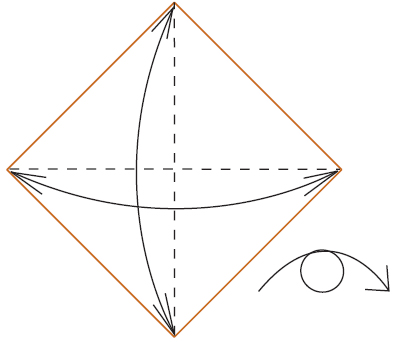
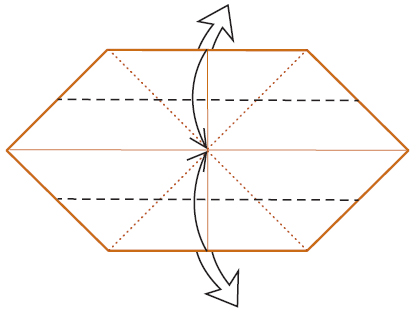
1 Begin “wrong” side up. Valley-fold in half diagonally both ways, unfolding after each. Turn over.
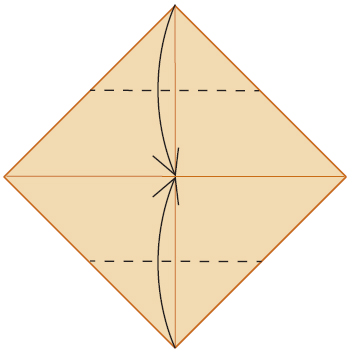
2 Valley-fold the top and bottom corners to meet at the middle.
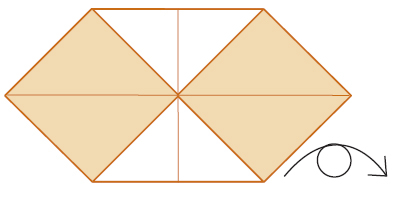
3 Your paper should look like this. Turn over, left to right.
4 Valley-fold the top and bottom edges to meet at the middle, allowing the backside triangular flaps to come to the front.
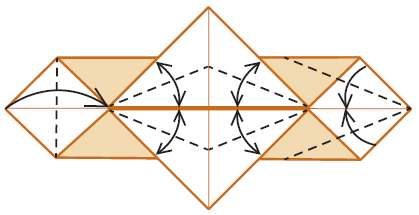
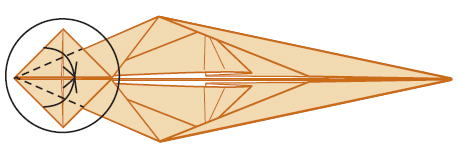
5 Valley-fold the left corner in. Valley-fold and unfold each of the four edges of the center square to the horizontal center. Valley-fold the top and bottom right edges to meet at the horizontal center.
6 Bring the top and bottom right edges of the center square to the horizontal center.
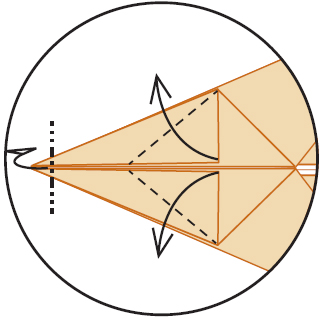
7 Mountain-fold the top and bottom square corners in half while folding them flat and to the right. Mountain-fold the left-side square corners behind.

8 Detail: Squash-fold the indicated corner into the shape of a kite. Unfold. Repeat with the corner above.

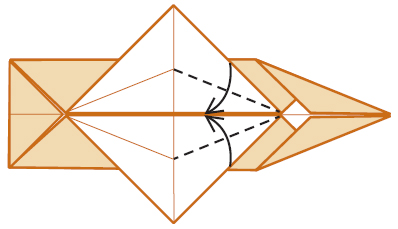
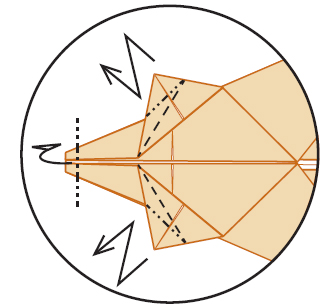
9 Valley-fold the top and bottom edges of the left side to meet at the center, allowing the triangular flaps at the back to come to the front. Valley-fold the left and right edges of the right corner to meet at the center.
10 Head detail: Valley-fold the top and bottom left edges to meet at the center.
11 Mountain-fold the tip of the corner behind. Valley-fold the topmost square corners out.
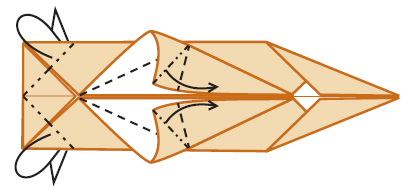
12 Mountain-fold a small portion of the left end behind. Valley- and mountain-fold the indicated portion of the triangular flaps to form the head fins.
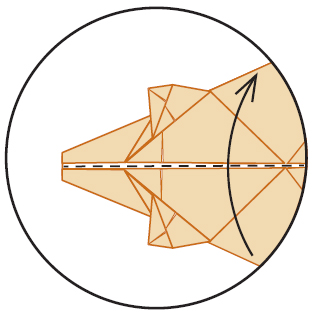
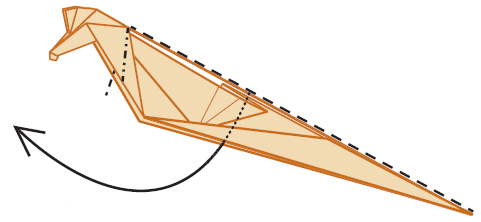
13 Valley-fold the entire model in half, lengthwise.

14 Outside-reverse-fold the model at the back end of the head. Look ahead for the shape.
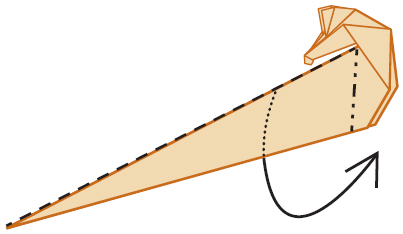
15 Inside-reverse-fold the body and tail section forward, aligning with the bottom edge of the head.
16 Inside-reverse-fold back, pivoting at the front of the neck.
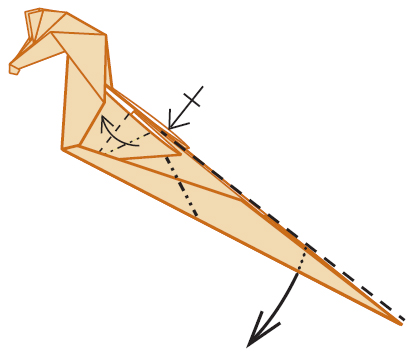
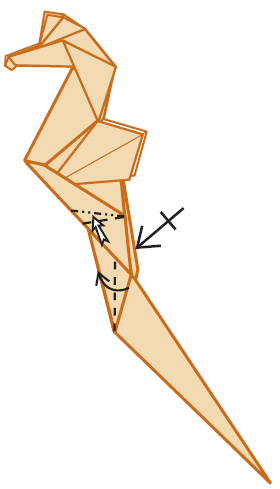
17 Re-squash the folded center flap for a fin. Repeat behind. Inside-reverse-fold the tail forward and down.
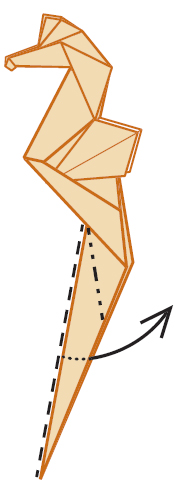
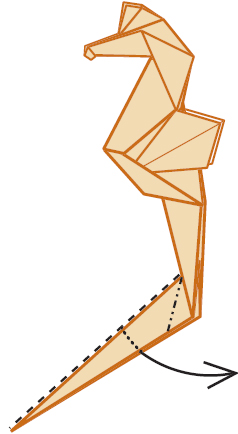
18 Inside-reverse-fold the tail backward.
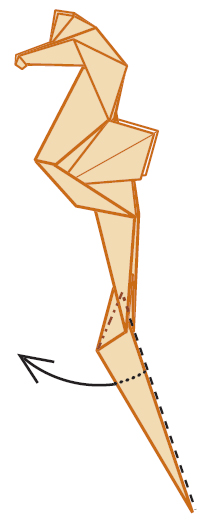
19 Inside-reverse-fold the indicated top layer, pushing the paper forward and upward. Repeat behind.

20 Inside-reverse-fold the tail forward.
21 Inside-reverse-fold the tail backward, pivoting from the front. Look ahead for the alignment.
22 Inside-reverse-fold the tail forward.

23 Repeat steps 21 & 22 until the tail paper is folded to the end, forming a graceful curl. Here is a balance challenge: Consider folding the model so that one of the tail’s segments forms a base, and the model will stand without any additional support. Note: The balanced version may require additional mountain folds to make the tail trim.
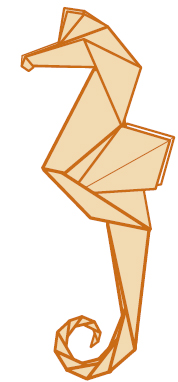
24 A Seahorse for Al Miyatake