1
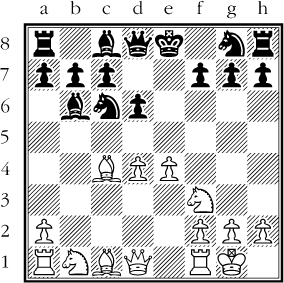
Morphy – Stanley
USA 1857
White to move
150 most important positions in the Opening and the Middlegame
1-30: Development of the Pieces
The key factor in the opening is to understand the value of development. The more open the position, the more important is development. In such situations it’s normal to develop all one’s pieces (including the queen’s rook!) before starting an attack. However, if the opening has a closed character, quick development is usually of less importance. Then manoeuvring will sometimes take precedence. The difficult question is what to do when the game is semi-open or half-closed and everything depends on the concrete nuances in the position.
Another important concept is the second wave of development, that is when one or several pieces move twice in the opening after the main development has more or less been completed. This sometimes signifies the transition between the opening and the middlegame, especially if there is a ready target to attack.
The first player to understand the importance of swift development in open games was Paul Morphy (1837-1884) and so we start off with him.
The following two positions are favourites of mine when I teach my students the value of development, rather than premature attacks or defences, in the early stages of the game.
1

Morphy – Stanley
USA 1857
White to move
This position arose in the Evans Gambit after: 1 e4 e5 2 ♘f3 ♘c6 3 ♗c4 ♗c5 4 b4 ♗xb4 5 c3 ♗a5 6 d4 exd4 7 0-0 d6 8 cxd4 ♗b6.
9 ♘c3!
Morphy was the first player in chess history to regularly play this apparently straightforward developing move of the knight. To this day it is considered the best move. White’s advantage lies in his strong control of the centre and advantage in time. White will have to consolidate these temporary advantages to gain full compensation for the sacrificed pawn.
Another great player, Adolf Anderssen, preferred the attacking 9 d5?! but ever since Morphy’s discovery that move was considered superficial. Although it has the advantage that the long dark-squared a1-h8 diagonal is opened, the classical a2-g8 diagonal remains blocked while Black’s bishop on b6 becomes stronger.
It’s more important to develop pieces instead of making useless short-term attacking or defensive moves. In other words one should avoid unproductive one-move threats and instead concentrate on long-term gains.
2
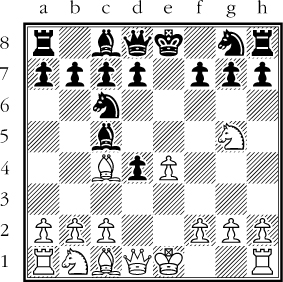
Meek – Morphy
USA 1855
Black to move
This position arose after 1 e4 e5 2 ♘f3 ♘c6 3 d4 exd4 4 ♗c4 ♗c5 5 ♘g5?! and now Morphy played the developing move:
5...♘h6!.
From his games we can deduce that it’s best to develop the pieces before starting an attack. And this position provides solid proof that Morphy’s principle of rapid development was superior to the style which preferred to attack before carrying out sufficient development.
For a less experienced player it might be tempting to play 5...♘e5? which defends and attacks with a single move.
However, after 6 ♘xf7 ♘xf7 7 ♗xf7+ ♔xf7 8 ♕h5+ g6 9 ♕xc5 White’s premature attack is suddenly justified due to the fact that Black broke one of the most basic principles in the opening: the principle of development.
6 ♘xf7 ♘xf7 7 ♗xf7+ ♔xf7 8 ♕h5+ g6 9 ♕xc5 d6 and Black is ahead in development and White must fight for equality.
3

P. Morphy – A. Morphy
New Orleans 1949
White to move
After 1 e4 e5 2 ♘f3 ♘c6 3 ♗c4 ♗c5 4 b4 ♗xb4 5 c3 ♗c5 6 d4 exd4 7 cxd4 ♗b6 8 0-0 ♘a5 9 ♗d3 d5?? (9...d6) 10 exd5 ♕xd5?? (10...♘e7) 11 ♗a3 ♗e6 12 ♘c3 ♕d7 we reach the diagram position. This is a primitive example showing the ground-breaking discovery made by Morphy when he was only twelve years old.
When you are ahead in development you should open the central files by a pawn sacrifice.
13 d5! ♗xd5 14 ♘xd5 ♕xd5

15 ♗b5+!
Morphy clears the d-file.
15...♕xb5
The central files are opened and it’s time to mate.
16 ♖e1+ ♘e7 17 ♖b1 ♕a6 18 ♖xe7+ ♔f8 19 ♕d5
As mentioned in the introduction, quicker and more spectacular was 19 ♖xf7+! resulting in a king hunt after 19...♔xf7 20 ♕d7+ ♔f6 21 ♗e7+ ♔g6 22 ♘e5+ ♔h5 23 ♕h3 mate.
19...♕c4 20 ♖xf7+ ♔g8 21 ♖f8 mate.
White won with the help of the a3-f8 and a2-g8 diagonals and this was typical of the romantic period in chess.
4
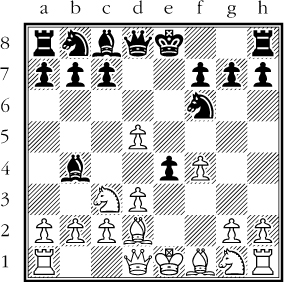
Schulten – Morphy
New York 1857
Black to move
The position arose after the moves 1 e4 e5 2 f4 d5 3 exd5 e4 4 ♘c3 ♘f6 5 d3 ♗b4 6 ♗d2 and now Morphy played 6...e3! opening the central file where the opponent’s king stands. The pawn sacrifice is a pendant to 13 d5 in the previous game.
7 ♗xe3 0-0 8 ♗d2 ♗xc3 9 bxc3 ♖e8+ 10 ♗e2 ♗g4 11 c4
5
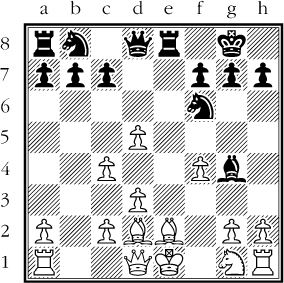
Black to move
11...c6!
Black wants to open the central files and so it’s logical to attack the spearhead on d5 rather than the base on c4 with 11...b5!?.
12 dxc6 ♘xc6 13 ♔f1
Now that both the central files are opened Black should exploit his more active pieces and look for a decisive combination.
13...♖xe2 14 ♘xe2 ♘d4 15 ♕b1 ♗xe2+ 16 ♔f2 ♘g4+ 17 ♔g1 ♘f3+! 18 gxf3 ♕d4+ 19 ♔g2 ♕f2+ 20 ♔h3 ♕xf3+ 21 ♔h4 ♘h6 22 h3 ♘f5+ 23 ♔g5 ♕h5 mate.
My recommendation is that you learn this model game by heart. In particular, moves 6 and 11 are important ideas to remember. When you are ahead in development you must open the central files. When the centre is opened you attack with all the forces you have at your disposal.
6

Wojtaszek – Wang Yue
Poikovsky Karpov 2012
Black to move
The diagram position arose after 1 d4 d5 2 c4 c6 3 ♘c3 ♘f6 4 e3 ♗f5 5 cxd5 cxd5 6 ♕b3 and now Wang Yue played the revolutionary improvement:
6...♘c6!.
The best way to meet threats is by development. Remember the game Meek – Morphy where Morphy played 5...♘h6!. Wang Yue’s choice is the most logical and active move, since it accelerates his development. 6...♗c8 is also playable but passive while 6...♕b6 7 ♘xd5 ♕xb3 loses a pawn due to the intermediate check 8 ♘xf6+.
If White plays 7 ♕xb7 a tempo is lost. After 7...♗d7 White loses two more tempi to bring the queen back to a safe place. Black plans ...♖b8 followed by ...♘b4 and ...♗f5. Black’s second idea is to open the position and exploit his lead in development.
8 ♕b3 ♖b8 9 ♕d1
The queen is back home but it has cost time.
François-André Danican Philidor (1726-1795) made the interesting statement that a pawn is worth three tempi. If we count all the queen moves, White has made four yet his queen is still on d1. However, we have to deduct one tempo for Black’s bishop move to d7.
Now, according to Morphy’s principles, Black should open the game. Remember 6...e3! from the game Schulten – Morphy.
After 9...e5 there is no question Black has good compensation since he is ahead in development and has seized the initiative. Apart from that White has an additional problem in finding an active position for his queen’s bishop.
5 d4!
This isn’t a loss of time since the d7-knight hampers Black’s free development. Therefore it’s good for White to open the game. Less precise is the slower 5 g3, since it doesn’t exploit the fact that Black is behind in development on both wings.
5...dxe4
5...exd4 6 exd5 cxd5 7 ♘xd4 leaves Black with a structural weakness on d5, bearing in mind that Black’s pieces are not actively placed. For example, the queen’s knight should be placed on c6 in such a position.
6 ♘xe4 exd4 7 ♕xd4 ♘gf6 8 ♗g5 ♗e7 9 0-0-0
White has a great lead in development and Tal won quickly after: 9...0-0 10 ♘d6 ♕a5 11 ♗c4 b5 12 ♗d2 ♕a6 13 ♘f5 ♗d8 14 ♕h4 bxc4 15 ♕g5 ♘h5 16 ♘h6+ ♔h8 17 ♕xh5 ♕xa2 18 ♗c3 ♘f6
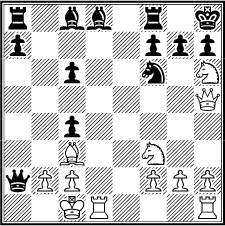
19 ♕xf7! ♕a1+ 20 ♔d2 ♖xf7 21 ♘xf7+ ♔g8 22 ♖xa1 ♔xf7 23 ♘e5+ ♔e6 24 ♘xc6 ♘e4+ 25 ♔e3 ♗b6+ 26 ♗d4 Black resigned.
Tal played like Morphy and opened the game as soon as he had realised he was ahead in development.
8
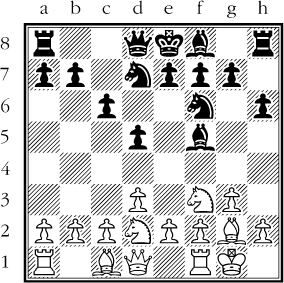
Smyslov – Euwe
Candidates tournament,
Neuhausen/Zürich 1953
White to move
7 e4!
Smyslov makes a sound positional pawn sacrifice to gain the initiative.
It may be rather an exaggeration to say that if Petrosian avoided risks and Tal welcomed them, then Smyslov was somewhere in between these players – which speaks for the soundness of the move!
7...dxe4 8 dxe4 ♘xe4 9 ♘d4 ♘xd2 10 ♗xd2 ♗h7 11 ♗c3
More precise was 11 ♖e1 keeping all options open for the dark-squared bishop. For example, it could land on a5 if Black places his knight on b6. Nevertheless, White has the advantage in development and both central files are opened. Therefore he has full compensation for the pawn.
9
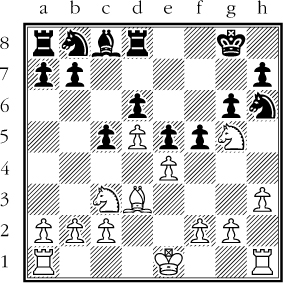
Alekhine – Tartakower
Dresden 1926
White to move
White has the more active position and is ahead in development. For these reasons he should open the centre. Alekhine played the principled move:
12 f4!.
Another way to open the position, but on the kingside, was 12 h4!? followed by h5. Note that 12 0-0? gives Black the opportunity to lock the position after 12...f4 and slow down the game. This is only to Black’s advantage as he lags behind in development.
After 12...exf4 13 0-0 ♘a6 14 ♖xf4 ♘b4 15 ♖h4 and Alekhine won in 55 moves.
10
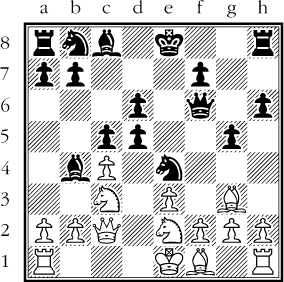
Timman – Winants
1988
White to move
White is ahead in development and so, according to Morphy’s principles, it is important to open the position and seize the moment. Black has helped White in doing this by exchanging on d5.
After the strong 11 0-0-0! White’s threat is to invade on d5 with the knight. The routine move 11 cxd5? is a mistake, since after 11...♗f5 Black has caught up in development by having four developed pieces against White’s four. Besides this Black has the initiative, since there are some unpleasant threats White must defend against.
11...♗xc3 12 ♘xc3 ♘xc3 13 ♕xc3! ♕xc3+ 14 bxc3 dxc4 15 ♗xc4
All Black’s active pieces have been exchanged and the d6-pawn is doomed. White won after only nine more moves.
11
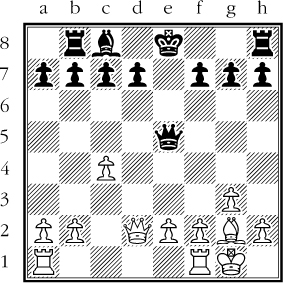
Petrosian – Ebralidze
Tbilisi 1945
White to move
If you are ahead in development and there are no pawn breaks available what are you supposed to do? The reasonable developing move 15 ♖fd1 was played in the game but it wasn’t the strongest continuation.
The critical move was 15 c5! in the style of Morphy. White tries to open the position since he is ahead in development.
15...b6
After 15...♕xc5? 16 ♖ac1 ♕e5 17 f4 ♕e6 18 ♔h1 White threatens not only ♖xc7 but also ♕d4 with simultaneous threats against the g7 and a7 pawns. If Black postpones an opening of the game by 15...0-0 White plays 16 ♖ac1 followed by f2-f4 and e2-e4. Sooner or later the c8-bishop must get out and then the position will automatically open up to White’s advantage, as he has more pieces in play.
16 cxb6 axb6 17 f4 followed by placing the rooks on the c- and d-file with strong positional pressure on Black’s position.
At higher levels there are many subtleties when in the process of developing the pieces and in which order. Here are two examples, one from the Sicilian Defence and another from the English Opening.
12

Bologan – Frolov
Moscow 1991 Black to move
After 1 e4 c5 2 ♘f3 e6 3 d4 cxd4 4 ♘xd4 Black can develop the queenside knight with 4...♘c6. This move is Taimanov’s clever refinement of the Paulsen variation as it exerts more pressure on White’s position and limits White’s choices when compared to 4...a6. It saves time and postpones ...a7-a6 to a time when that may become necessary. Kotov named it “the New Paulsen” but eventually the system was deservedly called the Taimanov Variation.
Taimanov decided on this move order following his devastating loss against Karpov in Moscow 1972 after playing in Paulsen style with 4...a6 5 ♗d3 ♗c5 6 ♘b3 ♗b6 (Nowadays 6...♗e7 is usual, so as to prepare for a Hedgehog position.) 7 0-0 ♘e7 8 ♕e2 ♘bc6 9 ♗e3 ♘e5 10 c4! ♗xe3 11 ♕xe3 0-0 and now the strongest move was 12 ♗e2! preparing to grab more space with f2-f4. Taimanov’s fourth move is also a clever way to reach the Scheveningen variation without allowing the dangerous Keres Attack after 4...♘f6 5 ♘c3 d6 6 g4.
5 ♘c3
The early attempt to establish a Maroczy Bind pawn formation by 5 c4 is met by 5...♘f6 6 ♘c3 ♗b4 putting more pressure on the white centre and forcing 7 ♘xc6 bxc6 8 ♗d3 (8 ♗d2!?) with a comfortable position for Black, who can choose between 8...d6, 8...e5, 8...0-0 or 8...d5 in the quest for equalisation.
The only way to get a reasonable Maroczy position is by playing the time-consuming manoeuvre 5 ♘b5, practically forcing a Hedgehog after 5...d6 6 c4 (6 ♗f4 is pointless according to Karpov. However, one psychological point is that Black is forced to form another pawn structure after the compulsory 6...e5.) 6...♘f6 7 ♘1c3 (After 7 ♘5c3 Black doesn’t need to play ...a6.) 7...a6 8 ♘a3 which is perhaps not to everyone’s taste even though the Hedgehog formation has a good reputation. (8 ♘d4 makes it easier for Black to play 8...d5 immediately or after preparing it with 8...♗e7. 8...♗d7 is also good enough for equalisation.)
13

Black to move
The normal move is 8...♗e7, and then 9...0-0, but a more clever move order is 8...b6, preparing a quick ...♗b7 followed by ...♘b8-d7 where the knight is more harmoniously placed than on c6. The knight is better placed on d7 since it’s not in the way on the c-file and can attack either the c4-pawn with ...♘e5 or the e4-pawn with ...♘c5 depending on circumstances. Anand – Illescas Cordoba, Linares 1992, continued 9 ♗e2 ♗b7 10 0-0 ♘b8 11 f3 ♘bd7 12 ♗e3 ♗e7 13 ♕d2 0-0 14 ♖fd1 ♕c7 15 ♖ac1 ♖ac8 16 ♗f1 ♖fe8 17 ♔h1 ♕b8 18 ♘c2 ♘e5 19 b3 ♗a8 20 ♗g1 ♖ed8 with mutual chances.
A third option is the Kasparov Gambit 8...d5?!. It was discovered by Kasparov in the spring of 1985 while moving the pieces on a pocket set during a flight. Kasparov played this “super bomb” in the 12th and 16th games in the World Championship match against Karpov during the autumn. The 16th game continued 9 exd5 exd5 10 cxd5 ♘b4 11 ♗e2 ♗c5?! (11...♘bxd5 wins back the gambit pawn but gives White the slightly better game after 12 0-0.) and now Karpov missed the strongest continuation 12 ♗e3! ♗xe3 13 ♕a4+ ♗d7 14 ♕xb4 ♕b6 15 ♕xb6 ♗xb6 16 ♘c4 when Black is facing an unpleasant struggle.
5...d6 6 g4
The Keres Attack obviously has less bite without having a knight on f6 to attack with gain of tempo, but the move is nevertheless purposeful since it’s useful to prepare a pawn storm against the black king’s future residence.
6...a6 7 ♗e3 ♘ge7
14

White to move
Black’s position is somewhat lacking in harmony and if it were his turn to move he would exchange the c6-knight and then move the e7-knight to c6. The e7-knight is superfluous, to use Dvoretsky’s terminology, and in reality it’s the e7-knight which wants to be exchanged for the centralised knight on d4. In such a situation it’s sensible for White to put up an obstacle to Black’s plan.
8 ♘b3!
Such a move makes Black feel a little uncomfortable.
8...♘g6
Generally speaking, a knight is not well placed on g6 in the Sicilian Defence.
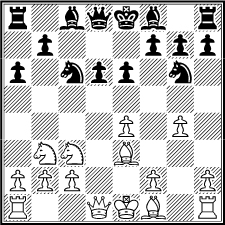
9 ♕e2!
The placement of the queen on e2 seems to be lacking in harmony with White’s position but has the advantage that from d1 his queen’s rook will have a good view along the semi-open d-file. Besides, White will avoid threats from one of the knights on the c4-square or perhaps f3 in the near future. The queen defends the g4-pawn and the light-squared bishop can be developed on g2.
The alternative continuation 9 ♕d2 b5 10 0-0-0 ♘ge5 11 g5 ♘a5 12 f4 ♘ec4 gains a tempo against the white queen. After the further 13 ♕f2 ♖b8 14 f5 ♘xe3 15 ♕xe3 ♕b6 Black gains another tempo since White isn’t interested in exchanging queens on Black’s terms. After 16 ♕g3 ♗e7 17 ♘xa5 ♕xa5 18 e5 d5 19 f6 ♗b4 20 ♘xd5 exd5 21 e6 White has compensation for the sacrificed piece as proved by the game Shirov – Polgar, Yerevan 1996.
9...♗e7 10 0-0-0 b5 11 f4 h6 12 ♕f2 ♗d7
15
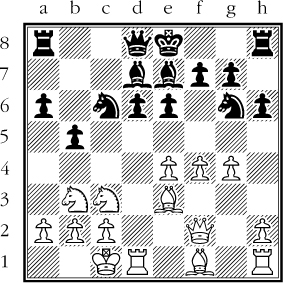
White to move
13 ♔b1
According to Bologan the white king is placed on the safe squares h1 or b1 in 90% of Sicilian Defence games. Such statistical information proves that there must be a very good reason if White chooses to avoid such a strong prophylactic and consolidating move before launching a real offensive, since once the attack has begun there is no turning back. One might also regard ♔b1 as the completion of queenside castling since the king might turn out to be exposed on the c1-h6 diagonal and in addition the a2-pawn can be vulnerable.
13...♖b8 14 ♗e2 ♘a5 15 ♘xa5 ♕xa5 16 ♗d3 ♗h4
This position is a good example of when there is no need to worry about 16...b4. White simply plays 17 ♘e2 followed by ♘d4 where the knight is very well placed, while the black attack can proceed no further. White is slightly better and won after 41 moves.
16
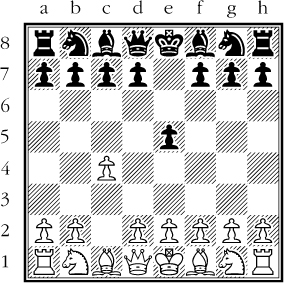
Marin – Korneev
Porto Mannu Open 2008
White to move
After 1 c4 e5 it has been discovered by Marin that 2 g3 is probably the most precise move. One advantage with this move order is that it avoids the popular variation 2 ♘c3 ♗b4. For example 3 ♘d5 ♗c5 is a variation favoured by Anand.
2...♘c6
White’s control of the centre has been temporarily weakened so Black can start active play in the centre with 2...c6. This is best answered by 3 d4 exd4 (3...e4 is fully playable and is perhaps best exploited by 4 d5 isolating the far advanced e4-pawn.) 4 ♕xd4.
3 ♘c3!
It’s tempting to play 3 ♗g2 to avoid the disturbing ...♗b4 but after 3...f5 (Also interesting is 3...h5 4 ♘f3 e4 5 ♘h4 g5 as mentioned by Nepomniachtchi. The rapidplay game Ivanchuk – Nepomniachtchi, Leuven 2017, continued with the hair-raising 4 d3?! h4 5 g4?! h3! and Black had the initiative.) 4 ♘c3 ♘f6 White has no useful move. 5 e3 (5 d3 ♗b4 gives Black an active game.) is answered by the surprising 5...d5! 6 cxd5 ♘b4 and White can claim no advantage. It’s no coincidence that Black has such a good variation at his disposal, bearing in mind that both of his knights are well developed.
The third move played by White is a good illustration of the well-known principle advocated by Emanuel Lasker which states that knights ought to be developed before the bishops. There are two reasons for this: firstly, knights are stronger than bishops in the early part of the game and, secondly, it’s easier to develop the knights to squares where they belong compared to the bishops which have more squares to choose from.
3...♘f6
3...f5 might be answered by 4 e3, preparing d2-d4. After 3...h5 White can play 4 ♘f3 according to Morozevich. A third option is 3...♗b4 4 ♗g2 ♘ge7 5 ♘d5 ♗c5 6 ♘f3 0-0 7 0-0 d6 8 e3 as in the game Svidler – Nepomniachtchi, Moscow 2018.
4 ♗g2
18

Black to move
Sometimes it isn’t easy to decide how to develop the bishop and psychological factors such as personal taste or a particular opponent might influence the choice.
4...♗c5
This is Karpov’s variation in the Four Knights’ variation but another good option is 4...♗b4. Karpov preferred to play this strategically more ambitious continuation when he was up against heavyweights like Korchnoi or Kasparov. Black exerts pressure on the c3-knight and plans to eliminate it at any time, thereby improving his control of the light squares in the centre. This means that the control of the long light-squared diagonal is in danger after a preliminary exchange on c3 followed by ...e5-e4 and/or ...d7-d5. An effective way to avoid this strategical problem is to reply 5 ♘d5. This is a good move favoured by intuitive players like Karpov, Tal and Gheorghiu.
5 ♘f3 d6 6 d3 0-0 7 0-0
Black’s c5-bishop cooperates well with the pawn chain c7-d6-e5-(f4). This is the same kind of cooperation White’s g2-bishop enjoys alongside the pawn chain e2-d3-c4-(b5) and sometimes even a6! The goal for both players is to improve the activity of their bishops.
7...a6 8 a3 ♘d4 9 ♘e1 h6 10 b4 ♗a7 11 e3
White follows the main plan which is to confine Black’s dark-squared bishop to passivity.
11...♗g4 12 f3 ♗d7 13 a4 c6 14 a5 ♖e8 15 ♔h1 ♘f5 16 ♘c2 d5 17 e4 ♘d4 18 c5 ♘b3 and a draw was agreed.
Note that it’s harder for Black to activate the c- and f-pawns because of the knights that stand in their way, White’s attack on the queenside is normally faster than Black’s on the other flank. A good introduction to learn how to play this variation is to study Karpov’s games with Black where he developed the bishop to both c5 and b4.
We will continue the discussion on giving consideration to the development of the bishop(s) with the help of a few instructive examples. We will also touch on the subject of when it’s advisable to prevent the development of the opponent’s bishop.
19
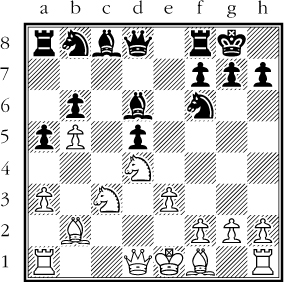
Capablanca – Janowski
San Sebastian 1911
White to move
In My Chess Career Capablanca writes that his move 13 ♗e2 was a mistake. He realised that 13 g3 was the correct move but was afraid to be criticised for constructing such a weakened pawn formation on the kingside. Because of this reason alone Capablanca opted to go against his better judgement. He points out that it was his first major tournament and he didn’t want to be scolded for making pointless pawn moves which is something weak players are prone to do.
13...♗e6 14 ♗f3
It’s better to maintain the bishop on the e2 square. To play an extended fianchetto (♗f3 instead of ♗g2) has the drawback that it’s easier to attack it with a knight on e5. However, it has the advantage of not having to make a weakening pawn move like g2-g3.
14...♖a7!
In comparison to Capablanca, Janowski isn’t afraid of playing “strange” moves!
Capablanca considered that 16 ♖c1 was better.
16...♘bd7 17 ♖fd1
17 ♘xd5 or 17 ♘c6 don’t work according to Capablanca.
17...♘e5 18 ♗e2
White has lost two moves with the bishop.
18...♕e7 19 ♖ac1 ♖fc8 20 ♘a4 ♖xc1 21 ♖xc1 ♖xc1+ 22 ♗xc1 ♘e4 23 ♗b2?
Better was 23 ♘xe6 with an equal game. For the first time in his life Capablanca felt he had been outplayed by his opponent up to move 23.

23...♘c4
Capablanca and Janowski missed the winning move 23...♕f6!. After 24 ♗f3 ♘d2 25 ♕d1 ♘exf3+ 26 ♘xf3 ♘xf3+ 27 gxf3 (27 ♕xf3? ♕h4 wins a piece.) 27...♕g6+ 28 ♔f1 ♗xh2 Black wins the h-pawn and creates a deadly passed pawn on the h-file.
After his 23rd move Capablanca managed to turn the tables and after 66 moves he emerged victorious. It’s noticeable that the pawn would have been better placed on g3 to prevent threats against h2. Moreover if the bishop had been developed to g2 earlier in the game it would have exerted pressure on the d5-pawn.
What’s interesting about the whole story is that if you check the opinion of Komodo 11 it actually prefers 11 ♗e2 and thinks it’s the best move and offers a clear advantage (0.94). 11 g3 is valued the third best move (0.81), so maybe Capablanca was too harsh on himself.
20
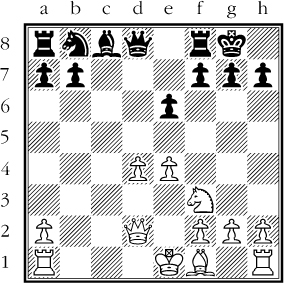
Keres – Fine
Ostende 1937
White to move
According to Keres White has two fundamental plans:
The first one is to exploit the pawn majority in the centre and play for d4-d5 establishing a passed pawn.
The second is about concentrating all his pieces on the black kingside and in that way utilising the centre and his space advantage.
In the game Keres played the flexible 11 ♗c4 which is the standard move in this position. Compared with 11 ♗e2 which keeps the d4-d5 push in mind, or 11 ♗d3 planning a kingside attack, the advantage of Keres’s move is that both options are still open. All the same it seems that Keres has forgotten one typical plan which has been used by Petrosian. That is to play for a minority attack on the queenside with a4-a5, especially when Black has played ...b6.

11...♘d7
Black intends the manoeuvre of the knight to f6 or f8, defending the kingside. 11...♘c6 plans to generate play on the queenside. The continuation 12 0-0 b6 13 ♖fd1 ♗b7 14 ♕f4 ♕f6! 15 ♕e3 ♖fd8 16 e5 ♕h6! gave Black good play in the game Reshevsky – Fine, Hastings 1937. Note how persistent Black is in making a queen exchange. If White plays 17 ♕xh6 gxh6 then strictly speaking Black’s splintered kingside pawns are not to be regarded as weaknesses since it’s not possible for White to attack them. The most important factors are that Black has good play in the centre as well as on the queenside. A plausible continuation then would be 18 ♖ac1 ♖ac8 19 ♗b3 ♘b4 with advantage to Black.
12 0-0 b6 13 ♖ad1
13 ♖ac1 is useless in the long run, since it will be easier for Black to endeavour to exchange rooks along the c-file. 13 a4!? is the plan preferred by Petrosian, and also by Yusupov and Beliavsky, to attack the b6-pawn with a4-a5 and create a weakness either on b6 or a7 if Black plays ...bxa5. 13 d5?! is a positional mistake due to 13...♘c5 and the black knight has an excellent position.
13...♗b7 14 ♖fe1
The advantage of placing the rooks behind the classical centre (pawns on e4 and d4) is that White can play for both d4-d5 and e4-e5 depending on the circumstances.
14...♖c8 15 ♗b3
Black must now make the difficult decision whether to defend the kingside with 15...♘f6, where the knight is more active but also more vulnerable, or 15...♘f8 where it is safer but more passively placed.
21

Bronstein – Averbakh
Moscow 1962
Black to move
Capablanca’s recommendation is to wait with the development of the c8-bishop and instead improve the placement of the king, rook, knight and dark-squared bishop.
10...0-0
10...♗e6?! was played in the game Capablanca – Eliskases, Moscow 1936, but Black had problems after 11 ♗xe6! fxe6 12 ♕b3 ♕c8 13 d4 (13 ♘xe5? ♗xe3! Capablanca) 13...exd4 14 ♘xd4 ♗xd4 (14...e5 15 ♘e6) 15 cxd4 and White remained with the freer and more active game.
11 0-0
If 11 d4 then 11...exd4 12 cxd4 ♗b4+.
11...♘g6 12 d4 ♗b6
It’s important to support the e5-pawn so Black isn’t forced to give up the centre with ...exd4 as in the Capablanca game.
13 a4 c6 14 dxe5 dxe5 15 ♕xd8 ♖xd8 16 ♖ad1 ♖e8 17 ♖fe1 ♔f8 18 ♘f5 ♗c7 19 ♗b3 ♘f4 20 ♘e3 a5 21 ♗c2 ♗e6
...and Black is slightly better although the game ended in a draw after 41 moves.
Black displayed good timing with the development of his queenside bishop. Other players who were very skilful with regard to how and when to develop this bishop, were Lasker and Réti. It’s a matter of developing the pieces correctly and in the right order, while at the same time never losing focus on the centre – the most important area of the board.
22

Nepomniachtchi – Nakamura
Wijk aan Zee 2011
Black to move
Sometimes it’s more important to disturb White’s harmony than to concentrate on development. Here Nakamura came up with the fantastic idea 7...♗g4!? where Black sacrifices a tempo to provoke the pawn move to f3.
Svidler – Nakamura, Amsterdam 2010, had continued with the inferior 7...dxc4 8 ♘g3 ♗g6 9 ♗g5 ♕b6 10 ♕d2 ♕b4 11 a3 ♕b3 12 ♘ge4 ♘d5 13 ♖h3! and so Nakamura didn’t want to repeat the variation. One idea behind Nakamura’s new move is simply to block the third rank for the king’s rook.
8 f3
Another drawback of 8 f3 is that the light-squared bishop can no longer exert pressure on the h5-pawn by ♗e2.
8...♗f5 9 ♘g3 ♗g6 10 ♗g5 ♕b6 11 ♕d2 ♘d7 12 a3?! f6 13 ♗e3 ♕b3!
Compared to the game against Svidler the black queen is safe on b3.
14 cxd5 ♘xd5 15 ♘xd5 ♕xd5!
Black has equalised and managed to win the game after 44 moves. An impressive novelty!
23
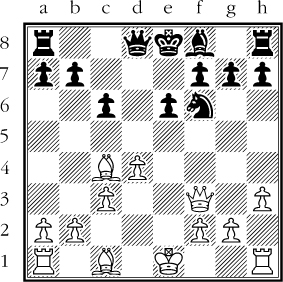
Mnatsakanian – Petrosian
Moscow 1964
Black to move
At times it’s more important to prevent the opponent from developing his bishop rather than developing your own. Here Petrosian played the clever 11...♘d5! to exploit the fact that White has been left with a rather passive dark-squared bishop because of making too many pawn moves. Now the active developing move ♗g5 is effectively prevented. Petrosian’s move is illuminating, since it shows that one must always be aware of the opponent’s development as well.
After 12 0-0 Black continued his development with 12...♗d6! and obtained a good game.
24
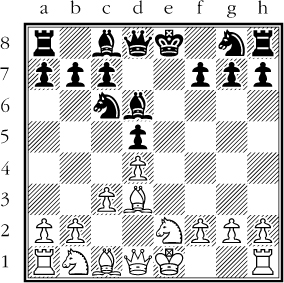
Winter – Alekhine
Nottingham 1936
Black to move
Alekhine prevented his opponent from developing the c1-bishop with the move 6...♕h4!.
It’s important to stop White’s bishop coming to f4 with a simplified game.
There followed 7 ♘d2 ♗g4! 8 ♕c2 (8 ♕b3 ♘ge7) 8...0-0-0 with a good game which resulted in a victory for Black after 39 moves.
When one has the bishop pair it sometimes makes sense to open the position rather than develop the pieces. Here are two examples on that theme.
Black has the bishop pair so it’s in his interest to open the position. This explains:
9...c4! 10 bxc4.
White has to accept the pawn sacrifice because otherwise Black gets rid of his doubled pawn and still has the initiative thanks to his bishop pair.
10...♗a4?
10...0-0-0 was correct. If Black is unable to win back the pawn, he would still have compensation in view of White’s damaged queenside pawns.
11 c3?
Correct was 11 ♘bc3 ♗b4 (11...♗xc2?? 12 ♔d2) 12 ♖b1 ♗a5 13 ♖b2 with a slight advantage to White. Black’s bishop is misplaced on a4.
11...0-0-0 12 ♘d2 ♗c2! 13 f3 ♗c5 and Black won after 28 moves.
26

Karpov – Timman
Netherlands 1981
White to move
12 f4!
12 d6? is obviously wrong due to ...♘c6 and ...♘d4. Most players would probably have played 12 ♕c2 to protect the b2-pawn before making the pawn break f3-f4. However, the problem is that White’s bishop would then have problems after 12...f5 13 f4 e4.
12...exf4
12...e4 is answered by 13 f5!.
13 ♗xf4 ♗xb2 14 ♖b1 ♗f6
Or 14...♗d4 15 ♗d6.
15 ♕a4!
White has good compensation for the pawn in his active play.
In some openings it’s tricky to know where the rooks will be most effectively placed and that may depend to a certain extent on the style of the players.
This position arose after 1 e4 c5 2 ♘f3 ♘c6 3 d4 cxd4 4 ♘xd4 g6 (Accelerated Dragon) 5 c4 ♗g7 6 ♗e3 ♘f6 7 ♘c3 ♘g4 8 ♕xg4 ♘xd4 9 ♕d1 ♘e6 10 ♕d2 d6 11 ♗e2 ♗d7 12 0-0 0-0.
An aggressively inclined player would prefer 13 ♖ad1. The main idea of the set-up is to develop the king’s rook by means of the pawn push f2-f4 and, if possible, f4-f5. This aggressive placement of the rooks focuses on the centre and the kingside and suits attacking players much better than the development of the rooks to c1 and d1.
Keres – Petrosian, Candidates Tournament 1959, continued more positionally with 13 ♖ac1 ♗c6 14 ♖fd1 ♘c5 (14...♗xc3 15 ♕xc3 ♗xe4 16 ♗h6 or 16 c5 with good play for the pawn.) 15 f3 a5 and Black could be satisfied with the opening.
Keres, like Larsen, was well-known for his fondness for attacking play but this time he chose quieter play despite the fact that a sharper continuation was available. This is perhaps one example of why Keres and Spassky were called universal players because they felt at home in both types of games.
13...♗c6 14 ♘d5 ♖e8?
14...♘c5, with the idea 15 ♕c2 a5 16 ♗xc5 dxc5 17 ♘f6+ ♗xf6 18 ♖xd8 ♖fxd8, was a fully playable continuation but for some reason Petrosian avoided it.
15 f4 and Larsen won brilliantly after 30 moves, finishing off with a queen sacrifice – which proves just how dangerous this position is for Black!
28
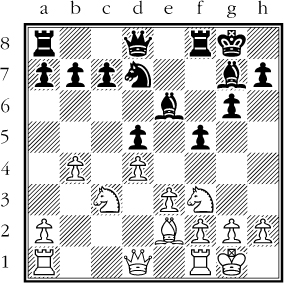
Karpov – Korchnoi
London 1984
White to move
Moves such as 13 ♕b3, 13 ♖b1 or 13 ♖c1 look like normal means of development but Karpov thought more deeply than that. He played 13 ♖e1! and realised that the key to maintaining the balance is flexibility. The move Karpov made is useful whatever happens in the future. This is positional play at a high level and the move that maintains optimal tension in the position.
Karpov’s move has the intention to meet a later ...f5-f4 with exf4 or possibly e2-e4. If Black plays ...♘f6-e4 White can move the c3-knight and plan a future f2-f3. Then the rook is correctly placed on e1 since the e3-pawn is defended and e2-e4 can be prepared. It’s also possible for Black to play ...c6 to meet b5 with ...c5. After dxc5 Black wants to play ...d5-d4 and then the rook will also be well placed on e1. It also makes sense to keep the queen on d1 (and avoid ♕b3) in case Black plans a kingside attack.
The game continued:
13...g5 14 ♖c1 ♔h8 15 ♗d3 c6 16 b5 g4 17 ♘d2 c5 18 dxc5 ♘xc5 19 ♘b3 ♘xb3 20 axb3 ♖c8 (20...d4 21 exd4) 21 ♘e2 ♖xc1 22 ♕xc1 ♕b6 23 ♘f4
...and Karpov had obtained a slight advantage which he converted to a win.
It’s a good idea to compare Karpov’s 13th move with that which Kasparov played against Karpov in the deciding final game of the World Championship in 1985. You will find this game in the section on manoeuvres.
Normally we move each piece only once in the opening. If we move any of them a second time after completing development we can talk of a second wave of development.
29

Rotlewi – Rubinstein
Lodz 1907
Black to move
The above position is completely symmetrical except for the fact that Black has a rook on d8 and is to move. This is actually one of the first games showing how to benefit from a slight lead in development (two half moves) in a symmetrical position.
Rubinstein played 15...♘e5!.
The best continuation is to start a second wave of development and take the initiative as soon as possible. The routine 15...♖ac8, completing his development, might have worked as well but then we would hardly have experienced the wonderful combination at the end of the game.
16 ♘xe5 ♗xe5
All Black’s minor pieces are a little better placed than those of his opponent because White is weak on h2 and g2 and the f6-knight can more easily go for an attack compared with White’s knight.
17 f4?!
The developing move 17 ♖fd1 was preferable.
17...♗c7 18 e4?! ♖ac8 19 e5?
Better is 19 ♖ad1 ♗b6+ 20 ♔h1 h5.
19...♗b6+ 20 ♔h1 ♘g4! 21 ♗e4
If 21 ♕xg4 ♖xd3.
21...♕h4
21...♘xh2!? was also good but who would criticise Rubinstein for not playing it after seeing the immortal continuation?

22 g3
22 h3 ♖xc3! 23 ♗xc3 ♗xe4 24 ♕xg4 (24 ♕xe4 ♕g3 25 hxg4 ♕h4 mate.) 24...♕xg4 25 hxg4 ♖d3.
22...♖xc3!! 23 gxh4
23 ♗xc3 ♗xe4+ 24 ♕xe4 ♕xh2 mate. Or 23 ♗xb7 ♖xg3.
23...♖d2!! 24 ♕xd2 ♗xe4+ 25 ♕g2 ♖h3!!
The queenside rook decides the game in the most beautiful fashion.
White resigned.
Apart from the fact that this is an enormously beautiful and rare combination, demonstrating the dynamic potential of the pieces, it is an important model game showing how to play for a win in a symmetrical position.
30

Matanović – Petrosian
Kiev 1959
Black to move
10...♗g4!
A clever prophylactic move played at the last moment to eliminate any idea of a second wave of development with 11 ♘e5 which would give White some chances of claiming the initiative, for example after 10...0-0?! 11 ♘e5. Another more direct idea was to focus on the light squares and play 10...b5 11 ♗d3 ♗xd3 12 ♕xd3 ♕d5 13 ♔b1 0-0 with mutual chances.
11 h3 ♗xf3 12 ♕xf3
It looks like White has won the bishop pair for nothing but after 12...♘d5 the dark-squared bishops will be exchanged by force.
13 ♗xe7
White cannot avoid the exchange if Black persists, since 13 ♗d2 can be answered by 13...♗g5.
13...♕xe7 14 ♖he1 0-0 15 ♔b1 ♖ad8
...and the position is about equal