The insect I would least like to be: a captive mealworm
The favourite bird food of some bird-feeder owners (and some fishermen, too) are live mealworms contained in plastic tubs. In this captive state mealworms live, if it can be called ‘living’, the most miserable of lives.
If being used as bird food, they first travel by post from supplier to customer, being bumped around in an airless container, going they know not where. On arrival they are put into a refrigerator to shiver their days away. If they are lucky, and this is probably rare, they may be given a bran snack; otherwise they will be put on a starvation diet. They will then be brought out and placed on a bird feeder which has straight sides to prevent escape, so should really be called a prison. Here, if they are fortunate, they will soon be eaten alive by a bird or an errant mouse. Alternatively, they will slowly be scorched to death in the sun or drowned in rainwater. Sometimes they can be found lying next to their blackened, dead companions.
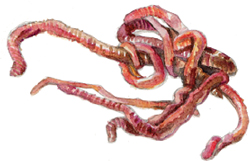
It was when a friend gave me a handful of mealworms that I observed these unpleasant facts. I watched an escapee mealworm which had fallen from the bird feeder to the ground – the human equivalent of falling from the Eiffel Tower. Fortunately the mealworm had no bones to break and was wisely hastening away as fast as possible. Considering it only has six front legs (as far as I can see) and glides along like a horizontal escalator, its speed and determination are admirable. It was then that I became interested in mealworms.
When not being superintended by so-called human beings, mealworms live most interesting and varied lives – more varied than ours. Unlike us, they undergo four distinct stages in their lives en route to becoming darkling or flour beetles: Tenebrio molitor.

Stage One, eggs Mealworms begin life as oval-shaped eggs which are ‘glued’ on to leaves so that they stand upright. Between a week and a month after being laid, the eggs hatch, when they change not only their shape but their name, too, becoming larvae or grubs, i.e. mealworms.
Stage Two, larvae or grubs During this time, the larva looks nothing like the adult. It has a long body, while the adult’s body is rounded in shape. Between bouts of eating vegetation and dead insects, mealworm larvae undergo repeated moults, as they become too big for their exoskeletons and have to change into larger-sized skins.
They can have as many as fourteen moults. Sometimes you can see their discarded skins, which look rather like diaphanous, striped nightgowns. During its last moult, the larva loses its carapace before curling into its pupal (cocoon) form. Larvae have no compound eyes, antennae or wings but they do have a few front feet which help them to wiggle through the soil.
During this stage, when the mealworms are in captivity, their greedy so-called ‘caretakers’ feed them with hormones to increase their size.
Stage Three, pupa, the resting stage This is the most extraordinary period in a mealworm’s life. Gradually the pupa develops a hard outer shell – a carapace. During this time it barely moves or eats. In fact it appears to be dead. But inside its dead-looking exterior, a miraculous metamorphosis is taking place. Its body is breaking down into a kind of soup, being totally dissolved before it is rebuilt and reshaped into an adult winged beetle.
P.S. The other day I was pricking out some chervil seedlings and encountered a most intriguing beetle ambling through the chervil undergrowth. Blackish in colour with lighter flecks, its ribbed shell made it resemble a creature from the prehistoric department of a natural history museum, or a Japanese warrior with a shield. I rushed to get my magnifying glass, but of course the warrior had moved on. Don’t imagine these creatures will wait for you to observe them; they have plenty of other things to do. Always carry a magnifying glass.
Fourth parsley check
As soon as the parsley seedlings have developed their first two true leaves, it is time to prick them out into more spacious individual accommodation. This can be obtained in various forms: recycled plastic modules (i.e. child-sized yoghurt pots), biodegradable plant trays or containers made from old newspapers using a pot maker (see page 170, A). This is a minute wooden press (which would also be suitable for making fezzes for Egyptian dolls). No glue or skill is required and the newspaper eventually blends into the soil after the seedling has been transplanted.
If using pre-punched plastic modules, make certain that the drainage hole has been properly punched; otherwise the module will become waterlogged, and would you like to live in a bog? Half-fill the individual containers with compost, making a small hollow to receive the seedling. With a teaspoon, gently scoop out a plant from the original container, taking care not to hurt the roots; they have been just as busy underground as the stem and leaf have been above.
Don’t hold the plant by its stem – this is the most delicate part; holding it here is the equivalent of hoisting someone up by the neck. If the seedling must be touched, hold the leaves carefully and, with forefinger and thumb (which suddenly feel gigantic and Gulliverish), gently place the Lilliputian seedling in the centre of its new container. Add more soil until this nearly reaches the top, allowing for it to swell when watered. Gently press down the compost, making certain that the stem is straight and the seedling looks secure and comfortable.
An alternative to the teaspoon method is to break the seed-tray contents carefully into single seedling portions, as though breaking a crumbly cake. This probably does less damage to the roots.
‘The lilliput, countless armies of the grass’
Walt Whitman (1819–92), ‘Carol of Harvest’
This part of gardening must surely bring out the maternal or paternal in the most unmotherly or unfatherly of gardeners.
Pricking out and transplanting are such intimate, gentle and peaceful occupations that they are better performed in silence, the ears unclogged by so-called background music or talk, which fills the foreground and induces a fuzzy semi-listening, semi-seeing state.
As the pricking out of all the other seedlings continues, the window ledge will soon become too small in its new capacity as seedling kindergarten. On either side of my bedroom window frame are two permanent brackets, on to which each spring I put a removable shelf to accommodate all the additional pots. If plastic modules are being used, they can be cut to the width of the shelf. After a time it is difficult to see out of the window, but this doesn’t matter for the few weeks during which there is so much to see inside.
Although my flat has central heating, the bedroom radiator is turned off during the propagation season, because it becomes too hot for the seeds and seedlings. This leaves the bedroom on the chilly side, so I now resort to using a small electric fire, placed as far away as possible from the window.
The survivors
Something else to check is last year’s late autumnal sowings. After almost disappearing during the most severe months, mitsuba, lamb’s lettuce, American land cress, rocket and winter purslane reappear – small and bright green, as though they have been on holiday rather than undergoing the endurance test of winter.
The making of compost
The making of compost (though a less extreme version than that quoted below), as opposed to worm compost, is not only for garden gardeners. To begin, all that is needed is a container with a lid, large enough to store a week’s supply of what is inaccurately called ‘kitchen waste’.
‘Martyrs’ ashes are the best compost to manure the church.’
Thomas Fuller (1608–61), The History of the Holy War
March is a good time to start because it is the month that contains the vernal equinox and heralds the gradual lengthening of the days, making going outside more inviting.
Instead of throwing away potato peel, citrus rind, dead flowers, tea leaves and tea bags – plus all the other detritus that is put into the rubbish bin – use them to replenish and enrich the soil. For those with a well-developed Scrooge-ish side, this particular form of thrift should be especially appealing. Anything that has been alive can be used, though it is advisable not to add the remains of animal and fish corpses or anything cooked as these can attract flies and/or vermin.
Roughly chop up banana skins, etcetera, as though making a very chunky salad for a large animal, and put them into the container. This chopping up might seem a nuisance at first, but isn’t really (especially when you think of the landfill-sites-versus-compost debate) and soon becomes a habit.
Composting begins in the container, when the ‘salad’ starts to ferment, lose its individuality, release its water content, reduce slightly in volume and, mysteriously, become faintly warm as it commences its return to the earth from where it came. It is a sort of ashes-to-ashes process, a metamorphosis in reverse. Some people may find it unappealing, but if you know what is happening and observe it, it becomes interesting.
When the container is full, a large, sturdy, plastic garden-waste sack will be needed with ready-made ventilation holes; alternatively the holes can be made with a paper hole-puncher.
Transfer the contents of the container to the plastic sack. Loosely secure the top and place it outside. Continue the squirrelling-away procedure in the container.
Each time you add more material to the sack, mix everything together. Probably the mixing of compost by hand isn’t everyone’s cup of tea, but there is nothing really unpleasant about it; in fact, it is most interesting if you remember what the ingredients were, and are now becoming. For those who don’t like the idea of touching compost – it is only the idea – wear gloves (see the anti-glove lecture on page 8). Garages supply free plastic gloves that, probably unbeknown to them, are ideal for this purpose. However, it is more interesting to feel the material on your skin. Remind yourself that you are adding to the earth, without which there would be nowhere for us to stand.
‘Soil is the breathing skin of the earth.’
Anon.
The inauguration of my first compost heap (before I graduated to the sack) took place in a plastic dustbin, which has a lid that can be secured by two clasps. When the lid was ‘locked’ and the bin rolled sideways and turned upside down and downside up, it acted like one of the more superior tumbler compost bins. Eventually it became too full, heavy and stuffy, and I moved on to the sack. Nevertheless, it was quite useful for the initial stage.
For those who have friends with lawns, ask for a small bag of mowings. Or get to know a public or private park gardener. Mowed grass creates heat, but if too much is added it clogs up the compost and makes it lumpy. Always sprinkle it on; don’t just dump it. Then mix well. What is this mysterious heat? What creates it? Mainly bacteria. As they work away, breaking down the organic material, their energy is released in the form of heat.
Straw is another ingredient that compost likes and which helps aerate it, but as bales of straw are not synonymous with towns, torn-up cardboard may be used instead. Compost does not like shiny Radio Times sort of paper.
Add dead plants from the allotment, too, but cut them up. Don’t add woody stems or leaves. Leaf composting is quite another branch of compost-making, but only for the patient and young, as it can take several years for leaves to turn into mould. Each weekend open the sack to give it fresh air, and mix it up. After only a few weeks everything will start to sink, become heavier, wetter, darker and unrecognizable, like a very organic hippopotamus-portion of muesli. It is still a long way from being compost, yet an equally long way from banana skins and tea leaves. It is now somewhere in between. Fruit flies may visit it, but they are harmless.
One of the main concerns of amateur compost-makers is: does it smell? This depends on your nose, and although compost could never be mistaken for Chanel No. 5, there is nothing unpleasant about it. What is more unpleasant is today’s obsession (when concerned with compost) with everything having to be odour free. How bleak an odour-free world would be!
Preparing containers for sowing
March is the month for the first-time window-box gardener to buy window-boxes and pots. Unless there is room for only one window-box, don’t buy anything too big. About 27 x 8 x 8in (70 x 20 x 20cm) is a good size, because even when the box is full of earth and plants, and watered, it is still liftable. Buy organic compost – not the one for seed sowing, but the more adult version for transplanting and planting. You will only have to buy it once if you have a compost sack and wormery. I also add some Arthur Bowers John Innes No. 3 peat-free compost. Put concave crocks (broken flower pots) over the drainage holes in the window-box to allow any water to drain away. Then fill with compost.
If filled window-boxes and pots are already available, remove about 1in (2.5cm) of the tired topsoil (this can be added to the compost sack), empty out the rest and sift through it to remove any old roots and lumps. Add a child’s handful of pelletized chicken manure, which resembles dry breakfast cereal, or, better still, use the above with added seaweed – available from some nurseries, garden centres and organic suppliers (see page 170). If you have already made compost and/or worm manure, mix in several large handfuls. This mixture should supply most of the nourishment the plants will need, though later in the year you can apply liquid seaweed, or use it as a foliar feed. Don’t be too generous with the fertilizer: this results in horticultural indigestion. Return the refreshed soil to the boxes and pots. Water – but don’t flood and create a bog.
My window-boxes are divided into three horizontal plots, according to the height and habit of the vegetables: for example, tomatoes in the back row, dwarf French beans in the middle and cut-and-come-again lettuce (or rocket) in the front stalls.
Sowing in a window-box
Take a support cane that is just a bit shorter than the length of the box. Place it on the compost, about 1in (2.5cm) from the edge, and create a furrow to the depth suggested on the seed packet, by pressing the cane down and moving it to and fro sideways, making certain that the soil on either side of the furrow is roughly the same in amount (this will be used for covering the seeds). Place a pinch of seeds in your clean palm and sprinkle sparingly into the furrow. Cover with soil made by the furrowing action. Write the date and the name of the seeds on a label – otherwise you will forget.
Some of the larger seeds, like the wrinkled, worried-looking spinach and the seahorse-tail segments of chard, can be sown individually. Ignore the packet’s instructions and sow close together, about 3in (7.5 cm) apart, not 8in (20cm) – there isn’t the space to spare and they don’t seem to mind living close together. Sow a couple more, just in case any fail to germinate.
With the larger seeds, count how many you have sown and add the amount to the label information. Sometimes you put in six, and up pop eight. With the smaller sprinklable seeds, don’t sow too many. You don’t want a glut of vegetables. Though the word ‘glut’ when linked to containers may seem a slight exaggeration, it is not. I’ve had ‘gluts’ of tomatoes (despite giving them away to friends and puréeing and freezing them), beans, lettuce and basil. It is better to sow little and often.
Sowing tip: medium-sized seeds (those too small for lifting with finger and thumb) can be sown individually by taking a light-coloured pencil, licking the tip, and then lifting the seed by the dampened tip and transferring it to the compost.
Worm menu
If you have ordered a wormery, the worms’ accommodation will arrive first by parcel post, giving time for you to follow the instructions and set it up for the tenants, who will arrive a few days later by letter post. Worms are not generally posted on Fridays, to avoid having them loitering in sorting offices during the weekend.
While waiting for their arrival, start collecting food; they only need a snack at this stage. Compost heaps and wormeries require different diets. This doesn’t mean that you have to open a canteen and cater specially for the reds and tigers. They like apple peel, bread, banana skins, baked beans, cabbage stalks and outer leaves, old cake, coffee grounds, outer celery stalks, old cheese, cucumber tops and bottoms, torn-up newspapers, eggshells, egg and milk cartons (soaked first), cold porridge, pasta, pineapple skin, cooked potatoes, plate scrapings, tea leaves and tea bags. They don’t like the peel of lemons, limes or oranges, or onion skins, which are all too acid. They hate nappy liners, grass and cat or dog faeces. As they have no teeth, they prefer to have their food cut up small.
From now on, instead of throwing away eggshells and all the other menu items listed above, start collecting them. The eggshells can be dried in an oven – or let the air do the drying and then crunch them up.
Because they have no teeth, food is ground down in the worms’ gizzards. Grains of sand and mineral particles collect in the gizzard, the muscular walls of which contract, compressing the hard particles and food while mixing it with digestive juices and grinding it down. Birds’ gizzards work in a similar way, and so do waste-disposal units; did their inventors copy the worms – or birds?
Why do worms need eggshells? Eggshells provide grit and calcium carbonate, which is necessary for reproduction and to prevent the wormery from becoming too acid. Powdered limestone, which does the same job, can be used instead. But eggshells are free, where limestone is not, and when using the latter you miss out on the collecting, drying and grinding process which makes you more a part of the wormery process – an aspect some would perhaps be prepared to sacrifice.
Worms’ arrival
When the worms arrive they should be placed in the wormery immediately and allowed to recover from their journey. Don’t peep at them: they don’t like light and need a little privacy.
Fifth parsley check
As soon as the March air becomes a little warmer and the sun a little stronger, the four-leaved parsley seedlings can be taken for a visit to the outside world – like putting a baby out in its pram for the first time. Before it gets dark, bring in the seedlings. Repeat these acclimatization outings each sunny day.
The first time I (unsuccessfully) grew melons, I took great care to follow my own advice, to the extent that I had to rush home early from a party, suddenly having remembered the stranded melon seedlings freezing to death outdoors.
By now the seeds you ordered should have arrived by letter post. If all the produce they will produce were to be returned – the total harvest of stems, shoots, flowers and fruit – a small van would probably be needed.
The sound of them rattling like small maracas in their slim packets fills you with expectation.
 Seeds to sow now, indoors
Aubergine (Solanum melongena) ‘Slim Jim’
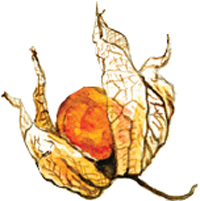
Cape gooseberry (Physalis peruviana, syn. P. edulis)
Lady in a mosquito net
Cape gooseberry is ideal for tubs as it grows vertically and is perennial; though the seed packet’s instructions say ‘Grow as a half-hardy annual’, there’s nothing half-hardy or annual-ish about my physalis. In Arabic it is called Sitt el Namousia, lady in a mosquito net. Each fruit is ensconced in its own private paper lantern. To begin with it is bright green. As it grows larger it becomes paler until much to one’s surprise through its paperiness a small yellow ‘bulb’-like fruit can be seen. As the lampshade becomes still paler, the fruit becomes larger, brighter and more orange, the lady glowing gently through her mosquito net. If the lantern is left on its stem the sweet-sour fruit becomes smaller, eventually returning to its seed stage, while the lantern changes from paper to Victorian lace. There is nowhere one could buy such a delicately veined and ribbed lantern.
 Seeds to sow now, outdoors
Lettuce (Lactuca sativa), ‘Salad Bowl’ and ‘Red Salad Bowl’
Perpetual spinach (a member of the beetroot species)
New Zealand spinach (Tetragonia tetragonioides)
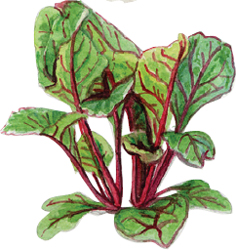
Swiss chard (Beta vulgaris Cicla Group) ‘Bright Lights’ (a member of the beetroot species)
Mignonette
Nasturtium (Tropaeolum majus)
Night-scented stock (Matthiola longipetala subsp. bicornis )
Virginia stock (Matthiola incana) with its minute cinnamon-coloured seed
Some of these seeds (for instance New Zealand spinach and Swiss chard) can also be sown in the autumn when sowing possibilities are more limited. Depending on how much space there is, it may be advisable to keep some of the autumnal germinators until then, though chard in its rainbow version, ‘Bright Lights’ (sometimes called ‘Jacob’s Coat’ or ‘Rainbow’ chard), is so appealing that it is worth sowing in both spring and autumn.
The stems and leaf veins of chard may be red, yellow, burgundy, cream or white, the colour almost phosphorescent, appearing to be illuminated from within, seeping up from below. The leaves may only be small and some are a little tough in the early part of the year. This is not surprising, since they have had to combat rain, wind, cold, ice and snow. But they provide a steamed salad that most rabbits would envy, even without a trickling of sesame oil and rice vinegar. Alternatively, instead of being turned into a salad, they can be dropped into simmering vegetable stock. As the year progresses and the weather relents, the plants do likewise and relax, producing a new, tender leaf crop.

WHAT TO EAT NOW
Steamed Swiss chard salad
If leaves are big, cut the stems into 1in (2.5cm) lengths and place on a steamer rack. Cover with leaves. Steam until wilted. Chard is so full of taste and juice that it is delicious eaten as it is, undressed. If this does not appeal, add, while still warm, a trickle of olive, sesame or sunflower oil and either lemon or balsamic or rice vinegar. Eat warm or cold.