Chapter 6: Prototyping
“The client just doesn’t get it”
SO YOU’VE MADE it this far, and if you hung with me you’ve generated a good amount of design assets. Now it’s time to roll everything up into one holistic unit and bring it to life. So far, all of the assets you’ve created have been static. And although static assets like wireframes and storyboards play a crucial role during the design process, they do leave something to be desired. Things like interactivity, movement, timing, and animation are really important for making “the light bulb go off” when communicating your idea.
That last bit is important—“make the light bulb to go off.” Technology-related design work is complicated by nature. And no matter how good your wireframes and documentation are, nothing elicits more genuine feedback than a functional prototype. I can’t tell you how many times I’ve generated wireframes and application flows and gotten client approval. Then when given the app, the client disappointingly mumbles, “Hmmm . . . I didn’t think it was going to work like this.” Shocked, I think to myself, this is exactly what was in the wireframes. But that’s okay; that’s the whole point. The goal is to eliminate any discrepancies before you get into full-blown production.
But take a step back—like all the tools and techniques in this part of the book, prototypes are another tool for communicating ideas (arguably the best tool). Almost anything can be prototyped—UI design, application functionality, or even entire products or services. Good ideas need to be held, poked, prodded, and played with. So many good ideas go unheard or get squashed by organizational politics because they don’t stand out or capture attention. Our field is saturated with people who rely on dry presentation decks to communicate ideas. Sadly, ideas die when they’re presented with cheesy clipart and slides covered in text. It’s up to you to make your ideas stand out. This chapter gives you the edge you need to make sure your teammates, clients, and stakeholders really “get it.” In this chapter, you find out how to
• Create low and high fidelity prototypes.
• Communicate the value of prototyping.
• Refine ideas with prototypes.
• Use prototypes for basic usability testing.
When Should I Prototype?
In the last few chapters, you produced static wireframes and sketches, which work well to get an idea across, but nothing makes an idea really stick like a real functioning prototype. Prototyping is a crucial part of my design process, and I try to prototype as early and often as possible. In the context of software, there are at least four major scenarios where I find prototyping really valuable.
1. Communicating a New Idea
When you’re building something truly innovative, chances are others will have a difficult time “seeing your vision.” Whether it’s a new product or service or a new way to collect form data, static mockups are only so “sticky.” Build a prototype for maximum sticking power. I frequently use prototypes when pitching ideas as a way to get the stakeholder or team enthusiastic.
2. Creating a Proof of Concept
When you’re not sure if something is even possible, prove it out. Instead of avoiding a particularly difficult feature, spend a little time building a proof of concept to see if it’s feasible. “Difficult” features are usually the ones that make for the best user experience, but are also the ones that result in going over budget and delivering late. Building a proof of concept early on will help you avoid potential project pitfalls and plan for additional costs or resources. I often create quick proof of concepts to experiment with atypical interactions, functionality, or things that include a hodgepodge of hardware integration.
3. Conducting Basic Usability Testing
Creating paper prototypes or click-through wireframes is one of the easiest and cheapest ways to conduct basic usability testing. When users have something real in their hands, it’s surprising how much it changes their perspective on how the idea will come together. The closer the prototype is to the actual intended experience, the more genuine and useful their feedback will be. Using prototypes for usability testing is particularly useful when you’re designing for a touch-based or gesture-based application, say for a tablet or kiosk.
4. Determining Whether an Idea Is Worth a Bigger Investment
Use prototypes to gather insights and make a strong business case for your idea. It’s hard to get funding for ideas that are merely based on speculation and historical data. Prototyping your idea will give you real tangible firepower to help move your idea along. And in the event that the idea turns out to be a flop, that is good, too. Learning from your mistakes will ultimately lead you to better and more creative approaches.
Regardless of the prototype context, I get the best results when I’m able to create at least two prototypes throughout the design process (see Figure 6-1). The first prototype is usually deployed during the design-thinking phase as a means to level-set with the clients or stakeholders and validate the overall direction of the user experience. In practice, this prototype should be pretty rough, say a paper prototype or a series of clickable static images. The second prototype is usually deployed during the visual design phase and should be as high fidelity as the budget allows. Ideally, this prototype should show things that are hard to convey with static images (animations, timing, and interactivity). The goal of this high-fidelity prototype is really to give the client or stakeholder a preview of the finished product. The point is to uncover any ergonomic flaws and refine the product before it’s released.

Figure 6-1: Including at least two prototypes in the design process will help you vet many design flaws before you get into production.
What Makes an Effective Prototype?
Prototyping can be a bit of a balancing act. Ideally, you want to strike the right amount of functionality without doing too much. There is not a “right” amount of prototyping, fidelity, or functionality; all these things will vary depending on your specific project and available resources. Regardless, truly effective prototypes share some of the following commonalities:
• Fast—Being able to produce a lot of ideas very quickly will ultimately allow new and better ideas to emerge as you validate concepts and refine them. Prototypes (see Figure 6-2) start losing their value if the process of creating them takes so long that you miss the opportunity to iterate on them.
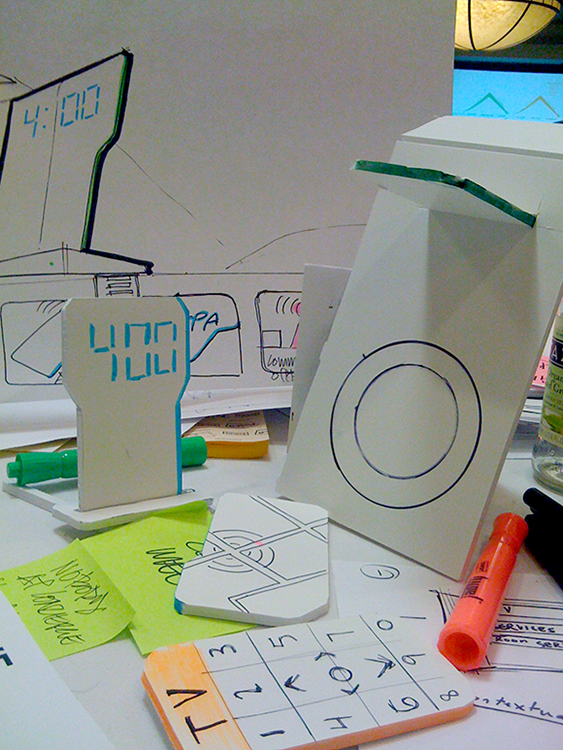
Figure 6-2: Paper prototypes are easily made and allow for quick feedback and iterations.
• Disposable—Don’t get too attached to your prototypes. Ideally, you should be able to quickly validate an idea and throw it away if it isn’t working. Most of your initial thoughts on how something should work are likely to be wrong. If your prototypes aren’t disposable (see Figure 6-3), you will inevitably force them to work, to justify the effort in creating them.
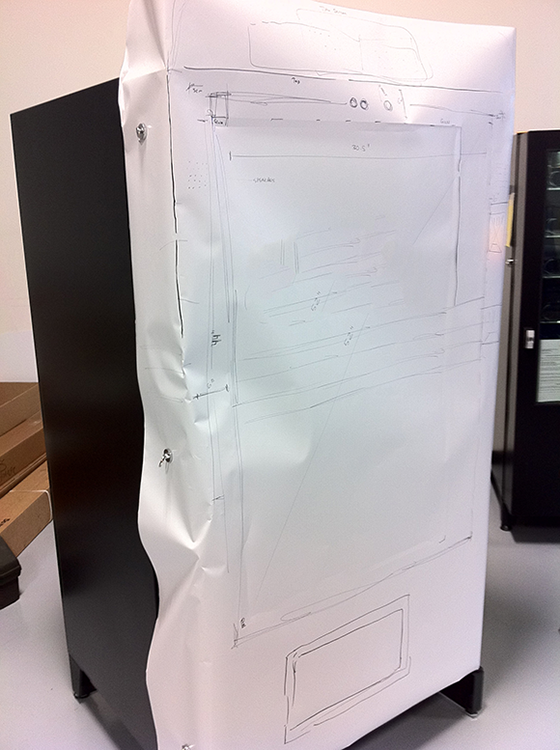
Figure 6-3: Early on in the design phase, keep your ideas fast and loose. This is an example of a disposable paper prototype used during an ideation session for an interactive vending machine.
(Copyright 2012 Kraft Foods)
• Focused—Pick the two to four key scenarios or ideas that need the most communication. Don’t aim to prototype an entire product or system. Focus on key elements of the user experience first; then broaden your focus. Focused prototypes (see Figure 6-4) will give you concrete samples to facilitate conversations with teams and stakeholders.
As you’re experimenting with different prototyping techniques, there is one guiding principal—from Bill Buxton’s book entitled Sketching User Experiences: Getting the Design Right and the Right Design—that I find to be particularly useful:
“It is fidelity of the experience, not the fidelity of the prototype that is important...”
In other words, while the quality of aesthetics and the implementation are important, they are far less valuable than the user’s experience. Focus on what the system actually does rather than on how it works or looks.
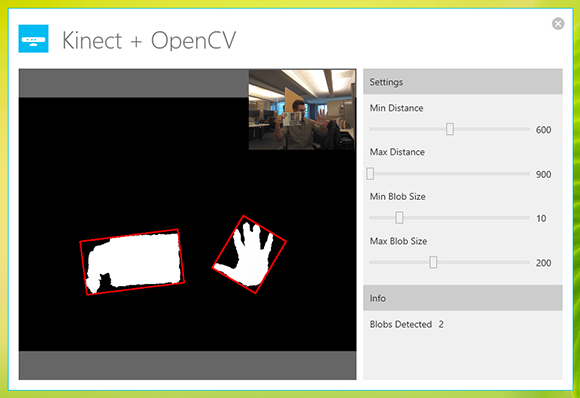
Figure 6-4: Prototyping specific interactions can help you evaluate ergonomics before you go into production. This is an example of a gesture-based prototype that recognizes arbitrary shapes hand movements.
Fake It—Be Clever, Not Complicated
Over the past few years, prototyping has become a very popular deliverable in the UX field. With good reason: It fills in the gaps where static design leaves off and development begins. In fact, click-through wireframes (one form of prototyping) have seemingly become the de facto means of prototyping software. Click-through wireframes are great for many situations, but they still require a bit of design up front before you can make effective prototypes out of them. You don’t always need wireframes to create prototypes. Prototypes can exist in many forms. If you find yourself spending too much time trying to decide what a prototype will and will not do—fake it; be clever, not complicated.
Again, the goal of creating a prototype is to communicate and validate an idea. Sometimes this means having someone sit behind a curtain controlling the system while a user is touching a mocked up interface. Seriously, this is great way to prototype ideas quickly and on the cheap. As noted in Buxton’s book, the technique is commonly referred to as the “Wizard of Oz Technique”:
“Making a working system, where the person using it is unaware that some or all of the system’s functions are actually being performed by a human operator; hidden somewhere “behind the screen.”
Making “Little Bets”
The last thing I want to talk about before getting into the tools and techniques is prototyping as a mindset. For many large-enterprise organizations, adopting the nature of prototyping will require a change in mindset. It is not uncommon for large organizations to incentivize their management to minimize risk and increase efficiency, which tends to minimize failure and any form of trial and error altogether. This mentality is rooted in the traditional waterfall model, which focuses on a very sequential method of breaking down tasks and leaves little room for experimentation or creativity. Thus, many organizations are unwilling to prototype an idea that doesn’t already have a well-documented business case and business model.
The problem with this mentality is that it relies heavily on the organization’s ability to predict things like consumer demand and market conditions, which are constantly shifting. And the “measure twice; cut once” approach is relatively slow and doesn’t align well with the fast pace of design and technology trends. The classic argument against the traditional process is illustrated when comparing the cost of fixing a software bug. It’s a common lesson that the cost to fix a bug grows exponentially throughout a project’s lifecycle. The cost of fixing a bug may be ten times higher during development than it would be if it had been identified during a planning phase.
Approaching ideas with a prototyping mentality will allow you to be limber and discover new and better ways of doing things. These “little bets” will allow you to create more informed business cases and product decisions rooted in real insights from real people. In his book Little Bets, Peter Sims writes:
“In this era of ever-accelerating change, being able to create, navigate amid uncertainty, and adapt using an experimental approach will increasingly be a vital advantage.”
Awesome Tools for Prototyping
It’s always good to have a handful of prototyping tools in your UX repertoire. I use a few different tools for different types of prototypes. The tools listed in the following section are ones I find most useful for prototyping a broad set of digital applications. These tools are great for quickly prototyping mobile and desktop apps, large format installations, hardware plus software, and motion.
As you experiment with different tools and frameworks, you’ll figure out which ones allow you to express your ideas quickly and effortlessly. To be honest, all tools have some tedious or cumbersome functionality that you’ll have to deal with. A lot of good tools are out there, but there’s no one be-all prototyping tool at the moment. Don’t be afraid to mix and match tools to produce more interesting results.
Generally speaking, it doesn’t really matter what tool you use. You might choose not to use any of these tools. That’s okay. You should use the tool or framework that you’re most proficient with—JavaScript, .Net, PowerPoint, Flash, whatever. The whole point is to facilitate your creative thought process and inspire you to create original solutions. Here are some tools that get my personal Grade-A stamp of approval.
Microsoft SketchFlow
SketchFlow (see Figure 6-5) is easily my favorite prototyping tool. Although it has a technical slant to it, you don’t actually need to know how to write code to use it (but you can if you want to). I prototype almost everything with this tool and it supports many common scenarios from a single UI—animations, touch interactions, sound feedback, drag and drop, and so on. One of its most overlooked but most powerful features is that it supports behaviors, which are code snippets of functionality you can literally drag and drop into your project. It’s also backed by a community of people who have created and shared their own behaviors free for download. And it exports Silverlight, so you can view the prototype on both Windows and Mac computers.
Use SketchFlow for
• Quickly creating click-through application flows
• Prototyping touch interactions
• Demonstrating animation and screen transitions
• Integrating audio feedback
• Prototyping desktop and mobile applications
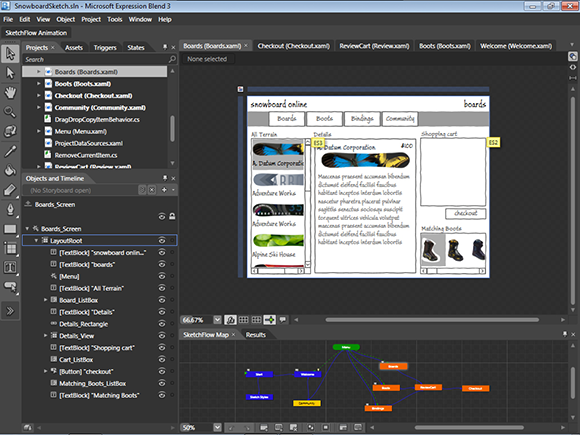
Figure 6-5: Microsoft SketchFlow has a ton of flexibility for creating high and low fidelity prototypes. It also integrates well into the Microsoft development stack.
Adobe Edge Tools
I mentioned the Edge tools (see Figure 6-6) in the previous chapter as a good wireframe tool. Not surprisingly, it’s also a great prototyping tool. This suite of tools has great support for creating granular animations and has a bunch of nice features that allow you to test your designs on a variety of mobile hardware. If you are building a web-based application the Edge tools are probably your best bet. Additionally, much of the code generated during the prototyping process can also be leveraged throughout the production process.
Use the Edge tools for
• Quickly creating click-through wireframes
• Demonstrating animation and control states
• Basic usability testing and user feedback
• Prototyping web-based applications

Figure 6-6: Edge is a great prototyping tool.
Adobe After Effects
Prototyping motion is one of my favorite parts of a project. Using motion for subtle visual cues, control states, and screen transitions will ultimately give your application its personality and character. Really, any animation tool will work for prototyping animations. I use Adobe After Effects (see Figure 6-7) mainly because it easily imports other design files like rasterized images, vector-based artwork, and video footage from the Adobe suite. After Effects is a pro-level tool and is capable of producing some really polished deliverables, but it does have a pretty steep learning curve. I often use After Effects to create a short vision prototype or vignette to give a preview of what the finished product will be like.
Use Adobe After Effects for
• Showing high-fidelity interactions
• Creating custom animations for screen transitions and control states
• Creating a video prototype of the app’s overall look, feel, and intended functionality
• Getting stakeholders enthusiastic about new ideas
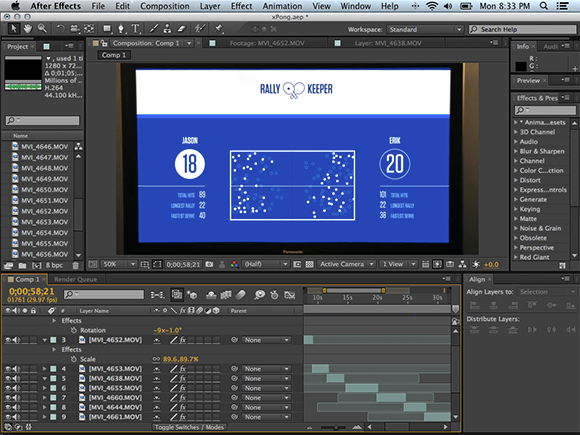
Figure 6-7: Although After Effects has a steep learning curve, it’s one of the best tools for prototyping motion.
Keynote / PowerPoint
Presentation tools like Apple Keynote (see Figure 6-8) and Microsoft PowerPoint have become popular tools for prototyping interactions and interactive wireframes. With relative ease, you can link pages together to simulate an application flow and create the illusion of interactivity with wireframes. One really nifty use for these types of prototypes is when designing for tablets. Keynote has an iPad companion app that, when running full screen, does a pretty good job of simulating basic functionality. The same is true for Windows-based tablets when you run PowerPoint full screen. Even better, there is a large community of folks who have been posting UI-specific templates for all of the common presentation tools.
Use Keynote or PowerPoint for
• Showing application flows
• Basic usability testing for control layout and placement
• Quickly creating interactive wireframes that require no coding skill
• Validating touch sizes and touch targets on mobile device screens

Figure 6-8: Using presentation tools like Apple Keynote you can simulate application flows and basic interactivity.
HTML / JavaScript / CSS3
Although these are not the most traditional prototyping tools, if you have some JavaScript chops, these technologies make for some killer prototypes. In the vein of expressing and validating ideas quickly, JavaScript is an awesome tool for quickly pulling together functionality and creating interactive concepts. Frameworks that run on top of these technologies, such as jQuery UI, jQuery Mobile, and jsFiddle, allow the tech-savvy artist to quickly cobble together functional prototypes without having to worry too much about the details. There is also a very active community of folks who contribute well-designed themes and templates that you can use to quickly get something up and running that looks pretty nice.
jQuery mobile (see Figure 6-9) has the added benefit of having prebuilt touch-friendly controls that follow best practices for touch-centric devices. These controls will save you a ton of time when building mobile touch-enabled software. Most, if not all, mobile browsers have pretty advanced html and JavaScript support, which makes it easy to test a concept across a variety of deices and screen sizes.
Use javascript/html/css for
• Creating true-to-life functional prototypes
• Prototyping code logic
• Creating prototypes that will work on many mobile devices
• Validating touch sizes and touch targets on mobile device screens
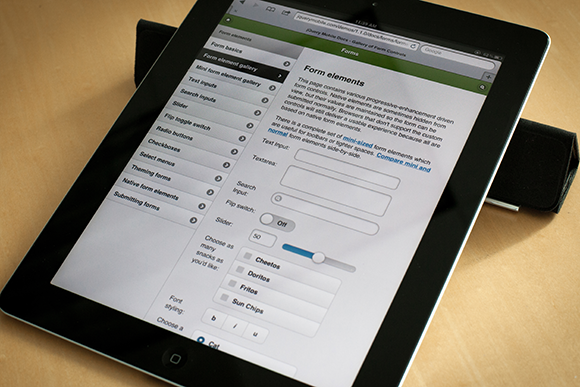
Figure 6-9: JavaScript frameworks like jQuery make it fast and easy to integrate for realistic prototypes.
Axure RP
If you’re working with a medium- to large-size team in an environment that requires formal documentation and design deliverables, this tool really streamlines that whole process. Axure RP (see Figure 6-10) has some well-thought-out collaboration features and a bunch of premade templates to help give your prototype a jumpstart. Although the tool is marketed toward web design, there is a lot of opportunity to extend the platform to any type of app design. Generating documentation and formal deliverables can be a tedious part of the design-thinking phase of a project. Axure RP simplifies a lot of these cumbersome tasks with a customizable MS Word exporter that ensures all your documentation is consistent and professional looking. And if you have a distributed design team, it has a great versioning and feedback support.
Use AzureRP for
• Creating click-through wireframes or rich interactive prototypes
• Managing feedback and sharing prototypes across a medium to large team

Figure 6-10: Axure RP is targeted for mid-to-large teams and provides nice automation tools for generating documentation.
Arduino, Openframeworks, Processing
I group these three platforms together because they fall into a category that is commonly referred to as “Creative Applications.” Many awesome experiments have been created over the past few years with these technologies. These three technologies (see Figure 6-11) can work together or independently for some really compelling results. They are typically found in interactive art installations and large-scale creative applications. Arduino is an easy-to-use microcontroller that aims to make hardware interaction more accessible. Openframeworks is a C++-based creative coding platform that greatly simplifies the coding involved with making interactive systems. And Processing is a java-based environment for creating highly visual generative art, animations, and interactions.
Use Arduino, Openframeworks, and Processing for
• Prototyping data visualizations
• Creating hardware + software proof of concepts
• Experimenting with sensors and atypical forms of input

Figure 6-11: Openframeworks (left), Arduino controllers (middle), and Processing (right) are targeted towards creative technologies and are often used in large-scale installations.
Prototyping Techniques
Okay, at this point we’ve talked about the value of prototyping, the characteristics of effective prototypes, and the tools to get started. By now, you’re probably chomping at the bit to start building your own. So without further ado, I’d like to share some of the prototyping techniques that I’ve used on my own projects with good success. All of these techniques are aimed to be “Fast, Disposable, Focused”—the themes that we established earlier in the chapter. Hopefully, you’ll pick up a nugget or two that you can use for your own projects.
Prototyping Technique #1: Paper Prototypes
Skill level: Beginner
Time required: 45 minutes to 1 hour per prototype
What you need:
• Foam core board
• Exacto knife
• Markers and pencils
• Post-It notes
• Glue
• Plenty of paper
Paper prototypes are one of the fastest ways to bring an idea to life. Creating paper prototypes are great for brainstorming with a group of people during the early stages of a project. You can use multiple sheets of pages to represent different views in the application. And for transient screen elements or controls, Post-It notes can be overlaid to crudely show functionality. Paper prototypes are really useful for determining realistic sizes and uncovering ergonomic flaws. For example, when designing for a tablet device, it’s common to create interface designs that are cramped or too small for a comfortable touch experience. Paper prototypes (see Figure 6-12) help create to-scale interfaces that are more likely to have better ergonomics.
One tactic I use a lot is to literally wrap the hardware in paper. For example, on one project, we were designing an interactive UI for a vending machine that had a 42-inch touch screen. Instead of trying to guesstimate the ideal button placement, we wrapped the machine in paper and started drawing the screen elements where they were most comfortable (refer to Figure 6-12). Another example where this came in handy was when we were building an airport way finding application. The hardware consisted of a 52-inch touchscreen, which in reality was almost too big for an interactive display. The main reason being that at a comfortable touch distance (about 15 inches), the average eye could see only a portion of the screen at a time. The remainder of the screen ended up in users’ peripheral vision and required users to turn their heads to interact with the ends of the screen. This proved to be a poor user experience. So we covered the touch screen in paper and experimented with a variety of sizes and placement to arrive at our optimal layout.
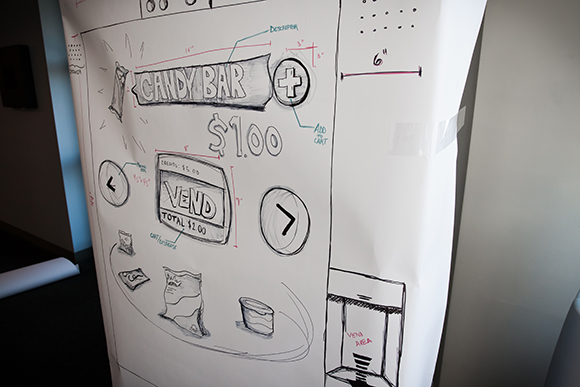
Figure 6-12: We wrapped a vending machine with paper to rough out the ideal sizes for the design.
Prototyping Technique #2: Interactive Wireframes
Skill level: Beginner to intermediate
Time required: 2 to 3 hours (maybe more if you have a complex app)
What you need:
• Any software capable of simulating click-through functionality
• Keynote or PowerPoint
• Microsoft SketchFlow
• Adobe Flash Catalyst
• Axure RP
• An existing application flow
This type of prototype is best used for gathering feedback on overall functionality and organization of the application’s features and screens. I usually create click-through or touch-through wireframes as a gut check once I’ve started going down a path (see Figure 6-13). Producing interactive wireframes creates a great opportunity to validate your designs with potential users and stakeholders.

Figure 6-13: Using wireframes to create a click-through prototype is helpful to visualize the flow of the application.
Getting started is pretty easy. First, import your wireframes into your tool of choice; scanned in sketches or digital wireframes will do the trick. Next, create “hot spots” on the areas of the screen that will link to other screens. Then link the screens together to simulate clicking through a particular scenario. When you’re happy with it, save it and hand it over to someone who will give you honest feedback. Watch people as they interact with the screens. Do they hunt for any buttons or features? Do they have a hard time understanding how to navigate from screen to screen? Do they get lost and look for a way to reset? These observations will quickly give you an idea of what is working and what to refine.
One thing I like to do after creating interactive wireframes is to see how fast I can get through the screens. Especially with touch applications, I will touch through all of the screens as fast as I can. This is mainly to ensure that the UI doesn’t “get in the way” as users become acclimated to the software.
Conception to Construction in 30 Days Flat
When time is tight and you need to get people on the same page fast, prototyping is often your best bet. In the following case study, we had an extremely aggressive timeframe and no room for error. We used an interactive prototype to convey our vision to our client and then we leveraged the assets for the production application. From concept to delivery in four weeks flat, this is how we did it.
The Brief
A client came to us with an exciting yet challenging opportunity that involved a high-profile event, a lot of data, and a touch-screen application. Normally, this kind of project fits nicely into our wheelhouse, but there was one catch: we needed to go from conception to construction to delivery in just a few weeks. The project required finding and engaging an efficient way to translate an 800-page, text-intensive book into a single touch application. We built interactive prototypes to streamline our creative process, which allowed us to nail the design and deliver on time.
The Challenge
Excited by the opportunity, we quickly geared up to tackle the project. It did not take long to discover the complexities involved. The major challenges included
• Translating an 800-page book filled with data points into an easy-to-navigate touch application.
• Accommodating non-tech-savvy users. The client requested that we cap the interaction to a maximum of three touches to find any particular piece of information.
• We have only 30 days to design and produce the app.
The Solution
With such an aggressive timeline, we knew it would be crucial to get the client’s approval early as we experimented with design concepts. We started with the usual (but accelerated) sketching, information architecture, and wireframe activities, and when we felt like we had a good approach to the overall organization and functionality, we huddled with the client to walk her through our approach. Figure 6-14 shows some of the wireframes that we produced.
Unfortunately, the meeting didn’t go as smoothly as we’d hoped. The client couldn’t connect the dots between our black and gray boxes and arrows and the ultimate goal of having an engaging touch application. In other words, the client just didn’t get it. The client politely offered up some suggestions that we took note of, but the stubborn designer in me knew we just needed a better way to communicate our vision.

Figure 6-14: Very early wireframes showing our approach to organizing the application’s information.
Running out of time, our team regrouped and decided to create a prototype to get our designs “green-lighted.” The goal was to produce a prototype that was highly realistic—both in how it looked and how it functioned. We decided to use a combination of high-fidelity UI mockups that were generated in Adobe Illustrator and Photoshop and make them interactive by using Microsoft SketchFlow. First, we imported art assets into SketchFlow and created a basic application flow of the primary use case. Then using some animation, we were able to achieve some very rich transitions between the pages. The only thing left was to wire up the screens with a touch behavior that would simulate how the application would actually work. When it was finished, we ran the prototype full screen on the touch hardware and essentially simulated how the final product would work. What’s more, we were able to do all of this in about three days. Figure 6-15 shows the high-fidelity designs in SketchFlow we used for the prototype.
When we invited the client back to review the app a second time, it was a hit! The client got it and was able to directly interact with the touch screen and manipulate the software exactly as we intended. We won the approval and moved on to production. Prototyping out our ideas early on allowed us to “nail down” a good design quickly and move it into production without any major setbacks along the way. Figure 6-16 shows the final application we created.

Figure 6-15: Using SketchFlow, we quickly produced a high fidelity prototype that showed screen transitions and the final artwork before we wrote any production code.

Figure 6-16: The final application. The design was virtually unmodified from the prototype to production.
Prototyping Technique #3: Video Prototyping
Skill level: Intermediate to advanced
Time required: 4 to 8 hours
What you need:
• Video editing software
• Adobe After Effects
• Final Cut
• Green paper
• Video camera
• Camera tripod
• Application concept
When developing applications that are interaction-heavy, say a gesture-based UI or multi-touch application, it can be difficult to convey the overall concept with static images. And in many cases, clients want to see what the final product is going to look and feel like before the development is finished. So how do you show them the final product without actually building it? You guessed it—video prototyping.
Using video as a rapid prototyping tool is an efficient and cost-effective way to visualize ideas and concepts. What’s more, video prototypes can be created with simple everyday equipment you probably already own. Video prototypes are also a nice substitute for in-person demos. Having a video to accurately convey the user experience will help make sure you pass along a consistent message as your prototype changes hands.
The basic concept of video prototyping is to film a “green screen” and a few choreographed interactions. Then import the footage into video editing software and composite UI graphics over the original footage. Export the video and—voila—you have a video prototype! Now, it’s time to walk through the steps in a little more detail.
Set Up the Hardware and Green Screen
To get started, find some hardware. The hardware doesn’t need to be the exact hardware used in the final product—any monitor, touchscreen, or monitor-like surface will do. Next, find a well-lit room. Make sure the lighting is as even as possible. Any shadows will cause weird video artifacts that will make the final video seem of low quality. Then measure the surface area of your hardware and cut the green paper to that size. Use some double-sided tape or adhesive and attach it to the hardware. Try to eliminate wrinkles or folds in the green paper (see Figure 6-17).

Figure 6-17: By simply affixing some green paper, you can transform any flat surface into a potential UI canvas.
Practice Your Demo
Before you start filming, you’ll need to have a rough idea of what you will be demonstrating. I usually create a quick demo script of the interactions and concepts. It’s helpful to sketch out a life-size mockup of the UI and give it a few practice runs (see Figure 6-18). Make sure you keep your timing and hand movements smooth and calculated. This will make the post-production work much smoother.
Film It
The next step is to set up the camera and capture some footage. The easiest way to capture footage is to line up the camera and hardware and film at a straight-on angle. Additionally, you can add alternative vanish points by filming from left- or right-side perspectives (see Figure 6-19). This will provide you with footage for adding transitions or cut-shots for more compelling results.
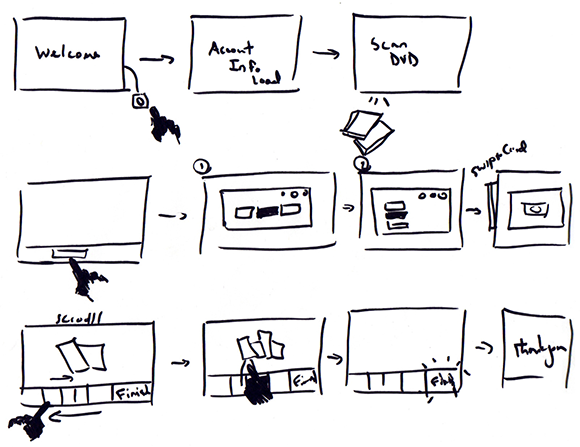
Figure 6-18: Sketching out a rough storyboard is the easiest way to choreograph the interactions in your video prototype.

Figure 6-19: Filming the interaction against a green backdrop makes it easy to key out the background in video editing software.
Video Compositing
Compositing sounds complicated, but don’t worry; most modern video software does the hard work for you. First, import the video footage into your video software of choice. Adobe After Effects and Final Cut are my tools of choice, but any video software with a Chroma-key feature will work. Next, import the UI graphics for your application into the video software. Once the graphics are placed in the scene, scale and skew them so they line up with the screen boundaries in your video footage. In After Effects, you can create a 3D layer from your graphics and map them to a surface relatively easily.
When all of the graphics are placed and lined up correctly, arrange them so they are behind the green screen footage. Then, using the Chroma-key feature, select the green screen in your footage to key out any green pixels and reveal the UI graphics beneath (see Figure 6-20).
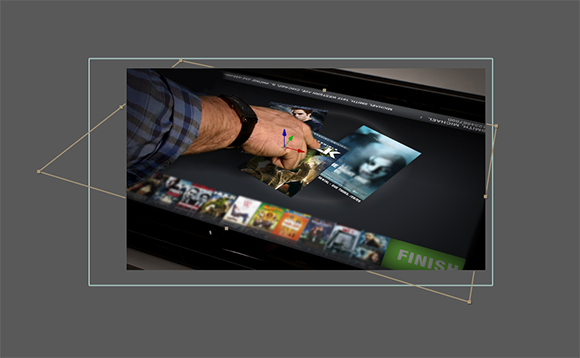
Figure 6-20: Replacing the green screen with your artwork can create a compelling video prototype without writing any code.
Lastly, track the UI graphics to your hand movements to create simulated interactivity. When you’re happy, render out the video and that’s it! Now you have a portable, compelling video prototype that’s sure to get anybody excited.
Summary
Prototyping is all about refining concepts in a strategic and deliberate manner to arrive at a well-designed product. With the techniques in this chapter, you should be able to quickly and effectively bring your ideas to life and get feedback early on in a project’s lifecycle. Letting your users and stakeholders touch, poke, and prod your concepts is the best way to communicate and validate your design decisions before making a bigger investment.
And there you have it. This chapter concludes the design-thinking portion of this book. We covered a lot in the last few chapters. And at this point, you should be sketchin’, info-architectin’, wireframin’, and prototypin’ your way to the right design. Hallelujah!
The next few chapters are dedicated to what I like to call “Making it my own.” In other words, now that you’ve figured out all the guts of the design, it’s time to give it some character, personality, and charm. And for that, you’ll need a heaping spoonful of visual design: color, typography, and motion—full steam ahead!