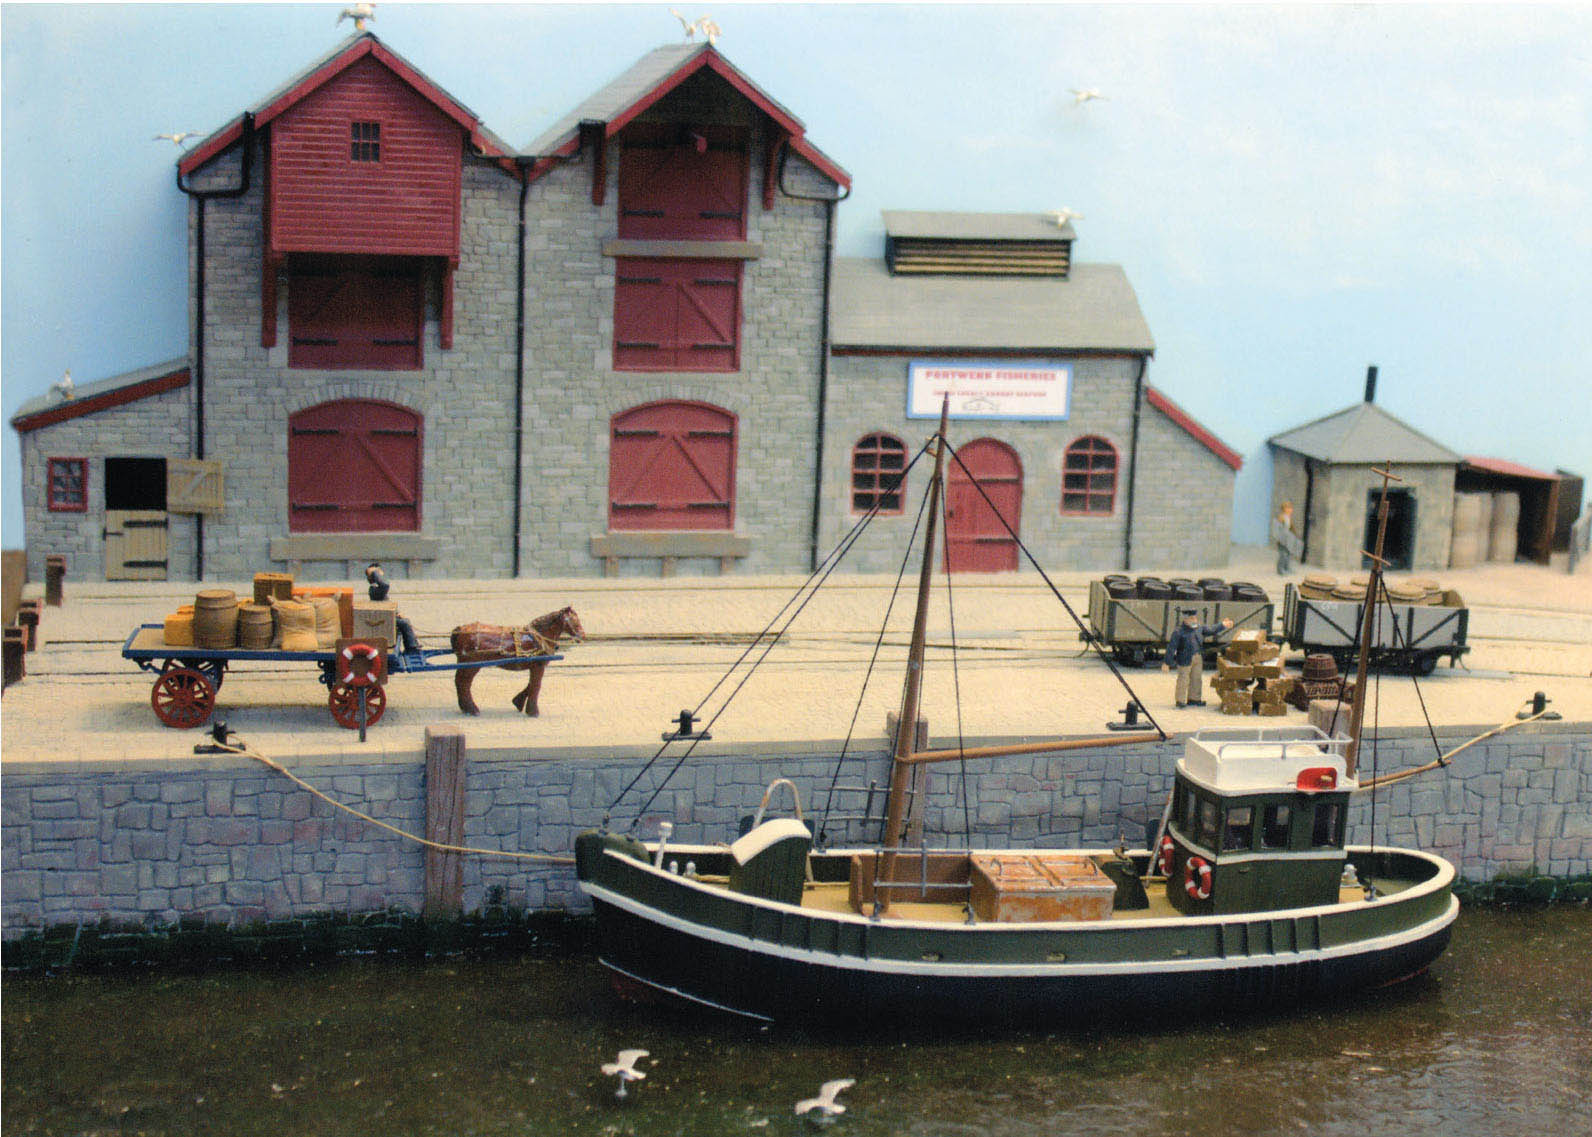
Porthwenn, modelled from my original plan produced for Railway Modeller magazine. It was built by the members of Crawley Model Railway Group.
PORTHWENN QUAY
PORTHWENN QUAY
For this first project I have presented part of a quayside model constructed to 7mm scale. The inspiration for the model came after many holidays spent on the coast of north Cornwall. The Atlantic coastline of Cornwall is dramatic and wild, but what also attracted me was the county’s rich industrial heritage. Mineral seams of tin and copper were found in abundance, together with granite and slate. All these materials were in great demand both for the developing home market and away from our shores.
All this industrial wealth was tapped, with mines appearing right along the coast as well as inland. The north of the county was dominated by the wilds of Bodmin Moor, and granite was quarried here, together with slate found in large deposits on the edge of the moor near Delabole.
Tramways were constructed to move these materials to the ports situated along the coast and river estuaries. This project assumes that a narrow-gauge railway was laid on the track bed of such an original horse-drawn tramway. This was constructed to transport the minerals from the mines and quarries down to a fictitious port positioned on the Camel estuary.
I needed a name for this fictitious railway and the port it served. After watching the television drama series ‘Doc Martin’ I thought the fictitious name given by the production team of ‘Portwenn’ would suit my purpose, although I decided to change it slightly to the more Cornish-sounding name of ‘Porthwenn’. My imaginary railway therefore became the Camelford & Porthwenn Light Railway.
Porthwenn, modelled from my original plan produced for Railway Modeller magazine. It was built by the members of Crawley Model Railway Group.
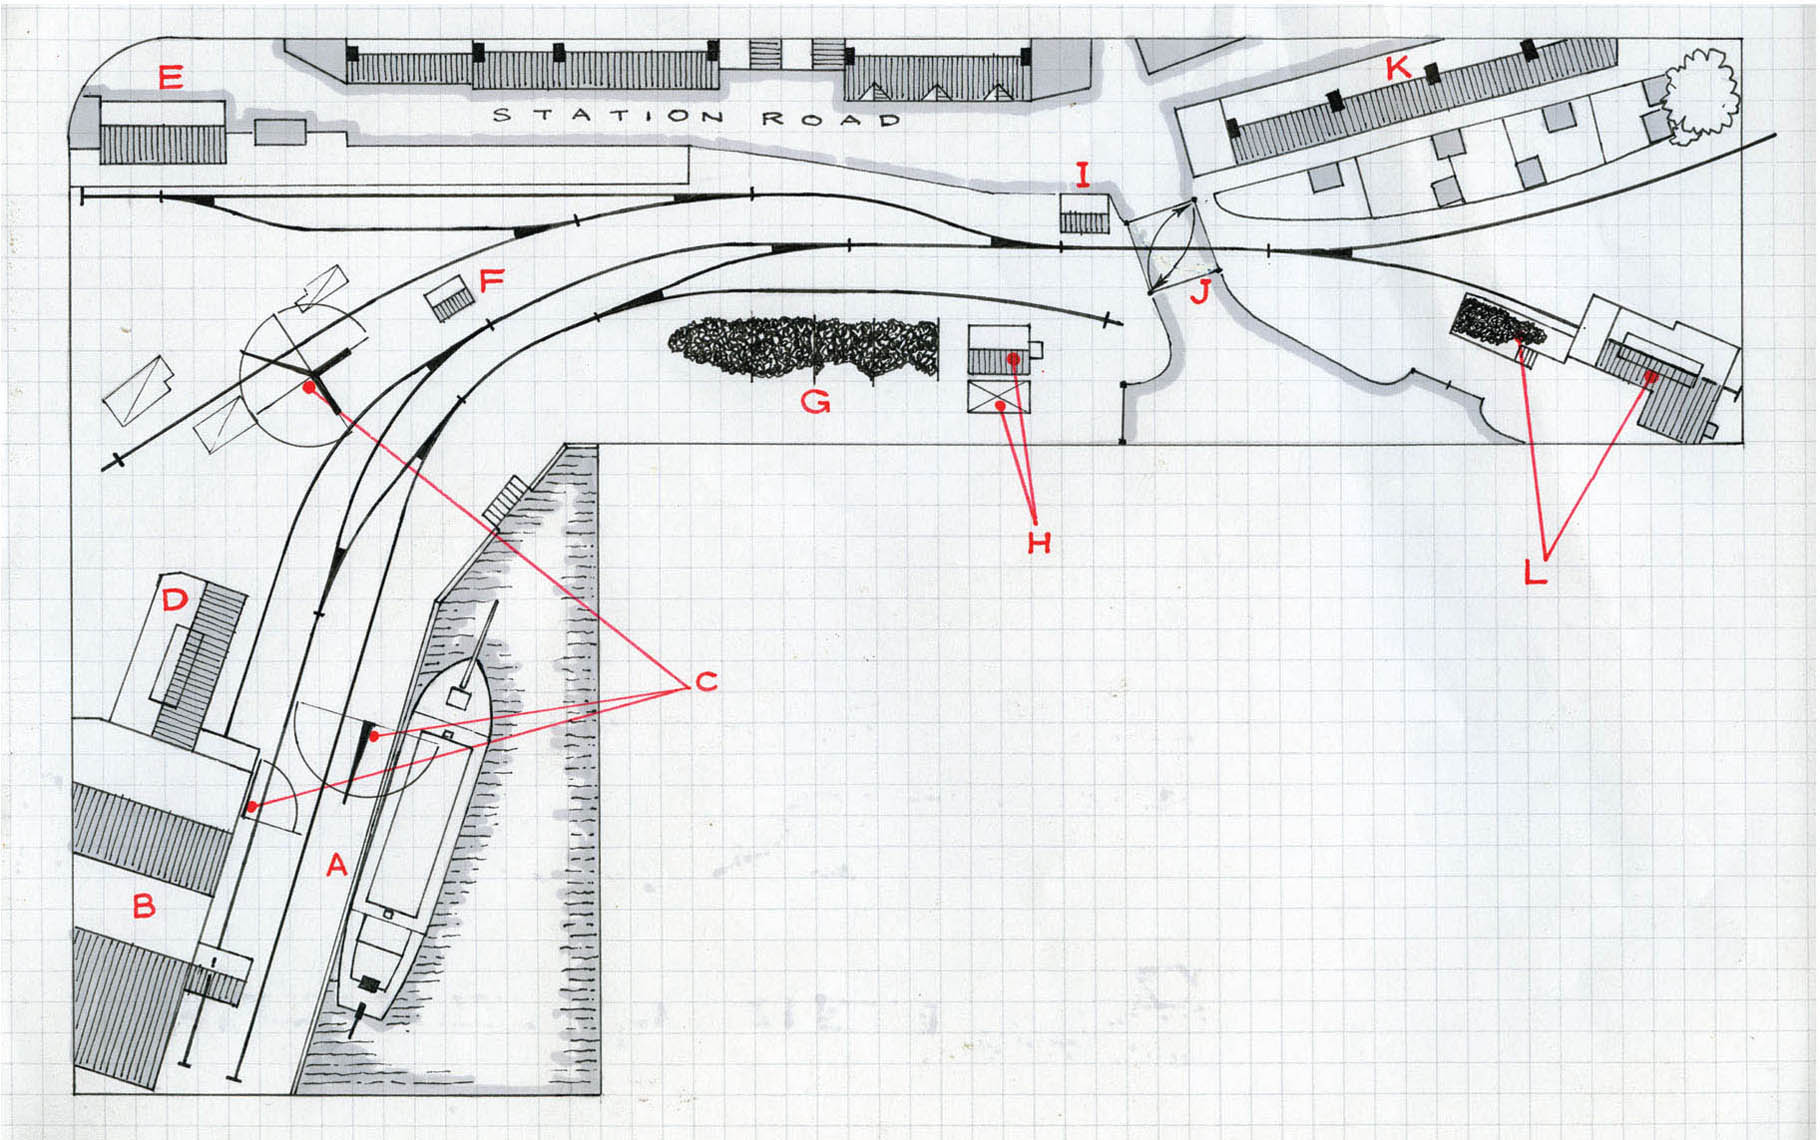
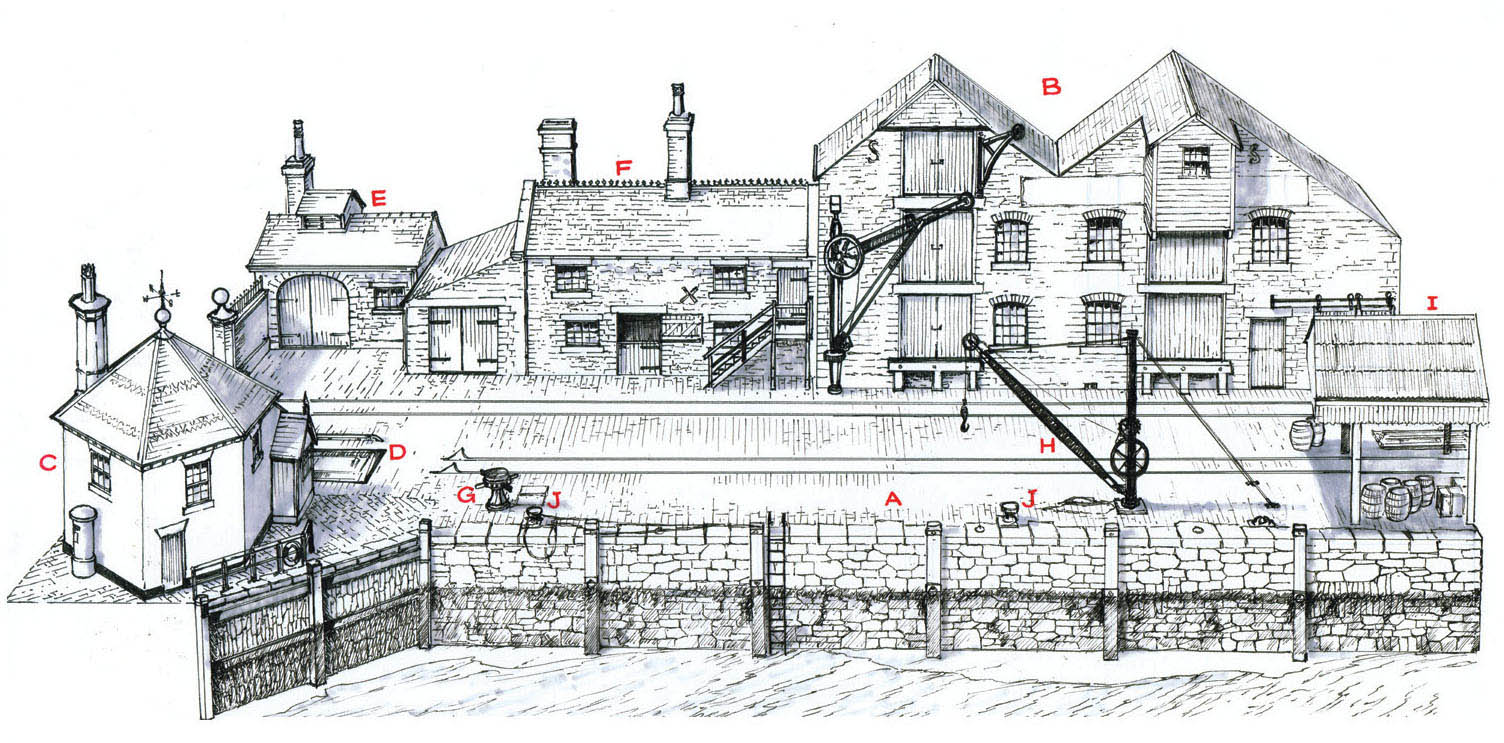
My original plan for the narrow-gauge terminus and quay for Porthwenn. I decided not to use the television series’ name. A) quayside B) warehouses C) loading derrick cranes D) stables E) station building F) rail weighbridge G) coal bunkers H) yard weighbridge I) ground frame J) crossing gates K) ‘Quarrymen’s Row’ L) engine shed, watertank and coaling stage.
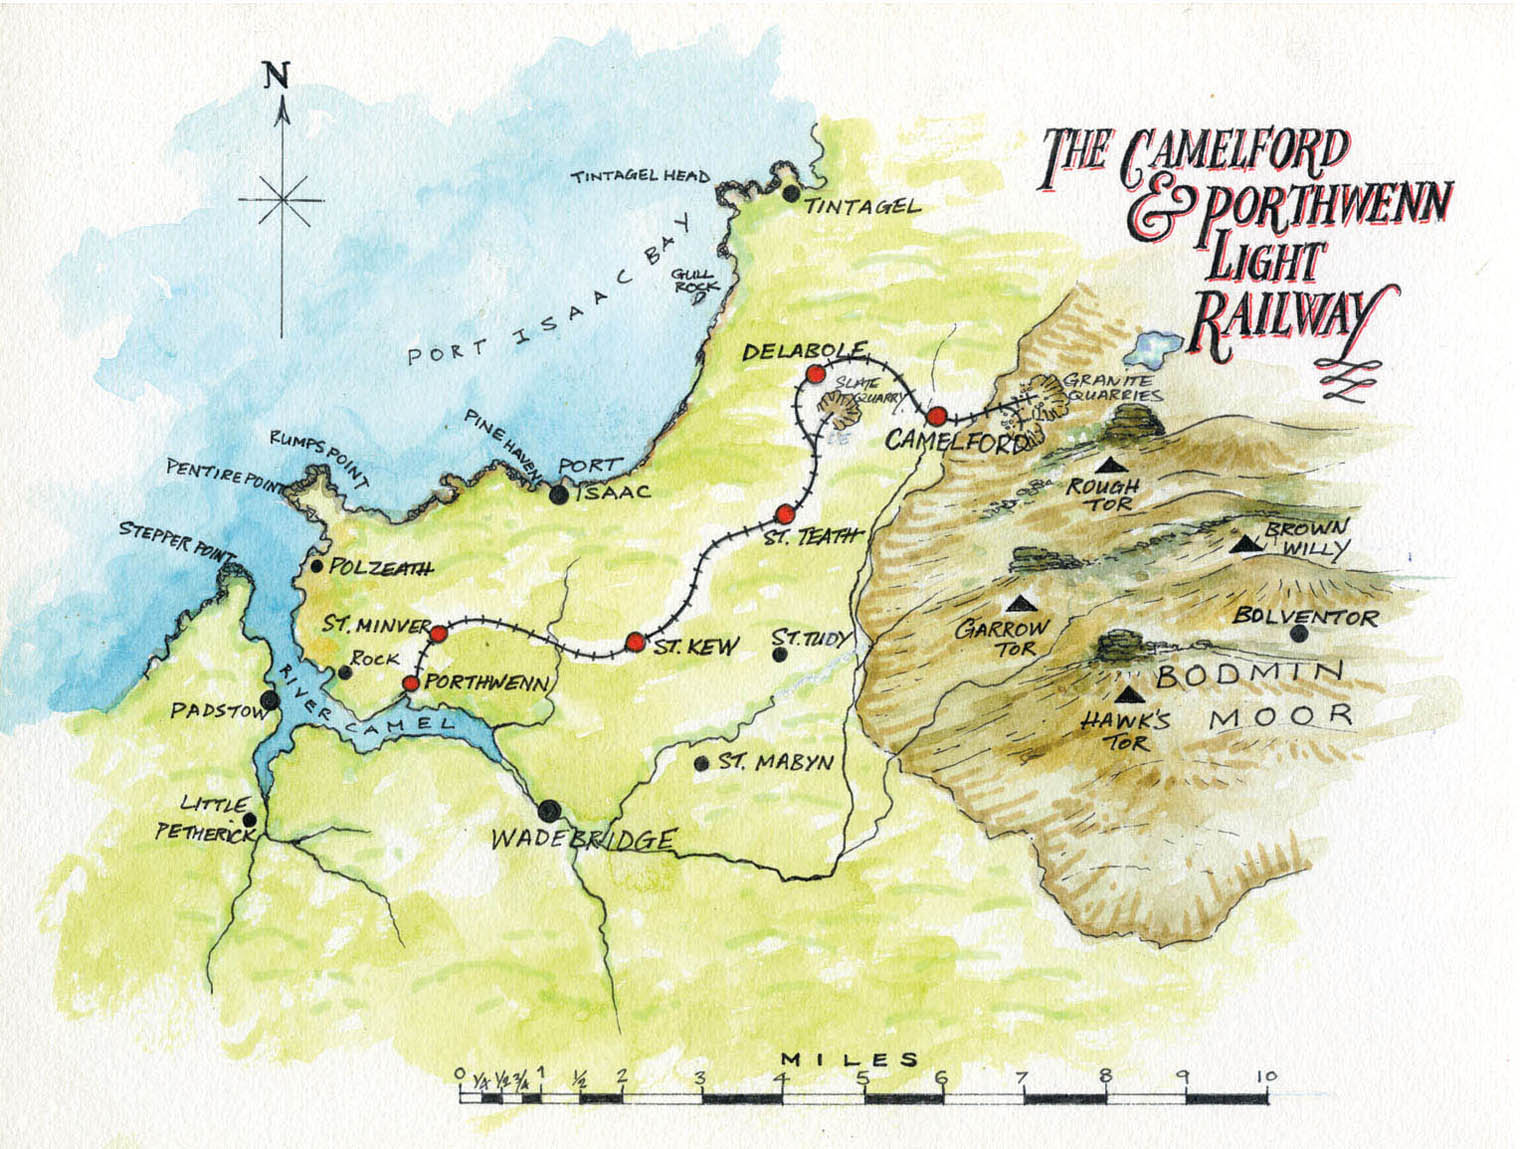
My original drawn map to show the route of my fictitious narrow-gauge railway, the Camelford & Porthwenn Light Railway, linking the quarries around Bodmin Moor with the Camel estuary port.
The project was presented a few years ago for a layout design in Railway Modeller magazine. This inspired members of Crawley Model Railway Society to construct a model based on my plans and suggestions, although the members modelling the layout decided to use the television name of ‘Portwenn’. The layout is now nearing completion as I write this, and should be on show at the model railway exhibitions in 2016.
For the project presented here, I have concentrated the model making on the quayside only, and have made quite a few changes to the original plan; these include a few extra buildings such as the harbour office, the blacksmith’s shop and the stables. I decided that even though the model is completely fictitious, I would give it the flavour of a typical north Cornish port or harbour. The original plan intended to use 16.5mm narrow-gauge track, using off-the-shelf track work produced by ‘Peco’, and I use this on the project diorama. The decision to choose narrow gauge over standard gauge gave the opportunity to model the diorama in 1:43rd 7mm scale. This allowed me to add more detail to the quayside and its buildings. At the same time this can all be condensed into the small space of the diorama without losing too much interest.
CREATING THE MODEL
Let us now look at constructing the model diorama, and concentrate on the materials and techniques used to achieve realistic results.
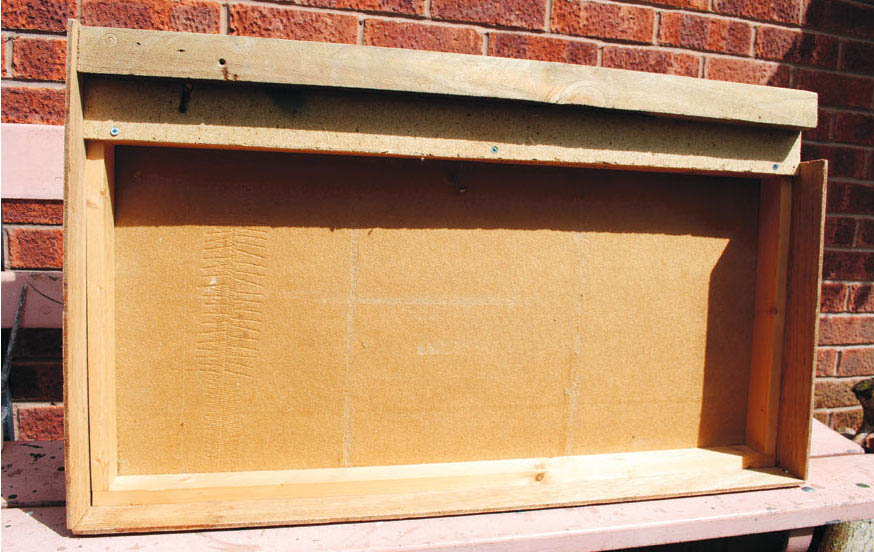
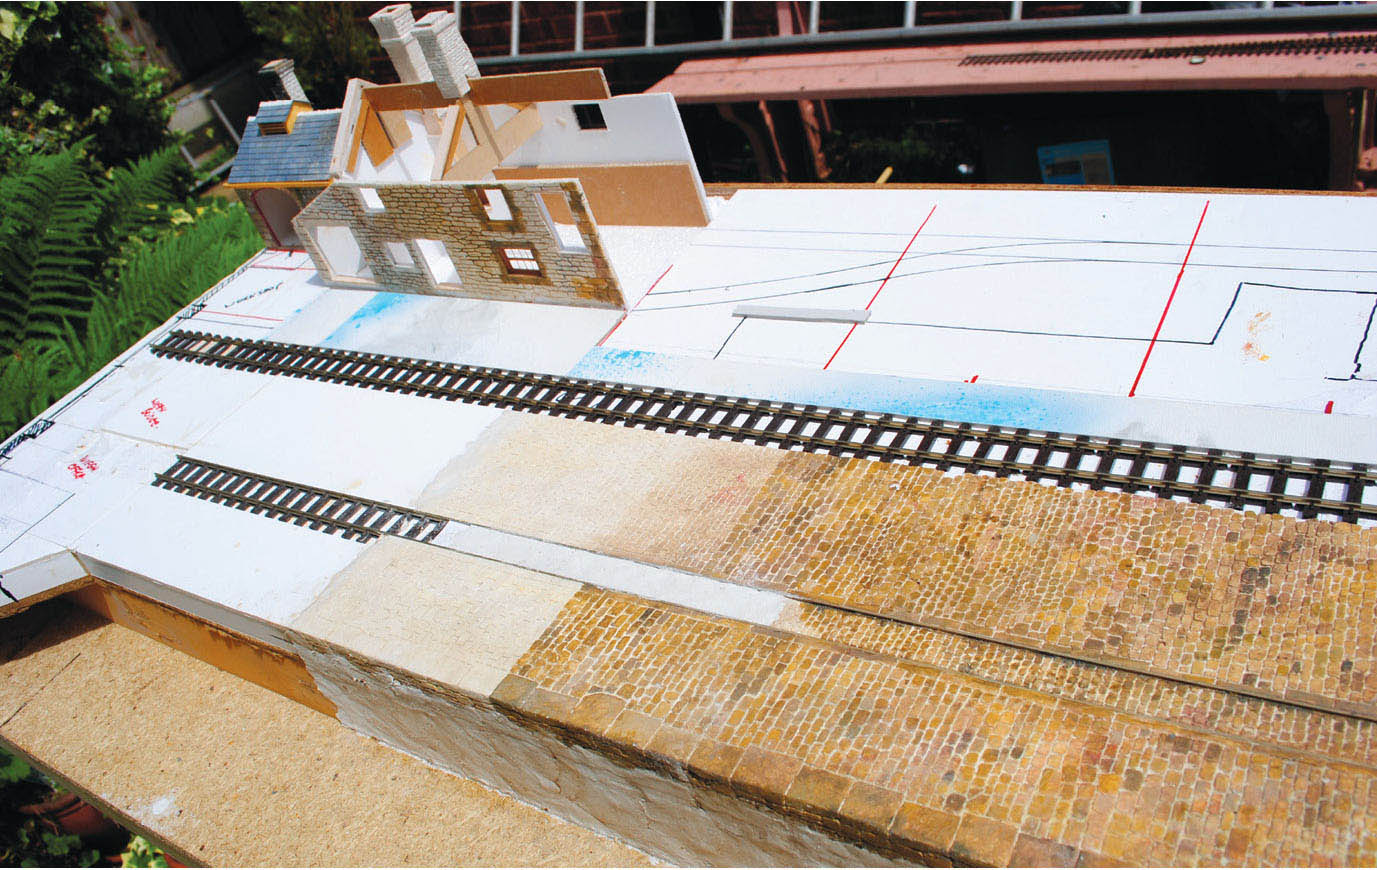
The baseboard I constructed for the Porthwenn quayside diorama. Most of the materials used for this were recycled after being found in a skip, which just goes to prove that you don’t always have to spend a great deal of money on model railways!

I decided from the start to make this model in 1:43rd 7mm-to-the-foot scale. However, to fit more track into the limited space I opted for a track gauge of 16.5mm, making it ‘narrow gauge’. The track chosen is produced by Peco, and features code 100 rail with narrow-gauge sleeper spacing. The latter will not be seen on the model, as the sleepers will be buried under the cobbles.
All models have to start with a foundation, which is a baseboard of some kind, and this is no different for this small diorama. I used offcuts of timber found in a skip, consisting of a piece of 9mm chipboard, some lengths of 40 × 20mm timber, and some 60 × 12mm pine, together with a few strips of 6mm plywood. I also acquired a sheet of 12mm polystyrene and a piece of 10mm insulation board.
From these scrap materials I managed to fabricate a reasonable baseboard for the model with a stepped front to represent the quayside wall using the 60 × 12mm length of pine. The chipboard came in handy for the bed of the dock, positioned at the front, the rough face of this even giving me some base texture. The lengths of timber were used to create a frame to hold the plywood. The insulation board made the sub-base for the quay itself, and the ply strips were used for cladding the outside of the diorama. The wood was cut and glued together, with screws and panel pins used where required.
The polystyrene sheet was used to create the base to the quay sitting on top of the plywood subbase. The track was glued directly on to this, and then 3mm foamboard was glued on, fitting up to the side of the track to give the depth required to sit the cobbles on top. This would give the correct effect with only the tops of the rails showing as they are set into the cobbles of the quay.
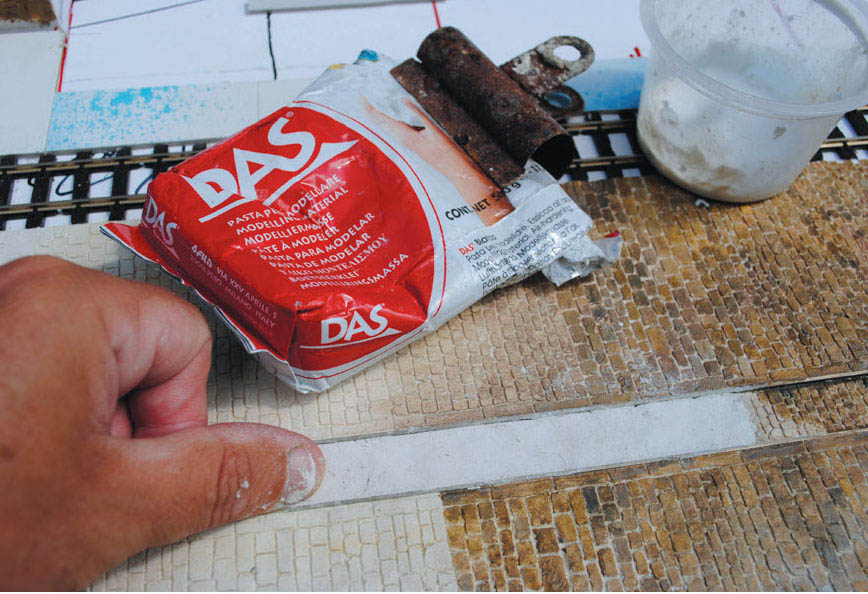
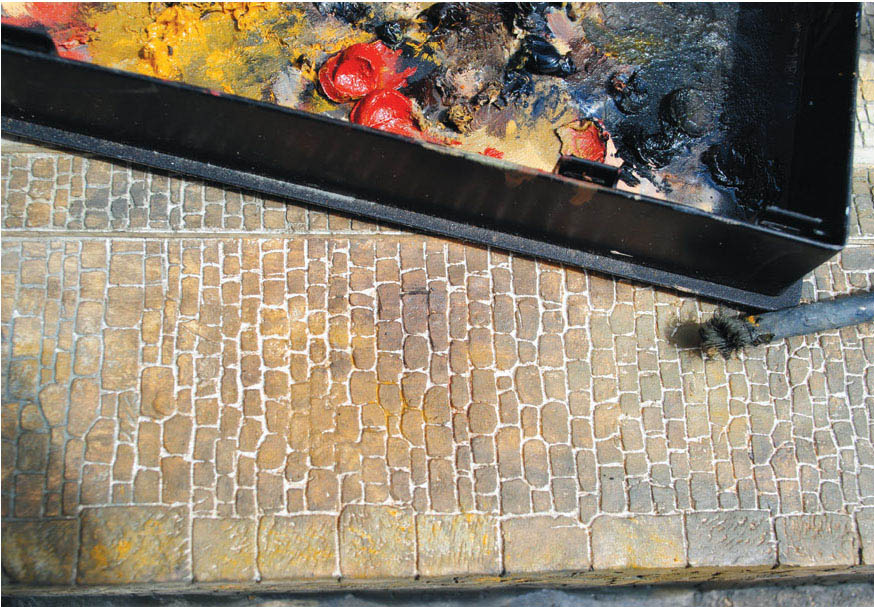
A sub-base of card and foam board is glued on to the insulation board. On top of this a skin of Das modelling clay is applied into a thin coat of dilute PVA. The clay is applied using your fingers, giving a slightly uneven surface to the cobbles, which will look more authentic.
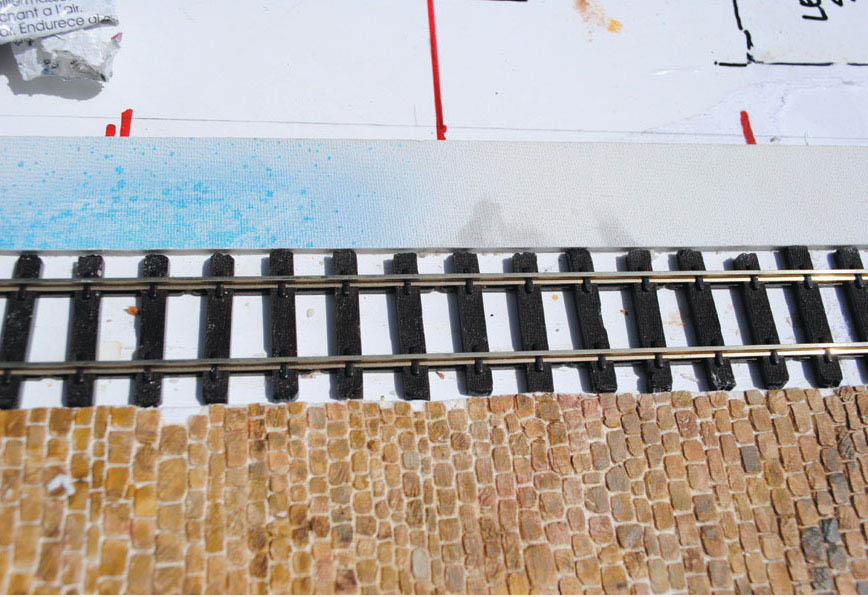
A section already finished, with the cobbles scribed out and painted. In contrast at the back the card sub-base is still visible before any clay is added to this section.
The next stage was to draw out where the buildings were going to appear. I then cut out the footprint of these into the 3mm foamboard; this created a foundation to the buildings, avoiding any ugly gaps when they are left just sitting on the base. Before adding any clay for the cobbles, I decided to glue down some strips of cereal packaging: by fixing this in between the rails it gave a base for the cobbles sets required. With this done, I could start to add the Das modelling clay. This was applied into a bed of PVA that had first been brushed on to all the sub-bases. I always apply the Das with my fingers – this way the slightly uneven surface of the cobbles is achieved.
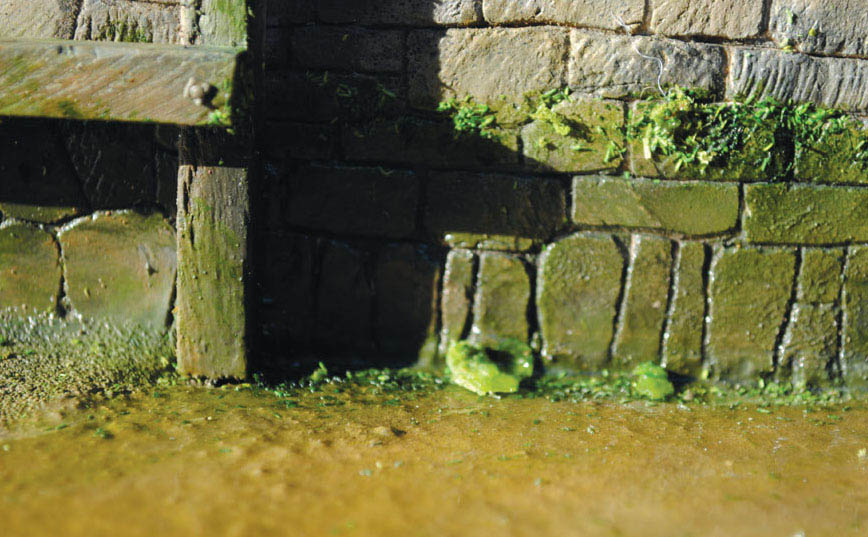
The stages of embedding the track and covering the quayside with the cobbles are well under way. Note also that the modelling clay has been taken over the edge of the quayside to create the coping stones and the quayside wall. The photograph also features the painting of the cobbles, produced by using artist’s oil paints.
The Das was applied in small amounts at a time, building up the thin skin required. The clay was also taken over the edge of the quayside to create the walls and the edging or coping stones. Once the clay had completely air dried I started the scribing out. First to be scribed were all the edging or coping stones, which I purposely made different sizes, replicating prototypes seen on various north Cornish harbours.
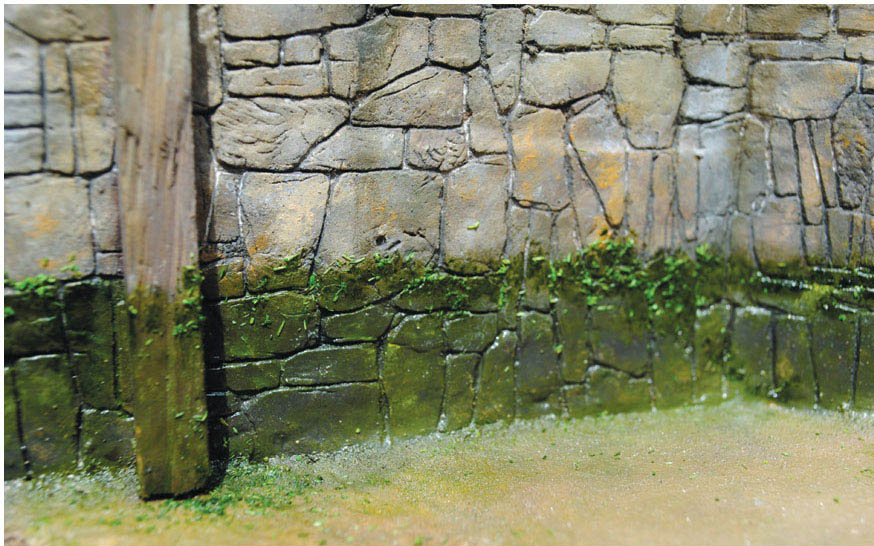
I then moved on to scribing out the quayside walls. The walls in this part of Cornwall were built from chunks of local slate and granite from the quarries on Bodmin Moor. The random way these walls were built was replicated as closely as possible; to achieve the required effect the scribing had to be deep. The face of the larger stones was also scuffed with the scalpel blade to replicate the graining of both the slate and the granite.
With the quayside walls complete as far as the scribing was concerned, I turned my attention to scribing out all the cobbles – again, these were random in size along the quayside. This was indeed a challenging task, but by splitting the job into small areas, or panels of cobbles, it made it a little easier. The area immediately outside the harbour office required very irregular cobbles; these are very commonly used in rural areas.
Before any scribing was started, I collected plenty of reference material together. I would always suggest a visit to the location if you are modelling a prototype or, even if your choice is completely freelance, I would still recommend looking at an actual area on which to base your model. Take plenty of photographs, recording as much as possible. This will also apply to the latter stages of the model when paint is added.
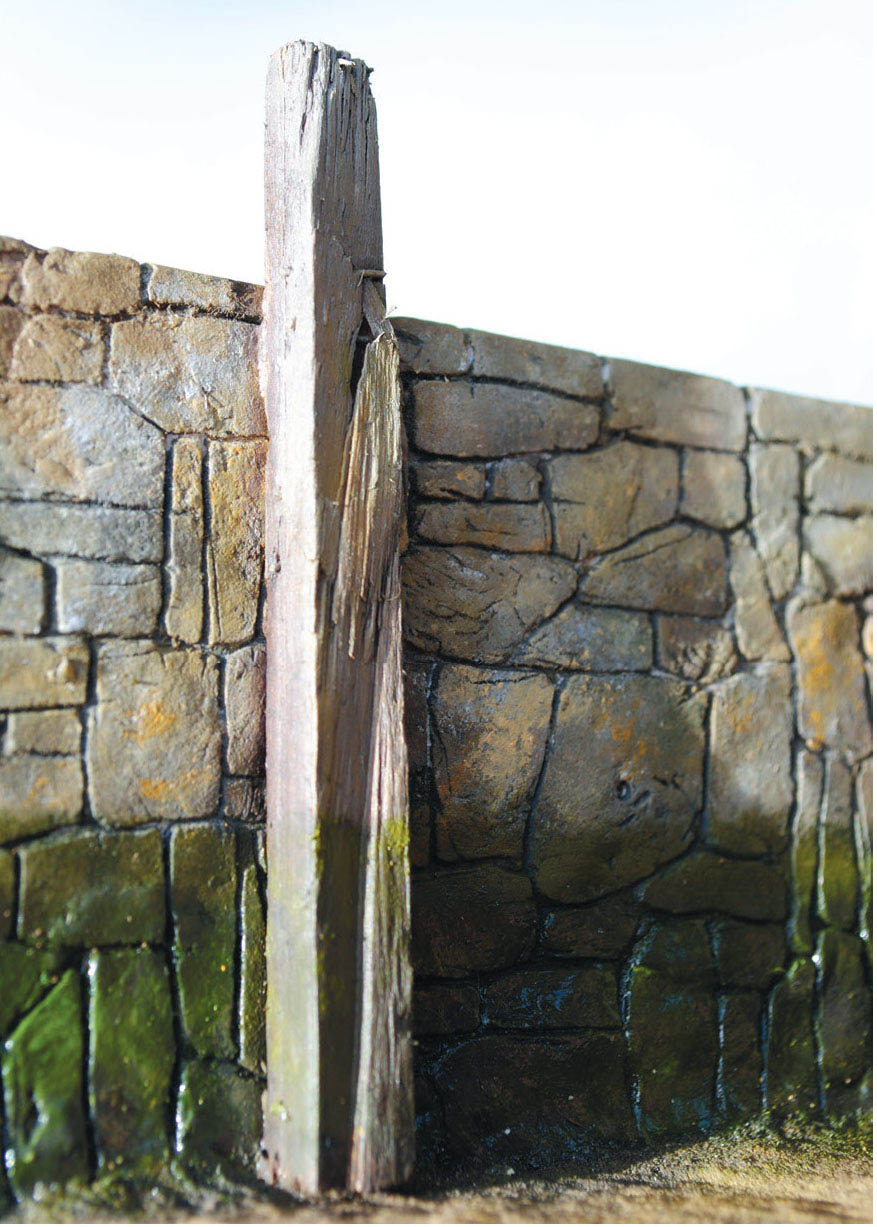
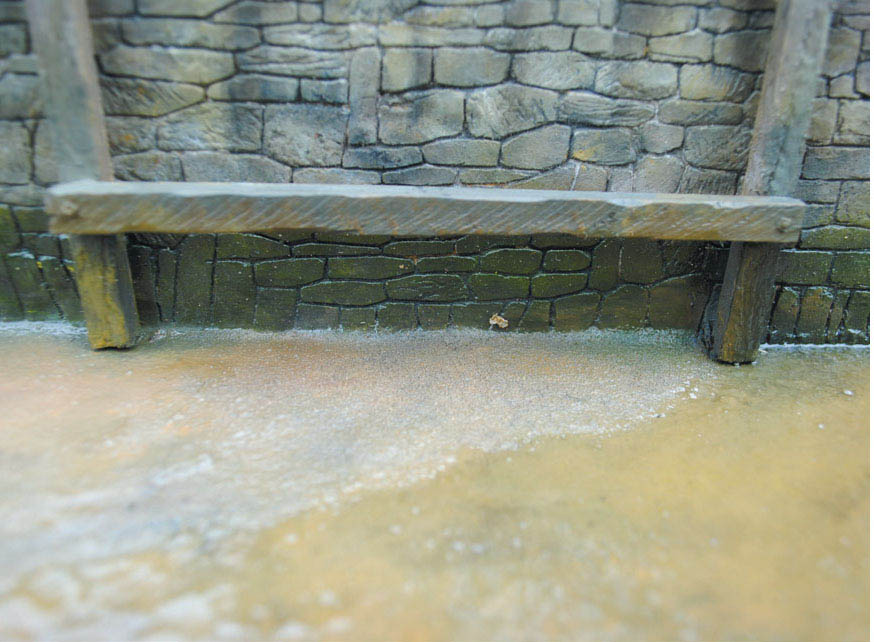
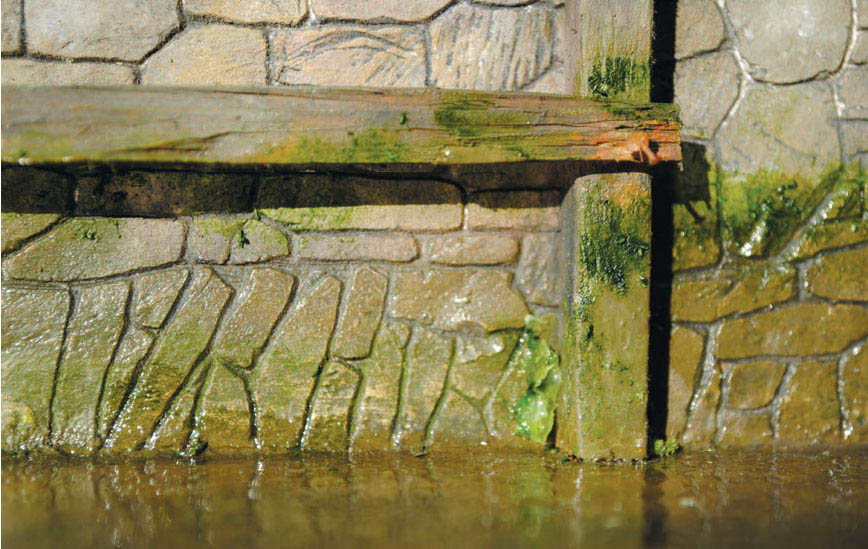
The next task was to fix up the wooden pilings used along the quay wall as buffers for boats to moor up against. These wooden pilings regularly receive heavy bashes from the boats and ships pulling up against them. Looking at the prototypes, this is immediately obvious – after all, this is what they were designed for.

The scribing of the clay, with the clay applied fairly thick and then scribed deep to represent the large chunks of granite and slate used to construct the quayside walling.

Once the pattern of the stonework has all been scribed, then it is down to painting. The first stage is a wash of the oil paint: I used Payne’s grey mixed with plenty of turpentine or white spirit. The wash soaks into the clay and along all the scribed-out gaps between the stones.
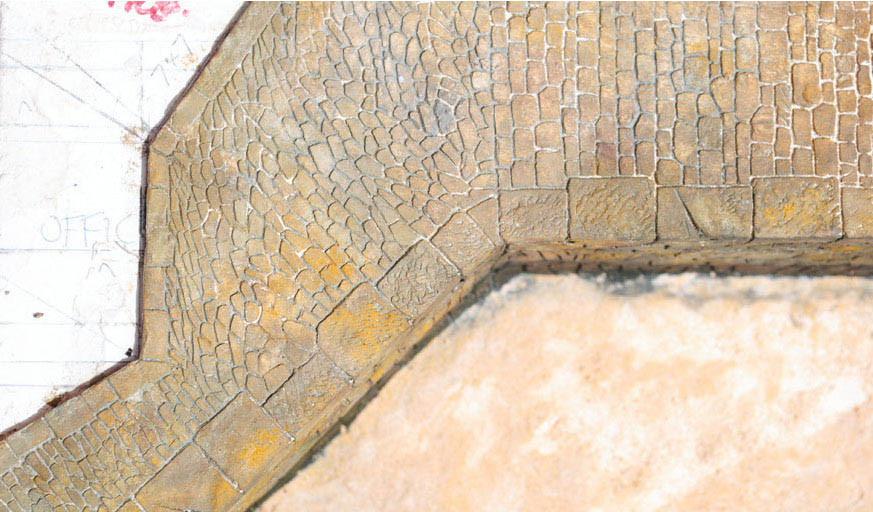
I have purposely included this photograph looking down on to the quayside to show how irregular the pattern of cobbles is. In rural areas such as this, local stone would have been used, and most of it would not have been cut to shape to save on cost; as a result you would normally see a mix of stone paving patterns appearing.
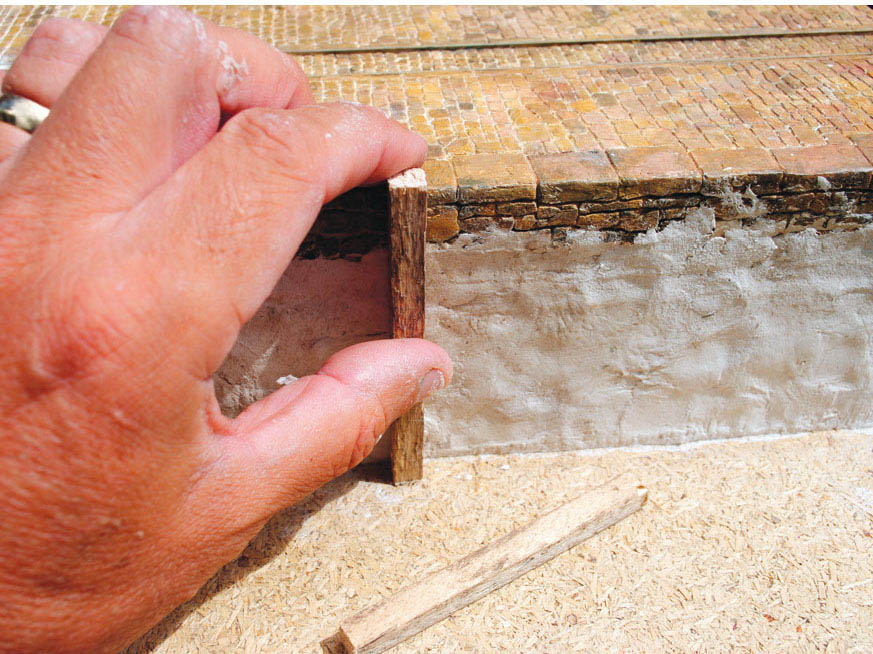
The first wooden piling is temporarily put into position to check how it will look.
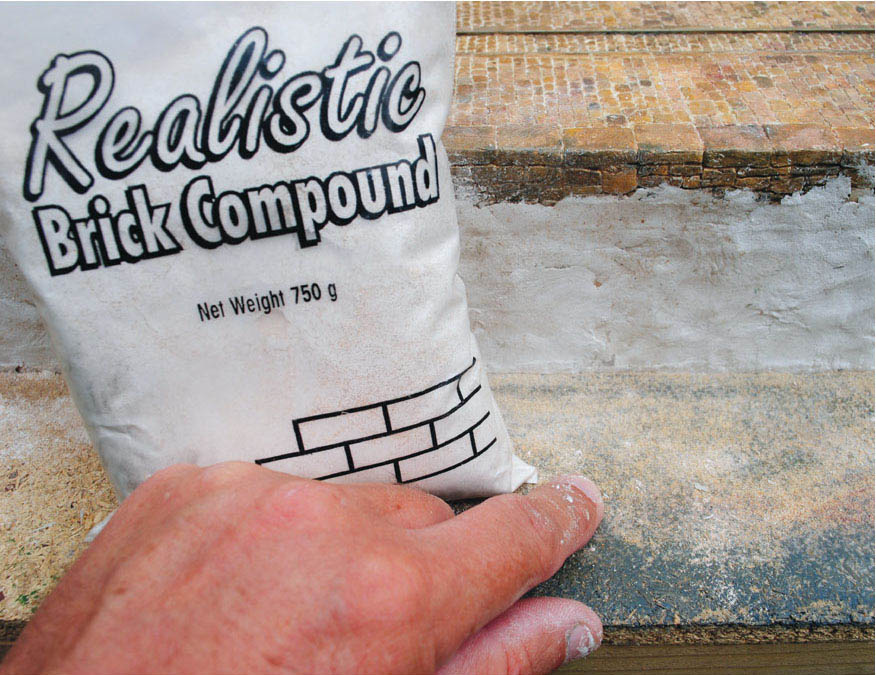
I decided to experiment with a brick compound that I acquired at a dolls’ house exhibition, and found that it was ideal to create the silt often found on the bottom of a dock. I applied it using dilute PVA, after wetting the compound first using a garden mister. This is the same technique as used when ballasting any track.
For this model diorama, the obvious choice for the wooden pilings was to use used firework rocket sticks. These were collected by a friend after bonfire night, or nowadays after New Year’s Eve. The used fireworks are perfect for this type of heavy timber baulk as they already have a distressed appearance. For this reason I did not discount the scorched, split and broken sticks. I decided to distress the sticks even more when they were positioned up against the quayside walls by scuffing them with a scalpel blade.
Details such as the large steel bolts and plates to secure the wooden pilings were added, simply made from track pins and small squares of card. The tops of the pilings have a metal tie-band added at the top to give the timber extra strength. This was replicated by using card, again with a fixing bolt added by using a track pin, or you could use a very small square cut from card and glued into position.
One extra detail to add to the pilings and the quayside walls was the seaweed. To replicate this I used sawdust glued in position with PVA glue. Referring to photographs, the weed appears mainly along the tideline and below.
Before I explain all the painting techniques used for the quayside, let us turn our attention to the bed of the dock. For this diorama I decided to show the dock with the tide almost out, allowing the mud and silt to be visible at one end. For the rest of the dock the surface of the water would be modelled. To create the bed I basically used a brick compound found at a dolls’ house exhibition – you can find some interesting and useful materials for model railways at such exhibitions.
The gritty compound mixture was lightly scattered from the pack over the baseboard. More layers of the mixture were added on top until the desired depth of mud, silt or sand was achieved. The method used to fix the compound in position was the same as used when ballasting track. First the compound required wetting all over by using a fine garden mister, obtainable from any garden centre or hardware shop. With the compound dampened all over, diluted PVA is added from a syringe or an eye dropper. The watered-down PVA will flow through the mixture, bonding it to the baseboard. I purposely built up the compound higher in the corner of the dock where the silt is more likely to be deposited.
PAINTING THE QUAYSIDE AND THE DOCK
With the bed of the dock completely dry, paint could now be applied to this and all the quayside. The first paint to be applied would be a wash of oil paint. A mix was made up first for the mortar colour of the masonry of the quayside walls, and for the coping stones and cobbles on top. This was mixed to a consistency of 20 per cent paint from the tube to 80 per cent of turpentine thinners; this could then be brushed all over the areas that required the mortar colour. The thinned-down paint reacts with the Das modelling clay straightaway as it soaks into the material, and this not only gives a base colour to the stone, but capillary action takes the paint into all the gaps that have been scribed out, to give you the mortar colour. However, I would advise mixing up the paint colour a shade darker than you want it finally to appear, because the clay will keep absorbing the paint mix until it finally dries out.
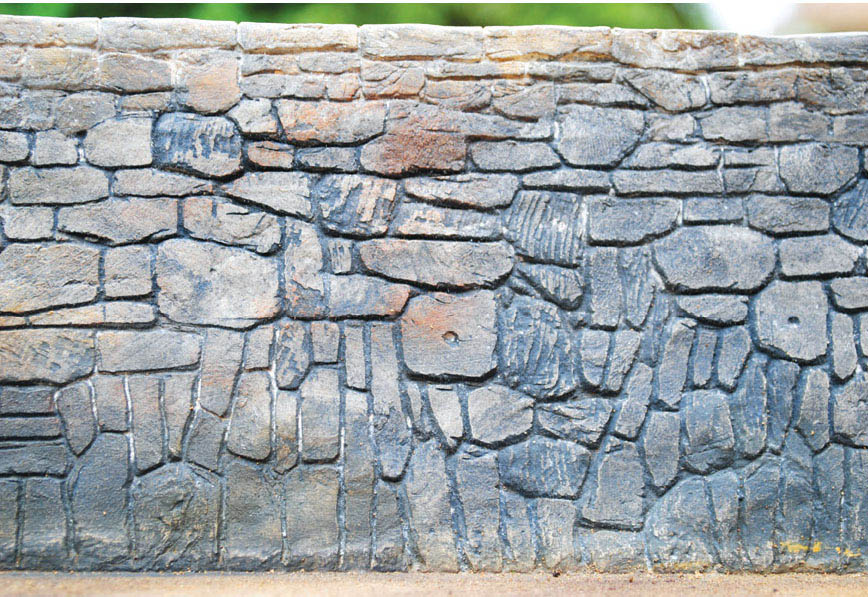
Details such as the grain and the occasional holes drilled into the stone are all included at the scribing stage. The holes would have been drilled into the larger blocks for handling by crane either at the quarry or when constructing the wall on site.
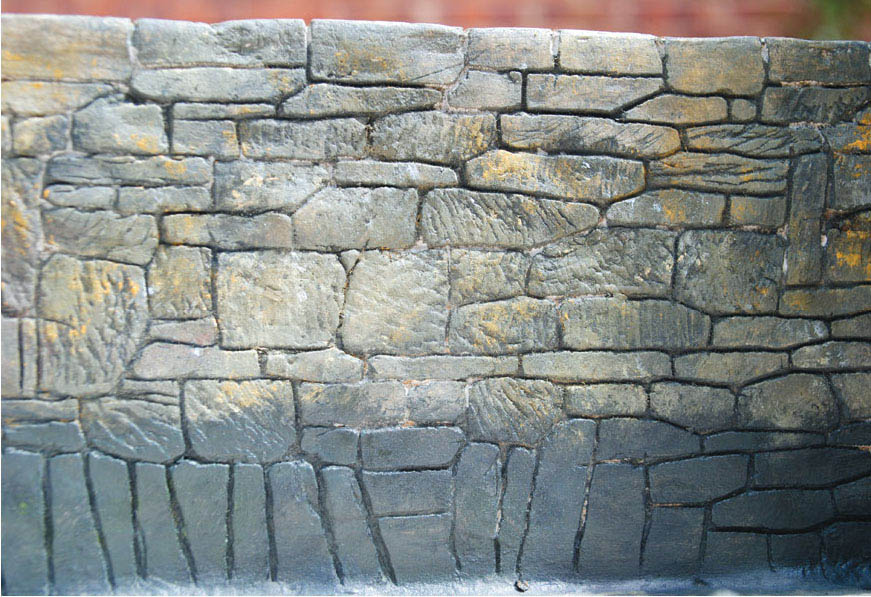
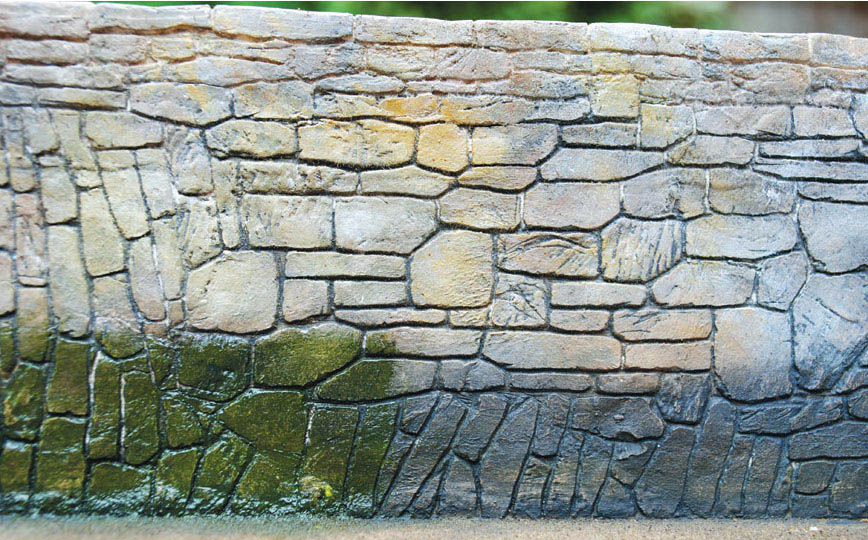
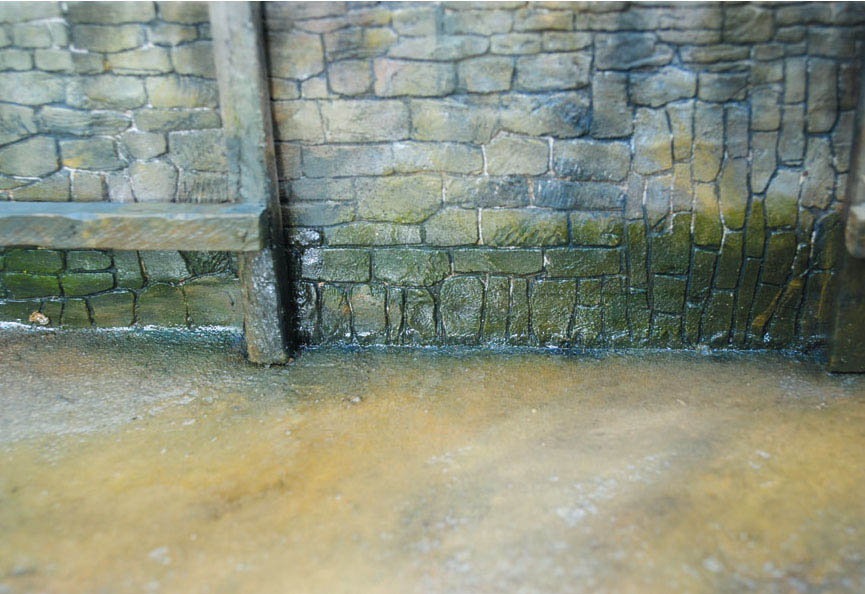
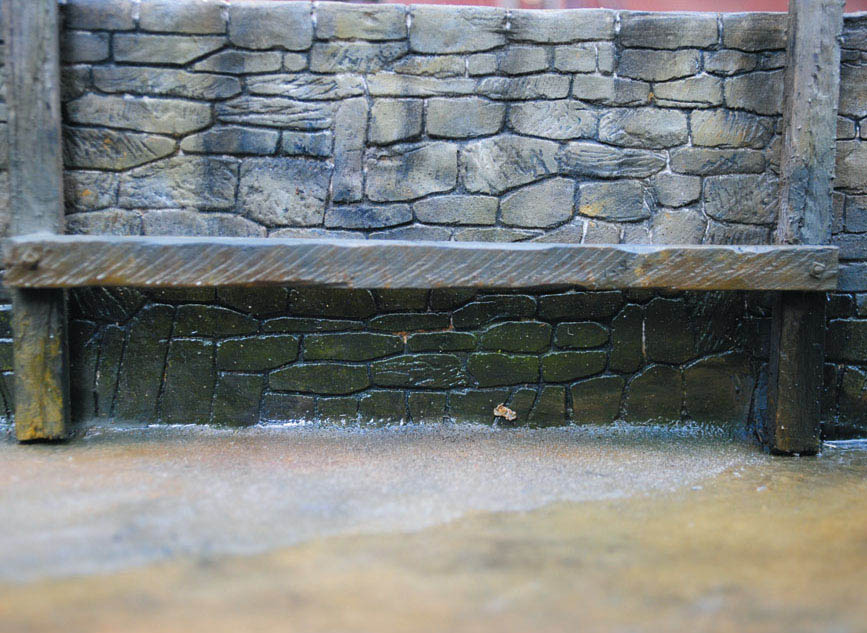
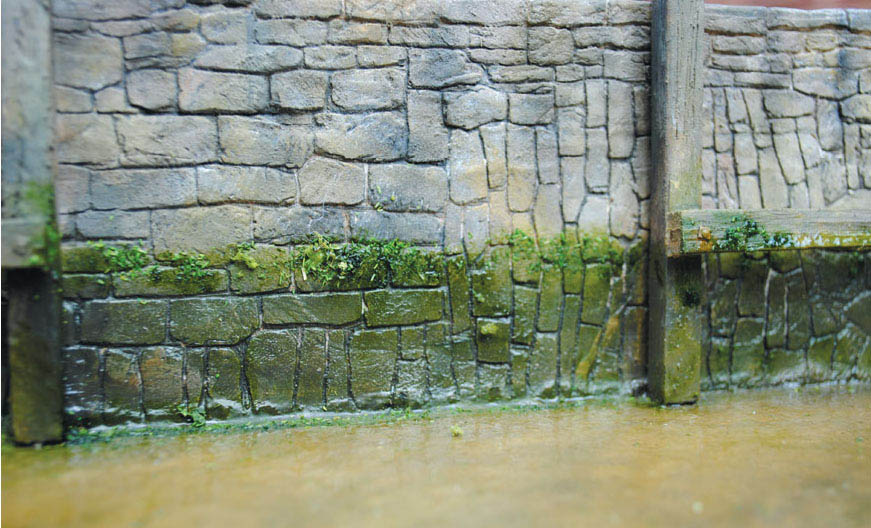
The final painting stage of the quayside wall. Note that dry brushing has been applied to the face of the stonework, and the lichens growing on the face of the stones have been added. These have been painted using the same dry-brushing techniques, though this time using a stippling action. Finally the base of the wall and the ground up to the tideline have received a wash of a dark grey colour.
The same dry-brushing techniques have been applied to the cobbles and the edging or coping stones. Note my mixing pallet is an old video cassette case, perfect for this job, as you can simply close it up when you are not using it!
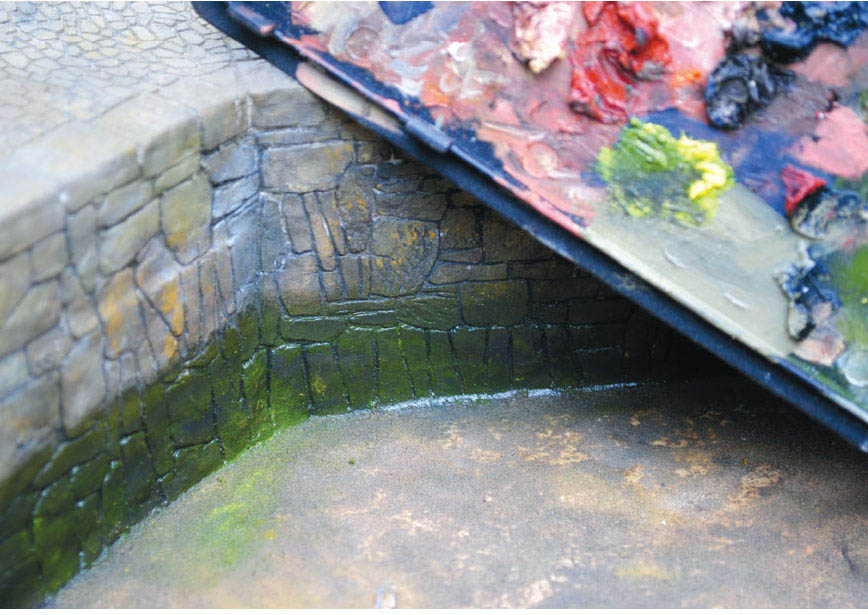
To finish the tideline and the section of walling that is regularly under the water I have used lemon yellow mixed with lamp black or Payne’s grey to replicate the green slime you always see in this situation.
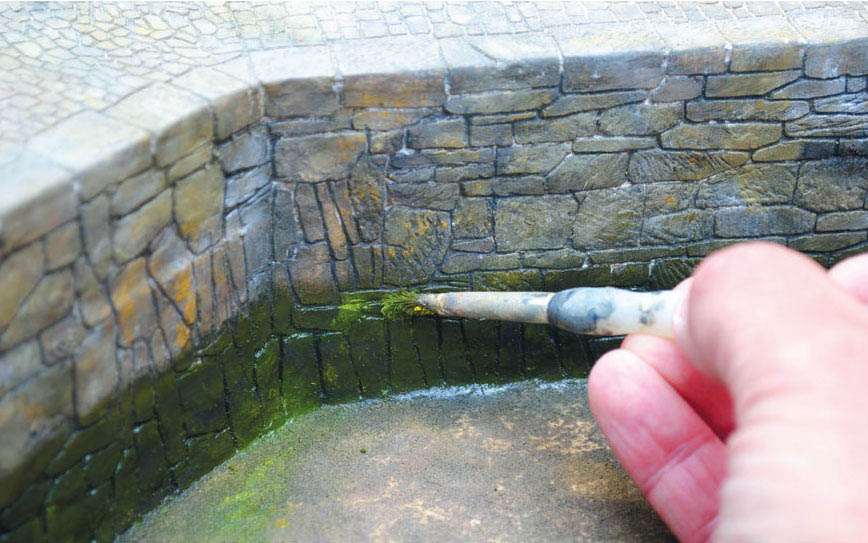
The yellow or green paint is applied using an old 1/8th filbert brush. I find that a well worn brush will give a better result. Always follow photographs taken of the real thing to achieve the right effect.
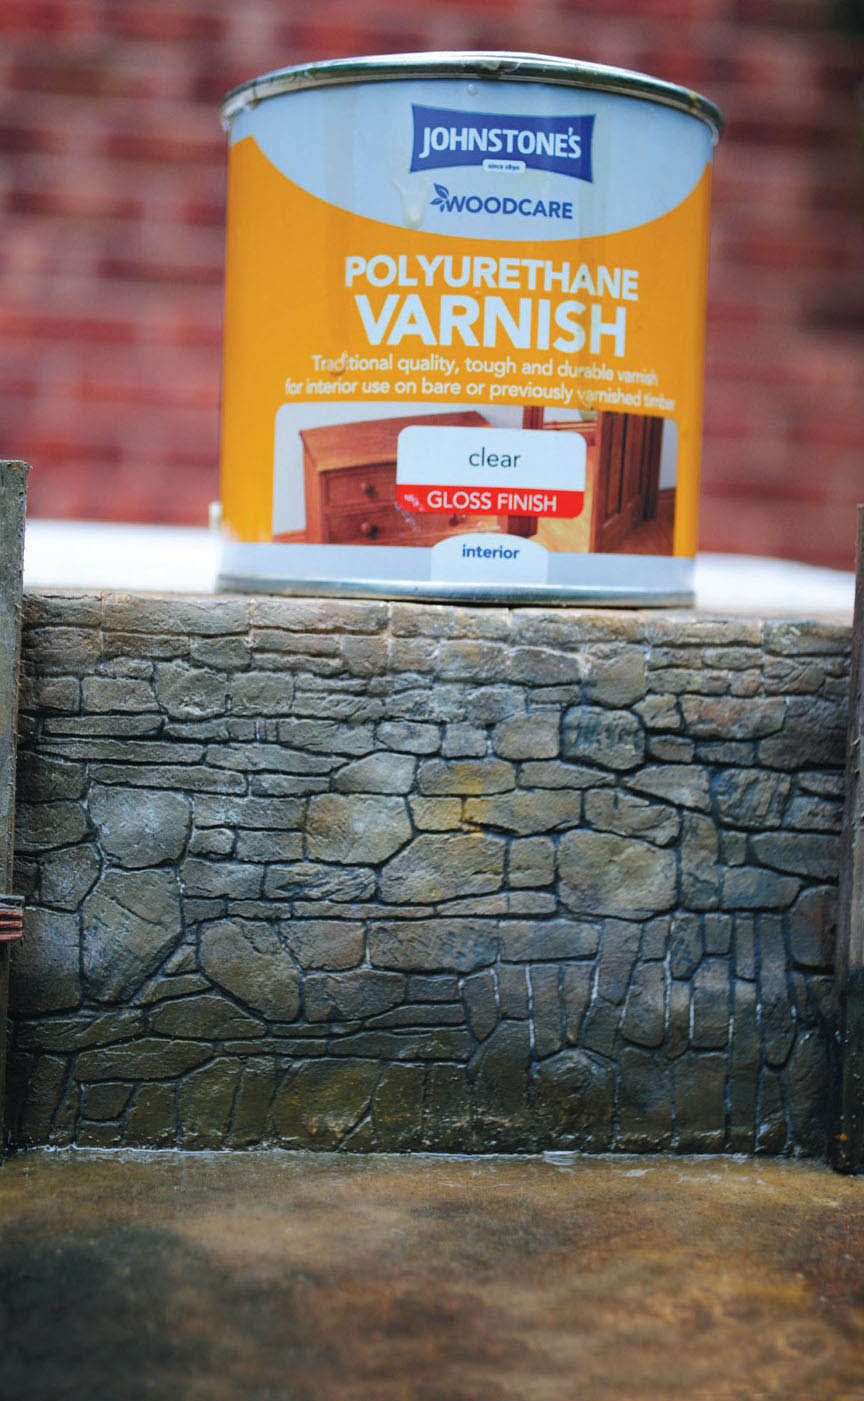
To achieve the wet and slimy finish, I simply went over it with a light coat of clear polyurethane varnish.
The same technique was used on the silt at the bottom of the dock, although different shades of colour were used to replicate the different colours seen in the silt. Looking at photographs for reference, the colour varies from light greys and light browns to darker greys and even shades of green in certain places. The mix of paint reacted in the same way with the brick compound with the thinned paint soaking into it, to give a very convincing result.
With all the washes complete the next painting stage could be addressed. This was to build up the tones of the stonework for both the quayside walls and the cobbles. To achieve this, the paint was applied nearly dry, building up the tones from dark to light. Dry-brushing and finally stipple-brushing techniques were used to achieve the right effect. Keep looking at photographs or reference material to obtain this, and always take your time: this way you should be rewarded with convincing results.
The same technique was then used on the wooden pilings, with dark green also added to replicate the seaweeds and slime always found in harbours and docks. Use reference photographs of the real thing, again to guide you towards the correct colour. The metalwork on the pilings will inevitably have weathered, being exposed to the elements. I used some chrome orange together with Mars or light red mixed together to give an authentic rust colour. There are, of course, rust-effect paints that are specially produced, but I find that mixing the oil paint in this way gives the desired results. This was applied using a smaller brush. Again, it is worth studying the real thing to see just how rust appears.
For the wooden pilings seen on the side of the quayside walls I used the spent sticks from firework rockets. Here, a broken and split stick makes a very authentic-looking battered wooden piling. Dry brushing the paint again above the waterline achieves a realistic appearance. The piling has also received the same treatment, as has the wall to any area on or below the waterline.
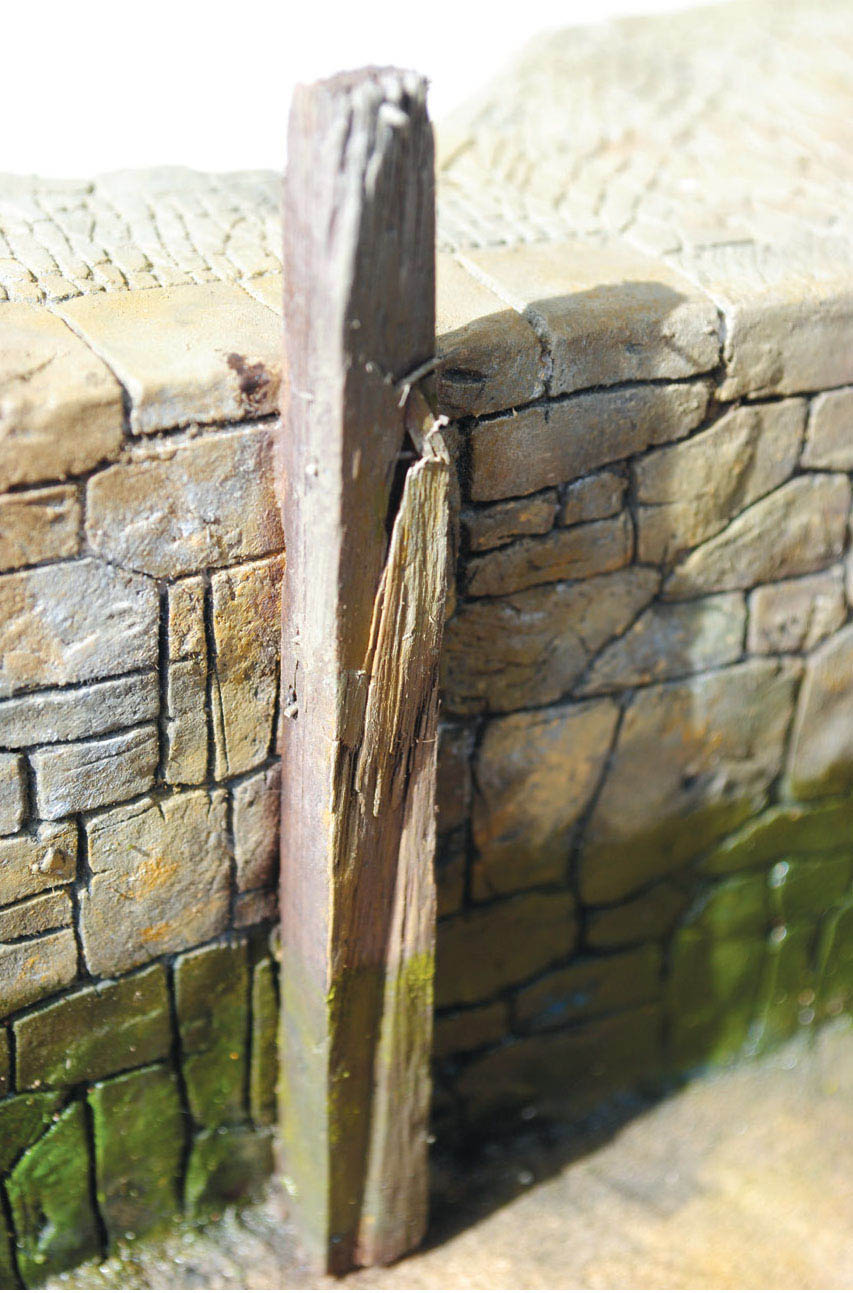
I have purposely included a different view of the same wooden piling, which illustrates its distressed and battered appearance on the model.
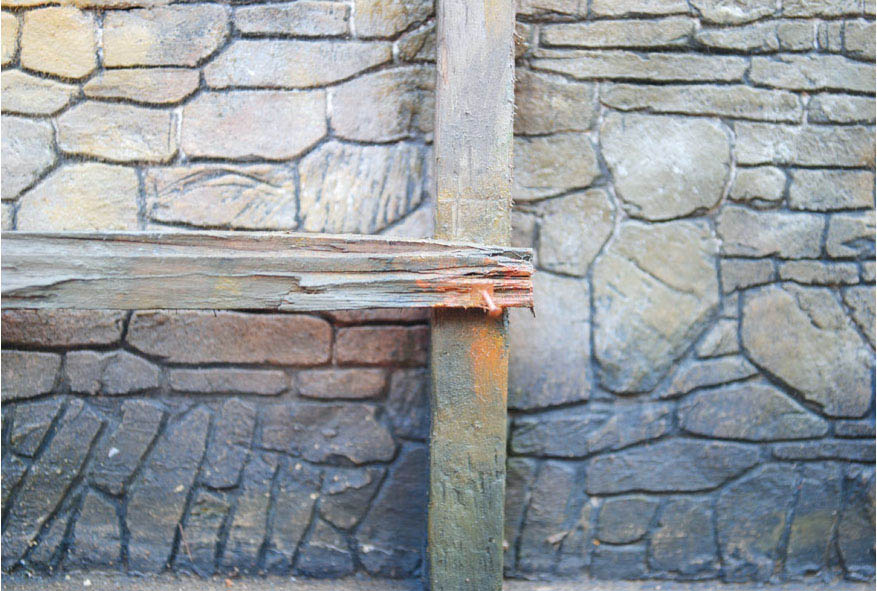
The horizontal beam has been added as a fender or buffer for the boats to moor up against. Note how I have again used a length of split rocket stick to give that battered, well used appearance. Another extra detail is the inclusion of a bent bolt, which has nearly rusted away.
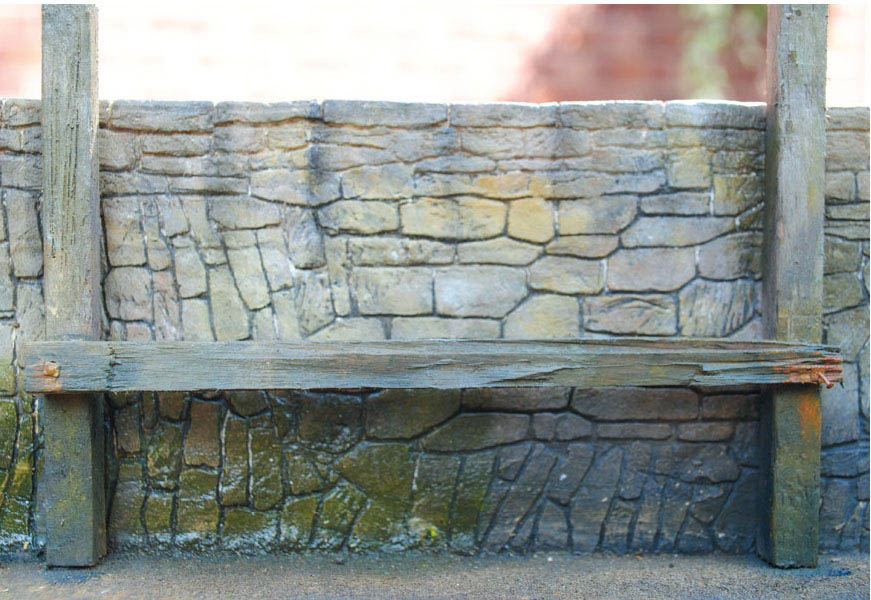
The completed horizontal beam. All the painting has been achieved by dry brushing using oil paint.
Then all that remained was to paint the seaweed along the tideline, picking it out in various shades of green and dark brown.
ADDING THE WATER IN THE DOCK
The next task was to add the water in the dock, although I will cover the different ways of creating water in a later chapter. On this diorama only a shallow amount of water was required, as the tide was almost completely out in the dock. On the lefthand side the silt left on the bed is revealed as the tide recedes. The water was created by brushing on a few layers of polyurethane clear varnish. By brushing in a diagonal direction the ripple effect was created on the surface. This was carried through to the edge of the silt, in an attempt to replicate how the water laps against it. The last task was to paint a thin coat of the varnish over the silt and up to the tideline on the quayside wall to give it a wet appearance.
The wet effect below the waterline has been created using varnish. You don’t have to use expensive products to create an authentic look.
A light coat of varnish has been brushed over the build-up of silt at one end of the dock, achieving the wet look perfectly.
The shallow water in the dock was added by giving a few coats of the same clear varnish. Note the colour given to the dock under the surface of the water.
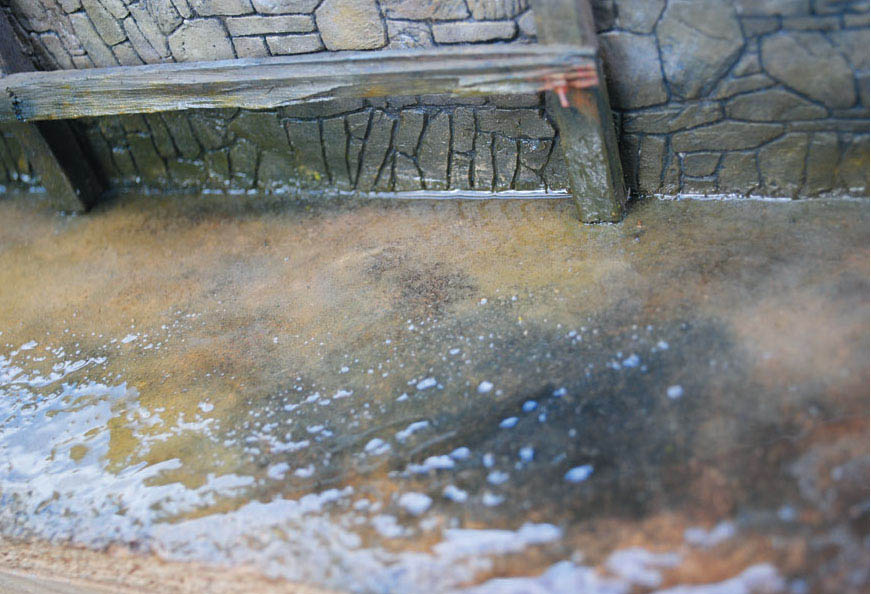
I have tried to capture the edge of the shallow water as it laps against the silt. Careful application of the varnish has given the results I was looking for.
Another view of the shallow water; note also the staining where the rain has run down from the copings over the dry walling above the tideline.
To give the walls even more detail, I have added some of the seaweeds that would be found along the tideline and on the wooden pilings. I used a mix of flock and sawdust to replicate these.
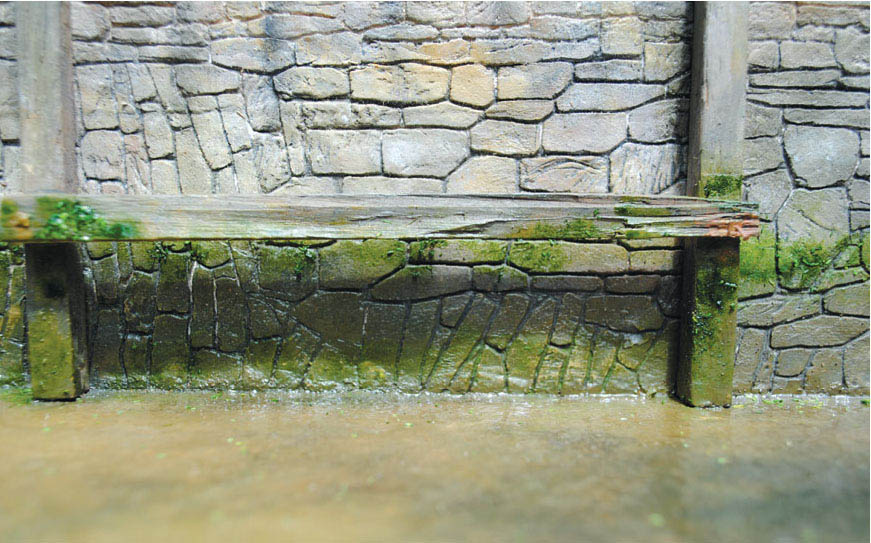
The weed was painted green, and varnish brushed over again to give the finished effect.
The weed was continued along the whole length of the tideline, including the facing of the horizontal beams.
In this closer image, the slimy algae seaweeds, looking like jelly, were replicated simply by using PVA and painted with thinned-down oil paint to give them a semi-translucent appearance.
Another close-up to illustrate the slimy green weed and the algae growing on the timbers. Note the realistic reflections created on the surface of the varnish. The effect is due to the dark shade of the painted bed underneath.

In this image looking down on the dock, the edge of the water can be seen clearly. It also shows the build-up of the silt concentrated in the corner of the dock.

Another view of the base of the wooden pilings to show the build-up of weed and slime on the timber below the tideline.
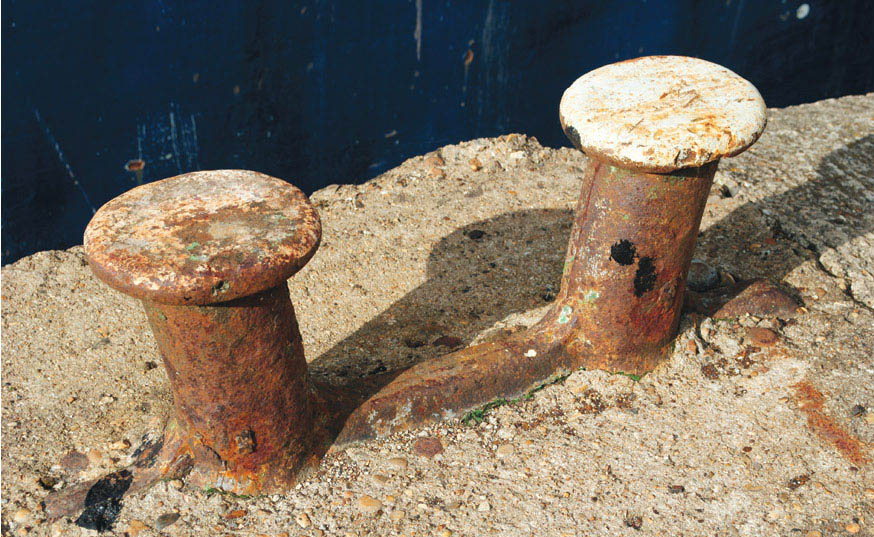
The quayside will need a few mooring bollards or rings to be added. For this model I have chosen the twin bollard type. I found some white-metal samples produced by PLM Cast-A-Ways. Looking at the reference photograph, besides the rusting of the metal the bollard tops are painted white. This is to improve their visibility, making it easier to locate them on the quayside when trying to moor a boat.
With the quay structure complete, the painting finished and the water added, the next stage is to dress out the quayside. I used selected products already on the market for this purpose: some are resin castings and some come as white-metal castings, though of course for this diorama I had to look at what was available in 7mm scale.
The only items I required for the edge of the quayside were the mooring bollards, which I found from the range by PLM Cast-A-Ways. These were first painted with a primer and then with the final colour, and slightly weathered following reference photographs taken of them at Liverpool’s Albert Dock.
The rest of the quayside infrastructure required will be covered in a later chapter, where we will examine items such as the different types of loading crane, capstans and the buildings, together with some of the dressings. Some of these will be relevant to finish the model of Porthwenn.
The finished diorama of Porthwenn. For the project I have just concentrated on showing how to construct, paint and finish the quayside and the dock. The buildings and quayside infrastructure will be the next task. A) quayside B) warehouses C) harbour office D) weighbridge E) stables F) blacksmith’s shop G) capstan H) loading derrick cranes I) loading canopy J) mooring bollards.