
Juxtaposition of Tide
In this tutorial I’ll explain how to take a low-light, underexposed image and apply techniques to create an image that tells an inviting story.
 ProCamera
TouchRetouch (optional)
Snapseed
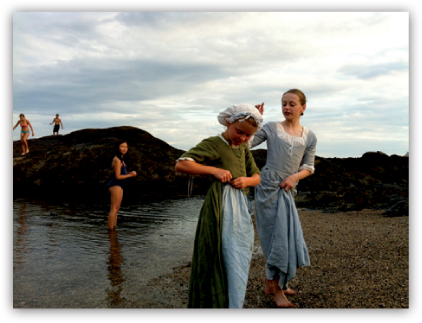
On a steamy, hot July afternoon I walked to the harbor near where I live, an old New England sailing town just bursting with history. I came upon a Revolutionary War reenactment, which is an annual event in our town. What first drew me in was the wonderful juxtaposition of two sisters dressed in period costume and the other children dressed in contemporary clothing as they played in the water. The light was low, and the green of the younger girl’s dress was luscious. The older sister was lecturing the younger one, and both seemed utterly comfortable and natural, as if the other children were the ones who’d just stepped out of a time machine. The sisters remained unconcerned and carried on with their banter, which is perfect for street photography.
I usually try to get as close to my subject as possible, and I rarely shoot straight on. I find myself on the ground a lot. To shoot the girls, I crouched down in the water to make the point of view more dramatic. Their indifference made shooting them effortless. The girl in the background noticed me but she didn’t pose, which made the shot even more interesting. I didn’t intend for her to be the focus of the shot, but her Mona Lisa smile just drew me in. Without her the image would still have been interesting, but the juxtaposition of time would have been lost |1|.
|1|
 Step 1: Removing Unwanted Elements
The children on the rocks were a distraction. I opened the original image, which I shot with ProCamera, in TouchRetouch and used the Brush tool to paint them out of the picture, and I used the Clone tool to touch up smaller areas in the water |2|. I then saved the image and opened it in Snapseed.
|2|

Step 2: Adding a Dramatic Filter
To add a dramatic effect to the image, I selected Drama, then I tapped the Star icon and the Drama 2 icon. Finally, I decreased the filter strength and then I tapped the Arrow icon on the lower right to apply the effect |3|.
I then reviewed the before and after by tapping the Preview icon before I applied the filter. This is an important step because after a filter is applied, you cannot undo it. If I didn’t like the effect, I could have discarded it before applying it by tapping the arrow on the bottom left to return to the last edited image.
|3|

Step 3: Adjusting Color and Tone
Using Tune Image, I made overall adjustments to the color that had been lost when I applied the Drama filter. I held my finger on the image and swiped up or down to bring up the menu, then I swiped left or right to make an adjustment. The settings I chose were Ambiance +27, Saturation +25, WB +24. I then tapped the arrow on the bottom right to apply the effect |4|.
|4|

Step 4: Cropping the Image
After I saw the edited image, I decided it would be more dramatic to crop the girls more tightly, making the original removal of the other children unnecessary. It’s in the nature of an artist to step back and assess the work in progress, so c’est la vie! I always save an uncropped version of my image, just in case. In Snapseed I selected Crop and tapped and adjusted the frame by pulling the edges (you can also set ratios, if desired). I tapped the arrow on the bottom right to apply the effect |5|.
|5|

Step 5: Making Detailed Adjustments
Because the light was low and the faces in the image were oversaturated, I wanted to select certain areas and adjust the saturation and brightness. Snapseed is a very easy app to work with, and minute color adjustments can be made in Selective Adjust. I tapped the (+) icon, and a little circle appeared on the image. I tapped on the circle and it turned blue (active). I used the brightness button at approximately 50–100 percent in areas of the image that I wanted to brighten. I tapped the arrow on the bottom right to apply the brightness |6–9|.
|6|

|7|

|8|

|9|

Step 6: Adding a Vignette
To apply a vignette around the edges I selected Center Focus > Presets > Vignette. I slid my finger across the image to adjust the intensity. I adjusted the image using the following settings: Inner Brightness 0, Outer Brightness –95, Blur 0. I tapped Weak in the menu bar |10|, and tapped the arrow on the bottom right to apply the effect. I saved the image to my camera roll by tapping the arrow in the upper right corner.
I felt as though I had captured the sisters out of time and place, and the onlooker in the image shared the secret with me. I titled this photograph Juxtaposition of Tide because the tides often bring us treasures and secrets from another time and place and just as quickly sweep them away. This was my treasure from that beautiful day.
|10|

Because I primarily shoot more realistic street photography and don’t combine intricately layered and abstract images, I edit most of my work in Iris Photo Suite and Snapseed. Iris Photo Suite offers common editing tools like those found in Photoshop. Histogram, color balance, saturation, temperature, hue, masking, cropping, and layers are all intuitive and easy to use. A nice feature in Iris Photo Suite is ColorSense, which allows color replacement or creating color within a black-and-white image by isolating the desired hue and converting the rest of the image to gray tones. If I’m feeling a little crazy, Iris Photo Suite offers about two-dozen special effect filters. The interface is easy to work with on both the iPhone and iPad.
Filterstorm and Photogene2 are more sophisticated and elegant across the board as general editing apps. They offer similar editing tools and more sharing options than Iris Photo Suite. I use Photogene2 more often since its upgrade from Photogene. Snapseed is also a favorite for tweaking and adding dramatic effects. It lacks masking and layers, but it’s a powerful little app when layering isn’t necessary, and I find myself using it frequently.
I shot this image with ProCamera, which offers more control than the native iPhone camera, such as setting exposure and focus point. It has editing features, but I don’t edit on the fly; instead, I choose my favorite apps for post-shoot processing.
The light was fairly low behind the subject, but the skin tones were oversaturated and the overall temperature was too cool. A few other children were in the frame, and I didn’t want to lose the shot by waiting for them to move, so I used TouchRetouch to paint them out of the image, and I used Snapseed to adjust the brightness, contrast, and saturation. I added some overall drama with the Drama filter, and I used the Crop and Vignette tools to eliminate distracting details and draw attention to the main subject.
Christine Sirois (Stina)

Christine works as a creative director in Massachusetts. She studied at the Art Institute of Boston and has been making up stories with pictures from a very young age. It wasn’t until she discovered the iPhone and iPhoneArt.com that her passion for creating beautiful photographs truly caught fire. She has been recognized as Artist of the Day on iPhoneArt.com several times and Artist of the Month in March 2011. Her work was exhibited at the LA Mobile Arts Festival (2012). www.iphoneart.com/Stina