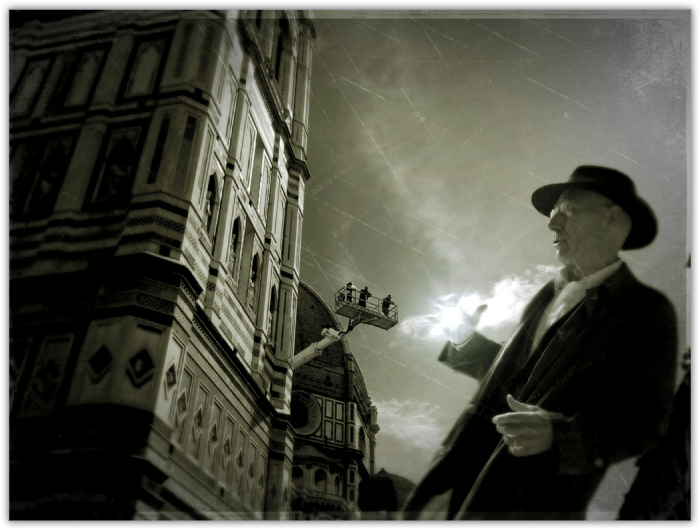

Cipolla in Florence
In this tutorial you will learn how to transpose an interesting character to another environment to strengthen the storytelling power of an image. You will also learn how to make the image more compelling by adding a timeless enhancement using texture and light.
 ProCamera
 Filterstorm
 Snapseed
 LensLight
 Big Lens
 ScratchCam FX
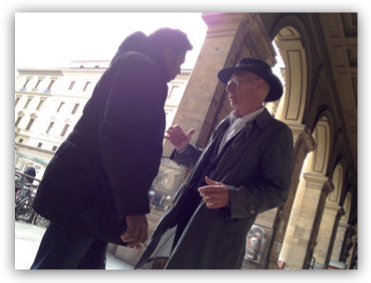
I spent a few days in Florence, Italy, in the spring of 2012. While I obsessively took photos of the city, I was struck by the appearance of a man I almost bumped into who had undeniable charisma. Thanks to the ProCamera app, I was able to quickly take a candid shot. Later, when I checked the shot, I realized that although I managed to capture the man in a relatively good picture, the rest of the image was poorly exposed and the angle was quite tilted. However, I was still drawn to the man, who reminded me of Thomas Mann’s Cipolla in the novella Mario and the Magician. He conjured the mesmerizing power of Mann’s hypnotist/magician. I decided to place him in another environment that corresponded to the ideas I had about the character. Fortunately, on that same day, I took a photo of the cathedral Santa Maria del Fiore. The cathedral was being renovated at the time of my visit, and this scene seemed to be perfect for my magician.
 Step 1: Capturing and Blending the Images
I generally use Filterstorm for blending images. Filterstorm has an excellent masking capability that allows me to make adjustments with pixel-level accuracy. It also retains the quality and the size of the image since it doesn’t compress the final picture.
Figures 1 and 2 show my original images, and figure 3 shows the background image I loaded into Filterstorm.
|1|
|2|

|3|
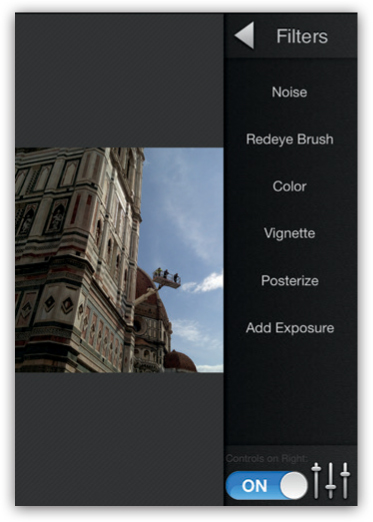
First I loaded the background image by choosing the Add Exposure option from the Filters menu. Then I loaded figure 1, and both images became visible in the Double Exposure screen, where I could alter the blending modes by touching the sliders near the bottom on the left side |4|. I used the Normal blending option, which is my usual choice.
|4|

I touched the Brush icon to bring up the Masking screen. Here I used the brush and eraser tools to isolate the figure of the man and focus attention on him |5|. I adjusted the diameter, softness, and opacity of the Masking tool, which helped me get the precision I needed as I worked around the figure. When I was finished, I hit the Accept icon and saved the image to the camera roll.
|5|

 Step 2: Converting the Image to Black-and-White
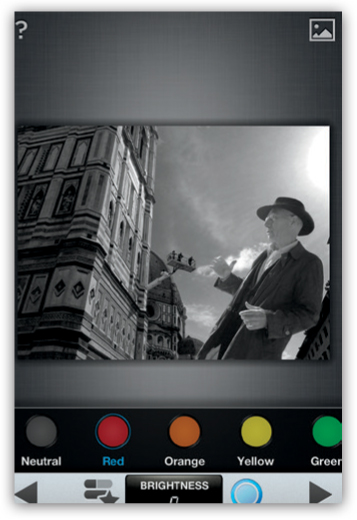
I opened the blended image in Snap-seed to convert it to black-and-white. Snapseed has very good color filters to adjust the tonal range of a photograph. I tapped on the Black and White tab in the bottom menu and chose the Red filter to produce a dramatic sky and to emphasize the details in the face |6|. I applied the effect by hitting the right arrow, then I saved the black-and-white image to the camera roll.
|6|
 Step 3: Adding Light
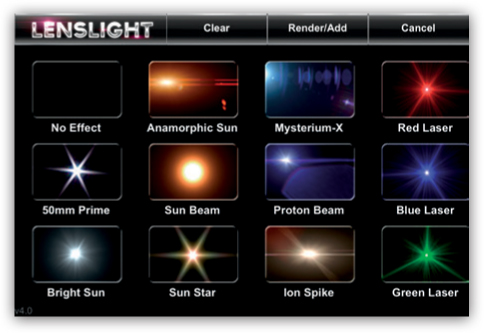
Because the subject evoked a magician, I wanted to add some magical feature, so I chose LensLight to add a surreal light effect. I loaded the image and selected the Bright Sun effect |7|.
|7|
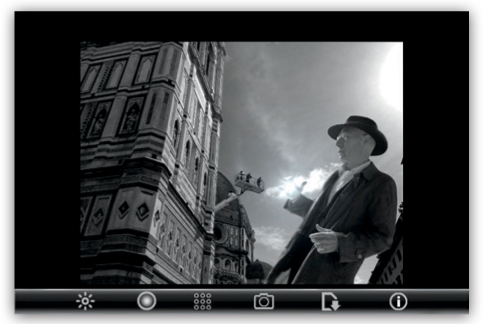
I adjusted the size and location of the effect by using finger gestures |8|. When I was happy with the position and size, I selected the high-resolution export option and saved the image to the camera roll.
|8|
 Step 4: Adding Blur and a Lomo Effect
Cipolla represents a timeless archetypical figure, so I decided to add a Lomo effect to the image. The Lomo effect resembles the look and feel of damaged film and is typically characterized by blur, twisted colors, and noticeable vignetting. I opened the image in Big Lens and chose the Basic editing option, which generated a red circle. The inside of the circle represents a clear (in-focus) area, and areas outside the circle will be blurred with a tilt-shift effect. I adjusted the area with finger gestures, and when I was happy with the result I adjusted the aperture to f/3.5 to decrease the strength of the blur |9 and 10|.
|9|

|10|

Then I hit the Filter icon and selected the Lomo1 filter, which gave the image a nice brownish-green tone and a subtle vignette |11|. I adjusted the strength of the effect by adjusting the slider.
|11|

 Step 5: Adding Texture
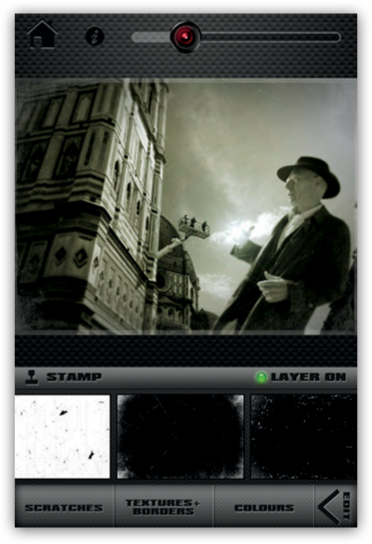
Finally, I added an aged look and feel by applying textures in ScratchCam FX. After I opened the image, ScratchCam FX automatically generated a random effect. If you hit the Rand button several times, you can preview thousands of random effects, but fortunately I was able to modify this process by selecting the Edit option.
The Edit option gives you access to three editing parameters, which can be used individually or combined: Scratches, Colours, and Textures+Borders. I used only Scratches. I played with the different Scratches layers until I found one that I thought fit the mood of the picture, and I adjusted the strength of the layer with the slider above the image |12|. After I applied the effect, I hit the Send button and saved the final image to the camera roll.
|12|
To complete the storytelling idea, I named my image Cipolla in Florence. It integrates both the real experience and the associated story inspired by the writing of Thomas Mann.
Filterstorm is a must-have app for dedicated iPhoneographers. It’s a full-featured editing tool—the Photoshop of the iPhone. Besides the basic correcting and editing tools, it has remarkable versatility and editing options to help you make compelling images. Its masking tools allow for precise editing of the selected part of an image. If you could take only one app to a desert island, you should choose Filterstorm.
To achieve the result I had envisioned, I used Filterstorm to blend the images, Snapseed to convert the blended image to black-and-white, LensLight to add a light ball to intensify the magical quality of the character, Big Lens to add blur and a Lomo effect, and ScratchCam FX to add texture.
Robert Herold (HerRo)
Robert works exclusively on his iPhone. He lives in Pécs, Hungary, with his iPhoneographer wife, Edina, their kids, and a dog. Robert’s images have been exhibited throughout the United States. He was tagged as one of the top 50 mobile photographers of 2011, and he was a featured artist on iPhoneogenic, iPhoneArt, P1xels at an Exhibition, the Mobile Photo Awards Blog, fotogriPhone, iPhoneogenic, Life In LoFi, iPhoneography Blog, and Eye’em, and he has had multiple works appear in print media. Robert won the Digital Art & Collage category at the 2011 International Mobile Photo Awards (MPA).