
The soaring trunks and spreading branches are the five-star skyscraper hotel of gardening for wildlife.
Making a Woodland Home
There is something about trees that resonates deeply with us. Perhaps it is their magnificent size; maybe we see in them something of our own lives in their change from slender youngster to proud adult to wrinkled veteran; or perhaps it is how they signal the seasons, from the fresh green hope of spring to the flash of autumnal fireworks?
Whatever the reason, they offer something quite profound for garden wildlife: they open up ‘room’. Or, more precisely, ‘rooms’. They turn a garden from a wildlife bungalow into nature’s hi-rise luxury hotel. The sheer volume of eatable material and the vast surface area they offer is astonishing, and they achieve this ‘perched on a pole’, a trunk that takes up only a square metre or often less of actual floor space. It’s an incredible way of maximising opportunities for the wildlife that likes and needs trees.
It can also be cheaper and easier than many people think. In fact, a little sapling can cost less than a pot plant. It is also something that I believe can be done in any garden; even the smallest gardens can develop their own little bit of woodland heritage. Yes, it takes time, but the key thing is to enjoy the journey as your flimsy little knee-high trees ‘get their feet down’ and, year by year, thrust ever skywards. Ultimately, it is a legacy for future generations, of people and of wildlife, to enjoy.
The soaring trunks and spreading branches are the five-star skyscraper hotel of gardening for wildlife.
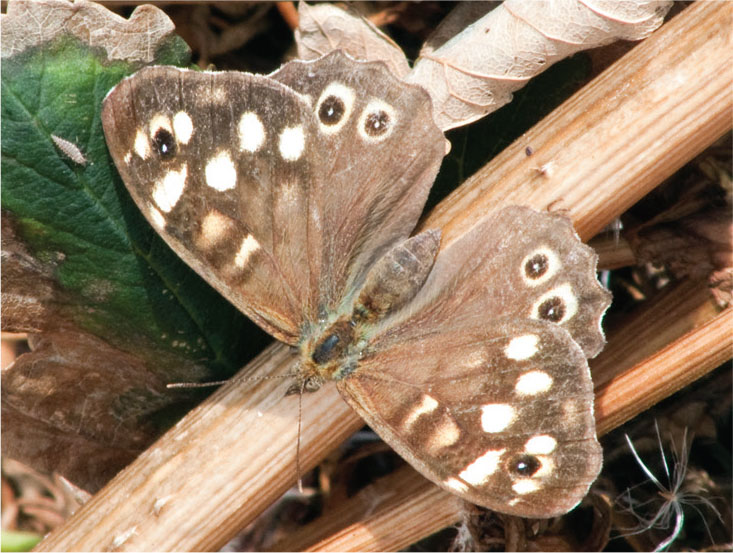
The Speckled Wood only feels at home in the dappled light of the woodland, as do a huge number of moths.
KEY SPECIES
—Almost all garden birds, but especially, woodpeckers, thrushes, tits, Starling, pigeons and finches
—Speckled Wood butterfly
—Bats
—Squirrels
—Wood Mouse
—Dormouse
—Many bee species
—Many moth species
—Many beetle and bug species
—Many spider species
—Many moss, liverwort and fungi species

Mosses flourish in the damp shade under trees, a lush microjungle for minibeasts, where the spreading buttress of tree roots offers ideal natural cavities for mice, and even nesting tits.
The inspiration
An ancient woodland – one that hasn’t been ploughed for 400 years or more – is a glorious place to look for woodland-garden inspiration. It is a glimpse of the time when the Wildwood covered much of northern Europe. This is the awe-inspiring oak woodland at RSPB Dinas in mid Wales.
It is a compelling thought that once upon a time most of our gardens were probably part of this giant forest. They probably still carry a bit of this ‘memory’ in their soils and in some of the creatures that live there. Why not reinstate a little bit of the Wildwood now in your garden?

A mature tree may have more than 100,000 leaves, every one a launch pad, hiding place or salad for all sorts of insects.
The trunk and main branches are the main highways for wildlife, offering a huge surface area made even larger by the bark’s ruts and folds. Mosses and lichens create a miniature jungle here, Ivy clambers up, woodpeckers drum holes and beetles bore under the bark.
The blossom of many trees offers pollen and nectar, followed by a great harvest of seeds, nuts or fruit. A tree is a supermarket as well as a hotel.
In the dappled shade underneath the canopy, smaller trees and shrubs create an understorey, yet another suite of rooms in this grand hotel.
Dead wood is just as vital to wildlife as the living tree, and that includes dead and dying branches on the tree itself. Here, all manner of beetles and dead-wood creatures live and breed, and fungi take hold.
In the crown of the tree, wildlife must have a head for heights and be able to cling on in a buffeting wind. But life-giving sun is aplenty, and they are safe from ground predators.
Thousands of smaller branches and twigs form miles (no exaggeration) of minor byways for insects, and safe perches and nesting sites for birds.
In the wild, as old trees die and fall, they open up sunny, sheltered glades. Flowering plants that need the light grab their opportunity, insects buzz, and large grazing animals, such as deer, may keep the glade open for years.
It is a different world depending which side of the tree you get up on. On the north side of the trunk it is cold and dark, it is dry on the east out of the prevailing wind, and warm and damp on the south and west.
Every year, falling leaves deliver a free mulch to the shady ground beneath. Part fertiliser but also part weed-suppressor, this windfall offers yet another microhabitat in which many creatures can prosper.
Down on the woodland floor, there can be a glorious carpet of flowers that bloom early before the canopy closes over.
Unseen underground, the roots spread out as wide as the tree itself, many of them close to the surface. Most are entwined with fungal threads in a cooperative partnership.
How to make your woodland: step by step
1. Think ahead…a long way!
Planning for the future If you plant the wrong species in the wrong place, you may find yourself having to start again (with an axe!) ten years down the line. So identify how much room you have for trees to grow and spread, and imagine how they might change the look and feel of your garden, and where they will cast their shade. Think if they will eventually affect buildings, roads, street lights, overhead cables, or underground pipes and services. Choose the right species Focus on how tall and wide a tree is said to grow, if it is right for your soil and climate, and, of course, make sure you select ones that will provide the home needs you want. The sooner you start, the better!
2. Seeds, saplings or specimens?
How you actually start off your trees is down to you, your budget and your levels of patience.
Planting from seed If you can afford the wait, this is the cheapest and ultimately most rewarding option – they will be your ‘babies’. Collect seed locally, knowing the trees will be well suited to where you live. Big seeds, such as hazelnuts and acorns, can be planted directly into pots of compost and do best if nicked with a knife to trigger growth. Berries should be soaked until the seeds can be extracted from the pulp; then sow them in compost under a layer of grit. Most tree seeds need scarifying before they will germinate, which means chilling them for several weeks in a bag of sharp sand in the fridge or leaving them out over winter in a cold frame.
Bare-rooted trees These are young trees dug up in winter while dormant, their bare roots wrapped in polythene for delivery. Plant them out as soon as possible and don’t expose the roots to the air for more than a few minutes. Some are sold as single slender stems only a year or two old called whips, and are a great and incredibly cheap way to start; it’s how I do it.
Root-balled trees These are delivered with the roots in a ball of soil within hessian sacking and can be pretty big (and expensive). They are best planted in autumn or spring.
Container-grown trees The most expensive way to start, they can be planted at any time of year but do best if planted in autumn or spring. You may need some well-muscled friends to help extract the heavy rootball.

When planting, take care to ensure the tree is vertical, and lay a stake across the hole to check it will be at the same level in the ground as it was at the nursery.
3. Planting your tree
Dig a big hole! It should be two to three times wider than the container or rootball. Lower in the tree, ensuring that it sits at the same level as it did in the container. If planting a bare-rooted tree, form a mound in the base of the hole and spread the roots over the top. You can mix in some well-rotted compost with the removed soil, but it isn’t essential. Fill the hole back in, treading in firmly. Then water well.
Most young trees need staking – a wooden stake hammered in at an angle of 45° is ideal. Anchor the tree to the stake with a soft cord such as rubber tubing, tied in a figure of eight. You might also want to use a tree guard if you are visited by rabbits or deer.
4. Caring for your woodland
The first year is crucial In particular, young trees need lots of water. Even then, a few young trees may not ‘take’.
Mulch Cover the ground around the tree with 5cm depth of well-rotted compost, keeping it clear of the young trunk. It will keep moisture in and weeds out.
Pruning Most young trees won’t need much. You may at some point, however, want to ‘lift’ the canopy, removing lower branches to let more light onto the woodland floor. Eventually large trees may need dangerous or inconvenient branches removing or their height reducing. When this happens, call in a tree surgeon.
Enjoy the gradual change The trick is to relish each step as your woodland grows rather than hanging on for your final vision to be achieved.
Creating woodland’s layers
To create all those different microhabitats that make up a natural woodland, we need to do more than just plant what will become the big trees – we need to create all the layers, so that there is all the variety, microclimates, food and homes for wildlife.
The Shrub Layer As long as the canopy isn’t too dense, you can plant an understorey of smaller trees and bushes. In a native woodland, these are often dominated by Hazel, Holly, hawthorns, Field Maple and Elder, but there can be smaller shrubs too such as Spurge Laurel, Mezereum and Butcher’s Broom. In your garden you have the chance to be even more adventurous, using non-native shrubs that are also well able to survive in the dappled shade between larger trees, such as Oregon-grapes, Flowering Currant and viburnums.
The Field Layer Beneath the shrubs, a bed of flowering bulbs and herbaceous plants grabs the limelight before the trees break into leaf in spring. Most herbaceous border plants sold in garden centres tend to be sun-worshippers, but if you look hard, you will find plenty of exciting wildlife-friendly plants that will tolerate or even delight in a shady position.
TOP 20 WILDLIFE PLANTS FOR THE WOODLAND FLOOR
Bluebell, English
Bugbane
Bugle
Burdocks
Columbines
Cranesbills, eg Geranium sylvaticum
Dead-nettles, eg Lamium maculatum
Ferns
Foxgloves
Lungworts
Monkshood
Pendulous Sedge
Primrose
Red Campion
Violets
Wild Strawberry
Wood Forget-me-not
Woodland grasses
Wood Sage
Yellow Archangel
The Ground Layer Unless some creature has been having a bit of a rootle about, few woodlands have a ground surface that is just bare earth. Instead, it is covered with a mouldering layer of dead leaves, bits of twig, decaying logs and flakes of bark. You can mimic this when you start your woodland area by putting down a thick mulch of bark chippings. Then, if you rake leaves off your lawn in autumn, you can sprinkle these here, too. Over time, it will begin to look and feel like a rich woodland floor.
The Climbers Finally, crawling up the natural scaffolding of trunks and branches, climbers such as Ivy and honeysuckles add yet more variety to the food and habitat on offer. Plant these about 30cm (12 inches) from the base of more mature trees, leaning in. Some people are horrified at the thought of letting Ivy loose on a tree, and I understand why, but a good healthy tree will cope, just as they have over thousands of years.
TREES FOR A VERY SMALL WOODLAND GARDEN
It is possible to create something that has the essence of woodland in the smallest of gardens. Select trees that are naturally small, such as Japanese Crab Malus floribunda which grows to 4 m or so, or, even smaller, Malus sargentii. There are then some tree cultivars that have been bred specially to be dwarf such as the weeping Goat Willow ‘Kilmarnock’. For a really small garden, then you can’t go far wrong with one of the fruit trees that has been grafted onto a dwarfing rootstock.
Growing a tree in a large pot slows down growth. Hollies and Yew do especially well and can be pruned like topiary. Fruit trees are also ideal for this, but almost any tree can be tried. They will, however, need plenty of water and a thick mulch.
Or grow ‘two-dimensional’ trees, trained up and along walls and fences as cordons or fans. Apples and pears are the ideal subjects, giving you flowers, fruit and nesting habitats for birds between branch and wall.

Foxgloves are one of those woodland plants native to Britain that are so glorious in flower they look straight out of the garden centre.
CREATING A SMALL WOODLAND GARDEN
It is possible to create something that has the essence of woodland even in small gardens. Here is my own example from where I used to live in what was called Woodlands Close. As with many road names, its origins were clearly ancient history for there were no woodlands to be seen, but at least my small front garden contained three mature Sycamore trees, and I was determined to put back a bit of what might once have been there.
The Sycamores cast a deep shade across almost the entire garden and, when I first moved in, the ground beneath the trees was just a bed of thin weedy grass and some wind-blown rubbish.
I set about planting a native hedge around the outside while, deep within my ‘woodland’, I planted young trees of different sorts under the canopy. I then introduced a wide range of woodland perennials beneath them, and added a bark path edged with old branches, plus a couple of stick piles. I drilled a birch stump with holes and ‘planted’ it upright in the ground; it soon became the nesting place for solitary wasps.
The woodland garden became an oasis of shade where Blue Tits nested, where Wrens sang and which hummed with insects in summer.

My woodland flowers at their best in April and May, with beds of Red Campion, Lamium maculatum, comfreys and geraniums seizing their moment before the closing of the canopy. Later in the season, woodland gardens inevitably look rather tired and dark, but by then thoughts can turn elsewhere in the garden.

In very early spring, Snowdrops and pink Mezereum buds ensure your mini woodland is a ‘must see’ part of the garden.

By March, Wild Daffodils take centre stage. Although not the best for wildlife, they help add to the complex network for woodland creatures to explore and hide amongst.

The trunks of the trees are perfect for bat and tit boxes.
BRINGING DEAD WOOD ALIVE
Few gardens naturally have dead wood lying about the place (fences don’t count – dead wood needs to be untreated and rotting to be good for wildlife!). In fact, it is one of the things that people tend to compulsively clear up. As I always say, it is not the tidiness that is the problem; it is when the things that have been tidied then get thrown away or burnt that wildlife loses out. A good garden for wildlife can be incredibly tidy, as long as it isn’t sterile.
So when it comes to making a ‘dead wood pile’, you can be as slapdash or as nitpickingly precise in how you arrange your materials. You can make it look as if dropped from a great height and left where it landed, or you can use your creative flair to turn it into a piece of art.
Notice how I’m not calling it a ‘log pile’. I want you to see any dead wood, including bark or sticks, as fair game. Dead wood can be used in all sorts of places and in all sorts of ways: the only limit is your imagination.
How to make a dead wood pile
1. Find some logs Should you ever need to have existing trees in your garden removed, keep anything that gets cut down. Keep a watch out, too, for any neighbours having tree work done and get straight round there to see if any are going begging. They’ll probably be delighted! Oh, and remember to tell them why you want it, to help spread the good word about gardening for wildlife. If all else fails, order a delivery. Try to source logs that come from near where you live: there are likely to be all sorts of creatures already inside the logs, and so will be well suited to your local climate and environment.
2. Choose a site – or several Don’t imagine that a dead wood pile has to be somewhere dark and dank. Build one in a sunny position and you’ll get a totally different range of creatures use it than one deep in shade. In particular, solitary bees and wasps do like sunbaked wood.
3. Then over to you and your artistic flair Arrange the logs in any way you wish, whether that be the natural look, or orderly perfection. But do consider part-burying some of them as some creatures much prefer rotting wood underground, especially Stag Beetle larvae. And why not even dot interesting-looking bits of dead wood among your flower borders.
4. Don’t forget the brash ‘Brash’ is another word for thin sticks, stems and twigs, which too often gets forgotten when creating a dead wood pile. Chunky logs are great, but they create rather a coarse network of large nooks and crannies. In a stick pile, the maze of spaces is much more complex. I have a hunch that in the cat-dominated garden world, a large stick pile may provide the best nesting site for Blackbirds, Robins, Dunnocks and Wrens, and a brilliant place for Slow-worms, too. In fact, because so few people bother to make a brash pile, it may be one of the most useful things you can create for wildlife, so I urge you to give it a go.
5. And finally, add flowers A log or brash pile is a perfect climbing frame for a clamberer such as a clematis or blackberry (wild or cultivated), adding yet more wildlife value. Or push earth into some of the gaps and plant woodland flowers such as Primroses and Bugle. Plus of course grow some nectar-rich flowers around its base. What a wonderfully diverse habitat you will have created.
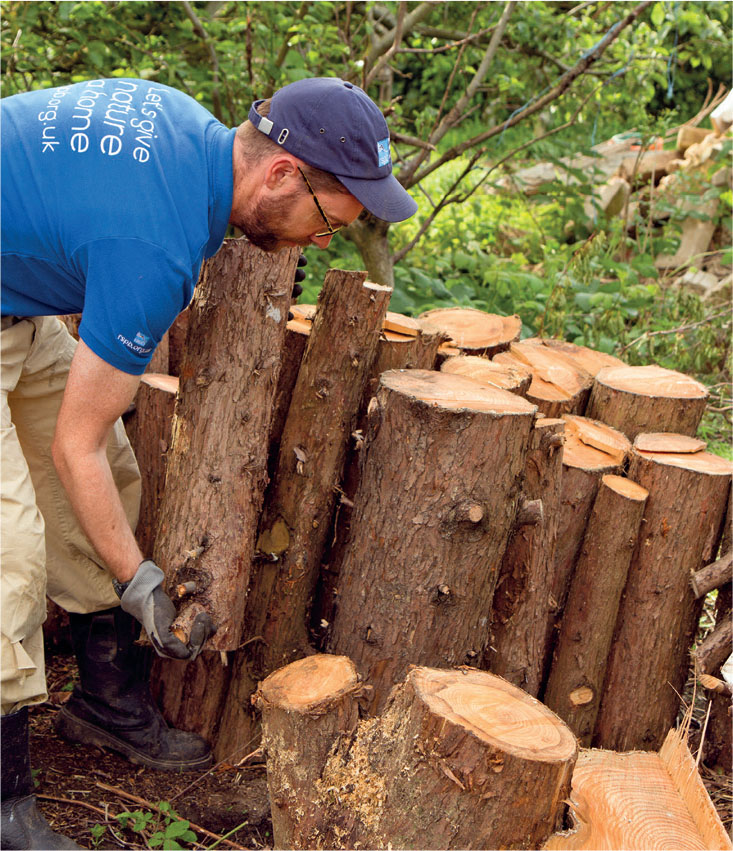
Lying or standing up; half buried or piled high – get creative with your logs to create homes for all sorts of creatures and a talking point for visitors. Just remember to keep your back straight!

Log piles offer a complex world of decay mixed with a labyrinth of dark and damp gaps and cracks. No garden should be without one!