Along with all the creative activity during preproduction (script development, rehearsals, and visualization) much needs deciding in relation to the practical aspects of filmmaking: the organization of time and personnel; coordinating locations, props, equipment, and costumes; dealing with film labs and other vendors; working with budgets, contracts, payroll, and insurance; and so on. Coordinating the practical dimension of film production is called line producing. It is the domain of the producing team (producer, line producer, and unit production manager), and you cannot make a movie without them.
Good line producing undergirds the production crew and protects the director from logistical issues that would intrude upon the all-important creative aspects of filmmaking. When all goes well, everything necessary to carry out the creative preproduction planning, from locations and sets dressing to equipment and personnel will be there and ready to go as production time comes round.
The director meets regularly with the producing team to elaborate the needs of the project and plan the production period so that everyone is on the same page when the camera starts rolling. At the final meeting before production—actually the culmination of many planning sessions— you lock down arrangements before shooting. By now, everyone heading a department has visited locations and brings their respective breakdowns. Participants include the producer, unit production manager (UPM), director, assistant director (AD), script supervisor (also known as continuity supervisor), director of photography (DP), art director, and head of sound. Now it’s time to coordinate everyone’s efforts and make last-minute corrections.
Scheduling is normally decided by the UPM and the AD and double-checked by the director and principal crew members, especially the script supervisor and DP. Higher-budgeted productions may use a line producer who works directly with the day-to-day production details on behalf of the UPM.
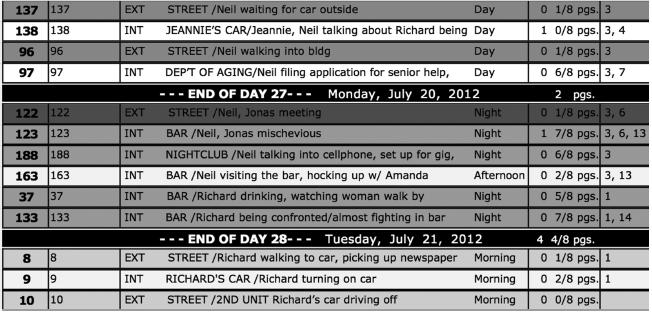
Good scheduling software (see box on p. 320) helps you distil information from the script, and enables you to schedule (and re-schedule if necessary) actors, props, and other necessities accordingly. It generates scheduling charts and stripboards that show at a glance which scenes and characters must be shot at each location (Figure 25-1). Any competent UPM or AD should be able to use this software with ease.
Aim to set the shortest practicable schedule because the number of working days translates directly into costs (see below, “Under-or Over-scheduling”). The logistics of travel, time to build and to strike sets, and time allowed for contingencies like bad weather, illness, or equipment breakdowns must all be factored in. However, scheduling always involves making educated guesses because no film is quite like any other. Anyone using the available scheduling and budgeting software available can do a thoroughly professional job, as we shall see. Take into account any or all of the following:
Normal practice is to shoot in order of convenience for locations and availability of cast and crew. Since lighting setups and changes take the most time during a shoot, a compact schedule avoids relighting the same set.
All scenes having a common location are shot on the same day(s) regardless of their order in the script. If there are three INT. CLASSROOM scenes (one in each Act) we’d schedule them all for the same production time so we visit and light the classroom set only once.
As mentioned earlier, wide shots are scheduled first: they establish the spatial relationships and blocking, the lighting logic, and performance intensity. If time becomes tight, you might get away with not shooting a close-up or a detail, but master shots usually cover the most territory in the scene and so are indispensable. Closer shots follow because their lighting and performance pitch must match the master shot. Cutaways and inserts usually come last because they can often be shot after the actors have left or can be picked up by a smaller 2nd unit crew at some other time. Other factors sometimes affect a normal shooting schedule, such as the availability of actors, crew, equipment, and locations.
Rehearsal now really pays off because director and cast can move confidently between the different script junctures and their associated emotional levels. Even so, the non-sequential nature of film shooting can throw many actors off. A director’s principal duty on the set is to keep reminding actors where they are in the script, where they have just come from, so they are in their character’s correct emotional frame when the camera rolls.
Certain types of films may need shooting in script order, particularly if director and cast are inexperienced. Here are examples:
Some scenes are so important that, should they fail, no film is possible. Perhaps your film requires its young heroine to fall deeply in love with an emotionally unstable man. It would be folly to shoot too much until you know that your actors can make a difficult and pivotal scene work. Key scenes must be filmed neither too early (when the cast is still green) nor too late (when failure might void weeks of work). If the scene works, it will give a lift to everything else you shoot. If the scene bombs, you will want to work out the problems in rehearsal and reshoot in a day or two. Until the problem is solved, however, you cannot risk shooting the bulk of the film.
Problems of performance should show up in rehearsals, but when shooting starts, camera nerves often kick in, especially in demanding scenes. Filming is occasionally better than the best rehearsal, but particularly at first it is quite often a little inferior. The cast may feel more deeply during the first takes of a new scene, but strong feeling is no guarantee of control or character development. Some actors, realizing they must sustain a performance over several takes per angle and several angles per scene, instinctively conserve energy. You can minimize this by predetermining how you want to edit so you shoot less extensively. Knowing how much or little to shoot, drawing a line between adequacy and wastefulness, is hardest for the new director. Err on the side of caution, and be sure to give your editor enough coverage.
Be aware of the steep demands some scenes make upon the actors. A nude love scene, for instance, or a scene in which two characters become violently angry, should be delayed until the actors are clearly comfortable with each other and the crew. Schedule such scenes late in the day’s work because they are so emotionally draining. For nude scenes everyone possible leaves the set.
Make contingency shooting plans whenever you face uncertainties. Schedule exteriors early in case they are delayed by unsuitable weather, and arrange for cover sets, which are interior locations standing ready as standby alternatives. This way you will not fall behind schedule.
Depending on the amount of coverage, the intensity of the scene in question, and the reliability of actors and crew, you might expect to shoot anywhere between two and four minutes of edited screen time per 10-hour day. Traveling between locations, elaborate setups, or relighting the same location will greatly slow the pace. It’s fairly standard practice to allot setup time for the mornings. While the crew is busy setting up, the director rehearses the cast.
A promising film may also be sabotaged by misplaced optimism. Consider the following:
Without resolute progress-chasing an inexperienced crew tends to delay hitting its stride. Any shoot can fall seriously behind if the AD and producing team do not keep the unit on schedule. Crew responsibilities are detailed in the next chapter.
The production manager and assistant director are responsible for translating the shooting sched-ule into day-by-day call sheets. These, distributed to the entire crew (and posted on the project’s Facebook page), detail: (1) what portion of the script is being shot on a specific day, (2) who needs to be on the set, (3) when each person needs to be there, and (4) how to get to the set. Arrival times allow for setup by the crew and makeup and rehearsal times for the cast. For short film projects, you can download blank call sheets from this book’s website (www.directingbook.com. under “Forms and Logs”), or you can generate you own with one of the popular film scheduling software packages that integrate all scheduling functions (see box p. 320).
In a broad sense, the budget of a film is essentially how much money (and other resources) one has available to make a movie. It is not something that one attends to “down the road”: you must know what financial resources you have before you begin production or you will experience serious sticker shock.
An ideal approach is to start with the script, cast breakdown, and visual design, and then raise the funds sufficient to make it happen. After that, budgeting means deciding what specific expenses you face and how available funds will be distributed across the various needs of the project.
Budgeting is primarily the domain of the producing team (producer, associate producer and line producer), but the film budget has enormous consequences for the director. Often the director must strategize to make the best film possible on the available money, and must balance interpretive aims (rehearsal schedule, visual design, coverage, and so on) against what is available. A detailed budget includes a price line for every item or service, and lays out how much your film will cost and where the money will go. Use pessimistic figures because the total for a film can be a mortal shock. Better face the music while you can still adapt, and be ready to rewrite scenes that incur more expense than they merit. Approaching production, you and your production crew must consider:
Broadly speaking, budget expenses divide into above-the-line and below-the-line costs. The line itself is the division between preproduction and beginning production. Thus:
Above-the-line costs:
Story rights
Screenplay
Producer’s fee
Director’s fee
Principal actors’ fees.
“The Line”
Below-the-line costs:
Production unit salaries
Cast, stand-ins, extras
Art department costs (sets, props and costumes)
Studio or location rentals
Film stock or media
Camera, electrical, sound, and other equipment (purchase and rental)
Laboratory fees (processing and transfers)
Special effects
Catering, hotel, and living expenses
Transportation
Legal costs and production insurance
Miscellaneous expenses
Music rights and composition
Postproduction expenses (sound mix, color grading, mastering, and other services)
Distribution copies and publicity materials
Festival entry fees and travel to festivals.
All movie budgets should also include a contingency percentage, usually four percent or more of the total budget. This is your Murphy’s Law surcharge; it allows for equipment failure, bad weather, reshooting, and other hidden costs.
A large line item that novices tend to avoid is production insurance. It is not an area to skimp, indeed consider it a necessity for all film shoots, regardless of size, scale, and budget. Accidents happen: an actor falls and breaks an arm, a grip truck has an accident on the way to the set, a $10,000 lens lands on the sidewalk… Without production insurance, any of these scenarios could easily shut you down. Union actors cannot work unless you provide proof of insurance to their union, and many equipment rental houses and locations require proof of insurance. Film workers too are often union members, and their union stipulates what coverage is necessary when they are hired.
If you’re a student, your department should have information about where and how to acquire production insurance. If you’re an independent filmmaker, the Independent Feature Project (IFP) website is a good place to start your search for affordable insurance (www.ifp.org). Insurance is complicated territory, so be sure to research exactly what kind of policies your project requires. Depending on the expense and sophistication of your production, you may need to carry some or all of the following: preproduction indemnity; workers’ compensation; film producer’s indemnity; consequential loss; errors and omissions; negative insurance; employer’s liability; public, or third-party, liability; third-party property damage; equipment insurance; sets, wardrobe, props insurance; vehicles; fidelity guarantee; union and other insurances. Special insurances are also generally neces-sary when working abroad under unusual health or other conditions.
Budgeting and Scheduling Forms
For short film projects you can use the budget form, breakdown form, and call sheet blanks available for down-load from this book’s companion website (www.directingbook.com., “Forms and Logs”). If you mean to approach anyone in the professional filmmaking world, all paperwork must use recognized budget and scheduling soft-ware. The industry favorite is Movie MagicTM, an expensive but all-encompassing software package. Less pricey, and good for the lean independent, is GorillaTM from Jungle Software. Either will help you break down the script, turn it into a schedule, and arrive at a detailed, properly laid out budget based on all the variables that you supply. The beauty of dedicated relational databases is that any change you enter in the budget, coverage, or scheduling shows up immediately everywhere that it matters. The software will also generate scene breakdowns, call sheets, contact lists, and organize locations and storyboards. Most new users will need training to make full use of their purchase, but properly used, the software even monitors daily cash flow, so there need be no unpleasant surprises lurking in the accounts department.
Getting over-elaborate is tempting for the technician trying to forestall problems by insisting on the “proper” equipment—always, of course, the most complicated and expensive. Beware of strong-minded cinematographers out to pad their sample reel with nifty techniques from nifty toys. Early in your directing career, you and your crew will be hard put to master basic techniques and gear, so it’s wise to foreswear advanced equipment and the time it takes to become proficient with them. This can also be a safety issue: a film production is not the place for on-the-job training in potentially harmful gear, especially when it involves electricity. In experienced hands, however, sophisticated equipment may save time and money. Expect the sound department in particular to want a large inventory. They are often asked to quickly adapt to changes in lighting set-ups, shot sizes, blocking or other circumstances and cannot comply without reserve equipment.
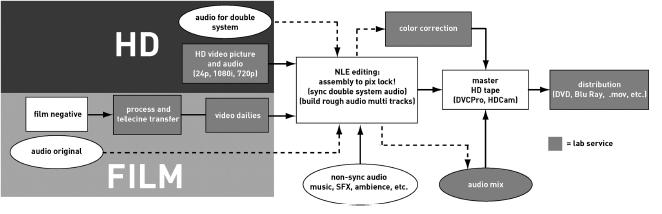
One essential factor that a filmmaker (especially a student or independent filmmaker) must research from the beginning of every new project is workflow. This is the format path and processes your project must follow. Workflow includes the image shooting and sound gathering formats, the editorial format, the finishing process, the mastering and distribution formats (Figure 25-3). At the present juncture in film production history, workflow varieties are myriad, and each can make a sig-nificant impact on the budget of the film, the technical processes, and the range of exhibition possibilities. Filmmakers who lose their way often face expensive consequences. Careful research and cross-checking from the very beginning will go a long way toward minimizing ugly surprises.
Preproduction meetings with your cinematographer, production sound mixer, editor, and post-production lab (if you require lab services like color grading) are the forum for discussing what formats to adopt for recording both sound and image, and everyone in the crew must be on the same technical page before a single frame has been shot. Regarding workflow, there are four basic questions to settle for each new project:
1.What is the shooting format? Film, HD video (720p, 1080i), uncompressed or RAW video?
2.How are we editing? Format, codecs, frame rate, resolution?
3.How do we want to finish and master the movie? Film, HD video (720p, 1080i), uncom-pressed media files, (2K, 4K)?
4.How do we want to exhibit and distribute the project? Broadcast HD format (720p, 1080i), Blu-ray, DVD, web, or a combination? Or high end theatrical projection like 35 mm film, or Digital Cinema? (See p. 325.)
Within these general questions are many arcane and ever-evolving details that you must reconcile if you are not to waste inordinate time, money and energy. Most directors need considerable education in these ever-evolving questions, so a cinematographer, sound mixer and editor are more than creative collaborators—they need to be technologically up to date or your project won’t make it through to completion successfully.1
Whether to shoot on film or digitally has two major facets: the first is creative—what look can I get from each production format? The second is budgetary—what will each format cost? Both then involve additional choices: film shooting can be 35 mm or Super 16 mm format, and digital shooting can be done in HD broadcast standards (720p, 1080i) or at 2K or 4K resolutions (uncompressed video files).
Nobody should believe that shooting digitally is inherently cheaper than shooting film. Michael Mann’s Public Enemies (2009), shot digitally, cost around $100,000,000. You can how-ever use digital video to produce aesthetically beautiful, professionally polished films for less than using film. Add to this recent developments in RAW and uncompressed video shooting, enlarged image sensors, and a full range of superior, interchangeable lenses and you have a very promising medium. With the highly sophisticated digital cameras like the RED Epic and Arri Alexa, digital video can be every bit as visually expressive as any 35 mm film production.
The major expense with film shooting, apart from cost of the film stock, is the unavoidable involvement with a film lab and the expense of its services for film processing, transferring, inter-mediate prints, effects, optical track masters and possibly distribution copies too. A digital cameras, on the other hand, uses reusable record media like SD or SxS cards or hard drives, and its output is wholly handled by computers.
Given the dramatic increase in the quality of today’s lenses, their responsiveness to light, and relatively lower cost, it’s no wonder that few students or independent filmmakers now make film their production format. So clear is this trend that the major film camera manufacturers (Panavision, Arriflex, and Aaton) are regularly rolling out the new digital rigs, and are no longer developing new film cameras.
Digital video has spawned an explosion of competing formats and compression codecs (see below), and they change and proliferate at an alarming rate. Luckily for filmmakers, this means the capabilities of digital video increase every year, while the price/quality ratio gets ever more advantageous. There will always be high-end gear beyond the reach of filmmakers on a low budget, but the image quality of the lower price cameras is nothing short of astonishing.
Directors generally choose their cinematographers by the quality of their previous work, their creative judgment, and their ideas regarding the project at hand—but at some point you will need to have “the discussion” about shooting technology. What are we going to shoot on?
In the United States, high definition (HD) broadcast resolution conforms to the frame rate, aspect ratio, and resolution standards established by the consortium of engineers, communication companies, and policy makers of the ATSC (Advanced Television Systems Committee).2 Of principal interest to filmmakers are the HD formats:
Aspect ratio expresses the width of the frame in relation to its height, and is the same for all these standards, 16:9. At this ratio, HD approximates the cinema format of 1.85:1, and is now the preferred aspect ratio for HD television (see pp. 155–156).
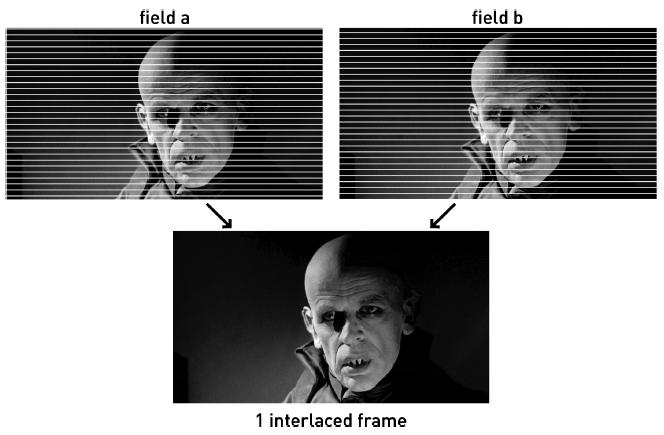
Frame rates and scanning: Because of differing electrical supplies, American frame rate stand-ards are based on 30 fps (frames per second), and the European PAL system is 25 fps. Which you use depends on where you live. ATSC standards create the frames in each of its 30 fps formats using two strategies. One is progressive scanning (Figure 25-4), meaning that all of the 720 hori-zontal lines of video information that make up the image are scanned (drawn on your image sen-sor or monitor screen), from top to bottom, 30 times per second. Progressive scan formats are indicated with the designation “p” while the “i” designation stands for interlaced scanning. Here the entire video frame is scanned twice from top to bottom. First the odd lines of information are scanned (lines 1, 3, 5, 7, etc.) and then the even lines of information are scanned (lines 2, 4, 6, 8, 10, etc.). Each scan is called a field and these two fields (the odd field and even field) are interlaced to create a full frame. The interlaced system, therefore, scans each field every 60th of a second and achieves the full frame of two interlaced fields every 30th of a second (Figure 25-5).
Resolution: Most important for the director, however, is the issue of resolution, because it has a direct impact on image quality. Resolution refers to the format’s ability to reproduce visual detail, sharpness of line, subtlety and degrees of luminance, and accuracy of color. Video resolution is affected by several factors: scanning type, lens quality, the number of sensor pixels, sampling bit rates, chroma subsampling, and data compression.
One principle factor of image resolution is the pixel count. A video image is created by hun-dreds of thousands (sometimes millions) of tiny capacitors lining the face of a video sensor or video monitor. These are called picture elements or pixels for short. The camera lens focuses light on the pixels of a camera sensor. This is commonly a CCD or CMOS chip which in turn translates those light values into digital information. In your video monitor the reverse process happens, but similarly, the more pixels there are, the better the rendering of image detail, light, and color.
The ATSC resolution standards (720 and 1080) are determined by the number of pixels in each format. We can determine the pixel resolution by multiplying the vertical lines by the hori-zontal pixels. So, the 720 format contains 921,600 pixels per frame and 1080 contains 2,073,600 pixels per frame—more than twice the information, which means twice the resolution.
Picture compression: With so many pixels capturing so much detail and generating so much data, the camera, postproduction equipment, and television transmitters all have to process a
torrent of digital information. However, since much in each frame repeats information from that preceding it, engineers have invented com-pression codecs (short for compression/decom-pression). Like shorthand, they reduce what gets “written” to the recording medium. A high-compression, “lossy” codec will, however, visibly intrude its economies onto the screen, particularly during image movement.
There are many different codecs, most of them proprietary by manufacturer. Sony HD cameras for example use MPEG-2 long GoP and Panasonic uses AVC-Intra. The H.264 codec is popular in many DSLR cameras that shoot video. At this juncture, rather than dis-appear down the rabbit hole of formats and codecs, you only need to know that your shooting format and codec must be supported by your editing system and by your postproduction lab—should you need their services. Thus, in preproduction your DP, editor, and lab must all talk with each other.
Sensor size: The size of the image sensor inside the camera also greatly affects the aesthetics of the final image, and is thus important when choosing a camera. There are two issues at play: one, larger sensors render finer detail because they can contain a greater pixel density (more or larger pixels). Two, lenses and depth of field are involved because small video sensors tend to create images of great depth of field, so controlling this important compositional element becomes difficult. Professional camcorders utilized fairly large sensors (usually measuring 1/2”, or 2/3”—about the size of a 16 mm film frame). Recent developments have greatly increased sensor size and HD cameras now often have sensors near in size to a 35 mm film frame. Using interchangeable lenses, these cameras achieve the same quality, perspective, and DOF control as 35 mm film production (Figure 25-6). See Chapter 27 for detailed information about depth of field and the creative impact of lenses.
Broadcast quality HD is always recorded compressed, transmitted compressed, and then decom-pressed for display. Ultra high-end digital camera’s, like the Arri Alexa, Aaton Penelope A, and RED Epic now record full resolution, 12-bit uncompressed video (or RAW files) and have light sensitivity and image quality easily matching 35 mm negative film (Figure 25-7). Known as 2K (2048×1080) and 4K (4096×2304) after their approximate number of horizontal pixels, these ultra-high resolutions far exceed the ATSC HD standards because they’re not intended for HDTV broadcast (Figure 25-8). As you might imagine, their video sensors are of exceptionally high quality and large. Most have a single, huge sensor (CCD or CMOS) the size of a 35 mm negative
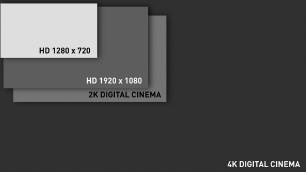
FIGURE 25-8 
The resolution of ultra high-definition cameras, at 2K and 4K, easily surpass ATSC standards for HDTV broadcasting.
frame, and shoot at 24 frames per second, the standard frame rate for both motion picture film and digital camera projection. These high end formats are destined for large screen the-atrical projection.3 The 2K and 4K shooting resolutions correspond to the Digital Cinema (D-Cinema) standard, a high-resolution digital theatrical projection format established by the Digital Cinema Initiative (DCI) (see p. 421). Of course, high image quality is still welcome even if your project is never picked up for theatrical release. To review a basic workflow chart for high end shooting and finishing, go to this book’s companion website www.directing-book.com. under “Workflow Charts.”
Given their notoriously small imaging chips (which produce an unmanageably large DOF), poor quality factory lenses, and lack of man-ual controls for focus, exposure, and so on, low-end consumer camcorders are inappro-priate for most—but not all—narrative film production, which demands control over all visual aspects of the image. Some filmmakers, however, have used their small size and “low-tech” aesthetic to advantage; notably Thomas Vinterberg with The Celebration (1998), Spike Lee with Bamboozled (2000), and Rebecca Miller with Personal Velocity (2002). So, never say never. If camera limitations become an advantage, use the technology that delivers it. Besides, technology never made the filmmaker. As these films attest, an aesthetically limited camera in the hands of a powerful filmmaker is always better than a powerful camera in the hands of someone aesthetically impoverished.
What film camera equipment to use depends on your chosen format, such as 35 mm or Super 16 mm (16 mm widescreen). Superior image quality is associated with 35 mm film because it uses lenses with a usefully limited DOF, and can be shown in any cinema in the world. Furthermore it can be transferred to any video format—at a price. It takes heavy funding up front to buy stock, and is vastly expensive to process and print. Anybody experienced enough to light and shoot in film will probably know where to get the equipment and how much it will cost. A feature with a $1 million budget for film acquisition is considered cheap.
Super 16 mm shoot: This widescreen for-mat is a less expensive and more mobile way to shoot features on film, but get advice from someone who has successfully (and recently) completed your preferred chain of production (Figure 25-9).
35 mm shoot: You will need the appropriate camera support systems and a dolly on rails if you shoot in 35 mm, especially Panavision. Any handheld shots will need either one of the newer shoulder-mounted, short-run 35 mm cameras or, if you intend a more gliding motion, a SteadicamTM operated by someone very strong and very experienced at using it.
The workflow from 35 mm or 16 mm film acquisition always requires lab work to process the original film negative and transfer it to a digital video format for editing using the telecine pull-down process. The additional lab services required to finish to a film print or D-Cinema master are also complex, expensive, and require much consultation with a film lab.
Address all questions about sound to the sound recordist (also called the production sound mixer), who heads the field sound team. This usually includes a boom operator and sometimes a cable wrangler. To decide sound equipment, consider how sound will be recorded. Through the camera and on the same recording media as the picture? Or on a dedicated and separate sound recorder? The first option is called single system sound, the second is double system sound recording. Serious narrative film projects are nearly always shot double system for two good reasons: one, the audio components built into digital cameras are usually inferior to those in a professional digital sound recorder. Two, since a field sound recordist must constantly monitor and adjust audio levels, he
or she cannot keep intruding on the camera operator to do so, nor can the camera operator attend to audio levels either.
So professional production uses double system sound, and since picture and sound are on separate media, they must be brought together in sync during post-production. This is where the s late or clapper board comes in (Figure 25-10). Its use has several functions: to place a positive visual identification at the head of every take (including scene, shot, take, and sound number), to verbally identify the shot and take, and to create a one-frame, easily identifiable reference “moment” by which to align picture and sound in postproduction. That moment is either the sharp snap of the slate sticks recorded by both camera and the audio recorder at the beginning of every take, or it can be a timecode reference number when using a “smart slate” generating visible time code. Either reference makes syncing sound with picture in postproduction a straightforward procedure.
Planning to shoot location sound poses a number of questions:
Conferring with your sound recordist should answer your questions and provide all the information you need to make an accurate estimate for the budget.
Whatever acquisition medium you use, you will need a non-linear editing system, from a Mac computer (around $2,000) equipped with Final Cut Pro ($300) at the low end to a $60,000 Avid DS postproduction system at the high end. The length of the movie, amount of coverage, whether special effects will require extensive rendering (computer processing), and whether you’ll need lab services will affect the postproduction schedule and budget profoundly. Remember to budget for plentiful hard drive storage, including for the audio phase when the final track is mixed using a Pro ToolsTM software suite.
The sound studio may be housed in a large theater, and cost hundreds or even thousands of dollars per day. Budget for project mastering, music rights, color grading, pressing DVDs, and for otherwise making distributable copies. Depending on whether you aim for release on television, Webcast, DVD, or a theatrical Digital Cinema venue, you must know your workflow and have consulted with others who have followed a similar path. The postproduction stages and processes are covered in more detail in Part 8.
It may seem a small matter, but get high resolution production stills taken on your shoots. A really striking production still can give your film immense credibility, so give thought to what compositions will represent the thematic issues in the film, the personalities of the players, and any exotic or alluring situations that will draw an audience.
When production starts, set a policy so everyone knows to freeze on command for a production still. Then the director or DP asks the actors to take up representative moments and juxtapo-sitions from a scene just shot. Ideally you employ a good still photographer, but you may have to designate someone in the crew with a good eye for composition. Often this person is the continuity supervisor. Good stills become vital when you prepare posters and publicity packages for festi-vals and prospective distributors.
Make “test and test again” your true religion. Leave nothing to chance. Make lists, then lists of lists. Pray.
Golden Rule #1, be prepared for the worst: Optimism and filmmaking are bad bedfellows. One blithe optimist left the master tapes of a feature film in his car trunk overnight. The car happened to be stolen—and because there were no copies, a whole production was transformed instantly into so much silent footage.
Imagination expended darkly at predicting the worst makes you carry particular spares, special tools, emergency information, first-aid kits, and three kinds of diarrhea medicine. A pessimist never tempts fate and, constantly foreseeing the worst, is tranquilly productive compared with your average optimist.
Golden Rule #2, test it first: Whoever checks out equipment should arrive early, and assem-ble and test every piece there and then. Never assume that everything will be all right because the equipment comes from a reputable company. Murphy is waiting to get you. (Murphy’s Law: “Anything that can go wrong will go wrong.”) Expect him to lurk inside everything that should fit together, slide, turn, lock, roll, light up, make a noise, or work in silence. The whole Murphy family hides out in every wire, plug, box, lens, battery, and alarm clock. Make no mistake: the whole bloody clan means to ruin you.
Once you’ve engaged crew and actors, throw a production party as an icebreaker. One of the lovely aspects of the film business is that, being an itinerant industry, you work with the same people from time to time throughout your working life. Because everyone is freelance, everyone is happy to work. Production parties are thus festive and optimistic occasions that lower the tensions in time for shooting to begin.
1 If you’d like a more detailed introduction to all these technologies, try Voice & Vision: A Creative Approach to Narrative Film and DV Production by Mick Hurbis-Cherrier (Focal Press, 2012).
2 Canada and Mexico also use the ATSC standard, however, there are three other digital TV systems around the globe. DVB-T (Digital Video Broadcasting—Terrestrial) used in Europe, Russia, Australia, and nations through out Asia and Africa; ISDB-T (Integrated Services Digital Broadcasting—Terrestrial), used in Japan, Brazil, and most of South America; and DTMB (Digital Terrestrial Multimedia Broadcast), used by China and Hong Kong.
3 During the writing of this edition there was much chatter in the industry about achieving resolutions of 5 K and 6 K… so stay tuned.