Chapter 16
Perking Up the Curb Appeal
IN THIS CHAPTER
 Pruning and preening your way to an eye-popping landscape
 Fixing up driveways, walkways, and entryways
 Refreshing the roof, gutters, and siding
 Sprucing up the garage
When prospective buyers look at homes, they drive up to the curb and take a quick glance at the outside of the house. If the exterior looks run-down, they conclude that the interior is probably in no better shape. Many buyers simply drive away, unwilling to waste their time on a house that the owner didn’t care enough about to properly maintain.
In this chapter, I show you how to enhance a property’s exterior through landscaping, painting, siding, roofing, and other improvements to stimulate the interest and enthusiasm required to pack your house with prospective buyers.
 If you’re flipping a house in an addition that has a homeowner association, contact the association if you’re planning any major renovations to the outside of the property. Homeowner associations often have covenants and bylaws that set restrictions on aluminum and vinyl siding, paint colors, fences, and a host of other features.
Revitalizing the Landscape
Most houses start out with attractive landscaping — a lush lawn, a few shrubs near the house, and maybe a couple of flower beds. After years of neglect, the landscape becomes unruly and faded. Grass and weeds creep across the borders. Shrubs obscure the house. Flowers get buried in their beds. And the surrounding lawn begins to appear a sickly green.
Because landscaping improvements often require several weeks or months to take hold, one of the first steps you should take in renovating the property is landscaping. In the following sections, I walk you through the most important tasks and provide a few tips along the way.
Doing the bare minimum
 Even if you choose not to do any heavy-duty landscaping, don’t overlook the bare essentials in landscaping: de-junking the yard, trimming trees and shrubs, pulling weeds, and mowing and edging the lawn. See Chapter 15 for more about refreshing the landscape.
 If you’re selling the house in the winter in an area where it snows, keep the walks shoveled and the driveways plowed. Consider hiring a kid from the neighborhood to shovel the walks whenever it snows, and check to make sure he does it. Also, clear any snow from the deck or patio; prospective buyers can’t tell what’s there or what condition it’s in if they can’t see it.
Revitalizing a tired lawn
A scorched, grub-infested, or mole-infested lawn is a big turnoff in areas where lush, green lawns are the norm. The easy fix is to call a local lawn-care company, have the lawn treated professionally, and follow the company’s instructions on keeping it watered. For you do-it-yourselfers, here are some tips on how to revitalize a burned-out lawn in 30 to 60 days:
- If the lawn is damaged beyond repair, and you plan on putting the house back on the market in fewer than 30 days, have it re-sodded.
-
If the lawn is in terrible shape and you’re not on a tight schedule, have it seeded, hydro-seeded, or over-seeded:
- Hydro-seeding consists of spraying a slurry of seed and nutrients on the ground. The slurry keeps the seeds moist, so more seeds germinate more quickly.
- With over-seeding, a machine cuts grooves into the ground and plants grass seed in the grooves.
In either case, you need to keep the seeds moist until they germinate and take root. Don’t mow until the grass is at least three inches tall.
- Patch any bare spots with a mixture of topsoil, seed, and slow-release fertilizer — about two cups of seed and one to two cups of fertilizer per 40 pounds of topsoil. Keep the mixture moist and don’t mow these spots until the grass is at least three inches tall.
- Fertilize using a slow-release fertilizer if the lawn isn’t weed infested or using weed-and-feed if weeds are a problem.
- Mow regularly at the highest setting to enable the grass to choke out the weeds.
Designing an adequate landscape
Avid gardeners may be tempted to sculpt a landscape that looks like something out of Better Homes and Gardens, but when you’re flipping a house, an adequate, affordable landscape is perfectly suitable. When designing a landscape to accent a home, you have some very simple goals:
- Direct water away from the foundation. To keep the foundation as dry as possible, slope the ground down away from the house.
- Create a smooth transition from the natural surroundings to the house. The natural surroundings must lead up to the house and anchor it without obscuring it. In other words, frame the house without hiding it. Instead of planting a tree front and center, for example, plant it off to the side and plant shrubs and other shorter plants in front.
- Add color and variation. A house typically has only a few color variations — the roof, siding, and trim. With landscaping, you can introduce additional variation in dimension and color. Choose complementary colors and plants of differing heights, but don’t go overboard — two or three complementary colors are sufficient.
 Watch your wallet. Do enough landscaping to properly accent the house, but no more than that.
Prepping areas for planting
Think of trees, shrubs, and flowers as the jewels that bedeck your landscape. The dirt and mulch create the setting for these jewels, and like any good setting, this one must hold the jewels firmly in place and provide a background against which the jewels stand out. Take the following steps to prepare a suitable bed for your plants:
-
Clear the area.
Pull weeds and any dead or ugly plants and rake all debris from the area.
 Before digging around your house, call the utility companies to have them mark the locations of buried power, gas, and water lines. Dig slowly and carefully to avoid hacking into any power or gas lines that a previous owner may have buried.
-
Install edging.
You can purchase affordable plastic or aluminum edging in rolls or use something more expensive, such as paving stones, bricks, or landscaping timber. Edging creates a clear division between the garden and adjacent landscaping and prevents grass and weeds from creeping into the flower beds.
-
Till the soil.
Loosen the soil six to eight inches deep. If the soil is hard, add amendments, such as sand, peat moss, compost, and topsoil. You can use a shovel, but a small tiller simplifies the task.
-
Grade the area.
Use a rake to level the ground, or if you’re landscaping near the house, gently slope the earth down and away from the foundation.
-
Lay landscaping fabric.
Apply a layer of landscaping fabric over the soil to prevent weeds from popping up in the flower beds. Use landscaping fabric, not plastic sheeting, so air and water can flow through to the plants.
Positioning and planting your greenery
After laying the landscaping fabric (see the previous section), set the potted plants where you think you want them planted. Take a step back to envision your new garden and then rearrange the plants until you achieve the desired look.
When you’re ready to plant, cut an X through the landscaping fabric at the location of each planter, about twice the diameter of the planter. Follow the instructions that came with the plant to dig a hole and position the plant at the proper depth, and then tamp down the soil around the plant and water it.
 To trim costs, landscape with small shrubs and trees, but throw in a few more mature plants as well. Older, mature plants cost more, but they make the entire landscape appear well established. If you have two or more properties, you may be able to dig up a plant that looks terrible next to one property and replant it at another property that needs a larger, mature plant.
Adding the final touch: Fresh mulch
Whether you plant new trees, shrubs, and flowers or simply trim back the old landscaping, you should always lay down a three-inch to four-inch layer of fresh mulch on top of the landscaping fabric. I recommend using natural cedar mulch because it’s insect- and disease-resistant, it adds a nice color to the landscape, it’s biodegradable, and it’s easy to replace if you need to freshen it up later.
 Contact your city’s street and sanitation department or local electric company to see whether they have any free mulch. When a city or utility company trims and cuts down trees (typically around power lines), it has a surplus of mulch to give away to anyone who’s willing to haul it off. It may not be cedar, but it’ll do the trick.
Don’t be stingy with the mulch. You can have a truck full of topsoil and a truck full of mulch delivered to the house and dumped on the driveway. That should be sufficient to rejuvenate the entire landscape. If you have leftover topsoil, simply spread it over the lawn. You can place any extra mulch around trees and bushes or offer it to the neighbors.
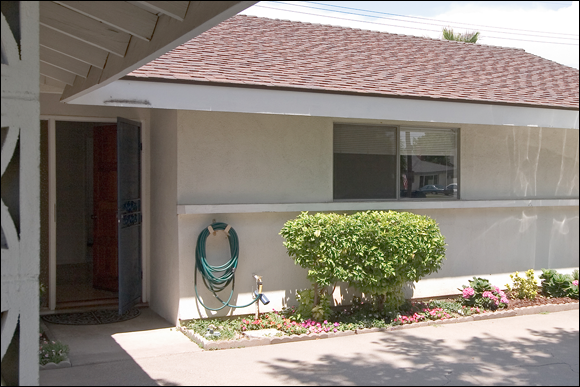
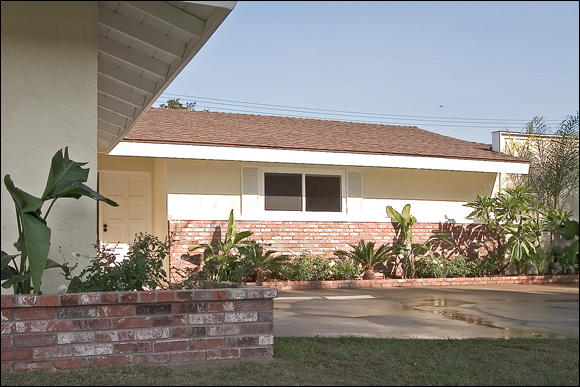
After you mulch, you’re done with your landscaping. Congratulations! Figures 16-1 and 16-2 reveal the power of proper landscaping. Notice the difference that adding just a few new plants and flowers can make. The homeowner also placed bricks around the planting area to create a lovely trim and removed clutter such as the garden hose near the front door.
Maintaining the landscape
After all your hard work getting the landscape into shape, you may be tempted to forget all about it and move on to the interior renovations. Don’t fall into this trap! To maintain your landscaping from the time you complete it until the time the house sells, water it regularly. Read the instructions that came with the plants, or ask the manager of the nursery where you purchased the plants for guidance. You can kill a plant just as easily by over-watering as you can by under-watering.
Tidying Up the Driveway and Walkways
Driveways and walkways, by their nature, get pretty beat up. They carry all the traffic into and out of the house; they’re exposed to sun, rain, snow, and ice; and they’re the favored location of the most stubborn weeds. To spruce up the driveway and walkways, trim the edges, pull any weeds or trees growing through the cracks, and then mend the pavement, as I explain in the following sections.
 To significantly improve the curb appeal of a home with a rough gravel driveway, consider paving it, especially if neighboring homes have paved driveways.
Asphalt driveways
Patching and sealing an asphalt driveway is a nasty job that you can probably hire someone to do for about the same amount (or less) than it would cost you do to it yourself. However, it’s also a perfect job for a do-it-yourselfer. It requires no skill or special knowledge, and the materials are cheap. You can complete the entire process in three steps:
-
Spray off the driveway with a hose, thoroughly spraying dirt out of the cracks, and let it dry.
 Power washers are great for cleaning out cracks and weeds. If you don’t have a power washer, use a screwdriver to get inside the cracks and then a wet/dry shop vacuum to remove all residue.
- Squirt asphalt patch in the cracks and holes and let it dry for about a day.
- Apply sealant with a brush, squeegee, or roller and let it dry for about a day.
 Check the weather forecast before performing Steps 2 and 3. A good downpour washes driveway sealant right down the drain. Seal the driveway at a time when you’re not expecting rain for at least 24 hours. Keep an eye on the driveway until it dries. Rope off the area with buckets (the ones that the sealant came in) and plastic “crime scene” tape (available at most hardware stores) to remind yourself and others to stay off the area.
Concrete driveways and walkways
If your driveway or walkway looks like Stonehenge, you may want to have it professionally repaved. Any deep cracks or changes in elevation that make you trip as you walk across the pavement are safety hazards that you must repair. Depending on how serious the problem is, you have several options for dealing with it:
- Patch cracks. You can fill in small cracks with concrete patch. If the cracks are wider than a quarter inch, stuff a rope in the crack, pour some sand over the rope, and then add a layer of flexible concrete patch. For larger cracks or areas where the pavement meets at different levels, you may need to fill the gap with concrete mix.
- Level concrete slabs. If portions of a sidewalk or driveway have settled, you can have entire slabs leveled off without replacing them. A contractor can drill holes through the concrete and then inject a liquid sand mixture or other substance below the slab to raise it to its original level. The service costs about half as much as having the concrete replaced, and the slab can handle traffic immediately.
- Resurface the walkway or driveway. If the surface of a driveway or walkway is crumbling but otherwise in good repair, you may be able to resurface it for a fraction of the cost of replacing it. Most building supply stores have epoxy materials that are perfect for resurfacing concrete.
- Replace concrete. Tearing out the old and pouring new concrete is the priciest option, but for walkways or driveways that are a lost cause, this choice may be your only viable solution.
 Laying asphalt over a cracked and crumbling concrete driveway may seem like a brilliant, quick, and affordable repair, but it’s more like a big mistake. I’ve tried it myself, as have many investors I know, and it never works. Anyone who works on roads for a living can tell you that a quality road is built on a stable substrate — large and small stones packed tightly together. Without a solid substrate, the ground beneath the driveway shifts and cracks under the weight of traffic.
 Sidewalks may be the responsibility of the town or city in which the property is located, so call the streets department before taking on any expensive repairs. The city may pay all or a portion of the costs. On the other hand, if you notice a red or yellow paint mark on your sidewalk or driveway, the city may be planning to assess you for repairs. Notify the city immediately and complete your own repairs as soon as possible. If you don’t have it done by the time the crew is on the street, they’ll do the repairs and bill you, and they may charge five or more times as much as you would pay a contractor!
Stone or brick walkways
Stone and brick walkways can pose a problem, especially if the previous homeowner was a do-it-yourselfer and not a do-it-righter. Improperly laid bricks or stones typically settle in odd formations and turn into weed patches.
First decide whether the walkway is necessary. If it’s in good shape and just needs a little TLC (weeding and maybe repositioning or replacing a stone or brick), give it the tender loving care it needs. If it’s merely a decorative piece and it looks bad, remove it, lay down some new topsoil, and plant grass seed or sod (see “Revitalizing a tired lawn,” earlier in this chapter, for more about sod and seeding).
Another option is to remove all the stones or bricks and redo the walkway the right way. Landscaping For Dummies, by Phillip Giroux, Bob Beckstrom, Lance Walheim, and the editors of the National Gardening Association (Wiley), has complete instructions on how to properly build attractive stone, brick, and concrete walkways.
Making Entryways More Inviting
Some entryways beckon visitors to step inside. Some inspire yawns. And others send visitors fleeing in disgust. An entryway should project a sense of security along with a warm greeting. In the following sections, I suggest various ways to achieve the desired look.
Refinishing the front door
As a prospective buyer approaches the house, the front door becomes the focal point. If the door is solid, you can alter its appearance through a few minor modifications, including the following:
- Paint or refinish the door in a bold color that complements the house.
- Install new hinges, doorknob, and locks.
- Install a new door knocker or doorbell, especially if the doorbell isn’t working. (If the doorbell isn’t working, you have three options — repair, remove, or replace.)
If the door is broken or it looks old or cheap, consider replacing the door. Most home-improvement stores have a wide selection of gorgeous, secure front doors in the range of $300 to $500.
 If you install a new front door, don’t hide it behind an old storm door. Replace the storm door, too. Check out Chapter 18 for more about replacing doors.
Refurbishing the front porch
Inspect the front porch for any damage and repair it in one of the following ways:
- If you’re flipping on the cheap, you can resurface concrete steps and a porch with an epoxy material designed specifically for that purpose.
- Another option is to resurface the steps and porch with ceramic or slate tile to give the porch a whole new look.
- Damaged wood is fairly easy to replace. You can patch small cracks or gaps and apply a fresh coat of paint to all the woodwork to make it match, or pry up old boards and install new ones.
 If the house is in an area where people often sit out in front, you may be able to significantly increase the value of the house by expanding the porch or replacing the existing porch with something larger. If you have to pay someone to perform the work, you probably won’t recoup your investment, but if you can handle the job yourself in a day or two, you can install a porch or deck for about $1,000, increasing the sale price by a few thousand dollars. For additional tips, see Chapter 19.
Adding some finishing touches
When you’re done with the major repairs and renovations to the entryways, focus on a few final touches to pull the outside of the house all together. Following are a few improvements I do on all my investment properties:
- Install new light fixtures for the coach (porch) lights.
- Install a kick plate at the base of the door.
- Replace the mailbox.
- Replace the address posted on the house.
- Polish the front-door handle.
- Yank out any nails or hooks that the previous owners used to hang holiday lights.
- Add a planter or hanging plant.
- Accent the flower beds with a few affordable solar lights.
- Remove the pink flamingo lawn ornaments.
Refreshing the Outside Shell of the House
The shell of a house consists of its roof, gutters, siding, doors, and windows — everything that keeps the elements out and the heat or air conditioning in.
In the following sections, I show you how to refresh the exterior with improvements to the roof, gutters, and siding. Chapter 18 shows you how to improve the outside shell with some moderate makeovers, including replacement windows and new sliding glass doors, which also enhance the appearance of the home’s interior.
Laying a new roof
If the roof appears worn or stained or if the shingles are curling up at the edges, I strongly recommend that you tear off the old roofing material and install a new roof. A new roof gives the house a whole new head of hair. Inspect the roof, keeping the following important points in mind:
- The steeper the pitch, the more visible the roof is from the street, and the more important it is to make sure the roof looks great.
- If the roof has two or more layers, tear off the old roof before installing the new. This is usually required by local building codes.
- If the roof has only one layer of roofing and your budget allows for it, tear it off before installing the new roof. If the budget’s tight, you can install the new shingles over one layer of old shingles.
- Don’t just patch damaged areas. Blending the new shingles in with the old ones is nearly impossible.
- If the roof has any soft, spongy areas, tear off the old layers of roofing so you can inspect and repair the sub-roofing before installing the new roof.
 Unless you’re a roofer, hire an insured roofing contractor to do the work.
To estimate the cost of a new roof, use the roofing estimator at www.improvenet.com. When you get to the home page, find the project calculator and select the roofing estimator.
 Dimensional roofing shingles cost more than standard shingles, but they enhance the appearance of the home in excess of the added costs. Opt for a lower-quality dimensional shingle over a higher-quality standard shingle.
 If the roof was damaged by strong winds or hail, the previous owner’s insurance company may be willing to pay for repairs, as long as you bring up the issue before closing. If you can get the insurance company to pay, the previous owner is only out the cost of the deductible, and you can offer to split the cost or pay the deductible in full, saving on the cost of a whole new roof.
Repairing or replacing gutters
If the gutters are in great shape, you may be able to clean them out and add some gutter brackets or nails to pull the gutters flush against the house. Otherwise, call a contractor to install new, seamless gutters around the entire house and garage. This upgrade is a fairly inexpensive and quick fix, and it significantly improves the exterior appearance of the house. Pick a color (usually white or brown) that matches the trim.
Retooling the siding
When talking siding, you’re in three-little-pigs territory. Is the house made of straw, sticks, or bricks? In the case of human homes, siding can consist of wood, vinyl, aluminum, brick, or stucco. Each requires its own unique upkeep:
- Wood siding: Power wash the siding at the very least. If the wood is damaged, you may be able to patch or replace damaged boards, but if the damage is extensive, siding over the old wood siding with vinyl is probably best. If the wood is in good shape but the paint is peeling, repaint the house. (If you’re not a professional painter, consider hiring someone who is.)
-
Vinyl siding: When wood-sided homes are too ugly to paint or existing aluminum or vinyl siding is peeling away from the home’s outer shell, consider re-siding the house with vinyl siding. However, get an estimate first. Having even a small home completely re-sided can quickly bust your budget.
 If you live in or near a major metropolitan area, locate distributors who carry seconds to see whether they have rejected materials. Sometimes a company rejects perfectly good siding from a production run simply because the color is a shade off.
-
Brick: If the mortar between the bricks is wearing away or if settling has caused cracks in the mortar, tuck point the brick. Tuck pointing consists of spreading new mortar between the bricks; it’s a fairly easy job, but it requires the patience of a saint.
 Personally, I’m not a big fan of painting over brick because I like the way most brick looks, and the paint commonly peels off later, but some brick can make the house look dark and dreary. A bright paint can give some homes just the pop they need.
-
Stucco: You can patch small cracks and holes yourself and even paint the stucco if the house is in an area with a fairly warm climate. Otherwise, hire a professional to patch and re-coat the stucco. A contractor who has the necessary equipment can spray a new layer of colored stucco over the old stuff and give the house a whole new look.
 In a cold climate, painting stucco is a bad idea because moisture gets behind the paint and causes it to bubble and peel.
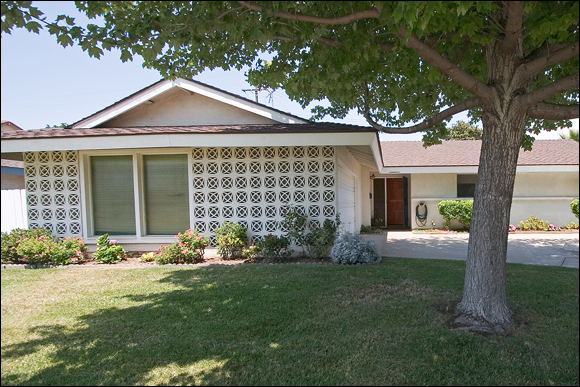
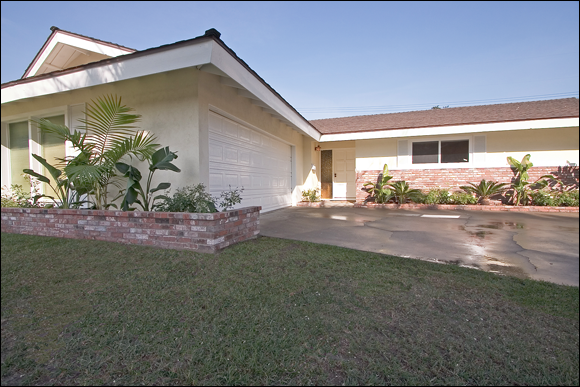
Figures 16-3 and 16-4 show the dazzling effects of a few moderate improvements to the siding of a home. The homeowner repainted the siding a slightly brighter color (with white trim as a complement) and retooled some of the brickwork.
Glamming Up the Garage
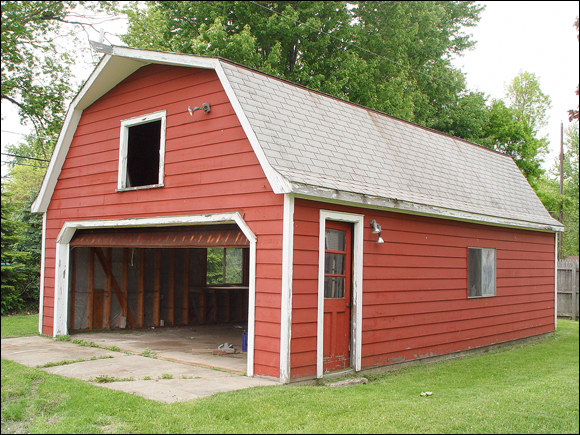
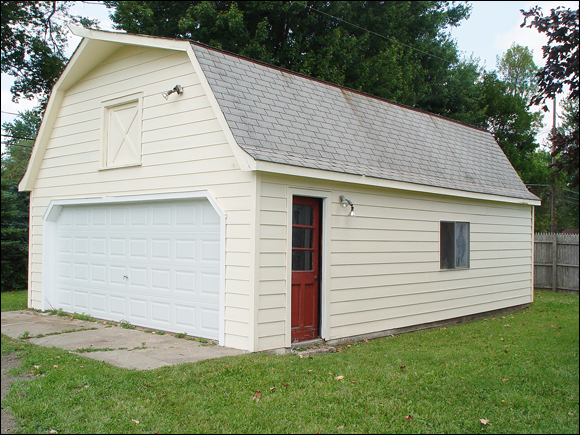
When you’re focused on fixing up a house, overlooking the garage is easy, but when prospective buyers show up, I guarantee that they won’t overlook it. Here are a few tasks you can do to breathe new life into a garage:
- Paint or re-side the garage to match the house.
- Replace the roof, if needed, to match the house.
- Replace the windows, especially if you replaced them in the house.
- Install a new automatic door with decorative glass.
- Install a new garage access door or repaint the existing door, if it’s in good shape.
Prettying up the garage improves the overall appearance of the entire property, as Figures 16-5 and 16-6 demonstrate. On this project, my flipping team gave the garage a new overhead door and a new loft door on top, fixed the trim, and applied a fresh coat of paint.
 Pruning and preening your way to an eye-popping landscape
 Fixing up driveways, walkways, and entryways
 Refreshing the roof, gutters, and siding
 Sprucing up the garage
 If you’re flipping a house in an addition that has a homeowner association, contact the association if you’re planning any major renovations to the outside of the property. Homeowner associations often have covenants and bylaws that set restrictions on aluminum and vinyl siding, paint colors, fences, and a host of other features.
 Even if you choose not to do any heavy-duty landscaping, don’t overlook the bare essentials in landscaping: de-junking the yard, trimming trees and shrubs, pulling weeds, and mowing and edging the lawn. See
  If you’re selling the house in the winter in an area where it snows, keep the walks shoveled and the driveways plowed. Consider hiring a kid from the neighborhood to shovel the walks whenever it snows, and check to make sure he does it. Also, clear any snow from the deck or patio; prospective buyers can’t tell what’s there or what condition it’s in if they can’t see it.