We have a couple of issues that we need to correct under Select a location. You will notice that when you click on Select a location, you can check multiple locations. We only want the user to be able to select one location. Also, the checkmark next to your selected location disappears if you click on Done in Location View and then click to choose a location again. We need to set the last selected location so that it is saved when you go back to your location list. We can address these issues at the same time:
- Open Explore.storyboard:
- Select the segue that is connected to the LocationViewController.
- Then, select the Attributes inspector in the Utilities panel and set Identifier under Storyboard Segue to locationList. Then, hit Enter:

- Now, select the segue that is connected to the RestaurantViewController and set Identifier to restaurantList. Then, hit Enter:

- Next, we need to set up these identifiers. We are going to update the segue enum, which we created in the last chapter. Add the following code inside the Segue.swift file under the Misc folder in the Common folder:
case restaurantList
case locationList
- Then, open up the LocationDataManager.swift file and add the following code before the last curly brace:
func findLocation(by name:String) -> (isFound:Bool, position:Int) {
                guard let index = arrLocations.index(of: name) else
                { return (isFound:false, position:0) }
                return (isFound:true, position:index)
}
- This method will allow us to find the location, and then obtain its index position within the array. We will return a tuple, which is a compound type in Swift, meaning that it can hold multiple values. Tuples allow you to combine different data types into one. The method will check the tuple to see whether or not we found the data. If we found the data, then we will use the index position; if not, we will not do anything.
- Next, we need to check whether or not a previous location was set. Open up the LocationViewController.swift file and create the following method after the viewDidLoad() method:
Let's break this method down:
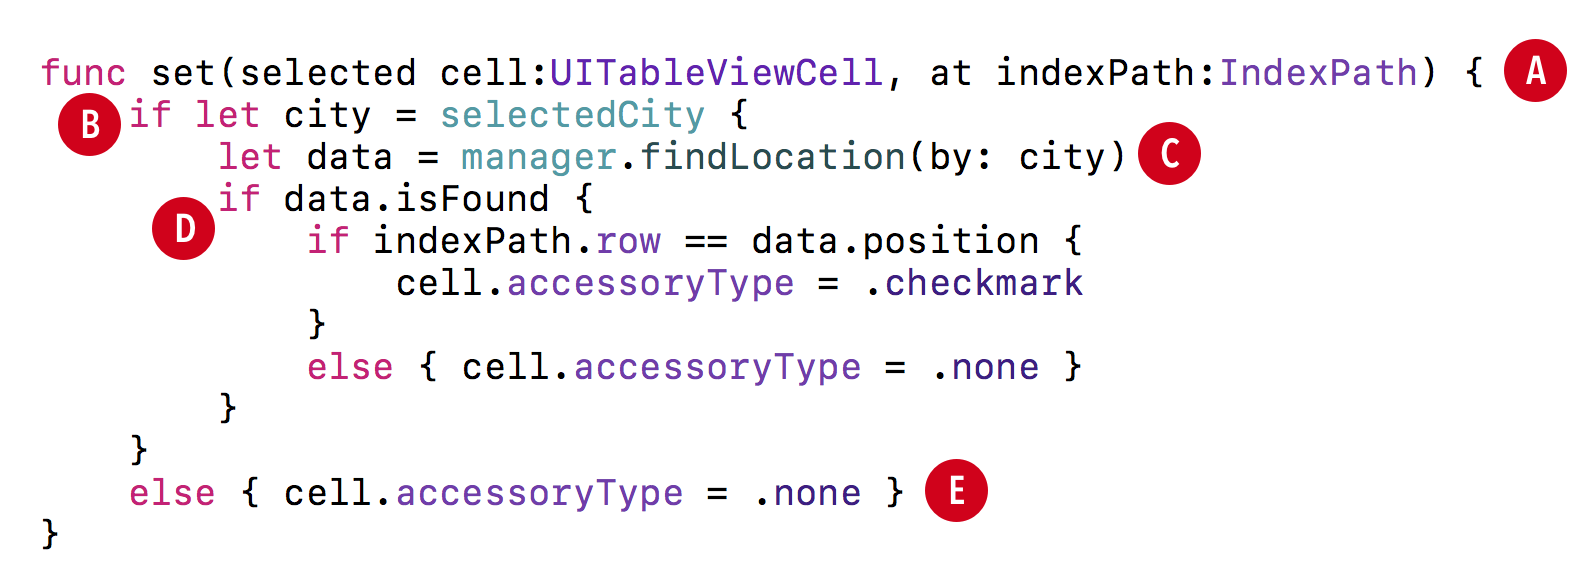
- Part A: In the parameters of this method, we are taking in a cell and an index path:
set(cell:at)
if let city = selectedCity
- Part B: Here, we are checking to make sure that the selected city is set.
let data = manager.findLocation(by: city)
- Part C: Then, we are calling the method we created in LocationDataManager, passing the selected city into the manager, and getting back a tuple of data.
if data.isFound {
   if indexPath.row == data.position {
          cell.accessoryType = .checkmark
   }
   else { cell.accessoryType = .none }
}
- Part D: Next, we are checking to see if data was found in the tuple; if so, we are checking to see if the selected row is the same as the position in the array. If the row and position are the same, we are directing the cell to set its accessoryType to a checkmark; otherwise, the accessoryType will be set to none.
else { cell.accessoryType = .none }
- Part E: Finally, if no data is found, we are setting accessoryType to none. Add the following inside cellForRowAt() after we set the text for the cell:
set(selected: cell, at: indexPath)
Build and run the project by hitting the Play button (or use cmd + R). You should see that you can only select one location now. However, after you select the location, if you click on Done in the Location view and then click to show locations again, your last selected location is not saved. We still need to address that issue, which we will do next.