
CHAPTER 2
MAKING CURVES AND ANGLES WITH SQUARE BLOCKS
Round castle towers, glass survival domes, airship balloons, and arched bridges all are built with curves and angles. However, Minecraft blocks are famously lacking these curves it’s a square, ninety-degree world. To overcome this building obstacle, Minecraft players have learned to approximate curves and angles so well that, at a distance, you can build a Minecraft Golden Gate Bridge that looks like the real thing!
Here are some techniques and ideas that will get you building arches, angles, and circles like a pro.
Diagonals and Angles
A diagonal line isn’t straight up and down, but it’s not a curve either. It’s a line that is straight, but travels at an angle, as if it is joining two opposite corners of a rectangle. A diagonal that represents a square goes up 1 block at the same time it goes across 1 block. You can make diagonal lines at steeper or shallower angles than 1 to 1 by increasing or decreasing the number of blocks the line goes up for each block it goes across.
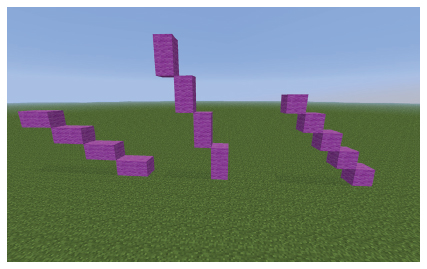
From left to right: a slightly angled line, a steeply angled line, and a diagonal line.
To make a steep line, for each block that you place sideways, go up 2, 3, 4 or more blocks. It’s the opposite for a shallow angle. For each block you rise, go 2, 3, 4 or more blocks along. Keep the ratio (1:3 or 3:1) the same the whole way along the line.
Placing Blocks Diagonally
Many times when you are building, especially when building curves, you need to place blocks diagonally to each other without having them actually touching sides.
For a diagonal block that is touching along one edge: Place the first block, one or two temporary blocks above it or to one side, and the final diagonal block where you want it. Then destroy the blocks in between. If you’re working in Survival mode, you may want to use a “cheap” block like dirt as a temporary block.
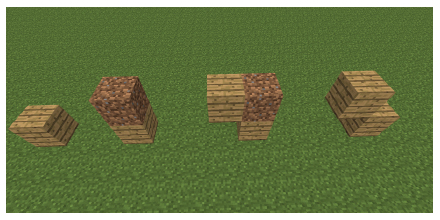
Use 1 temporary block to add a diagonal block along one edge, and then destroy the temporary block.
For a diagonal block that is touching just one corner: Do as above, but build out one more block from the top temporary block.
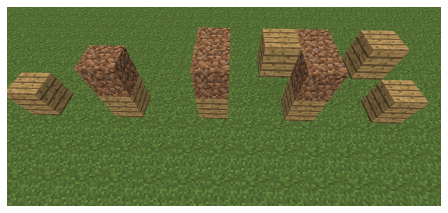
Use two temporary blocks to add a diagonal block that touches just one corner of another block, then destroy the two temporary blocks.
Curves
Whereas a diagonal or angled line keeps the same ratio of vertical to horizontal blocks as it goes, a curve changes the ratio. A curve can change slowly (a slight curve) or quickly (a steep curve).
To make a curve, you decrease the number of blocks that you place vertically (or horizontally) as you progress with almost every new step. (You can have a few steps that are angular, rather than curved, and still keep the overall curved look in Minecraft.)
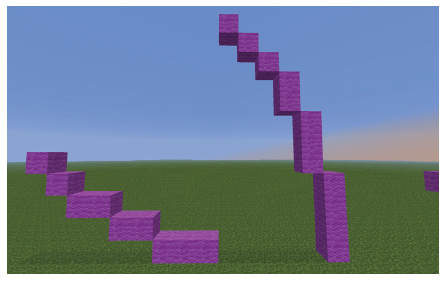
The first curve is made from 1 step of 3 blocks, 2 steps of 2 blocks, and 2 steps of 1 block. The second curve is made from 1 step of 4 blocks, 1 step of 3, 1 step of 2, and 3 steps of 1.
Circles
The easiest way to make a circle in Minecraft is to follow a pattern for a circle and exactly copy the number of blocks. You can find many patterns for circles, ellipses, and spheres online by searching for “Minecraft circle, sphere, ellipse patterns.” But there are some simple techniques you can use to make your own circles by hand that look good.
First you decide how big a circle you want, in terms of its diameter. The diameter is the length of a straight line from one side of the circle to the other that passes through the circle’s center point. Half of the diameter is the radius. It’s the line from the circle center to the edge. It is easiest to create a circle with one center block, which means that the diameter will always be an odd number.
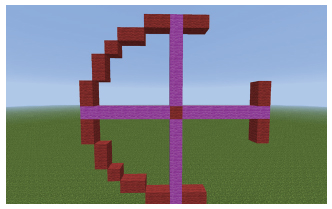
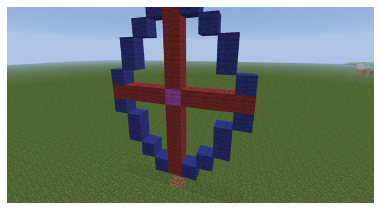
Next, create a cross whose two lines are the length of the diameter.
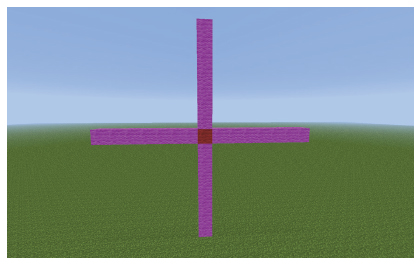
This cross is for a circle with a diameter of 15 blocks across.
At each end of the four spokes that come from the center, create four flat lines of the same length. The length of this line should be 5 blocks long for (odd) diameters of 9 to 17, 7 blocks long for diameters between 19 and 41, and 9 blocks long for diameters 43 to 49.
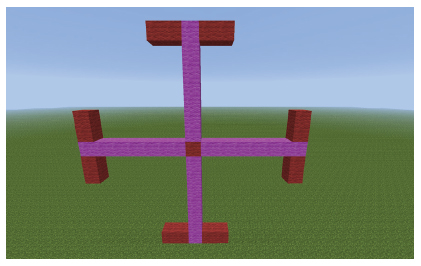
With a diameter of 15 blocks, spokes 5 blocks long are good. With the pink diameter block in the middle, you just add 2 blocks to either side for the total length of 5.
Once you’ve set the spokes, you’ll need to make a curve in one corner of the circle. The curve needs to be symmetrical, so you can start by placing a line that is shorter than the spoke length, starting from the spoke’s end. Continue to shorten the additional lines until they meet at the center. You may need to experiment to make sure the quarter circle curve is symmetrical and looks good.
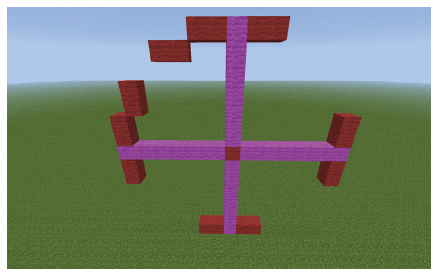
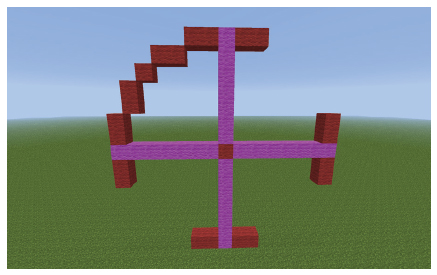
Start the curve by placing lines that are shorter than the length of the spoke. At the top, the line should be horizontal, and at the side, it should be vertical. For bigger circles, continue this way, decreasing the length of the lines till they meet in the middle. In this case, there is just one space left for a single block.
Once you’ve finished the quarter circle curve, copy it exactly to the other three parts of the circle.
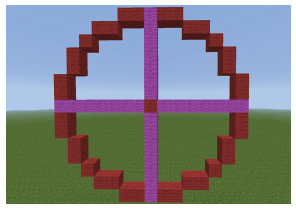
Copy the curve pattern to the other three “corners” of the circle. If you don’t want the center or the diameter in the finished circle, break those blocks.
You can use this basic technique to make circles of any size. Circles and arches can be replicated in Minecraft at small sizes, but they tend to look better and smoother the larger they are. A circle with a diameter of under 7 blocks tends to look more like a square.

Here are patterns for four circles with diameters of 13, 11, 9, and 7 blocks.
Arches
You’ll want to use arches for making amazing bridges, majestic entryways, and building details. You can make an arch with a half circle on top of two straight sides, but you can also make arches that are wide, shallow, or pointy. The one thing to keep in mind as you build an arch is to maintain the curve; each new line of blocks in the curve should be shorter or the same length as the previous. When the curve changes to point the other direction, each new line of blocks should be the same length or longer than the previous.
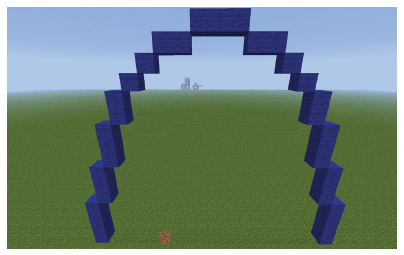
Notice that an arch is symmetrical and that the curve for each side of an arch goes from decreasing vertical lines to increasing horizontal lines (3, 3, 3, 2, 1, 1, 2, 3). You can make arches that are wider than this, narrower, higher, or steeper.
Spheres
Like circles, you can find patterns online that you can use to make spheres. You can make them yourself, although they are a bit harder than circles. In Minecraft, one way to make a sphere (or an ellipsoid) is by creating a series of circles placed one on top of the other. In the middle is the circle with the largest diameter, and as you move out from the middle, the circle diameter decreases, although the center has several circles of the same size. The tricky bit is that you don’t decrease the size of the circle by a single block with each step. You need repeat circle sizes so that you create a curve as you decrease the circle size.
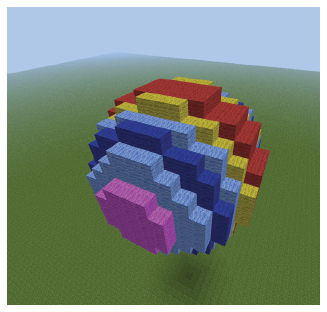
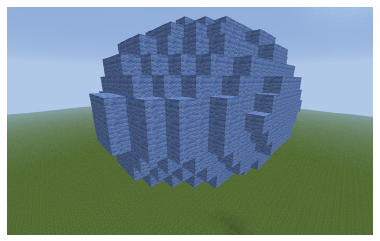
A sphere is essentially layers of smaller and smaller circles. When you make a sphere, you have to make sure that the slope created as the layered circles decrease in size (above, from the red circles to the smallest pink circle) is also a circle. This means that some circle layers will be repeated. In this sphere, the middle three red circle layers are identical.
To help you build a sphere, you can create an inner frame similar to the frame you created for a circle. This cross has a third bar showing the depth of the sphere. Then, around these three bars, you create identical circles. You can use these circles as a guide to the outside edges of the sphere as you fill in each layer of the sphere. It is easier to start with the horizontal middle and build up or down.

A frame for building a sphere. The central pink 3D cross shows the diameter of the sphere. Around this, you build three identical circles to show the curve of the outside of the sphere.
The sphere shape can be used for floating habitats, space ships, giant balls, and balloons. Often you will want to use just half a sphere shape to create domes for large towers, churches, mosques, and glass survival habitats.
Ellipses and Ellipsoids
Ellipses are flattened circles, and you can make them either by joining two arches together or using a central cross with one crosspiece shorter than the other. As with arches, you need to make sure each half is identical to the other. Ellipses can be used to help you make ellipsoids, which are elongated spheres. Ellipsoids can be used to make air ship balloons, sports stadiums, and more.
Use the same skills you use for making arches and circles to make ellipses.
An ellipsoid is like an elongated sphere, and you can make it in the same way as a sphere. You can stack ever-decreasing circles on each other or create a frame of ellipses and a 3D cross.