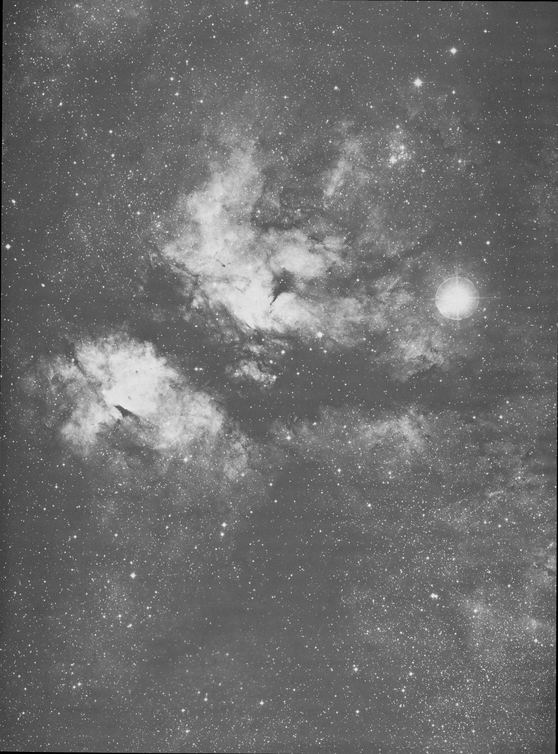
199.Compare the form of this cloud of cosmic energy to the smaller kinds of clouds in our atmosphere. (Courtesy of Mount Wilson and Palomar Observatories)
4. Pattern
The concept of pattern in art is an extension of the idea of form. Pattern deals with the relationships between forms in nature. In Chapter 3, we discussed basic forms and reduced these forms to their simplest shapes and movements. But as we did this, we realized that nature is not always as simple as we wish. Forms relate to their environment in complex ways. A single entity might be composed of several interconnected forms, and this entity relates to others of its kind. And finally it changes as time passes on.
For example, rather than having only one shape, a plant begins life as a seed, progresses into a shoot, then develops its leaf and root systems until it reaches its full growth when its flowers and seeds finish the cycle. Animals, on the other hand, have distinctive arrangements of organs and structures that are actually a whole series of forms that work together as a unified pattern. Animal forms grow in an ordered sequence so that the over-all system of change and growth is part of the pattern that is repeated with every new generation.
Each form lives in a complex world where it is surrounded by other forms of its own kind, as well as by forms of similar type and forms of different or opposite character. An example of this is the bug on a frog on a bump on a log by the lily pool at sunset in the summertime, where each form relates to other forms in the environment and becomes part of an over-all pattern. This pattern is like several different songs that are sung at once and end up sounding better than one song by itself. No form stands alone: a plant depends on its family traditions (its genetic customs), other plants that are living and dead, the soil, insects, the geography, the seasons, and the weather changes. A human depends upon his genetic forebears, his intellectual forebears, other living humans, animals, plants, earth, air, water, and the laws and functions of the galaxy that keep the earth moving on its yearly trip around the sun. So pattern in drawing also shows a series of relationships within a unit and/or that unit in relation to forms in its environment.
Some of the things that can be drawn in patterned relationships are the arrangements of forms like the fruit and flowers in a still life, the grouping of rocks and plants in a landscape, or the rhythmic forms of a human figure that focus into an expressive action like a kiss or the drawing of a picture.
Some of the qualities that pattern shows in drawings are arrangements of similar shapes, grouping of dissimilar shapes, symmetry, balance, sequence of movement, contrasting movements, and rhythmic movements. Also, there is variation within forms such as male-female or adult-child. Pattern can also show asymmetry or distortion of the natural shape; it can show the emotionally rational and the irrational. We can say then that pattern shows the forms within a single system or the relationships of various forms to the different realms of nature.
In drawing the patterns of things in nature, we automatically discover the laws of composition and design. Composition and design in art are not separated from the laws of nature. At the same time, artists are free to choose the patterns and meanings that appeal to them or suit their expressive purpose. In drawing pattern, you also encounter story, content and history, and the abstract meanings of nature that connect one realm to another. This sounds pretty impressive and may lead you to think that there are hidden and secret laws about art known to only a few artists, but in actuality all of these things are before our eyes. The problem is not that they are secret but that they are overlooked or seen only on the surface by most people.
COSMIC PATTERNS
We are all part of the universe; the movements and forms that occur in outer space—in our galaxy and others—can also be found in our earthly environment and within all living creatures. The galactic swirls and the anastomotic formations of star clusters are all echoed within the artist and his fellow humans (Figs. 199, 200, and 201). So it is important for you to realize, even when you are drawing the smallest and simplest forms, that these things have a cosmic origin and that you are a traveler through space. And further, that no one person can lay claim to these forms or their laws; they are all ours for the seeing.
Yet we understand very little about the universe and the cosmic patterns, and it has taken us thousands of years to understand the little that we do know. Even though we do not comprehend the whole scheme, the universe and its laws are the foundations of our activities and existence. The artist accepts these laws on faith, pretty much in the same manner that each newborn child accepts its creation and the function of its life. Even though we might see a reflection of the galactic swirl and superimposition in the swirl of a daisy or a vortex in the water in the kitchen sink, the life in us accepts far more things that we will never know because life is an automatic acceptance of all complex forces of nature. The idea of man controlling nature to any large degree is rather vain because nature is larger than our comprehension.
The realm of the known in art is not as vast as the area of the unknown. This idea is important to recognize in drawing because the blank page of paper represents open space—not emptiness, but the unknown and the unknowable. It also represents the space and the laws that govern the things that we do understand. We draw things out of the mysteries hidden on the page.

200. The Spiral Galaxy in Pisces is typical of the spiral form of the galaxies found throughout the universe. (Courtesy of Mount Wilson and Palomar Observatories)
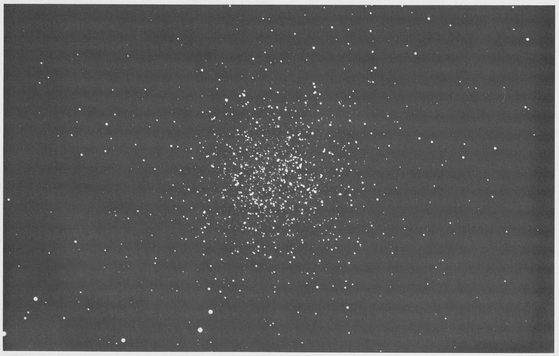
201. The Star Cluster in Libra is a more developed stage of creation that occurs after the spiral and cloud formation. (Courtesy of Mount Wilson and Palomar Observatories)
You must recognize that the page itself represents cosmic space. Even though it is flat and bounded by four edges, for the artist it is a kind of crystal ball where images of unknown things appear.
Project: In teaching students to draw, I have found it very useful to ask the student to first imagine the simple form of an egg and then concentrate on the page with great intensity as though he might actually bring the form of an egg to reality with the power of his mind. Then I ask the student to make drawing movements over the paper with his fingertips without making any marks. The student then draws the egg as though it were emerging from the page itself. I want you to repeat this experiment and then do some variations. You need pencil and paper for the first part and charcoal, a kneaded eraser, and fixative for the next one.
I want you to do some stargazing at night and some spacegazing during the day. Allow yourself enough time so that you can sit down or lie back and look up at the sky in a relaxed way. Do not look for particular objects, but let your eyes concentrate on open space and let your mind be free. You will notice waves, points, and zigzag motions in the air; pay particular attention to these motions as well as to the stars. Observe how light emerges from the space and that the space itself is full of movement and liveliness. When you have finished your observations, darken a piece of paper all over with charcoal. Draw out with the kneaded eraser the light forms you have seen Draw out the light of stars and the points and movements in free space. This is also a good way to draw a spiraling galaxy or the anastomotic clouds of star clusters.
For your drawing with white paper, I would like you to create dots of various sizes so that they appear to be set at different depths in space. When you have done this, look at a sheet of blank paper and try to see it as depth and infinite space.
WEATHER AND ATMOSPHERIC PATTERNS
The patterns in the atmosphere that concern the artist are the cloud formations that stretch from horizon to horizon. In order to understand these patterns, it is necessary to show that the direction of weather movement is generally from west to east. You should also know the positions of the sun at different times of day. The sun appears to move from east to west, though it is the earth that actually revolves in a west-to-east movement, making the sun appear to cross the sky (Fig. 202). You should also have a good sense of the north-south lines of the earth’s magnetic field.
The drawing of atmospheric patterns is governed by the movements of the earth’s rotation on its north-south axis. The lines of the earth’s magnetic field and the lines of the energy that causes the earth’s rotation to cross each other at right angles create an invisible gridwork in the sky. The artist must visualize this gridwork pattern in order to place cloud forms and the weather movements in their proper relationship. If you take a large glass bowl and use a grease pencil to mark a series of parallel lines an equal distance apart in one direction and then another series of equally spaced lines at 90° to the first series, you will have an example of the lines that you must visualize in the sky. Hold the bowl above eye level and imagine similar lines crossing the bowl of the sky.
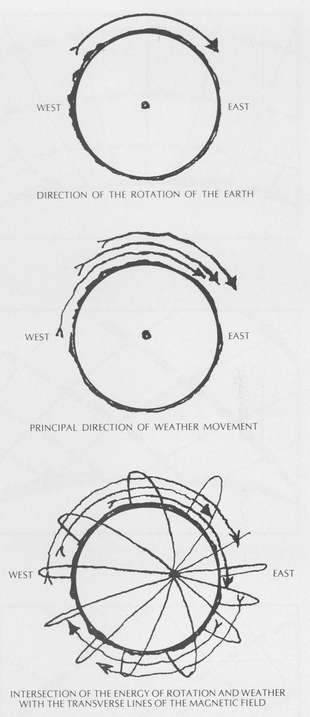
202. These diagrams show the invisible energy grid of the atmosphere from different compass positions. The broken lines indicate rotation and weather movement, and the solid lines indicate the magnetic forces.
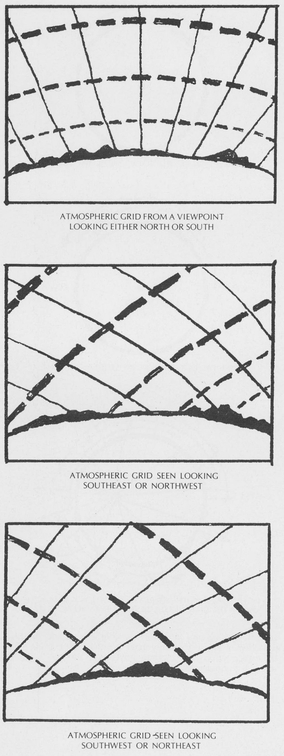
203. These diagrams show the grid of the atmosphere from different compass positions. The broken lines indicate rotation and weather movement and the solid lines indicate the magnetic forces.
How do you duplicate this grid on the drawing paper? Since you can draw only one portion of the sky from the point where you stand, you must determine how these invisible east-west and north-south lines cross above your horizon line. The key to this problem is the direction that you face. This pattern is the same if you face north, east, south, or west; lines coming from the horizon radiate from a point below the horizon with a center line going to the top of the page and the other lines coming out at angles on either side of it. The other lines are curves from side to side that grow in distance as they approach the top of the page. In cases where you face a position that is between south and east, south and west, north and east, or north and west, one set of curved lines comes from the left horizon while the other set crosses from the right (Fig. 203).
Some cloud formations correspond almost exactly to the invisible gridwork, and they form in a series of long lines and move toward the east from the western horizon. In this case, the clouds in the distance parallel the horizon and are close together, while those coming nearer are more separated, though still parallel with the horizon. The same clouds you see when you face north or south will follow the radiating lines right into the horizon. From the south-west, north-west, north-east, and south-east positions the clouds will be arranged so that they cross from the top of one side of the paper to the horizon at the opposite side. This applies only to linear formations.
Scattered and puffy cumulus formations tend to flatten out and create a linear pattern along the horizon line regardless of which direction they come from and which direction you face. But cumulus patterns also tend to radiate out at angles from a point at the horizon when there are only a few scattered clouds.
Once you have gained some experience in using the invisible grid patterns, you will find that it is a simple matter to draw cloud formations that exist in one stratum above the earth. But if you observe different weather formations, you will notice that at times clouds exist at two different levels (Fig. 204). When two such formations appear, it is necessary to visualize two gridworks, one above the other. This would be as though there were two glass bowls with lines, one inside the other.
Though at first visualizing this gridwork may seem difficult, you will find that it is also something with which you are familiar. We are all subconsciously aware of this atmospheric geometry. Our sense of direction comes largely from the unconscious observance of the great atmospheric lines and angles. Remember that we live within a giant magnetic field that runs in great curving north-south lines and that this is crossed at right angles by the stream of energy that moves the weather and the planet.
Project: This project will help you draw and understand large cloud patterns. You need pencil and paper. To begin, I want you to make four pages of structural gridworks like the preceding figures. Find a position outdoors where you will have an unobstructed view of the horizon and the whole sky. The top of a hill or the roof of a tall building is a good vantage point.
First, determine the north-south and the east-west directions. Select the structural diagram that most closely approximates these directions in relation to the direction that you have chosen for your picture. Next, quickly plot the position and direction of the clouds by making light outlines of their shapes. Then change your position and select another structural gridwork accordingly; then plot out the clouds again. Do the same thing from at least four positions. Finally, repeat the drawings from the same positions without using a diagrammed grid structure. Try to imagine the invisible structure that exists.
Take your diagrams back to your workroom and try to shade the clouds and draw in the landscape. Once you have grasped the basic principles, you can invent skies and your own weather formations.
Be sure to understand that clouds mean weather. A very fine drawing project is to work from the diagrams you have made and to use light and dark tones to create a feeling of weather movement. You can create a whole series of different kinds of weather in your landscapes.
WATER PATTERNS
The patterns of form created by flowing water are determined by the volume of water flowing, its rate of flow, and the structure and composition of the channel in which the flow occurs. You must first visualize the stream bed without the water in it. Draw the features of rocks and soil that are the stream boundaries before you attempt to draw the water pattern.
The first drawing concept to consider is the plane of gravity and the shape of the land in the picture area. If the stream bed allows the water to flow down an inclined slope, the streaming will produce turbulent rapids. But if the stream bed is a series of steps, there will be ponds in the level places that break into falls or rapids where the levels change, falls where there are abrupt breaks, and rapids where the levels are divided by inclines (Fig. 205). In this type of stream are all water forms: the eddies, the waves, the vortex, and the spirals. In drawing streams, look for the earth structures and from these you can predict what the water will do. Remember that the water is seeking the sea or a lake where it will finally come to rest. The patterns that water assumes are the expressions that it makes when it encounters obstacles along its journey.
When drawing large areas of water like lakes or the sea, remember the water’s tendency to respond to the great energetic forces. The principal force is gravity which constantly urges the water to become still and form a level plane of surface. The forces of the atmosphere urge the water upward into movement. So the great drawing contrasts are the flatness of the plane of gravity and the water’s response to the atmospheric directional movements above it. These are the major forces in the patterns of large bodies of water where the structure lines of current and wave movements oppose the flattening pull of the gravitational force.
In Chapter 3, we discussed the major wave and current movements, but the structure lines of weather movement that we have just discussed are important too.
The wave lines move at right angles to the weather’s direction until they reach the shallows of the shore where again the earth structure interacts with the water to create shore waves.
The key to drawing water is to realize that water is always involved in a sequence of movements in response to the earth and the atmosphere.
Project: In this project, you can draw some water patterns. I will show you the steps in planning an imaginery stream, using the water forms that you have already studied. You can also draw an imaginary seascape. You need pencil and paper.
In order to draw a stream correctly, you must know its direction of flow. Plot out its turns from side to side and its levels from the highest point to the lowest point. Start by making a plan of the stream in a bird’s-eye view, showing all its levels and turns. Next draw a profile view, showing the places where there are level pools and the separations between the pools where there are falls or rapids. To make the drawing more natural, place rocks and boulders along the stream course in the bird’s-eye view and then place these properly in your eye-level view. The object is to use the bird’s-eye view as a guide in drawing the eye-level picture; it will help you to foreshorten the stream in the areas where it comes toward you. Once you have plotted out the course of the stream, you can think out how to draw the water.
Think out the rate of flow. It is slow in the pools, but it begins to show current at the openings where it changes levels. If there are rocks in the pools, there are eddies around the rocks where the current is strong. There are only ripples around rocks where there is little current. These ripples are also at the edges of the pool. Where the slow currents and faster currents meet, a large or small vortex forms. At the falls there is some spiraling as the water pours over the edge and splash forms at the bottom. The rapids show intertwined currents, splash forms, and falls.
If at all possible, try this same drawing procedure with a real stream. This will reinforce what you have learned and demonstrate that you have learned how to understand a stream.
In your drawing of an imaginary ocean, start by drawing the horizon line a little above the bottom third of your paper. The shore line should begin at the bottom right-hand edge of the paper and move up to the horizon line at the left, but before it reaches the horizon let it curve back toward the right and up to the horizon. Then make a bird’s-eye view on another sheet of paper, showing the shore line and the wave lines with an arrow showing the wind direction coming into the shore. The bird’s-eye view should also show where the water becomes shallow—the point at which the shore waves begin to form. You will find that in your eye-level drawing, you are not facing directly into the wind and waves, but that they are coming in from your right toward your left, so the lines of the waves recede toward the horizon on the left. At the shore line there are overlapping sheets of water where the waves have swept up on the shore and these sheets diminish in size along the shore line as they move up to the horizon.
When you do a seascape that faces the shore and sea directly, it will give mostly horizontal lines. The only relief possible in such a head-on seascape will come from the way you handle the sky where there is a possibility of radiating or oblique lines.
It is very useful in the seascape project to use the drawings that you have made in your weather project to determine the pattern of your sky and weather. But be sure that the movement of the waves and the cloud direction coincide. When you have finished the project try to do a seascape from nature (Fig. 206).
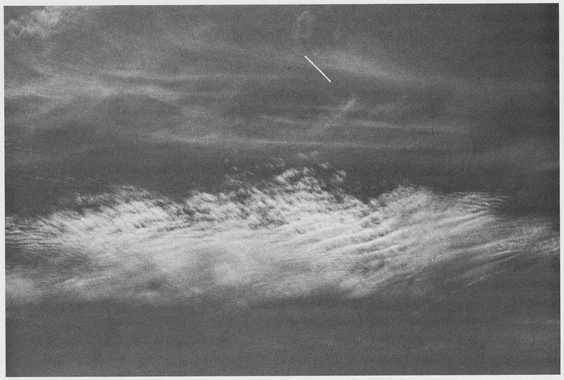
204. Two layers of clouds show gridworks at two levels.
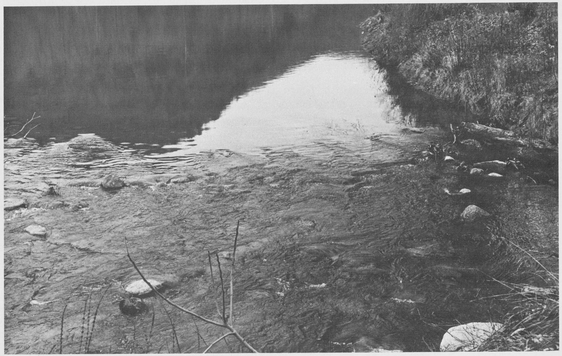
205. A level pond breaks into a downward flow at the pool’s edge.
PATTERNS OF EARTH FORMS
In working with atmospheric and water patterns, we have already touched upon the earth patterns. Earth, air, and water are contrasting elements of nature, but at the same time they cannot really be separated from one another. This makes it difficult for the artist sometimes because he must separate them before he can understand them well enough to put them back together in a way that makes visual’sense. You can see that the process of abstraction is like picking out the ingredients in a bowl of stew. You try to look for the parts, but it is the fact that the “juices are all swapped around” (to quote Huck Finn) that really interests us. The artist is always moving between contrast and unity in a fluid world of impressions.
One way of analyzing earth forms is to mentally remove all of the plants, atmosphere, and water in order to get down to the structure of the area you are drawing. In doing this, decide the heights of the earth and rocks, the contrasting angles of slopes and level ground and the direction of rock strata, all in relation to the plane of gravity, the horizon line, and your own position. Estimate the size and distance of objects in relation to your own height and your sense of the right angle of the plane of gravity and the line of levitation. In doing all this, you operate within the framework of your seven rings of attention, which we discussed previously. The nearer things are clearer and more interesting while the farther vague, indistinct, and mysterious.
This does not mean that there are always seven rings of depth in a picture. Our angle of vision takes in about 120° and large forms in the foreground can obscure portions of the distant landscape; a picture may have only three rings of depth. This is all a matter of the view you choose. But for learning purposes; it is best to use at least five rings of depth: close, nearby, within vision, distant, and atmospheric. Mentally remove plants and water to get down to the structural lines and directions. Draw these with simple lines that show the size and directions of masses. As you do this, take into consideration some aspects of earth formation that you may never actually draw. Think about how these forms came into being and how they are gradually changing.
In drawing, do not just copy the lines of the landscape, because ignorant, rote copying is not art. Lines as lines have no value and no meaning; your lines must reveal your thought and feeling, your contact with the forces in the landscape that you draw. You must look into the depth of things to find the inner causes, the movements and direction of growth and change. For example, in outlining a rock, ask yourself if the rock is freshly broken or old and worn, hard or soft. Is it of local origin, or thrust up out of the earth, or has it been brought there by flood or glacier? Perhaps this rock was once only a layer of silt at the bottom of a long-gone sea. If you ask such questions your lines will show not just shape, but also the deeper pattern of things.
And that patch of soil that you have represented with a line—is it filled with roots and little living creatures? How have plants and water helped to make and preserve the landscape that you see? What is the meaning hidden beneath your lines? Lines alone will not make a drawing profound. You can do this only by making your lines the expression of your vision and understanding.
Though you began your drawing by removing the plants, the water, and the atmosphere, you must give the structure meaning by bringing these things back. You know how to draw the atmospheric pattern and the water patterns that might be a part of the view. What other problems are to be solved? What more can lines express? What about weathering? Has the soil eroded in the rains or wind? Or is the soil of the landscape held together by the roots of trees, plants, and grasses? People tend to think of erosion or earthquakes as the great forces in earth formation because these forces are very theatrical. Yet the plant and animal world are even greater in forming the landscape by the slow and gentle accumulation of their remains. This is the source of the soft landscape forms; this is the great invisible forming pattern of richness and fertility.
Pattern in landscape does not mean just the heights, the angles, and the shapes. These are very simple things for anyone to draw. Barren structural lines might apply more closely to a desert landscape or to the surface of the moon, which are lifeless places of rocks and minerals—dead matter. So remember that abstraction does not mean find the skeleton; it means find the essence—the life !
Project: This project will help you make the transition to drawing earth masses as environments that interact with plant life. You need pencil and paper.
Take a field trip to an area that has no plant life at all. This might be a building site that has been cleared with a bulldozer, or if you live near a desert, do your drawing there. Make a drawing of a barren ground area to show the ground levels and slopes and how the ground is changed by wind and water erosion.
For your next drawing, pick a spot that has a ground covering of grasses and shrubs. As you draw, pay special attention to the way the plants and grasses hold the soil and soften the forms. Note the difference between the two terrains so that you understand the contrasts between a lifeless area and living ground.
Make some closeup drawings of the soil at the bases of trees. In contrast to this, draw the soil at the bases of rocks.
When you have finished with your field trip drawings, make some imaginary drawings starting with a basic structure of lines that indicate different levels of ground, rocks, and at least four rings of distance. In one drawing use this basic structure as a landscape covered with grasses and shrubs. In another one, draw the same structure with stands of trees. Next, draw this landscape after a forest fire and show how the land eroded when the plants were destroyed.
PATTERNS IN PLANTS
Pattern in plants begins with the basic linear forms that we have discussed in Chapter 3. Different plants use the basic forms in distinctive ways. Each plant has its own pattern of growth and change which affects its height, the growth of leaves, the shape of flowers, and the shape of its fruit and seeds.
Plants grow in a rhythmic sequence. There are pauses and changes of form in plant growth as each new period of growth proceeds. In drawing plant patterns, it helps a great deal if you are aware of the sequence of growth (Fig. 207). Just as the seed begins germination by sending up the axial shoot, begin by drawing the central axis of the plant. Next are its first leaves, a pause, and then the formation of branches. Draw the plant from the central axis to the branching pattern. Then draw the leaves themselves if the plant is a simple one. But if the plant has large clusters of leaves draw the patterns made by the whole group before proceeding with the individual leaves. You can see that the drawing sequence comes close to repeating the growth sequence.

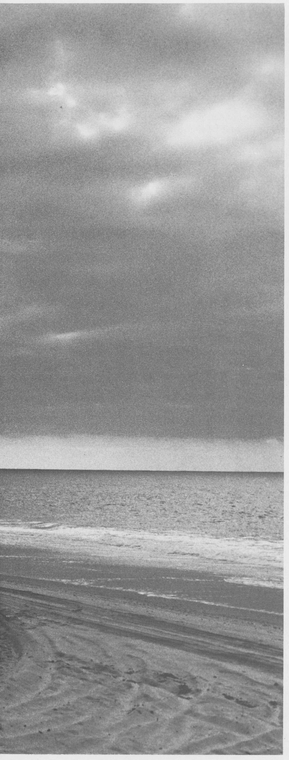
206. Here is a seascape you can study for the exercise. A few simple, structured lines can suggest deep space and far horizons.
Rhythm in the drawing of plants is very similar to the actual rhythm of growth. Drawing a tree or a plant is not just a matter of drawing shapes; it is drawing what the tree or plant is doing. In the fruit trees there is a seasonal rhythm of growth that begins with the budding in springtime followed by the blossoms; then the leaves are established and the blossoms disappear. After pollination, the fruit develops and matures during the summer so that it becomes ripe by the fall. Without understanding this yearly cycle, an artist draws only meaningless shapes with no real knowledge of the tree inherent in them.
The movements of growth come from within the plant in response to the seasonal changes. Develop your drawing of the tree or plant so that your drawing expresses the period of development of the plant at the time the drawing is made. You must also learn to draw plants with some knowledge of what the plant is striving for. This is the abstract pattern of the plant. You can see that this approach has much greater meaning than a drawing that treats the plant like an inanimate object.
PATTERNS OF BRANCHING
In the United States alone there are 1,035 classified trees. Though they fall into just major four categories—the deciduous trees, the conifers, the broad-leafed evergreens, and the palms—each one of these trees has a branching system and silhouette that is distinctively and recognizably its own. This seems to make the problem terribly complex, but the artist does not have to memorize isolated facts; instead he uses a few drawing principles that apply to many things. The artist is trained to draw movements and to comprehend shapes. So when you encounter a new form, you should be able to re-create it from direct observations.
Understanding branching patterns requires two things—seeing the over-all silhouette of the tree and seeing how the branches divide. Tree silhouettes are all variations on the form of the magnetic field. They range from rounded tops to fan shapes, the cone, the tear-shaped orgonome clusters, and finally, random clusters. Within these silhouettes, it is important to observe the central trunk. In some cases, it grows straight to the top with branches spiraling off its axis as in the case of the cone-shaped white spruce or the orgonome-shaped cedar, the fan-shaped sugar maple, the cluster-shaped shagbark hickory, or the round-shaped sycamore. In other trees, the main trunk divides into secondary branches and loses itself in a veinous pattern throughout the tree as in the rounded white oak, the fan-shaped ash, and the cluster-shaped black locust.

207. These diagrams show the stages of growth of an avocado tree.
Most branches from the main trunks follow the veinous branching pattern. You can watch for the angle at which the branches divide from the stem. Ask yourself if the branches come off in random places or follow an ordered sequence.
PATTERNS OF LEAVES
Besides flower patterns, the patterns of leaves have been used as decorative elements in art and architecture more frequently than any other decorative motif since the beginning of civilization. Because they are symbols of the earth’s fertility, they will probably continue as long as man survives. So let us consider the various kinds of leaves and the drawing problems of their patterns.
The cone-bearing trees have three kinds of simple leaves (Figs. 208 and 209). The pine trees have needlelike leaves that grow in clusters which you can draw with simple pencil lines. The firs and spruces also have needlelike leaves, but these grow directly off the branches, if you remember from your last Christmas tree. You can draw these with a pencil also, but from a distance the branches have a furry and indistinct look. Other conifers like the juniper and cedar have long clusters of scalelike leaves that grow in soft, thick bunches. You should draw these leaves as masses.
The other evergreen trees are of the broad-leafed variety like the magnolia, the holly, or the eucalyptus. They are not cone bearers but are much like the deciduous trees since they lose some leaves while new ones begin and others remain green and growing. The problems in drawing these leaves are the same as those encountered in the deciduous trees.
Just as there are too many types of trees for you to remember, there are also many different leaf shapes (Fig. 210). Drawing leaves of any of these trees can be reduced to just nine features, which have to do with the characteristics of shape and how the leaf grows on its stem. These are the features you should look for in drawing: (1) whether the leaves grow in a group off a single stem, (2) the general outline of the leaf, (3) the shape of the leaf tip, (4) the shape of the base of the leaf, (5) the type of margin or edge that the leaf has, (6) the pattern of its veining, (7) the lobation of the leaf (whether there are hollowed-out indentations in its pattern), (8) how it is attached to the stem, and (9) whether the leaf is curled or flat.
The pattern of entire leaf groupings is also important in drawing trees. Observe the over-all shape made by the clusters of leaves. Some groups form thick fan-shaped clusters. Others form flat, hand-shaped planes that seem to float in the air. Still others form the tree into a solid mass of leaves that gives the tree a shape like a cumulus cloud. Some leaf clusters point upward, while others have a downward direction.
Project: This project will help you use the principles that we have discussed in making drawings of the trees in your locality. You need pencil and paper.
208. (Right) These conifer leaves are linear forms that cluster in groups on branches.
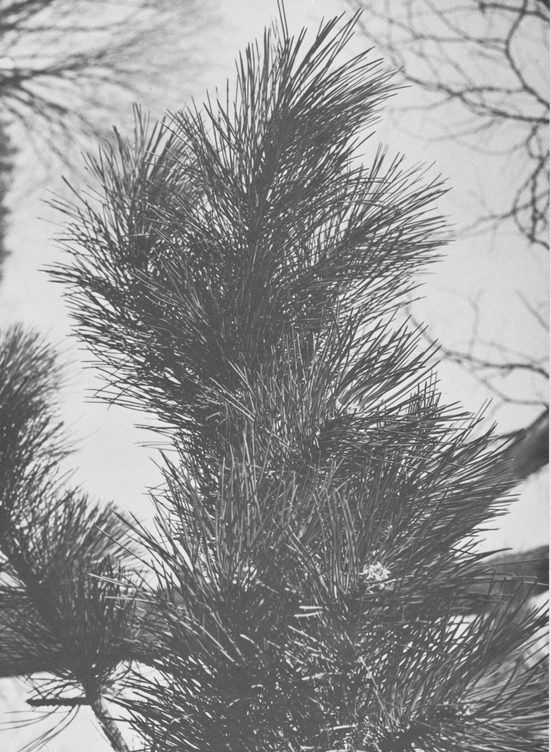

209. These are different varieties of conifer leaves that cluster in groups.

210. Here is a key to simple and compound leaves. (From Webster’s New International Dictionary, 2nd Edition)
Walk through your neighborhood and select five types of trees that you like well enough to draw. Begin the drawing of each tree by lightly drawing the trunk and the outline of the branches. Pay attention to the order in which the limbs branch out from the trunk as your drawing grows upward. You control the scale of the drawing of the branches by outlining the shape of the entire tree and making sure that the drawing of the branches does not go outside the limits you set. Begin by first drawing the line of the branches rather than their volume. Once you have done this, draw the volumes of the branches closest to you, followed by those at the sides of the tree, and finally those on the side opposite. Take special care to draw the diminishing size of the branches as they extend outward and upward.
When you have drawn the skeleton of the tree, draw the leaf clusters in outline. When you have done this, strengthen the lines of the trunk and visible branches. Finally, draw the texture of the leaves closest to you in detail, using pencil texture for those that are not distinct. Use the heaviest texture at the bottom and the undersides of the clusters since the upper parts reflect more light.
You will find it very useful to collect leaves to draw. Collect many different kinds and draw them while they are still crisp and green. You can trace the outlines of each one and you can make studies of the veining.
If you have house plants, make some careful drawings of leaf clusters to practice leaf foreshortening and the groupings of leaves.
PATTERNS OF PLANT GROWTH
Up to this point, we have considered plants as isolated objects, but now let us consider plants as groupings and as a part of the environment. Patterns of plant groupings vary in different geographical locations and in different climates. Plants become so much a part of their environment that many of them do not live in a place where the climate or altitude is not the same. Plants and earth together give the character and feeling to locales, countries, and continents. No two places in the world are quite alike.
Plants, like people, require the proper food and conditions of weather and climate in order to survive. And like the people of different regions, their character reflects their background. A tree growing on a rocky, windswept coast will have the same tough resiliency as the coastal fisherman whose lined, determined face reflects his arduous way of life. A tree growing in a fertile meadow by a stream in a mild climate will have the same fullness and grace as does a person who lives an easy and well-regulated existence in a temperate climate. Part of drawing plants in a landscape is to give them character. Is the plant rich or poor, sick or well; what is its personality? Use your feelings and responses to draw out what is in the plant.
Some plants thrive in rocky soil, others in sand, and still others only in the richest meadowland. Each kind of terrain has its characteristic trees, shrubs, and grasses. Plants and their terrain always harmonize in some way that can be drawn because the form of one will accent the form of the other (Fig. 211).
Grasses blanket and soften the earth forms (Fig. 212). The term ground cover is very apt for the grasses when, in drawing, you consider how the grasses affect the raw earth forms. A growth of grass converts a field textured with rocky shapes to one that appears to have a soft tone on a drawing. In areas of flat or rolling land the grass covering may so dominate the surface that it is converted into an area of the most responsive movement by the smallest breeze. Such grass-covered land is turned into a sea of moving waves as air currents and the grasses interact (Fig. 213). Other variations in this landscape pattern are occasional clusters of low shrubs and occasional stands of trees that grow along water courses. The drawing structure of this sort of landscape deals with rounded and flowing forms. Big contrasts do not occur in the shapes of this type of landscape, but are a result of the seasonal changes, weather changes, or the time of day.
In the northeast portion of the United States, where the great deciduous forests grow, something similar occurs in the landscape. The land is structured with low, rolling mountains that are covered with trees which make the earth appear a solid, rolling billow of green in the summer months. But in the fall the trees are denuded of green and a rocky, sometimes angular landscape is exposed. When the snow comes, the earth forms again disappear and all that remains are the verticals of the treetrunks and the veining of the branches that are intermingled above. So the drawing contrasts here depend both upon the point of view of the picture and the season; for even in the summer when the long view of the forest is billowy, a drawing done inside the forest will have all of the contrasts of terrain and growth imaginable.
There are geographical environments where plant and earth forms are both always visible and always in contrast. High, rocky mountains provide footholds for only the hardiest plants and the patches of growth are randomly spaced. In this kind of locale, the vegetation and trees also change higher up the mountain until finally at the timber line the trees can no longer grow. Again, this is an example of how the plants and the terrain contrast to give meaning and content to the landscape drawing.
In deserts, the amount of growth varies a great deal, but it is always separated and stunted. When you draw a desert landscape, keep in mind the dominating earth structures. The only other environment that comes close to this is the modern city.
Project: To study the environments that affect plant growth, take advantage of any trips that you make to do drawings of plant patterns in different localities such as the seashore, farm land, forest, and unforested mountains. Use pencil and paper and make quick sketches of what you see so that you can later rework and develop your drawings at home. Your object is to understand the climate, terrain, and type of plant so that you can re-create drawings from imagination.
As you draw, try to see the underlying earth structure by seeing through the growth. Next, draw the major tree forms with their vertical lines. Treat clumps of shrubs as rounded forms. In all localities, pay particular attention to the bordering areas that divide earth and grasses, shrubs and trees. Let the details of leaves and textures come last.
EFFECTS OF PLANTS ON ONE ANOTHER
One big factor in the patterns of plants is the relationship of plants to one another. Plants are by no means passive; they strive and compete with each other for sunlight, soil, and air (Fig. 214). A thicket of shrubs often consists of more than one type of plant and these various plants compete with one another for space. Some plants even kill other plants in their attempt to take over a patch of ground, while others will attempt to live peaceably with their fellow plants. Within forests there is only so much space available and the air overhead may be covered with a tangle of leaves and branches. A new tree has difficulty surviving unless another tree loses some branches or an old tree dies to give it room. Even if this does happen, the larger trees might send out more branches to take the space before the small tree can grow big enough to hold its own.
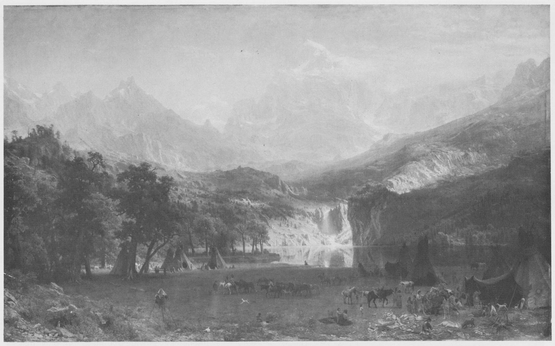
211. The Rocky Mountains, Albert Bierstadt, oil on canvas, 73 1/4“ x 120 3/4”. The Metropolitan Museum of Art, Rogers Fund. The different plant growth patterns of the plains, the mountains around the lake, and the land beyond the timber line create contrast in this painting.
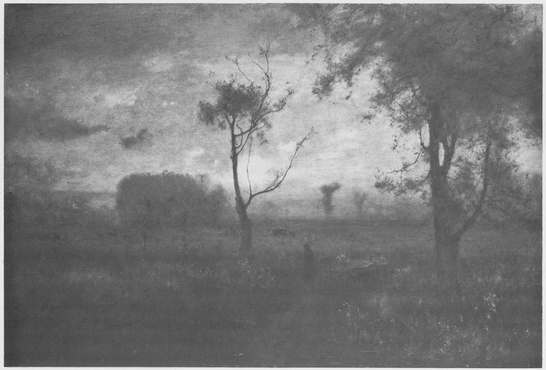
212. Sunrise, George lnness, oil on canvas, 30” x 45 1/2”. The Metropolitan Museum of Art. The subtly diminishing scale of the trees in this landscape gives depth to the scene, and the range of soft tones sets the mood of sunrise.
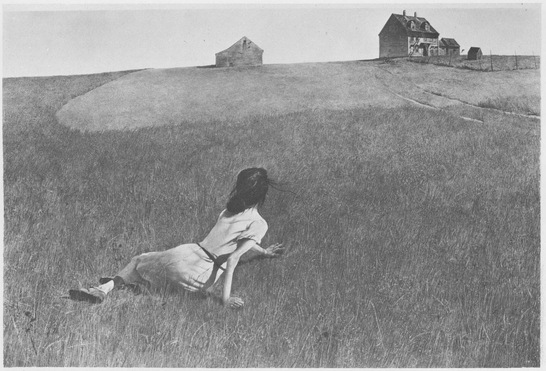
213. Christina’s World, Andrew Wyeth, tempera on gesso, 32 1/2” x 47 3/4”. Museum of Modern Art. The grass and Christina’s hair give movement to this stark composition. The grass also gives depth to the painting as the many lines which form it grow smaller in size as they move toward the background.
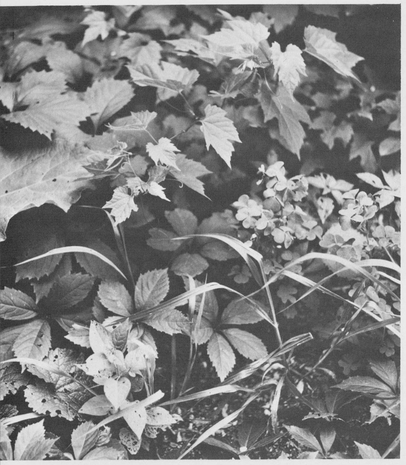
214. The patterns of plant leaves found in a very small area show the incredible variations in nature.
So in drawing plants, your lines will take on more meaning if you look for the dominant plant forms which tower over the lesser, or subdominant, forms. In drawing, consider the age and strength of the trees and plants, and contrast their youth and age. You can accent these features by the strength or lightness of your lines. The contrast in height between tall trees and the low shrubs accents the different kinds of life in the plant community and stresses the upward striving of plant life. A good landscape drawing should have as much character differentiation as an old-time family album.
Project: In this project, make drawings of plants, stressing their different characters and the competitive relationships in the thicket or forest. Use pencil and paper to make simple line drawings.
For your first drawing, find a plot of ground where there are very small plants, no more than a few inches high. Make your drawing from a sitting position on the ground that enables you to examine the plants very closely and peer in among them as though they were part of a tiny forest. Draw these plants just as you would a larger landscape, but put something like a button or a bottle cap in your drawing to give the scale.
Repeat this procedure with a thicket or a clump of shrubs. Be sure to draw wild plants and not neat garden arrangements. The plants are probably snarled and tangled, so as you draw, plot out the positions of the trunks and stems of the main plants on your ground plane. This helps you to draw the lines of each plant and not lose the lines in a tangle. When you have done the main plants, you can easily draw the lesser ones and not become confused. The mistake beginners make when drawing complex things is to begin drawing the first thing they see rather than plotting out the bases and space of the plants.
You can repeat the procedure in a forest if you go in among a stand of trees. First, find the lines of the ground structure. Next, plot the bases of the trees. Then draw the trunks and branches, working from the nearest trees first, and finally the leaf clusters and textures.
PATTERNS OF LIVING CREATURES
The varieties of living creatures that exist are almost beyond comprehension. No man could describe them all. The fact that living creatures can be grouped into species makes it possible for us to understand them. Even so, it is difficult for us to discuss aii of the species in this book. We will concentrate on the species that are most familiar to us: the birds, the fish, and the vertebrate animals. And though we will not venture into the realms of insects, microbes, or reptiles, I believe this chapter and Chapter 2 will give you some principles that will enable you to draw them on your own.
First, however, a discussion about surface pattern is in order. To many people the word pattern means the decorative designs of dress material, wallpaper, or the carved flowers and leaves that were once used to decorate buildings. This group consists of manmade imitations of nature’s patterns. Pattern also brings to mind the zebra’s stripes, the leopard’s spots, and the peacock’s tailfeathers. This group consists of imitations of nature’s patterns made by biological processes. These surface patterns help some animals to blend into the background and hide their form and pattern. Because of this we must get beyond surface deception and concentrate on the forms beneath. Only after we do this can we start to draw the camouflage.
PATTERNS OF FISH FORMS
We have already talked about the basic fish forms stemming from the orgonome. The remarkable thing about this basic form is that the fish family has developed a startling number of variations. There are an estimated thirty thousand kinds of fish—all different in size and shape—but creating their variations from the same original orgonome shape. This is the main feature of the fish pattern and the structure of its body and the part that must be drawn first.
The fin pattern of the fish is of next importance (Fig. 215). For many fish, the fin pattern is basically the same. The dorsal fin runs along the backbone. The tail fins may be divided or the tail may have a square or rounded shape. The pectoral fins are located at each side of the fish behind the gills on the lower half of the fish’s body. The two armlike ventral fins are below the pectorals and project from the underside of the fish. Depending on the length of the fish, there may be one or two anal fins. The fin pattern is followed by fish as small as the guppy all the way to the large fish like the warsaw grouper that reaches six feet in length and weighs as much as five hundred pounds. In drawing the fins, remember that they are built a lot like Japanese fans with a series of needlelike bones that reinforce the thin membrane. They are flexible, but not completely so. The long fins tend to move in rhythmic waves while the short fins like the pectorals and the ventrals are used for armlike power strokes and as maneuvering devices.
Fish are unwitting cartoonists of people. The instructive thing in drawing fish is in playfully altering one simple shape and creating marine personalities that parody human character types. At the same time, drawing fish can instill the lesson that all living forms are modeled by the movements that creatures make. The pattern varies from the long sleek lines that are characteristic of the fast swimmers to the short and powerful lines of the fish that dart and maneuver, but there are also forms that are so grotesque as to appear dragonlike and hideous (Figs. 216A and 216B). Fish can distort their basic form in incredible ways, exaggerating one or two characteristics: some become a mass of spiny bones; others become almost all skin and inflate themselves into balloon shapes at the approach of danger. Fish can make their bodies as flat as a flounder or as narrow as a grunt.
The science of forms—called morphology—uses the grid pattern of coordinate lines and points as a basis for analyzing form and comparing form changes in related types of fish (Fig. 217). Albrecht Dürer, the great German painter of the Renaissance, was perhaps the first one to use this method of analysis in a systematic way, preceding the science of morphology by several hundred years. This method can be adapted to the analysis of human types and animal species as well (Fig. 218). The American sculptor and anatomist William Rimmer used a modified form of this grid to demonstrate different human body types.
When you first examine these figures, the change of form appears to be the result of a pulling from the outside as though the fish were being pulled and stretched by a vertical and horizontal force outside their bodies. You must remember that these drawings have been made by man and that the forces of change come from inside the fish. The atmosphere of the earth does have a gridlike structure of forces, but how this affects the form of animals has never been determined. Your drawing should take into account both the internal forming of the fish and the horizontal of gravity and the vertical of levitation as these are all part of the drawing problem.
In drawing fish, remember that you are drawing them in their living, moving world of water. Their movements are similar to the movements that water makes: the wave, the ripple, the spiral of the vortex, the eddy, the jet, and the splash can be found in the different forms of swimming that fish employ as well as in various fish bodies.
Project: Here is your chance to make creative use of the grid patterns in the drawing of imaginary fish. You need pencil and paper.
You can use either photographs or real fish as reference to make drawings. Make these drawings within a grid pattern. When you have completed your original drawings, draw some new gridworks that distort the original shapes. You do this by expanding the center or the head or tail sections. Next transfer the lines of your originals to the new gridwork by placing the lines in the proper squares. Once you have practiced transferring the lines, you can easily invent new fish forms. The use of the grid helps you get an idea of how proportions actually evolve. Once you grasp this idea, it is not very difficult to draw your inventions freehand.
Make some drawings of aquarium fish. Looking at the fish will give you a fine opportunity to observe their living movements. The major line to capture is the curve of the spine. The fish’s body moves from side to side in wavelike movements. The motion of the body in swimming is echoed in the fin movements, the pectoral and ventral fins being held close to the body, as the fish darts forward. The ancient Japanese were the world’s best draftsmen of fish in movement and form. Go to your local library and look at books of Japanese paintings and drawings and notice how they capture the forms with the fewest simple lines.
PATTERNS OF BIRDS
Birds and fish are very similar in form because both glide through the media in which they live. Their streamlike lines emerge from the laws of movement in water and air. Although there is wide variation in the shape of birds, their general form does not undergo the changes that occur in the fish family. Water supports and encourages more extreme variations than air. This is understandable when we realize that flight requires simplicity of form. Nevertheless, the bird family has some pretty gaudy members.

215. Here are some examples of fin patterns of fish.
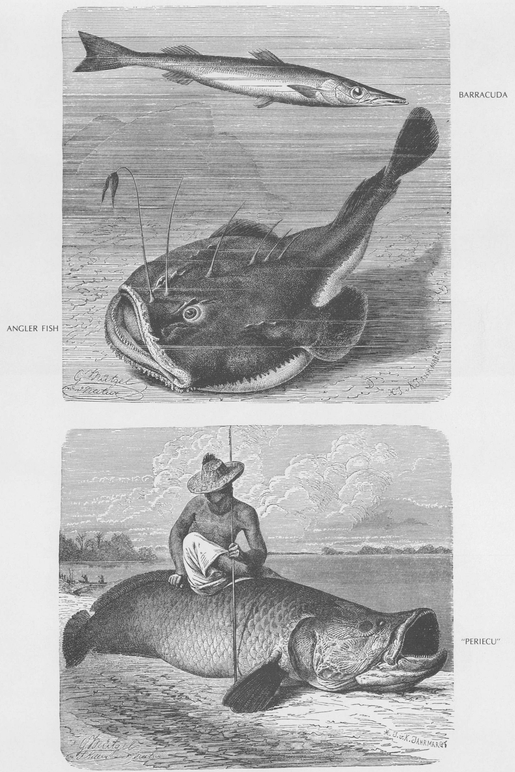
216A. Here are examples of fish body types.

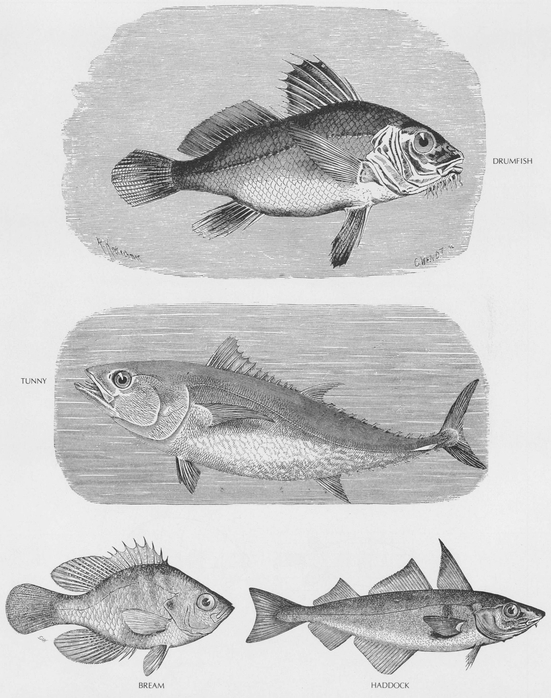
216B. Here are some examples of fin patterns of fish.
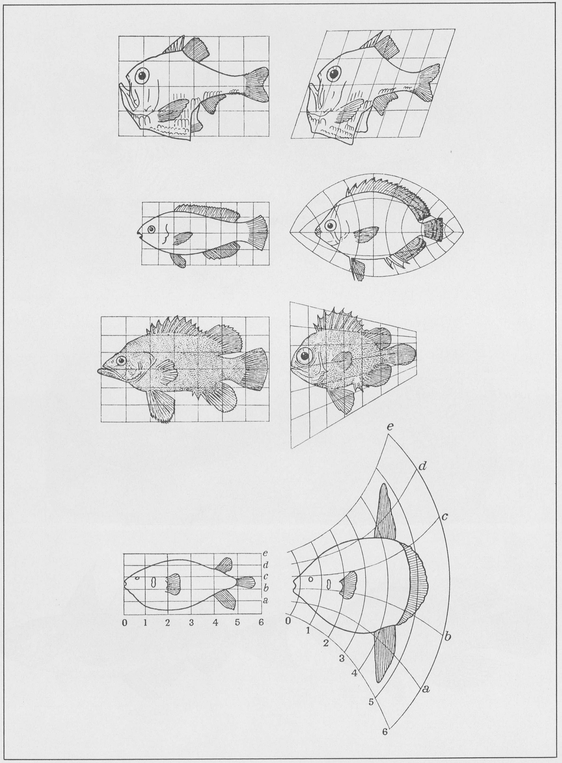
217. The gridwork concept enables us to visualize the difference of feeling within creatures caused by a variation from a basic pattern. (From On Growth and Form)

218. Dürer’s system of morphological coordinates provides a method of analysis for form variation in the human body. Where the form varies from the normal, there seems to be a fixation of a certain expression, such as fear, aggressiveness, petulance, etc.
The smallest known bird is the bee hummingbird of the Caribbean. Its wingspread is only two inches. The largest bird that is capable of flight is the condor. And, of course, the largest bird of all is the ostrich, which cannot fly But regardless of the size difference among these birds, the general form of their bodies resembles the orgonome.
Several factors determine the variations that do occur in birds’ shapes. Variations occur in size, type of beak, length of neck, type of foot, length of leg, type of wing, and in the type of feathering (Figs. 220, 221, and 222). The variations depend on the way the bird gets its food: wading birds have long necks and legs, swimming birds have webbed feet, predatory birds have talons, etc.
One of the main characteristics is the type of flight that the bird has adopted, and this alone determines the wing structure. Wing structure is gauged by length and shape in relation to the body and the tail. There are four essential wing types. The short wings are used by the maneuvering birds like the hummingbird, the swift, and the swallow. Birds of speed like the pheasant or the duck use broad wings for quick takeoff. Gliding birds like the tern or the gull use long narrow wings. And the great soaring birds such as the eagle and the condor use long, wide wings. And, of course, there are birds that have combination type wings.
It’s almost impossible to draw birds without drawing their markings. These patterned markings vary from the ultraconservative markings of the blackbirds and sparrows to the exhibitionistic and theatrical garb of the peacock and cockatoo. It is always the males who wear the finery. The markings always obscure the actual structure of the feather groupings so I can give you no particular drawing advice except to say that in the cases where there are lines in feathers, the lines will help reveal the over-all form. The camouflage of tropical birds seems extreme to us because we do not take into account the colorful surroundings in which these birds live.
Project: This is a birdwatching and drawing project. I am suggesting things for you to observe and draw. All you need is pencil and paper.
The best way to become familiar with bird forms is to visit the aviary at the local zoo. Take your pad and pencil along and make some sketches. In the beginning, try to draw the over-all shapes of the birds as they sit on their perches. Make several simple drawings and compare them with one another to see how closely they duplicate the basic form. Next redraw the same birds with closer attention to the way the folded wings modify the form. Observe the leg forms as they emerge from beneath the folded wings. If you have trouble visualizing how the wings fold over the thighs, I suggest that you buy an uncut chicken at your local meat market and draw the legs and wings in various positions. You will find that the feathers disguise the underlying form.
After you have drawn perching birds and understand how the wing and leg forms fit compactly into the bird’s body, draw birds on the wing and also as they hop about on the ground or run along the seashore in search of food. You can see the relationships of the wings and legs in movement and balance.
You will find that sea gulls in flight are easy to draw. They are gliding birds that keep their wings extended much of the time. You can see and draw the three segments of the wing which are very much like our own upper arm, forearm, wrist, and hand. Most important, as you draw these birds in flight, try to visualize the air currents that they glide on. This is important because it is this unseen factor of atmospheric currents that the bird is touching and feeling while in flight.
PATTERNS OF VERTEBRATE ANIMALS
All vertebrate animals are structurally similar to man as well as to one another in their musculature and bony framework. Their internal organs are all much the same too. Our own bodies are very reliable standards of comparison that help us to understand the forms and patterns of animals. This is why it is easy to use a modification of the stick figure as a framework for drawing animals.
The most important parts of the animal form are the body, neck, and head that are all part of the central axis of the spine. This spinal unit is capable of wavelike movement from side to side and from back to front. In general, the forms of animals can be abstracted into a superimposition of the orgonome form and the magnetic field form. We can consider the legs, neck, and head as the servants of the torso and so in drawing it is important to begin with the shape of this central form.
The torsos of all four-footed animals may vary greatly in size, but the similarity in shape among them all is pronounced. The segmented spinal column with its rib cage and pelvic structure is the common denominator. The forms that really make the difference are the legs, the neck, and the head (Fig. 223). Some animals like horses, deer, cows, and pigs stand upon the ends of their toes, their feet having become extensions to the length of the leg. This extended leg adds to the speed in running or adds extra height for grazing. Other animals like cats, dogs, and bears walk on the fingers (or toes) and the pads of the hands and feet. Their shorter legs and more powerful muscles give them the capability for the short bursts of speed needed to gratify their carnivorous ways. Just like the fishes and birds, their way of life molds their body form.
In drawing animals, it helps to first study the animal’s character by acting out the role of the animal. I mentioned before that children play such roles and learn a great deal in their play by finding the common characteristic that we humans share with the other vertebrates. So in order to draw animals well, we must compare them with ourselves, both in form and attitude.
Just like the other creatures of the vertebrate persuasion, we carry our air and water supply within us as we move about Some of the animals—the camel as a water carrier and the whale as a breather of air—are far superior to us in both functions. All animals superimpose in the mating process. The young are carried within the female until the young develop their forms and functions well enough to survive independently. After infancy they continue as a part of a multistaged life cycle. So it is clear that we must draw out our own natural understanding of these same processes when we draw animals.
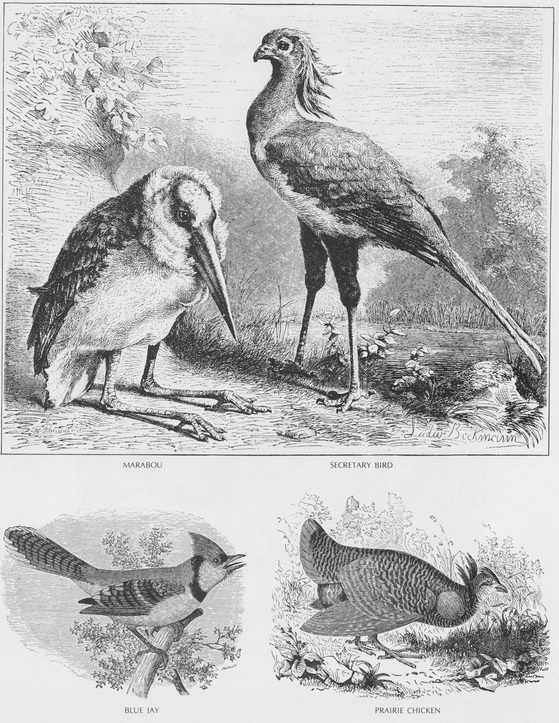
219. Examples of bird body types are shown above.
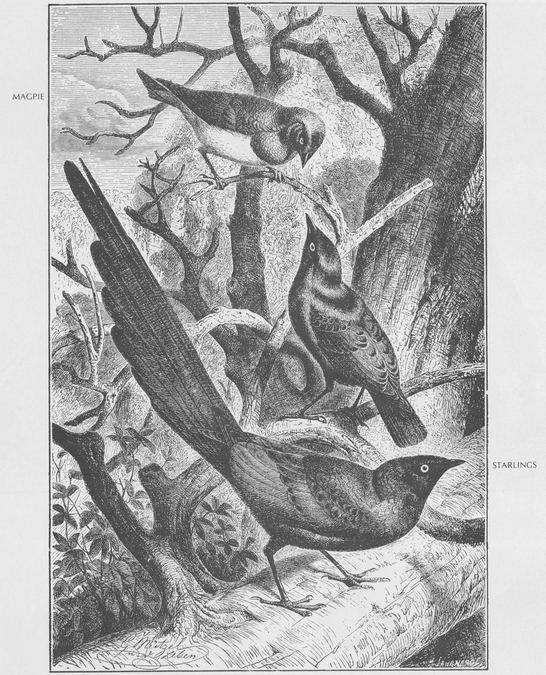
220. The shape of birds’ beaks, their wingspan, and the type of legs they have are all adaptations to their environment. These two pages show examples of the variations in bird body types.

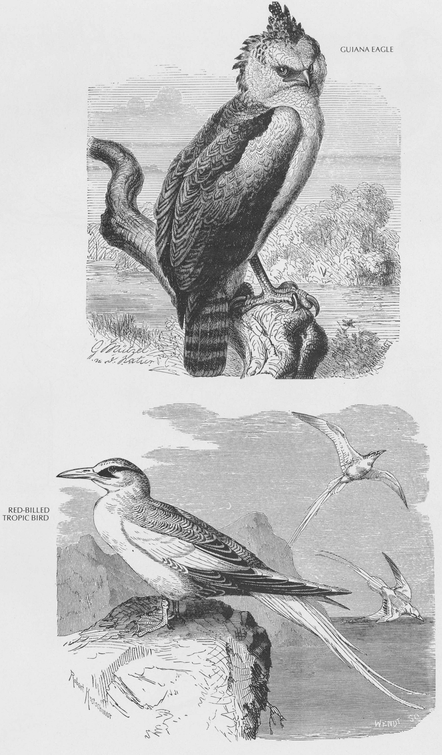

221. Variations in the structure of birds’ bodies depend on the way they obtain their food, as shown on these two pages.
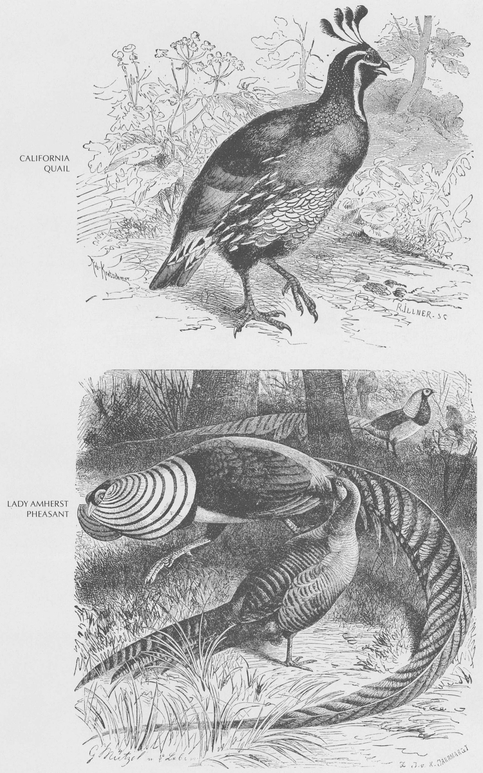
222. Part of the study of the variations of bird body types is the study of their markings.

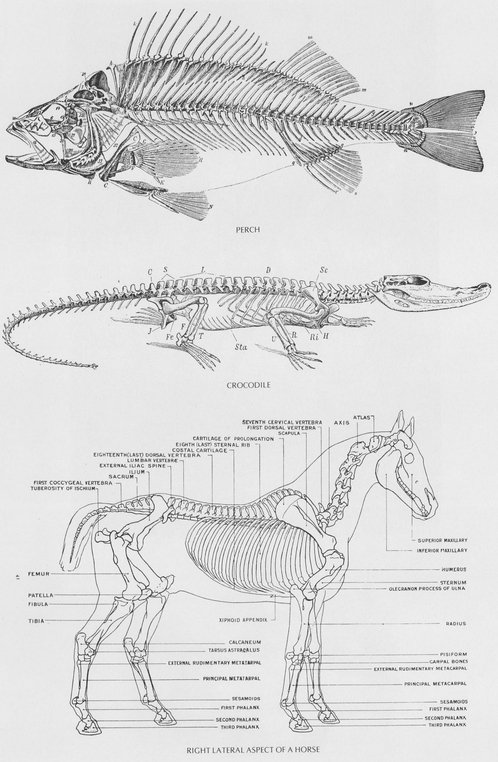
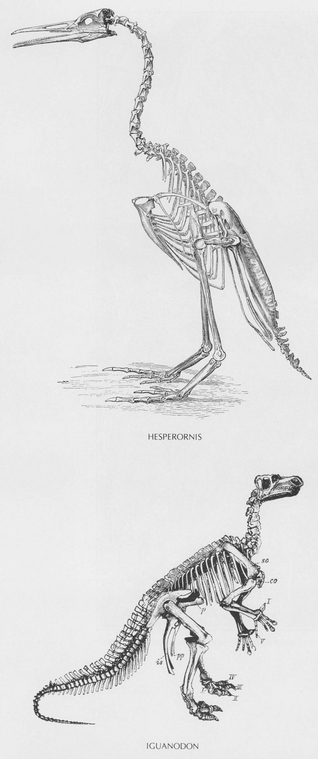
223. This group of skeletal diagrams shows the common forms shared by all creatures possessing a bony structure.
Of the living vertebrates there are seven classes and three thousand species, all of which share forms in common as well as all being different in some ways. The patterns of animals vary because of the ways of life from which they have evolved and also because of their sizes and life span. For example: a mouse is tiny, has a rapid metabolism, and is easily startled (Fig. 224). The gestation period of a mouse is about twenty-one days and the mother bears from one to eighteen young. Its length of life, barring accident, is three years. The mouse is a creature for whom fright is a way of life since it is eaten as food by many other creatures. But it defends against extinction by becoming mature in forty-five days and bearing up to twelve litters of young per year. On the other hand, the elephant is a great and complex creature that moves slowly and ponderously (Fig. 225). The embryo takes twenty months to develop. The elephant may live to be eighty or ninety years old. The only real enemy that an elephant has is man. So the elephants move with a dignity and unconcern that is both powerful and gentle. You can easily see that the qualities of these two animal patterns should be quite familiar to human feelings.
Once you have grasped the character of animals, the more complicated aspects of their anatomy will make sense to you because you will know the reasons for the form patterns. We draw fish by becoming aware that their forms are modeled by the laws of water movement. And so we must draw animals by understanding that their form is modeled by their life on land (Figs. 226, 227, and 228).
The grid pattern that you worked with when drawing fish also has it use in drawing animals. Fig. 229 shows how the form of the skull changes and modifies with different uses of the jaw. This kind of grid analysis can also be used for the other forms of the body. Some people object almost automatically to the use of the grid because it seems too precise to them and not artistic and free. Art students often object to the idea of measuring anything. I dislike rigidity and restraint as much as the next person, but to make an effective drawing, we must use every tool at our disposal to develop our skill.
Surface patterns in animals are less a part of their defenses than they are in the fish, birds, and insects. Animals rely much more on their character traits, their speed, and their instinctive knowledge of the type of environment to which they have adapted.
Project: This project will teach you a method of understanding the character patterns of animals so that your drawings will express more than just the outer forms of the creatures you see. You need pencil and paper.
Try to become familiar with the basic animal structure. In this case, you can use the family cat or dog as a model. Draw the basic shape of the body indicating the spine, the rib cage, the belly, and the pelvis. Be sure to draw the joints of the forelegs and back legs correctly. If you have some doubt about how long these are and how they bend, feel these segments on your pet and bend them gently until you see how they work. If you are still in doubt, buy a skinned rabbit from your butcher and make drawings of the exposed structure in various positions.
Next, make some drawings at the local zoo, following the same forms as described above. Note the similarities at first but do not concentrate on the differences. Simply look for the spine, the rib cage, the belly, the pelvis, the neck, the head, and the joints of the legs. You will find that the differences are not as great as you imagined. When you have done this, then make drawings that bring out the individual variations. See these variations as exaggerations of the basic form: the longer neck of the giraffe, the deeper chest of the buffalo, the larger masses of the elephant’s whole body, etc.

224. The form of the mouse-its scale and movement—arouse feelings in us of amusement and delight.
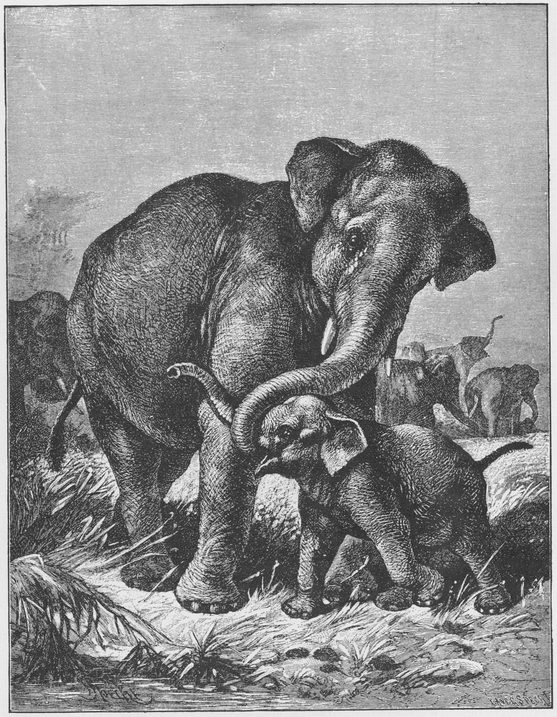
225. The form of the elephant, because of its mighty size, is a wonder to us.
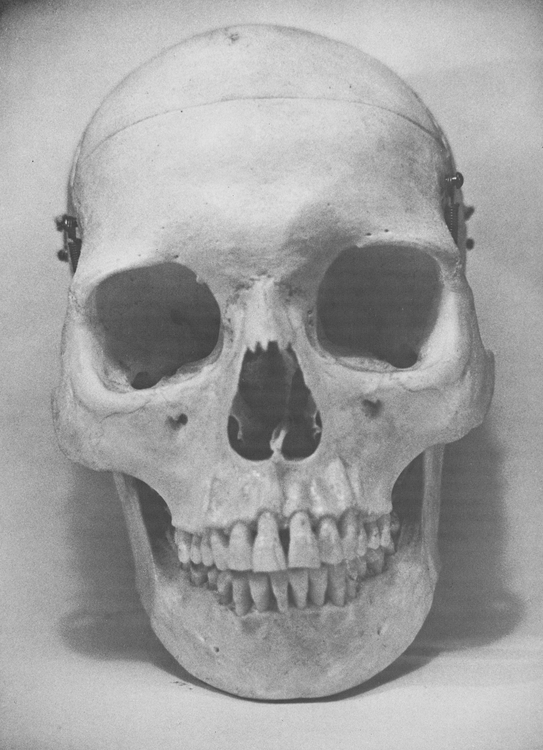
226. (Left) All of the senses radiate from the human skull; no one sense dominates.
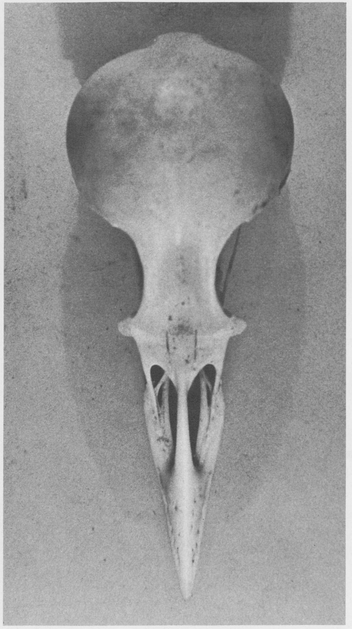
227. The beak and the eyes dominate the form of the bird skull.
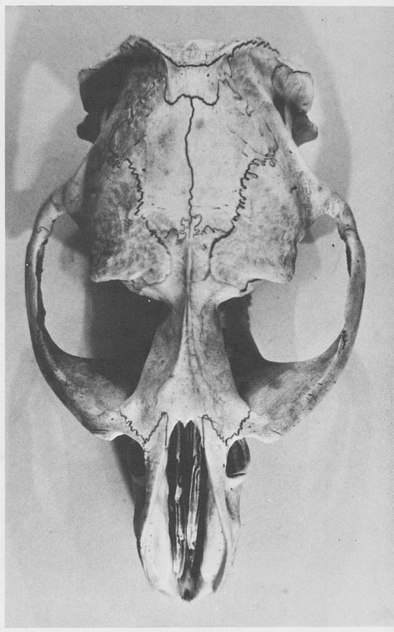
228. In this animal skull there is a dominance of eye and jaw forms.
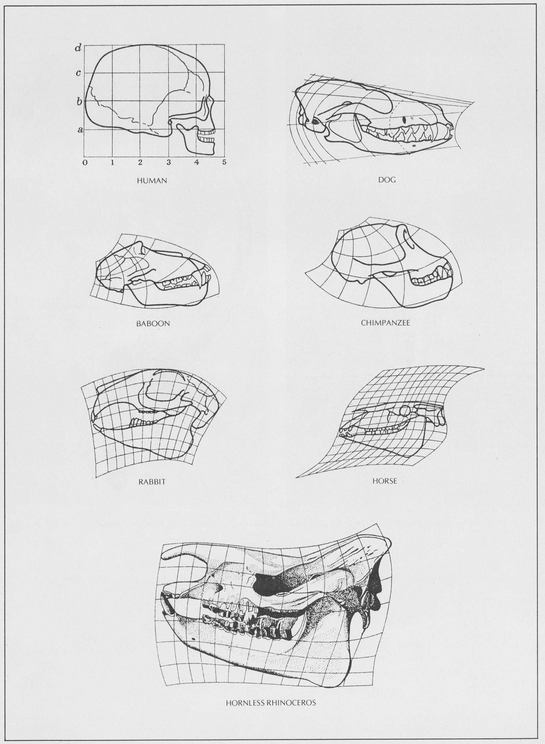
229. The gridwork concept is used to illustrate the differences in various types of skulls. (From On Growth and Form)
Finally, in the privacy of your workroom—or in the classroom—act out the parts of the creatures that you have drawn. Be a timid rabbit, a friendly sniffing dog, an angry bull, a gentle deer, a fierce tiger, a sly and tricky fox, etc. When you have acted out each part, redraw the animals using your own feelings as a model of their characters.
PATTERNS OF HUMAN FORM
We begin the study of patterns of human form by looking for the characteristics that humans share with animals, and then looking at the ways that the human form is distinctively different. In form the human torso, head, neck, arms, and legs are very similar to those found in all of the animals, both in construction and function (Fig. 230). But in man all of these members form a closer unity. In animals, the forms are basically oriented to the ground plane. The animals are earthbound, their spinal columns parallel to the plane of gravity, and their attention is directed toward the earth. The exception to this is the ape family.
Man’s stance is organized along the line of levitation. This posture allows the entire human body to achieve more versatile and thoughtful movements. This great capacity to move in versatile—but not specialized—ways allows the human a certain freedom of choice, whereas the animals are restricted by their balance which is centered on four legs. They are like stationary tables in their mode of balance where humans are constantly interacting between gravity and levitation. Man has to constantly be aware of his surroundings because of his stance.
Animals generally have only one or two specialties. For example, the giraffe feeds off the tender leaves of trees and is able to reach these leaves because his body is chronically reaching; it could not adapt to a different mode if it wanted to. Man, on the other hand, is constructed in such a way that he can reach or climb at will and go on to other things. The mole digs as a way of life and spends his life burrowing. Man is an adaptable creature who will dig only if necessity demands it. Man’s structure has specialized in perfecting the anatomical principles that allow the senses and the structure to do as many things as possible.
Man’s head is constructed so that the organs of his senses radiate outward from a central point within his skull and they can all focus on the object of his attention (Fig. 231). The ears, eyes, nose, and mouth combine in a series of radiating angles that allow man to compare several sensations at one time and, in so doing, form superimposed impressions of the object of attention. The face of a horse, on the other hand, is a shortsighted, grass-eating appendage ; the face of a lion is a killing and flesh-tearing structure. The faces of animals reveal their specialized modes of life. The face of man is, first of all, the face of thought and reflection. A good example of these qualitiees is Leonardo’s self-portrait (Fig. 232). Man’s head is the crown of his whole structure and, under favorable conditions, is not just the servant of his belly. In drawing the human head, you are drawing a structure that has the potential for thought and wisdom, though it sometimes happens that the lesser traits gain the upper hand.
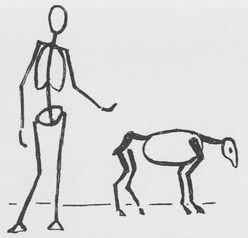
230. This diagram illustrates the difference between a human stance and an animal stance.
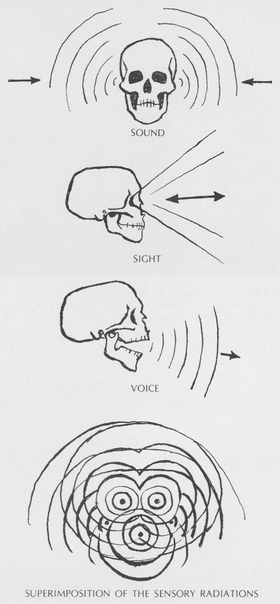
231. The form of the human skull follows the radiations of its receptive organs: ears, eyes, nose, mouth.

232. Self-Portrait, Leonardo da Vinci. Man’s face reflects the capacity for thought and understanding. (Courtesy of the Archives of the Biblioteca Reale, Torino, Italy)
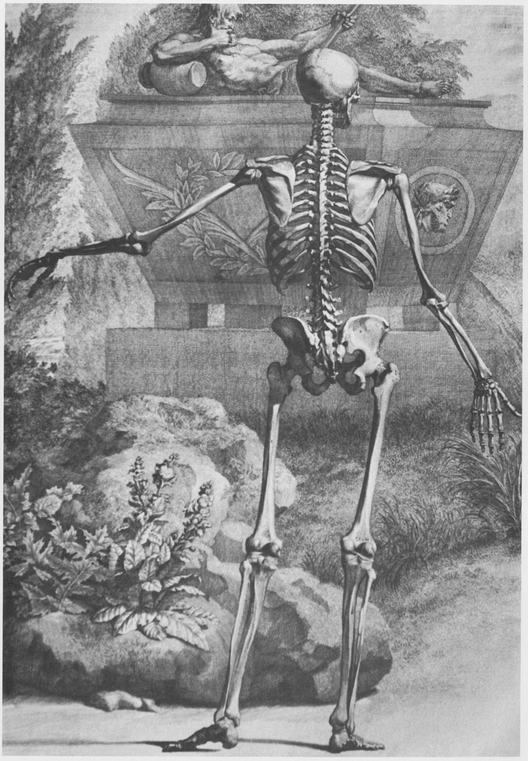
Next in significance in the human pattern are the arm-hand structures. Because they do not share in the burden of supporting the body, they move freely in cooperating with the head (Fig. 233). They can move instinctively, but they also move in cooperation with thought as an extended part of the intelligence. The hands of man have become delicate tools of the mind and senses. The art that we work to perfect—as well as music and science—are the results of the interrelationship of hand and head. These are the truly human characteristics, but they are superimposed upon the deeper and more basic functions of life that man holds in common with all warm-blooded vertebrates.
When we draw the human figure, we must understand that the forms express many purposes. A hand can support the body’s weight, but it can also play the piano, pick a dandelion, or make a fist. The secret of the human body is this multipurposed potential. This is the chief reason why figure drawing is a very important study for artists.
For example, in drawing the hand, it would be a great mistake to delineate the wrist, palm, fingers, and thumb in a diagrammatic fashion and call this a meaningful drawing. It would be only a study of a structure, a beginning work for an art student. A truly fine drawing would use the lines to transmit not only the structure but also the feeling within the hand, its touch and its purpose (Fig. 234). In other words, the abstract understanding of life patterns has to do with expressive content as well as structure.
These expressive functions of man exist in superimposed layers around the basic core of life. The hand is an extension of the life and purpose within the torso. Whenever we see a drawing of a hand, the torso is an implied part of the picture whether we actually see the torso or not.
In pattern, the torso consists of three interacting forms which are interconnected and fused to the spinal column: the rib cage which is a firm structure, the pelvis which also has a bony foundation, and the abdomen and diaphragm which are soft and pliant. The basic expressions of the torso are pulsation, and contraction and expansion, which are expressed in the living movements of breathing, the sexual convulsions, and the contractions of fear. In a drawing, a torso may express the expansion of pleasure and relaxation, the contraction of fear and anxiety, or conditions that alternate between these extremes. The other layers of expression emerge from these basic moods of the torso as these moods underly all actions and gestures. The head and neck, the arms and legs are like the props and the actors in the drama of the basic life forces in the torso.
The head, neck, arms, and legs never reflect expressions that are not connected to the whole body. For example, in extreme fear the legs are drawn up to protect the genitals and the soft organs of the stomach while the arms protect the head. In relaxation the arms and legs, head and neck are elastic, but they show no tension. In love the arms reach outward and draw the loved one into close embrace to satisfy the need for contact, pleasure, and reproduction. In Rembrandt’s etching Christ Preaching, many basic body stances are drawn in relation to the expression of the central figure (Fig. 235).
233. (Right) The structure of the human body suggests potentials of movement and function in many directions rather than a bent for one particular way of life as do animal forms. (From Albinus)

234. Study of Hands, Leonardo da Vinci, silverpoint with white on paper. The Royal Library, Windsor Castle. A fine drawing transmits not only the structure of form, but the feeling within—its touching and its purpose.
But whatever the basic expression of the torso, there are three factors that must be considered in any figure drawing. First is the correct drawing of the shapes of the members of the body such as the knees, fingers, breasts, or arms, etc. The second is drawing these forms of the body in their correct proportional relationships such as the length of the foot to the lower leg and thigh, etc. The third is drawing these shapes in their correct position and movement (geometrical and spatial relationships). The last includes not only the relationship between torso, legs, arms, head, and neck, but also their relationship to the plane of gravity and the line of levitation. If these three aspects of the drawing are not coordinated, the figure’s basic expression will resemble a department store dummy.
Great mistakes can be made in drawing expression if the artist thinks that expression means only the super-heroic, grandiose, flamboyant, or heartbreakingly sentimental pose. The expressive movements of the figure go far beyond theatricality. Natural expressions are more complex and difficult to draw than poses because they require a keener knowledge of the human character and form. Artists who resort to theatricality do not have this insight.
The best way to draw human expression is to draw the basic movements in a natural way rather than drawing the frozen extremes. Natural movement follows a certain order. Here are a few simple classifications: movements of the figure that draw the concentration inward such as thought, conflict, or sorrow; outward movements done in harmony or contrast with outside influences such as objects, other figures, or animals. There can also be an interaction between outward and inward movement. There are literally thousands of possible figurative positions that are derived from these basic movements. You and your own body are the best source of these patterns. Your development as an artist grows from your developing contact with the expressiveness that is within you.
Project: This project will help you become familiar with the problem of drawing patterns of human expression. I am going to suggest a number of specific patterns for you to draw with pencil and paper. When you draw these patterns, use the stick figure and simple egglike or rounded shapes. Concentrate on the body movements of these expressions starting with the torso as the core of the expression, the basic movements going outward from the torso into the neck, head, arms, genitals, and legs. Keep the drawings simple and do not attempt to draw anatomical details.
I want you to draw these emotional patterns that all start from processes within the trunk of the figure: love, hate, rage, sorrow, mildness, joy, strength, fatigue, sleep, indifference, shyness, interest, enthusiasm, guilt, pride, revulsion. Draw these states without drawing the features of the face. Use yourself as a model and act out the expressions. Pay attention to the way the body moves when you become angry or when you feel love or guilt, etc. The idea is for you to see these emotional states as kinds of movement rather than as frozen theatrical poses.
An advanced project, very difficult to do, is to draw the figure in transition from one state to another. Try it. Be sure to remember the three points I mentioned: correct shape, correct proportion, and correct position.
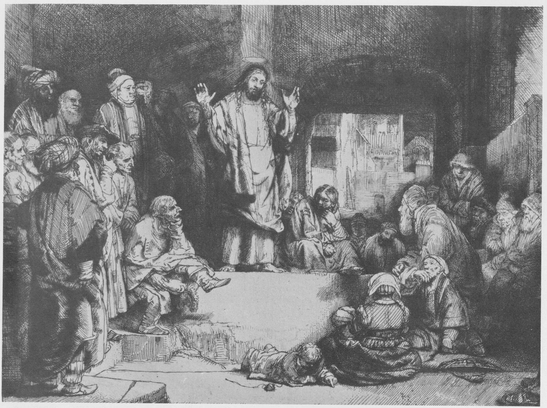
235. Christ Preaching, Rembrandt van Rijn, etching, 6 1/16″ x 8 1/8″. The Metropolitan Museum of Art, H. O. Havemeyer Collection. Emotional expressions emerge from contraction and expansion—and from the movements of pulsation in organisms.