CAMERA EQUIPMENT
In the end of the day, a camera is just a box with a hole on it, it is just a tool, you are the artist, and you can take amazing photos with any camera. It starts to get a little complicated nowadays since there are so many different types of boxes and all the bells and whistles that come on the outside of that box. Every person is going to have their own way of interacting with their camera and they own definition of what a great camera is, along with what great photography is to them. This has a huge effect on what kind of camera is right for them. There is no perfect standard hero camera that will fit every person needs and aesthetics. Every person is different, and every photographer is different. There will be presented different camera bodies and options to you so that you can make the right decision for what you need as an artist and as photographer. The absolute best camera in the world is the one that you have chosen to have with you.
In this lesson you will learn about the common types of cameras on the market today. We will break down the cameras in four different types: DSLR, mirrorless, point and shoot and smartphones.
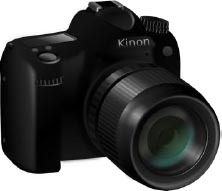
DSLR stands for Digital Single Lens Reflex, as we already know. They are named after their film predecessor SLR which were Single Lens Reflex camera that shot on non-digital film. The single lens means they use only one lens to capture and see the image. The reflex is the moving mirror (shutter) inside the camera that allows light, image, to go the lens, hit and bounce its way up to the viewfinder. When you press the shutter down, the mirror moves, reflex, and then allows the shutter to hit the digital sensor or the film. DSLR are often bigger than other camera bodies because of all those components. They have more buttons and are heavier than other cameras.
These cameras tend to be a bit smaller, mostly because they don’t have the mirror system the DSLRs have. It is just a lens and then the sensor. Although the cameras are a bit smaller and weigh less, some of them are still full frame sensors, meaning the quality of the image captured is very similar and sometimes better than the DSLR. Often, because they are so small, we see a lack of buttons on some of the newer ones. With fewer buttons and dials on the body, most of the options will be selected and changed in the menu system. You also find a small electronic viewfinder in the replacement of the optical viewfinder from DSLR.
These cameras are also mirrorless but are even smaller. They usually lack viewfinder and often have a fixed lens on it, these means you can’t swap out lenses to change your angle, aperture or options or things like that. You just hold them up, look to the screen in the back, point and shoot. These are usually cheaper and have lot of automatically functionality on them.
MOBILE AND SMARTPHONE CAMERAS
Mobile camera is that camera that is built into your phone or tablet device. These come in all different shapes and sizes. Every modern phone pretty much has a different camera from the other, with many having fun facing cameras, great for selfies.
Within each different type of camera, there are many options. From the sensor sizing and types of lens mounts, there are endless different combinations and systems you can dive into. Something to keep in mind is that cameras tend to get updated every year or two. It is a fast-moving technology that is always changing. You may not always be able to keep up with the latest and greatest, but the important thing is that you have a camera that allows you to take the photos you want to take. Better than having a camera with you than be waiting to what is coming out next.
When talking about different camera types, the cost can greatly vary. You can have a smartphone for a hundred dollars, or you can buy a medium format digital Hasselblad for over $10.000. So, what are you paying for? Why are some cameras more expensive and why would you want to pay more for a camera like that?
WHAT MAKES A CAMERA EXPENSIVE?
In photography, price tends to go up for a more sensitive bigger sensor, the speed of the camera, how fast it can take and process photos, pixel count, also known as resolution, ability to shoot videos and that videos quality and the lens system. Most full frame DSLR are going to be the most expensive cameras you will see on the prosumer market, while smaller point-and-shoot will be the cheapest. In the mid-range, you will find smaller crop sensor DSLR and crop sensor mirrorless cameras. But you also see some crop sensor mirrorless for the same price as a full frame DSLR. It really varies. You may see an advanced point-and-shoot camera more expensive than a cropped frame DSLR. You have to look a bit deeper than the sticker price on that type of camera to see really what is best for your budget and the type of photography you are doing. Therefore, most cameras sail persons will ask you for your budget before they tell you what kind of camera you are going to get into.
HOW MUCH CAN YOU SPEND ON A CAMERA?
Once you have an idea of how much money you can spend on a camera body, you then have to start thinking about lenses. A lot of cameras will come with a kit lens that is typically a zoom lens with a mediocre aperture, it will not be the best lens money can buy but it will be great for basic lens to start with and while you are learning it’s a really good lens. Aside from lenses, you will start to think about accessories and other purchases, and things that can get a bit pricy. Basically, include things like flashes, stabilization, battery packs and more.
If you have a very small budget, you may consider buying a used camera, they will be cheaper and are a great option for just getting started. You can then spend that extra money you have on investing in a better lens that suits your type of photography that you are in to. If you have a larger budget test and handle as many camera systems as you can. If you star spending lots of cash on a camera with some lenses, you are going to start committing to a system with specific lenses and accessories. You will want to make sure it works for you as a photographer and what you are shooting before you start spending a ton of money on one system. You can always sell your camera body when you are ready to upgrade but keep your lenses and accessories. Lenses will outlast the technology of the camera body.
Up until now we haven’t mentioned or recommended different camera brands and the truth is that there is no one perfect brand. It is up to you to decide which camera feels more natural and what works for you that is why we highly recommend going to a camera shop, putting it in your hands and feeling it out, see what it feels like, go thought the menus and see if it is easy for you to understand. Even if you purchase the camera online, it is great to test it out before you buy it.
WHAT TO LOOK OUT FOR WHEN BUYING USED CAMERAS
It can be a real help to use your laptop or PC to determine if there are any faults with the images you take on the camera you propose to buy. Check for dead pixels in an image. Dead pixels are damaged pixels, and there’s no way of fixing them.
To find out if the camera has any, take some photos with the camera, RAW format if you can, and at the lowest ISO setting it has. Take several photos with different colors and patterns in, then check at 100% on a computer screen. Dead pixels are always in the same place in the image and will usually show up as a different colored spot. Older cameras often have a few dead pixels, so it’s not a huge deal, but if there are more than a few, you should be wary, as there could be a problem with the sensor.
Shutter count is the number of times the camera has taken an image. As you can imagine, the shutter mechanism gets used thousands of times over the life of a camera, so the higher the number of the shutter count, the more wear and tear it has had on it. Camera manufacturers rate their cameras for hundreds of thousands of shots over its lifetime, but you don’t know if it will make it that far.
Check the expected life of the shutter on the camera you are looking at, and then check how many shots it has actually taken. You can find out this information by looking at a RAW format photo you have taken with it, and opening it in
PhotoME
, which is a free tool for finding information in an image – including the shutter count. You can also upload a JPEG photo to websites that will tell you the shutter count of the camera that took it, like
www.camerashuttercount.com
. The price of a used camera should reflect how high the shutter count is. The higher the count, the cheaper the camera.
It’s normal for cameras to have a bit of dust in the sensor chamber, but not huge amounts. Check the sensor chamber. If it is really dusty and horrible-looking, chances are you’ll end up paying for a professional sensor clean sooner rather than later. This should be considered in the price you negotiate with the seller.
You can generally tell if a camera has been carefully looked after and handled by the amount of scratches, dents and rubber peeling off you can see. However, most light scratches are merely cosmetic and have no bearing on the mechanics of the camera, so you can discount them. If there are any dents or deep scratches, it could be a sign that the camera has been dropped at some point. Yes, cameras are made to be tough, but we wouldn’t take a chance on one that had been dropped, unless it was very, very cheap. You don’t know what internal damage the impact could have caused. Sometimes the rubber on the grip or the back of the camera can start to come off through wear or being continually used in damp conditions. This can be fixed pretty cheaply, or you can even do it yourself.
This should be clean and in good condition, with no dents or damage. Check by putting a lens on and see how it fits and feels. It shouldn’t move around or feel insecure.
If it’s heavily scratched, you may need to replace it, and that doesn’t come cheap. Make sure it’s in good condition and shows an image accurately.
A quick way to check that your camera doesn’t have any issues with this by putting a lens on and using AF several times on different things. Check the resulting images at 100 % on your computer. Then take the same images using the live view option. Put them on your computer too and compare the two sets. You should see straight away if there are any glaring differences. Also, if the AF has trouble focusing quickly in good light, be wary of it.
HOW AND WHERE TO BUY A CAMERA
There are two schools of thought when it comes to buy a camera: either online or in person. If you buy from a local camera shop, you can handle the camera and play with the lenses and accessories in person. When you buy online, you have endless options of finding a good deal but might be going into your purchase blind without ever having felt the camera in your hands.
VS
Buying in person does not mean that you haven’t done your research online, it is best to take time to read reviews online, review all the features for the camera you are interested in and come up with some questions so that you can ask in person. When you go into the store, you can then ask all your questions to the sales person. Often, they love to answer questions in hope to sell you a camera.
More questions and concerns may come up in conversation as well and they may be able to show you features you didn’t know about. On top of all the one-to-one knowledge you can get from being in a store, you can also feel each camera and lens in your hands and the weight. The camera is a tool you use with your hands, so you want to make sure it fits right. Some camera stores will let you rent cameras, so you can take them out for a test run before buying it.
You can also rent cameras online (
www.borrowlenses.com
) to see what fits you best. Buying online can be a bit less time consuming but you may not get the one-to-one support necessary to answer all your questions. Some of the websites we recommend to purchase cameras and equipment include
www.bhphotovideo.com
,
www.adorama.com
,
www.keh.com
. Amazon and eBay are also good places to look but you will want to look into the details of the exact model you are buying.
Some cameras sold online are what we call grey market products. These cameras may be complete fakes that look similar to the real deal, often they are actual cameras, built by the cameras company but they may be import models that don’t meet all the specifications of the camera dealer. They won’t include warranties or be able to be repaired by the camera manufacture if damaged, so be cautious.
It is up to you to do your due diligence and make sure whatever camera you buy from whoever is in working conditions, that’s why you pay a premium when buying a camera direct from a company or one of its dealers and often it might be worth it.
WHAT IS THE BEST BEGINNER CAMERA?
There are many factors when thinking about the best beginner camera. As a strait quick answer: a small crop-sensor DSLR or a small mirrorless camera are going to be the best places to start for most people’s budgets. Things to consider are how much do you think you will be spending on lenses and growing as a photographer. If you are set on using your camera as a professional, investing in a DSLR or large mirrorless cameras will be important for the long run. You will be able to grow with the camera as you learn, and you won’t be stilted by any other shortcomings of the camera. But if you don’t have that kind of budget, starting with a cheaper DSLR or mirrorless and then upgrading the camera body later is probably your best bet.
When it comes to prices for the best entry level camera, any camera between $300 - $1.000 will be very similar in terms of quality of photo. In Canon
entry line you will see the rebel series such as the T3I, T4I, T5I, T6 or T7. These are the north American names for these series of cameras. Outside of the US, these might be called 550D, 650D, 750D… Nikon
entry levels includes the D3300, D3400, D3500, D5300, D5500, D5600… Sony
’s A line is a good mirrorless beginner camera, these include the A5000, A6000, A6300, A6500 and a lot more. Fujifilm
XA3, X-T10, X-T20 are also great mirrorless beginning cameras. Panasonic
Lumix
makes the G7, G85 and the FS1000, all great entry-level mirrorless cameras and the list could go on and will go on. Next year or next week for that matter, there could be additional models added to this list, so please take it to heart that any camera between $300 and $1000 is a great beginner camera. The higher the model number, usually means the more options or increased quality, so if you can swing it, go ahead with the higher number.
If you have a budget of higher than a $1000, you can start to look at the basic full frame DSLR and semi-professional mirrorless camera. Each camera brand will have a camera in the next tier. Unfortunately, it is not possible to tell you which brand and which model camera you should buy. But we will tell what the best camera for us is at the time and why we use it.
➢
Will.
My first digital camera was a Nikon D70. I remember at the time it was a big deal and I loved it. It was a wonderful beginner camera for me personally because I knew that I wanted to get into photography. I was also shooting for my school newspaper and it took the Nikon lenses that I had from my own film cameras from high school. So, for me a D70, at the time around $1.000, was perfect. Now I’m a professional photographer and I use a Fujifilm X-T2, is a mirrorless camera that has all the dials at the outside which is great for a beginner. The smaller brother of the camera is the Fuji X-T20, almost half the price, contains the same sensor, although it has a slower FPS and is not water sealed, it is a great camera for beginners. The reason I use the X-T2 now is because a lot of the accessories and lenses are cheaper than the Nikons, it is also smaller for traveling, which I do a lot, and it is lighter in weight for traveling and for shooting events and weddings. For caring a camera for 10 hours a day, it feels much better to have one of these around my shoulders then having a giant DSLR.
➢
Sam.
My first digital camera was the Nikon D80, which was actually a hand-me-down for my father. I was getting into photography and doing a lot of video stuff and he wanted to buy a new camera, so I was lucky enough to just take his camera which also came with the 18 to 200mm lens that I loved learning how to use and shoot photos with. Today, I shoot with a Sony A7R III, which I just recently picked up I’m still really putting it through its paces, but it is a great camera for me so far. I really like the Sony line because I do a lot of photo and video work, they are just really the best for me. For a long time though, I was shooting on the Nikon D800, this camera was tried and true for a very long time, but I’ve since moved to the mirrorless system.
➢
Phil.
My first digital camera was the Canon 7D, which was a great camera at the time because it had the video feature as well and for me that was really important. I wanted a camera that can shoot both, photos and video. That are the types of things you have to keep in mind when purchasing your camera. Do you want to be able to shoot video as well? Different cameras will be able to do that at different qualities. So, I really loved that camera and used it a lot.
Each camera is different for each of us, we all have different needs and use it in a different way. So, the camera is really specific to you and what you are going to do with it.
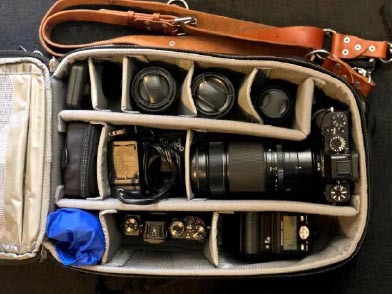
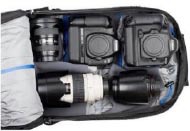
Each type of shooting needs different setups so there is a wide variety of equipment you may need or not need. Let’s see what is in our bags to get an idea of different needs.
a. In Will’s wedding bag
-
2x camera (1 with vertical grip)
-
70-200 zoom lens (2.8)
-
24-70 zoom (2.8)
-
85mm 1.4 portrait lens
-
35mm 2.0
-
flash and remote system
-
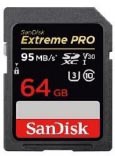
SD card holder with 4x 64GB SD
-
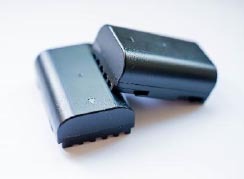
4x batteries and charger
-
rain cover for backpack
-
dual camera harness
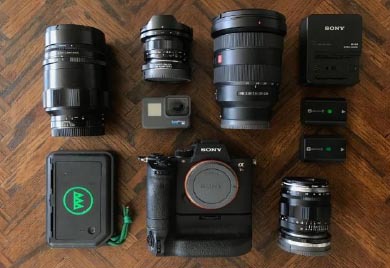
b. In Sam’s travel bag
-
camera body with vertical grip
-
35mm 1.2 with close focus adapter
-
super wide 15mm f4.5
-
65mm f2
-
16-35 f2.8 zoom
-
4x batteries and charger
-
2x 128GB SD cards
-
GoPro Hero 6
-
GNARBOX
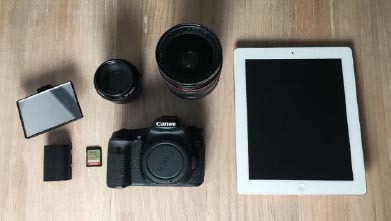
c. In Phil’s portrait shoot bag
-
camera body
-
24-70 zoom
-
50mm f1.8
-
internal flash diffuser/bounce
-
tablet (for client visualization)
-
1x 128GB SD card
-
1x extra battery
HOW TO BUILD A CAMERA KIT
Now that you know a bit about buying a camera, let’s talk about the next things you may want to purchase. Building out your first camera kit is always so much fun.
WHAT ORDER SHOULD YOU BUY EVERYTHING?
Start with the camera body. Obviously, you can’t go anywhere without the camera first. Often, when you buy a camera, the store or online store will throw in a kit lens, memory card, bags, cleaning tools… if you can get advantage of this stuff, it will always come in handily later. If your camera comes with a kit lens, often something like an 18 to 55mm, or middle-range zoom, that has an aperture that opens up to probably and F/4, this kit will be fine to get started with.
Then you only need to make sure you have enough memory, an appropriately sized SD card for the camera for the amount that you will be shooting. Next is batteries. Most cameras often come with one battery. You’ll want at least one extra, sometimes two extras, if you are traveling or starting to use your camera on jobs. This way you keep one battery in the camera and one charging, or when you go out into the field, you’ll have some backups for when your batteries dies.
If you didn’t get a bag with your first purchase, it may be time to start thinking about that. Bags can be underrated but it is a great way to keep your stuff together once you start collecting all your accessories.
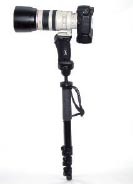
Depending on the type of photography you will be doing, you may need some other things. If you are shooting landscape photography, night photography or long exposures, you want a tripod. Photo tripods are fairly inexpensive, so they recommend getting one just in case.
If you are shooting portraits and photos of people, it might be time to look into getting a better lens than the kit lens. Ideally you want something that can open up to a wider aperture, perfect for lower light situations, and also getting that beautiful shallow depth of field. Most brands have a standard zoom lens around 24 to 70 that opens up to around a F/2.8, that would be great. If you are interested in getting a prime lens, look into a 23mm, 35mm or 50mm prime lens for your camera brand. The nifty fifty
lens (50mm) is one of the most recommend lenses as there are inexpensive options for most camera brands and these can open up to an aperture of even a 1.4. It is a great walk-around lens for your camera.
From here, it is really up to you. Start to accessorize, maybe find a strap you really like, thing about alternative lenses, start looking into basic filters, start looking into other photographers whose style you like and see what they use to shoot.
Now that we have a better understanding of what kinds of cameras are out there and a lot of the basic functions of your camera. Let’s talk about those big pieces of glass attached to the front of them and make all our photography possible: the lens
.
Lenses are crucial to photography, because they control how light reaches the camera sensor or film plane. They affect the look of your photos in several ways and ultimately, they can be considered as important, if not more important, than the camera body you use.
In this section, we are going to cover all things related to lenses. Why people pay so much money for certain lenses? And why other lenses can be great quality but not crazy expensive? We will talk about f-stops, which are also known as iris or aperture, what focal lengths are and how they affect your image, why would ever want to buy a lens that cannot zoom, the best lenses to start off with, and how do you grow your lens set over time, filters for your lenses, creative lenses like fisheye and tilt shifts, what lenses are best for different types of photography and more.
There is so much that goes into lenses and having a better understanding of them will greatly help you grow as a photographer and help you make better decisions when it comes to purchasing or renting them.
DEEPER DIVE INTO FOCAL LENGTH
To begin our discussion about lenses, there are two key ways that we as photographers use to describe what type of lenses we are talking about, whether it be to describe what lenses are in out kit or what lens we use to get that shot. The first, which we will cover in this lesson, is focal length, something we briefly mentioned in the composition section.
Focal length is one of the key elements of how we as photographers specify what lens we are talking about, especially when we referring to our personal kits. When talking about a 50mm prime lens, we just call it my fifty
, or a 24 to 70mm zoom lens is my 24 to 70
. These are all various focal lengths of lenses, the latter being a zoom lens which has a range of focal length.
The numbers of the focal length represent the measurement of the distance between where the light rays are entering the lens converge to make a clear sharp image from that point to the camera’s sensor. It is a complex idea to understand at first and ultimately knowing the difference of how lenses affect our photography is more useful than knowing how these lenses work. But, because we all want to become better photographers, let’s try to understand what is going on here.
Take your camera and point it on a subject, everything you see through your viewfinder or on the screen, is light entering your lens and hitting your camera sensor. In the diagram, you can see those light rays entering through the lens and converging. From there, the light continues to the film or digital sensor inside your camera. It is the same way your own eye works actually. This distance from where the light is converging to your sensor, that is the focal length.
Field
of
view
(FoV) will be mentioned in this lesson a few times too. It refers to how much you can see through your camera depending on which lens you are using. The 50mm is considered the middle focal length of lenses, this is because the 50mm has no distortion and is more or less equivalent to how the human eye sees the world.
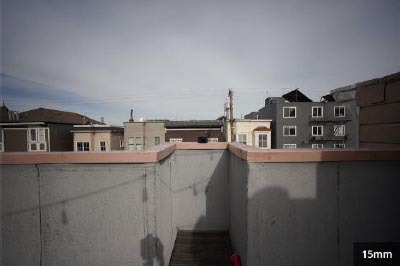
As the numbers of the focal length get smaller, we get into wide-angle lenses, what this means is that a wide-angle lens field of view or what you are able to see with them, becomes greater. You can see more when using a 35mm instead of a fifty but there is no change to the image overall look. When we get down to 24mm and below, you can really start to see the difference.
Wide-angle lenses
allow you to see much, much more from the same location. These lenses can start stretching the image adding distortions sometimes because they are greatly expanding what you were able to see. Where wide-angle lenses start to get kind of funky and sometimes pretty incredible is when you get wider than 24mm. From the 50 to the 24mm, most lenses remain relatively sharp in image quality, without getting crazy expensive, but when you start to get wider than 24mm, you will start to see distortion in the corners and edges, things become sharper and prices increases for pro level wide-angle lenses.
This distortion happens because the glass of the lens itself is bent or extremely curved. It is pretty incredible what really expensive wide-angle lenses are able to do but at the same time, it doesn’t mean you need to go out and spend a bunch of money to get one of them. Some people use the distortion of cheaper wide-angle lenses as a creative style or take a step further by using a fisheye lens, but we will talk about that later.

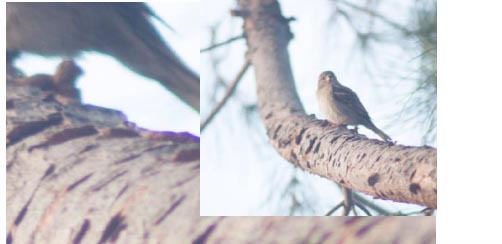
Let’s now jump to the other end of the focal length spectrum, which are numbered greater than 50mm, also known as telephoto
lenses
. Where wide-angle lens reveals more of increasing your field of view, telephoto lenses narrow your field of view but allow you to see things farther away in greater detail. As you increase your focal length, or go up in numbers, not only can you see farther away objects closer up, but you will also notice that your photos start to have a shallower depth of field. Where the wide-angle lenses enable you to capture many things in a single image, a telephoto lens will enable you to really focus on a single subject.
Now, similar to wide-angle lenses, the prices of ultra-telephoto lenses can get crazy, especially when getting up to 400mm and above. Typically, what you will start to notice when using more economical telephoto lenses is that they won’t be quite as sharp or crisp looking.
Now that we understand the difference between a wide-angle and a telephoto lens, let’s talk more about depth of field. It is ultimately how much is in focus or clear in your image. Typically, telephoto lenses achieve a shallower depth of field much easier. Whereas wide-angle lenses will have more in focus or larger depth of field. This is the reason that people love 85mm or above lenses for portraits, because the backgrounds have this beautiful look to them. Although there are recommended lenses for various type of photography, it is best to find a focal length or lens that you enjoy for the type of work you are doing. There are no rules in photography that aren’t meant to be tested or broken.
In this lesson, we will dive deeper into f-stops and lens options. By now you know that the two most important things that affect the overall look of your photo are the focal length and the depth of field, which relates to the aperture.
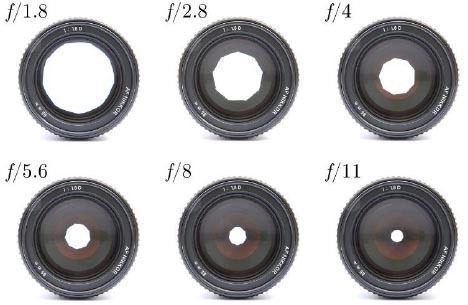
First and foremost, let’s review the mechanics of it all. When a lens is wide open, it means that within the lens, the aperture of the lens is fully open, allowing in the maxim amount of light possible. Now, as we close down or make the aperture smaller, we are reducing the amount of light allowed into it. This control of lights is measured in f-stops, numbers that you will use every time you pick up your camera and set your exposure. The lower the f-stop number, the more light is being allowed in. With each larger number, the amount of light allowed intro your camera is cut in half. So, when you are set to f/4 and go to f/5.6, you effectively cut the light coming in by half. Now, if you move from f/8 to f/5.6, you have doubled the amount of light that is entering your camera. You will also see that some lenses are f/3.5 and this is considered a half stop, meaning halfway between 2.8 and f/4.
Another term you might hear photographers saying, when someone asks how fast
a lens is, they are referring to the f-stop when the lens is wide open or the smallest f-stop number. So, a fast lens would be one that opens up to something like f/1.4 or f/2, a slow lens might only open up to an f/4.
Beyond the control of light, the f-stop also makes a huge difference in the overall look of your image. Remember from earlier that the wider open you are, the shallower the depth of field there is, the closer down you are, the deeper the depth of field and the more that will be in focus. Due to this, some people love shooting with a 24mm f/1.4 because you get really great wide-angle images but still that shallow depth of field. Additionally, some people taking photos that are on the telephoto lens prefer to close down to f/8 because more will be in focus and will be easier to get a clear shot. If you are shooting on a 200mm at a f/2.8 it can be really tricky to get a really nice in focus image if things are moving around.
Another thing to remember with this is that all depends on how close your subject is, the closer they are, the shallower the depth of field, and the father away they are, the more that will be in focus.
Now as you look around for lenses to purchase, you will notice that the ones that are f/1.4 are typically more expensive and ones that are higher than f/1.4 like f/2 or f/4 for example are much more economical. This is because the mechanics of building and f/1.4 lens is more difficult than one with a smaller aperture. You will also see on some zoom lenses, meaning lenses with multiple focal lengths, the aperture will range from f/3.5 to f/5.6 for example. This means, as you zoom your lens in, moving from wider focal lengths to more telephoto focal lengths, the f-stop will reduce from 3.5 to 5.6, effectively reducing the amount of light allowed to enter when you are at more telephoto focal length. This is again because the mechanics of having a non-variable aperture is more expensive to make.
One thing to know is that as you get into ultra-telephoto lenses, meaning 200mm and above, you will rarely see anything below an f/4, this isn’t because they are lacking in quality, but rather because there is so much glass in them that they require much lighter to expose properly. Also, if you remember how shallow the depth of field was at f/2.8, there really isn’t any need to go any lower because it would be near impossible to focus on anything.
METERING MODES (ADVANCED TIP)
Another important note is that outside of super high-end lenses the sharpest and best performance of lens will be around f/4 or f/5.6 and in terms of sharpness, we are not talking about being in focus but the quality the focus. So, shooting at f/4 will look sharper than shooting at f/1.4, even if the focus is perfect. This is by no means to say that you never want to shoot at f/1.4, it is just that the clearest image will come when shooting around f/4.
When you go out to purchase a lens, keep in mind that they will get more expensive as an aperture becomes faster and that not necessarily mean you need to go and buy the fastest lens you can find, you just need to purchase the right lens for what you are trying to do.
Most photographers will tell you that the lenses are more important than the camera. Good glass, and the right glass, can make or break pictures. Lenses that are 40 years old can outperform brand new ones when used right because of the quality of the glass. Lenses work by focusing a series of glass plates inside so that light (and the image) is reflected into the sensor a certain way. As camera sensors become more sensitive it’s become less about getting this 100% right.
Prime lenses have always produced sharper images which is why pros gravitated away from zoom lenses, the quality was always just shy enough that primes won for tack sharp images. This hasn’t changed, but with the improvement in technology more photographers are willing to consider zoom lenses for their convenience. Even third-party companies like Tamron and Sigma are producing lenses that outperform the big names in zoom and are almost matching in prime quality for a fraction of the cost.
Despite this, there are significant differences between the two lenses and how they work which may be the deal-breaker when choosing new glass. So, now that you understand the key specs for lenses, focal length and f-stops, it is time to talk about zooms and primes.
Primes or fixed focal length lenses are lenses that are just one focal length. Prime lenses have a fixed focal length which means that the viewing angle cannot change unless the photographer moves. The focus can be adjusted but the frame of the image cannot. The only way to enlarge your focal point is by moving closer or further away from it. A 50mm prime or a 35mm prime are just that, a 50mm lens or 35mm lens. There are many different focal lengths and some of them also have extra features like fish eye or telephoto because of the type of glass inside. These lenses come in a wide range of sizes and while they are typically more compact, lighter and faster than zooms, some are as heavy and big as other zoom lenses and although it might seem like a zoom would be the better option since you get multiple focal lengths, prime lenses are preferred by many professional photographers. Typically offering better image quality, bokeh and overall performance. You can find relatively cheap prime lenses that have amazing quality.
Prime lenses sometimes have the option to set aperture, for example f/1.4-1,8, f/1.6-5.3 etc. You can shoot using any aperture setting with a prime lens as this won’t affect the focal length and you’ll still have the same framing. The issue here is that the f-stop number may also depend on the camera sensor size and are not necessarily an accurate description. For example, a 50mm prime lens on a crop sensor camera is actually the view of a 75mm prime lens on a full frame sensor. While the focal length and aperture may be the same, the sensor of the camera interprets this differently.
ADVANTAGES OF PRIME LENSES
Each type of lens has its use which is why there are advantages to both. For prime lenses there are several reasons users may prefer them over a zoom lens.
-
Cost.
Prime lenses are usually cheaper than zoom lenses, with the cheapest costing less than $100 for most brands. Even if you buy multiple primes to cover the focal range of a basic zoom lens you will still end up paying less overall. This means that compromising by buying cheap zoom lenses isn’t worth the money when you can buy several good quality primes and cover the exact same range, though the downside is the inconvenience of having multiple lenses.
-
Image quality.
You can get better prime glass than zoom lenses simply because there isn’t as many moving parts. Because of the fixed focal length, the glass inside has to be extremely precise. While this precision means sharp images newer zoom lenses can match this, the problem is that they cost an awful lot more. Unless you’re buying top of the line zoom lenses you will never get the same tack-sharp images that a prime can achieve.
-
Size.
Primes are usually much smaller and lighter because they don’t need as many components. The motor design is much simpler, so it can be made smaller, and even if there’s no motor in the prime lens there’s simply less “stuff” in there. Size matters for many reasons, you only have to see how popular mirrorless systems are. The heavier the lens and the camera the harder it is to hold still for long periods and the less you want to have to carry it around. The only issue with this is that by the time you add several prime lenses you’re still carrying significant weight.
-
Ease of use.
Having only one focus ring, and often only one aperture, means that the learning curve for a prime lens is much easier. There are also many that believe having to physically move to adjust the focal point also teaches you better framing, however, it can also be limiting since you cannot see how the image would look with a wider or narrower depth of focus. A zoom lens allows you to pick the perfect framing without moving or adjusting any setting other than the focal length.
-
Aperture.
The wider aperture also means that low light situations are much easier to capture without getting blur. Prime lenses can go below f/2.8 which even the fastest professional zoom lens struggles to reach. At f/1.4 you’re getting double the amount of light by using a prime lens. Most fixed prime lenses have a wide, fast aperture. This means that you’ll get better light and a shallower depth of field. This creates the bokeh or blurred background with only the subject in focus that many create artificially in post processing. It’s why the 50mm prime lens is often the next step for those who have bought kit lenses having smaller apertures and cheap optics.
DISADVANTAGES OF PRIME LENS
If prime lenses were perfect no one would carry anything else. There are situations when a prime lens simply can’t do the job of a zoom.
A prime lens having a fixed focus means that you have to move or swap lenses to get the right framing. It can also mean having to spend the time in post-production to do that if you can’t make it in camera. By adding time you’re also limiting your ability to capture split second shots. You may miss a shot or damage your camera in haste trying to change lenses. There’s also a chance that dirt and dust can get in while you’re changing lenses. Another inconvenience is that you’ll have to carry many lenses to make one zoom lens. This means carrying a bag, and more weight than necessary.
Zoom lenses or just zooms are lenses that have a range of focal lengths. Unlike a prime lens, by turning the focal ring you can make the subject bigger or smaller and change what is viewable within the frame without moving yourself. The object can be zoomed in bigger or zoomed out smaller just by spinning the ring inwards or outwards to refocus the internal glass within the zoom lens. Zoom lenses are typically larger and heavier.
The term zoom lens and telephoto lens are semi-interchangeable. A telephoto lens means one that has a longer than normal focal length, but it does not mean that it has a variable focal length. It’s common for people to refer to a long focal length zoom lens as a telephoto lens, and while this is true, it’s also possible to have a telephoto lens which is a prime.
A zoom lens has two focal lengths listed on it to show the maximum and minimum range, like 70-300mm. This means the lens can have a focal length of any number between those. Most consumer grade zoom lenses also have an adjustable aperture, though it is limited at the maximum focal length. Most professional zoom lenses, however, have a limited maximum aperture for the whole focal range, for example 18-200mm f/3/5 compared to a professional 70-200mm f/2.8. At best, they open up to around f/2.8. The more economical zooms will be f/4 or f/3.5 through 5.6. Their quality can be very good but typically not as good as primes. More economical zooms will have worse quality than more economical primes typically. Most common zoom lengths, at a pro level at least, are 16 to 35mm, 24 to 70mm, 24 to 105mm and 70 to 200mm. There are many combinations of zoom lens and you can’t measure quality based off of zoom range.
Zooms are great because they give you plenty of options when it comes to composition, standing from one spot. This is especially great for travel photographers and when out and about with your camera not knowing exactly what you will be shooting.
ADVANTAGES OF ZOOM LENSES
Zoom lenses do have their merits. Despite being bulkier, heavier, and often more expensive there’s simply a convenience to not having to carry multiple lenses or swap them when you want to change focal length.
-
Versatility.
The simple fact is that a zoom lens is several prime lenses in one package. One zoom lens can do the job of several. This means you can go from a wide scene to a telephoto image in a fraction of a second, while changing lenses would take a minute or two and very likely cause you to miss the capture. For some types of photography, you simply can’t afford to risk losing that minute.
-
Stabilization.
All the large brands now have image stabilization, either in their lenses or in their bodies. Thanks to this you don’t have to worry about the minor shake from the elements focusing or camera shake from pressing the shutter. Image stabilization counters everything at the slower speeds so that you can still get sharp images. There are a few prime lenses that have stabilization technology, but the technology is moving into the sensors and bodies rather than lenses, so this may soon be obsolete.
-
Convenience.
Zoom lenses are more portable because you only need one zoom lens. By not having to carry multiple lenses you don’t have to have a big bag and can even get away without one. Less weight is better on your back, and you’ll also be doing your camera a favor by not swapping lenses constantly. This means less opportunity for dirt and dust to get into the camera and less getting on to the sensor (and mirror if you have one).
DISADVANTAGES OF ZOOM LENSES
A quality zoom lens can perform just as well as multiple primes, the issue is the cost. Unless you’re buying top quality zoom glass, you’re not going to get images that are of the same quality as a prime lens can offer. The cost is simply prohibitive for the average photographer while buying several prime lenses over time is a lot easier on your wallet.
If you’re questioning your next lens purchase, then it’s probably because you’re moving up from a kit lens or looking to expand what you’ve already got. The biggest thing is going to be your subject matter. For most portrait photographers a prime lens is a much more suitable investment, while a landscape photographer may also be best served by a wide angle prime.
-
Landscapes
. Wide-angle lenses are an essential part of shooting landscapes. While there are a few limited wide-angle zooms they are not common. They also might not suit every situation, but the wide-angle allows more emphasis on the subject – a wide landscape which fills the view rather than a central figure. A standard prime lens is suited for more “true to life” images and focusing on foreground elements. A zoom lens on the other hand allows you to bring elements of the landscape closer without having to physically get closer, a real advantage if it would be impossible to do so.
-
Portraits
. Most portrait photographers will tell you the majority of their work uses prime lenses. Portraits are an art, posed, and not rushed which means there’s plenty of time to change lenses to get the right frame as long as the image is sharp. There are almost no instances of portraiture where a zoom lens wins. Even for things like wedding photography, where you may be looking at split second images the speed of a prime lens wins.
-
Travel
. When it comes to traveling, you’re often taking once in a lifetime or split-second images that you don’t have time to worry about swapping lenses or you don’t know the area well enough to get close for the right framing. A large zoom lens and a DSLR camera stick out though, and if you’re worried about theft a smaller prime lens is much less inconspicuous. Travel, like landscapes, depends a lot on your expected subject matter. A city experience will likely have less need for a wide-angle prime lens, but a small zoom lens will add versatility compared to taking multiple primes.
-
Video
. Most cinematographers prefer prime lenses. This is partially because they’re cheaper, and while most videographers can only dream of a $100k zoom lens for cinematography, budget still rules on most film sets. Much of this comes down to the type of film being shot and the look that you’re going for.
Primes are used much on film today, while before they were the only choice. The advantages of shooting video with a prime are the same as for stills – cost, portability, sharpness, and fast apertures. Many high-quality zoom lenses are just as good as primes these days, and when you take into account most film budgets then a quality zoom lens may be worth more, easier to shoot with, and more versatile than several primes.
Both, zoom and prime lenses, have their advantages, and most of it comes down to what you’re shooting, your preferences, and your budget. There isn’t a real answer to the question whether prime or zoom lenses are better because there are advantages to each. While zoom lenses used to be inferior, if you’ve got the money to spend on them a high-quality zoom can easily outperform a cheap prime.
Now when it comes to building your own kit, money does play a big role in this because lenses aren’t cheap. One thing we want you to know is that while cameras are important, you can always upgrade your camera body later on. But ideally you can keep using the same lenses regardless of what camera you get. This is why people typically become loyal to only shooting Canon, Nikon, Sony, Fuji, etc. It is because even as they upgrade their cameras, they are able to keep using the same lenses. You can buy adapters that allow you to put a Canon lens on a Sony camera for example, but that extra piece of equipment is typically pretty cumbersome, and the adapters greatly slow down your cameras autofocus and take away from any weather sealing you might have.
WHAT LENS SHOULD YOU BUY?
So, assuming you have a camera in mind, what lens do you get? A zoom with a big range is a good place to start and typically the most economical will be the kit lens which the manufacturer will offer at a good price with the camera. As you progress as a photographer though you will outgrow this lens and realize that there is much better quality out there. Getting a wide-angle lens and something that is more telephoto is usually the next step, you want to be able to cover a range of focal lengths with your kit. So, if your kit lens is an 18 to 55, you might want a telephoto lens that is something like a 70 to 200. You might also want a wide-angle that is somewhere around 10 to 24.
But just because you have a zoom that covers a particular focal length, doesn’t mean you shouldn’t think about getting a prime lens as well. For example, the 50mm is a great prime lens to start out with for any photographer. If you want a decent all-around workhorse, you can’t go wrong with the 24-70 f/2.8 or 24-105. From there, it depends on what kind of photography you want to do.
-
If you are passionate about portraits
, get a prime lens somewhere between 50mm to 135mm.
-
If you are traveling
, a zoom lens might be the most practical, because you can just bring that one lens. While traveling, a discreet prime lens like a 35mm, get some of the best images because it is smaller, and people don’t seem to be as bothered by it. If it is a f/1.2, it will allow you to get great images in low light which a zoom couldn’t. Plus, it is easier to pack and carry around.
-
For landscapes
, you will definitely want a wide-angle lens to capture large wide-open landscapes, wider than 35mm. Try to use a telephoto lens too, so you will get those detail shots as well.
-
For street photography
, undoubtedly a compact prime lens is the way to go but focal length is dependent on your style, if you want to get up close and personal, a wide-angle is better for that, but if you want to stay farther away, a telephoto lens is best.
-
For nature photography
, you might realize you want an even more telephoto lens, more than 300 or 400mm to get that right shot of the bird or animal far, far off in the distance.
There are photographers who feel an intense need to cover every focal length possible, and if that’s you and you want that versatility there’s nothing wrong with it. There are also people who don’t mind overlapping focal lengths a bit and a wide range of lenses do overlap (especially if you’ve got different brands). Missing out on a few focal lengths, or having a small gap isn’t going to make a big difference. Simply moving a few feet will fix that. For someone who wants a huge range of coverage they may want to buy: 14-24mm, 24-70mm, 70-200/300mm, 200-400mm. These lens set is more than enough to cover every situation. These are all zoom lenses and will add up both in weight and price. For someone who doesn’t mind overlap a 16-35mm, 24-120mm, and 70-200mm is a suitable lens kit.
Some photographers also prefer to use a specific type of lens. For example, a wide-angle lens isn’t necessary for landscape photography though it does often give better perspective. Some photographers simply don’t like them, and rather than just buying a lens set with a cheap wide angle which may have lots of distortion they would prefer to wait until they can afford quality glass to get a good one. Preference is also about priorities. If your priority is getting the hang of focusing and using your camera then the lens set that comes with most beginner bodies is suitable enough, the real question is when you want to move on.
In terms of quality, cheap doesn’t mean good, and expensive doesn’t necessarily mean you’re going to get better lenses. Some old lenses have great glass and can be picked up for a fraction of the cost of the newest versions. However, quality may mean extra features like weather sealing, metal casing, smoother focusing, and better glass quality or coatings. Quality can also relate to the images produced. Good glass = good images, and especially when buying third party lenses the lack of coatings can lead to chromatic aberration and images that just aren’t as sharp as the more expensive brand versions.
While it goes without saying you need compatibility with whatever body you have, many third-party brands like Tamron and Sigma provide just as good quality at lower costs. What your budget is doesn’t matter so much as getting the right items since you can always trade up later.
All lenses have internal elements that move, if you’re buying a manual lens that means you have the ability to adjust these to get a sharp image. For beginners an autofocus lens is one less thing to think about as the lens can take the guess out of focusing.
Just like focal length, an adjustable aperture allows for low light photography and shallow depth of field. While most lenses have an adjustable aperture some cheaper versions and lens set kit lenses don’t bother with it. This is also something as a beginner that might be skipped if money is the most important part.
If you can, one of the best things recommend is to rent lenses. There are many good companies out there where you can rent every lens imaginable for short and long periods. This is the perfect way of figuring out your lens set without having to buy and return equipment you don’t like. This may end up costing more in the long term, but it will broaden your options until you can narrow down what you actually want to own.
As you can see, there are a lot of decisions to make when it comes to building your lens kit. Start slowly, experiment, see what types of photography you like and go from there. A lens set isn’t easy to figure out, especially when you’re not experienced enough to know what you’re going to need. Your first lens set isn’t likely to be the one you stay with, and even if it takes two or three buys to get lenses, you’ll eventually figure out what works for you and what doesn’t. Even if you’re a bit off you can always fix it in post-production.
BUYING USED CAMERA LENSES
The savings you can make on buying used lenses is the most obvious (and some will say the most important) factor. This is certainly true, especially as you can buy more lenses for your money than if you were buying a single new one. There are other good reasons, though, such as if you have decided to switch camera brand systems, or you want to try a different system out.
You can pick up a decent used camera body and lenses for a different system for a lot less than if you bought them new. Older lenses will of course be cheaper than their newer generation counterparts, but even the newer ones will cost significantly less than they would new.
As with buying used camera bodies, there are many reasons to be wary when buying second-hand gear. There are scammers around who will try and rip you off, so you really need to buy your second-hand gear from a trusted source.
You also need to be able to test the lens properly before you agree to buy it, as there is no way you can tell if the optics are defective until you’ve tried it on your camera. If the seller refuses to let you test it, or becomes defensive about it, walk away. It’s best if you ask them up front if you can test it before you even go to see them. Although most of the sellers have good intentions, lenses have lots of delicate parts, and however carefully they’re packed, they could sustain unseen damage from rough handling during shipping, when buying online.
When you go to look at a potential new lens, you should have a good look at the condition it’s in, both inside and outside, before you do any tests. So, look out for these things:
-
Is it scratched and dented?
Small, cosmetic scratches and wear shouldn’t be a problem, especially if it’s a pro spec lens, but if it’s carrying some major dents and nicks then that is an indicator that it’s been handled less than gently, and it may have some problems lurking inside. We wouldn’t buy such a lens, but if you really want it, make sure that you give it a really thorough testing on your camera.
-
Aperture blades
. Inspect the aperture blades with the lens off the camera. Check the front and back of the lens to make sure they appear normal, and that there are no small nicks missing from them.
-
Check any switches and buttons
on the lens, such as the AF/MF switch, to make sure they work and don’t get stuck.
-
Filter threads
. Take a filter with you that will fit on the lens and see if it screws on and unscrews smoothly. If it’s cross-threaded, and you have difficulty putting on or removing the filter, you’ll have to make a judgement call on whether this is a deal breaker for you. If you use filters a lot in your photography, a cross-threaded filter can quickly become a real pain to constantly deal with.
-
Handle the zoom and focus rings on the lens
. The zoom ring should never be really loose and offer no resistance at all and check both rings by turning them through their entire scale. Be wary of any physical damage to either ring.
-
Give it a gentle shake
. That way you can tell if it sounds like something could be seriously loose inside. If you think there is, then walk away unless you’re prepared to pay a professional to fix the lens somewhere down the line when it breaks.
-
Look inside
. Shine a flashlight through the lens, and you should be able to see any scratches and dust, or worse still, fungus or mold. There will always be a few dust specks in a lens, but large amounts of dust or dirt are a big no.
-
Check the lens coating and condition of the glass
. If there are scratches on the glass, or damage to the lens coating, don’t buy it.
-
Put it on your camera
, set it to aperture priority mode, and take some shots. If you don’t get a picture, or if the quality is terrible, then you’ll know immediately that it’s a dud.
-
Check the autofocus if the lens has it
. Focus on a close object, take a shot, then focus on a distant subject and take another shot.
-
If you are testing a zoom lens, go through all the focal lengths
to check the autofocus works on each of them.
-
If the lens has image
stabilization
, turn it on by the switch on the side of the lens, and take some shots while hand-holding the camera to make sure that the stabilization works.
-
Sharpness
test
. Do your research on the lens before you go to see it. Find out which apertures and focal lengths it performs best and worst at. You can discover this from the many reviews of specific lenses on the internet. Then test the lens you’re thinking of buying by shooting at these apertures and focal lengths, and carefully examining the results to see if it’s still as sharp at these settings as when it was new.
-
Check
the
autofocus
accuracy
. Focus on a subject with the AF on, and see how sharp it appears. Then do the same with live view on and compare the two shots. If it’s way off on the AF shot, then you have problems.
BUILDING YOUR LENS SET OVER TIME
A lens set is expensive. Photographers often spend thousands on a single lens so it’s no wonder people often prefer to build things up over time. It’s quite likely you’ll outgrow your first lens set or buy something you just don’t like. After owning some lenses for a while, you may find you rarely use them.
The best part about lenses is that they’re often an investment. You won’t get all your money back, but you can get some of it back, and that simply goes towards a different lens that will work. There is nothing wrong with switching out your entire lens set, and there’s nothing wrong with continuing to use the same lens you started with. If it’s working for you then there’s no need to buy new unless you want a technology upgrade.
Depending on the camera manufacturer, image stabilization might have a different name. It is, for longer telephoto lenses, within the camera it is helping keep the glass steady and even some cameras nowadays have this built into their sensor. All what it is doing is helping you get a steadier shot and any little movements from your hands, it reduces that, so you have a steadier shot throughout. This is something that can typically cost a little bit more for lenses, but it is of great benefit if you are using those longer telephoto zoom lenses.
Specifically, if you are trying to get into sports or wildlife photography, it is highly recommend investing a little bit more money into a lens that offers image stabilization of some sort. If you do decide to get one of these lenses or you have already purchased one, typically, on the side of your lens, you will find a on and off switch, what this enables is that when you turn it on, the image stabilization will be on and you will be able to notice the difference, you turn it off and instantaneously you should notice a big difference. One thing to know, if you do have it on, it will use up a lot more battery life from your camera.
CHROMATIC ABERRATION (PRO TIP)
Chromatic aberration or color fringing is a common issue that people have when using fast primes or more economical lenses. Typically, you will notice it when shooting in high contrast settings and can be fairly subtle at times but incredibly annoying. It can also make your image look slightly soft and have slight colored edges around things in your photo. There are two causes of chromatic aberration but for the most part what is happening is that as the light passes through the lens, due to poor optical performance, the light is dispersed unevenly, and all the colors don’t land on the sensor or film plane correctly.
The two kinds of chromatic aberrations are longitudinal and lateral. Longitudinal
chromatic
aberrations
occur most often in fast primes lenses, even higher end ones, when wide open. Camera technology is constantly improving though, and some cameras have built-in systems to reduce the chromatic aberrations that occur with lenses. Additionally, you’re able to remove this kind of aberration by either stopping down to a slower f-stop or can remove them in Lightroom or other editing software.
Lateral
chromatic
aberration is a bit harder to get rid of and typically occurs in lower quality, more economical lenses. It occurs because as the light move through the lens, some wavelengths of colors focus on different parts of the focal plane that the majority of other colors. It mainly occurs in the edges of the frame, not in the middle and can only be removed in a post-editing software like Lightroom. While some might not notice this when looking on their camera, it will be much more noticeable when looking on your computer or when printing.
At the end of the day, chromatic aberrations can lessen the quality of your images overall look and be frustrating as a photographer. While knowing the science behind it is interesting, knowing how to fix it is far more important. It’s another reason to invest more in your lenses than your camera.
Back in the days of film filters were sometimes the only way to get a certain “effect”. They could do amazing things like make stars from any light source, soften the image, or turn it a variety of different colors. Today, most of the job of filters is done in camera, but filters are not only still relevant, they’re a marvelous “trick” that some photographers haven’t bothered getting to know. They can be indispensable in some situations or they can just be there to protect your lens from dirt or scratches.
Filters are, at a basic level, a piece of glass or plastic that we typically place in front of our lens, either with an adapter or by screwing it into the front. Often, they improve our images while shooting so we don’t need to edit them in post. This enables us to make certain colors pop more, reflections disappear, darken only parts of our frame and much more. Filters are a bit like glasses for your lens. They can help the camera “see” better in intense light, reduce glare, reduce the amount of light, and enhance colors, or change colors. Sometimes filters aren’t helpful, like wearing sunglasses at night. So, it’s not just about using the filter but about using the right filter and knowing when to remove it. Essentially a filter is a piece of coated or colored glass inside a frame, and they can cost anywhere from a few dollars into the hundreds.
The type of photography you do tends to dictate whether you need filters or not. Landscape, architecture, and weather photographers rely heavily on them, while those capturing street photography or animals rarely need them. Many tools in post processing programs mimic filters so there are plenty who question any need at all, but there are types of filters which just can’t be copied on the computer.
Filters are usually made of either glass or resin, and the quality of glass and whether it is coated or not makes a big difference in the image. Glass filters are better quality but are easier to break, especially when they are square or rectangular which is why many of those use resin instead. There are also some made of polyester and polycarbonate which are thinner and more scratch resistant respectively.
There are four main types of lens filters, with the most common being those which screw onto the end of the lens. They come in a variety of sizes to match those lenses and have different ways of mounting onto the lens. The exception is gel filters which don’t mount to the camera at all and mount onto studio lighting to create colored lighting effects.
-
Circular screw-on filters
. This is the most common type of filter, and often the cheapest. These thread directly into the threads on the end of the lens and have a corresponding size to the lens, for example 52mm, 72mm etc. The most common are HV, Haze, CPL, ND and color filters. It is possible to put more than one filter on at a time, but the thickness may cause vignetting, and other styles may have to be removed again before capping the lens.
-
Square filters
. They are less common, but these are usually mounted to a square holder on the lens threads. These are usually 3×3 or 4×4 for larger cameras and can be stacked, though this impacts image quality just like stacking circular filters.
-
Rectangular filters
. They are like square filters but a different shape. Graduated ND filters don’t work well in a circular size, so this is often the more popular choice for landscape photographers since there’s more room for adjustment.
-
Drop in filters
. They are used for longer lenses or super wide angle and are used inside the lens between it and the body rather than on the front of the lens. These do not have as much variety as the other types.
Unless you want to buy multiple filters you’ll also need step up/down rings. These act as a converter so that your filter can fit on different lens sizes, you can stack these but there’s a large chance of vignetting even by using a single one. They are available in all shapes and sizes and can often be found in a kit that varies from X-Xmm sizes.
One thing to know about filters is that you need to make sure they will fit onto the front of your lens. The filter size in millimeters needs to match the size of your lens. It is important not to confuse this with the focal length of your lens but rather the diameter of the lens, which can be found written on the end of most lenses with the O with a little slash through it. You can buy adapters if your filter is any larger than the front of your lens but not if your lens is larger than the filter.
There are many types of filters, as we will see now, but to start out, definitely purchase UV filters to protect each of your lenses, then move on to purchasing other filters if you want to get more creative.
The filter that most of us will use initially is the UV filter. The UV filter or ultraviolet filters are most commonly known as a way to protecting your lens from dust, smudges, scratchers and whatever else could potentially damage your lens. The concept is that instead of risking something damaging the front piece of your expensive lens, it damages the hundred-dollar filter instead. Beyond that, UV filters shouldn’t have any effect on your actual image. So, they are generally used for protecting the front glass of your lens. While they used to help keep out unwanted sun rays, ultraviolet light, which could damage film elements, DSLRs now have a UV/IR filter built in so there’s no longer a need for them.
In terms of filter brands, we recommend Tiffen, B&W or Hoya filters. If you’re buying a clear filter, look for one that has multi-resistant coating. This helps keep the image clear and stops reflections and ghosts from poorer quality glass. Not all photographers like using clear lenses, and you should avoid stacking these as there is a high chance of vignetting with more than one.
The second most common filter would be the polarizer. There are two types of polarizing filters you’ll come across, circular (CPL) and linear. Linear filters are not suitable for DSLR cameras because they can cause false readings on the metering, while a circular version adds a second glass element that creates a diffusion between the two.
The element can be turned in a CPL so that when they are aligned the colors are more saturated, reflections are muted, and the image is better contrasted no matter how your camera is tilted, or the light enters. Polarizing filters are also good at removing haze and are essential for landscape photographers to get those extremely blue skies, consider all the light that bounces off the sky, you can help reduce this making the skies seem bluer. Typically, you can use these to take out reflections in glass or on large bodies of water. They reduce the light entering your lens so make sure there is plenty of light when you are using them.
The issue with a polarizing filter is that you do have to adjust it for each situation. The maximum effect is at 90 degrees to the sun and usually the filter is marked on the threads showing the direction of increased/decreased effect. The maximum polarization effect is often too strong and can cause the sky to become almost black. A polarizing filter should not be used on wide angle lenses because it creates a dark distortion in part of the sky because of the way the lens works. When using a polarizing filter, you’ll lose about 2 stops which can affect your shutter speed, and because they are thicker than other filters, they are also more likely to cause vignetting.
Neutral density (ND) filters are another fairly common filter. These filters also act like sunglasses for your lens, they reduce the amount of light coming in so that your shutter speed can be increased, and your exposure time decreased without having to change lighting, so they are great for long exposure photography during the day. ND filters come in a variety of stops to darken different amounts based on the situation, they move in a scale of 0.3, 0.6, 0.9, 1.2, 1,5, 1.8… all the way to 5.0. With each increase of 0.3 equals to one stop of light. For example, if you’re photographing moving water like a river you may have a good daylight ISO of 100, a shutter speed of 1/2000 and an f/2.8 aperture, and this will give you good exposure but not the blurring for a great image. Even adjusting the stops to f22 won’t affect the shutter speed enough to get motion blur so by adding an 8 stop ND filter the shutter speed can be dropped to 2 seconds without having to drop the aperture down too much and lose image quality.
With ND filters you are able to shoot with a slow shutter even if there is a lot of light out. This results in a cool motion blur effect, great for photographing water, moving clouds and other motion during the day. You can also get variable ND filters that have a range of darkness all in one filter, you just spin them, and the image gets darker. If shooting in aperture priority or anything by using this filter it is not going to affect your image because the camera will adjust the shutter as need be. So, we have to use manual mode. These filters are great if you want to use a slower shutter speed during the day and be able to long exposure. They are good when you want to use really specific settings of ISO, shutter speed and f-stop to just change the map light that is able to come into your lens. A good option is the ND 10 “big stopper”, made by Lee filters.

Neutral density filters can also come in a graduated type (GND) where one half of the filter is clear. Since most images have different sky/foreground requirements a graduated ND allows for only part of the image to be stopped down. These always come in a rectangular shape, but this allows you to stack multiple filters without dealing with alignment, but it can add vignetting, especially with focal lengths less than 35mm. GND filters also come in hard edge variety where the horizon line has a very strong and contrasted ND to darken the sky while leaving the foreground light, such as in this image. This only work when the horizon is straight and a soft edge GND provides a much less severe line and is more flexible for the horizon line.
There are also now reverse GND filters which have a dark and hard horizon line which gradually softens. These are designed for sunsets where the sun may be very bright, but the sky is not which will leave you with a choice to overexpose the sun to get the sky or underexpose the sky. These allow for a more balanced result where both can be stopped differently simultaneously.
-
Creative filters.
These filters are great for preventing the need or desire to do a lot of post-processing on your images in the editing room.
-
Gradient filters.
Gradient filters are basically half normal glass and half filter. There are a number of types of gradients, but they are most commonly used for photos with sky in them. The top half would typically filter the sky either darkening it or changing the color and the bottom would remain unaffected. With this you can have more balanced exposure if the lower half or your image is in the shade and the top half is much brighter.
-
Color correction.
Color correction filters actually change colors in your image either tinting the entire image or making certain colors pop more. These are used to fool the camera’s white balance into giving a warm or cool exposure. There are two different types of color filters though, others can add color so that only that color is visible (though these were more used for film and aren’t really necessary with post processing now). These aren’t used as much because modern DSLRs can adjust all this “in camera” without need for filters. These are especially great with nature or landscape photos, when you want blues or greens to pop more.
-
Cross screen/star.
Another fun filter would be the cross screen or star filter. There are pretty straightforward, they transform any light source into a star shape. There are varying types of these and can have various looks to them.
-
Close up.
They are more of a lens than a filter, they’re the poor man’s macro lens which attaches to another lens for macro images. These do tend to give poor quality images and they’re not very useful overall as they won’t really create enough of a focal difference to get a real macro effect.
In this lesson, you will learn about specialty lenses like macro, tilt shift and fisheye lenses. These lenses, each have a unique look to them and are great for photographers who have a specific project or style of photography. If you think you are interested in using them, rent one and lean how to use it first.
The word macro is used in a number of ways generally meaning large, but for our purpose, it is the idea of making something very small seem largen than life. A macro lens enables you to do this by allowing you to focus extremely close to an object. Seeing every little detail and then when printing or viewing on your screen, the object seems huge. Macro photography is really the art of detail, almost like looking at things under a microscope. The tricky part of macro photography is that because you are so close to your subject, the depth of field is incredibly small. Every photo is very detailed and most macro photography and lenses have the ability to focus up close, but they are also normal lenses, so really, they have dual purpose.
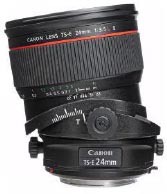
These lenses are really something incredible. On one side, they have marking that are the tilt and the shift of the lens. The shift allows you to move the lens side-to-side, helping reduce distortion in wide-angle lenses. The tilt allows you to actually angle the lens in different ways to change where your plane of focus is. This is creating a sliver of focus across your lens which has been popularized on Instagram with the tilt shift effect. These lenses also get that awesome miniature world look when shooting from far away and up above. These lenses are a favorite of architecture photographers because you can eliminate any distortion that you would get from a typical wide-angle lens and also an awesome way to get very unique images of cityscapes or places with lots of people.

Lastly, we have fisheye lenses which have become slightly less popular in recent days but still serve a purpose and are definitely a favorite of some concept photographers. These are extreme wide-angle lenses typically around 10mm or even wider and have crazy distortion to them curving on every edge to give a circular look to the image. They allow you to get incredibly close up while still seeing a lot and are way less expensive than some high-end ultra-wide-angle lens that doesn’t have any distortion. A nice thing about these is that you can always crop in afterwards or use a software to slightly correct the distortion if you want to. They are great for crowded places where you want to be able to see as much as possible or if you just want to creatively, use that curved look. They are typically a bit slower though you will rarely find them any faster than f/2.8.
HOW TO CLEAN A CAMERA LENS
Cleaning the lens, meaning the glass of the front of the lens and the back of the lens, is something usually done before a big shoot or a job. Even the smallest little spot could mess up your photos. You could fix it in post, but it is really good practice to get in the practice of just cleaning your glass.
To start, use a blower, you can squeeze it and it will blow air out, usually it has a plastic tip, so it does not hurt the glass. It is the best thing to start with if you are just trying to get dust off. You want to minimize the amount you’re physically touching the glass. It is also preferred over compressed air which can sometimes be too harsh, it is bigger to carry around, you have to rebuy it every time and it creates some moisture if you are angling incorrectly. Start by just blowing across the glass to see if you can knock off any dust particles.
The next thing that we need is a microfiber cloth which comes in a lot of cleaning kits and it is specialty cloth that is really for glass or your phone or any screens. It works well on lenses, nothing will come off it, you won’t see any fibers. You will do circles lightly doing some little spins. Then, use some lens cleaner solution. Do not spray directly onto the lens but onto the cloth itself so it is moist, and you will do the same thing, rotate clockwise. Then, with the dry part of the cloth, dry it off, pick up any other loose change on there. If there are still something on it, blow it off.
Sometimes there are some tine little speck that get caught between sort of the glass and the housing of it. For clean it, you will use a lens cleaning pen, pushing it out or twisting it out and you will find little tiny fibers to get there without hurting your lens.
Don’t forget there is glass at the back of your lens. Take your lens off and protect your sensor with your port cap to not leave it open so that no dust can get in there. To clean the sensor, you should have a professional do. With the back glass, just do the same thing: blow, use the dry cloth side, then the wet side, the dry again, blow and use the lens cleaning pen.
11. EQUIPMENT: ACCESSORIES
This section is all about accessories for your camera kit, we will go over everything from memory cards to batteries chargers, tripods, flashes, camera bags and hard drives. It might sound like a lot of basic stuff but after we go through all of this, you will have a better understanding of what the difference is between all the options and what stuff you actually need. A lot of this stuff will actually come with your camera and some of it will be nice to have, might not be completely necessary when for starting off though.

Memory cards are the digital storage device that your camera saves each photo to. They come in different shapes, sizes and speeds. Depending on your camera, you are probably shooting on SD (Secure Digital) cards, maybe CF (Compact Flash) cards and less likely but possibly micro SD cards. There are many types of memory cards but as long as you know what works with your camera, that is all that really matters. You will also find different kinds of SD cards like SDHC (Secure Digital High-Capacity) or SDXC (Secure Digital Extended Capacity). All will come in varying storage capacities from 2GB all the way up 256GB and beyond. Gigabytes stands for a unit of measurement that each card is capable of storing, so, the bigger the number, the more it can hold. SDHC and SDXC offer more storage and are most commonly recommended to photographer who will need much more space than someone using an SD card to store smaller files like documents. Check your camera’s user manual and see what kind of memory card slot it has and if there’s a recommended speed.
Speeds of cards are typically by class. Class 4 memory card will write out 4 megabytes per second, whereas a class 10 card will write at 10MG/second. You need to make sure your camera can utilize all the speed your card can deliver, consult your instruction manual for the fastest card speed supported. There are also UHS I and UHS II, which are ultra-high speed. At the very least, use class 10 but if you’re going to be taking photos at RAW and for burst mode, use UHS I or II.
TYPES OF MEMORY CARDS, IN DETAIL
-
SD (Secure Digital) Memory Cards
. SD cards are by far the most common type of memory card. They are compatible with the majority of digital cameras.
-
SDHC (Secure Digital High Capacity) Memory Cards
. These are SD memory cards but with a higher capacity. Original SD cards only went up to 2GB, so SDHC was invented with a maximum capacity of 32GB. They are identical in shape and size, but they are different media types. Though your camera may fit a SDHC, be careful because if the camera was made before SDHC came along it may not recognize it.
-
SDXC (Secure Digital ‘Xtra Capacity’) Memory Cards
. These are SD cards but with a much higher capacity and faster processing speeds. These have a maximum capacity of 2TB. Similar to SDHC, in that an SDXC fits in a normal SD slot – but your camera may not be able to recognize this newer technology, so always check in advance. Computers also need to be able to read the exFAT filesystem to be compatible with SDXC.

-
CompactFlash (CF) Memory Cards
. CompactFlash cards offer very high storage capacities and fast processing times. They were first introduced by Sandisk in 1994 and were widely used, but now they are usually only found in the most advanced DSLRs. Last year Canon chose CompactFlash as the recording media for use in its new lineup of professional high definition video cameras.
-
Micro SD Memory cards
. Micro SD cards were initially a popular method of storing images in mobile phones. In actual size they are the smallest commercially available memory card at 15×11×1mm but can store up to 2GB of information. The micro SDHC versions are able to store much larger files from 4GB-32GB. Micro SD cards are now more commonly seen in GPS systems and MP3 players, however a small number of digital cameras (recent Samsung compact models) are also compatible with them.

-
xD Picture Memory Cards
. xD Picture cards (standing for ‘eXtreme Digital’) are a Fujifilm format used in some (older) Fuji and Olympus cameras, although these brands are now routinely compatible with more standard SD/SDHC technology.
-
Memory Stick Duo Memory Cards
. Memory stick duo was launched, and is still used, by Sony digital cameras. Most Sony cameras are now also compatible with SD cards.
-
MultiMedia Cards (MMC)
. Multimedia cards have the same physical appearance as SD cards, but just without the access lock. They are used as an alternative to SD and will fit most compatible cameras, although transfer rates are lower.
-
UHS-II
. UHS-II standard SDHC/SDXC cards were recently released by Sandisk and aim to offer quicker transfer rates, increasing write speeds up to 250MB/s or faster. The Sandisk Extreme Pro cards match up with the sheer amount of data streaming through the camera’s buffer when shooting lots of RAW files or high-quality HD movies.
-
CFast 2.0 Standard
. In 2012, the CompactFlash Association announced the CFast 2.0 Standard, promising to read and write speeds of more than double what was then the current standard. In September 2013, SanDisk released the first CFast 2.0 card, billed as the world’s fastest memory card, promising read speeds of up to 450MB/s and write speeds of up to 350MB/s.
You’ll need a memory card reader to transfer photos to your computer if you don’t fancy lugging around a USB cable for every one of your devices. You’ll be able to get a card reader for each of the above types of memory cards and some come with built in memory and can also function as a USB flash drive. But check the device you’re loading your photos to, some come with built-in memory card slots. If you’re using more than one memory card regularly it will probably be worth investing in a multi-card reader, which accept multiple types of memory cards and brands. The Lexar Professional USB 3.0 Dual-Slot device is perfectly cut out for the job.
HOW MUCH SPACE DO YOU NEED?
The other thing to consider is the amount of space that you need, 32, 64, 128 GB… Many photographers like being able to go on trips and know that they will have enough memory space to last entire trip and when they only shoot uncompressed RAW images, they will need a few 128 GB cards. Some photographers like swapping memory cards often to prevent losing all of your images from a corrupt card. If you are shooting JPEG, 128 GB is going to go a very long way and might be overkill but if you can afford it, why not have the extra space? Starting off, 32 GB or 64 GB is probably fine. A 32-gigabyte card can hold over 4000 22-megapixel JPEG photos but only 410 22megapixel uncompressed RAW photos. So, this really comes down to what your need is. Get something a bit bigger than you might think you need and then another smaller one just as a backup if you fill up that larger memory card.
Memory cards hold all your photos, so it is a good idea to invest in better quality once. Sand Disk is a good brand but Kingston, Samsung and Lexar both make excellent cards as well. They are fairly robust little cards and typically live in your camera but having a case for them is a good idea. Pelican SD card case is a great choose, they will be save even if it drops from a moving car or into a puddle of water.
Most of the cameras you buy will come with at least one battery. While working or traveling, have at least three batteries, one to be charging, on in your camera and one at the ready in your pocket. If you are just getting started, two is probably fine. Also, if you are only shooting photos, one battery will last you very long time. Well the batteries that are made from the actual camera manufacturer, might be more expensive, they always last longer than the other third-party brands.
When it comes to chargers, you will probably only need that one charger that came with your camera. If you want an additional charger to help charge your batteries more quickly, buy the Watson dual charger which has adapters for several different kinds of batteries. It also allows you to charge two batteries at once.
Vertical grips are a great addition to any professional photographer’s kit, they plug into your camera’s battery compartment and allow you to use multiple batteries at once. They also work as a separate grip for your hand more easily shoot vertical photos. With many mirrorless cameras today, not only our battery life is getting shorter, but they are also so small they don’t fit comfortably in the hand. A vertical grip solves both these issues by adding a bit more mass to the camera and also holding multiple batteries inside it. With some cameras, it also allows you to actually shoot more frames per second in various burst modes.
Depending on the kind of photography that you are going to be doing, a tripod or a monopod might be a great addition to your kit, even essential for certain types of photography like long exposure.
Tripod come in all sorts of shapes and sizes and finding the right one for you can be slightly overwhelming because there are so many kinds and options. For the most part, finding something that can support the weight of your camera combined with your heaviest lens is what matters most. That being said, there are typically two parts of a tripod, the base or the legs and then the tripod head. On the most basic tripods, the head will come connected to the tripod. The tripods with a removable head, allows you to swap out or upgrade either the legs or head. Regardless, what the tripod provides is a stable base and the ability to leave your camera in one spot and really compose the exact frame that you want without having to hold it there in place.
Some things to consider as you look around at tripods is how tall can they get, how heavy are they, how small do they get when they fold up. Tripods will range from fairly reasonable prices between $25 to $100 to crazy expensive carbon-fiber versions that are over $300. Some are better for traveling since they are lighter and more compact while others are better for studio work because they are a bit taller. If you need it for taking photos of a model, we recommend getting something that can get up to at least 6 or 7 feet high (1,8 – 2,1m), so you have the option of looking somewhat downwards at your subject.
There are two most common types of tripod heads, the ball head and the three-way head. Ball heads are typically lighter and quicker to use, really move the camera into any angle or position and then lock it into place. They can be used for any type of photography, but they are especially well suited to still life and macro photography when the camera needs to be held at strange angles. However, they can be a pain to use for landscapes when you want to tip the camera up or down but keep the horizon level in the frame. This is when three-way tripod heads are useful as the camera can be moved around three planes individually. The other type, fluid heads, are more common for videographers.

The gorillapod is another cool accessory. It is basically a tripod with legs that can move into any position. It is really compact and very versatile, great for attaching to specific places like a chair, a tree branch or railing. For backpacking or traveling it works great because it is so compact, but it is also not necessary all the time. Sometimes a backpack or book is perfect for propping your camera up.
Lastly, we have mono pots which are basically one-legged tripods, so they can’t stand up by themselves, but they do provide support and stabilization. They are typically used when you need to be mobile but have a really big telephoto lens that if you are hanging around all day, starts to get really heavy or if your lens is just too large to shoot handheld. You will see this with sports photographers and their huge lenses. They are good if you want something to rest your camera on as you move around and are a bit more compact since they only have one leg and are fairly light.
In terms of brands, Manfrotto is definitely one of the most common brands out there and highly rated but there are plenty of other companies out there making quality products like Ravelli, Zomei, Fancier, Benro and Gitzo. Do some research first, seeing what makes sense for your budget and going from there. A decent tripod should last you a very long time but some of the cheaper plastic ones will start to fall apart if you are using them every day. So, consider investing in something that will last maybe a bit longer if you plan on taking your photography to the next level.
Another very useful but not 100% necessary tool for everyone is the flash. There are a few kinds of flashes out there and a number of ways to use them. At the most basic level is an onboard flash that come built into some cameras. Then there are external flashes that you can attach to the cameras hot shoe mount, the mail on top of your camera. Also, the strobe systems are an option that pro photographers use in the field or in the studio.
External flashes are a step up from on-board flashes, these typically fit in your camera’s hot shoe mount and need to be sync with your camera. Each manufacturer makes their own external flash for their cameras. Typically, the more economical choices will have less features than the higher end ones. What these are capable of are also dependent on what camera you are using. Some cameras are able to sync to multiple flashes and don’t even need to be attached to your camera, so, you are able to get really creative by placing these flashes all around you, as we have mentioned earlier.
The more economical external flashes will be in a locked position and the more expensive once will enable you to tilt and rotate them. If you are going to invest in an external flash, get one that can rotate until and ideally one that has various flash intensities. You will also find that there are many different kinds of diffusions for external flashes. There is not one best option, everyone has their own preference but in general people don’t want to blind their subjects and find a way of diffusing the flash.
So, who really needs an external flash? Event photographers, for example need and external flash because they need to make sure that they always get the shot and sometimes the lighting won’t be ideal for them. This is great for wedding photographers or concert photographers.
Lastly, the concept of strobe lights is similar to an external flash but instead of the flash being attached to your camera, you can place them wherever you want. Lighting is a huge part of photography and learning to use flashes can really help you take your photography to the next level. External flashes are a great thing to learn.
There are all sorts out there and really, no one best bag. It comes down to what your needs are and how you are going to use it. Also, how much gear you are carrying with you or need to carry. Do you need to worry about heavy rain or snow, sand or dust? Are you walking around public places and maybe want something a little bit more low-key that doesn’t stand out? Are you going to be traveling long distances and need something that will be comfortable after many miles? Do you want a backpack that can hold your clothes and other gear? A day pack for going out during the day or just a satchel that is easy to throw of your shoulder? There are great bags for all of these occasions and the technology is always improving.

There are also hard cases which are typically a bit more rugged but not quite as easy to carry around. These are great for ultimate protection when traveling with or storing your camera equipment. Pelican cases are really great cases, their military-grade waterproof, dustproof, everything-proof cases will guarantee the safety of your camera and your gear. They are a bit bulky and heavier than other cases, but your equipment will be safe. Storm cases is another brand worth checking out that are equally as durable.
In terms of backpacks, F-stop and Shimoda backpacks are two good brands. They are made for adventures, people going on hikes with their camera gear and need something that has good support. Their feature internal storage pouches of various sizes and can really hold a lot of gear very safely. They are a bit more heavy-duty and can easily be used to travel with them or just take them on a day hike.
Think Tank, Domke, Tenba and Lowepro are all great bag makers and makes so many different kinds of bags, from backpacks, to little pouches, to satchels. Go into any camera store and if you can try to mount yourself. Think Tank shapeshifter 2.0 is a good option, it can hold a ton of gear safely and has many built in pouches, which are great for the ultimate organizer.
Domke and Tenba are great satchel makers which are really accessible and great if shooting weddings or anything where you want to quickly and easily access a spare lens or other accessories. Another thing you can do is use little pouches that can carry your camera lens, maybe a few accessories and then put that inside a normal backpacker back. This has a benefit of people not knowing that he is carrying a camera inside and is a lot more low-key.
Lastly, there are holsters like the high-end leather ones, made by Holdfast or fabric ones that keep your camera’s accessible at all time. These are great for event photographers who need to have multiple cameras or lenses at the ready.
As you can see, there are many options out there. The most important thing is to have at least one bag that organizes all your gear in one place. Then, depending on your style of shooting, having another bag that makes going out on a photo adventure easier than ever.
Organization is very important for photographers, so it is important to have a good place to store all of your photos. It is recommended to use an external hard drive and creating a filing system that works for you, so in five years you can go back and easily find that one trip or that one photo. We also recommend having a spare backup drive to be extra-careful. Cloud storage is also a great option for your edited photos as hard drives can break and you don’t want to lose your work.
One issue we have dealt with hard drives is that as technology changes, so do the plugs that connect to your hard drives to the computer, so you may need to update your external hard drives every few years. Luckily, hard drives are getting more affordable. At one time a one terabyte hard drive was extremely expensive but today getting a four-terabyte drive won’t break the bank. It is recommended to get two drives at least two terabytes space, one to edit off of and use normally and another that just sits in a safe place and has everything on it backed up.

Now, in terms of some of the more technical stuff, there are the older more common hard
disk
drives
and the newer solid-state hard drives
. Solid-state drives are amazing because there are no moving pieces, so they are more durable and typically much smaller but also way more expensive. Disk drives are more common and much cheaper. They work just as well but you need to be a bit more careful with them since they do have a moving piece inside of them. If you damage that disk, it can be very expensive to repair and sometimes you are unable to retrieve all the data from that disk.
Additionally, you will see some disk drives that are 5400 rpm and others that are 7200 rpm. These are basically how fast the drives are able to operate. The last thing to mention here is that various types of plugs that they use. These are constantly and very frustratingly changing and there isn’t much we can do about it.
A reliable external solid-state or hard drive is critical when you start amassing a large collection of digital photos. These are a lifesaver when you need a way to transfer large folders, back-up image catalogs, or simply clear up some room on your computer. WD’s line of Elements Portable Hard Drives come in a range of sizes from 500GB through 2TB, with compatibility for both USB 3.0 and 2.0. If you plan on lugging it around with you, you may instead want to check out LaCie’s Rugged line. Those recognizable orange hard drives also range from 500GB through 2TB, with an external solid-state drive available in 250GB. All LaCie drives hold up against drops, moisture, and dust contamination. They can also be password-protected in case one goes missing.
At the end of the day, the more you spend on a hard drive, the faster and compact they will be. So, when it comes to hard drives, it is really important to always have two of them, one to backup all your photos and another to work off of. You need to take care of them and make sure that you don’t bounce them around too much because at the end of the day, these are carrying all of your photos.
So, when it comes to storage, hard drives are definitely the best option because they are there, you have them physically in your possession. A lot of people do use cloud storage but if you are shooting RAW photos or JPEG large photos over time it will take a really long time to upload all those photos to the cloud or if you want to retrieve them to download them again. It is nice though to use cloud storage to upload edited photos or maybe your select photos that you know that you’re going to want to keep for a long time. This way, if your hard drives do get damaged, you will have them in the cloud still.