More important than running? In years gone by if someone had said training in the gym was equally important as running, I’d have probably got into an argument with them. I’ve been brought up like most runners on the philosophy that more running and specificity in training is the only answer to making step improvements in performance. If you want to improve your running surely just run longer, faster and more often? Unless you are naturally gifted, then the answer to this question is probably no. But even at the elite level there are few runners today that ignore the benefits of strength work in their training programs. They recognize its importance and so should you.
In chapter 7 I discussed strength and coordination and explained that regular runners with imperfect technique would benefit more from strength and coordination training than their biomechanically sound elite counterparts. My reasoning remains the same: elite runners already demonstrate excellent ability to coordinate their movements and most have sufficient strength to run with good technique for long periods. Strength training provides the opportunity for regular runners is to work on both these aspects of their running.
If you already have the movement pattern mastered, running will enhance your existing strength. For example: a talented runner doing hill sprints will find that a very beneficial work-out. Running up the hill adds difficulty making it very similar to resistance training. Hill training for runners with poor technique would have less profound benefits. I used to run hills and it definitely added to my cardio fitness base, but it didn't spontaneously trigger improvement to my technique because my muscle activation patterns were off the mark. I get much more benefit from these sessions now because my technique has improved.
Strength and coordination training for runners provides the opportunity to strengthen the muscles needed to improve technique and coordination without the fatigue of a running session. Think about how hard practicing any skill is when you are already puffing and your heart-rate is high. You need to practice running-like movements without the distraction of fatigue to build the capacity to run with better technique - something that is only possible with strength. Later as your technique and fitness improves you’ll prolong your ability to hold it together over longer runs. But be wary, don’t let your cardiovascular fitness get ahead of the ability to hold running technique together. If you are a developing runner improving your technique, then you should make your strength and coordination training at least as important as your running.
Chapter objectives. This chapter provides
an understanding of the areas of the body that you should train and
how they should be trained to maximize benefit to your technique. I
have included a list of exercises that will provide an excellent
base to learning how to approach strength and coordination
training. In addition to providing some example exercises I explain
how each muscle group should be trained so you have a better chance
of evaluating the benefits of any new exercises you may want to
try. There are literally hundreds of good drills and exercises out
there so keep adding to your repertoire. In summary, at the end of
this chapter you should know:
- The major muscle groups to target in training.
- Which muscles you shouldn’t isolate in training.
- Some specific exercises to learn at a basic level.
- How to approach learning a strength training exercise.
- How each exercise links to improving technique.
- How to identify useful versus useless exercises.
Muscle groups to target in your training. To prevent this chapter from growing into a book on its own I will restrict the discussion to mostly strength and coordination training for the legs and hips. While this may seem a narrow focus, most of the exercises that target the hips also work the abdominals and lower back muscles and contribute to excellent functional core strength. There are no surprises here, the muscles you need to target as a priority are those that are most involved in good running technique, the agonists or prime movers of running and require the most coordination to act effectively.
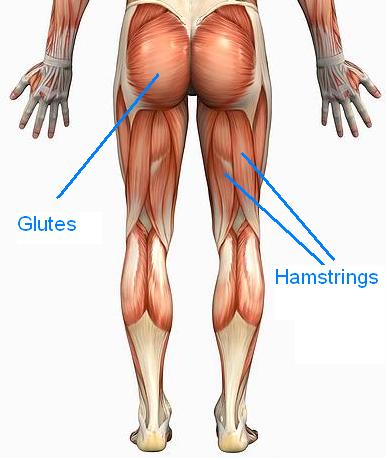
Hamstrings. The hamstrings are the muscle group active for the longest during each complete stride. They also provide the muscle action that generates thrust and forward momentum in running by extending the hips and flexing the knee. They require excellent coordination to work effectively as they cross both the hip and knee joints.

Glutes. Many of us probably don't pay enough attention to our butts, maybe it’s because we sit on them all day or we can’t see them without looking in the mirror. The glutes, maximus and medius are the most important muscles to train. The buttocks are not active for nearly as long as the hamstrings in running. However, their role in generating thrust, stabilising the hips and maintaining good posture enables the hamstrings to function effectively. This means they receive elevated priority in strength training.
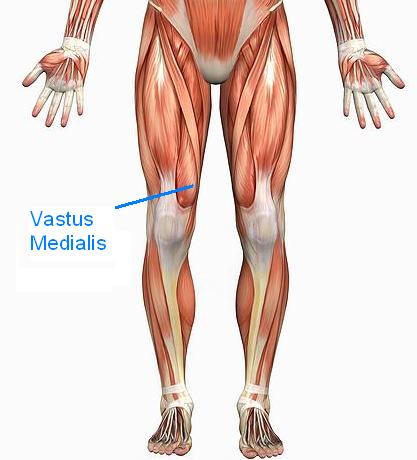
Vastus Medialis. The Vastus Medialis is the medial part of the quadriceps that attaches to the inside of the knee. It and the glutes work as a team to exerting and resisting force from opposite sides of the thigh. Exercises that target the VMO should also target the glutes to ensure the two areas remain well coordinated.
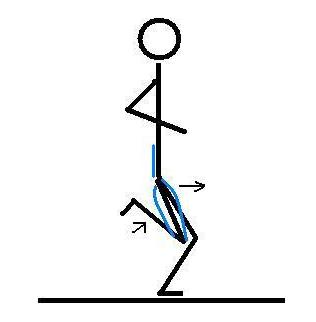
Erector spinae. Maintenance of optimal posture is critical in running, the spinal erectors help keep curvature in the spine and the back extended (straight) while maintaining a flexed hip in the preparation and contact phases of running. Good curvature and maintenance of spine extension helps pre-tension the major internal hip flexor psoas such that hip flexion is initiated powerfully and early. This also helps prevent over extension and slow recovery of the leg behind the body. An upright posture also helps activate the glutes and from a position where the leverage and power is maximized.
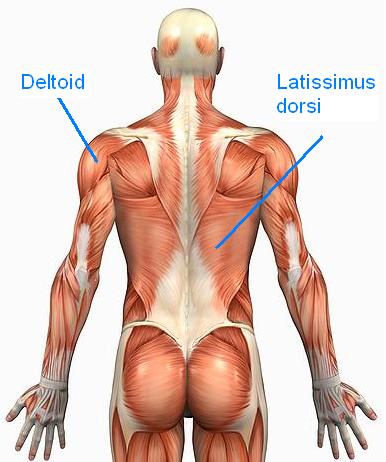
Shoulder girdle and upper back. This area is mostly neglected by runners. In first world society hunched shoulders and forward flex in the lower and upper spine is endemic. With so much time sitting in cars, at the computer and on the couch, we just don’t have the strength to hold ourselves upright and strong. You don’t want to run stooping and have your shoulders held forward and tight. This works against the posture you are trying to hold at the lower back and hips. It also restricts your breathing and the proper functioning of the arms and shoulders as they respond to and help generate movement in running. The main muscles in focus here are the latissimus dorsi, posterior deltoids, rhomboids and teres. The easiest way to remember the muscles involved is to think of the movement required to draw your shoulder blades down and together.
Chest. It might seem strange to want to train your chest for running, but keep in mind that the pectoral muscles are primarily involved in drawing the arm and shoulder forwards - an attribute, particularly in faster running that helps generate forward thrust and may help the leg get off the ground quicker and return into the next stride faster.
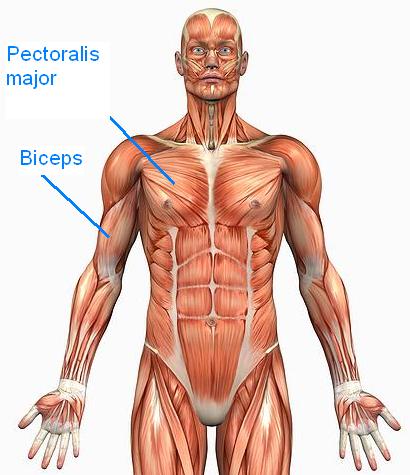
Core and hips. Core has become a catch phrase for exercise professionals and has almost become an obsession. Most core exercises are focused on the front of the body, so it’s important not to ignore all the muscles that provide stability around the torso and hips. While isolation exercises are generally not a good idea, there some that target the hip area that can be useful. The main muscle that I’m thinking of is the glute medius. Many of the exercises prescribed for running are performed on a single leg. Lack of strength and control of the glute medius can lead to the hip dropping or popping out to the side when doing single leg squats and in running. There is therefore some benefit in isolating this muscle with specific exercises that allow you to sense when the glute medius becomes active and control it more skillfully in difficult movements such as single leg squats and running. Creating awareness and more strength around these hip stabilisers will also help you progress from exercises performed on two legs to those that are performed on a single leg.
Good news. The good news is that the core, hamstrings, glutes and erector spinae can be trained together and this is preferable given they work synergistically during running. The benefit to this is you don’t need to do a shopping list of exercises at each gym session. Two or three main exercises will be sufficient.
Muscles not to isolate in your training.
Rectus femoris. Rectus femoris despite being one of the major muscles involved in running is not high on my list to specifically train in isolation. There are a few good reasons for this. Rectus femoris is an antagonist muscle in running: it responds to work done by the hamstrings to extend the thigh and flex the knee. Its action is quite elastic: you’ll notice this if you flex your knee while sitting on the edge of the chair - consciously flex your hamstrings and then relax them - your knee straightens on its own, it does not need conscious application of force if the muscle is pre-stretched to activate effectively.
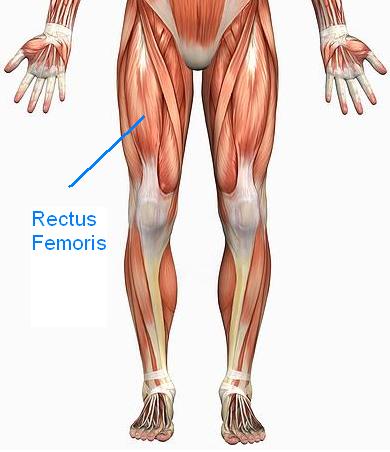
One of the favored machine exercises in gyms is the leg extension- this action isolates the rectus femoris and trains it to act more like an agonist muscle and an antagonist. While you might be thinking that you are improving your running it’s likely that you might actually increase the problem of co-activation of antagonist muscles. You may be training the rectus femoris to switch on when the hamstrings are active in generating rear thrust and flexing the knee: the result - low back-kick and a shorter stride. Alternatively, it might encourage you to over-straighten your leg as it swings ahead of the body - leading to over striding. I don’t think it’s worth it. Moreover, the rectus femoris is trained in a range of other compound movement such as squats and leg press. In these exercise the rectus femoris plays its antagonist role as it does in running.
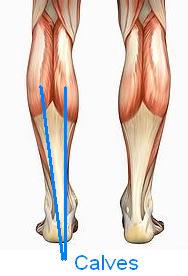
Calves. This is slightly controversial, but I would argue performing exercises such as calf raises (particularly those that isolate the gastrocnemius) are counterproductive. They generally involve a straight leg (which you don’t have at key phases in optimal running); they also involve use of the gastrocnemius muscle in a posture that is not the same as in running. The gastrocnemius (larger calf muscles) is active in running during preparation and initial contact. These are all times where the knee is flexed and the foot is mostly held horizontal to the ground. The range of work performed by the gastrocnemius is therefore very small - much smaller than that required in calf raises. You may also not want to grow large heavy calf muscles as adding mass at the end of the lever arm may be detrimental to your running economy.
If you do decide to train the lower leg, think about doing bent knee calf raises; these will target the deep compartment muscles responsible for helping maintaining foot strength during running.
Hamstrings. The hamstring curl machine has become ubiquitous in gyms and is still an exercise that is heavily prescribed by fitness instructors and trainers. There are a few problems with isolating the hamstrings in the way this machine tends to work. Firstly, it works over a longer range of motion (in a different posture) than the hamstrings work in running. It also puts considerable strain on the calves because the machine hooks in behind the knees applying pressure against the calf muscles (Gastrocnemius) as it travels behind the knee to attach onto the femur (thigh bone). It also forces the calf to absorb heavy loads. Like the hamstrings it is a muscle that operates well under tension storing and releasing energy - the hamstring curl does nothing to emphasis such operation of the muscle.
The exercise also forces the hamstrings to do dumb concentric flex and relax type work when in fact the hamstrings need to be smart as they coordinate movement across the hip and knee joints. It also eliminates involvement of the glutes and erector spinae group which need to operate in conjunction with the hamstrings in running: firstly to maintain optimal posture, and secondly to apply force to allow the hamstrings to lever the torso forward ahead the hips.
Quadriceps. Isolating the quadriceps in order to produce square muscles about the front of the thigh might look impressive at the beach, but may have limited applicability in running. As discussed in chapter 5 the quadriceps group is primarily involved in providing stability early in the contact phase of running. These muscles help provide stiffness around the knee joint that helps maximize the return of elastic energy to the runner. If you look at the quadriceps of elite long distance runners the muscle you notice the most is the VMO or Vastus Medialis, it’s highly developed to allow maintenance of relatively deep knee flexion during running and as discussed in this chapter works in with the glutes to provide stability at the hips. These muscles should be trained together in exercises such as decline single leg squats.
Abdominals. I struggle to think of reasons why you would need to isolate the abdominals - particularly the rectus abdominus which is responsible for the six pack effect. This looks the goods but then you realize that one of the functions of this muscle group is to flex the spine forwards. That is pulling the spine in the opposite direction to that which would maintain optimal running posture. Training the abdominals is occurring at all times during most exercises, you want them to work in concert with the deeper muscles (Traverse Abdominus) and the obliques. In running, the abdominals tend to be active helping to stabilise the spine so training them to work with static holds is a better way to go.
Spinal erectors. I’m also dubious about the benefits of isolating the spinal erectors. If you need to strengthen this area specifically, restrict yourself to working with body weight only. Most of the exercises prescribed to strengthen the glutes and hamstrings also work the spinal erectors, especially when you maintain good posture and curvature of the back during the exercise.
Useful exercise versus useless exercises. There are literally hundreds of exercises that are beneficial to your running. Many of the leading running websites, magazines and running books suggest exercises on a regular basis. Here are some principles you can use to easily identify those that are worthwhile adding to your repertoire. Ask yourself these questions before taking on the exercise.
How similar to running is this exercise? This is probably the easiest test to apply. If you look at the exercise you should be able to imagine either the range of motion and/or the posture used in the exercise as being at least somewhat related to running. You might need to turn the exercise on its side to see the similarity but you should be able to make a connection. If you can’t, there must be a very good reason to add the exercise to your program. Usually this would involve needing to rehabilitate an injured muscle or strengthen a stabilising muscle to enable you to perform a more difficult exercise. In both these scenarios deviation from the similarity rule would be reasonable. A word of caution though, don’t over specialize in these isolation exercises. Do them for as long as needed, but quickly abandon them in favour of exercises that use the weakened muscle in its team role, i.e. to assist larger muscle groups to perform an exercise with good balance, stability and posture.
Does it isolate joints and muscles that require coordination? If the exercise is isolating a joint and muscles that usually work in conjunction with others you may end up inadvertently training away your ability to coordinate movement effectively. For example, isolating the knee joint in either exercises the extend (straighten) or flex (bend) the knee is not a good idea as the knee should work in tandem with the hip joint.
Does it work the muscles in the correct range of motion? The major muscles involved in running do not apply force over a full range of motion. Therefore exercises that try and work the muscles over a very long range are unlikely to be closely related to running and may even place the muscle in a weak position that could risk injury. For these reasons it’s better to focus on exercises that work in a narrow range with a good deal of maintained isometric tension throughout the movement. By this I mean you don’t want to fully flex or extend the hips, knees and ankles. For example, when doing squats you would try to maintain hip and knee flexion at the bottom and top of the movement - you would not flex your knees too far, nor extend them or your hips fully. This tends to make the movements more difficult, dynamic and bouncy: much more akin to running.
Does it focus on the larger muscles involved in running? The further away you travel from the larger muscles that drive running i.e. glutes and hamstrings, the less likely you are to be able to train these muscles without breaking the three rules as described above. There’s also a risk of overloading smaller muscles and causing injury while doing the exercise or later in running because the muscle is overworked, too tight or has become uncoordinated with its proper role.
How to construct your program. This section provides some ideas and shares the philosophy that continues to work well for me and others in the gym. Ultimately, the way you approach strength training will be a decision for you and your coach. The training you undertake must be both within your capabilities to perform and not be detrimental to your running, nor put you at increased risk of injury. The idea is to prevent injury and improve performance, so anything that risks taking you backward on these fronts should be avoided. Here are some basic principles to live by:
Train complex muscle groups many different ways. Muscles such as the hamstrings will benefit from changes in emphasis, so long as you stick to short ranges of motion and coordination training. This means you can do things like change the posture of the hips, back and knees as you do different hamstring oriented training. Try and stick to postures and movements that are similar to running.
Go backwards to move forwards. Don’t be afraid to begin your strength and conditioning program using extremely light or virtually no weight at all. Yes it might be embarrassing - particularly for sinewy distance running men to do a set of squats with a naked bar on your shoulders next to some guy who could lift a small car, but it’s all about keeping things in perspective. The first thing to remember is that coordination is the most important thing to learn - you must master the skill of each exercise through activating the correct muscle groups at exactly the right time. Even doing this with the lightest weight possible will bring significant early gains back into your running - remember neurological adaptations?
Sometimes we need to be patient, add volume and intensity once you have build solid foundations around coordination. This is exactly the same approach I believe should be followed in running: master the skill first before adding significant volume and especially the intensity required to run long intense intervals. So it shouldn’t be any different with weight training, skill first, volume and intensity follow - even if this means you need to drop weight on a particular exercise to relearn it.
Don’t over specify. Runners tend to be obsessive compulsive in nature. If someone tells us that a particular training session or gym workout will improve our performance, then we’ll likely over indulge in that solution to the point of causing an injury. Strength and coordination training is very much like that, if I said single leg squats were the most beneficial exercise for runners, it’s likely that someone reading this would want to do them every day and in huge volumes.
Single leg squats are good by the way, but you don’t want to do them each time you go to the gym. In fact you should specifically rotate the exercises you do in any given week. I have two basic programs that I train with that involve doing a completely different set of exercises each time I visit the gym. The result is I do two gym sessions and each of those sessions contains a completely different set of exercises. This way I get to practice twice as many different strength and coordination exercises and I don’t overdo any one particular exercise no matter how good I think it is. Invariably, if you do the same thing over and over you’ll end up stiff and sore and likely injured from over taxing the same joints and muscles with repetitive strain. Mixing things up also helps accelerate neurological adaptations by the body learning to do new movements more efficiently and with better coordination.
Do a mix of strength and coordination. It’s a good idea to mix up your training focus. One of my days in the gym I focus on exercises that are more strength oriented. I generally do these on two legs and try to add a bit more weight to just build up strength and power in my muscles. As you get stronger and have mastered the exercise, you can think about adding speed and bounce to the movements - this is a good stepping stone towards plyometric training.
On one of my sessions I do heavier leg press and barbell squats. In the other session I do single leg squats (three different ways) and dynamic single leg back extensions. Beginners should always focus on more coordination work – strength and power can be added later as you progress. Nearly all my training remains focused on coordination, I only perform strength work on relatively simple exercises that I’ve had a lot of practice at such as leg press.
Don’t do too many exercises in any one session. For me that means probably no more than about five in total and for the lower body (hips and legs) it’s only about three main exercises per session. If you’re doing multiple sets and being fastidious about your technique you tend to tire quickly. Do a small number of exercises really well in favor of trying to do a lot of exercises poorly.
Circuit training pros and cons. Circuit training usually involves setting up a number of exercises that are done consecutively with a limited break between each exercise. An exercise may be called a station; you complete a number of repetitions of the exercise at a station and then move to the next. It is conducive to working in a group exercise environment. If you had six athletes you could have six stations set up at which the athletes work simultaneously.
I’m generally predisposed to the idea of circuit training, but it should be aimed at athletes who have already mastered the movements being used during the circuit and athletes that have the fitness to maintain good form as they fatigue. These means I would recommend this type of training to more advanced athletes who are capable of maintaining good form under pressure - it’s really good practice for holding things together in a race when you really feel the pinch.
If you want to include circuit training as a beginner or developing athlete, choose a smaller number of exercises that you have mastered. Also consider having a longer break between each station to ensure your heart rate and breathing recovers and you can do the next exercise with good technique.
Do more complex and difficult exercise early in the session. The more difficult the exercise i.e. one that requires strength, balance and coordination, the harder it is to perform with good technique. These types of exercises are best done at the beginning of your work-out. This allows you to execute these difficult movements more correctly than if you tried to do them when already fatigued. For example, I could never manage to execute a good set dynamic single leg back extensions after pushing heavy weight on the leg press.
Do your strength training away from running (especially as a beginner). Be careful about mixing up strength training with your running - especially if you plan on doing a harder session. It’s best to schedule strength work on one of your non-running days or do it when only an easier run is called for in your program. This is true for beginners; however more advanced athletes may have to violate this rule because of the additional volume they are performing. Planning for strength to be performed on easy days would still be preferable.
Where the exercise is more gentle and focused on coordination only, it may be worthwhile doing these at the same time as your scheduled run. You could do a gentle warm up, then pick 2 - 4 coordination exercises to gently perform as a means of activating the correct running muscles. This can help stimulate better running technique.
Strength training as recovery. This can work, but only with very gentle (light weights) that put the body through an easy range of motion. For reasons unknown to me it seems to help, most likely because of the gentle stretch and activation stimulate repair of the muscle - blood flow is important to healing and some gentle light repetitions can be helpful if you’re a bit sore. Do not lift fast or heavy if you’re sore. It’s like a hard session in running, best left until you are fully recovered before you stress your muscles again.
Keep looking for new exercises. The exercises described in this chapter are a small sample of what’s out there. The good news is that with a little reading you can accumulate new and valuable additions to your strength and coordination program. Remember to carefully evaluate whether the exercise is safe and useful to your running. Always take the time to try out and master a new exercise with very light weight and low intensity movement. As I get the time I will publish a further work specifically devoted to strength and coordination training - there’s just not enough space left in this book!
Phase I – Developing correct muscle activation
I have included detailed sample exercises in this section of the book. Initially, the focus is on coordination and technique, but after these exercises are mastered, they can be intermingled with more difficult movements. The emphasis of these exercises can then change from coordination to strength building. These can be performed at home or in the park with no equipment. I have described each exercise here and included some basic images, but look for more information, photos and videos about these exercises at the online resource site.
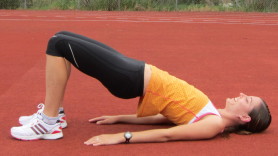
Bridging. Bridging is an excellent exercise that builds strength through the buttocks, hips and hamstrings as well as the abdominals. This exercise provides a safe way to build foundation strength at the hips and through the core. Bridging has numerous variations and progressions you can do once you master the basics.
Coordination and running. Learning to activate your glutes in running is critical to developing a stable and powerful stride. This exercise is a great way to learn how to switch on your glutes.
How to:
1. Start the
exercise by lying on your back, knees flexed with your heels on the
ground.
2. Place your arms beside you, palms down - keeping them
relaxed.
3. Make sure your feet are in alignment with the hips – keep your
feet flat on the ground.
4. Engage your core muscles.
5. Exhale and push your buttocks off the ground by squeezing your
glutes until your pelvis is level with your torso. Hold this
position for 10 to 60 seconds.
6. Inhale as you lower yourself to the ground - under control and
with the butt still engaged.
7. Begin with a single set of 6 repetitions.
Think about:
- Think of
pushing down through your whole foot with your buttock
muscles.
- Squeezing your butt muscles to create the movement.
- Whether you feel a burn through the buttock muscles, especially
when you hold at the top of the movement - if you feel this, you’re
doing it right.
Try not to: Lift your butt off the ground with the muscles at the front of your thighs and hips - remember this exercise is focused on increasing buttock and hamstring strength.
Dynamic single leg bridging. This exercise is an excellent functional exercise for running as it emphasizes the strength and coordination needed between the glutes and hamstrings. It’s not what I would call a fancy or glamorous exercise, but it gets results, hardening up the butt and developing some musculature around the hamstrings. It is also an easier exercise to master than squats or the leg press. It will help you develop the strength and awareness to push your torso forward powerfully in the running stride.
Coordination and running. The great benefit of this exercise is that it forces you to practice exerting force through the hamstrings while holding your glutes firmly engaged to prevent collapse at the hips. If you turn this exercise on its side you’ll see that it an almost exact mimic of running posture and motion. It also works the hamstrings in a relatively short range of motion and if done correctly maintains tension through the hamstrings and glutes through the entire range of movement.
How to:
1. Start by lying
comfortably on your back, arms relaxed at your side palms down,
knees flexed with your heels on the ground or on a raised
step.
2. Position the foot directly under the hips - check to ensure it
is aligned.
3. Hold the non-working leg in a slightly flexed position - it’s
more natural this way and mimics the forward motion of the swing
leg in running.
4. Engage your core muscles, exhale and push your hips off the
ground while maintaining a level pelvis. Do not raise your hips
past the point where your body forms a flat plank.
5. Keep your buttocks engaged the whole time and don’t stop the
movement at the top.
6. Lower your butt towards the ground, but don’t touch it or stop
moving.
7. Push up with your butt and hips straight away into the next
repetition.
8. Keep breathing during the movement.
9. Begin with a single set of 8 - 12 repetitions on each side. If
you need to start with less, that’s ok, don’t sacrifice quality for
quantity.
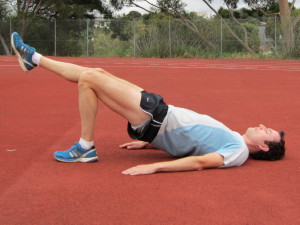
Think about: Pushing down through the whole foot with your buttocks and keeping them engaged. Feeling a burn in your buttock muscles and upper hamstrings as your do more reps – this is a great indication you’re doing it right. Squeezing your butt muscles to create the movement.
Try not to: Lift your hips and pelvis using your hip flexors or quadriceps. Prevent the front of your thigh and hips from getting involved. Don't let your pelvis sink as you do the exercise. Over-extend the hip or pull your torso up with your hip flexors.
Progression: Two sets of 12, building up to three sets of 20-30 repetitions. A soft ankle weight held across your hips can increase the resistance. A training partner could also push down on your hips as you push up.
Mastery: Mastery of this exercise involves learning to truly emphasise the butt and hamstrings as the only major muscle groups responsible for raising the hips from close to the ground to the point where the thigh becomes level with the torso. Try not to relax your muscles at the start or end positions of this movement. As you get stronger, try and make the movements continuous and more dynamic.
Place the supporting foot in line or under the hip, exactly as you should in running, this helps practice keeping your butt engaged as the leverage of the hamstrings is applied to your torso. If you tend to fall off or drop your hips in running, then this is the perfect exercise to prevent this problem. If your glute medius is properly engaged, you should feel a burn on the outside of your hip and butt. This exercise is harder than it looks, practice doing a small number of high quality repetitions until you can master the exercise.
Prone hip extension. The prone hip extension is a relatively easy exercise to learn that helps develop an awareness of how the leg moves in relation to the hip joint. By using a mirror to check the position of your feet during this exercise, you can start to work on moving your thigh and leg directly under the hip.
How to:
1. Engage your
core and butt muscles and keep your pelvis level during the
movement.
2. Start with your hip and knee flexed and gently push your leg
backwards, if you have a mirror you will see your foot popping up
behind your buttocks.
3. Check in the mirror that your hips are square and your leg is
tracking directly behind the hip.
4. Don’t try and push back too far or too hard, gently approach
true hip extension.
5. Push your leg back gently using your buttock muscles - don’t
swing or use momentum.
6. Return your leg to the start position.
7. Start with 1-2 sets of 10-15 repetitions.
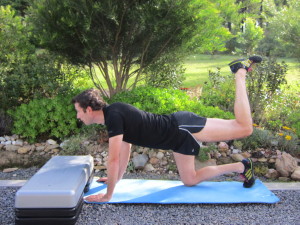
Think about:
- Pushing
back through the hips with your buttock muscles.
- If you’re doing it correctly you should start to feel a burn
through the buttocks.
- Keeping control of the movement and staying smooth the whole way
through the action.
- Making sure your pelvis is level and your leg is tracking
straight behind you.
Try not to: Swing your legs across or outside the line of your body, use momentum or push back too far or hard (this exercise is about learning control). Don't use ankle weights - this exercise is not about strength and these may cause injury.
Progression: Remove one hand from the ground to introduce instability - try to control the exercise maintaining your balance and a level pelvis. Increase the repetitions to 20.
Clam. The clam is an exercise designed to strengthen the glute medius muscles - this is an important stabiliser in the hips and helps maintain balance and strength of hip extension during walking and running. People with a weak glute medius can tend to collapse through the hips and find it difficult to perform exercise or even stand on a single leg. If you run the central line in your technique, this is one exercise that will help give you the strength and coordination to drag your thigh bone into alignment directly under the hip.
Coordination and running. Learning to activate team glute (maximus, medius and minimus) couldn’t be more important in helping your running. Developing awareness (especially for maximus and medius) will allow you to consciously begin to switch on these muscles during the preparation and contact phases of the running gait cycle. This exercise will also help you develop the strength and stability to take on more advanced exercises performed on a single leg.
How to:
1. The exercise
is performed lying on the side. Knee flexed at about 90
degrees.
2. Place a hand gently on your thigh so you can check activation of
the correct muscles.
3. Exhale and lift your knee upwards with your buttock muscles - by
squeezing the buttocks.
4. The thigh muscles and hip flexors may try to get involved so
check with your hand that these stay relaxed through the
movement.
5. Hold for three breaths.
6. Inhale and return the knee to the starting position.
7. Begin with a single set of 10-12 repetitions.
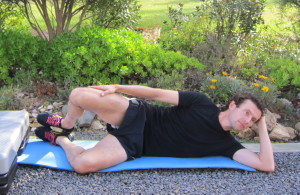
Think about: Squeezing your butt to lift the knee, the movement comes from the hips, not your thighs. Feeling for a burn around the rear of your hips and the side of your buttocks - when you feel this, you’ll know you’re doing the exercise correctly.
Try not to: Lift the leg with the thigh muscles or hip flexors, particularly the Tensor Fascia Lata (TFL) - keep checking with your hand that these stay relaxed. If you have trouble switching off the TFL, start and end the movement with your knee slightly raised.
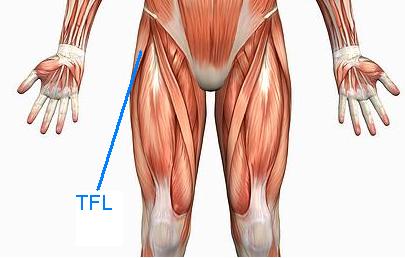
Progression: To further enhance the strength of your hip stabilisers, you can increase the repetitions to 20, add another set of 12-15 repetitions and apply resistance to the leg with your hand or by holding a small weight on the outside of your knee.
Activations and drills. Consider doing some muscle activation and/or running drills to help stimulate and fire the correct muscle groups. Drills must meet the same criteria as strength and coordination training when it comes to assessing their usefulness. Any of the exercises described above can be used as activations. Here are some additional activations and drills to try:
Bum-kicks: (as described in chapter 8).
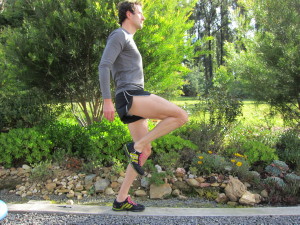
Single leg stance: stand on one leg with slightly flexed hips and knees. Activate your glutes and raise your opposite leg until your thigh reaches the horizontal.
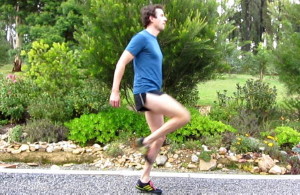
Walking high knees: using the single leg stance as a template for the movement, take slow deliberate steps forward on each leg, raise the opposite leg as described and ensure you activate the glutes on the support leg to balance and push off.
For more information visit the online resources.
Phase II - Increase strength and stability through the hips
These exercises are designed to progress in difficulty and also to help you develop the strength, coordination and power to activate the glutes and hamstrings during the preparation and contact phases of running earlier and with more power. Once you have begun driving your running with your hamstrings and glutes, this is the next phase of improvement to aim for. This combination of movement from the buttocks in particular also helps to drag the thigh back under your hip with each stride. This will reduce or eliminate the tendency of some runners to track along the central line of their bodies. As I explained earlier, running with your thighs and feet under the hips reduces problems like pronation and lowers the risk of developing stress fractures and soreness in the shins by reducing twisting in the lower leg. I have described each exercise here and included some basic images, but look for more information, photos and videos about these exercises at the online resource site.
Bouncy barbell or bodyweight squats. Barbell training has a long and successful history in athletics. Students of running history familiar with the barbell training methods of Percy Cerutty, who coached the second man to break the 4-minute mile, John Landy, and 1960 Olympic 1500m champion and then world record holder, Herb Elliot. Graem Sims’ book Why Die? catalogues the eccentric Cerutty and some of his methods, it has a few great photos of Elliot and the scrawny but powerful Cerutty lifting some impressive weights on barbells.
Coordination and running. Using the barbell, particularly in squats, allows you to maintain postures and movements that are very similar to running while providing an overload in the form of the weight on the bar. The barbell also teaches you to maintain excellent lower back posture and strength, without which you cannot train safely or effectively. This posture carries over into running, preventing forward collapse and helping maintain a good upright posture. Squats are hip extension exercises that help runners develop the power to push off with strength from a position where the hips and knees are both flexed.
How to:
1. Select light
weights - only the bar itself if you are starting out. Be cautious
as the big Olympic barbells weigh 20 kilograms which may be too
heavy. Choose a lighter bar to begin.
2. Lift the bar and place across your shoulders (not on the neck).
If you progress to using heavy weight use a squat rack (not for
beginners).
3. Keep your core engaged and a good curve in your lower
back.
4. Position your feet at least as wide as your hips, allow your
toes to point outwards slightly.
5. Keep your torso upright, core engaged and back strong.
6. Squat your butt down towards the ground - don’t go past the
horizontal with your thighs.
7. Catch the weight with your butt and push powerfully back to the
start position.
8. Begin with a single set of 10 – 12 repetitions.
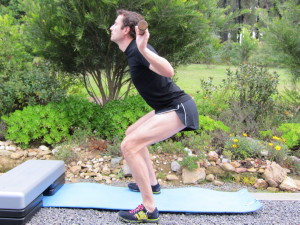
Think about:
- Breathing
in as you squat, breathing out as you push up.
- Maintaining strength in the core and lower back.
- Sitting down on your butt.
- Trying to catch the weight and push off with a bounce from your
butt (you need light weights to practice this without risking
injury).
Try not to:
- Flex
forward at the spine, don’t allow your back to round forward as
this leads to injury.
- Squat forward at the knees - the idea is to sit down on your
butt, not flex forwards at the knee.
- Don't go deeper than you need to. Maximum depth is your thigh to
be horizontal to the floor; the exercise is effective working in a
short range of motion, making it similar to running.
- Straighten your knees at the top of the movement - keep them
slightly flexed.
Making progress:
- Master
isolating the buttocks and hamstrings and maintaining excellent
posture first.
- Add an additional set of 10 - 12 repetitions.
- Increase the repetitions to 20 per set.
- Add a third set.
- Increase speed and add more bounce to the movement.
- Only then think about increasing the weight.
Mastery: This is an exercise that takes a long time to master. You should resist the urge to add weight before you are completely comfortable and competent at performing the movement. Doing the squat side on to a mirror or having someone video your posture is an excellent idea. The main problem you’ll experience is flexing forward at the spine as you get tired or as you try and add weight. This needs to be avoided at all costs. The second element that needs mastery is the timing and power of the bounce you generate out of your butt at the bottom of the movement. Practicing this is very relevant to running and will increase your power and speed of stride. Once you have mastered the posture and movement required for squats you can think about adding heavier weight. I have been practicing this exercise for many months and am still in the process of mastering the movement. Remember being bouncy and powerful is better than being able to squat a huge weight - coordination is key.
Monster walking. This exercise is one that you might want to do at home; well if you don’t mind some strange looks you can get away with practicing it in the gym. The exercise specifically targets the muscles that initiate hip abduction and stabilization. It’s a good exercise to help you progress to more dynamic single leg workouts.
Coordination and running. While this movement is not functionally similar to running it does help maintain a posture that can be recognised in the running movement. Doing this exercise well relies on maintaining flexed hips, knees and an upright back - as you tire you feel the urge to straighten your knees and hips. As in running you should resist this temptation.
How to:
1. Select a piece
of therapeutic rubber (the kind you get from your physiotherapist)
and tie this around your ankles or just below your knees. Allow
enough play so you can move your legs apart without too much
effort.
2. Squat with flexed knees and hips - keep an arch in your back and
splay your feet slightly.
3. Stay sitting and take sideways steps in one direction, stop and
then evenly retrace your steps.
4. Take ten steps in both directions.
5. Do two sets.
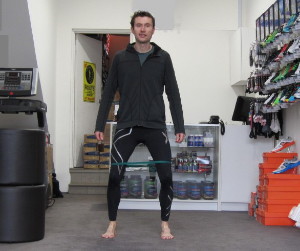
Think about:
- Using the
same muscles as in the clam - keep your butt engaged.
- Checking your thighs and hips to make sure the movement is from
the hips and butt.
- Staying low and keeping your knees and hips flexed.
- Keeping tension in the support and moving leg, the support leg
must resist the urge to collapse, both sides work simultaneously,
one to abduct the leg (taking it away from the hip) the other to
resist adduction (letting the thigh angle in towards the midline of
the body).
- How much burn you get down the rear of your hip and side of the
butt. It should really burn if you are hitting the glutes
correctly.
Try not to:
- Stand
upright.
- Let your toes point in.
- Allow your knees to dip inside the line of your toes.
- Let your thighs and hip flexors get involved in generating the
movement.
Decline single leg squat. This exercise is often prescribed by physical therapists as a knee rehabilitation exercise; however it is also an excellent way to strengthen your glutes and vastus medialis (quadriceps muscle that attaches to the inside of the knee) combined. These two muscle areas work in combination to stabilise the leg at the hip and knee when you are in contact with the ground during running.
Coordination and running. Being strong in this combination is important - elite runners flex and maintain strength at the knee more than regular runners. They all have highly developed vastus medialis muscles, when you look at better runners when in contact with the ground this muscle stands out predominately. However you can improve your strength in this area by practicing this exercise and then begin to slowly carry over this posture into your running.
How to:
1. Set up an
aerobics step so that you remove one or two levels of support from
one end. This creates a stable sloping platform. Check to see it is
locked together before standing on the step.
2. Establish the starting posture. Position your foot under the hip
as much as possible. Sit back on your butt so your hip and knee are
flexed and your butt muscles are engaged.
3. Squat down while keeping your butt engaged, keep the knee
outside the line of your big-toe.
4. Push back up with your butt to the starting position.
5. Begin with a single set of 8-12 squats on each leg.
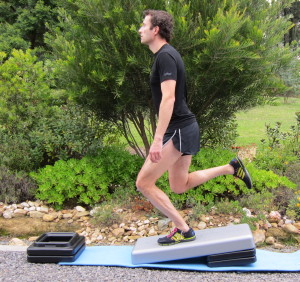
Think about:
- Keeping
your hips back and butt engaged. Keep your hips square.
- Checking to see if your vastus medialis switches on - you should
feel it on the inside of the bottom of your thigh near the
knee.
- Not going too deep in the squat.
- Keeping your knee outside the line of your big toe.
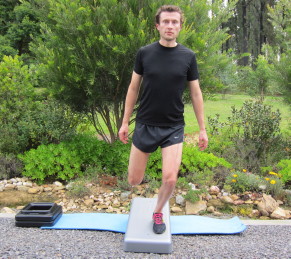
Try not to:
- Let your
hip collapse. Keep your butt flexed and hips back and strong.
- Allow your knee to start tracking towards the centre of your
body.
- Push through your toes - push through the whole foot.
Progression:
- When you
can do 20 good squats, introduce a second set.
- In the unlikely event you want to make this exercise harder, hold
a dumbbell in each hand.
- Try increasing the slope of the step.
Mastery: This exercise is tough to do well. Keeping your hips back, your butt engaged while at the same time squatting on a sloping surface is no easy task. However, if you’re struggling with your hips in running, this is a great way to prompt the activation of the glutes - especially medius when your knee and hips are in the flexed position. Do this exercise early in your gym session and don’t do it every time you go to the gym, once or twice each week is sufficient.
Activations and drills. Here are some additional activations and drills to try:
Body weight squats: Make these bouncy, fast and more explosive to get your glutes and hamstrings firing ahead of running.
Bouncy walking high knees: Instead of taking slow deliberate steps, add a little bounce out of your buttocks to pop forward as you drive the opposite leg.
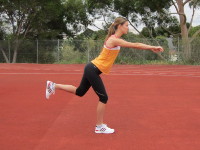
Single leg forward tilt: Stand on one leg with your knees flexed and hips back and square - engage your glutes and tilt your torso forward at the waist while keeping an arch in your back. The buttocks and hamstrings remain engaged - hold for a five to ten count.
Phase III - Fine tuning for power and speed
These exercises are designed to progress in difficulty, but you can mix and match with the previous exercises. Use exercises you have previously mastered on your strength days and add these more difficult exercises to days when coordination, power and skill training are to be emphasized. Do not attempt these or other advanced exercises if you are a beginner. Remember, be cautious with the plyometric type leaping exercises, do a good warm up and only small volumes at modest intensity to begin. Allow your body to adapt to these over weeks and months progressively adding volume and more power to each movement.
Advanced athletes and their coaches should also consider exercises from authors such as Saunders and Bosch & Klomp. The more advanced you are, the greater benefit you will accrue from introducing explosive strength and plyometric training into your program. The exercises in this chapter are designed to give you a small sample of more advanced training techniques you might employ. I have described each exercise and included some basic images, but look for more information, photos and videos about these exercises at the online resource site.
Dynamic single leg back extensions. This difficult exercise demands the buttocks and hamstrings drive and support the body as you complete a series of controlled, but quite powerful extensions of the hip and back - all while balancing on a single leg.
Coordination and running. The dynamic single leg back extension works the hamstrings and glutes in a short range while keeping them under tension - it is fantastic for developing their strength and elastic properties. In addition, the control and power required from the glutes is very similar to that in running.
How to:
1. Stand on a
single leg with flexed knee and hip and engage your buttocks.
2. Hold your hands clasped together outstretched and in front of
your body.
3. Tilt your pelvis forward, dip forward slightly at the knee while
maintaining an arched back.
4. Keep your knees flexed and the knee outside the line of your big
toe.
5. Keep your hips back and square.
6. As you reach slightly less than the horizontal plane with your
back, flex your butt and hamstrings powerfully to bring your torso
back upright to the start position.
7. Repeat.
8. Do a single set of 5 - 10 on each leg to begin.
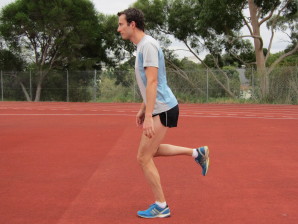
Think about:
-
Maintaining control of your core and lower back muscles.
- Performing this exercise at the beginning of your work-out or on
your coordination focused day in the gym. After heavy squats or leg
press this exercise is very hard to do well.
Try not to:
- Flex
forward at the spine, maintain good curvature in the lower
back.
- Do this exercise if you have a bad back, sore or tight
hamstrings.
- Lose control of your posture. If you do, make the movement slower
and more controlled - as you progress you will be able to speed up
the movement and make it more powerful.
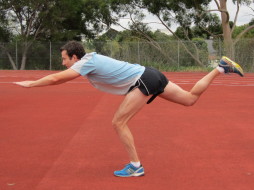
Progression:
- Increase
the repetitions until you can do 20 on each leg.
- Add a second and/or third set.
- Do the exercise with a light barbell on your shoulders.
Mastery: This exercise is difficult to master and it has mastered me more than once. Take your time learning to control your hips especially. Any loss of strength in your glutes will throw you completely off balance. If you need to correct your posture briefly place the opposite foot on the ground. Don’t be in a rush to progress to using barbells. I overdid this initially and because I wasn’t strong enough it tightened up my hips and lower back for a few days.
Leap onto platform. With exercises that emphasise powerful dynamic movement, we’re beginning to delve into plyometrics. Keep in mind that exercises such as this carry a greater level of injury risk - especially if not done correctly. You need to weigh up carefully whether you are ready for the exercise and if the benefits you expect are worth the risk. This exercise seeks to minimize landing shock by initiating the leap from below a solid platform.
Coordination and running. The leaping action helps to train the body to store and unload energy powerfully from the glutes, hamstrings, gastrocnemius, Achilies and feet.
How to:
1. Find a wide
raised platform, perhaps a landing or a raised deck - just be
careful of a low roof if you go down this road.
2. Stand about a foot or two away from the platform, knees and hips
flexed.
3. Tilt forward at the pelvis as in the previous exercise, but
don’t flex your spine - create the same forward motion as in the
dynamic single leg extension.
4. Thrust with your hamstrings and glutes, letting your arms come
up to add lift.
5. Halfway through the extension of your knee and hip, bring one
leg off the ground and complete the thrust with the supporting
leg.
6. Land on the platform on the opposite leg or swing leg.
7. Practice this so you don’t have to leap too far or high in the
beginning - mini leaps at lower intensity on even ground might be a
good idea to learn the movement pattern.
8. A handful 3-6 good quality leaps are more than enough to
begin.
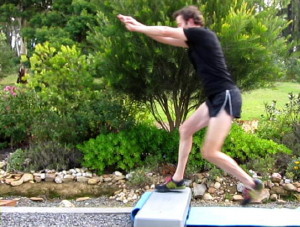
Think about: Keeping your foot stiff as you thrust - activate the plantaflexors. Don’t toe-off but allow your foot to stiffen and transfer the thrust from your glutes and hamstrings. Push your torso ahead of the supporting leg and hip - keep the glutes engaged.
Try not to: Roll off your foot or let it become relaxed. Don't do this exercise when fatigued from lifting weights or running a hard session - you will need all your wits about you to coordinate the movement without injury.
Making progress: Be very confident in your skill at performing this exercise before considering holding a light barbell across your shoulders.
Step-ups. These step-ups are not the traditional fast cardio ones that you might have experienced in an aerobics class. They are to be done deliberately to add strength to your butt and hamstrings. It particularly strengthens the buttocks.
Coordination and running. This exercise is deliberately designed to practice holding your knee and hip flexed while leveraging your body up onto the step with the hamstrings and butt. The idea is to practice keeping your hamstrings engaged at the same time as your butt powers the movement. This means the extension from the hips becomes very powerful and stable.
How to:
1. Find a decent
platform or use a step from a gym.
2. Stand back from the step a little and lift one leg onto the
platform (this is not the exercise). Keep this foot in alignment
with the hip.
3. Once the leg is in position with the knee flexed at about 90
degrees engage your hamstrings and glutes to drive your body up
onto the step.
4. Swap sides - try to identify and eliminate any wobble or hip
rotation.
5. Use your arms to help drive you up.
6. Begin with 5-10 repetitions on each side.
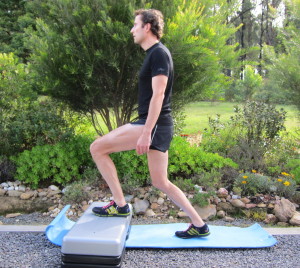
Think about: Generating a clean decisive stride up onto the step driven from your butt.
Try not to: Let your hips collapse - if they do, put this exercise on hold for a few weeks until you build strength. Squats, lunges and dynamic single leg bridging will all help build you up.
Making progress:
-
Increase the number of repetitions.
- Do two or three sets.
- Hold a barbell across your shoulders (light weight to begin
with).
- Alternatively, hold dumbbells in both hands.
Activations and drills. Here are some additional activations and drills to try:
Skips with high knees: Drive your knee forward with your glutes and hamstrings as you powerfully launch each skip.
Single leg hops: Hop on one leg keeping your knees and hips flexed. Drive forward with your glutes and hamstrings over your whole foot rather than toeing off.
Side to side jumps. Jump across a lane marker or a small raised barrier such as a low training hurdle. Leap from side to side firing the glutes.
Squat jumps: Leap straight up in the air from a deep two leg squat position and repeat.
****