A POOR but not uncommon way to start rock climbing is to go off with an equally inexperienced friend and an old rope, and try to work out protective techniques on your own. The best way is to climb with experienced, competent companions who have the advantage of several years’ accumulated knowledge in modern techniques. Get instruction on the cliffs from those who know how.
The first problem is to find knowledgeable companions who are willing to help you through the early stages of gaining experience. They may turn up by lucky chance; more likely, you will have to go out and hunt for them.
You can hang around groups of climbers in popular climbing areas, ask questions and exude interest and admiration until information and assistance are offered. Climbers are easily identified by their clanking equipment, coils of rope, and specialized footgear – not to mention their rock-worn garb and air of physical fitness. Professional guides and climbing schools are available in several major climbing areas (for a price, of course). Some colleges Offer climbing and mountaineering courses. Or you can look up a climbing club in your school or geographical area. Some specialize in climbing only; some are sections of general outdoor clubs. Each group has its own regulations and methods. All offer opportunities for beginners to learn. Equally important, the members are available later as companions on the many and varied climbs that go into making a skilled climber. Much can be learned from books, but reading is no substitute for actual climbing.
If determined, you will find yourself among climbers willing and able to teach you. Your mentor may happen to be the type to take you at once on a long climb, where by necessity you quickly find out something about everything. It is more probable that you will spend hours on or near the ground, learning the basic techniquas of safe climbing.
As an utter novice, you need not worry about providing equipment. Vear old clothes adequate for the weather, and rubber-soled shoes. The group or individual instructing provides the ropes. Though learners are expected to use the ropes, the owners are fussy about their lifelines, which must be treated with tender loving care: never stepped on, nor pulled needlessly in the dirt, nor dragged over sharp edges.
The protective use of the rope naturally involves tying yourself onto it. Knots used by climbers must be bombproof, foolproof, correctly and quickly tied, and of a kind that can also be untied readily (without benefit of a hatchet). Practice the knots at home, with a piece of string or rope, until you can tie them under any conditions, no matter how adverse. The basic climbing knots, illustrated in the first seven figures of Chapter 2 (Figures 2-1 through 2-7), are drawn as they will look while you are tying them. Left-handed people often prefer to tie them in reverse.
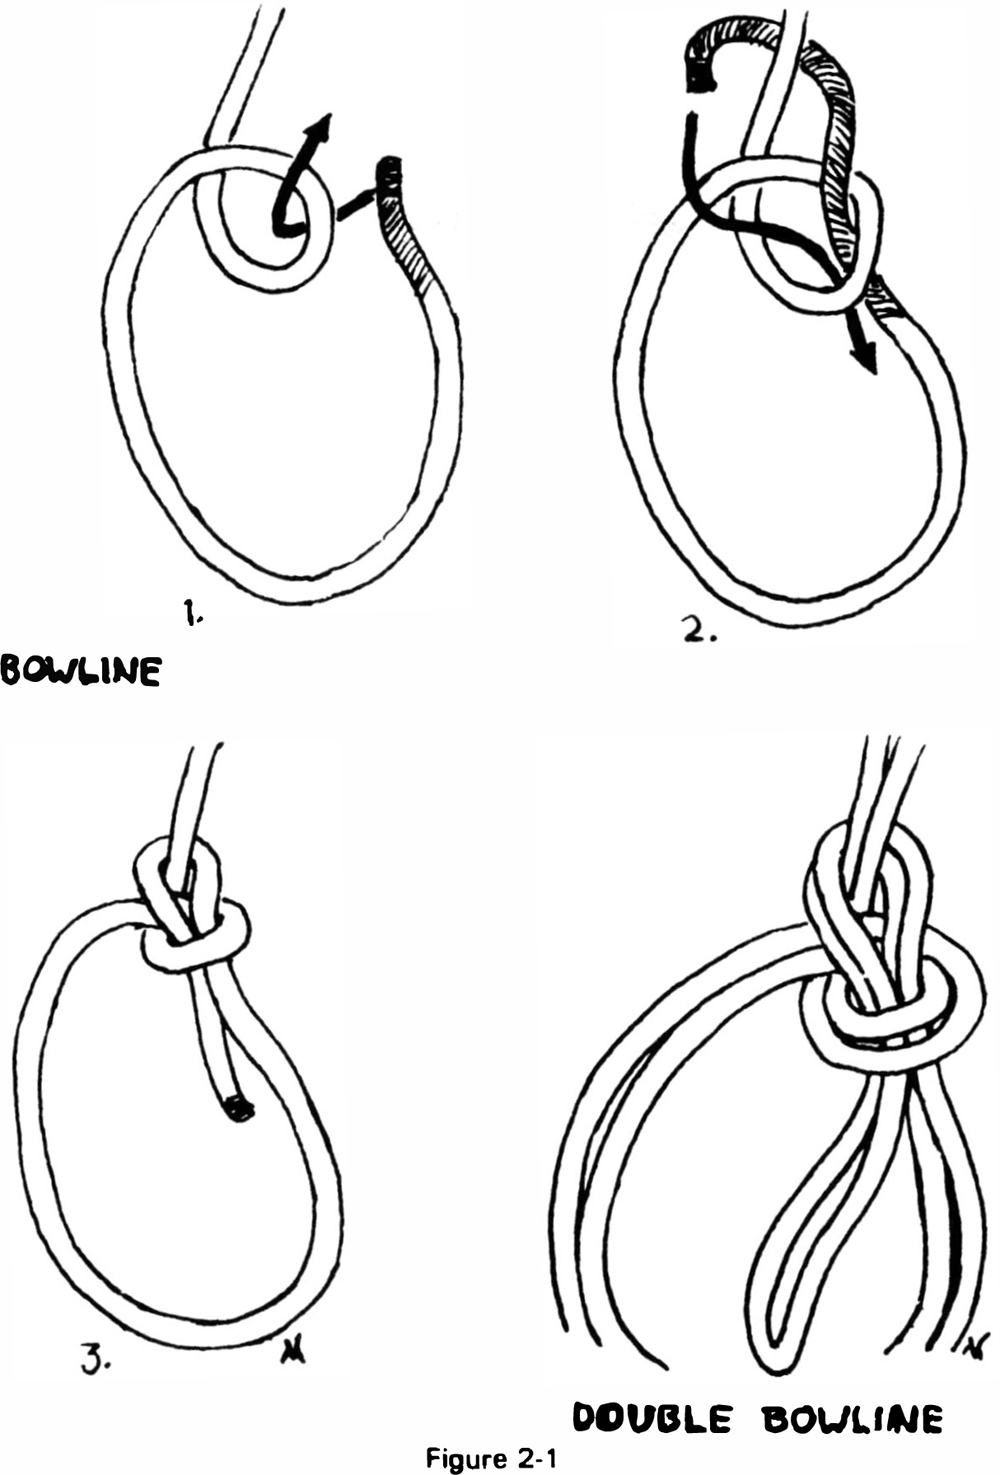
Bowline
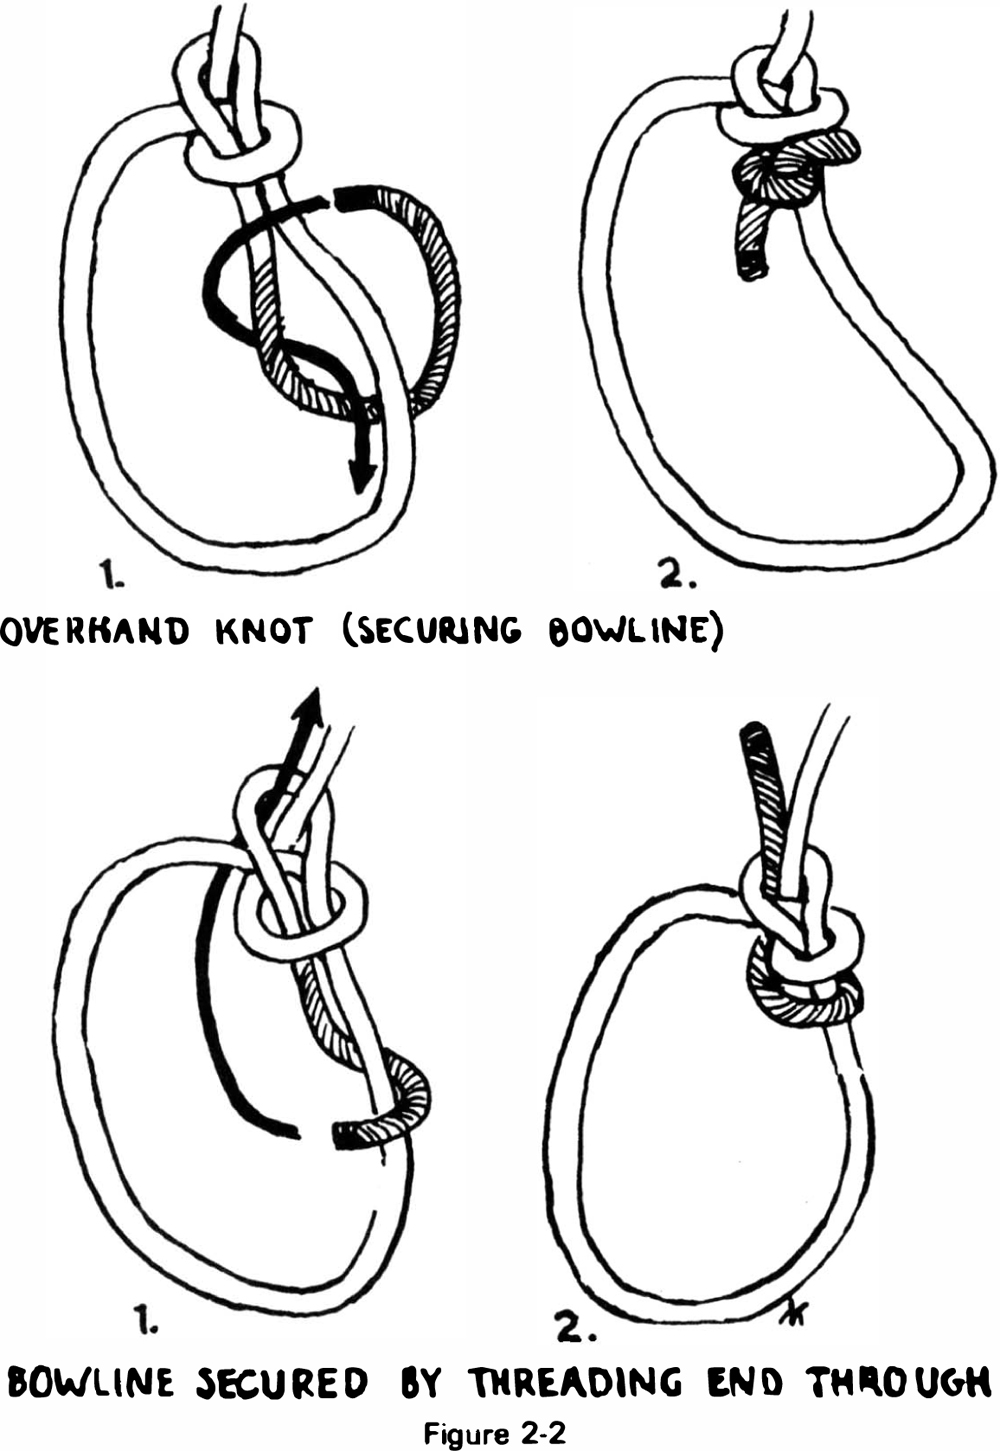
For tying the end of the rope around your waist. Standardize your method of tying it. For the version illustrated in Figure 2-1 , pass the rope behind you from left to right. Now hold the long or “standing” part of the rope in your left hand, and the short end in your right. With the left hand, make a loop as shown. Put the end up through the loop, around the standing end, and back down through the loop. After tying the knot, work it along the rope until the waist loop is really snug. Test and set this knot with a good tug. The bowline tends to loosen with use, and should be safeguarded in one of the two ways illustrated in Figure 2-2: (1) Add one or two overhand knots around the waist loop. (2) Thread the end back through the knot before setting it. This is a less bulky method used by some experienced climbers. The end goes over the right side of the waist loop; under the left side; and up through the loop, parallel with the standing end. Several inches of rope should remain after the knot is secured; otherwise retie the knot. Check the bowline occasionally during a climb and tighten the waist loop as necessary.
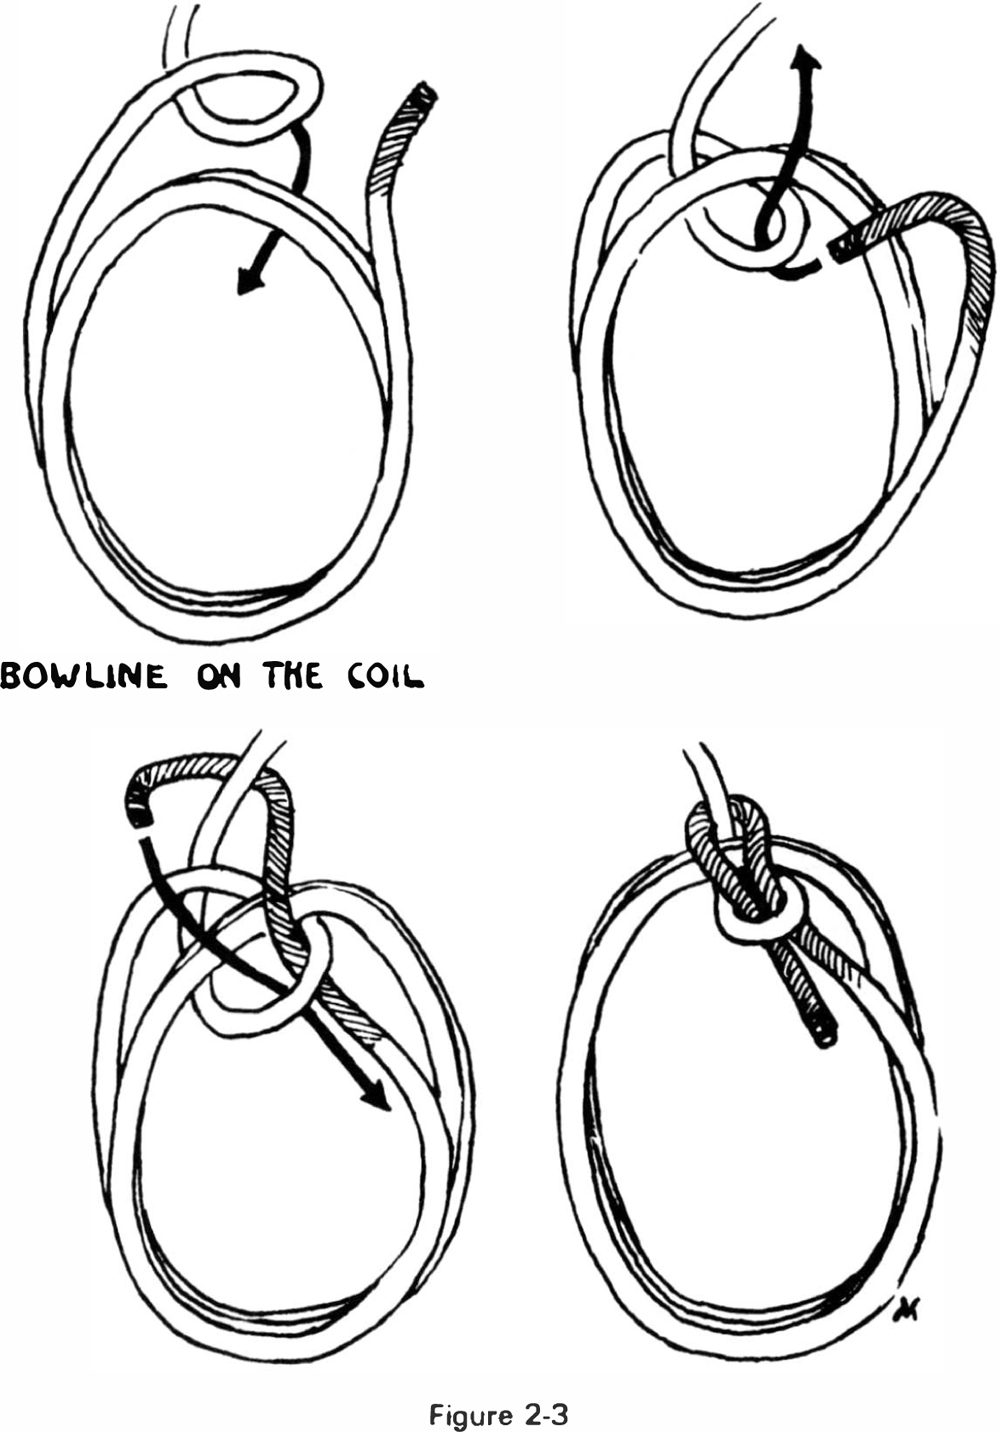
Bowline-on-a-Coil
Almost identical to the simple bowline, but more complicated to tie. Wind the rope around your waist several times, an arrangement which is more comfortable if you fall or must be held on the rope. Tie the knot around the coil as illustrated in Figure 2-3, and secure it.
Butterfly
Usually used for the middle man in rock climbing, when three people are tied into one rope. It is a symmetrical knot which is equally strong when pulled from either side. Make sure the waist loop is tightened before starting to climb. This knot tends to tighten in use, and is not secured (see Fig. 2-4).
Overhand
Used to prevent many other knots from slipping (see Fig. 2-2).
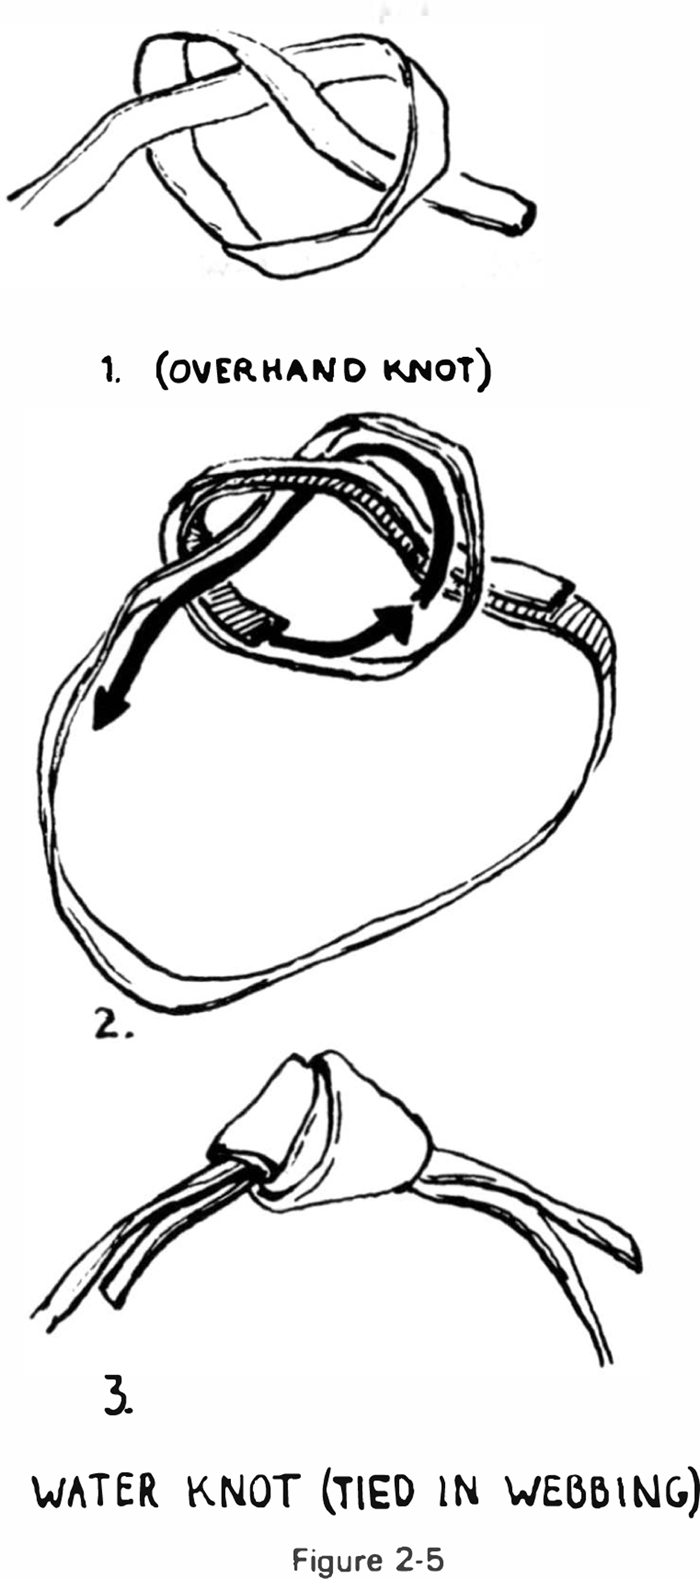
Water Knot
Used for joining ends of flat sling material. Tie an overhand knot, and thread the other end through it in the opposite direction, as shown in Figure 2-5. Make sure the two parts of the sling lie flat against each other throughout the knot.
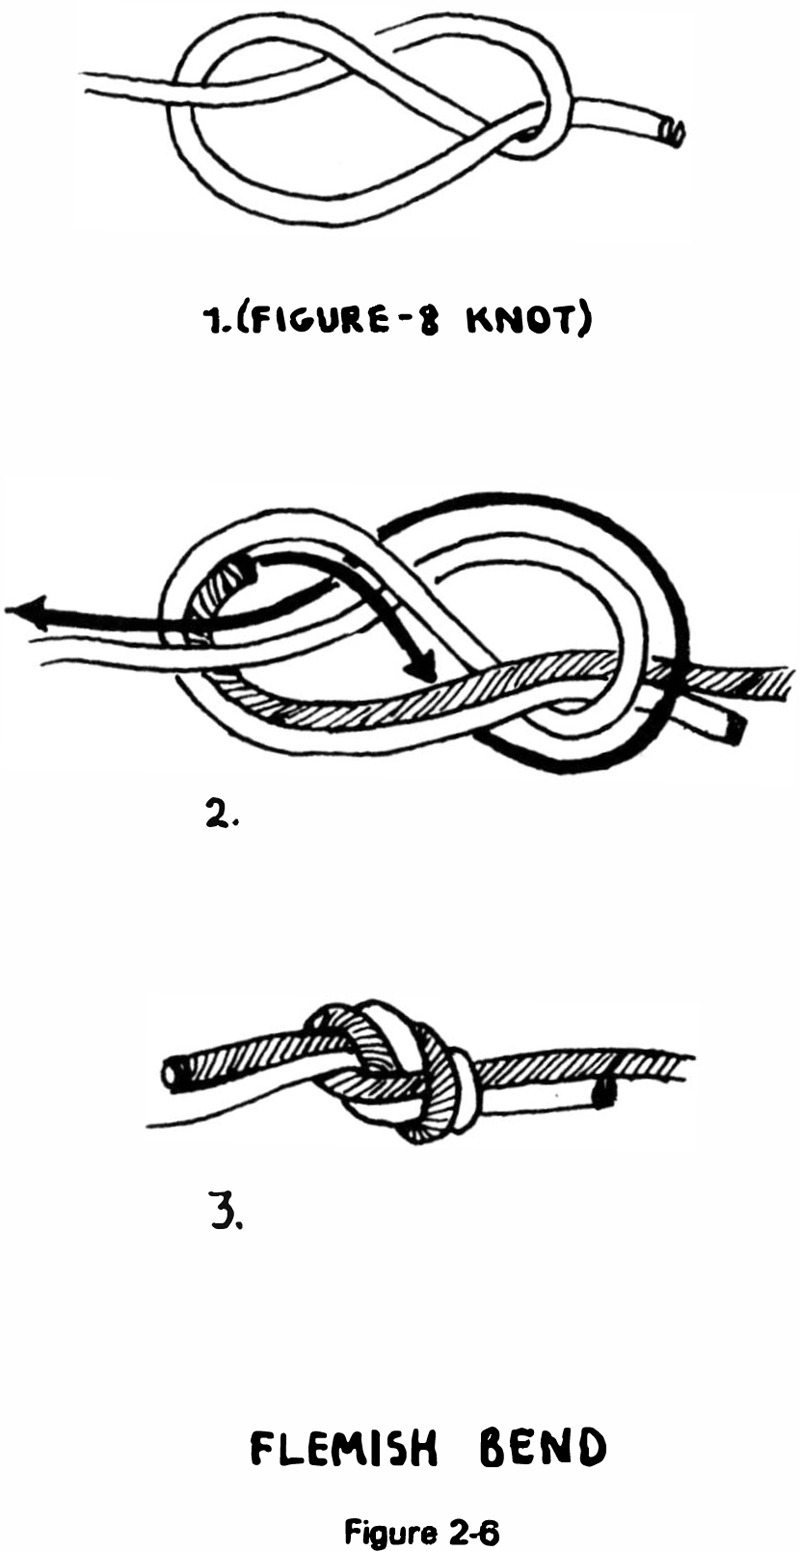
Flemish Bend
Used to join two ropes of the same or unequal diameters. It is similar to the water knot, but start by tying a figure-8 knot in one of the ends, leaving an ample end for a safety knot. Thread an end of the other rope through the knot in the opposite direction, as shown in Figure 2-6. The standing parts of the ropes pull against each other. Make sure the two ropes lie parallel throughout the entire knot. Tighten and test by pulling hard on the standing ends of both ropes, especially when the diameters are unequal. Secure on each side with one or more overhand knots.

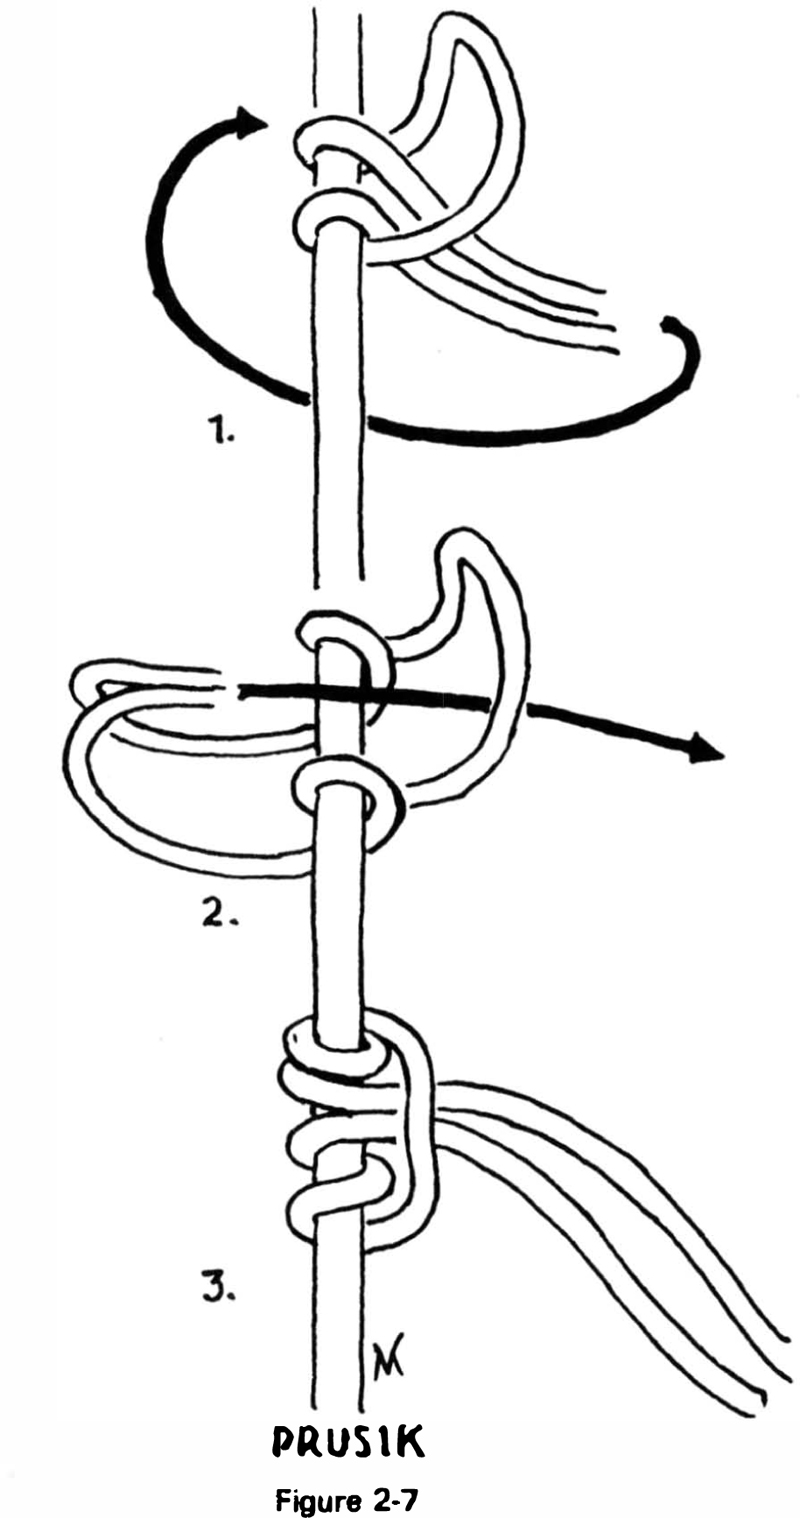
Prusik
Formed by twisting a loop of light rope around a fixed rope hanging vertically, as illustrated in Figure 2-7. The prusik knot has the property of remaining in place when weighted, but slipping easily up or down when unweighted. This makes it possible to stand in loops, and ascend a rope in an emergency. The average person is physically unable to climb a long rope hand over hand; also, if you use your climbing rope for handholds, slack accumulates below, and you are no longer protected with an upper belay (see Upper Belays, later in this chapter). Prusik slings vary in size to fit the person. They should be approximately six feet in circumference, made from quarter-inch rope. Manila holds best, but nylon will serve if the sling is passed around the rope a third time. Even flat slings will work, but require more effort.
One of the standard techniques for ascending a rope with prusiks is to use three slings. Attached at intervals to the vertical rope, these form a chest loop for balance, and two footsteps. To ascend, stand with all your weight in the lowest sling, while raising the next one as high as you can step. Transfer your weight to the upper footstep, and raise the chest loop as high as you can. Next pull up the rope below so you can reach the second foot loop, and slip it up as far as possible. Stand in both loops. Repeat. Prusiking can be practiced from the limb of a tree. The average prusik on rock is easier, as you are less apt to twirl around.
Other Knots
Variations of these knots, or different knots, are also employed, depending on the group or individual preference; or by experienced rock climbers for special situations.
Once tied on, you can climb, with someone on the rocks above belaying as a safeguard in case you fall. The rope is intended as a protective device only. It is never used as a handhold, or to pull the climber up, except in specific types of advanced rock climbing (or desperation). The actual ascent of a cliff somewhat resembles climbing a very steep staircase, with scanty irregular treads, some wide and some narrow, at strange angles. The climber’s legs normally do most of the work, with the hands and arms providing balance and any necessary upward pull. Avoid use of the knees; feet are more effective.
The key to an effortless ascent is balance, the knack of keeping the body weight over the feet, and away from the rock, at exactly the most efficient angle to make full use of whatever support the holds provide. There are many moves in rock climbing where no single hold can support you, but where perfect balance between several holds gives adequate purchase while you move rhythmically upwards. Such balance climbing is a muscle skill. If you are a “natural,” you already possess this exquisite talent. But you may have to practice and cultivate the art.
Friction climbing is an example of pure balance climbing; the resistance between boot sole and rock is all that keeps you from slipping off, and momentum may permit progress where you cannot stand still. Types of special moves include the mantel, in which you push yourself up on a ledge with the heel of the hand or hands, as in getting out of a swimming pool; chimneying, in which various pressures of back, arms, and feet against opposing walls enable you to wiggle, or struggle, upwards; and the layback or lieback, in which the feet walk up the face of a cliff, held there by the pressure of the hands and arms pulling outward from a parallel crack, or from a flake that is sufficiently separated from the cliff to allow the fingers a grip behind it (very strenuous).
The climbing maneuvers described, and others, can be performed with safety because the rope you are tied to is being taken in from above at the same rate you are climbing. An absolutely necessary step in learning roped climbing is acquiring the skill to protect other climbers. When giving an upper belay, you can easily hold the weight of a heavier person below.
First, sit down in a good spot, feet apart and braced firmly. As a beginner, you must be anchored (tied) to a rock, tree, piton, or even another climber, so you cannot be pulled off. The rope coming up from the climber below is passed around your hips. Both hands hold the rope, one on each side of your body, as illustrated in Figure 2-8. The hand on the climber’s end guides, feels, and pulls in the rope. The other hand, on the opposite side of your body, holds the weight in case of a fall; the friction of the rope around the hips makes this surprisingly easy. Take the rope in by moving the feeling hand, which is pulling up the rope, toward the body, and extending the belay hand, also pulling the rope, away from the body; quickly slide both hands along the rope to their former positions; repeat. The belay hand must never leave the rope. While you are learning to belay, the climber below will call “Testing” before he starts to climb. Reply “Test!” and he will give a good pull, with his weight off the ground, so you can gain an idea of how it would feel if he fell off.
While belaying, you must watch the rope attentively. Lay the part you pull up in a compact pile (preferably within reach, and in a place where it is unlikely to snag on anything, or knock rocks down on the climber). Keep it taut between you and the climber, but do not jerk or pull. Your guiding hand on the rope informs you of how fast to take in rope; it is not unlike flying a kite or playing a fish.
The person climbing also has a responsibility toward the rope. He must keep it free of kinks, and make sure he does not overclimb the rope. If slack accumulates, he should slow down or stop until the rope is again taut. He must also watch the rope above him to make sure it has not caught on rocks or in cracks.
Climbers are frequently out of each other’s sight, and may be almost out of earshot as well. Yet it is essential that each know what the other is doing. A set of verbal signals has been pretty well standardized among climbers; but in a new climbing group, check out what signals are used. Routine signals in roped climbing are:
Climber: “Belay on?”
Belayer: “Belay on.”
Climber: “Ready to climb.”
Belayer: “Climb!”
Climber: “Climbing.”
Climber, if he wants the be layer to take in more rope, or take it in faster: “Rope!” or “Up rope!”
Climber, if he needs a lessening of tension, or extra slack for m aneuvering, descending, throwing the rope, etc . : “Slack!”
Climber, to warn belayer: “Prepare for fall,” or “Falling!”
Either, if a rock is dislodged: “Rock!”
Climber, when he is in a safe position near the belayer: “Belay off.”
Belayer: “Belay off.”
Except for “rope” and “slack,” signals are usually repeated by the person they are meant for, as confirmation that he has heard, understood, and is taking action. You may have to shout repeatedly as loudly as possible, but do not assume the signal has been heard until you get an answer.
Climbers have developed a method of descending steep rocks by sliding down a rope which is doubled around a fixed point. This is called rappelling or roping down. Methods and safety precautions used in affixing the rappel rope are explained in detail in Chapter Three.
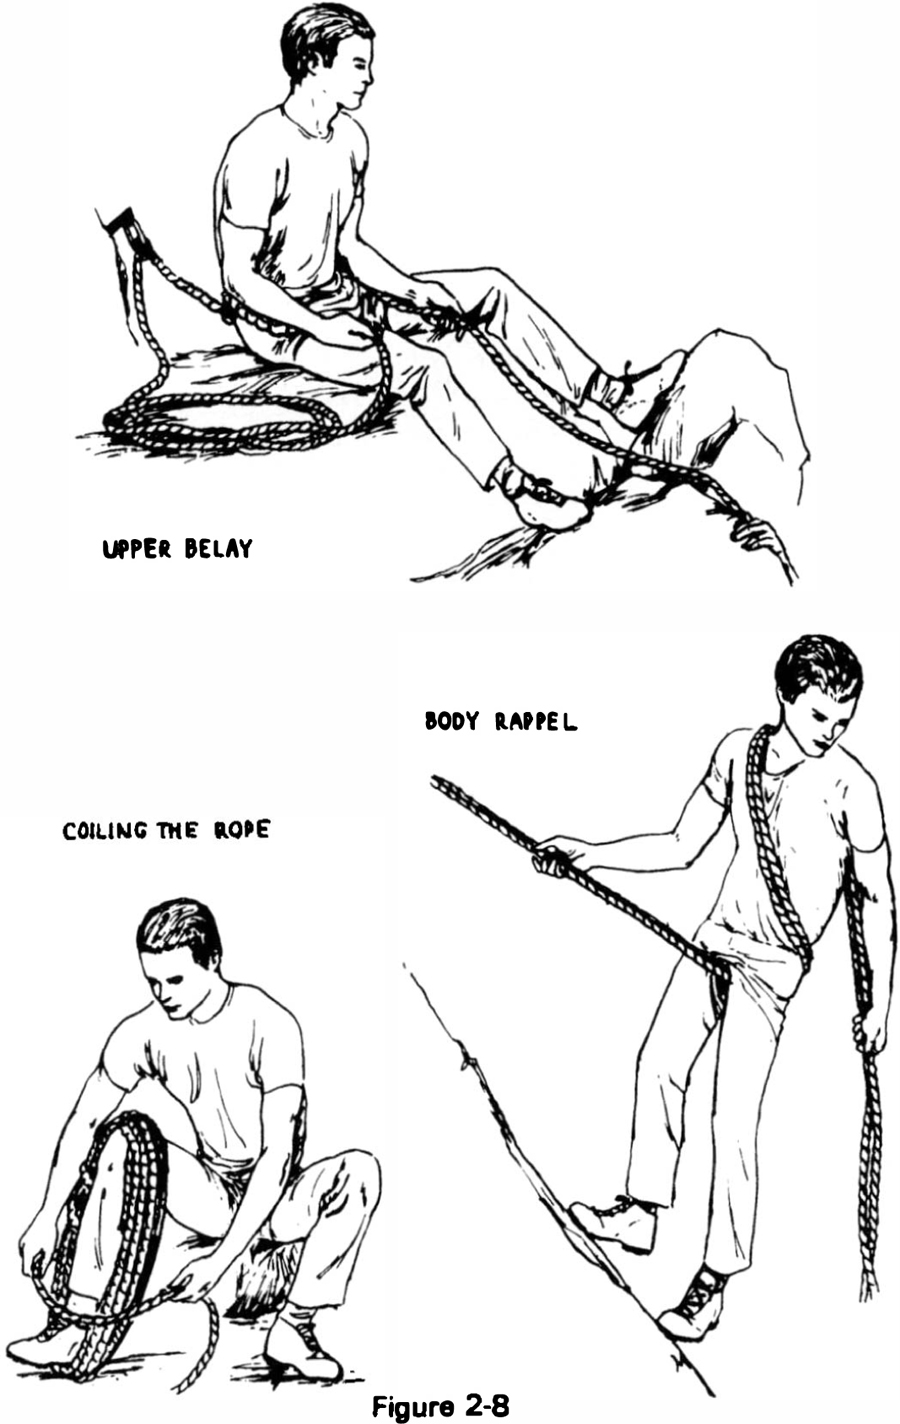
As a neophyte, you begin with a simple body rappel, sometimes called the Dⅱlfersitz, with a belay for safety. To get into the rappel, stand below the point where the rope is fixed. Face the cliff and straddle the rope. Take hold of the doubled rope behind you, and bring it forward across the left hip. Pull it up across your chest, and backwards’ over your right shoulder. The doubled rope now hangs down behind you. Grasp it with the left (lower) hand, palm forward and thumb downward, as illustrated in Figure 2-8. This hand supports your weight, holds you into the rope, and must never let go. The right hand holds the rope above you for balance; if you need a spare hand, use the upper one. A left-handed person may feel better with the whole arrangement reversed.
Now lean backwards in the rope. Your body should be at about a 45-degree angle to the rock, knees bent slightly, and feet 24 to 36 inches apart for balance on the varying inclines. Looking down over your left shoulder to see where you are going, walk backwards or sideways down the cliff. The rope slides slowly through your hands and over your body. The points of greatest friction, hip and opposite shoulder, become very evident if you go too fast. For a long rappel, extra padding is needed at these points to avoid a rope burn. The lower hand controls the speed of descent; nothing is gained by gripping frantically with the upper hand. At the bottom, step out of the rope, and call “Off rappel” to those above.
One of the beginner’s duties is to learn how to coil the climbing rope for carrying and storage. Methods vary. A good one is illustrated in Figure 2-8. Sit down and cock one knee so your foot rests on the heel. Wind a length of rope around knee and foot. Tie a square knot, leaving an end about fifteen inches long. Wind the rope firmly into a coil around foot and knee. Wrap the last ten feet or so around and around the coil to hold it together. The two ends of the rope are joined with a square knot.
Soon after your climbing begins, some personal climbing equipment is needed. Notice what your companions are using, and ask their advice. Go slow about acquiring equipment until you know what you really want and need. Many sporting goods stores handle, or specialize in, mountaineering supplies. There are also excellent mail order sources of mountaineering equipment which publish very informative catalogues. If you become seriously interested in rock climbing, you should have the following minimum of personal equipment:
Kletterschuhe
Specialized rock climbing shoes from Europe, usually of grey suede, with thin black lug soles, often without heels. They should fit snugly over one pair of light socks, to provide a good feel and grip on rock. European sizes have been loosely translated into American sizes, and do not run true.
Piton Hammer
Needed by any rock climber who gets off the ground in rope work. Its main function is to drive and remove pitons. A ball-peen hammer is satisfactory to start with, until you know exactly the kind you want to buy. Piton hammers of both American and European make are available in a wide price range. The head is square, and has a wedge or point at the other end, as shown in Figure 2-9. Choose one that feels balanced in your hand and is heavy enough for a real wallop.
The hammer must be fitted with a sling to guard against being dropped. Piton hammers come with a hole in the handle (if using a ball-peen hammer, drill a hole). Thread it with a length of nylon cord tied in a loop that goes around your neck and one arm. The completed sling should be as long as your greatest reach with either hand. The hammer is usually carried in a belt holster (occasionally in a hip pocket).
Pitons
Metal spikes with an eye or ring in the head, especially made from various alloys, to be driven into rock cracks of many different sizes, shapes, depths, and configurations. Experienced climbers always have a large variety of pitons (sometimes called “pins”) . Several common types are illustrated in Figure 2-9. The beginner needs only a few. Choose three or four horizontals and one or two angles. Your future needs will depend on the difficulty and location of your climbs. For the present, practice driving pitons into cracks for belay anchors.
Carabiners
Steel or aluminum alloy snaplinks, about four inches long, with a spring gate-opening. Carabiners are most commonly oval; others are pear- or “D”-shaped, etc. Carabiners are used to connect the climbing rope with the eye of the piton; also for carrying pitons, rigging slings, and many other purposes. Start with a minimum of four.
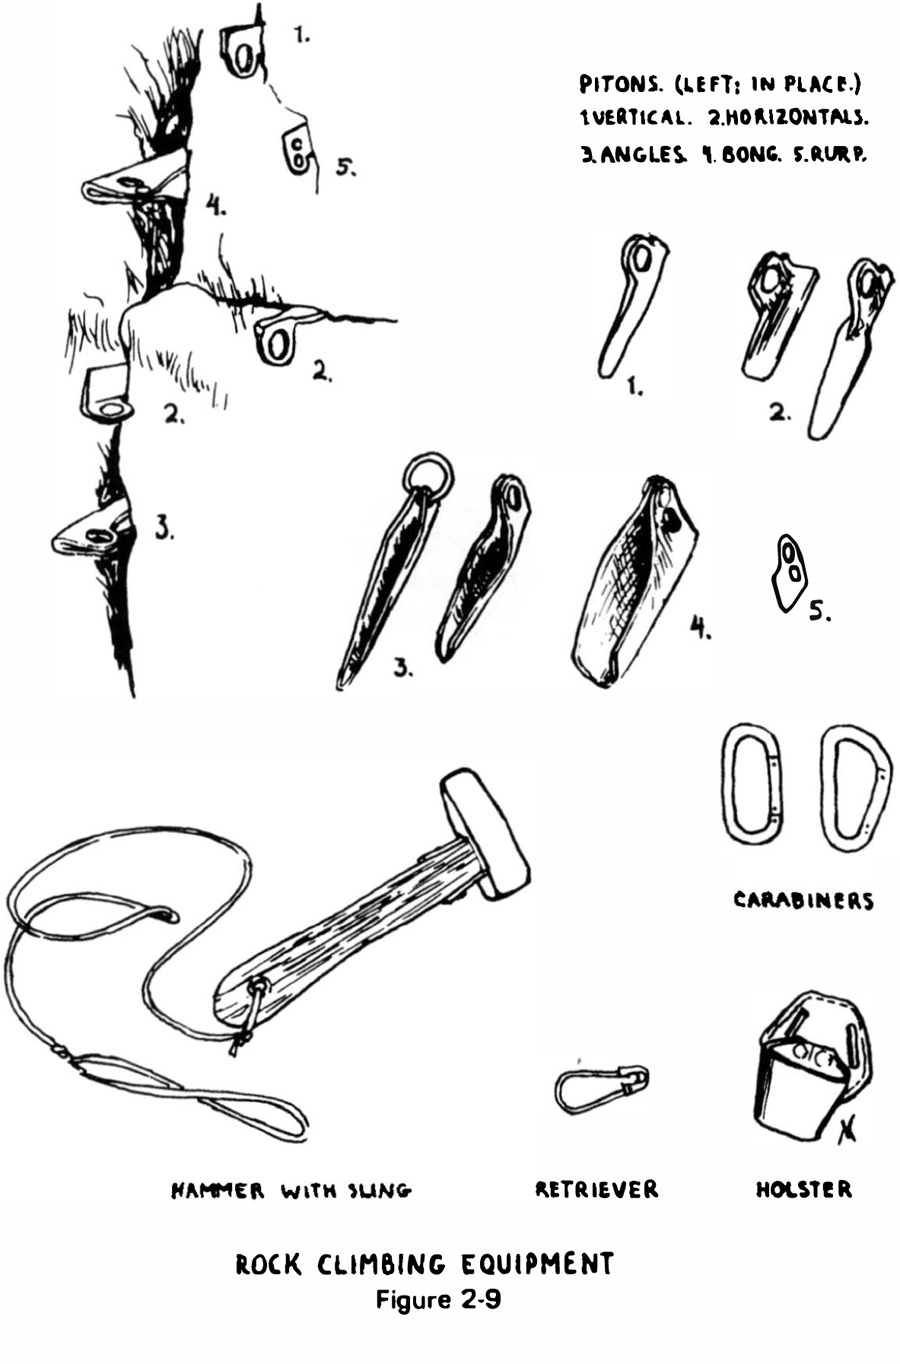
Piton Keeper or Retriever
A lightweight clip, fastened to your person with a light cord, to prevent loss of pitons while driving or removing them. Very useful to beginners, who are regrettably subject to dropping other people’s pitons, but rarely used by advanced climbers.
Slings
Loops, varying from about three to twelve feet in circumference. They may be bought ready-made, or constructed from quarter-inch rope or from flat nylon webbing one-half to one inch wide. All nylon rope and sling material, when cut, should immediately have the ends lightly fused with a match or other flame to prevent raveling. To make the loop in rope, tie the ends with a Flemish bend and overhand knots. In webbing, use a water knot, and sew the ends back flat to the loop, by hand or sewing machine. You should always carry a few assorted slings for various uses.
Rucksack
A small summit pack is needed to keep your stuff together, and transport it to the start of the climb. It is also needed on the actual climb, and the least experienced member of the party often has the honor of carrying everyone’s supplies.
Having practiced the basic techniques and acquired some equipment, you are ready for multi-pitch rock climbing. A pitch is the distance climbed between belay spots.
Routes
Climbs are not made anywhere on a cliff, at random. The route goes up a portion of cliff broken by natural forces into connecting cracks, ledges, chimneys, flakes, etc., which provide handholds and footholds, piton cracks and belay stances. Routes viewed from a distance may appear very steep, but a side view usually reveals them to have an easier angle than is apparent head on. Usually you find more holds when you are climbing than there appeared to be from a distance (though the opposite may also be true). Climbs you are doing generally seem quite unsensational compared with ones you may have watched.
Climbing Parties
A “rope” means not only the object itself, but also the team that climbs tied together. The usual number on a rope is two or three. As a beginner, you will probably start consecutive climbing as third, at the end of a three-man rope, and can learn what is involved without much additional responsibility. After the rope is made up, the climbers go to the foot of the chosen route. They may scramble some distance up the base of the cliffs without roping up. Never hesitate to ask for a belay if you feel insecure at this stage. The climbing ropes are uncoiled, hammers and hardware adjusted, and the climbers rope up.
Order of Climbing
The second man takes his belay position, and the leader climbs. He may place pitons from time to time. When he reaches the next belay spot, he stops, prepares to belay, and calls to the second to climb. You, as the third man, have so far done nothing. When the second starts to climb, watch the rope going up to him, make sure it does not snag, and perhaps pay it out. When the second reaches the leader, he takes up his belay stance, and the leader climbs another pitch. You, the third man, are again doing nothing; but be ready to climb as soon as the word comes down – and do not forget the rucksack.
When the leader is at the top of the second pitch, the second man turns his attention to the third and last man. If there is extra rope between you, he will pull it up; you should notify him when it is all taken up. S ignals are exchanged, and you start to climb. If you reach a piton, you will see that the rope is running through a carabiner snapped into the piton’s eye. Stop in as convenient a position as possible, remove the rope from the carabiner, snap the carabiner out of the piton, and secure it in your waist loop, or on a sling carried for the purpose (do not trust your belt).
Next remove the piton. Hammer it forcefully as far as it will go to one side, and then all the way to the other side, back and forth until it can be pulled out with your fingers. Your position may be precarious or uncomfortable; if it is too tiring, call “Tension!” and the belayer will support you on the rope while you work. When the piton begins to loosen up, snap your keeper into its eye so it will not pop out and go clanging down the cliff. If a keeper is not available, you can use a carabiner and sling, but avoid battering the ’biner. Pitons can be stubborn, but most do come out with time, persistence, and might. If your stop has been a long one, call out “Climbing!” to let your belayer know you are moving again. When you reach the second man, you may find that he is anchored with a sling or with a section of the climbing rope to a rock, tree, or piton. Tie yourself on in the same way. Hand the hardware you have collected to the second, who takes it along for the leader’s use.
Be attentive to your rope mates’ needs and instructions. Do not climb until you receive the signal to do so. Watch and tend the rope. Once on the climb, you may as well belay the second: it is good practice for learning to handle the rope adeptly, and an extra safeguard for the entire party. Remember to remove the anchor piton, etc., before starting the next pitch.
Tips for Beginners
A few pointers may help you, as the beginner on your first long climbs. Concentrate on the climbing. Watch the climbers ahead of you, as it is helpful to know which holds they use and how, even though you may climb the pitch differently. If you cannot get going with one set of holds, try another combination. Make use of small holds close together to minimize the effort of hauling yourself up. Climb quickly. Many holds are fine for a swift, smooth passage, but not as a stopping place. Rests should be made on large holds.
A few cautions are also in order. You will probably be too busy to notice the empty spaces beneath you, known in climbing parlance as “exposure.” Or you may find the sight wonderfully exhilarating. But if it scares you, look back at the rock and rope, and remember that you are well protected. (Y ou are almost sure to become fond of exposure, or at least inured to it, as your techniques improve.) Check your waist loop occasionally. Be very careful not to dislodge rocks with feet or rope, and test handholds that might come off. If a rock does fall, yell “Rock! Rock!” for the benefit of anyone below. If you see or hear one coming from above, get your head up against the rock, into a crack, or under an overhang. If you cannot take cover, watch the rock and duck at the last minute. Whenever possible, keep out from under climbers above. Even if the climbing gets hairy and the pitons won’t budge, refrain from complaint. Grunt, ask advice, or make jokes – but don’t claim you “can’t.” Don’t talk too much; it distracts your companions and sometimes annoys them. Listen to the more experienced; there is still much to learn.